Often in portrait photography, you will find that some of your sessions will take place indoors. Whether you are photographing someone in their home, in a studio or at a unique location – shooting indoors has its benefits and challenges for every photographer.
In order to create great indoor portrait photography, you will need to consider a few factors including lighting, your specific gear and the space available. To help you build and strengthen your indoor portrait photography, here are 7 helpful tips:
7 Indoor Photography Tips
- Choose the Proper Gear and Settings
- Shoot in an Organized Space
- Utilize a Window for Natural Light
- Eliminate Artificial Lighting Sources
- Use Your Background to Frame Your Subject
- Use a Flash or Reflector
- Consider Using a Tripod
1. Choose the Proper Gear and Settings
For indoor portrait photography, you will want to focus on using gear that allows for a compression of your background with a small depth of field.

In some situations, such as photographing an artist in their personal studio, your portraiture will call for a larger depth of field in order to include the background elements of your location.
Yet, in standard indoor shoots such as for families, couples and children, you will want to create portraits that are crisp, clean and give you the visually appealing blurred, bokeh background. In order to do this, you should consider lenses that will create little to no distortion.
For example, using prime lenses such as a fixed focal length of 35 mm, 50 mm or 85 mm will be your best options for capturing portraiture.
You should decide which length to use based on the type of image you wish to create. The longer the focal length, the more of your subject you will capture – so, consider a 35mm for longer, full body shots and an 85mm for up-close and personal portraits.
As for your settings, you will want to primarily focus your attention on your shutter speed as it will determine the amount of light you let into your sensor.
Depending on where you photograph your subject, will be the determinant of what you choose for your shutter speed. For example, a well-lit room would call for a higher shutter speed, while a space with hardly any light would require a lower shutter speed.
By utilizing the principles of aperture, shutter speed, and ISO, you can determine how to properly expose your indoor portraits. A good rule of thumb for these situations is to set your aperture wide open, bring down the shutter speed and set your ISO to no more than 400 to avoid any look of grain.
Again, each situation and location will differ, so be sure to adjust your lighting throughout your session.
2. Shoot in an Organized Space
Another factor to creating your best indoor portraits is to organize the space in which you are shooting. Even if you are creating narrowed in and up-close portraits, you will want there to be little to no distracting elements in the background of your images.
In order to ensure that you have enough open space, consider making a few adjustments prior to shooting. This can be as simple as moving furniture, setting your subject in a chair against a blank wall, reorganizing the table and removing any excess clutter that will give the appearance of disorganization or mess.
If you are shooting in someone’s personal home, be sure to ask before rearranging their space. Explain how the image will be stronger with a more simplistic background and remember to place the room back in its original condition after you have completed the shooting.
3. Utilize a Window for Natural Light
Although you are shooting in an indoor space, you can still utilize natural light from the exterior to illuminate your subject.
Related Posts
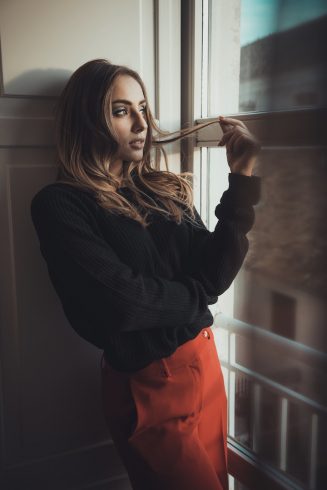
A simple technique to properly light and compose your subject is to move them closer to a window. A window will provide a direct light source through the glass with a small amount of diffusion, causing a soft and delicate ray of lighting for your subject.

When using a window to bring in natural light, you will want to move your subject nearby, but with a few feet of distance in between. This is because we want the subject’s face to be illuminated, but not completely engulfed by the lighting causing overexposure.
Related Post: Best Cameras for Headshot Photos
In terms of posing, have your subject slightly turn their figure toward the window to allow the light to hit their face and brighten up their features. Using a window as a lighting source will allow you to have a natural and soft composition of your subject.
4. Eliminate Artificial Lighting Sources
Often when photographing portraits indoors, you will want to eliminate the artificial lighting sources that may be present in tungsten or fluorescent lighting fixtures.
In order to remove artificial lighting from your set, you should find and turn off any overhead lighting that may be present. By doing this, you are allowing the only lighting in the room or space to be filled with natural light.
This technique will work in the situations where you can use windows as a lighting source, but in other scenarios turning off all forms of lighting may prove to be difficult. If you find that your only option is to keep on the artificial lighting, you will need to adjust your camera’s white balance for proper exposure and tonal composition.
Related Post: Indoor Photography Tips
To adjust your white balance, you can employ the use of a grey card to set the tonal range or even use the custom settings within your camera body to alter for the specific type of artificial lighting. Once you have determined the proper white balance, you should be able to remove any extraneous and distracting color tones from your images.
5. Use Your Background to Frame Your Subject
In the case of a unique indoor portrait session, you should consider using the background to frame your subject and tell a story.
In certain scenarios, indoor portraits will be heavily portrait focused with little to no background composition. Yet, on the other hand – an indoor portrait session may be set in a specific location in order to express an idea or tell a story.
For the latter example, using a location to tell a story can be an effective way to create images that connect the viewer to your photographs. In various situations, you can use the background to frame your subject such as:
- Photographing a musician in their recording studio
- Capturing an artist in their atelier
- Creating a story of an interior designer in their personal office
- Reimagining portraiture with families or couples by creating intimate and unique images within their own home.
In each of these scenarios, you will want to use your background to fully immerse your subject. You can do this by creating poses such as sitting in a chair, working at their desk, reading a book or even looking out a window. Think of these images as less of a traditional portrait and more of an expression of personality.
6. Use a Flash or Reflector
As we described above, working with and navigating the complexities of artificial and natural light can be a balancing game. In order to compose your best portraits, you will first and foremost want to consider how to create proper lighting.
If you find that there is a lack of available natural light, but the artificial sources are too harsh – you may need to integrate the use of a flash or reflector.
A flash and reflector will both help you bounce and control light in various ways. A flash can be used either directly on your camera or off-camera on a triggered system. To use the flash, you should not aim it directly at your subject as it will completely overexpose their frame. Aim to use the flash by bouncing it off of surrounding walls, therefore diffusing its intensity.
Additionally, you can also use a reflector to move and manipulate lighting within your space. If you have set your subject next to a window, use the reflector to capture and bounce the natural light onto the face of your subject. This method allows you to illuminate them and also remove any form of harsh and distracting shadows.
You can also use a reflector to create a catchlight (a glimmer or spark light) in your subject’s eyes.
7. Consider Using a Tripod

In order to eliminate any form of camera shake or blurring of your images, you can employ the use of a tripod.
A tripod can be used in any situation to keep your camera level and steady but is truly necessary when you are shooting in low light conditions.
Using a tripod in low light aids in keeping a balance for your equipment when your shutter speed is set lower to bring in more light. Your tripod will also help you keep your shot straight and properly aligned.
Related Posts
If you are wary of creating images with a small amount of blur due to the lack of available lighting in your space, you definitely need to consider integrating the use of a tripod.
Indoor Portraits Photography Tips: Summary
Creating indoor portrait photography can effectively be done through:
- the use of proper gear,
- employing natural light,
- eliminating artificial light, and
- creating an organized and interesting background to frame your subject.
Are you a photographer that primarily or often creates images in indoor spaces? Do you have any additional insight into this type of portraiture? Feel free to share with us in the comments below.
