If youโre looking to capture beautiful sun flare photography, then youโve come to the right place.
Because this article is all about sun flare:
What it is.
How to create it.
And how to set up your shots for incredible results.
So, if youโre ready to get the best sun flare photos youโve ever takenโฆ
…letโs get started.

Sun Flare Photography Tips:
What Is Sun Flare Photography?
Sun flare photography is any form of photography that includes lens flare of some sort.
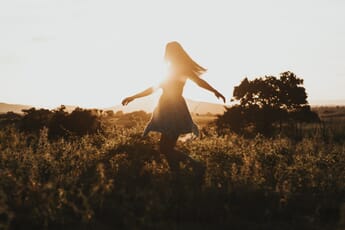
Lens flare looks like a burst of light (sometimes geometric) that appears in your photos near light sources, like this:

And this:

Now, lens flare is caused by stray light entering your lens and bouncing around, which means that itโs caused when you point your lens directly into the sun, or very nearly into the sun.
Thatโs how youโll achieve a gorgeous sun flare effect.
Note that not all photographers like sun flare, and at times it can be annoying–so you have to use good judgment to decide whether flare is best included or excluded.
Why is sun flare sometimes bad?
For one, it reduces contrast, so itโll make your photos look hazy.
It can also distract from the main subject; if you have geometric spots all over your shot, youโre going to draw attention away from what matters.
However, when used carefully, flare can offer a fantastic artistic result, and it can make for very creative photos.
Which is why it pays to learn how to produce and work with lens flare for maximum effect.
So hereโs how you can create amazing sun flare photography:
1. Make Sure Your Subject is Backlit
As I said above, flare is caused when stray light enters your lens.
And for this to happen, youโre going to need to point your lens at least somewhat toward the sun, if not directly into it.

Youโll need the sun to be at least within a few degrees of the frame edges, which means that your subject will have to be very strongly backlit.
In other words:
Find the sun, and position your subject in front of it.
However, make sure that the sun isnโt obscured by your subject; otherwise, youโll end up with no flare at all.
2. Remove Your Lens Hood for the Best Flare
Remember how I said flare isnโt always good?
Lens hoods are designed to eliminate flare.
What this means, then, is that if you want the best flare effect, you need to remove your lens hood.
One thing to note is that flare can make it harder for your lens to focus, so there are benefits to composing your shot, making sure focus is locked, and only then removing the lens hood.
But you can also just ditch the hood entirely. This often makes sense, especially if youโre going to be aiming for a lot of sun flare shots.
3. Adjust Your Aperture for Different Sunflare Effects
Aperture is the setting when it comes to lens flare.
Because once you have a backlit subject (with your lens pointing into the sun), and once you have your lens hood removedโฆ

…then itโs aperture that takes over, and determines how the lens flare looks.
Hereโs the rule when it comes to aperture and flare:
The wider the aperture, the softer the flare.
And the narrower the aperture, the more hard-edged and starry the flare will become.
So if you shoot at f/2.8, youโll end up with a soft flare effect, like this:

But if you shoot at f/11, youโll end up with a sunstar effect, like this:

Of course, there are times when youโre going to want the soft effect, especially if youโre shooting shallow depth of field portraits.
But the sunstar effect is truly stunning, and itโs something that I recommend you try out as youโre capturing sun flare shots.
(Quick tip: You donโt just have to use the sun for the sunstar effect. If you use a narrow aperture while shooting at night, the streetlamps will also appear very starry!)
Note that you should take some time to experiment with different apertures and sun flares.
You may find that you prefer one type of flare over another, or that you can capture a whole bunch of unique images just by slightly changing your aperture.
Make sense?
4. Partially Block the Sun With Your Subject for More Artistic Images
If youโre after artistic photos, then hereโs one of my favorite tips:
Position your subject so that theyโre in front of the sun.
And then change your angle until the sun is partially–but not completely!–peeking out from behind the subject.

This is nice for a few reasons.
First, it can add a point of focus in an otherwise more confusing image. The sunflare on your subject gives the viewer a place to look (a place that looks really, really stunning!).
Second, the sun flare will wrap around your subject, and if youโve used a narrow aperture, this will make the edges of the star stand out even more.
Howโs that for artistic?
5. Shoot Late in the Day for Golden Sunflares, and Earlier in the Day for Cooler Sunflares
Did you know that you can change the color of your sunflares, just by shooting at different times of day?
Itโs true.
Midday light tends to be relatively cold, which means that your flares will be blue or white.
(Though note that youโll need to get down a lot lower to get the sun in the frame, because at midday itโll be high above your subject.)
Golden-hour light, in the early morning and late evening, will be very warm, which means that youโll get a much more yellow or orange sunflare.

Personally, Iโm a fan of this second type of flare, though more neutral flares do have their place, and both are worth trying out!
6. Use a Tripod to Ensure You Get a Well-Exposed Image
If youโre photographing sun flare, and you want to capture a beautiful, hard-edged sun starโฆ
…then youโre going to use a narrow aperture, as Iโve discussed above.
But hereโs the issue:
If you shoot at f/11 or so, then youโre going to let in very little light.
This, in turn is going to drop your shutter speed dramatically, especially if youโre shooting at the very end of the day, and you want a well-exposed subject.
So what do you do?
You bring a tripod!
This will keep your camera steady as you capture a gorgeous sun flare, and will prevent you from pulling up your photos at home only to find blur in every one.
You can also combine sun stars with long-exposure landscapes if you have a tripod on hand, which is definitely a bonus. That way, you can find a beautiful foreground, produce a nice sun star in the background, and capture a 1 to 10 second exposure that blurs any moving water.
Cool, right?

7. Keep Your ISO Low to Prevent Noise
Iโve talked about choosing the best aperture for sun flare photography.
But what about ISO? How should you choose it?
Well, as a general rule, you want to keep your ISO as low as possible, without sacrificing on shutter speed.
(ISO and shutter speed complement one another; if you raise the ISO, you can raise the shutter speed, and if you drop the ISO, you must drop the shutter speed to compensate.)
Of course, if you have a tripod, a long shutter speed isnโt an issue, in which case you can just leave your ISO at 100 and forget about it.
But if you donโt have a tripod, I recommend you use the lowest ISO you can get away with, while preventing movement and camera shake.
This is because ISO causes noise, which in turn will make your flare appear more dirty and generally less stunning.
So start with an ISO of around 100, and only raise it when necessary.
8. Use a Reflector to Keep Your Subject Nice and Bright
When doing sun flare photography, your subject is going to be backlit, literally 100% of the time. Thatโs just how sun flare photography works.
The problem, however, is that backlight shades the front of your subject, so that youโll end up with a very dark subject and a much brighter background.
This can go a few ways:
It can result in a very dark, silhouette-like subject and a well-exposed, detailed background. Personally, I like this look, and it can be very interesting and dramatic. But itโs not always what youโre going for, and so it pays to know how to avoid it when necessary.
Second, you can get a well-exposed subject and a bright, overexposed background. The problem here is that the background may look somewhat bad, thanks to the overexposure, and itโll diminish the effect of your sun flare.
Third, you can get a photo that sits somewhere between these two extremes, but this often doesnโt work, either. The image will be a bit too dark in the foreground and a bit too bright in the background, which may require some post-processing to deal with.
Which brings me to a great solution for sun flare photos:
A reflector!
A reflect is nice, itโs cheap, and itโll let you punch up your subject, so that it appears well-lit and nicely detailed.
Just hold the reflector in front of your subject, so that the sun is being reflected right back, then take your photo!
9. Donโt Be Afraid to Bring Out Sun Flare in Post-Processing
If you donโt do a lot of post-processing, donโt worry; this step isnโt absolutely necessary.
But it can really help improve your sun flare photos, so I do recommend you test out a bit of post-processing, just to see what it can do for you.
Import your sun flare images into a program such as Lightroom.
Then try boosting the contrast slightly to bring out the edges of the sun flare.
You can also boost the saturation to enhance the colors, and you can drop the highlights to bring out detail in the brighter parts of the image.
If you really want to enhance the flare, you can cover it with a radial filter, then try brightening or darkening the exposure. Figure out which option makes the flare pop (it depends on the specific photo), without affecting the rest of the image.
Really, with good post-processing software and a bit of patience, the sky’s the limit!
Master Sun Flare Photography: Conclusion
Capturing gorgeous sun flare photography may seem hard, but it doesnโt have to be.
With the tips and tricks Iโve provided above, you should be able to easily capture stunning sun flare images.
Images with soft lens flares or hard sun stars, images that offer nice golden colors, beautiful backgrounds, and much more.
So go ahead and start taking some sun flare shots.
I guarantee youโll be pleased by the results!

How do I get a sunstar in my sun flare images?
To get a sunstar, use a narrow aperture, such as f/8 or f/11. This will ensure you get a nice, well-defined sunstar (though I recommend you also try to cover part of the sun with your subject, so that the sunstar becomes even more visible).
How do I create a more diffused flare effect?
Use a wide aperture, such as f/2.8. Instead of creating a sunstar, you’ll get a very diffused, glow-type flare effect.
Should I get rid of my lens hood for sun flare photography?
I definitely recommend it. Lens hoods are designed to stop stray light from entering the lens, but this is exactly what lens flare is . So if you want the best lens flare, you’ll often want to get rid of your hood.
Is lens flare good?
That depends on the shot and your personal preference. Lens flare can be very artistic, but it can also be very distracting, depending on its size and placement in the shot. So make sure you understand how lens flare works and what causes it, so you can avoid it when you want to, and keep it when it adds to the shot!
Thank you for breaking lens flare down so simply!