
- What is silhouette photography — using backlighting to create dark, shape-defined subjects against bright backgrounds
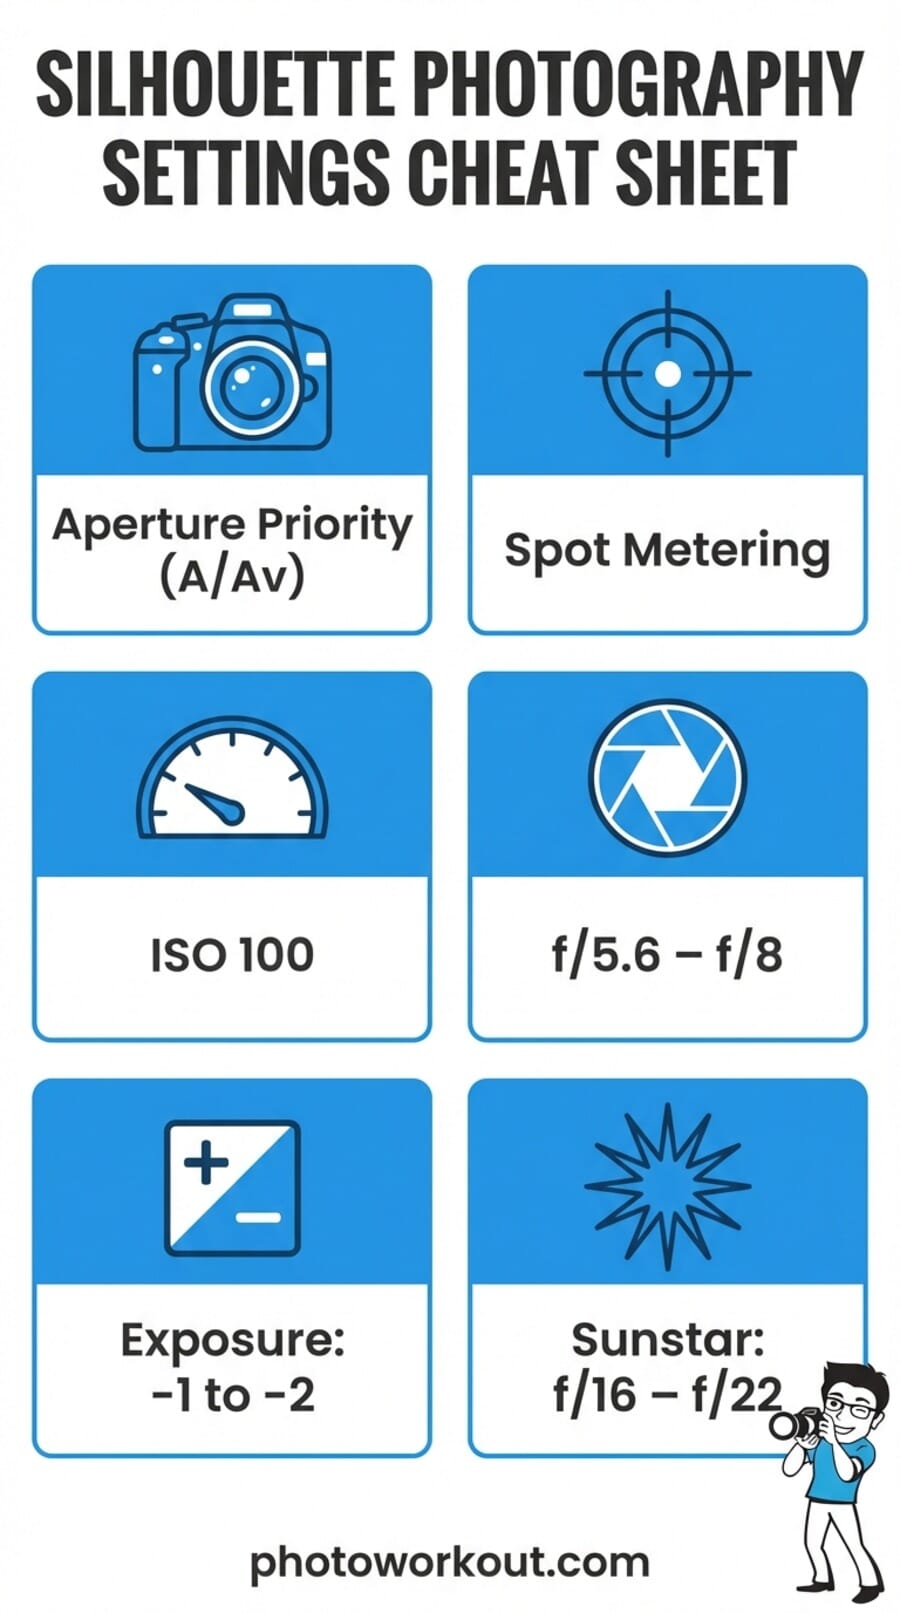
- Camera settings — spot metering, Aperture Priority, ISO 100, and exposure compensation
- Best time to shoot — golden hour, blue hour, and civil twilight offer the most dramatic skies
- Composition tips — shoot low, isolate subjects, use negative space and recognizable profiles
- Smartphone silhouettes — disable HDR, lock exposure on the sky, use pro mode apps
- Post-processing — crush blacks, boost vibrance, and use AI sky masking in Lightroom
What Is Silhouette Photography?
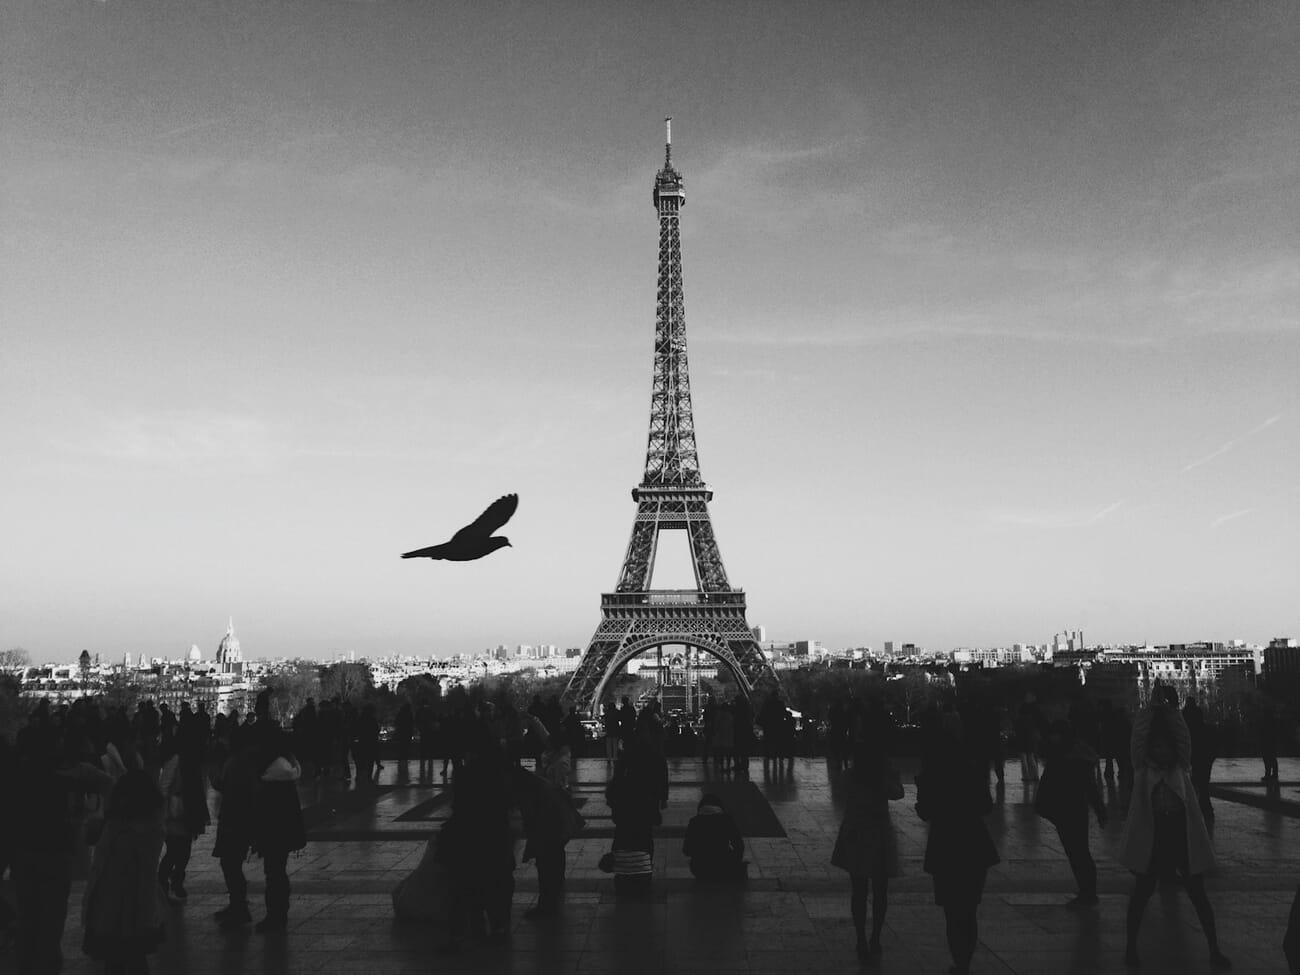
Silhouette photography turns your subject into a dark, shape-defined outline against a bright background. The technique works because you deliberately underexpose the foreground while letting the sky or light source blow out behind it.
Here’s why it’s so effective: the human eye can see roughly 20 stops of dynamic range, but your camera sensor captures only about 12–15. When you expose for the bright background, your camera can’t recover the shadow detail the way your eyes do — and the subject goes dark.
The result strips away color, texture, and detail from your subject, forcing the viewer to focus on shape, gesture, and emotion. It’s one of the most dramatic techniques in photography, and it’s surprisingly easy once you understand the fundamentals.
This reduction to pure form makes silhouettes a powerful technique for visual storytelling — they let viewers project their own meaning onto the image.
Essential Camera Settings for Silhouettes
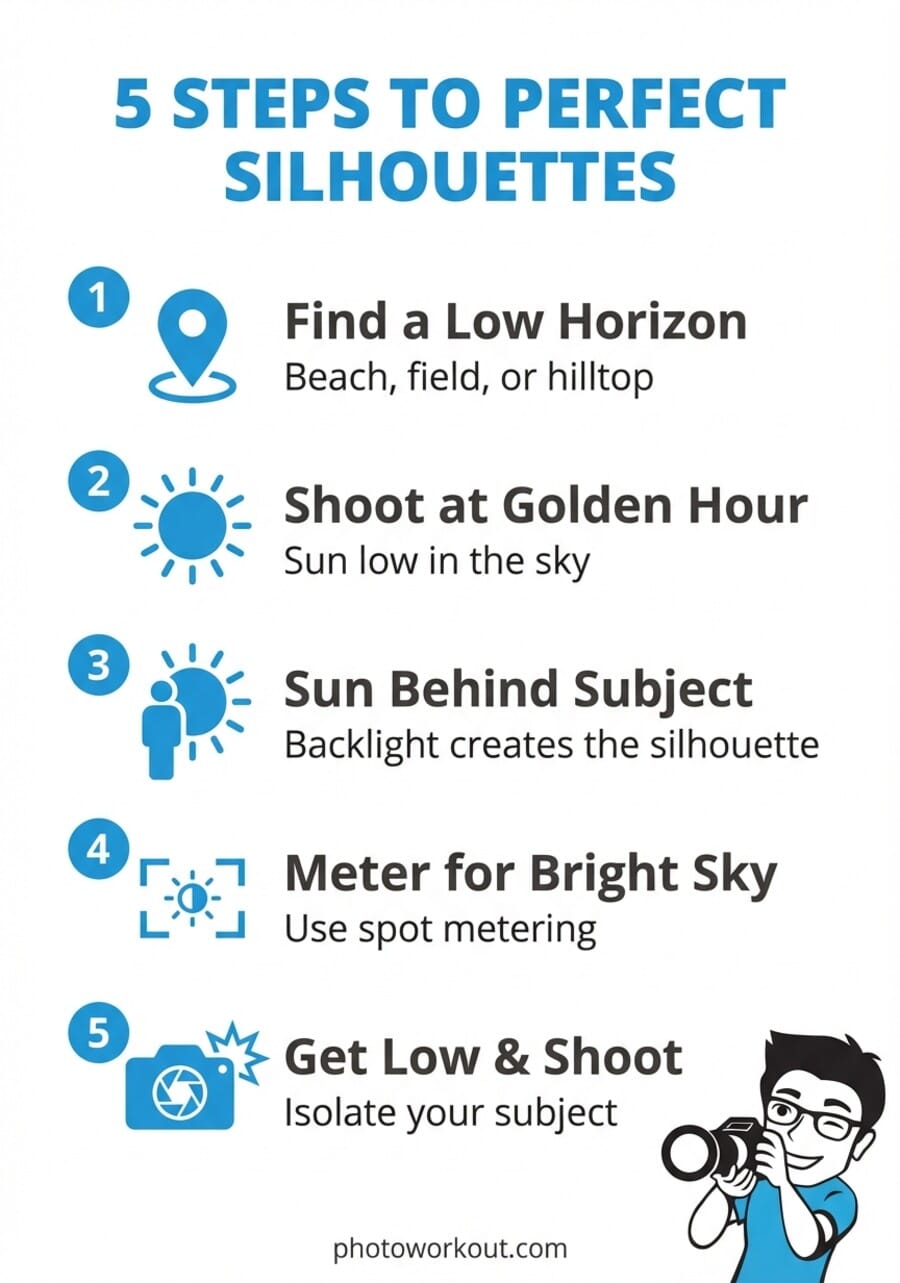
Getting a clean silhouette comes down to telling your camera to ignore the dark subject and expose for the bright background. Here are the key settings:
Metering Mode
Switch to spot metering and meter off the brightest part of the sky (not directly at the sun). This ensures your camera exposes for the highlights, pushing your subject into darkness. If your camera uses evaluative/matrix metering by default, it’ll try to balance the exposure and you’ll end up with a muddy, half-lit subject.
Shooting Mode
Aperture Priority (Av/A) is the easiest starting point. Set your aperture and ISO, and let the camera choose the shutter speed. For full control, switch to Manual mode — meter off the sky, then dial in those settings yourself.
If you’re shooting with a mirrorless camera, you have a huge advantage: the EVF (electronic viewfinder) shows you a real-time preview of your exposure. What you see is what you get — so you can adjust settings and instantly see the silhouette forming before you press the shutter.
Key Settings at a Glance
- ISO: 100 (lowest native ISO — keeps noise minimal in those dark shadow areas)
- Aperture: f/5.6 to f/8 for sharp subjects; f/16–f/22 if you want a sunstar effect
- Exposure compensation: Dial in –1 to –2 EV if the silhouette isn’t dark enough
- Focus: Use single-point AF and focus on the edge of your subject where it meets the sky
- White balance: Daylight or Shade to preserve warm tones (avoid Auto WB, which can neutralize sunset colors)
Best Time and Light for Silhouettes
Silhouettes aren’t just a sunset trick. While golden hour (the hour after sunrise and before sunset) is the classic choice, there are several windows that produce stunning results.
Golden Hour
The warm, low-angle light creates rich orange and red skies that make silhouettes pop. The sun sits close to the horizon, so it’s easy to position your subject directly against it. This is the most forgiving time to shoot — even beginners get great results.
Blue Hour
The 20–30 minutes after sunset (or before sunrise) offer deep blue and purple tones that create moody, atmospheric silhouettes. The light is dimmer, so you may need to open up your aperture or raise your ISO slightly.
Civil Twilight
This is the transition zone between golden hour and blue hour — roughly 10–20 minutes around sunset. The sky often shows the most dramatic color gradients during civil twilight, blending warm and cool tones together.
Weather Matters
Don’t skip cloudy days. Scattered clouds catch and reflect light, creating textured, dramatic skies that work beautifully behind silhouettes. Completely overcast skies are less ideal — you need some brightness contrast to define the silhouette.
How to Compose Stunning Silhouettes
A great silhouette is all about shape recognition. Without color or detail, your subject needs to be instantly identifiable by its outline alone. Here’s how to nail the composition:
Place Your Subject Against the Sky
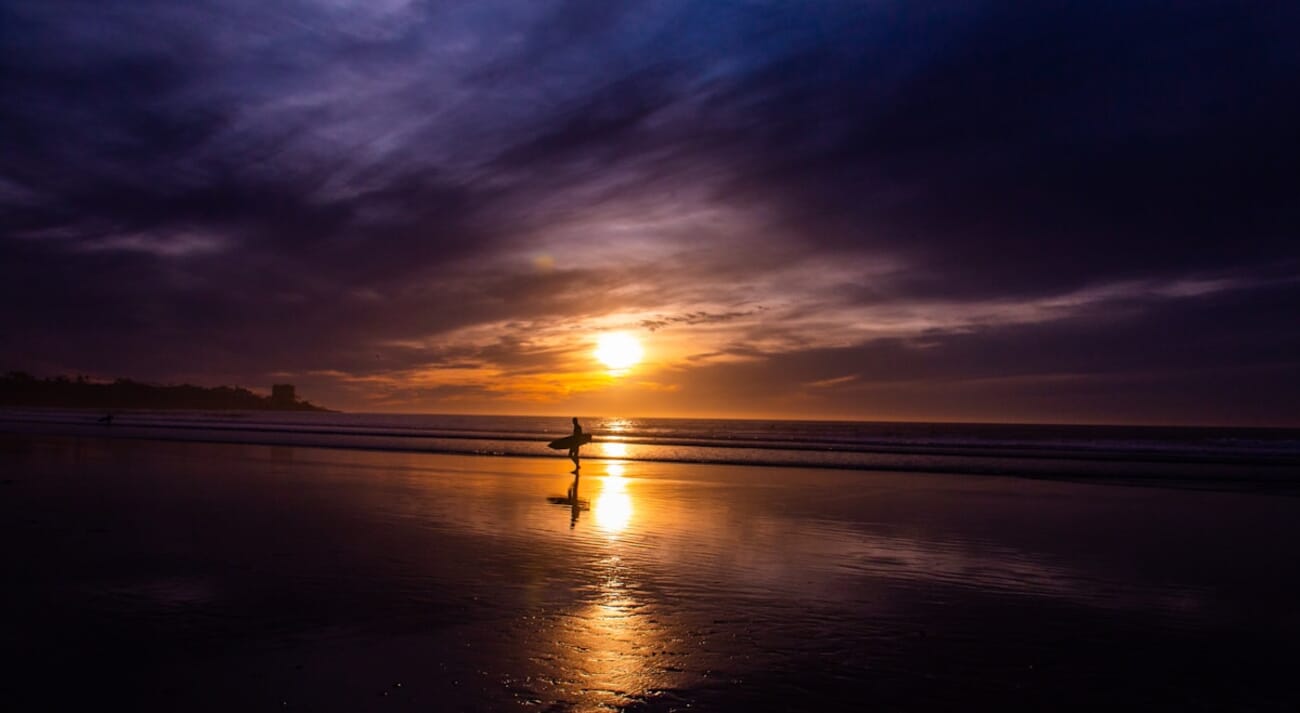
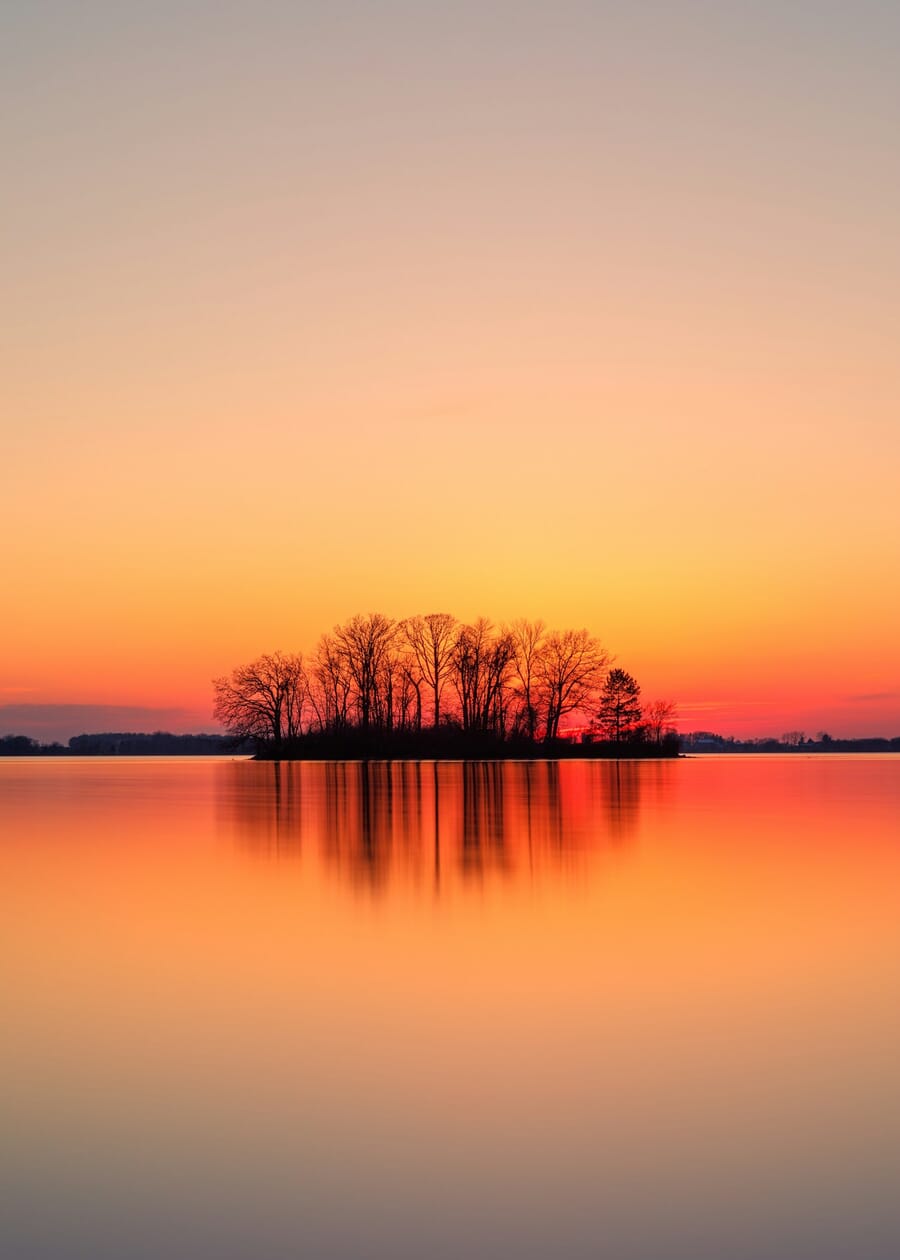
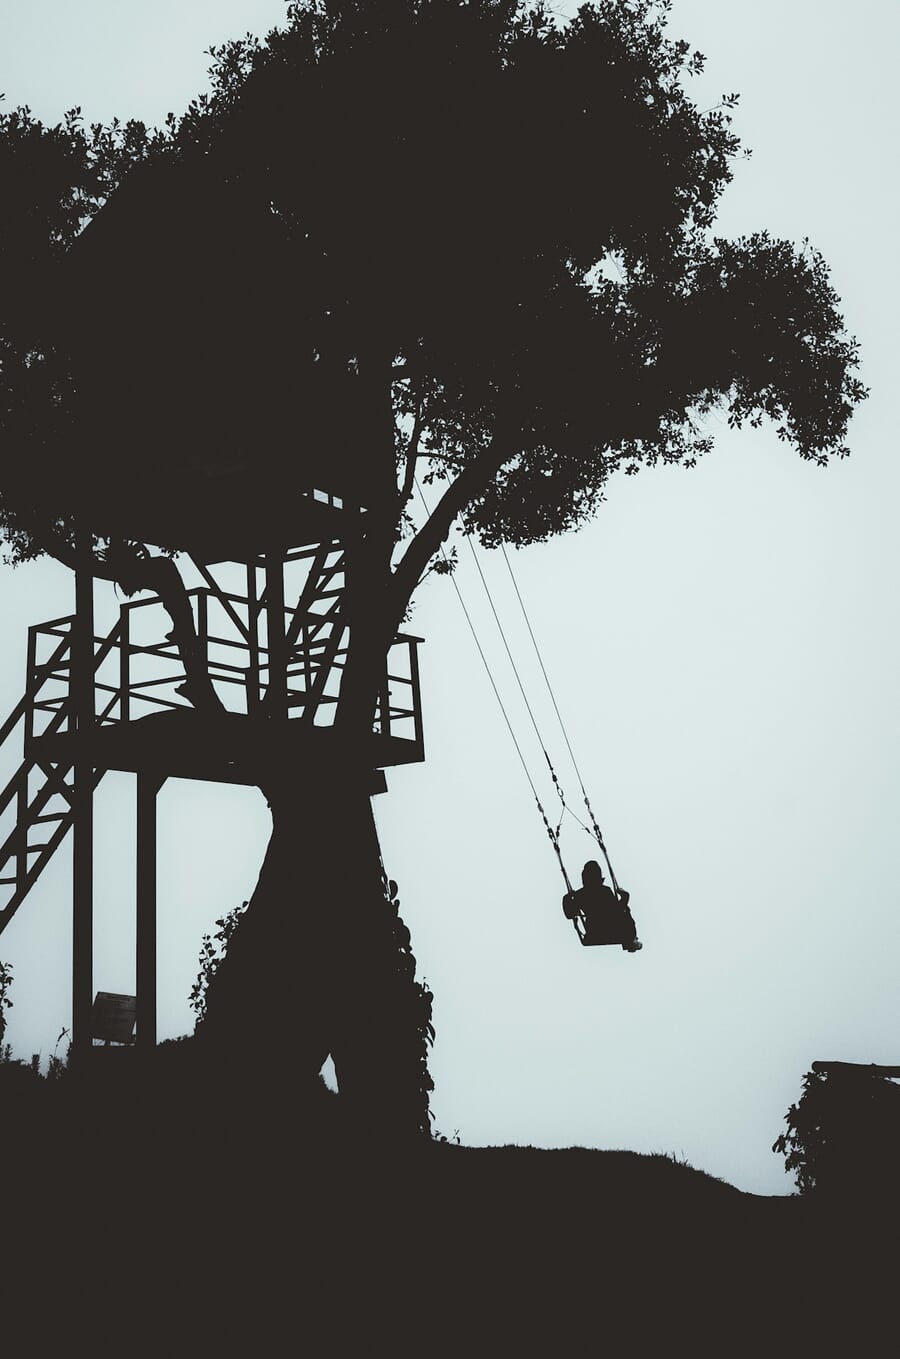
The brightest part of the frame should be directly behind your subject. Get low to the ground — even lying flat — to push your subject higher against the sky and eliminate distracting background elements like buildings or trees.
Isolate Your Subject
Overlapping subjects merge into an unreadable blob. Keep people, trees, and objects separated with clear gaps of sky between them. If you’re photographing a person, have them extend their arms or legs away from their body to create a recognizable human shape.
Use Negative Space
Silhouettes thrive on simplicity. Give your subject room to breathe. A small, dark figure against a vast, colorful sky is far more powerful than a frame packed with competing elements.
Capture Recognizable Shapes
Shoot subjects in profile rather than head-on. A person facing sideways shows their nose, chin, and posture. A person facing the camera becomes a featureless blob. The same applies to animals, buildings, and vehicles — angle matters.
Action Poses
Movement adds drama. A jumping figure, a dancer mid-leap, or someone throwing a ball creates an instantly compelling shape. Ask your subject to freeze at the peak of their action, or use burst mode to capture the perfect moment.
Creative Silhouette Techniques
Once you’ve mastered the basics, try these techniques to push your silhouette photography further.
Sunstar Effect
Narrow your aperture to f/16–f/22 and partially hide the sun behind your subject’s edge. The small aperture creates a starburst pattern around the sun, adding a magical quality to the image. This works best when the sun is just peeking out from behind a person’s head or a tree trunk.
Reflections
Water, wet sand, puddles, and glass surfaces mirror your silhouette and double the impact. Look for calm water at beaches or lakes during golden hour. Even a rain-soaked parking lot can create stunning reflection silhouettes.
Multiple Subjects
Groups tell a story. A couple holding hands, children playing, or a family walking together creates an emotional narrative. The key is keeping each figure separated enough to be individually recognizable.

Window Silhouettes
You don’t need a sunset. Indoor silhouettes work by placing your subject in front of a bright window. This technique is popular for portraits, maternity shoots, and moody editorial work. Expose for the window light, and your subject becomes a beautiful dark outline.
Partial Silhouettes and Rim Lighting
Not every silhouette needs to be pure black. A partial silhouette retains some detail in the subject while keeping the overall dark look. Rim lighting — where the backlight creates a glowing edge around your subject — adds depth and separation. Adjust your exposure compensation to find the sweet spot between full silhouette and partial detail.
Smartphone Silhouette Photography
Modern smartphones can capture excellent silhouettes — but you need to fight their built-in instincts. Phone cameras are designed to expose everything evenly, which is the opposite of what silhouettes need.
The Biggest Challenge: HDR
Both iPhones and Android phones use computational HDR (Smart HDR, Night Sight, etc.) that automatically brightens shadows. This actively fights your silhouette by trying to recover detail in the dark subject. Disable HDR/Smart HDR in your camera settings before shooting silhouettes.
Lock Your Exposure
Tap and hold on the bright sky to lock exposure (AE/AF Lock on iPhone, long-press on most Androids). Then slide the exposure slider down if the subject isn’t dark enough. This tells your phone to expose for the highlights, exactly what you want.
Pro Mode Apps
For maximum control, use a manual camera app like Halide or ProCamera (iPhone) or your phone’s built-in Pro mode (Samsung, Pixel). These let you set ISO, shutter speed, and metering independently — just like a dedicated camera.
Use the Telephoto Lens
If your phone has a telephoto lens (2x or 3x), try it for silhouettes. The compressed perspective makes the sun or sky appear larger relative to your subject, creating more dramatic compositions than the wide-angle main camera.
Post-Processing Silhouettes
A little post-processing goes a long way with silhouettes. The goal is to enhance what’s already there — deeper blacks, more vivid skies — without overdoing it.
Lightroom (Desktop and Mobile)
Adobe Lightroom is the go-to tool for silhouette editing. Here’s a quick workflow:
- Crush the blacks: Drag the Blacks slider to –50 or lower to deepen the silhouette
- Boost vibrance (not saturation): Vibrance targets muted colors, preserving already-vivid tones. +30 to +50 usually works well
- Enhance the sky: Use Lightroom’s AI Sky Masking (Select Subject > Sky) to selectively boost contrast, clarity, and color in the sky without affecting the silhouette
- Reduce highlights: Pull highlights down to recover detail in bright clouds
- Add warmth: Push the Temp slider slightly toward yellow/orange to enhance golden hour tones
Snapseed (Free Mobile Editing)
For quick edits on your phone, Snapseed is excellent and free. Use the Tune Image tool to drop brightness and boost contrast, then the Selective tool to brighten or saturate just the sky area.
AI-Powered Editing
Modern editing tools use AI masking to make selective adjustments effortless. Lightroom’s AI masking can automatically detect and select the sky, subject, or background — letting you adjust each independently with a single click.
Common Mistakes to Avoid
Even experienced photographers make these silhouette mistakes. Here’s what to watch for:
- Leaving HDR on: The #1 silhouette killer. HDR on cameras and phones brightens shadows, ruining the dark subject you’re trying to create
- Cluttered backgrounds: Trees, buildings, and power lines that merge with your subject destroy the clean outline. Scout your location and find a clear background
- Subject overlap: When two people or objects touch, they become one unreadable shape. Keep visible gaps between all elements
- Shooting too early or too late: Midday sun is too high and harsh for silhouettes. Too late after sunset, and you lose the colorful sky. Aim for 30 minutes before to 15 minutes after sunset
- Forgetting to disable auto-HDR on phones: This deserves its own mention because it’s so common. iPhones and Samsung phones especially love to “fix” your silhouette with Smart HDR
- Over-processing: Pushing saturation too high creates unrealistic, neon-looking skies. Keep edits subtle and natural
Step-by-Step Silhouette Shooting Plan
Save this as a quick field reference for your next silhouette session:
- Arrive early. Get to your location 45 minutes before sunset. Scout for clean backgrounds and interesting subjects
- Set your camera. Switch to spot metering, Aperture Priority, ISO 100, aperture f/5.6–f/8
- Position your subject. Place them between you and the light source. Get low to push them against the sky
- Meter and expose. Point your spot meter at the bright sky (not the sun), half-press to lock, recompose on your subject
- Check and adjust. If the silhouette isn’t dark enough, dial in –1 to –2 EV exposure compensation
- Shoot variations. Try different poses, angles, and compositions. Move around your subject. Shoot wide and tight
- Stay for blue hour. Don’t pack up at sunset — the next 20 minutes often produce the best sky colors

Silhouette Photography FAQ
How do you capture gorgeous silhouette photography?
Position your subject between you and a bright light source like the setting sun. Switch to spot metering and meter off the bright sky — this underexposes your subject into a clean silhouette. Use Aperture Priority mode (f/5.6–f/8), ISO 100, and dial in –1 to –2 EV exposure compensation if needed. Mirrorless cameras make this especially easy since the EVF shows you the silhouette in real time. Get low, isolate your subject against the sky, and shoot during golden hour for the best colors.
What is the best aperture for silhouette photography?
f/5.6 to f/8 is the sweet spot for most silhouettes — sharp subjects with good depth of field. If you want a sunstar effect, narrow down to f/16–f/22 and partially hide the sun behind your subject. If your subject is far away and there’s no real depth to the scene, your lens’s maximum aperture works fine too.
What ISO should you use for silhouette photography?
Use your camera’s lowest native ISO — typically ISO 100. Silhouettes have large dark areas where noise is most visible, so keeping ISO low is critical for clean results. Since you’re shooting toward a bright light source, there’s plenty of light available and no reason to raise ISO.
How do I make a silhouette photo?
Find a bright background (sunset sky, lit window, bright wall), position your subject in front of it, and expose for the background. Use spot metering aimed at the sky, set Aperture Priority with ISO 100, and the camera handles the rest. Get low to push your subject against the sky, keep shapes separated and recognizable, and shoot during golden hour for vivid colors. On smartphones, tap-hold on the bright sky to lock exposure and disable HDR.
Do you need to post-process your silhouette images?
Not necessarily — many silhouettes look great straight out of camera. But post-processing can take them further. In Lightroom (desktop or mobile), crush the blacks, boost vibrance, and use AI Sky Masking to selectively enhance sky colors. Free apps like Snapseed also work well for quick adjustments. The key edits are deepening the blacks and enhancing sky color — usually just a minute or two of work.
How do you get vibrant silhouette colors?
Shoot during golden hour or civil twilight when the sky naturally offers the most vivid oranges, pinks, and purples. Scattered clouds add texture and catch more color. In post-processing, boost vibrance (not saturation) to intensify muted tones without making vivid areas look artificial. Lightroom’s AI sky mask lets you enhance just the sky without affecting the silhouette.
Can I take good silhouette photos with my smartphone?
Absolutely. Modern smartphones take excellent silhouettes — the main challenge is overcoming computational HDR that tries to brighten shadows. Disable Smart HDR (iPhone) or HDR (Android), tap and hold on the bright sky to lock exposure, and slide the exposure slider down if needed. For advanced control, use Halide or ProCamera on iPhone, or your phone’s built-in Pro mode. Try the telephoto lens for compressed, dramatic compositions.
Related Posts
