
- A reflector bounces existing light onto your subject – the simplest way to improve portraits without adding new light sources.
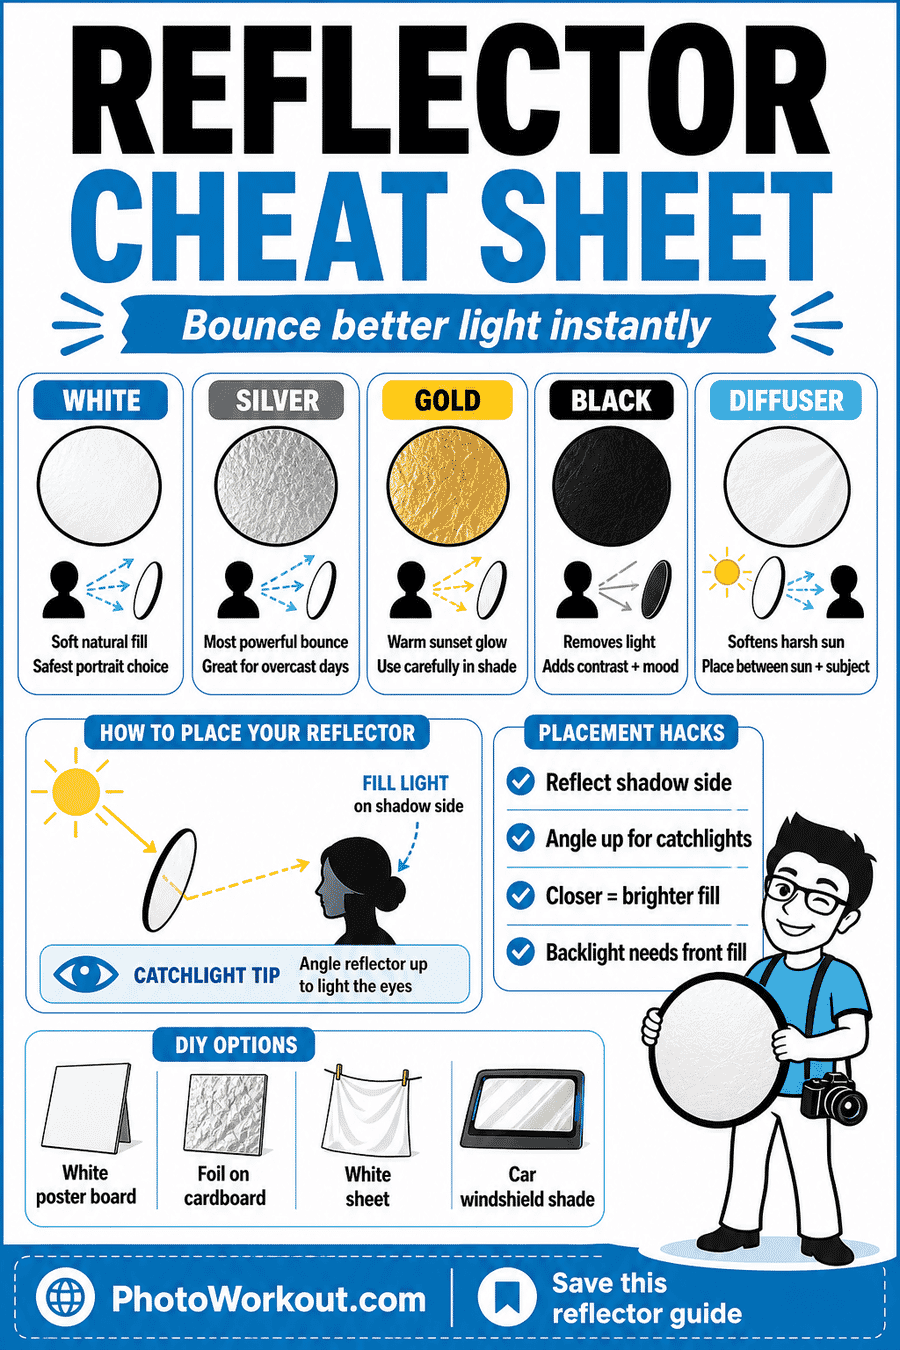
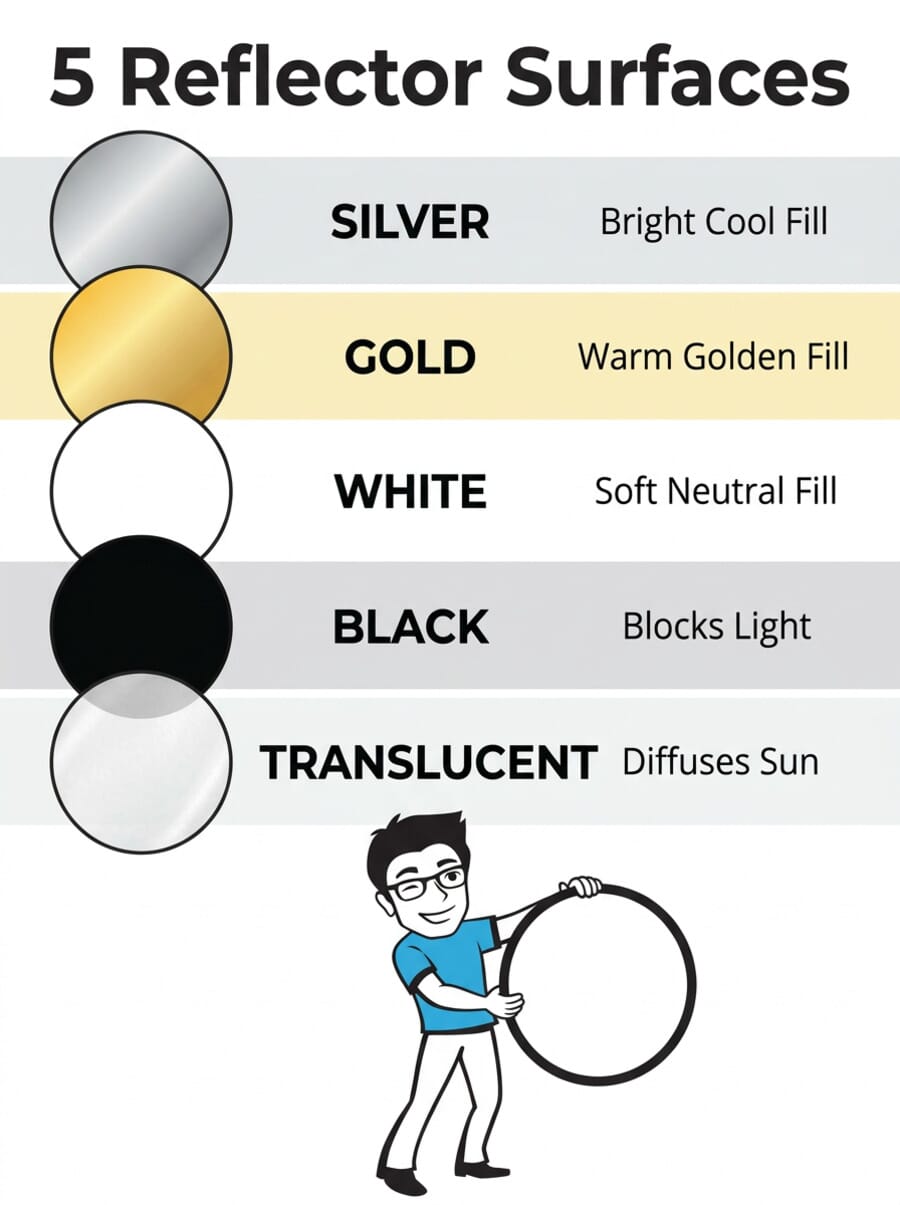
- Five reflector surfaces (white, silver, gold, black, translucent) each serve different purposes.
- Positioning is everything – angle and distance determine how much fill light reaches the subject.
- Portrait photographers use reflectors to fill shadows, add catchlights, and create professional lighting with natural light alone.
- DIY alternatives like white poster board, aluminum foil, and bed sheets work surprisingly well on a budget.
- Avoid common mistakes like over-filling shadows or positioning the reflector too close.
Introduction
A reflector is one of the most useful and affordable tools a photographer can own. It doesn’t create light – it redirects it. By bouncing existing light onto a subject’s shadow side, a reflector fills darkness, adds catchlights to eyes, and produces professional-quality lighting without a single watt of electricity.
Whether shooting portraits outdoors, working with window light indoors, or supplementing studio setups, reflectors give photographers control over light quality and direction. This guide covers the different types, when to use each, how to position them, and budget-friendly DIY alternatives.
What Is a Reflector?
A photography reflector is a flat, reflective surface used to bounce light toward a subject. The most common form is the 5-in-1 collapsible reflector – a circular disc with a zippered cover that offers five different reflective surfaces in one compact package.
Reflectors work by redirecting light that already exists in the scene. Unlike a flash or strobe, they don’t add new light – they take the light that’s already there and send it where it’s needed. This makes them a perfect complement to natural light photography.
The concept is closely tied to understanding light direction. A reflector essentially creates a second light source by bouncing the main light from a different angle, filling shadows and adding dimension to the subject.
Types of Reflector Surfaces
Each reflector surface produces a different quality of bounced light. Choosing the right one depends on the shooting situation, the look you’re going for, and the existing light conditions.
White
The white reflector produces the softest, most natural-looking fill light. It bounces a gentle, diffused glow that subtly lifts shadows without overpowering the scene. Most photographers consider white the default choice.
- Best for: Portraits in natural light, close-up photography, any situation where subtlety matters
- Character: Soft, neutral, non-specular
- Downside: Least powerful – needs to be positioned close to the subject to be effective
Silver
The silver reflector is the most powerful surface, bouncing back the most light with a slightly cool, specular quality. It’s the go-to when working at a distance or in lower light conditions where the white surface isn’t strong enough.
- Best for: Overcast days, larger distances between reflector and subject, adding strong fill
- Character: Bright, slightly cool, more specular than white
- Downside: Can be too intense up close – may cause subjects to squint
Gold
The gold reflector adds warmth to the bounced light, producing a golden, sunset-like glow on the subject. It’s popular for outdoor portraits when photographers want a warm, flattering look.
- Best for: Golden hour extension, warm skin tones, outdoor portraits
- Character: Warm, flattering, can mimic late-afternoon light
- Downside: Can look unnatural when the ambient light is cool (overcast, shade, indoor); works best when the ambient light is already warm
Black (Negative Fill)
A black panel does the opposite of reflecting – it absorbs light. Also called a “flag” or “negative fill,” it removes light from one side of the subject to increase contrast and deepen shadows.
- Best for: Adding drama, creating deeper shadows, controlling light spill
- Character: Subtractive – removes light rather than adding it
- When to use: When ambient light is too even and flat, and you want to add contrast and mood to shadow areas
Translucent (Diffuser)
The translucent disc is held between the light source and the subject to diffuse and soften direct light – acting as a portable shade. Unlike the other surfaces, it doesn’t bounce light; it transmits it.
- Best for: Midday sun portraits, product photography outdoors, any time direct sunlight is too harsh
- Character: Softens and diffuses without changing color
- Practical note: Requires an assistant to hold it overhead or a stand with a clamp
How to Position a Reflector
The two most important variables in reflector use are angle and distance. Getting both right makes the difference between natural-looking fill and an obviously artificial bounce.

Basic positioning rules:
- Opposite the light source: Place the reflector on the shadow side of the subject, facing the main light. The reflector catches the light and bounces it back as fill.
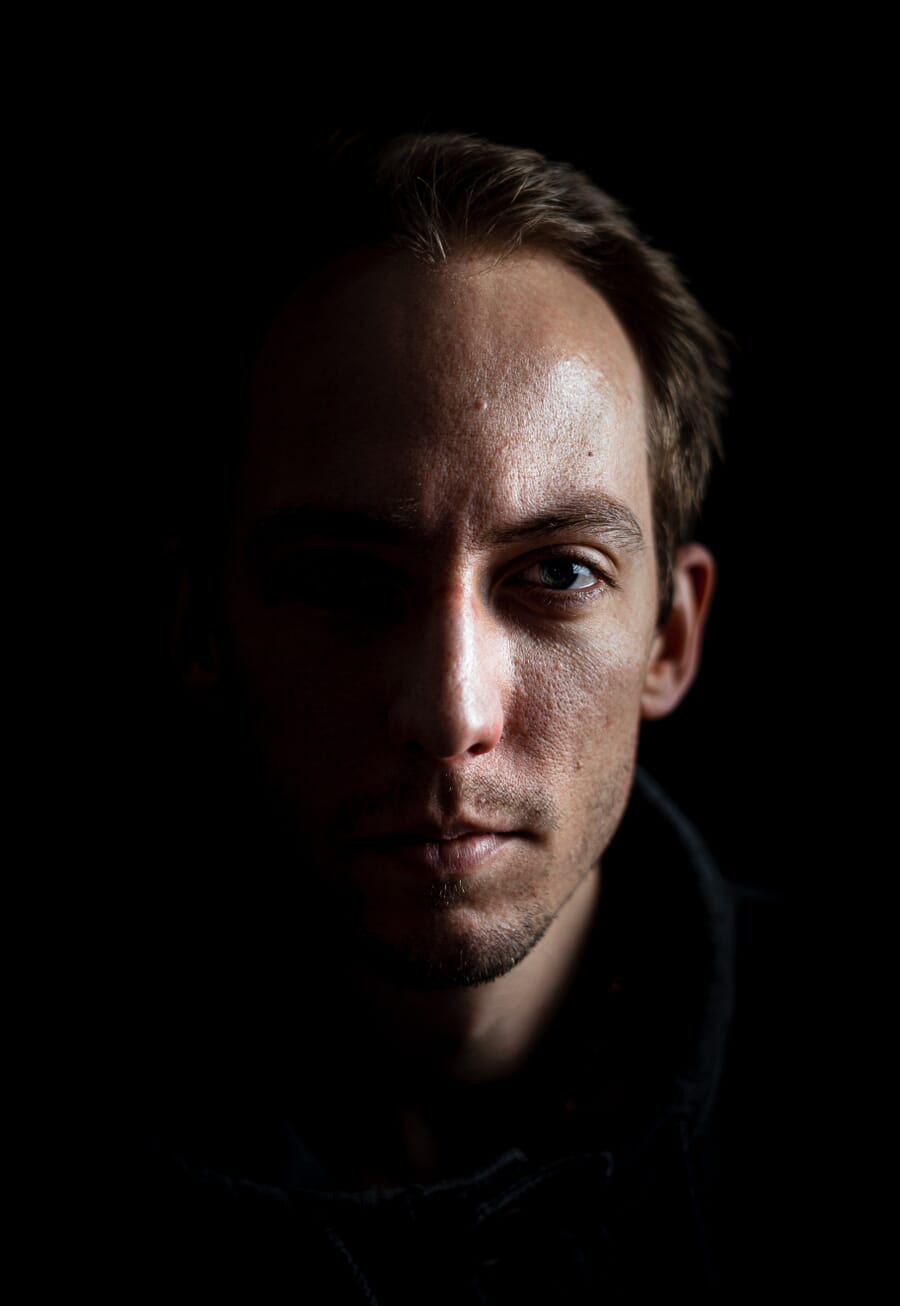
- Below for eye catchlights: Hold the reflector low (waist to chest level) and angle it up toward the face. This creates beautiful catchlights in the eyes and gently lifts under-chin shadows.
- Above for hair light: Position the reflector above and slightly behind the subject to bounce light onto the hair, creating a natural rim light effect.
Distance determines intensity: Move the reflector closer for stronger fill, farther for subtler fill. Start at arm’s length from the subject and adjust. The inverse square law applies – doubling the distance reduces the light to one quarter of its intensity.
Watch the subject’s eyes. You can literally see the reflector’s effect in the subject’s eyes as you move it. When you see a nice, round catchlight appear in the lower portion of the iris, you’ve found a good position.
Use this quick reflector cheat sheet to choose the right surface and place it where the shadows need help.
Reflectors for Portrait Photography
Portraits are where reflectors earn their keep. A single reflector transforms harsh outdoor light into something flattering and professional.
Scenario 1: Open shade + reflector. Position the subject in open shade (under a tree, building overhang), then use a silver or white reflector to bounce ambient light onto the face. This creates soft, directional fill with beautiful catchlights.
Scenario 2: Backlit portrait + reflector. With the sun behind the subject (creating beautiful backlighting), hold a reflector in front and below the subject to bounce sunlight back onto the face. This fills shadows while preserving the dreamy backlit glow.
Scenario 3: Window light + reflector. When shooting window light portraits, place a white reflector on the shadow side of the face, just outside the frame. This creates a classic two-light look with a single window.
For a deeper dive into exposure settings for portrait lighting scenarios, check the camera settings cheat sheet.
DIY Reflector Alternatives
You don’t need to buy a commercial reflector to start bouncing light. Some of the most effective reflectors are things you already have at home.
- White poster board – the most popular DIY option. A dollar-store poster board produces clean, soft fill light. Perfect for food and product photography.
- Aluminum foil on cardboard – wrap foil (shiny side out) around a piece of cardboard for a strong, specular bounce similar to a silver reflector. Crumple the foil slightly for a softer, less directional reflection.
- White bed sheet – hang or drape it near the subject for a large, soft reflective surface. The bigger the sheet, the softer the reflected light.
- Car windshield shade – the silver, foldable sunshades are basically large silver reflectors. They’re lightweight, cheap, and surprisingly effective.
- Open white book or notebook – in a pinch, an open book propped up works for small subjects and close-up work
The key advantage of a commercial 5-in-1 reflector is portability and versatility – it collapses to a small disc and offers five surfaces. But for learning the technique, any white or reflective surface works perfectly.
Common Reflector Mistakes
Reflectors are simple tools, but there are a few common errors that undermine results.
- Over-filling shadows. The goal isn’t to eliminate shadows entirely – that flattens the image. Shadows create depth. A subtle fill that lifts the darkest areas by 1-2 stops is usually perfect.
- Reflector too close. A reflector held inches from the subject creates harsh, unflattering fill. Keep at least 2-3 feet of distance for natural-looking results.
- Wrong surface for the conditions. A gold reflector on an overcast day adds an unnatural warm cast. Match the surface to the ambient light.
- Reflector visible in catchlights. While catchlights are desirable, a rectangular poster board creates an unnatural-looking rectangular catchlight. Round reflectors create more natural-looking round catchlights.
- Causing subjects to squint. Silver reflectors in bright sun can be blinding. If the subject is squinting, switch to white or move the reflector farther away.

Start Using Reflectors
A reflector is the best bang-for-your-buck lighting tool in photography. A $15 5-in-1 reflector (or a free piece of white poster board) can transform harsh, unflattering light into something professional and polished. The technique is simple: find the shadow, bounce light into it, and adjust distance and angle until it looks natural.
Start with a white surface for the most forgiving results, then experiment with silver for power and gold for warmth. Once you see how much control a simple reflector gives you over natural light, you’ll wonder how you ever shot without one. For low-light situations where reflectors alone aren’t enough, the night photography guide covers artificial lighting techniques.
Frequently Asked Questions
What size reflector should I buy?
For portraits, a 42-inch (107cm) 5-in-1 reflector is the most versatile size. It’s large enough to provide soft, even fill for half-body and headshot work, and it collapses small enough to fit in a camera bag. For full-body or group shots, consider a 48-inch or larger reflector.
Which reflector color is most useful?
White is the most universally useful surface. It produces soft, neutral fill that works in nearly every situation. Silver is the second most useful for its power in overcast or low-light conditions. A 5-in-1 reflector gives you all five surfaces, so you don’t have to choose just one.
Can I use a reflector without an assistant?
Yes, but it requires a bit of improvisation. Use a light stand with a reflector holder clamp, lean the reflector against a chair or table, or prop it on the ground at the right angle. For food and product photography, a small white card propped up on a support works perfectly without assistance.
How far should the reflector be from the subject?
Start at 3-4 feet from the subject and adjust. Closer means stronger, harder fill; farther means softer, more subtle fill. Watch the subject’s face as you move the reflector – you’ll see the shadows lift in real time. The sweet spot is when shadows are gently reduced but not eliminated.
Featured image: Photo by Unsplash.


