
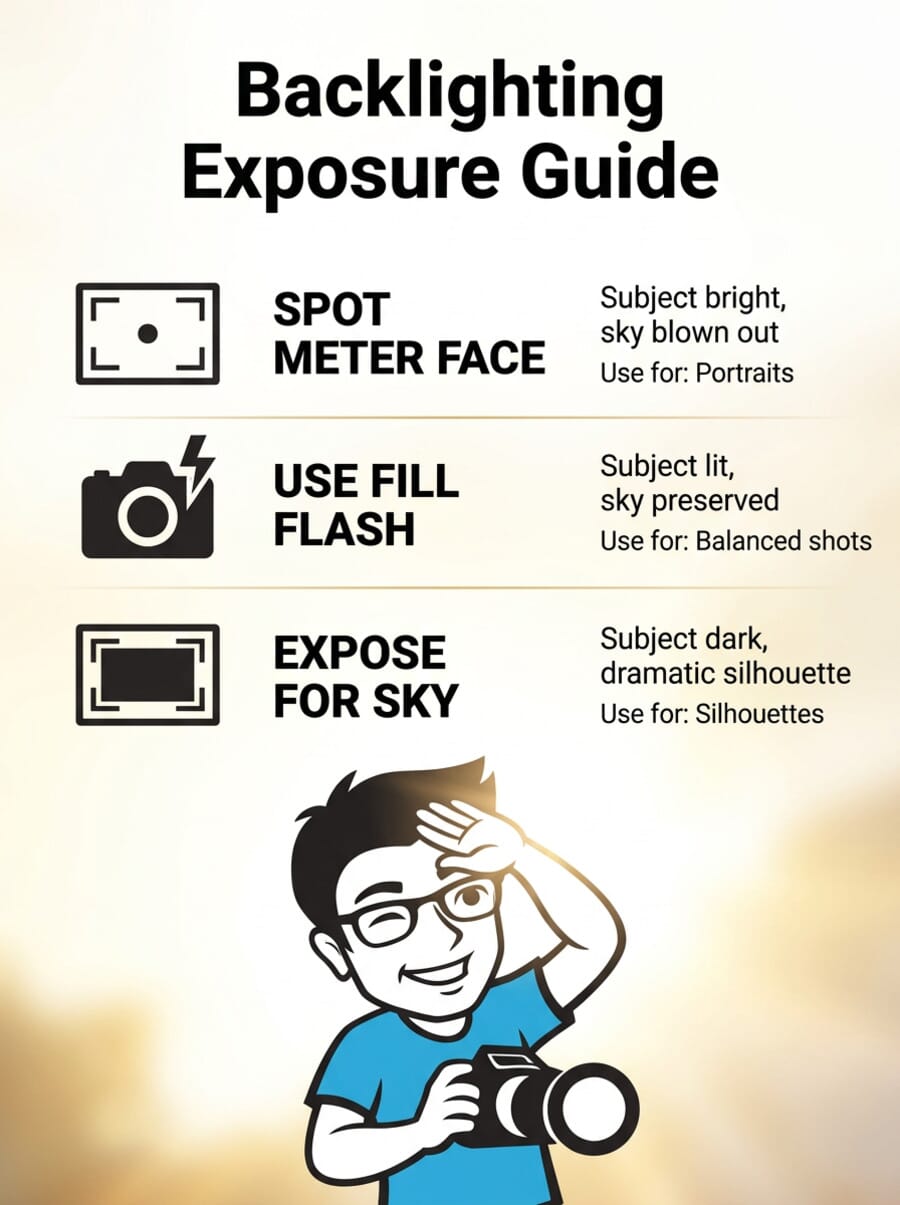
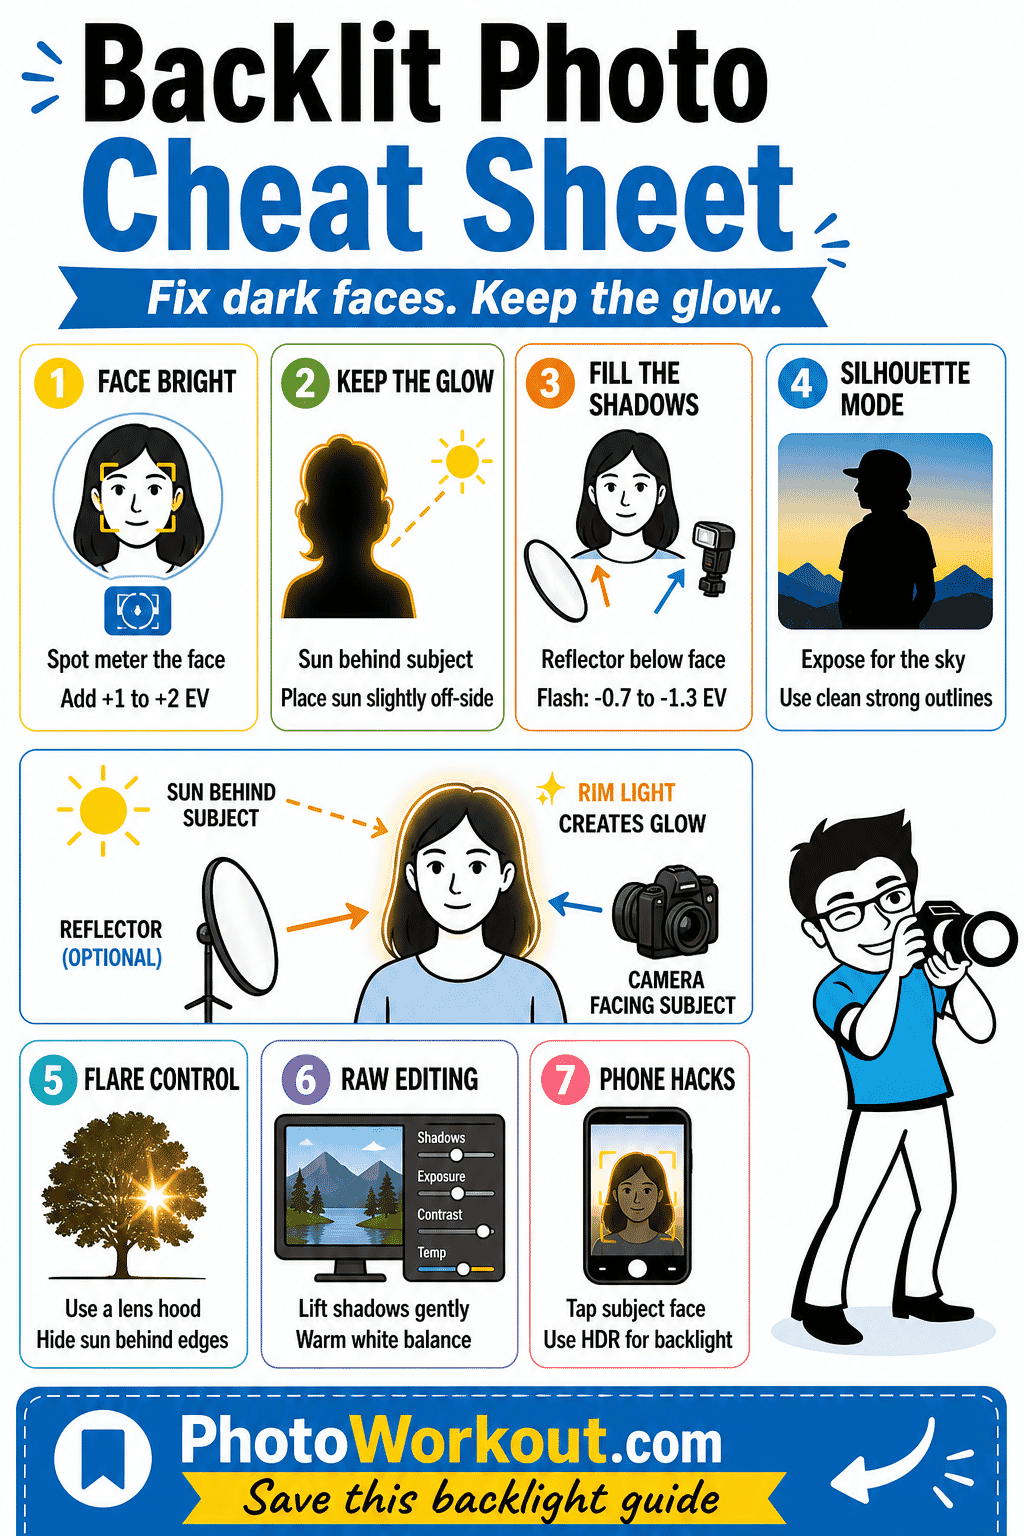
- Spot meter on your subject and dial in +1 to +2 EV exposure compensation to prevent dark, underexposed faces.
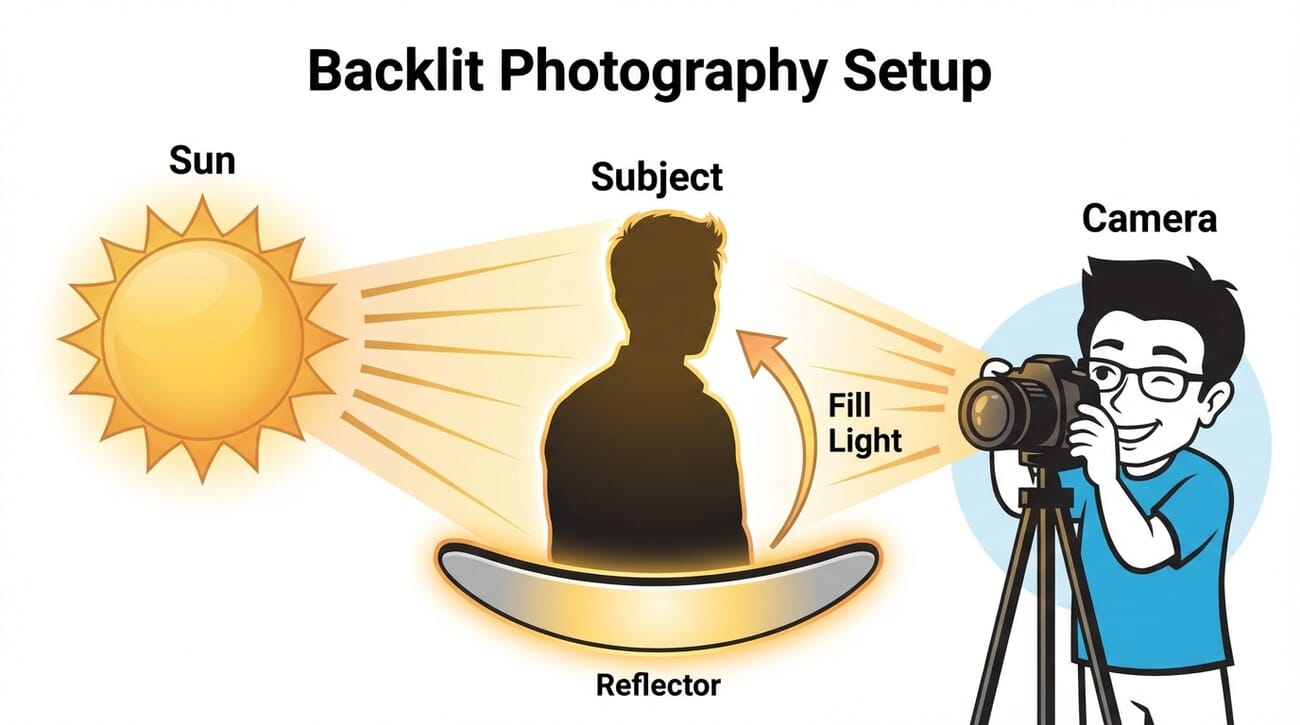
- Use fill flash or a reflector to bounce light back onto your subject while keeping that beautiful backlit glow.
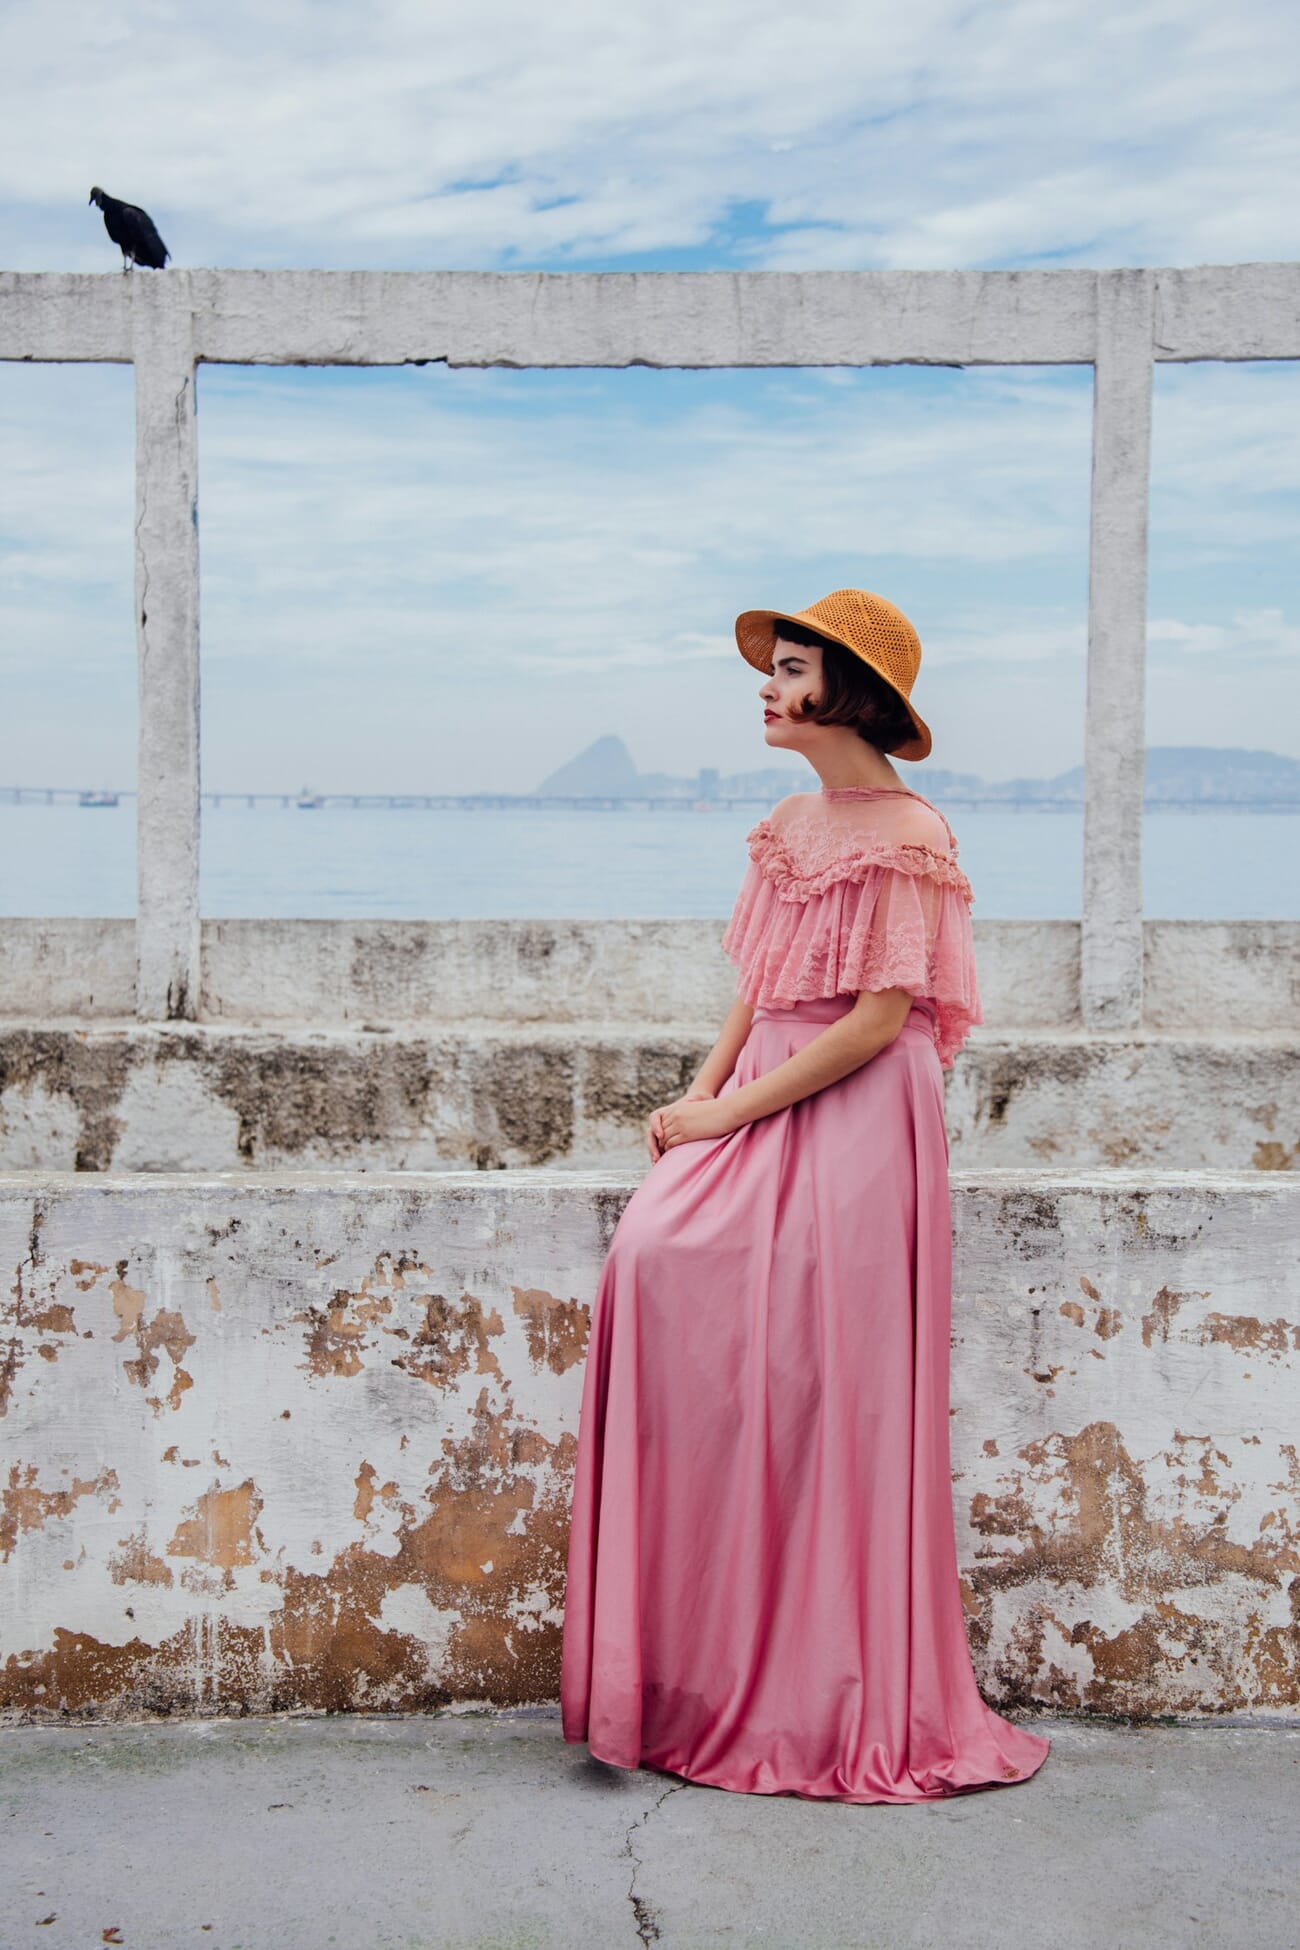
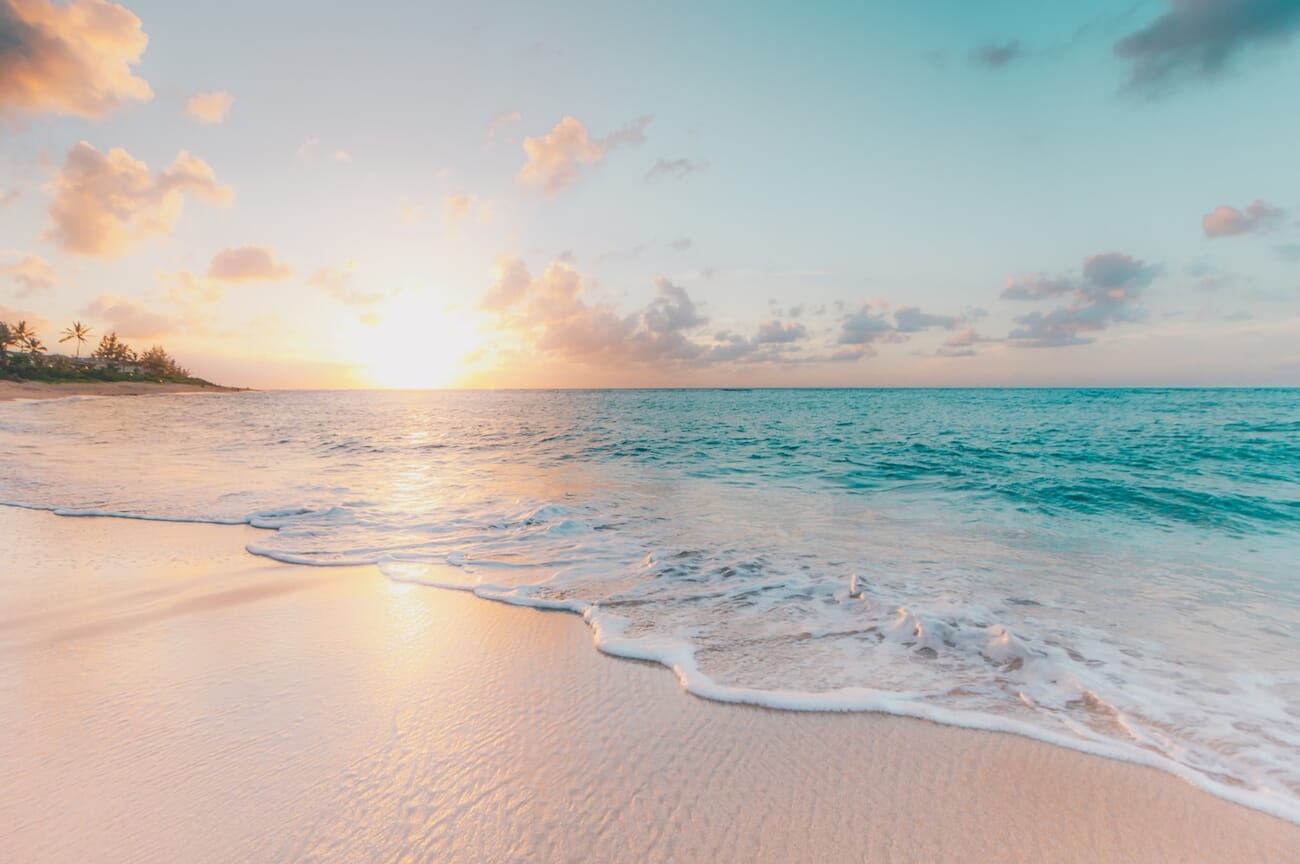
- Shoot during golden hour for the warmest, most flattering backlit light with natural rim lighting on hair and shoulders.
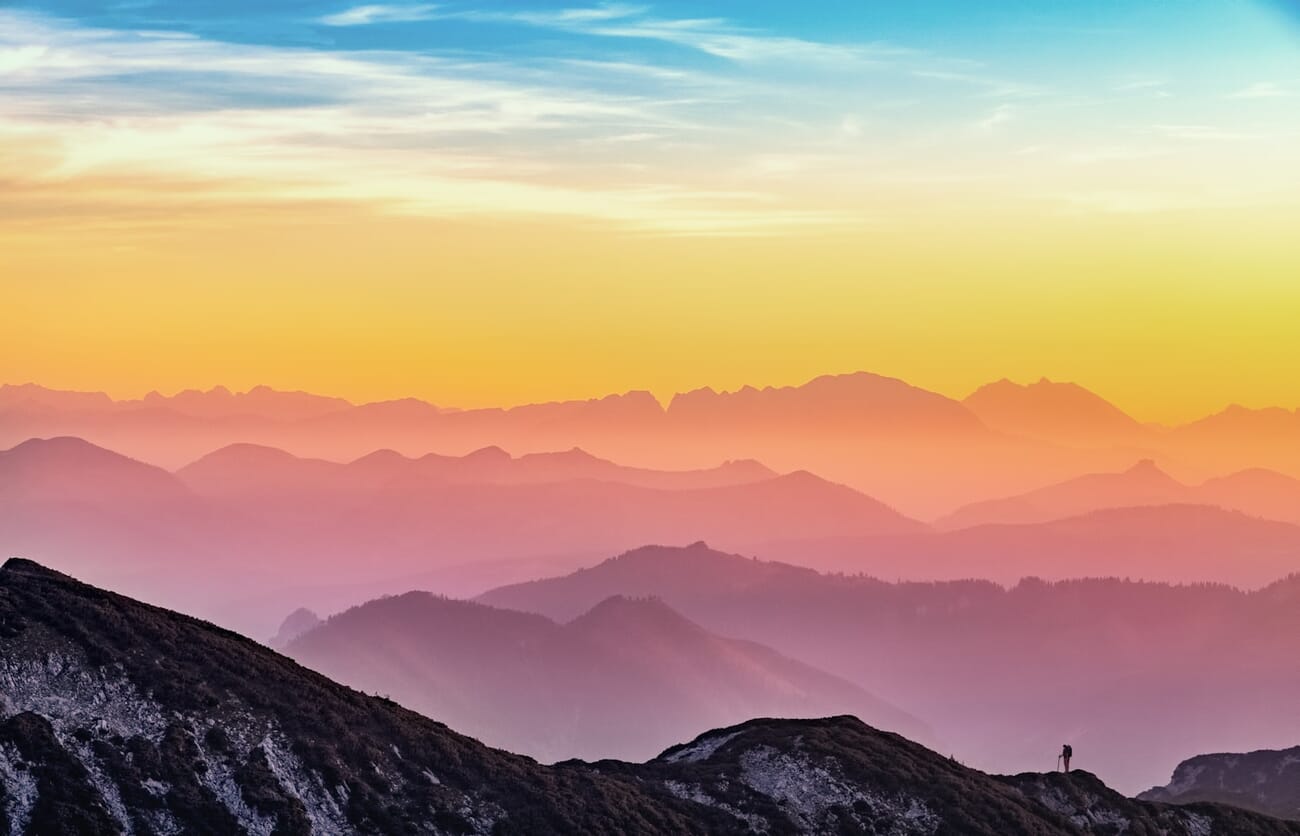
- Embrace silhouettes intentionally by exposing for the bright sky – sometimes the dramatic backlit shape is the goal.
- Lens flare can be a creative tool or a problem – learn to control it with positioning and lens hoods.
- Recover shadow detail in post – shooting RAW gives you 3-5 stops of shadow recovery.
Introduction
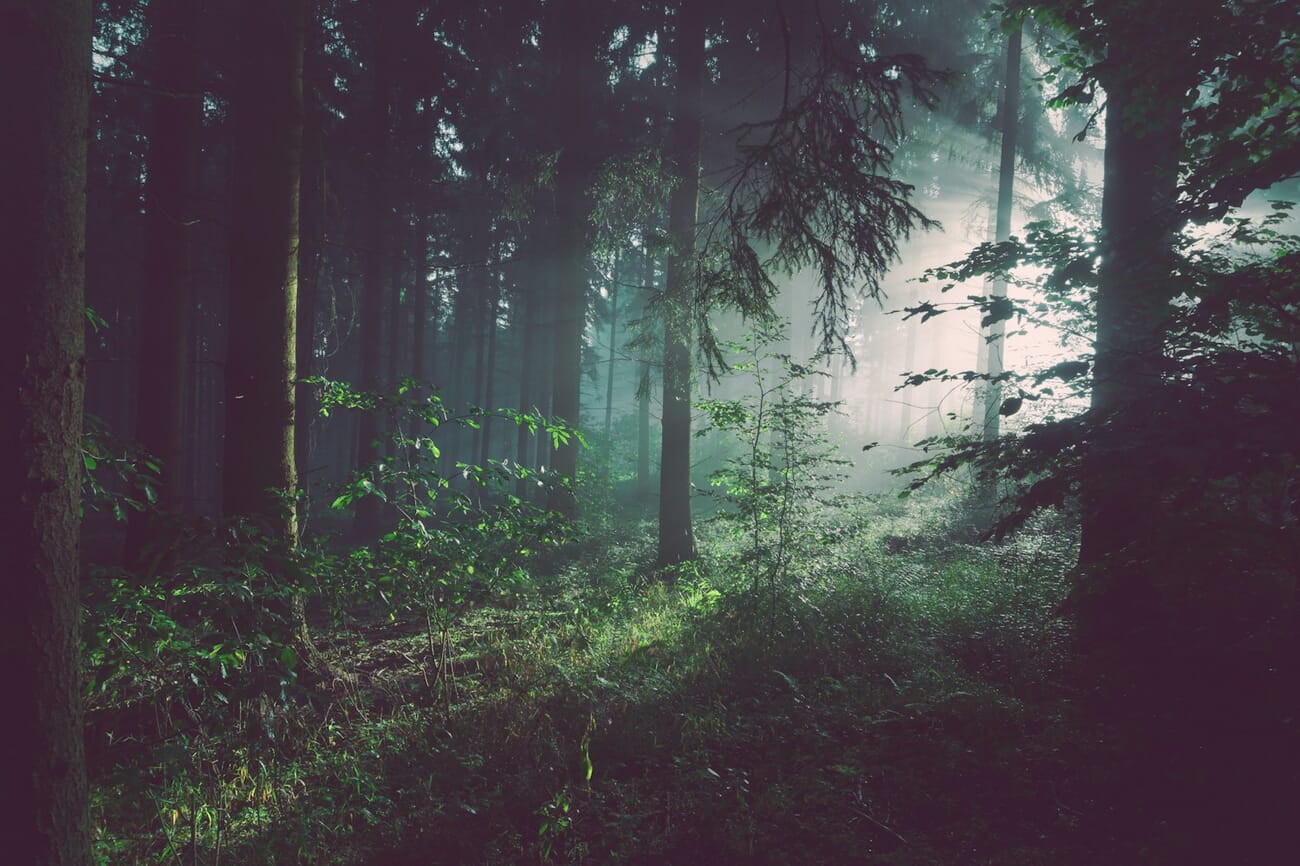
Shooting with the sun behind your subject creates some of photography’s most dramatic images – golden rim light outlining hair, warm backlit glow through translucent elements, and striking silhouettes against vivid skies. It also creates some of photography’s most frustrating exposure challenges.
The camera’s meter sees all that bright light and underexposes the subject, turning faces into dark shadows. But with the right techniques – from simple exposure compensation to fill flash and reflectors – backlit photography becomes one of the most rewarding skills to master.
What Happens When the Sun Is Behind Your Subject
Backlighting occurs when the primary light source is positioned behind your subject, facing toward the camera. This creates a massive difference in brightness between the background (sky, sun) and the foreground (your subject’s face and body).
This brightness difference is called dynamic range, and it’s the core challenge. Your camera sensor can only capture a limited range of tones in a single exposure. When the difference between the brightest highlights and darkest shadows exceeds that range, something has to give – either the sky blows out to white or the subject goes dark.
Modern mirrorless cameras offer significantly better dynamic range than older DSLRs – often 14-15 stops compared to 11-12 stops a decade ago. This means more room to recover shadow detail in post-processing, but the fundamental challenge remains: the camera’s light meter gets confused by all that brightness behind the subject. Understanding how light direction affects exposure is essential for solving this.
Metering and Exposure Compensation
The single most important technique for backlit photography is changing how the camera measures light.
Switch to spot metering. Instead of letting the camera average the entire frame (which includes all that bright sky), spot metering reads light from a small area – typically 2-5% of the frame. Point it at the subject’s face, and the camera exposes for the face, ignoring the bright background.
Use exposure compensation. Even with spot metering, backlit scenes often need +1 to +2 stops of exposure compensation. Dial it in and watch the subject’s face brighten in the EVF preview (mirrorless cameras show this in real time – a huge advantage over DSLRs for backlit work).
Quick method if you’re in a hurry: Stay in evaluative/matrix metering, add +1.5 to +2 EV compensation, and check the back screen. Adjust from there. The camera settings cheat sheet covers metering modes in more detail.
Use this quick backlit photo cheat sheet when the background looks beautiful but your subject turns too dark.

Fill Flash for Backlit Subjects
Fill flash is the professional’s go-to solution for backlighting. A small burst of flash illuminates the subject’s face while the ambient exposure handles the bright background. The result: a properly lit subject with a beautiful backlit glow.
How to set up fill flash:
- Set the camera to manual or aperture priority
- Expose for the background/sky (this will underexpose the subject)
- Turn on the flash and set it to TTL mode
- Dial flash exposure compensation to -0.7 to -1.3 EV (this keeps the flash looking natural rather than overpowering)
- Shoot and adjust as needed
The key is reducing flash power so it fills shadows without creating that obvious “flash photo” look. The background should still be properly exposed with its warm, ambient glow intact.
High-speed sync (HSS): When shooting at wide apertures (f/1.4-f/2.8) in bright backlight, the shutter speed may exceed the camera’s normal flash sync speed (typically 1/200s-1/250s). Enable HSS on the flash to sync at higher shutter speeds, allowing wide-open apertures in bright conditions.
Using Reflectors to Bounce Light
A reflector achieves similar results to fill flash – but without any equipment beyond a reflective surface. Position it in front of and below the subject to bounce sunlight back onto the face.
Best reflector choices for backlighting:
- Silver: Most powerful bounce – works at greater distances and in lower light
- Gold: Adds warmth that complements golden hour backlighting beautifully
- White: Softest, most natural fill – best for close-up portraits
The advantage of reflectors over flash: the fill light matches the color temperature and quality of the existing sunlight perfectly, since it is the existing sunlight. The downside: you need an assistant to hold it, or a stand with a clamp.
Golden Hour Backlighting
The golden hour – the last hour before sunset and first hour after sunrise – is the best time for backlit photography. The sun sits low on the horizon, casting warm, directional light that’s far less intense than midday sun.

Why golden hour backlighting works so well:
- The lower sun intensity means less dynamic range to deal with – easier exposures
- Warm color temperature creates naturally flattering skin tones
- The low angle produces beautiful rim light on hair and shoulders
- The sky retains color and detail even when the subject is properly exposed
Positioning tip: Don’t point the camera directly into the sun. Instead, position the subject so the sun is slightly off to one side (about 135 degrees from the camera). This creates rim light on one side while keeping flare manageable, and gives a slight gradient of light across the subject.
Silhouette Photography
Sometimes the best approach to backlighting is to stop fighting it and embrace the dramatic dark shape. Silhouette photography intentionally underexposes the subject while properly exposing the bright background.
How to create a silhouette:
- Position the subject against a bright background (sunset sky, bright window, backlit wall)
- Meter for the bright background, not the subject
- Choose subjects with recognizable outlines – profiles, outstretched arms, distinctive shapes
- Keep the subject separated from other elements so the outline reads clearly
For a partial silhouette with some rim light detail, add a small amount of exposure compensation (+0.5 to +1 EV). This lets a thin edge of light define the subject’s outline while keeping the front dark.
Lens Flare – Problem or Creative Tool?
When shooting into bright backlight, stray light hits the front element of the lens and creates flare – either as visible streaks/circles or as a hazy wash that reduces contrast. Some photographers love flare; others consider it a flaw.
To reduce flare:
- Use a lens hood – the single most effective tool against flare
- Hide the sun behind the subject (partially or fully) so it doesn’t hit the lens directly
- Use your hand or a card as a flag just above the lens, outside the frame
- Clean the front element – smudges and dust amplify flare dramatically
- Prime lenses (fewer glass elements) generally produce less flare than zooms
To create intentional flare:
- Remove the lens hood and let the sun peek from behind the subject’s edge
- Use a smaller aperture (f/8-f/16) for defined starburst flare patterns
- Shoot through obstacles (trees, fences) that partially block the sun for scattered light streaks
Backlit Nature and Landscape Photography
Backlighting transforms natural subjects. Leaves become translucent and glow with color. Dew drops and spider webs catch the light and sparkle. Fog and mist become visible as light scatters through the particles.
Best natural subjects for backlighting:
- Translucent leaves and flowers – backlight reveals veins, textures, and colors invisible in front light
- Fog and mist – particles scatter backlight into visible rays (god rays)
- Water – rivers, waves, and waterfalls glow when backlit
- Spider webs and dew – individual droplets catch the light and sparkle
- Dandelion seeds and grass – delicate structures become luminous halos
For nature backlighting, use aperture priority with negative exposure compensation (-0.5 to -1 EV) to preserve the luminous quality without blowing out highlights. The night photography guide covers similar low-light natural scene techniques.
Post-Processing Backlit Photos
Post-processing is where backlit photos often come together. RAW files from modern cameras contain enormous shadow detail that’s invisible in the initial capture.
Essential editing steps:
- Lift shadows: Push the Shadows slider to +50 to +80 to reveal face and body detail
- Pull highlights: Bring Highlights to -30 to -60 to recover blown sky detail
- Add contrast back: After lifting shadows, add a touch of contrast or use the tone curve to prevent the image from looking flat
- Warm the white balance: Backlit scenes often benefit from a slight warm shift to enhance the golden glow
- Use AI masking: Lightroom’s “Select Subject” mask lets you brighten the subject independently from the background in one click
HDR and exposure bracketing offer another approach for extreme backlit scenes. Shoot 3-5 exposures at different brightness levels, then merge them in Lightroom or Photoshop. This captures full detail in both the bright sky and shadowed subject. Most modern cameras have a built-in bracketing mode that automates the process.
Smartphone Tips for Backlit Scenes
Modern smartphones handle backlighting surprisingly well thanks to computational photography. Here’s how to get the best results:
- Enable HDR mode – most phones auto-blend multiple exposures for better dynamic range
- Tap to focus on the subject’s face – this tells the phone to expose for the person, not the bright background
- Lock exposure (long press on most phones) after setting it on the face
- Use Portrait Mode for backlit portraits – the computational processing handles mixed lighting well
- Shoot in ProRAW/RAW for maximum shadow recovery in editing apps
Common Backlit Photography Mistakes
- Trusting the meter: Evaluative metering will almost always underexpose the subject in backlit scenes. Always check and compensate.
- Overpowering with flash: Fill flash should be subtle. If the flash output matches or exceeds the ambient light, the backlit effect disappears and the image looks like a standard flash photo.
- Shooting JPEG: JPEG files have limited shadow recovery. Always shoot RAW for backlit work – the difference in post-processing flexibility is dramatic.
- Ignoring the background: A beautiful backlit portrait against a cluttered, bright background still looks messy. Choose clean backgrounds even when backlighting.
- Midday backlighting: The overhead midday sun is extremely harsh for backlighting. Wait for golden hour or find partial shade for more manageable light.
Start Shooting into the Light
Backlit photography goes against the old “keep the sun behind you” rule – and the results are worth it. That golden rim of light around a subject, the glowing atmosphere, the dramatic silhouettes – these are the images that make viewers stop and look.
Start with golden hour (it’s the most forgiving), use spot metering on the subject’s face, and don’t be afraid to overexpose the background a bit. Once you see that first perfectly backlit portrait, you’ll understand why professionals actively seek out the light that beginners avoid.
Frequently Asked Questions
What camera settings should I use for backlit portraits?
Use spot metering on the subject’s face, aperture priority at f/2.0-f/4.0, and add +1 to +2 stops of exposure compensation. Keep ISO low (100-400) and shoot in RAW. If using fill flash, set flash compensation to -0.7 to -1.3 EV for natural-looking fill.
How do I avoid dark faces when shooting into the sun?
Three methods: (1) switch to spot metering and meter off the face, (2) use fill flash at reduced power, or (3) use a reflector to bounce sunlight back onto the face. Any of these techniques will brighten the subject while preserving the backlit atmosphere.
When is the best time for backlit photography?
Golden hour – the first hour after sunrise and last hour before sunset. The low sun is warm, less intense, and creates beautiful rim light on hair and shoulders. The dynamic range is also more manageable, making it easier to expose for both the subject and the background.
Should I use a reflector or fill flash for backlighting?
Both work well. Reflectors produce more natural-looking fill because they bounce the same sunlight, maintaining consistent color temperature. Flash gives you more control and works at greater distances. For casual outdoor portraits, a reflector is simpler. For professional work or when you need precise control, fill flash is more reliable.
Featured image: Photo by Unsplash.


