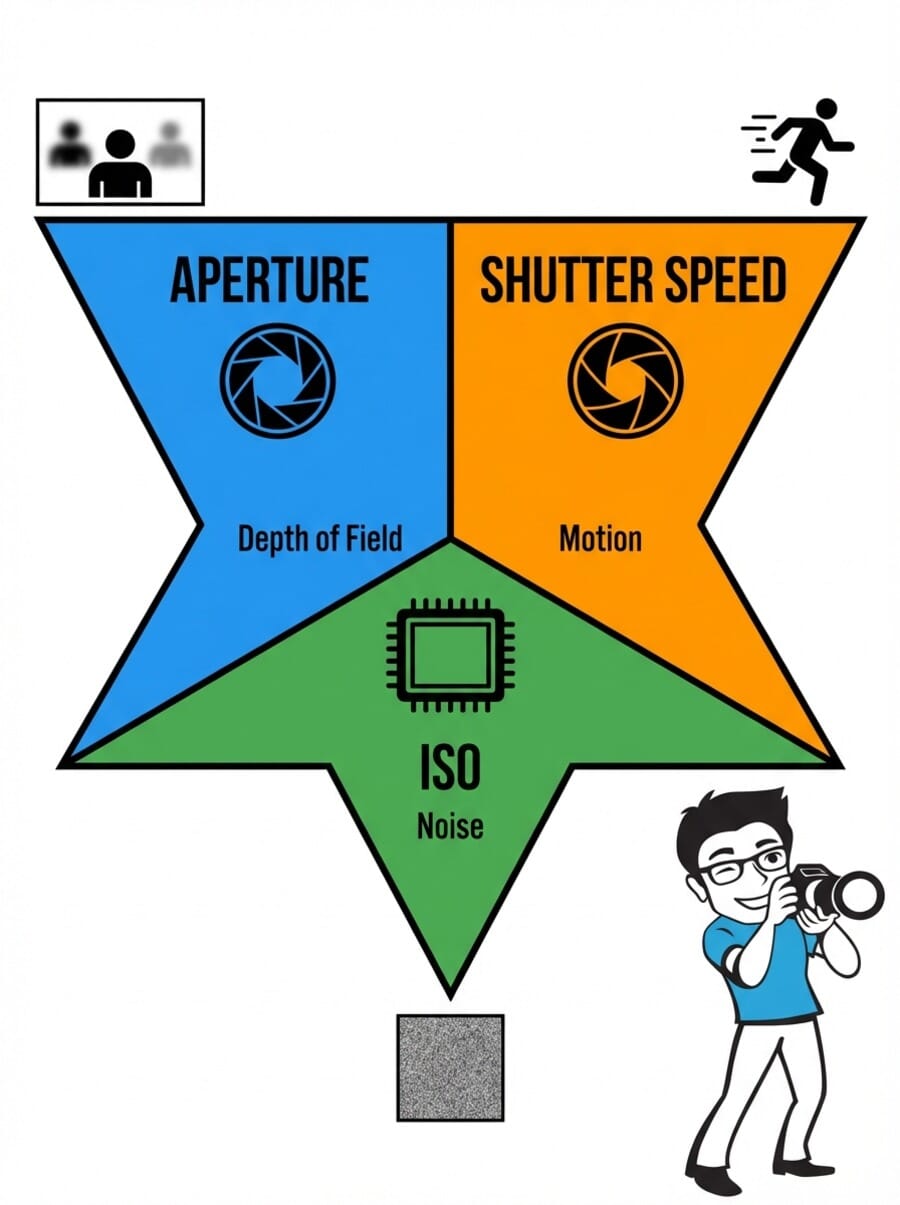
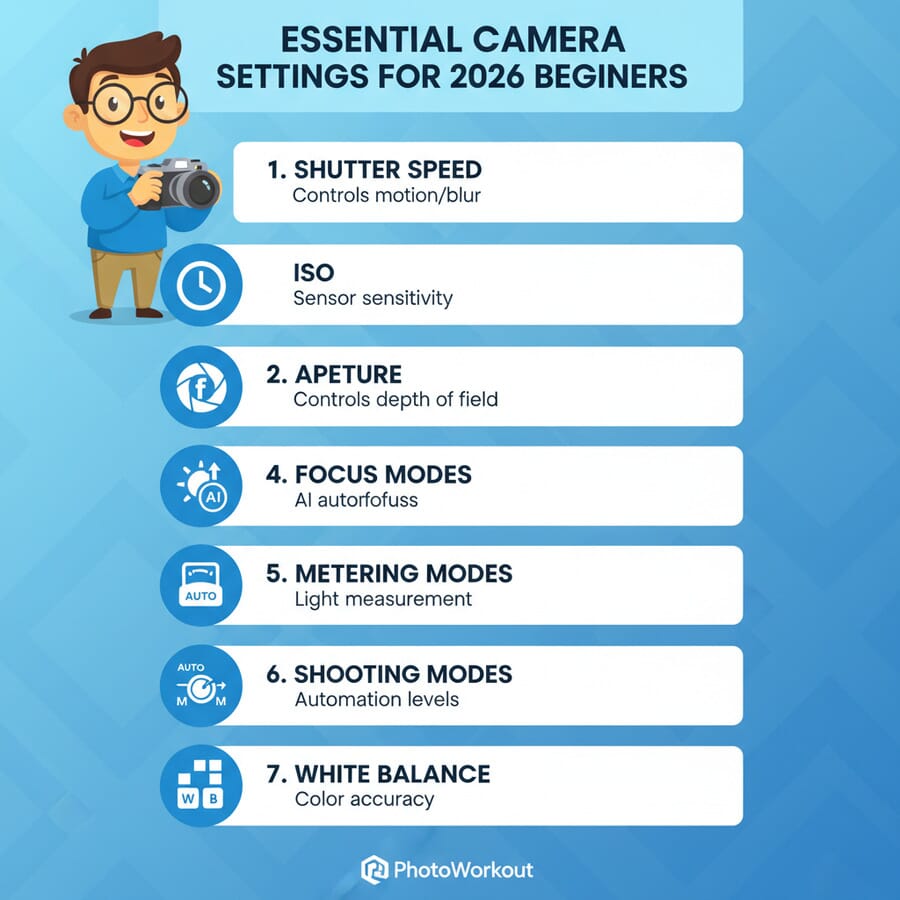
Key Takeaways: Essential Camera Settings Every Beginner Should Master
- Shutter Speed: Controls motion blur and camera shake — faster speeds freeze action, slower speeds create artistic motion
- Aperture: Manages depth of field and light — wider apertures (f/1.4-f/2.8) blur backgrounds, narrower apertures (f/8-f/11) keep everything sharp
- ISO: Adjusts sensor sensitivity — modern cameras handle ISO 1600-6400 excellently, with AI noise reduction improving high-ISO performance
- Focus Modes: Choose the right autofocus system — continuous AF tracks moving subjects, single-point AF provides precision
- Metering Modes: Control how your camera measures light — spot metering for precise exposure, matrix/evaluative for general scenes
- Shooting Modes: Semi-automatic modes give creative control — aperture priority for depth control, shutter priority for motion control
- White Balance: Ensures accurate colors — auto WB works well, but manual settings provide consistency in mixed lighting
Whether you’re holding your first mirrorless camera or upgrading from a smartphone, mastering fundamental camera settings can transform your photography from snapshots to stunning images. Modern cameras—both DSLR and mirrorless—offer incredible computational photography features, but understanding the core manual controls remains essential for creative control.
This comprehensive guide covers seven crucial camera settings that every photographer should understand. While today’s cameras excel at automatic modes, knowing how to adjust these settings manually unlocks your creative potential and ensures you can capture exactly what you envision.
When you buy through links on our site, we may earn a commission at no cost to you. We evaluate products independently. Commissions do not affect our evaluations.
Why Understanding Manual Settings Still Matters
Modern cameras feature sophisticated AI-powered automatic modes, computational photography, and intelligent scene detection. However, automatic modes make assumptions about your creative intent. When you understand manual controls, you can:
- Create specific artistic effects like motion blur or shallow depth of field
- Adapt quickly to challenging lighting conditions
- Maintain consistent exposure across a series of shots
- Override the camera’s decisions when they don’t match your vision
- Work efficiently in rapidly changing conditions
Think of these manual controls as the foundation beneath your camera’s smart features. Even when using AI-assisted modes, understanding aperture, shutter speed, and ISO helps you make better creative decisions.
Setting #1: Shutter Speed — Controlling Time and Motion
Shutter speed determines how long your camera’s sensor is exposed to light. Measured in fractions of a second (1/60s, 1/250s, 1/1000s), this setting dramatically affects how motion appears in your photographs.
Understanding Shutter Speed Effects
Fast Shutter Speeds (1/250s and faster): Freeze motion completely. Use these for sports photography, children playing, wildlife, or any situation where you want to eliminate motion blur. Modern mirrorless cameras can achieve shutter speeds up to 1/32,000s electronically.
Moderate Shutter Speeds (1/60s to 1/250s): Generally safe for handheld photography with image stabilization. Most people can handhold a camera steady at 1/60s with proper technique, though this varies by focal length.
Slow Shutter Speeds (1/30s and slower): Create intentional motion blur for artistic effect. Perfect for flowing water, light trails, or conveying movement. Requires a tripod for sharp backgrounds.
The Handheld Photography Rule (Updated)
The traditional rule states your shutter speed should be faster than your focal length (1/focal length). For example, with a 50mm lens, use at least 1/50s or faster.
However, modern image stabilization has transformed this guideline. With in-body stabilization (IBIS) found in most modern mirrorless cameras, you can often shoot 3-5 stops slower than the traditional rule. Some systems allow handheld shots at 1/4s or even 1/2s with excellent technique.
Updated Guidelines:
- Without stabilization: 1/focal length minimum
- With lens stabilization: 2-3 stops slower
- With in-body stabilization: 3-4 stops slower
- With dual stabilization (lens + body): 4-5 stops slower
Creative Shutter Speed Techniques
Panning: Follow moving subjects with shutter speeds between 1/30s and 1/125s to create dynamic backgrounds while keeping subjects relatively sharp.
Water Photography: 1/500s freezes droplets, 1/4s creates silky smooth waterfalls, and 2-4 seconds produces glass-like lake surfaces.
Light Trails: 10-30 seconds captures car light trails, while 2-4 minutes can record star trails with the right conditions.
Setting #2: Aperture — Creating Depth and Controlling Light
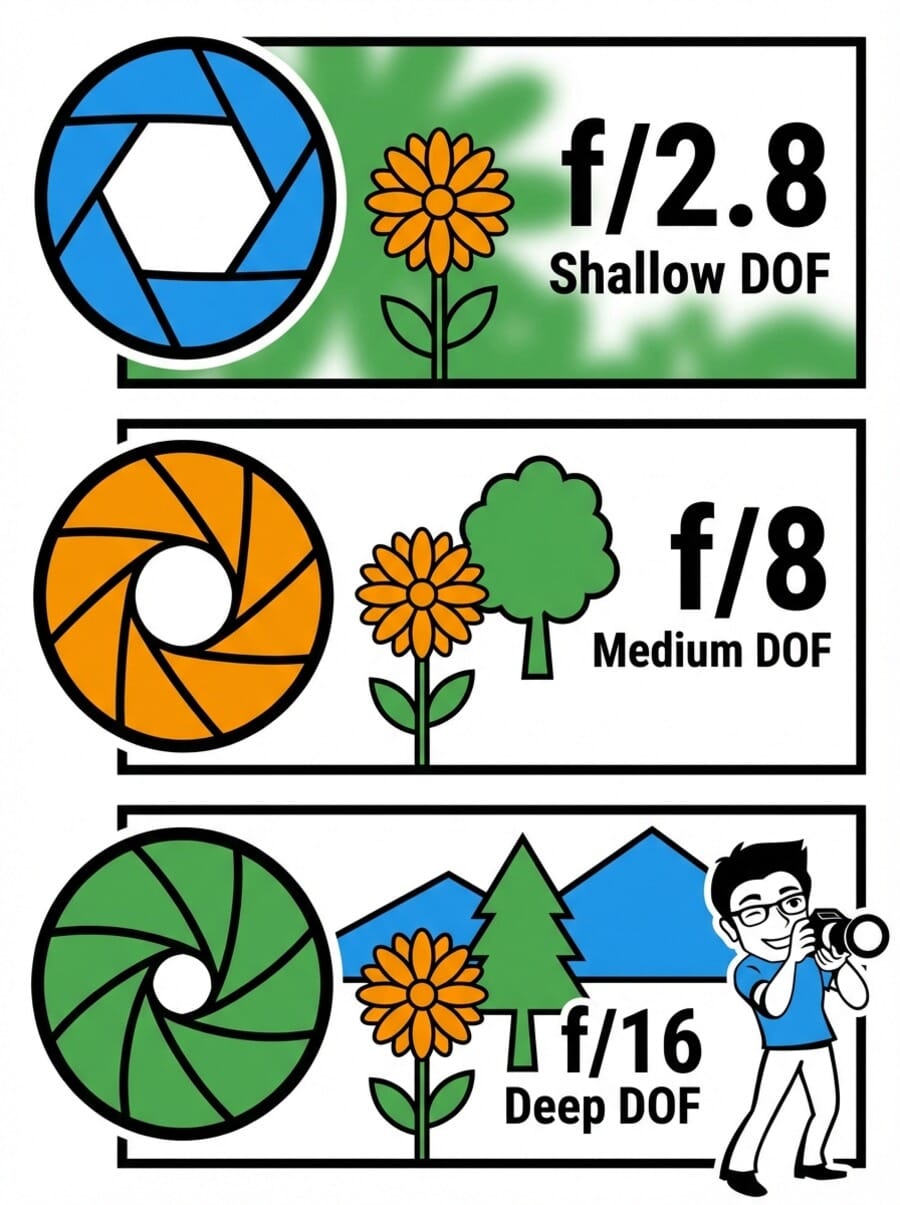
Aperture controls the size of the opening in your lens, affecting both the amount of light entering your camera and the depth of field in your images. Measured in f-stops (f/1.4, f/2.8, f/5.6, f/11), smaller numbers indicate larger openings.
Aperture and Depth of Field
Wide Apertures (f/1.2 to f/2.8): Create shallow depth of field, perfect for portraits where you want to isolate subjects from busy backgrounds. The background blur, called bokeh, can be incredibly smooth on modern lenses.
Moderate Apertures (f/4 to f/8): Balance depth of field with sharpness. f/5.6 to f/8 typically provides optimal lens sharpness while maintaining reasonable depth of field for most subjects.
Narrow Apertures (f/11 to f/22): Maximize depth of field for landscapes or architectural photography where you want everything in focus. Be aware that very narrow apertures (f/16 and smaller) may introduce diffraction, slightly reducing overall sharpness.
Modern Aperture Considerations
Contemporary lenses often perform exceptionally well even at maximum aperture, thanks to advanced optical designs and coatings. Many f/1.4 and f/2.8 lenses now deliver excellent sharpness wide open, eliminating the need to stop down for image quality alone.
Mirrorless Advantage: Electronic viewfinders and LCD screens show depth of field preview in real-time, making it easier to visualize the aperture effect before taking the shot.
Focus Stacking: Modern cameras offer automated focus stacking features, allowing you to combine multiple images at different focus points for maximum depth of field without diffraction penalties.
Finding Your Lens’s Sweet Spot
Most lenses have an aperture “sweet spot” where they perform optimally—typically 1-2 stops down from maximum aperture. For an f/2.8 lens, this might be f/4 or f/5.6. However, don’t let technical perfection override creative vision. Sometimes the “imperfect” wide-open shot with beautiful bokeh is more compelling than the technically optimal image.
Setting #3: ISO — Modern Sensor Sensitivity
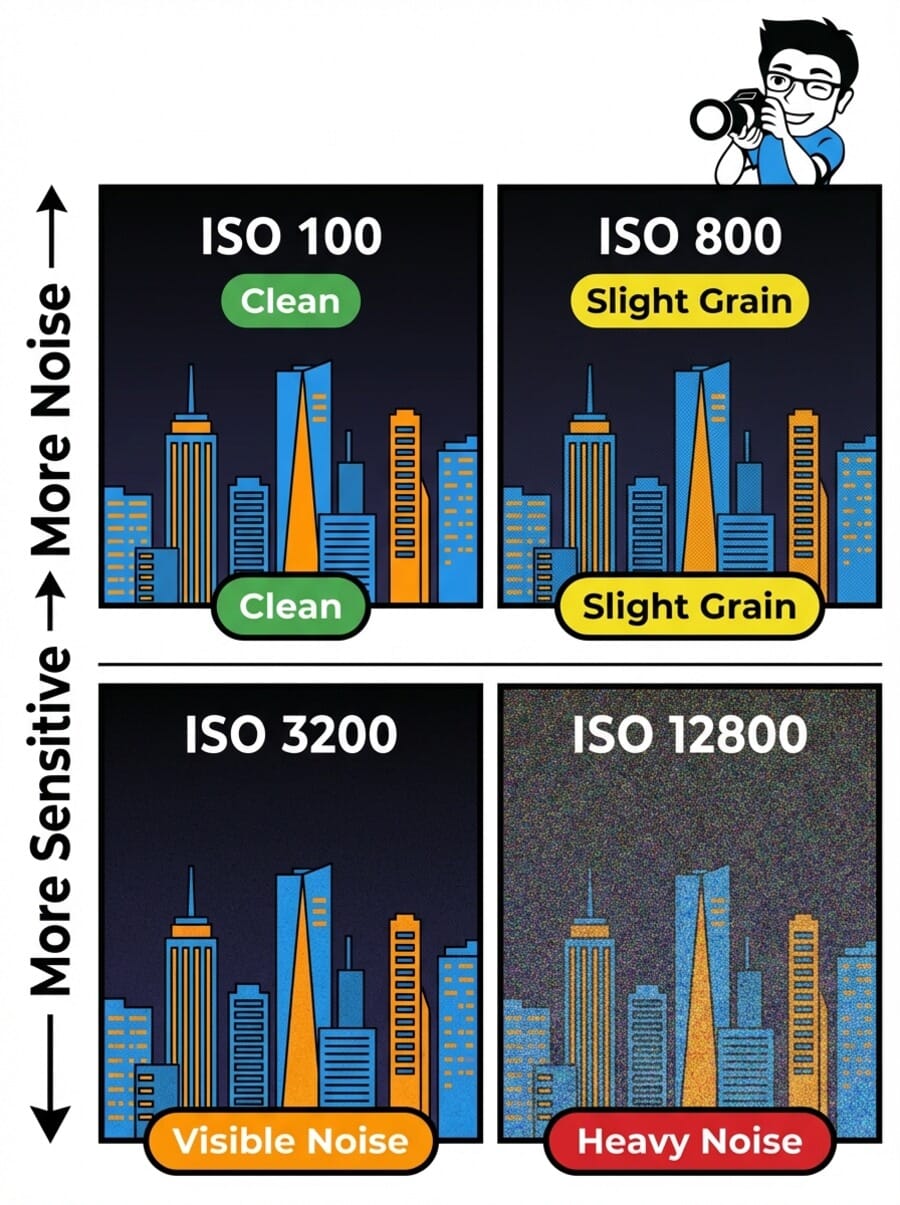
ISO determines your camera sensor’s sensitivity to light. Sensor technology has advanced dramatically, with many cameras delivering excellent image quality at ISO levels that would have been unusable just a few years ago.
ISO Performance Today
Base ISO (typically 100-200): Provides maximum dynamic range and lowest noise. Use whenever lighting conditions allow.
Low ISO (400-800): Excellent quality on all modern cameras. Perfect for overcast days or indoor photography with good lighting.
Moderate ISO (1600-6400): The new “usable range” for most cameras. With AI-powered noise reduction, images at ISO 3200 often look cleaner than ISO 800 did a decade ago.
High ISO (12800-25600): Acceptable for important shots where the alternative is missing the moment. Modern full-frame sensors handle these ISOs surprisingly well.
Extreme ISO (51200+): Emergency use only, but still potentially valuable for once-in-a-lifetime shots or documentary work where the content matters more than technical quality.
AI-Powered Noise Reduction
Many modern cameras feature built-in AI noise reduction that processes images in-camera, delivering cleaner high-ISO results immediately. Additionally, software like Adobe’s Camera Raw, DxO PureRAW, and Topaz DeNoise AI can dramatically improve high-ISO images during post-processing.
This technology means you can confidently use higher ISOs than ever before, prioritizing the shot over perfect technical quality. A sharp image with some noise is always preferable to a blurry image with perfect technical settings.
Auto ISO: The Modern Photographer’s Tool
Auto ISO has evolved significantly and is now a powerful creative tool rather than just a convenience feature. Modern cameras allow you to set:
- Maximum ISO limit based on your quality preferences
- Minimum shutter speed to prevent camera shake
- ISO range for different focal lengths
- Different settings for manual vs automatic exposure modes
This allows you to maintain creative control over aperture and shutter speed while letting the camera handle ISO optimization.
Setting #4: Advanced Focus Modes — Precision in the AI Era
Modern autofocus systems have transformed dramatically, with AI-powered subject detection and tracking capabilities that were unimaginable just a few years ago. Understanding these focus modes helps you choose the right tool for each situation.
Single-Point AF (One Shot/AF-S)
Best for stationary subjects where you want precise focus control. The camera locks focus when you half-press the shutter and won’t take a photo until focus is confirmed. Perfect for portraits, landscapes, and still life photography.
Pro Tip: Many cameras allow you to select the specific focus point manually, giving you complete control over where the camera focuses within the frame.
Continuous AF (AI Servo/AF-C)
Continuously adjusts focus while you hold the shutter button halfway down, tracking moving subjects. Modern versions use predictive algorithms to anticipate where subjects will be when the shutter fires.
Essential for sports, wildlife, children, and any situation where your subject might move. Contemporary systems can track subjects across the entire frame with remarkable accuracy.
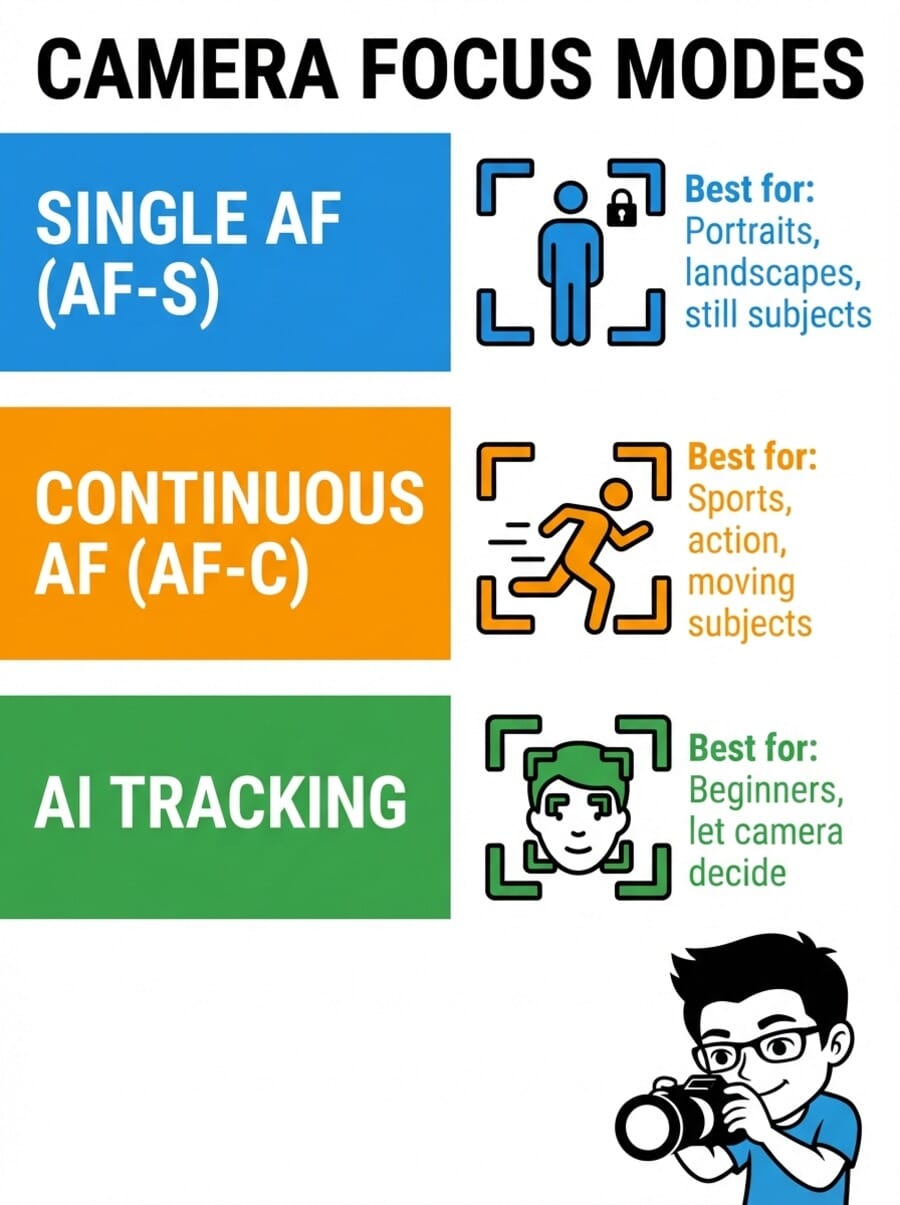
AI Subject Detection and Tracking
Today’s cameras feature sophisticated AI that can recognize and track specific subjects:
- Human Detection: Recognizes faces, eyes, and bodies, prioritizing the closest eye for portraits
- Animal Detection: Tracks pets and wildlife, focusing on eyes or heads as appropriate
- Vehicle Detection: Follows cars, motorcycles, and aircraft
- Object Detection: Some cameras can track custom objects or specific sports equipment
These systems work in both photo and video modes, dramatically improving success rates for moving subjects.
Focus Area Modes
Single Point: Uses one focus point for maximum precision. Best when you know exactly where you want to focus.
Zone/Dynamic Area: Uses a cluster of focus points, helpful when subjects move slightly but stay within a general area.
Wide/All Area: Uses all available focus points, letting the camera choose. Works well with subject detection AI for moving subjects.
Setting #5: Metering Modes — Understanding Light
Metering modes determine how your camera measures light to calculate proper exposure. While modern cameras excel at automatic metering, understanding these modes helps you achieve consistent results in challenging lighting.
Matrix/Evaluative Metering
The default mode on most cameras, matrix metering analyzes the entire frame using sophisticated algorithms. Modern systems consider color, contrast, distance, and even subject recognition to calculate exposure.
Works excellently for general photography and handles most lighting situations automatically. The AI-enhanced versions in modern cameras are remarkably accurate, even in mixed lighting.
Center-Weighted Metering
Emphasizes the center portion of the frame while considering the entire scene. Useful for portraits where your subject is centered, providing more predictable results than matrix metering in some situations.
Spot Metering
Measures light from a very small area (typically 1-3% of the frame). Essential for high-contrast situations like backlit subjects, stage performances, or when you need precise exposure control for a specific part of the scene.
Particularly valuable for photographers who prefer manual exposure control or need to expose for specific tonal values.
Exposure Compensation: Your Fine-Tuning Tool
Even with perfect metering, you may want to adjust exposure for creative effect. Exposure compensation allows you to make the image brighter (+) or darker (-) while staying in semi-automatic modes.
Most photographers use exposure compensation more frequently than fully manual mode, as it provides quick adjustment while maintaining the convenience of automatic exposure.
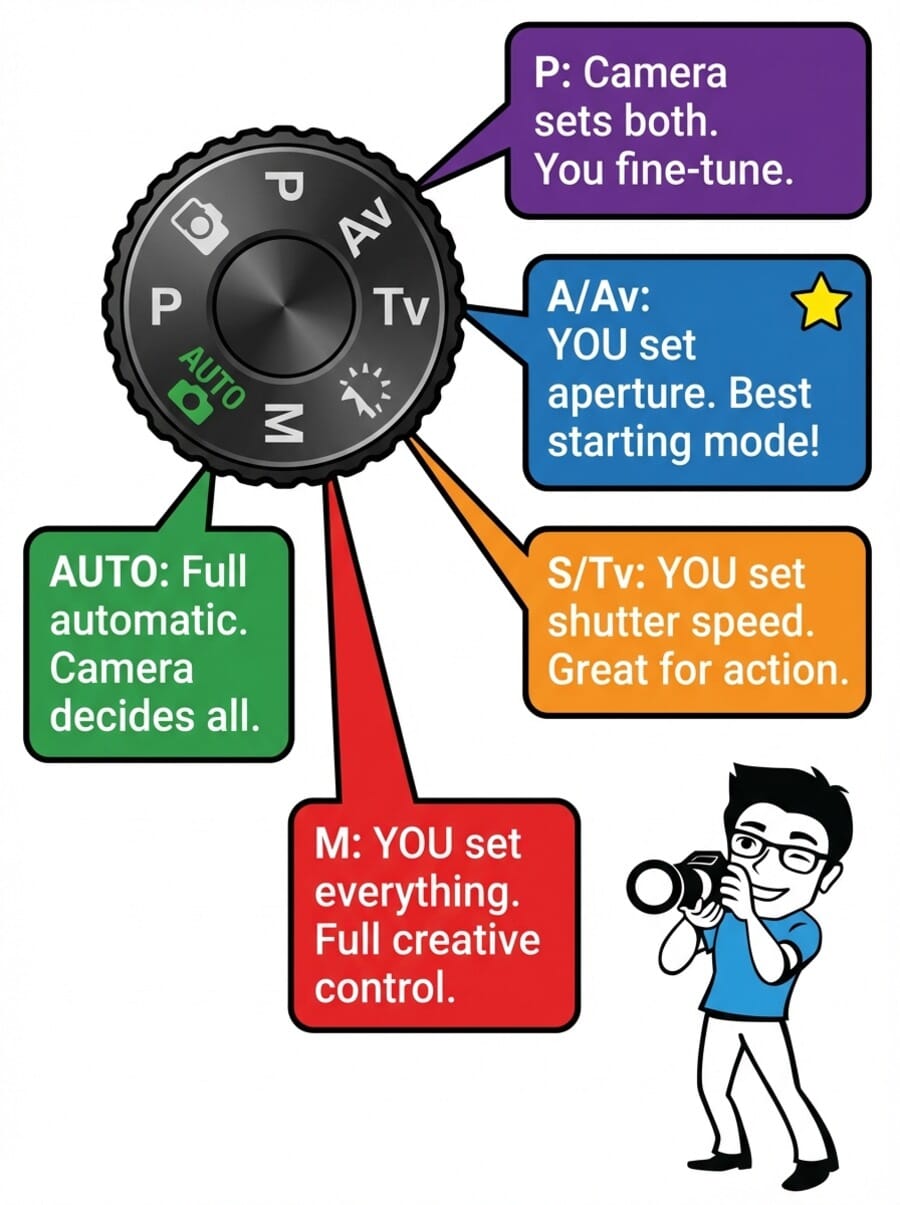
Setting #6: Shooting Modes — Balancing Automation and Control
Shooting modes determine how much control you have over exposure settings. While full manual mode provides complete control, semi-automatic modes often offer the perfect balance of creative control and shooting efficiency.
Aperture Priority Mode (A/Av)
You set the aperture, and the camera selects an appropriate shutter speed. This mode gives you creative control over depth of field while ensuring proper exposure. Perfect for portraits, landscapes, and most general photography.
Most professional photographers use aperture priority as their default mode because depth of field is often more critical to the creative vision than specific shutter speeds.
Learn more about maximizing this mode in our comprehensive Aperture Priority Mode guide.
Shutter Priority Mode (S/Tv)
You set the shutter speed, and the camera selects the aperture. Ideal when motion control is your primary concern—sports photography, action shots, or when using specific shutter speeds for creative effects.
Also valuable when shooting handheld in varying light conditions, ensuring your shutter speed never drops below the threshold for sharp images.
Program Mode (P)
The camera selects both aperture and shutter speed, but you retain control over ISO, focus modes, metering, and exposure compensation. Often underestimated, program mode can be excellent for quick shooting situations or when learning.
Many cameras offer “program shift,” allowing you to change the aperture/shutter speed combination while maintaining the same exposure value. Discover more techniques in our Program Mode in Photography guide.
Manual Mode (M)
Complete control over all exposure settings. Essential for consistent lighting situations, long exposures, flash photography, or when you want to override the camera’s metering completely.
While intimidating to beginners, manual mode becomes intuitive with practice and is invaluable in specific situations where automatic modes struggle.
Setting #7: White Balance — Achieving Accurate Colors
White balance ensures that colors appear natural under different lighting conditions. While automatic white balance has improved dramatically, understanding manual white balance gives you consistent, professional results.
Common White Balance Settings
Auto White Balance (AWB): Modern cameras do an excellent job with AWB, especially in consistent lighting. The AI-enhanced systems in modern cameras can handle mixed lighting situations that would have confused earlier cameras.
Daylight (5500K): Perfect for outdoor photography in direct sunlight. Provides neutral colors and works well for most outdoor activities.
Cloudy (6000K): Adds warmth to compensate for the cooler light under overcast conditions. Also useful for adding slight warmth to portraits.
Tungsten (3200K): Corrects the orange cast from traditional incandescent bulbs. Less commonly needed now with LED lighting becoming standard.
Fluorescent (4000K): Addresses the green tint from fluorescent lighting, though modern LED office lighting often works fine with daylight white balance.
Flash (5400K): Optimized for electronic flash, providing neutral colors with flash photography.
Creative White Balance Applications
White balance isn’t just about technical accuracy—it’s also a creative tool:
- Warmer settings (cloudy, shade) add emotional warmth to portraits and golden hour landscapes
- Cooler settings (tungsten, fluorescent) can enhance blue hour cityscapes or create moody atmospheres
- Custom white balance ensures consistency across a series of images shot in the same conditions
Handling Mixed Lighting
Modern cameras handle mixed lighting situations much better than previous generations, but you still have options for challenging scenarios:
- Use Auto WB and fine-tune in post-processing
- Set custom white balance for the most important light source
- Shoot RAW format for maximum flexibility in post-processing
- Consider using fill flash to match ambient color temperature
Putting It All Together: A Modern Workflow
Understanding these seven settings individually is important, but knowing how they work together creates truly effective photography. Here’s a practical workflow for different shooting situations:
Portrait Photography Workflow
- Mode: Aperture Priority for depth of field control
- Aperture: f/1.4 to f/2.8 for shallow depth of field
- Focus: Single-point AF with eye detection
- Metering: Matrix with exposure compensation as needed
- ISO: Auto ISO with maximum of 1600-3200
- White Balance: Daylight outdoors, custom indoors
Landscape Photography Workflow
- Mode: Aperture Priority or Manual
- Aperture: f/8 to f/11 for optimal sharpness and depth
- Focus: Single-point AF or manual with focus peaking
- Metering: Matrix or spot for high-contrast scenes
- ISO: Base ISO (100-200) when possible
- White Balance: Daylight or custom for consistency
For comprehensive landscape techniques, check our 5 Landscape Photography Settings Every Photographer Should Know guide.
Action/Sports Photography Workflow
- Mode: Shutter Priority or Manual
- Shutter Speed: 1/500s or faster to freeze action
- Focus: Continuous AF with subject tracking
- Metering: Matrix with exposure compensation
- ISO: Auto ISO up to 6400 or higher as needed
- White Balance: Match venue lighting conditions
Low Light Photography Workflow
- Mode: Manual or Aperture Priority
- Aperture: Widest available (f/1.4-f/2.8)
- Focus: Single-point AF with AF assist beam if available
- Metering: Spot or center-weighted for precision
- ISO: High as needed, relying on modern sensor performance
- Stabilization: Enable all available stabilization systems
Dive deeper into challenging lighting with our comprehensive Low Light Photography: The Ultimate Guide.
Common Beginner Mistakes to Avoid
Over-Relying on Automatic Modes
While modern automatic modes are sophisticated, they can’t read your creative intent. Practice with semi-automatic modes (aperture/shutter priority) to develop your understanding while maintaining shooting efficiency.
Fear of Higher ISOs
Many beginners avoid ISOs above 800, missing sharp shots due to camera shake. Modern cameras handle ISO 1600-6400 excellently. A sharp image with slight grain is always preferable to a blurry image with perfect technical quality.
Ignoring Focus Modes
Using single-point autofocus for moving subjects or continuous autofocus for stationary subjects can result in missed focus. Match your focus mode to your subject’s behavior.
Not Understanding Aperture Priority’s Limitations
In very low light, aperture priority might select impossibly slow shutter speeds. Monitor your shutter speed and use exposure compensation or manual mode when necessary.
Practice Exercises for Mastering Camera Settings
Exercise 1: Aperture Exploration
Photograph the same subject at every aperture your lens offers (f/1.4, f/2, f/2.8, f/4, f/5.6, f/8, f/11, f/16). Notice how depth of field changes and identify your lens’s sharpest aperture settings.
Exercise 2: Shutter Speed Creativity
Find a moving subject (flowing water, traffic, people walking) and photograph it at various shutter speeds: 1/1000s, 1/250s, 1/60s, 1/15s, 1/4s, 2s. Compare how motion is rendered at each speed.
Exercise 3: ISO Comfort Zone
Shoot the same scene at ISOs from 100 to your camera’s maximum. Review images at 100% magnification to determine your personal quality threshold for different uses (social media, prints, professional work).
Exercise 4: Focus Mode Mastery
Practice with your camera’s AI subject detection by photographing people, pets, and moving objects. Test how well the tracking performs and when you need to intervene manually.
Advanced Techniques
Computational Photography Integration
Modern cameras often combine multiple exposures automatically to extend dynamic range or reduce noise. Understanding how these systems work helps you decide when to rely on them versus using traditional techniques.
High Dynamic Range (HDR): Many cameras can capture and process HDR images automatically, combining multiple exposures for scenes with extreme contrast.
AI Noise Reduction: In-camera processing can clean up high-ISO images automatically, but you might prefer to disable it for maximum control in post-processing.
Focus Stacking: Automated focus stacking lets you achieve extreme depth of field without diffraction penalties by combining multiple images at different focus distances.
Custom Functions for Modern Cameras
Take advantage of your camera’s customization options:
- Custom Modes: Save complete camera settings for different scenarios (portraits, landscapes, sports) and recall them instantly
- Function Buttons: Program frequently-used settings to physical buttons for quick access
- My Menu: Create personalized menu pages with your most-used settings
- Auto ISO Curves: Set different ISO behaviors for different focal lengths or shooting modes
Troubleshooting Common Camera Setting Issues
Blurry Images Despite Fast Shutter Speed
- Check if image stabilization is causing issues (disable for tripod use)
- Verify focus accuracy—fast shutter won’t help if focus is wrong
- Consider subject motion blur vs camera shake
- Check for lens calibration issues with DSLR cameras
Inconsistent Exposure in Auto Modes
- Switch from matrix to center-weighted or spot metering
- Use exposure lock (AE-L) for consistent lighting
- Apply exposure compensation for challenging scenes
- Consider manual mode for studio or controlled lighting
Autofocus Hunting in Low Light
- Enable AF assist beam if available
- Use single-point AF rather than area modes
- Focus on high-contrast edges when possible
- Consider manual focus with focus peaking or magnification
Essential Camera Settings: Frequently Asked Questions
What camera mode should beginners use most often?
Aperture Priority (A/Av) mode offers the best balance of creative control and shooting efficiency for beginners. It allows you to control depth of field while the camera handles shutter speed selection. This mode teaches you to think about the creative impact of aperture while building confidence with camera operation.
Start with aperture priority and gradually experiment with shutter priority and manual mode as you become more comfortable with exposure concepts.
How high can I push ISO on modern cameras?
Most current cameras produce excellent results up to ISO 3200-6400, with many full-frame models delivering acceptable quality at ISO 12800 or higher. The key is understanding your tolerance for noise versus the importance of getting the shot.
Modern AI-powered noise reduction, both in-camera and in post-processing software, has dramatically improved high-ISO performance. Test your specific camera model to determine your personal quality thresholds for different output purposes.
When should I use manual focus instead of autofocus?
Manual focus is valuable in several situations: macro photography where precise focus control is critical, low-light conditions where autofocus struggles, through glass or other barriers that confuse autofocus, and creative situations like focus pulling in video or intentional focus effects.
Modern cameras make manual focusing easier with features like focus peaking (highlighting in-focus areas), magnification, and electronic viewfinder aids. Don’t be afraid to use manual focus when it serves your creative vision better than autofocus.
Are camera settings different between DSLR and mirrorless cameras?
The fundamental settings (aperture, shutter speed, ISO, focus modes) work identically between DSLR and mirrorless cameras. However, mirrorless cameras often offer additional features like real-time exposure preview, silent shooting modes, and more advanced AI autofocus systems.
Mirrorless cameras also typically provide better manual focus aids through electronic viewfinders, making precise manual focusing easier than with DSLR optical viewfinders.
Should I shoot RAW or JPEG as a beginner?
Shoot RAW whenever possible, especially while learning. RAW files preserve all sensor data and allow extensive corrections for exposure, white balance, and color adjustments that aren’t possible with JPEG files.
Many cameras offer RAW+JPEG modes, giving you the convenience of immediately shareable JPEG files plus the flexibility of RAW files for learning and improvement. As your skills develop, you’ll appreciate having the RAW data available for advanced processing.
How important is image stabilization for camera settings?
Image stabilization dramatically expands your handheld shooting capabilities, allowing you to use slower shutter speeds and lower ISOs in marginal lighting. In-body stabilization (IBIS) works with any lens, while lens-based stabilization can be more effective for specific focal lengths.
With modern stabilization systems providing 4-6 stops of shake reduction, you can often handhold shots that would have required a tripod just a few years ago. However, remember to disable stabilization when using a tripod, as it can sometimes introduce minor vibrations with static camera positions.
Conclusion: Building Your Photography Foundation
Mastering these seven essential camera settings—shutter speed, aperture, ISO, focus modes, metering, shooting modes, and white balance—provides the foundation for creative photography today and beyond. While modern cameras offer incredible automated capabilities, understanding manual controls empowers you to capture your exact creative vision.
Remember that technical perfection should never override creative expression. These settings are tools to help you realize your artistic vision, not restrictions to limit your creativity. The best camera settings are the ones that help you capture the story you want to tell.
Start with one setting at a time, practice regularly, and don’t be afraid to experiment. Every professional photographer started as a beginner, and mastering these fundamentals is your first step toward creating images that truly represent your unique perspective.
As you continue your photography journey, remember that these technical foundations support your creative growth. The more intuitive these settings become, the more mental energy you can dedicate to composition, storytelling, and the artistic aspects that make photography so rewarding.
Keep practicing, stay curious, and most importantly, have fun exploring the creative possibilities that understanding your camera settings unlocks.