
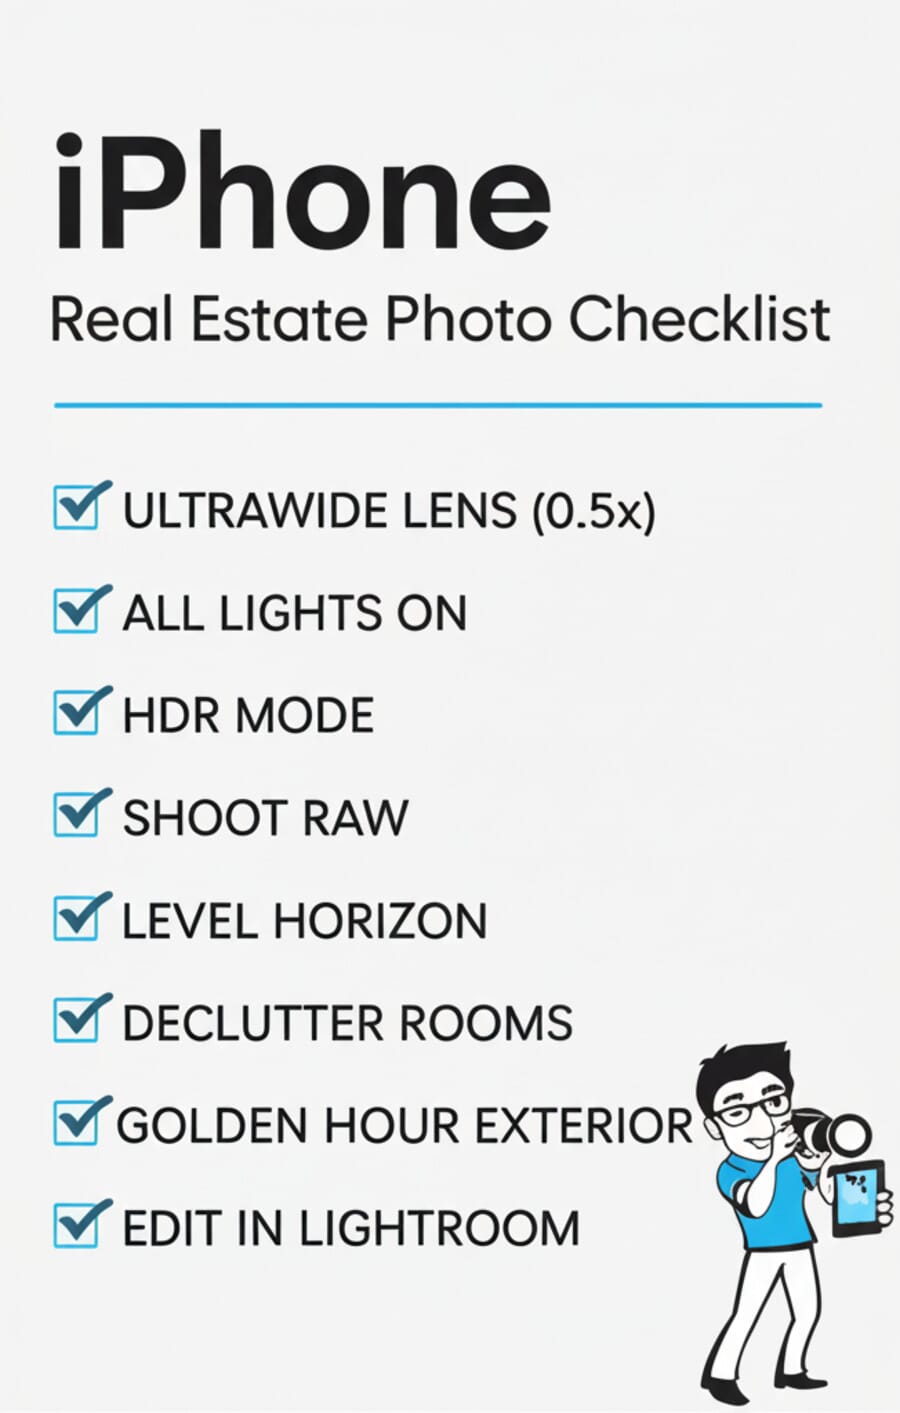
- Use the 0.5x ultrawide lens on iPhone 17 Pro, 16 Pro, and 15 Pro — it captures more of each room and makes spaces look larger. Jump to section.
- Shoot in Apple ProRAW (48MP) for maximum editing flexibility, especially when balancing bright windows with dark interiors. Jump to section.
- Turn on every light and open all curtains before shooting — proper staging and lighting make the biggest difference. Jump to section.
- Edit with Lightroom Mobile for exposure and color correction, and use TouchRetouch to remove clutter from shots. Jump to section.
- Shoot exteriors during golden hour (the hour before sunset) for warm, inviting curb appeal photos. Jump to section.
Your iPhone is now a legitimate real estate photography tool. The latest models — iPhone 17 Pro, 17 Pro Max, 16 Pro, and 15 Pro — pack a 48MP sensor, ProRAW capture, and an ultrawide lens that rivals dedicated wide-angle cameras for interior shots.
Professional real estate photographers still exist for a reason, but if you’re an agent listing a property, a homeowner selling FSBO, or a landlord photographing a rental, these techniques will help you capture photos that actually sell.
Here’s everything you need to know about shooting real estate photos with your iPhone — from camera settings to staging, editing, and getting your images listing-ready.
Use the Ultrawide Lens (0.5x) for Every Interior Shot
The single most important real estate photography tip for iPhone: switch to the 0.5x ultrawide lens. Tap “0.5” in the Camera app to activate it.
The ultrawide lens on iPhone 17 Pro, 16 Pro, and 15 Pro has a 13mm equivalent focal length — wider than most dedicated real estate camera lenses. This captures entire rooms in a single frame, making spaces appear larger and more open.
- Living rooms and bedrooms: Stand in a corner or doorway and shoot diagonally across the room
- Kitchens: Capture the full counter-to-cabinet sweep
- Bathrooms: The ultrawide is essential here — small spaces look twice as big
- Hallways and entryways: Show depth and flow between rooms
One caveat: ultrawide lenses create barrel distortion at the edges. Keep the iPhone level (use the built-in grid and level tool) to minimize warping. Most real estate photo editing software can also correct lens distortion automatically.
Shoot in ProRAW and HDR for Maximum Detail
Apple ProRAW captures 48MP images with full sensor data — no compression, no baked-in processing. For real estate photography, this matters because you’re constantly dealing with extreme lighting: bright windows next to dark corners.
To enable ProRAW: go to Settings → Camera → Formats → Apple ProRAW. Then toggle “RAW” in the Camera app before shooting. Files are larger (25-75MB each), but the editing flexibility is worth it.
HDR and Exposure Bracketing
The iPhone’s built-in HDR (Smart HDR / Deep Fusion) does a decent job blending exposures automatically. For most rooms, leave it on. But for challenging situations — a room with floor-to-ceiling windows on a sunny day — you may need more control.
Third-party apps like Halide and ProCamera offer manual HDR bracketing: they capture 3-5 exposures and merge them, giving you much better window/interior balance than the native Camera app. This is the same technique professional real estate photographers use with DSLR cameras.
If you want to dive deeper into smartphone exposure control, we have a dedicated guide covering manual settings and bracketing techniques.
Best Camera Apps for Real Estate Photography
The native Camera app works for quick shoots, but dedicated apps give you the manual controls that real estate photography demands.
- Halide Mark II — Best overall for ProRAW shooting with manual focus, exposure lock, and a clean interface. The “Process Zero” feature gives you unprocessed RAW files
- ProCamera — Excellent HDR bracketing mode specifically designed for high-contrast scenes like interiors with windows
- RoomScan LiDAR — Uses the iPhone’s LiDAR scanner (Pro models) to create floor plans alongside your photos
- VSCO — Good for quick edits with real estate-friendly presets that brighten and clean up interior shots
For a deeper comparison, check out our guide to the best manual camera apps for iPhone and Android.
Staging and Lighting: The Biggest Difference Maker
Camera settings only get you so far. The real secret to great real estate photos is what happens before you pull out the iPhone.
Lighting Checklist
- Turn on every single light — lamps, overhead fixtures, under-cabinet lighting, even closet lights. Layered lighting makes rooms feel warm and spacious
- Open all curtains and blinds — natural light streaming in is your best friend for interiors
- Turn off ceiling fans — they create motion blur and distracting shadows
- Replace burned-out bulbs — a dark fixture sticks out in photos
- Match color temperatures — ideally use all daylight-balanced bulbs (5000K-5500K) to avoid mixed warm/cool tones
Quick Staging Tips
- Declutter aggressively — remove personal items, fridge magnets, countertop appliances, and anything that shrinks the visual space
- Make every bed — wrinkled sheets photograph terribly
- Close all toilet lids — this is the most common mistake in amateur real estate photography
- Add fresh flowers or a fruit bowl — small touches add life to kitchen and dining shots
- Straighten towels, pillows, and rugs — symmetry reads as “clean” in photos
Composition Techniques That Sell Properties
Good composition in photography is what separates a listing that gets clicks from one that gets scrolled past.
The Two-Wall Rule
Always try to include two walls in your interior shots. Shooting straight at a single wall makes rooms look flat and small. Angling your shot to capture two walls creates depth and gives viewers a sense of the room’s actual dimensions.
Shoot From Corners and Doorways
Position yourself in a corner or just inside a doorway. This maximizes the visible floor area and captures the most room in a single shot. Hold the iPhone at about chest height (roughly 4 feet) — this is the standard for real estate photography. Too high or too low creates an unnatural perspective.
Keep It Level
Tilted horizons are the #1 giveaway of amateur real estate photos. Enable the grid overlay in Settings → Camera, and use the built-in level indicator (the crosshair that appears when you tilt the phone). Consider using a tripod for consistently level shots — even a small tabletop tripod works.
The rule of thirds applies here too: place key architectural features (fireplaces, windows, kitchen islands) at the intersections of your grid lines for more balanced compositions.
Exterior and Curb Appeal Photography
Exterior photos are usually the first image in a listing — they need to stop the scroll.
- Golden hour is non-negotiable — shoot the front of the house during the hour before sunset. The warm, low-angle light makes any property look inviting
- Blue hour (twilight) — if the home has great interior lighting, shoot at dusk with the lights on inside. This “twilight shot” is the gold standard for luxury listings
- Mow the lawn first — fresh-cut grass photographs dramatically better than overgrown yards
- Move cars out of the driveway — they clutter the composition and date the photo
- Shoot slightly below eye level — this makes the house appear more imposing and established
Using Night Mode for Dark Interiors
Not every room has great natural light. Basements, interior bathrooms, and rooms with small windows can look cave-like in photos.
iPhone’s Night Mode activates automatically in low light and uses multi-frame computational photography to brighten the scene without flash. For real estate, this means:
- Basements look bright and usable instead of dungeon-like
- Interior bathrooms show tile and fixture details
- Garages and utility rooms become presentable
Use a tripod when Night Mode extends to 3+ seconds — even micro-movements create blur at those exposure times. The iPhone’s Photographic Styles can also help: the “Luminous” style brightens shadows while keeping highlights in check, which is ideal for interiors.
Editing Your Real Estate Photos
Even the best-shot real estate photos need post-processing. Here are the essential editing apps and what to use them for.
Adobe Lightroom Mobile
Lightroom Mobile is the industry standard for real estate photo editing. Key adjustments for listings:
- Exposure +0.5 to +1.0 — brighten the overall image (buyers prefer bright photos)
- Shadows +40 to +60 — open up dark corners without blowing highlights
- Highlights -20 to -40 — recover detail in bright windows
- White balance → Daylight or Auto — remove color casts from indoor lighting
- Lens corrections → Enable — fixes ultrawide distortion automatically
- Upright → Auto — straightens vertical and horizontal lines
Save your settings as a preset and apply to every photo in a shoot for consistent results. Lightroom is available as a free app with limited features, or as part of the Adobe Photography Plan.
Snapseed and TouchRetouch
Snapseed (free, by Google) is excellent for quick one-off edits: the “Selective” tool lets you brighten or darken specific areas of the photo, and the “Perspective” tool fixes converging verticals.
TouchRetouch ($2.99) is a must-have for real estate. It removes unwanted objects with a tap: power outlets, wall blemishes, trash cans visible through windows, even light switches. This “clean up” step is what separates amateur listings from professional-looking ones.
Virtual Staging and AI Tools
Empty rooms are hard to sell. Virtual staging apps digitally furnish vacant spaces, and the AI-powered tools available now produce remarkably realistic results.
- Virtual Staging AI — upload a photo of an empty room and get a furnished version in seconds. Multiple style options (modern, farmhouse, Scandinavian)
- Apply Design AI — similar concept with more customization, including the ability to change wall colors and flooring
- BoxBrownie — a hybrid service (AI + human editors) that delivers polished virtual staging for about $24 per image
Always disclose virtual staging in your listing. Most MLS platforms and all NAR guidelines require it. A simple “Virtually staged” caption on the image is enough.
For more on AI-powered editing, see our roundup of AI photo editing tools.
The Complete iPhone Real Estate Shooting Workflow
Here’s the step-by-step process for a typical property shoot:
- Scout the property — walk through every room and identify the best angles. Note which rooms get the best natural light and at what time of day
- Stage and prep — declutter, turn on all lights, open curtains, make beds, close toilet lids
- Set up your iPhone — switch to 0.5x ultrawide, enable ProRAW, turn on grid and level
- Shoot room by room — 3-5 angles per room. Stand in corners and doorways. Keep the phone level at chest height
- Capture the hero shots — kitchen, primary bedroom, living room, and any standout features (pool, view, fireplace) get extra attention
- Shoot exteriors last — time it for golden hour or blue hour if possible
- Edit in batch — import everything to Lightroom Mobile, apply your real estate preset, then fine-tune each shot
- Clean up with TouchRetouch — remove any remaining visual distractions
- Export and upload — resize to 3000px on the longest side for MLS, full resolution for Zillow and social media
Aerial and Drone Photography
Aerial shots showcase the property’s lot, neighborhood, and proximity to amenities. While you can’t fly an iPhone itself, pairing it with a drone like the DJI Mini 4 Pro or DJI Air 3 gives you professional aerial capabilities.
- Fly at 50-100 feet for the classic overhead property shot
- Capture the lot boundaries, backyard, and surrounding area
- Use the drone’s built-in panorama mode for wide neighborhood context
- FAA Part 107 certification is required for commercial drone photography in the US
Even a single aerial shot can dramatically improve a listing’s appeal. Many listing agents now consider it standard for properties with outdoor features.
Using Your Photos in Listings
Great photos are worthless if they’re not presented correctly. Here’s how to use your iPhone real estate photos across different platforms.
MLS Listings
- Most MLS platforms accept JPEG files and have upload limits (typically 25-50 photos)
- Lead with the best exterior shot, then kitchen, primary bedroom, living areas
- Order matters — the first 5 photos get the most views
- Resize to 3000px on the longest side for optimal display without excessive file size
Zillow, Realtor.com, and Social Media
- Zillow — supports high-resolution uploads. Use the highest quality available
- Instagram — square crops for feed posts, vertical 4:5 for maximum screen real estate. Reels of property walkthroughs outperform static posts
- Facebook Marketplace — still a major source of real estate leads. Bright, well-lit first photos get more clicks
Agents using dedicated cameras for real estate will still have an edge in image quality, but iPhone photos shot with proper technique are absolutely sufficient for most listings.
iPhone Model Comparison for Real Estate
Not all iPhones are equal for real estate photography. Here’s what matters:
- iPhone 17 Pro / Pro Max — 48MP main + 48MP ultrawide (with Hybrid Focus Pixels) + ProRAW + LiDAR + Smart HDR 5. The best option. The A19 Pro chip and improved computational photography deliver the sharpest interior shots yet
- iPhone 16 Pro / Pro Max — 48MP main + 48MP ultrawide + ProRAW + LiDAR. Still excellent — nearly identical image quality to the 17 Pro
- iPhone 15 Pro / Pro Max — 48MP main + 12MP ultrawide + ProRAW. Still very capable. The ultrawide is slightly less detailed than the 16/17 Pro but perfectly usable
- iPhone 14 Pro / 13 Pro — 48MP/12MP main + ultrawide. ProRAW available. Good but the smaller sensor struggles more in low light
- iPhone 12-14 (non-Pro) — 12MP with ultrawide. No ProRAW. Still usable with good lighting, but you’ll need to rely more on HDR apps
- iPhone 11 and older — Limited ultrawide (or none). Consider upgrading if real estate photography is part of your business
Want to improve your iPhone photography skills further? Check out the iPhone Photography School for structured courses on getting the most from your iPhone camera, or browse our list of the best iPhone photography courses.
Can iPhone photos be used for MLS listings?
Yes. Most MLS platforms accept JPEG files from any camera, including iPhones. The key is proper lighting, staging, and editing. iPhone 17 Pro, 16 Pro, and 15 Pro produce images with enough resolution (48MP) for any listing platform.
Which iPhone lens is best for real estate photography?
The 0.5x ultrawide lens (13mm equivalent) is the go-to lens for interior real estate shots. It captures the most room in a single frame and makes spaces appear larger. Use the 1x main lens for detail shots and exterior close-ups.
Do I need a tripod for iPhone real estate photography?
A tripod is highly recommended, especially for low-light rooms and Night Mode shots. It ensures perfectly level horizons and eliminates camera shake. Even a small smartphone tripod mount works well for real estate shooting.
Should I shoot in portrait or landscape orientation for real estate?
Landscape (horizontal) orientation for the vast majority of real estate photos. MLS platforms, Zillow, and Realtor.com all display landscape images best. Use portrait orientation only for tall features like staircases or two-story foyers.
Is virtual staging with AI legal for real estate listings?
Virtual staging is legal in most jurisdictions, but you must disclose it. NAR guidelines and most MLS rules require that virtually staged photos are clearly labeled. A simple caption like ‘Virtually staged’ is sufficient.
Featured image: Photo by Point3D Commercial Imaging Ltd. on Unsplash.
