Key Takeaways
- Program Mode (P) automatically sets both aperture and shutter speed for correct exposure, while still giving photographers control over ISO, white balance, exposure compensation, and flash. [Jump to section]
- Program Shift is Program Mode’s most powerful feature — it lets photographers rotate through different aperture/shutter combinations without changing the overall exposure. [Jump to section]
- Best for fast-moving situations like street photography, travel, and events where there’s no time to fiddle with settings. [Jump to section]
- Not ideal when creative control matters — studio work, long exposures, and deliberate depth-of-field effects call for Aperture Priority, Shutter Priority, or Manual Mode. [Jump to section]
What Is Program Mode?
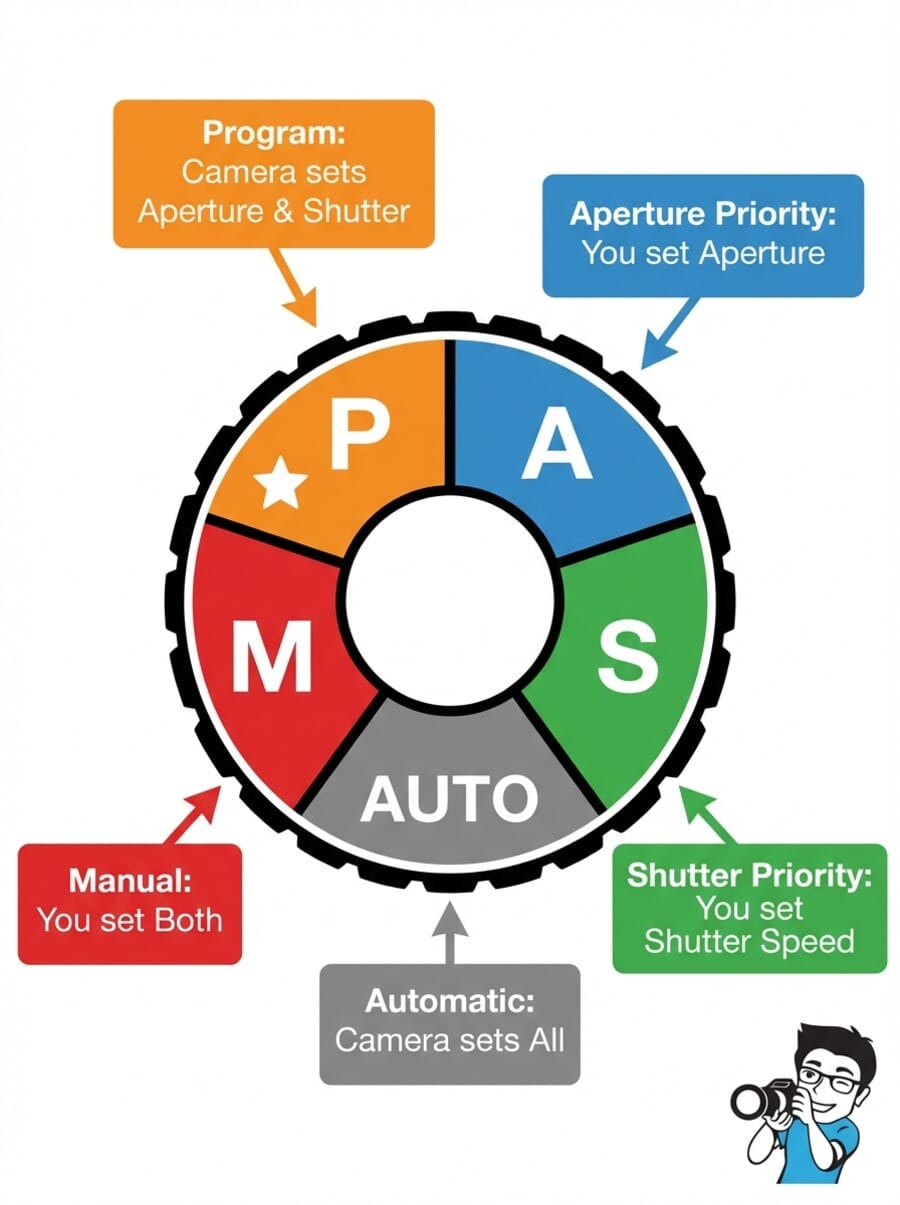
Program Mode is the “P” on a camera’s mode dial, sitting between the fully automatic modes and the more manual options like Aperture Priority (A/Av) and Manual (M).
When set to Program Mode, the camera takes over the two most critical exposure variables — aperture and shutter speed — while leaving everything else in the photographer’s hands. That means control over ISO, white balance, metering mode, autofocus settings, exposure compensation, and flash remains fully accessible.
This makes Program Mode fundamentally different from Auto mode. In Auto, the camera controls everything — including whether the flash fires, what ISO to use, and sometimes even the focus mode. Program Mode only automates the aperture-shutter combination, trusting the photographer to handle the rest.
Think of it this way: Auto mode treats the photographer like a passenger. Program Mode puts them in the driver’s seat with cruise control — the camera handles speed, but the photographer still steers.
For anyone who has been shooting in Auto and wants to start making more intentional decisions without the learning curve of full Manual Mode, Program Mode is the natural next step.
How Program Mode Works
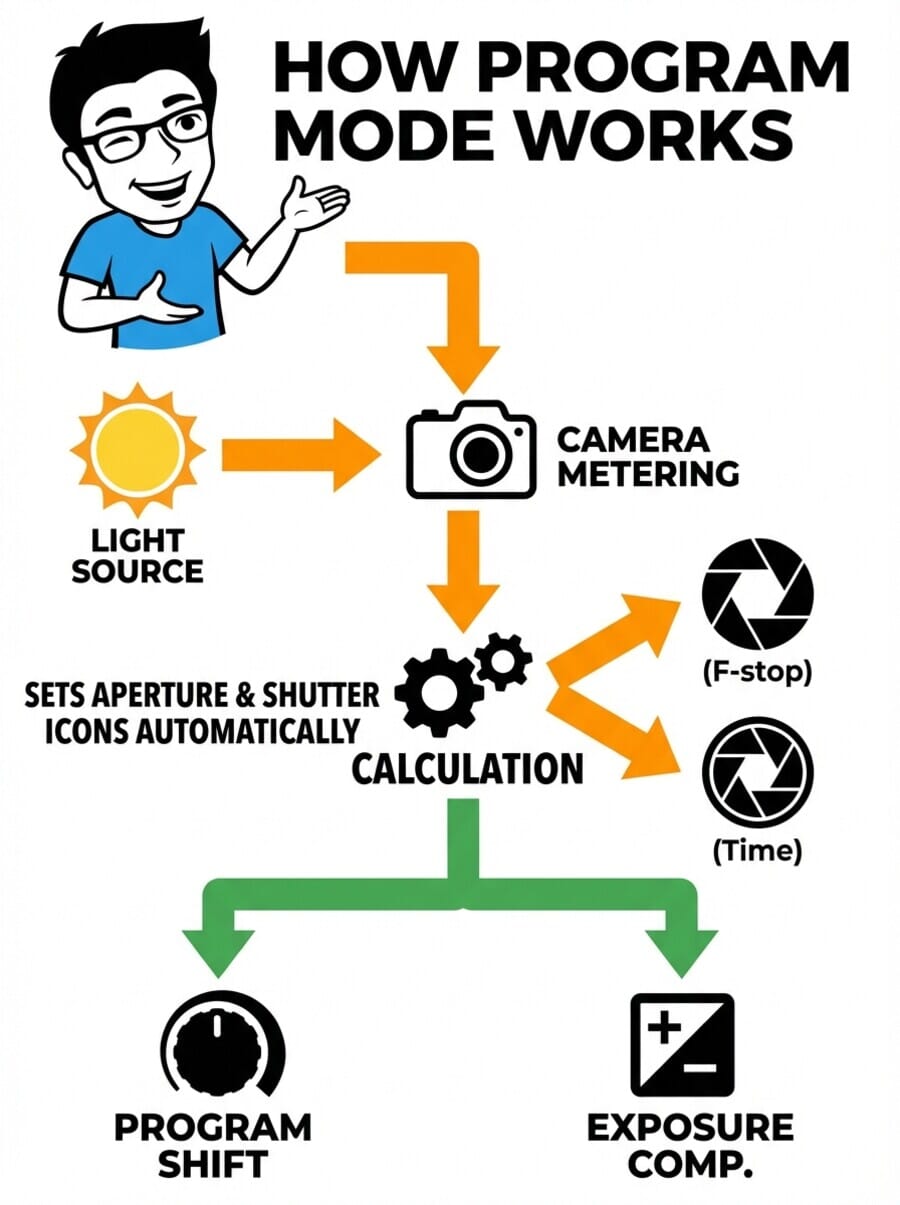
When the shutter button is half-pressed, Program Mode runs through a quick sequence:
- Light metering: The camera measures the light coming through the lens using its built-in meter.
- Exposure calculation: Based on the metered light and the current ISO setting, the camera determines the correct exposure value (EV).
- Aperture + shutter selection: The camera picks an aperture and shutter speed combination from its programmed chart that will produce that correct exposure.
- Display: The selected values appear in the viewfinder and on the LCD, ready for the photographer to accept or adjust.
The camera’s “program chart” is the algorithm that decides which combination to use. Different manufacturers have slightly different charts, but they generally follow the same logic:
- In bright light, the camera tends to choose a smaller aperture (higher f-number) and faster shutter speed
- In dim light, it opens up the aperture (lower f-number) and slows the shutter speed
- The camera tries to keep the shutter speed fast enough to avoid motion blur from handholding
The key thing to understand about the exposure triangle is that many different aperture-shutter combinations produce the same exposure. For example, f/5.6 at 1/250s lets in the same total light as f/8 at 1/125s. The camera just picks one combination — but Program Shift lets the photographer choose a different one.
Program Shift: The Hidden Power of P Mode
Program Shift (sometimes called “Flexible Program” on Nikon cameras) is the feature that separates Program Mode from a simple point-and-shoot auto mode — and it’s the reason experienced photographers sometimes reach for P mode.
Here’s how it works: after the camera selects its aperture-shutter combination, rotating the command dial shifts to a different combination that produces the exact same exposure.
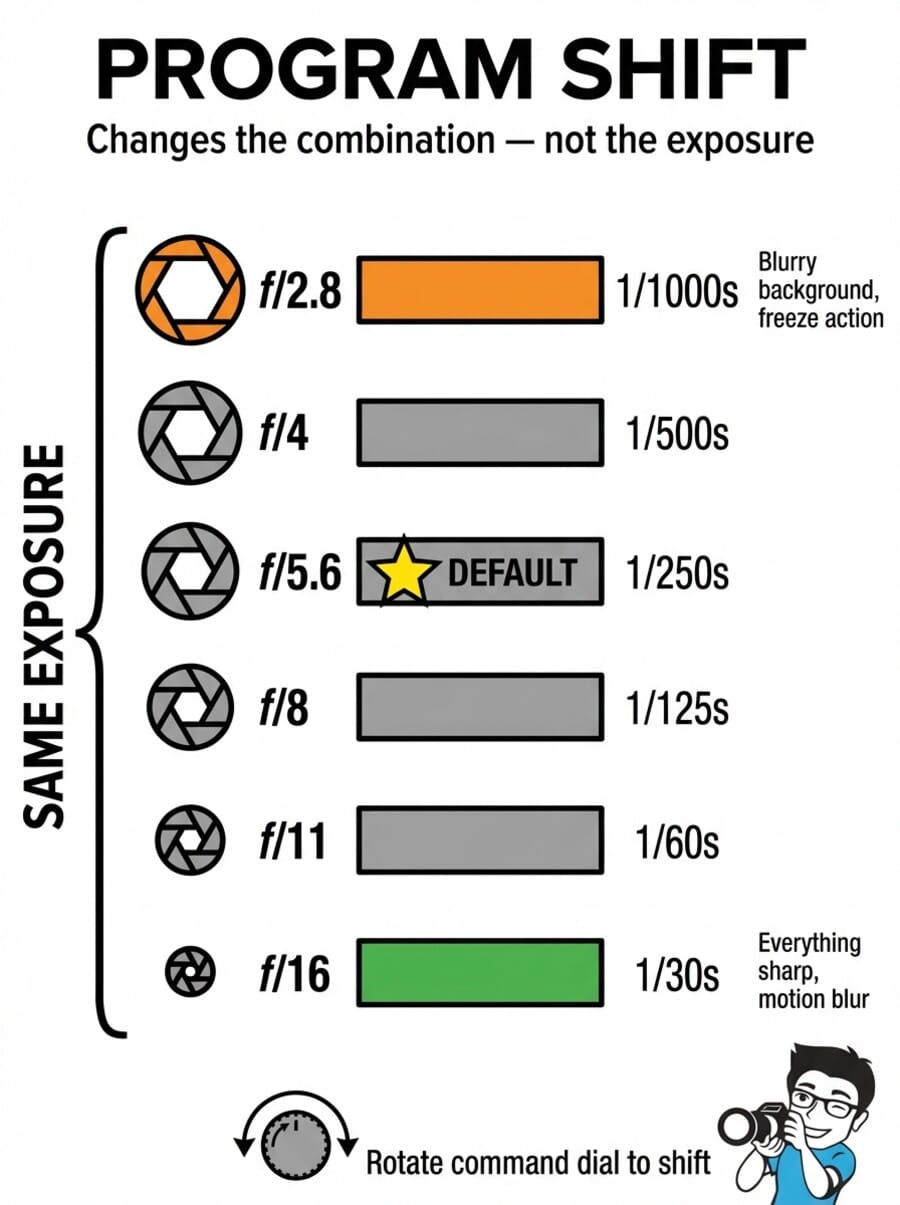
For example, if the camera selects f/5.6 at 1/250s:
- Shift one way: f/4 at 1/500s (wider aperture, faster shutter — better for isolating subjects or freezing action)
- Shift the other way: f/8 at 1/125s (smaller aperture, slower shutter — more depth of field)
This is powerful because it gives quick, on-the-fly control without needing to switch modes. Need a wider aperture for a quick portrait? Shift the dial. Need a faster shutter speed because the subject started moving? Shift the other way. The exposure stays locked — only the creative trade-off changes.
Program Shift resets after each shot on most cameras (or after a few seconds of inactivity), returning to the camera’s default combination. This is actually a benefit in fast-changing situations — every new shot starts fresh with the camera’s best guess, and the photographer can shift only when needed.
Program Shift vs. Exposure Compensation
These two adjustments work differently and serve different purposes:
- Program Shift changes the aperture/shutter combination while keeping the same exposure — the photo stays equally bright
- Exposure Compensation makes the photo brighter or darker by telling the camera to deliberately over- or underexpose
Both are available in Program Mode, and they can be used together. A photographer might use exposure compensation to brighten a backlit scene, then use Program Shift to get a wider aperture within that adjusted exposure.
When to Use Program Mode
Program Mode shines in situations where speed matters more than precise creative control:
Street Photography
Decisive moments don’t wait for photographers to dial in settings. Program Mode keeps the camera ready to shoot instantly while still allowing quick adjustments through Program Shift. The auto exposure handles rapidly changing light — stepping from shade into sun, ducking into a doorway, turning a corner.
Travel Photography
When exploring a new city or landscape, the lighting and subjects change constantly. Program Mode lets photographers focus on composition and moments rather than exposure settings. The camera adapts automatically, and Program Shift handles the occasional need for more depth of field or a faster shutter.
Events and Social Gatherings
Weddings, parties, conferences — any event where the photographer needs to capture candid moments quickly. Program Mode prevents missed shots caused by wrong settings from a previous scene.
Learning Photography
For beginners moving beyond Auto, Program Mode is an excellent stepping stone. It demonstrates the relationship between aperture and shutter speed in real time — watching the values change as lighting conditions shift teaches the fundamentals of exposure without the risk of completely blown or underexposed images.
Quick Documentation
Sometimes a camera is just a tool for recording what’s there — reference shots, real estate walk-throughs, insurance documentation. Program Mode handles these efficiently without fuss.
When NOT to Use Program Mode
Program Mode has clear limitations. For these situations, other modes are better choices:
Shallow Depth of Field (Portraits)
When a specific wide aperture is needed to blur the background, Aperture Priority is the right tool. Program Mode might select a narrower aperture than desired, and while Program Shift can help, it resets with each shot — making it tedious for a portrait session where f/1.8 or f/2.8 is needed consistently.
Long Exposures
Waterfalls, light trails, star photography — these require shutter speeds measured in seconds. Program Mode’s algorithm is designed to prevent blur, so it actively avoids slow shutter speeds. Shutter Priority or Manual Mode gives direct control over long exposures.
Studio Work
In a controlled lighting environment with strobes or continuous lights, exposure settings are calculated once and kept consistent across an entire shoot. Manual Mode is standard practice in studios, where the lighting doesn’t change between shots.
Sports and Fast Action
While Program Mode can handle casual action, dedicated sports shooting requires guaranteed fast shutter speeds (1/1000s or faster). Shutter Priority mode ensures the shutter speed stays where the photographer sets it, regardless of lighting changes.
Consistent Exposure Across a Series
Product photography, panorama stitching, HDR bracketing — any situation where every frame needs identical exposure calls for Manual Mode.
Program Mode vs. Aperture Priority vs. Shutter Priority vs. Manual
Understanding when to use each mode comes down to knowing what each one controls:
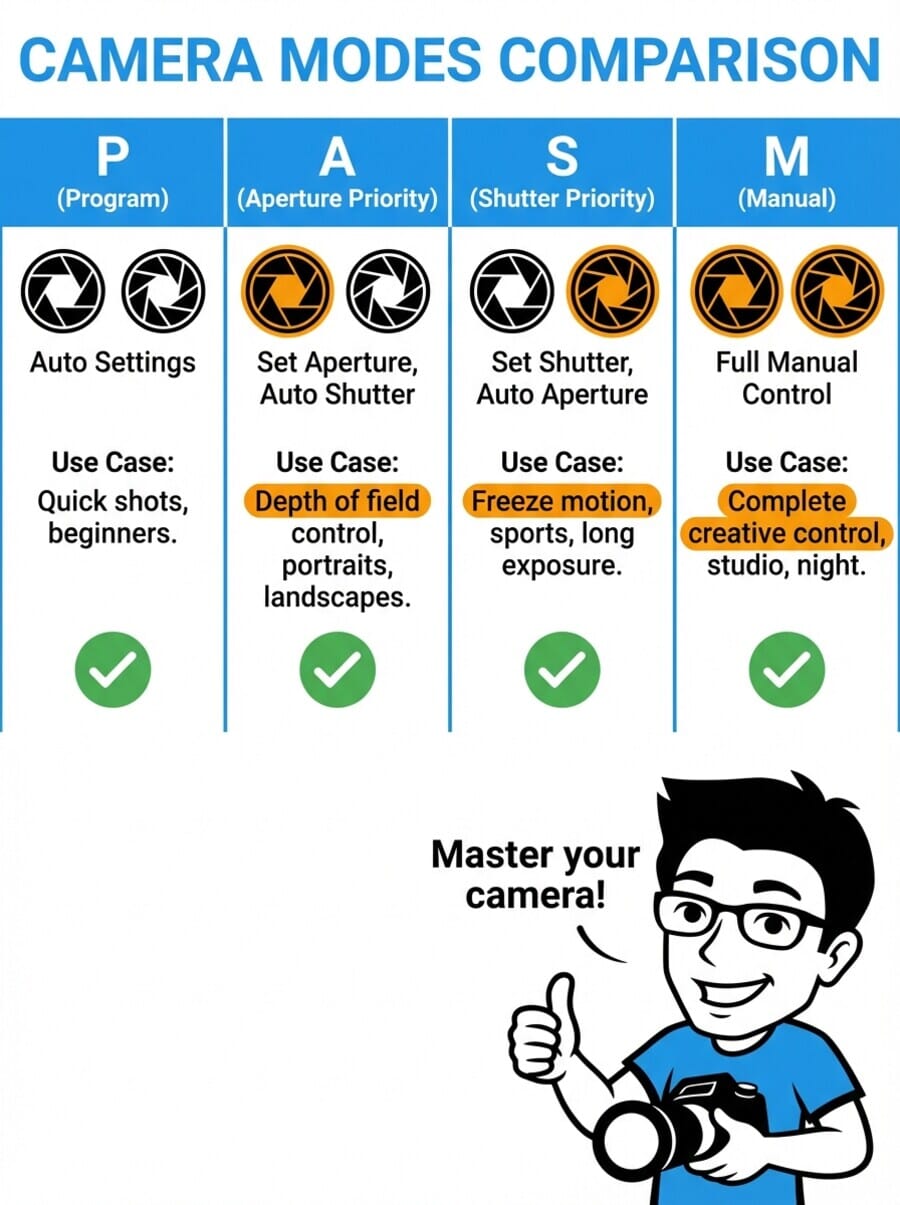
Program Mode (P) — Camera sets aperture and shutter speed. Photographer controls ISO, white balance, exposure compensation, and can use Program Shift. Best for: unpredictable, fast-moving situations.
Aperture Priority (A/Av) — Photographer sets the aperture; camera sets the shutter speed. Best for: portraits (wide aperture for blur), landscapes (narrow aperture for sharpness), any situation where depth of field is the priority. This is the most popular semi-automatic mode among experienced photographers.
Shutter Priority (S/Tv) — Photographer sets the shutter speed; camera sets the aperture. Best for: sports (fast shutter to freeze action), waterfalls (slow shutter for smooth water), panning shots.
Manual Mode (M) — Photographer sets everything. Best for: studio work, consistent lighting, long exposures, any situation where the camera’s meter might be fooled. Learn more in the complete guide to shooting in Manual Mode.
A practical progression for learning photographers: Auto → Program → Aperture Priority → Manual. Each step adds more control and understanding.
Tips for Getting the Most from Program Mode
1. Set ISO Manually (or Use Auto ISO with Limits)
Program Mode controls aperture and shutter speed, but ISO is still the photographer’s responsibility. Setting ISO manually gives better control over image quality. If using Auto ISO, set a maximum limit (like ISO 3200 or 6400) to prevent the camera from pushing into noisy territory.
2. Learn to Read the Exposure Values
Get in the habit of glancing at the aperture and shutter speed the camera selects. Over time, this builds an intuitive sense for what settings work in different lighting — essentially learning essential camera settings through observation.
3. Use Exposure Compensation Aggressively
Camera meters are designed to make everything middle-gray. Scenes that are predominantly bright (snow, white walls) will be underexposed; dark scenes will be overexposed. Use exposure compensation (+1 to +2 for bright scenes, -1 to -2 for dark ones) to correct this.
4. Practice Program Shift
Spend a few minutes deliberately shifting through aperture-shutter combinations in different lighting. This builds muscle memory and understanding of equivalent exposures — knowledge that transfers directly to using Aperture Priority and Manual Mode later.
5. Pair with Back-Button Focus
Separating autofocus from the shutter button (back-button focus) works especially well with Program Mode. It allows pre-focusing on a subject, then recomposing and shooting without the camera re-metering and changing settings.
6. Check the Flash Setting
Unlike Auto mode, Program Mode won’t fire the flash on its own (on most cameras). If shooting in low light, remember to pop up the flash manually or enable it in the menu.
Frequently Asked Questions
Is Program Mode the same as Auto?
No. Auto mode controls everything — aperture, shutter speed, ISO, flash, and sometimes even focus mode and white balance. Program Mode only automates aperture and shutter speed, leaving all other settings under the photographer’s control. This is a significant difference that gives much more creative flexibility.
Do professional photographers use Program Mode?
Some do, particularly for casual shooting, street photography, or when they’re not working and just want to capture a moment. Most professionals primarily use Aperture Priority or Manual Mode for paid work, but there’s no shame in using Program Mode — it’s a legitimate tool, not a beginner crutch.
What does the “P*” or asterisk mean in my viewfinder?
On many cameras, an asterisk or star next to “P” indicates that Program Shift is active — the photographer has shifted away from the camera’s default aperture-shutter combination. It resets after the shot or after a period of inactivity.
Can I use Program Mode with flash?
Yes. When a flash is attached or popped up, most cameras switch to a “P with flash” program that adjusts the shutter speed to the flash sync speed (typically 1/200s or 1/250s) and uses the aperture to balance ambient and flash exposure. TTL (through-the-lens) flash metering works normally in Program Mode.
Why does my camera sometimes show a blinking shutter speed or aperture in P mode?
Blinking values are a warning. A blinking slow shutter speed means the scene is too dark for a sharp handheld shot — either raise the ISO, use flash, or stabilize the camera. A blinking aperture means the scene is too bright or too dark for the lens to provide correct exposure at the current ISO.
Is Program Mode available on mirrorless cameras?
Yes. Program Mode works identically on DSLRs and mirrorless cameras. The mode dial or menu system may look different, but the function is the same — the camera selects aperture and shutter speed, and Program Shift is available to adjust the combination.
