Key Takeaways:
- 8 stunning macro examples with full camera settings and technical breakdowns
- 4 key lessons from real-world macro photographers
- Step-by-step challenge plan from morning scouting to evening sharing
- Recommended camera settings for flowers, insects, water droplets, and textures
When you buy through links on our site, we may earn a commission at no cost to you. We evaluate products independently. Commissions do not affect our evaluations.
Why Macro Photography Will Transform How You See the World
Macro photography is the art of revealing what the naked eye misses. A dewdrop balanced on a blade of grass becomes a crystal sphere reflecting an entire landscape. The compound eye of a dragonfly transforms into an alien mosaic of impossible geometry. This genre doesn’t require exotic travel or expensive locations — the most extraordinary macro subjects are hiding in your backyard, on your windowsill, or along the cracks in a sidewalk.
The discipline traces its roots to the earliest days of photography, when Victorian scientists strapped cameras to microscopes to document botanical specimens. But it was the invention of dedicated macro lenses in the mid-20th century that democratized the genre, giving hobbyists the power to capture life-sized reproductions of tiny subjects. Today, even smartphone cameras offer surprisingly capable macro modes, making this one of the most accessible yet endlessly rewarding branches of photography.
What makes macro special isn’t just magnification — it’s the shift in perspective. Shooting macro forces you to slow down, observe, and compose with surgical precision. Depth of field shrinks to millimeters. Focus becomes a creative decision rather than an afterthought. Light behaves differently at close range. If you’ve ever felt stuck in a photographic rut, macro is the reset button you need.
Inspiration: 8 Real-World Macro Examples
1. Jumping Spider Portrait — Johann Schutte

Camera: Canon EOS 6D | ISO: 200 | Shutter: 1/160s
This 10:1 magnification shot showcases the extraordinary detail possible with dedicated macro equipment. Johann’s use of ISO 200 keeps noise to an absolute minimum, while the 1/160s shutter speed freezes the spider despite the extreme magnification. At this reproduction ratio, even the slightest vibration ruins the shot — flash illumination was almost certainly used to provide both the light and the effective motion-freezing needed. Notice how the eyes are tack-sharp while the body falls into a beautiful, creamy blur, directing all attention to the spider’s gaze.
2. Ladybug on a Leaf — Justin Lauria

Camera: Sony A6500 | Focal Length: 50mm | Aperture: f/4.0 | Shutter: 1/400s | ISO: 1600
Justin demonstrates that you don’t need a dedicated macro lens to capture compelling close-ups. Shot at 50mm with a probable extension tube or close-up filter, the f/4.0 aperture provides enough depth of field to keep the ladybug’s shell sharp while beautifully blurring the leaf surface. The faster 1/400s shutter speed was essential — ladybugs are surprisingly quick and can take flight without warning. The higher ISO of 1600 is a smart trade-off on the A6500’s APS-C sensor, accepting a touch of grain for the action-stopping speed needed with living subjects.
3. Apple Blossom Detail — Mehdi Raad

Camera: Nikon D600 | Focal Length: 105mm | Aperture: f/5.6 | Shutter: 1/125s | ISO: 450
The classic 105mm macro focal length gives Mehdi comfortable working distance from the blossom — critical when photographing flowers you don’t want to disturb (or cast your own shadow on). The f/5.6 aperture is a sweet spot for flower macros: sharp enough to resolve petal texture and stamen detail, yet soft enough to separate the bloom from its background. At ISO 450, the full-frame D600 delivers clean, noise-free files. The 1/125s shutter speed tells us this was likely shot on a calm day — any breeze would demand faster speeds or a flash to freeze flower movement.
4. Dragonfly on Flower Buds — Courtney Smith

Camera: Canon EOS 80D | Focal Length: 85mm | Aperture: f/1.4 | Shutter: 1/250s | ISO: 100
Courtney takes an unconventional approach here — using an 85mm f/1.4 portrait lens wide open for a macro-style shot. The razor-thin depth of field at f/1.4 isolates the dragonfly against an impossibly smooth background of pink and green bokeh. This is a reminder that “macro” is as much about mindset as magnification. The 1/250s shutter speed provides insurance against the dragonfly’s sudden departure, while ISO 100 on the 80D keeps image quality pristine. The color palette of blue wings against pink buds is pure visual poetry.
5. Bee Foraging in a Garden — Maxence Pira

Camera: Sony A7 IV | Focal Length: 105mm | Aperture: f/7.1 | Shutter: 1/1250s | ISO: 2500
Photographing bees demands speed, and Maxence’s settings prove it. The 1/1250s shutter speed freezes the bee mid-forage, capturing individual leg hairs and pollen grains with startling clarity. The f/7.1 aperture provides enough depth of field to keep the entire bee sharp — critical since these subjects rarely align themselves perfectly parallel to your sensor. The ISO 2500 trade-off is well worth it on the A7 IV’s capable full-frame sensor. Shot in Grenoble’s Jardin des Plantes, this image proves that public gardens are goldmines for macro photographers.
6. Dewdrop on Grass — Vivek Doshi

Camera: Canon EOS 700D | Focal Length: 44mm | Aperture: f/8.0 | Shutter: 1/45s | ISO: 100
Vivek proves that entry-level gear can produce stunning macro results. The Canon 700D (Rebel T5i) is a beginner APS-C body, yet at f/8.0 and ISO 100, it delivers beautifully clean detail. The slow 1/45s shutter speed indicates either a tripod or extremely steady hands — and with macro, a tripod is almost always the right call. The 44mm focal length suggests a kit lens with close-focus capability, making this an inspiring example for photographers who think they need expensive macro lenses. Sometimes patience and technique matter more than gear.
7. Green Damselfly — Grant Ofstedahl

Camera: Nikon D3300 | Focal Length: 105mm | Aperture: f/8.0 | Shutter: 1/250s | ISO: 400
Grant’s damselfly portrait is a masterclass in balancing sharpness with background separation. The 105mm macro lens at f/8.0 keeps the entire insect’s body in focus from head to tail — essential for these elongated subjects. The 1/250s shutter speed provides a safety margin against both camera shake at 105mm and the damselfly’s potential movement. ISO 400 on the D3300 is well within the sensor’s clean range. The muted, earthy tones of the background complement the vivid green of the damselfly, creating a natural color harmony that elevates the image beyond simple documentation.
8. Bee on a Leaf — Neringa Normantaite

Camera: Sony A7R III | Focal Length: 90mm | Aperture: f/7.1 | Shutter: 1/320s | ISO: 400
The A7R III’s 42-megapixel sensor is a macro photographer’s dream — the resolution allows aggressive cropping while retaining publication-quality detail. Neringa’s 90mm macro lens (likely the excellent Tamron 90mm f/2.8) at f/7.1 delivers edge-to-edge sharpness across the bee’s body. The 1/320s shutter speed freezes any movement, while ISO 400 barely taxes this sensor. What makes this image special is the simplicity of composition: a single bee against a single leaf, with nothing to distract from the intricate detail of wings, legs, and compound eyes.
What These Photos Teach Us
Lesson 1: Shutter Speed Is Non-Negotiable With Living Subjects
Every insect photo in our collection uses 1/250s or faster — some reaching 1/1250s. At macro magnification, even tiny subject movements are amplified dramatically. The photographers who nailed these shots understood that a slightly noisy image at ISO 800 is infinitely better than a motion-blurred image at ISO 100. When in doubt, bump up the ISO and keep that shutter speed high. Your subjects won’t wait for you to set up a tripod.
Lesson 2: f/5.6 to f/8 Is the Macro Sweet Spot
Notice that most of our featured shots fall between f/5.6 and f/8. This range balances two competing needs: enough depth of field to keep your subject sharp, and enough background blur to separate it from distracting elements. Going wider than f/4 in macro means only a sliver of your subject is in focus. Going narrower than f/11 introduces diffraction softening that undermines all that expensive glass. The sweet spot is genre-specific but remarkably consistent across these eight images.
Lesson 3: You Don’t Need Expensive Gear
Our collection includes shots from a Canon 700D with a kit lens, a Nikon D3300, and a Sony A6500. Not a single image required a $10,000 camera body. Vivek’s dewdrop shot, taken with an entry-level Canon and what appears to be a basic zoom lens, is as compelling as any image in the set. Extension tubes ($20), close-up filters ($15), and reverse-mounting rings ($10) can turn any lens into a macro lens. The investment that matters most is time — time to find subjects, compose carefully, and wait for the perfect moment.
Lesson 4: Background Makes or Breaks the Image
Study the backgrounds in every photo above. Not one has a cluttered or distracting backdrop. Courtney’s dragonfly floats against smooth pink-green bokeh. Grant’s damselfly sits against muted earth tones. This isn’t accidental — experienced macro photographers choose their shooting angle specifically to control the background. Moving just a few inches left, right, up, or down at macro distances can completely transform what appears behind your subject. Before you press the shutter, check the background.
Your Macro Photography Challenge Action Plan
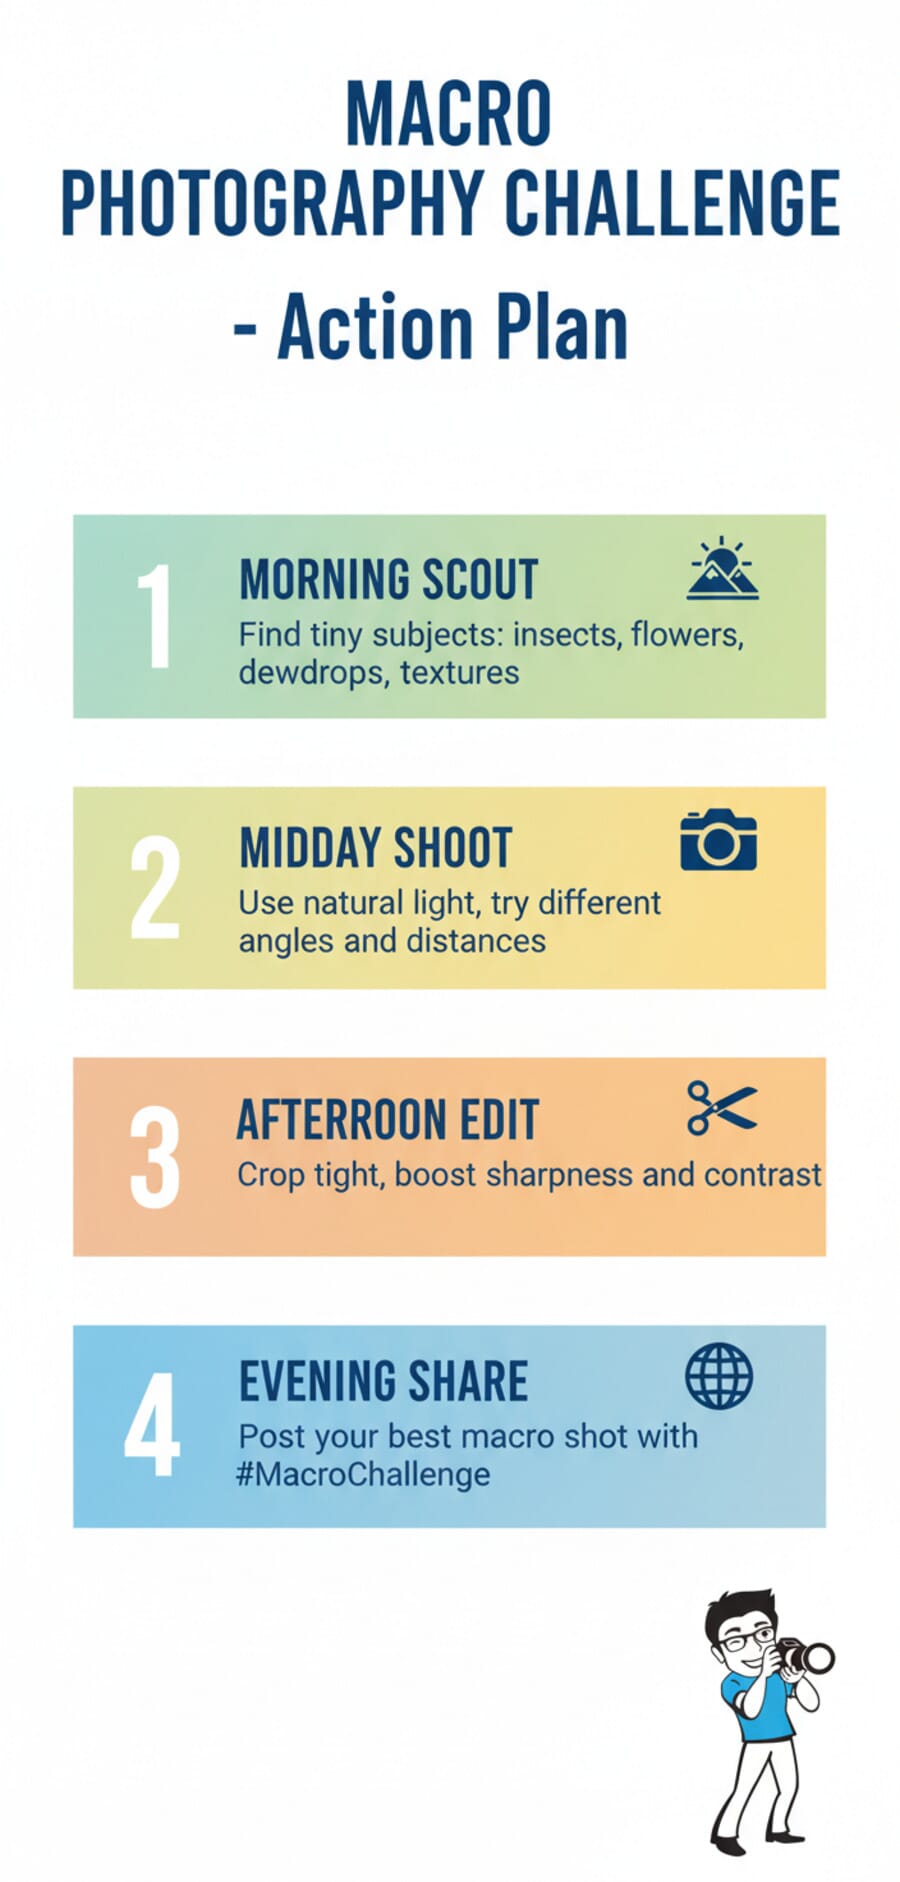
🌅 Morning Scout (7:00–9:00 AM)
Early morning is macro photography gold. Dew covers everything — grass blades, spider webs, flower petals — creating natural crystal decorations. Insects are sluggish in the cool air, making them easier to approach and photograph. Walk slowly through your garden, a local park, or even a patch of wild ground near your home. Look at ground level. Check under leaves. Examine bark. Keep a list of promising subjects and locations for your shooting session. The morning scout is about discovery, not shooting — leave the camera in the bag and just observe.
📷 Midday Shoot (10:00 AM–1:00 PM)
Return to your scouted locations with your camera and macro setup. Bright, diffused midday light (or overcast skies) provides even illumination that eliminates harsh shadows on tiny subjects. For each subject, shoot from at least three angles: directly above, at eye level with the subject, and from slightly below. Experiment with different apertures — take the same shot at f/4, f/8, and f/11 to see how depth of field changes. Aim for at least 50 frames per subject. Macro photography has a low hit rate, and that’s perfectly normal.
✂️ Afternoon Edit (2:00–4:00 PM)
Import your shots and be ruthlessly selective — out of 50 frames, you might keep 5. Check critical focus at 100% zoom. Crop tight to eliminate dead space, but leave enough context so the viewer understands what they’re looking at. Boost clarity and sharpness gently (macro images love a touch of local contrast). If you shot in RAW, adjust white balance to make natural colors pop. Consider converting one or two shots to black and white — macro textures can be stunning in monochrome.
🌐 Evening Share (5:00–7:00 PM)
Pick your single best image and share it. Include a brief description of what the subject is, what gear you used, and one thing you learned during the shoot. Tag it #SundayPhotoChallenge and #MacroPhotography. Then browse others’ submissions — macro photography is a genre where every photographer sees something different, even in the same location. Let their perspectives inspire your next shoot.
Recommended Camera Settings
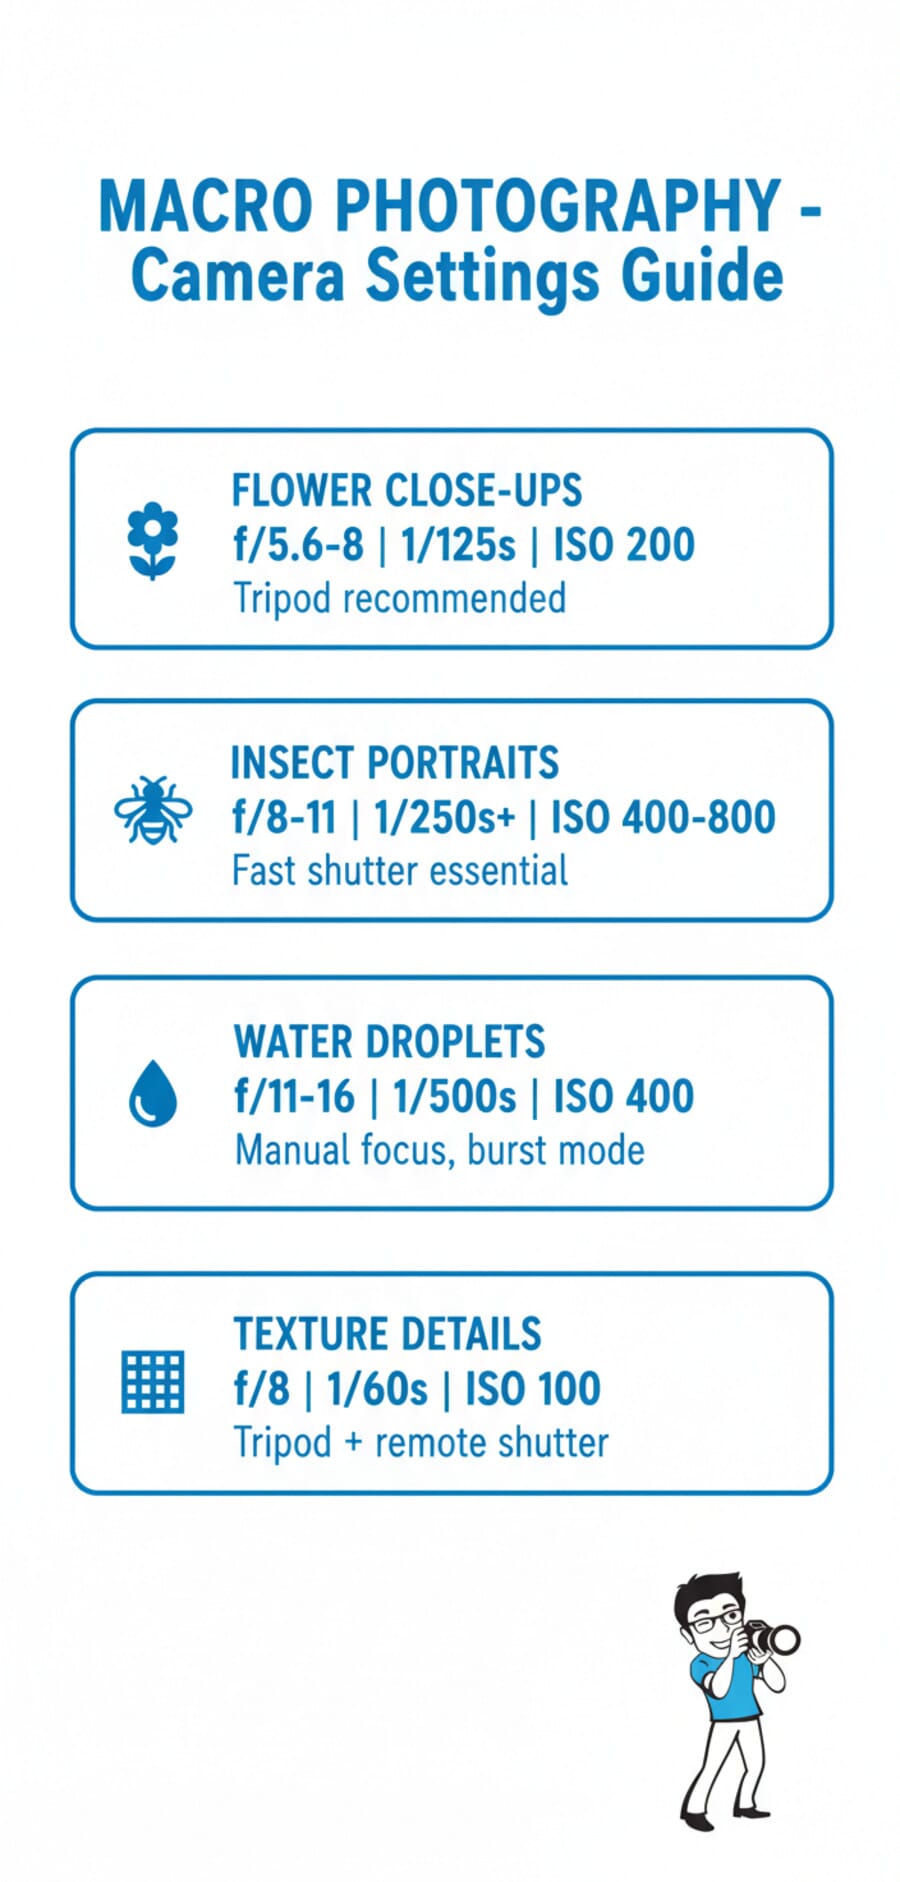
🌸 Flower Close-Ups
Aperture: f/5.6–f/8 | Shutter Speed: 1/125s | ISO: 100–200 | Focus: Manual with focus peaking
Flowers are patient subjects — use a tripod and take your time. A 2-second self-timer or remote shutter eliminates camera shake. If there’s any breeze, either wait for a lull or bump your shutter speed to 1/250s and raise ISO accordingly. Focus on the stamens or the nearest petal edge for maximum visual impact.
🐝 Insect Portraits
Aperture: f/7.1–f/11 | Shutter Speed: 1/250s–1/1000s | ISO: 400–1600 | Focus: Continuous AF or manual
Speed is everything with insects. Use aperture priority mode so the camera adjusts shutter speed automatically, and set Auto ISO with a minimum shutter speed of 1/250s. Pre-focus on the spot where you expect the insect to land, then wait. Burst mode gives you the best chance of nailing critical focus on the eyes — always focus on the eyes.
💧 Water Droplets
Aperture: f/8–f/16 | Shutter Speed: 1/250s–1/500s | ISO: 200–400 | Focus: Manual focus with live view magnification
Water droplets act as tiny lenses, refracting the background into miniature scenes. Position yourself so the background behind the drop is colorful or interesting — it will appear inverted inside the droplet. Use a narrow aperture (f/11–f/16) to keep both the drop and the refracted image sharp. A spray bottle is your secret weapon: create your own dewdrops on any subject, any time of day.
🪨 Texture Details
Aperture: f/8 | Shutter Speed: 1/60s | ISO: 100 | Focus: Manual focus with focus stacking
Bark, rust, peeling paint, weathered stone — textures are everywhere and they don’t move. This makes them perfect for tripod work and focus stacking (taking multiple shots at different focus distances and combining them in software). Side lighting from a low angle dramatically emphasizes texture. Try shooting the same surface in direct sunlight and in shade — you’ll be amazed at how different they look.
Frequently Asked Questions
Do I need a dedicated macro lens for this challenge?
No. While a dedicated macro lens (like a 90mm or 105mm macro) gives the best results, you can start with what you have. Extension tubes ($15–50) fit between your camera body and any existing lens, allowing closer focusing. Close-up diopter filters screw onto your lens like a magnifying glass. Even reversing a 50mm lens on your camera body with a $10 adapter ring gives true macro magnification. Start with what you have and upgrade when you’re hooked.
Why are my macro photos always blurry?
The three most common causes are camera shake, subject movement, and missed focus. At macro distances, depth of field is measured in millimeters, so even tiny movements cause blur. Solutions: use a tripod, increase shutter speed (1/250s minimum for handheld macro), use flash for effective motion-freezing, and switch to manual focus with live view magnification. If you’re shooting handheld, brace your elbows against your body and take bursts of 5–10 frames — at least one will likely be sharp.
What’s the best time of day for macro photography?
Early morning (just after sunrise) offers dew-covered subjects, calm air, and soft golden light. Overcast midday provides even illumination without harsh shadows — ideal for detail work. Late afternoon brings warm side-lighting that dramatically emphasizes textures. Avoid harsh midday sun on bright days, as the extreme contrast makes it difficult to expose tiny subjects properly. That said, you can shoot macro at any time using a simple diffuser (even a sheet of white paper) to soften direct sunlight.
Should I use autofocus or manual focus for macro?
Manual focus is generally preferred for macro work. At extreme close-up distances, autofocus systems often “hunt” back and forth without locking on. The most effective macro focusing technique is to set your focus distance manually, then rock your body (or the tripod) slightly forward and backward until the critical part of your subject snaps into sharp focus. Use your camera’s focus peaking feature or live view magnification to confirm sharpness. For moving insects, continuous autofocus with eye-detect can work well on modern cameras like the Sony A7 IV.
How do I get a completely sharp macro image from front to back?
The technique is called focus stacking. Take 10–30 images of the same subject, shifting the focus point slightly between each frame. Then combine them in software (Photoshop, Helicon Focus, or Zerene Stacker) which merges the sharp portions of each frame into one fully-focused image. This works best with static subjects on a tripod. Many cameras now offer built-in focus bracketing that automates the capture process — check your camera’s menu for “focus shift” or “focus bracketing” options.