Aperture Priority Mode: Complete 2026 Guide for Modern Photography
Key Takeaways
- Aperture Priority gives creative control while maintaining proper exposure by automatically adjusting shutter speed
- Perfect for depth of field control – from ultra-sharp landscapes to dreamy portraits with smooth bokeh
- Essential for changing light conditions where consistent aperture matters more than precise shutter speeds
- Works brilliantly with AI-assisted exposure found in modern mirrorless cameras
- Best avoided when motion control is critical – sports, action, or intentional camera shake effects
- Modern computational photography enhances aperture priority with real-time depth preview and exposure assistance
—
Aperture Priority mode has evolved dramatically since the early days of photography. What once required careful light meter calculations and educated guesswork now benefits from advanced AI assistance, real-time exposure preview, and sophisticated metering systems that make this semi-automatic mode more powerful than ever.
This comprehensive guide explores how to master Aperture Priority mode, leveraging the latest mirrorless camera technology and computational photography advances to create stunning images with professional-level control over depth of field and creative exposure.
What is Aperture Priority Mode?
Aperture Priority (often marked as “A” on Nikon cameras or “Av” on Canon) is a semi-automatic exposure mode where the photographer sets the desired aperture (f-stop) and ISO, while the camera automatically selects the appropriate shutter speed for proper exposure.
This mode bridges the gap between fully automatic and manual control, offering creative freedom over depth of field while maintaining consistently well-exposed images. Modern mirrorless cameras have revolutionized Aperture Priority with real-time exposure simulation through electronic viewfinders, making it easier than ever to predict your final result before taking the shot.
How Aperture Priority Works
Contemporary cameras use sophisticated multi-zone metering systems, often enhanced by machine learning algorithms, to determine optimal exposure. When you adjust your aperture:
1. The camera measures scene brightness using advanced metering patterns
2. AI-assisted exposure algorithms analyze the scene type and lighting conditions
3. The system calculates optimal shutter speed based on your chosen aperture and ISO
4. Real-time preview shows exactly how your image will look through the EVF or LCD
5. Computational photography features may apply automatic corrections for difficult lighting
This intelligent automation allows photographers to focus entirely on composition and creative aperture choices while trusting the camera to maintain proper exposure across varying lighting conditions.
Understanding Aperture and Depth of Field
The aperture setting directly controls two critical aspects of your photographs: exposure (how much light enters the camera) and depth of field (how much of your image appears sharp from foreground to background).
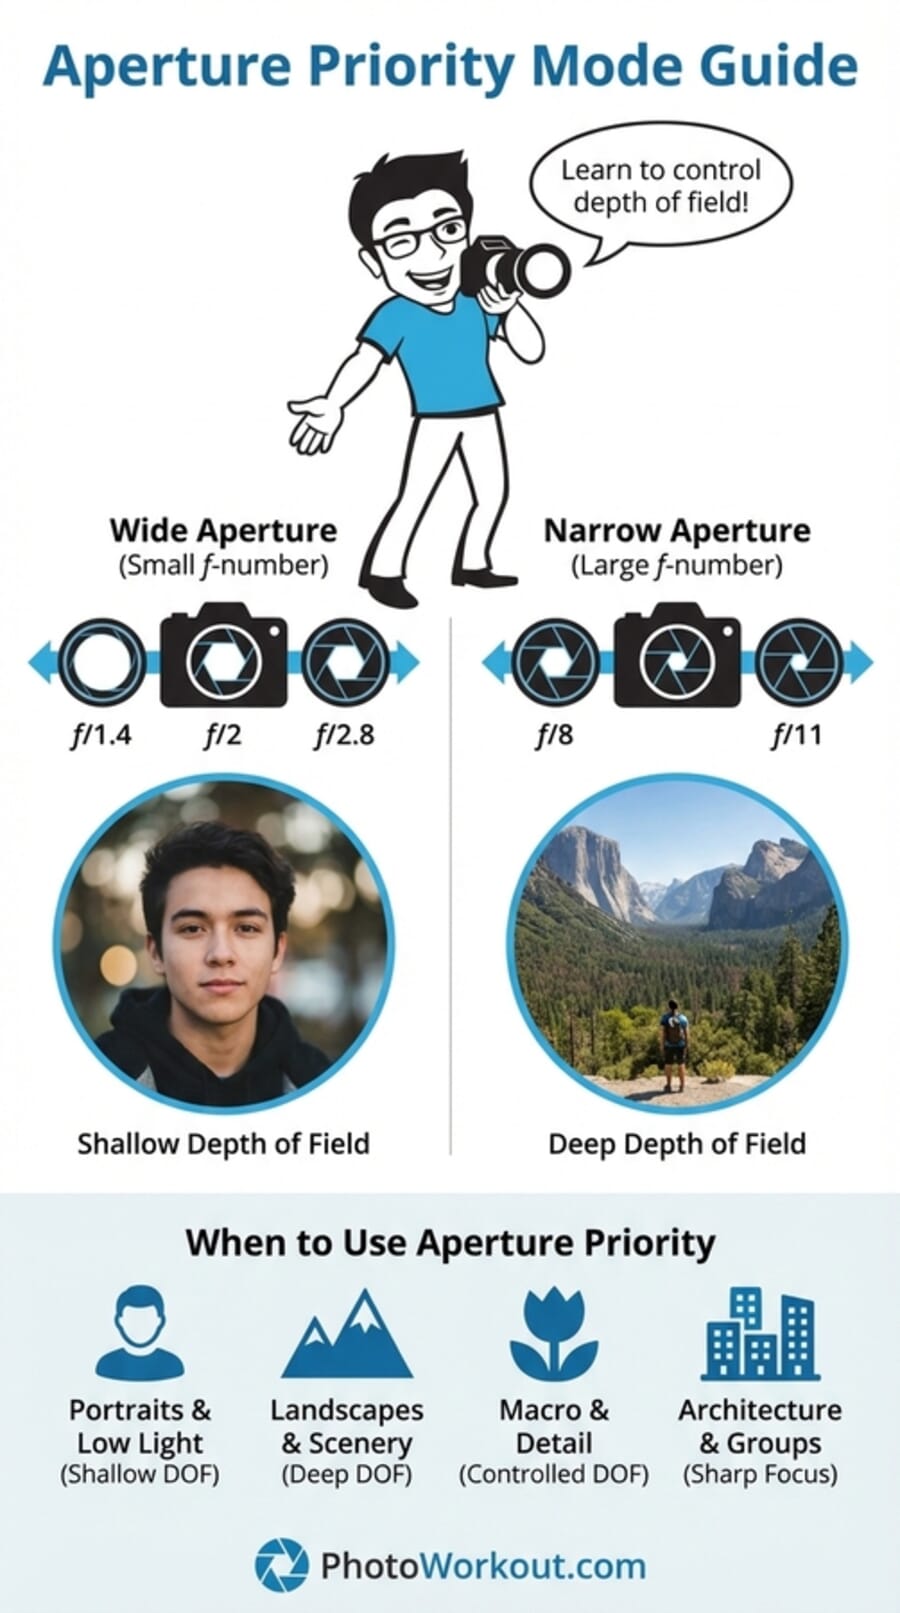
Aperture Values and Their Effects
Wide Apertures (f/1.4 – f/2.8):
- Create shallow depth of field with smooth background blur (bokeh)
- Allow more light for faster shutter speeds
- Ideal for portraits, macro photography, and subject isolation
- May show slight softness at the extreme edges on some lenses
Mid-Range Apertures (f/4 – f/8):
- Balance depth of field with overall sharpness
- Often the “sweet spot” for lens optical performance
- Versatile for various subjects and lighting conditions
- Provide sufficient depth for small groups or environmental portraits
Narrow Apertures (f/11 – f/22):
- Maximize depth of field for sharp foreground-to-background rendering
- Essential for landscape photography and architectural work
- May introduce diffraction softening at extreme settings (f/16+)
- Require slower shutter speeds or higher ISO in dim light
Modern mirrorless cameras often provide real-time depth of field preview, allowing you to see exactly how your chosen aperture affects the final image before pressing the shutter.
When to Use Aperture Priority Mode
Aperture Priority excels in specific photographic situations where depth of field control takes precedence over precise shutter speed selection.
Portrait Photography
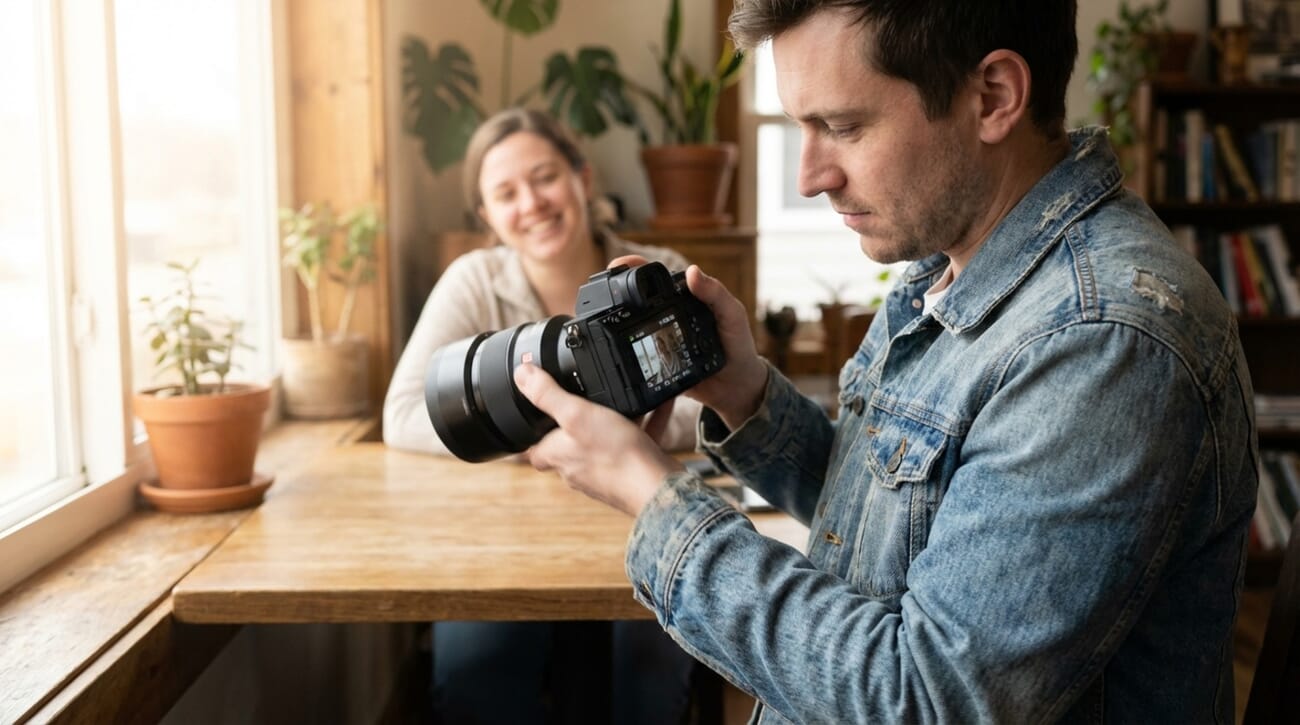
Portrait photographers rely heavily on Aperture Priority to achieve flattering depth of field while maintaining consistent exposure across changing lighting conditions. Wide apertures like f/1.8 or f/2.8 create attractive background separation, making subjects pop from their surroundings.
Modern portrait-specific features in mirrorless cameras, such as eye-detection autofocus and real-time bokeh preview, work seamlessly with Aperture Priority mode. AI-powered face detection ensures proper exposure on subjects even when lighting conditions change during a shoot.
Landscape Photography
Landscape photographers typically use Aperture Priority with narrow apertures (f/8 to f/11) to achieve front-to-back sharpness. The mode automatically adjusts shutter speed as lighting conditions change throughout the day, making it perfect for golden hour shooting or rapidly changing weather.
Advanced metering systems in modern cameras can handle challenging landscape scenarios like bright skies with dark foregrounds, often eliminating the need for graduated neutral density filters or extensive post-processing.

Street Photography
Street photographers value Aperture Priority for its ability to maintain consistent depth of field while quickly adapting to changing urban lighting. Setting an aperture like f/5.6 provides sufficient depth for environmental context while allowing fast enough shutter speeds for handheld shooting.
The combination of silent electronic shutters in mirrorless cameras and intelligent auto-ISO makes Aperture Priority ideal for candid street photography without drawing attention.
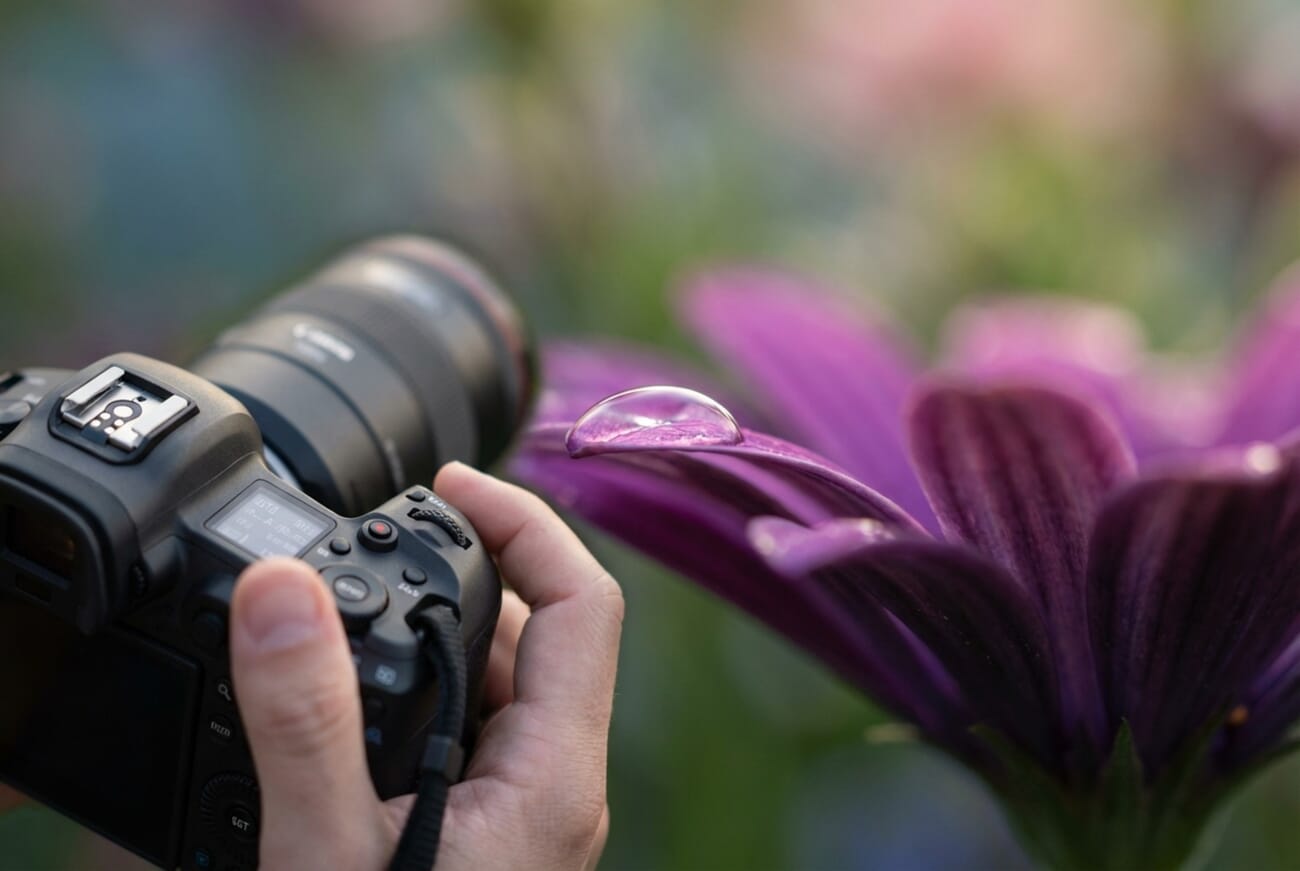
Macro Photography
Close-up photography benefits enormously from precise aperture control. Macro photographers often work with very shallow depth of field at close focusing distances, making aperture selection critical for determining which parts of tiny subjects appear sharp.
Modern focus-stacking features found in many mirrorless cameras can automatically capture multiple images at different focus points while maintaining consistent aperture settings, then combine them for extended depth of field.
Aperture Priority vs Other Camera Modes
Understanding when to choose Aperture Priority over other exposure modes helps photographers make informed decisions based on their creative priorities.
Aperture Priority vs Manual Mode
Choose Aperture Priority when:
- Lighting conditions change frequently
- Depth of field is your primary creative concern
- You want to work quickly without constant exposure adjustments
- The camera’s metering system can handle the scene’s lighting
Choose Manual Mode when:
- You need precise control over both aperture and shutter speed
- Working in consistent lighting (studio environments)
- Creating intentional over/under-exposure for artistic effect
- Using flash photography with specific power ratios
Aperture Priority vs Shutter Priority
Aperture Priority is better for:
- Portrait photography with controlled depth of field
- Landscape photography requiring maximum sharpness
- Macro photography with precise focus control
- Any situation where depth of field trumps motion control
Shutter Priority works better for:
- Sports and action photography
- Panning shots with motion blur
- Water photography (freezing or blurring motion)
- Any scenario where controlling motion is the primary goal
Aperture Priority vs Program Mode
Program mode automatically selects both aperture and shutter speed, while Aperture Priority gives photographers creative control over depth of field. Modern Program modes often include “shift” features that allow temporary adjustments, but they lack the consistent creative control that Aperture Priority provides.
Advanced Aperture Priority Techniques
Modern mirrorless cameras have introduced sophisticated features that make Aperture Priority more powerful and precise than ever before.
AI-Assisted Exposure Control
Contemporary cameras like the Sony Alpha 7R V and Canon EOS R6 Mark II incorporate machine learning algorithms that analyze scenes and adjust exposure compensation automatically. These systems recognize common photographic scenarios and apply subtle corrections to optimize results.
For example, when photographing a person against a bright sky, AI exposure systems can automatically underexpose slightly to retain highlight detail while using face-detection data to ensure proper skin tone rendering. This intelligence works seamlessly with Aperture Priority mode.
Real-Time Depth of Field Preview
Electronic viewfinders in modern mirrorless cameras provide accurate real-time preview of depth of field effects. Unlike optical viewfinders that always show maximum aperture depth, EVFs simulate your chosen aperture setting, showing exactly how much of the scene will appear sharp in the final image.
This feature eliminates guesswork when working with unfamiliar lenses or in challenging lighting conditions. Photographers can see their creative vision realized before pressing the shutter, making Aperture Priority mode more predictable and reliable.
Computational Photography Integration
Modern smartphones have popularized computational photography, and these techniques are now appearing in dedicated cameras. Features like:
Auto HDR: Automatically captures multiple exposures and blends them for extended dynamic range
Focus Stacking: Takes multiple shots at different focus points and combines them for extended depth of field
Noise Reduction: Uses AI algorithms to reduce noise while preserving fine detail
Scene Recognition: Automatically optimizes settings based on subject matter detection
These features work transparently with Aperture Priority mode, enhancing final image quality without requiring additional photographer input.
Exposure Compensation Refinements
Modern cameras offer exposure compensation in 1/3-stop increments (sometimes even finer), allowing precise control over final exposure while maintaining your chosen aperture. Many cameras also provide separate compensation controls for different metering patterns or subject types.
Advanced highlight and shadow metering helps prevent blown highlights in high-contrast scenes, automatically adjusting exposure to preserve important tonal information while maintaining your creative aperture choice.
Aperture Priority for Different Photography Genres
Each photography genre benefits from specific aperture priority techniques and considerations.
Wedding Photography
Wedding photographers often work in challenging and rapidly changing lighting conditions, making Aperture Priority ideal for maintaining consistent depth of field while adapting to different venues and lighting scenarios.
Key techniques include:
- Using f/2.8 for ceremony shots to isolate couples from distracting backgrounds
- Switching to f/5.6 for group photos to ensure everyone stays in focus
- Leveraging high ISO performance of modern cameras to maintain fast shutter speeds
- Using exposure compensation to fine-tune skin tone rendering
Wildlife Photography
Wildlife photography presents unique challenges that Aperture Priority handles well, particularly when combined with modern autofocus systems.
Recommended approaches:
- Start with f/5.6 for good subject isolation while maintaining reasonable shutter speeds
- Use continuous AF modes that work seamlessly with aperture priority automation
- Rely on auto-ISO to maintain optimal shutter speeds for sharp animal movement
- Apply exposure compensation for challenging lighting (backlit animals, snow, etc.)
Architecture Photography
Architectural photography requires maximum sharpness and geometric precision, making specific aperture choices critical.
Best practices include:
- Use f/8 to f/11 for optimal lens sharpness and sufficient depth of field
- Enable lens corrections to minimize distortion and vignetting
- Use exposure compensation to retain detail in both bright skies and shadowed building areas
- Consider graduated neutral density filters for extreme dynamic range scenes
Event Photography
Event photographers need to work quickly and reliably in mixed lighting conditions, making Aperture Priority an excellent choice.
Effective strategies:
- Set f/2.8 or f/4 for good low-light performance with reasonable depth
- Use high ISO settings that modern sensors handle cleanly
- Rely on fast, accurate autofocus systems that work well with aperture automation
- Use exposure compensation to handle stage lighting and mixed color temperatures
Common Aperture Priority Mistakes and Solutions
Even experienced photographers can fall into aperture priority traps. Understanding these common issues helps avoid disappointing results.
Mistake 1: Ignoring Shutter Speed
Problem: Focusing solely on aperture while ignoring the shutter speed the camera selects, leading to motion blur or camera shake.
Solution: Monitor shutter speed in the viewfinder and use auto-ISO or exposure compensation to maintain adequate speeds. Most photographers need at least 1/60s for handheld shots, though image stabilization can extend this range.
Mistake 2: Over-Relying on Wide Apertures
Problem: Always shooting at maximum aperture without considering that most lenses perform better when stopped down slightly.
Solution: Test your lenses to find their optimal aperture range. Many lenses are sharpest 1-2 stops down from wide open. Use f/2.8 instead of f/1.4 when maximum sharpness matters more than extreme shallow depth.
Mistake 3: Ignoring Background Elements
Problem: Focusing on subject isolation while overlooking distracting background elements that shallow depth of field doesn’t eliminate.
Solution: Even with wide apertures, bright or high-contrast background elements can remain distracting. Change shooting angle or position to eliminate problematic backgrounds rather than relying solely on depth of field.
Mistake 4: Inappropriate Aperture for Subject Matter
Problem: Using shallow depth of field for subjects that need to be sharp throughout, or using deep depth of field when subject isolation would be more effective.
Solution: Match aperture choice to subject requirements. Group photos need sufficient depth (f/5.6-f/8), while single portraits often benefit from isolation (f/1.8-f/2.8).
Optimizing Camera Settings for Aperture Priority
Modern cameras offer extensive customization options that enhance the aperture priority experience.
Metering Mode Selection
Different metering patterns work better for specific subjects:
Matrix/Evaluative Metering: Best general-purpose option that handles most scenes well
Center-Weighted: Ideal for subjects positioned centrally in the frame
Spot Metering: Perfect for high-contrast scenes where precise exposure control is needed
Auto-ISO Configuration
Proper auto-ISO setup is crucial for aperture priority success:
- Set minimum shutter speed to prevent camera shake (typically 1/focal length)
- Choose maximum ISO based on your camera’s noise performance
- Use auto-ISO range that maintains image quality standards
- Consider different settings for different shooting scenarios
Exposure Compensation Setup
Configure exposure compensation controls for quick access:
- Assign compensation to easily accessed buttons or dials
- Set increment size (typically 1/3 stop works well)
- Consider separate compensation for different metering modes
- Use exposure bracketing for challenging lighting situations
Custom Function Setup
Modern cameras allow extensive customization:
- Program function buttons for quick aperture priority adjustments
- Set up custom modes with preferred aperture priority settings
- Configure electronic front/rear curtain options for different scenarios
- Customize AF point selection methods that work well with aperture automation
The Future of Aperture Priority Mode
As camera technology continues advancing, aperture priority mode evolves to become even more intuitive and powerful.
Artificial Intelligence Integration
Future cameras will likely incorporate more sophisticated AI systems that can predict photographer intent based on subject matter and shooting patterns. These systems might automatically suggest optimal aperture settings or provide real-time guidance for achieving specific creative effects.
Enhanced Computational Photography
Computational photography techniques will continue expanding, allowing cameras to capture multiple exposures with different aperture settings and blend them for optimal results. This technology could enable “variable aperture” effects in post-processing while maintaining the simplicity of aperture priority shooting.
Improved Real-Time Preview
Electronic viewfinder technology continues improving, offering more accurate preview of final image characteristics including depth of field, bokeh quality, and exposure effects. Future EVFs might even provide predictive preview showing how slight adjustments would affect the final result.
Advanced Lens Communications
Modern lens-camera communication protocols allow for more sophisticated interactions between aperture settings and other camera functions. Future systems might optimize image stabilization, autofocus speed, and noise reduction based on selected aperture settings.
Conclusion
Aperture Priority mode represents the perfect balance between creative control and automated assistance. Modern mirrorless cameras have transformed this classic exposure mode into a sophisticated tool that adapts to photographer needs while maintaining the fundamental creative control that makes photography personally expressive.
Success with Aperture Priority comes from understanding both its technical aspects and creative possibilities. By mastering depth of field control, learning when to rely on camera automation versus manual intervention, and staying aware of how modern computational photography enhances traditional techniques, photographers can consistently create compelling images across diverse shooting scenarios.
The combination of advanced metering systems, AI-assisted exposure control, and real-time preview capabilities makes modern Aperture Priority mode more reliable and predictable than ever before. Whether capturing intimate portraits with dreamy bokeh, sweeping landscapes with front-to-back sharpness, or dynamic street photography with perfect environmental context, Aperture Priority provides the creative foundation for exceptional photography.
As camera technology continues evolving, Aperture Priority mode will undoubtedly become even more intuitive and powerful, but its core principle remains unchanged: giving photographers creative control over depth of field while trusting intelligent automation to handle the technical complexities of proper exposure. This balance between human creativity and technological assistance represents the future of photographic expression.
What aperture setting should I use for group photos?
For group photos, use aperture settings between f/5.6 and f/8 to ensure everyone in the group remains in sharp focus. These apertures provide sufficient depth of field to cover the typical front-to-back distance in group arrangements while maintaining good lens sharpness. Avoid apertures wider than f/4 for groups, as people positioned at different distances from the camera may fall outside the depth of field range.
How do I prevent camera shake when using Aperture Priority?
Monitor your shutter speed in the viewfinder and ensure it stays fast enough to prevent camera shake. As a general rule, use shutter speeds faster than 1/focal length (1/50s for a 50mm lens). Enable auto-ISO to automatically raise sensitivity when shutter speeds become too slow. Modern image stabilization systems can extend handheld shooting capabilities by 3-5 stops, allowing slower shutter speeds when needed.
When should I use exposure compensation with Aperture Priority?
Use exposure compensation when the camera’s metering system doesn’t interpret the scene as you envision it. Common scenarios include backlit subjects (use +1 to +2 stops), snow scenes (use +1 stop to prevent gray snow), dark subjects against bright backgrounds (use +0.7 stops), and high-contrast scenes where you want to preserve specific tonal ranges. Modern cameras often handle these situations well automatically, but manual compensation gives precise control.
Can I use Aperture Priority for action photography?
While Aperture Priority can work for some action photography, it’s generally better suited for subjects with predictable movement patterns. The mode works well for activities like cycling or running where you want to maintain consistent depth of field while allowing shutter speed to vary. For fast, unpredictable action like sports, Shutter Priority or Manual mode typically provide better control over motion rendering.
How does Auto-ISO work with Aperture Priority mode?
Auto-ISO in Aperture Priority mode automatically adjusts sensitivity to maintain proper exposure when your chosen aperture and the camera-selected shutter speed would otherwise result in under or overexposure. You can set minimum shutter speed limits (to prevent camera shake) and maximum ISO values (to control noise levels). This combination allows you to maintain creative aperture control while ensuring consistently well-exposed, sharp images across varying lighting conditions.
What’s the difference between Aperture Priority on mirrorless vs DSLR cameras?
Mirrorless cameras provide significant advantages for Aperture Priority shooting, including real-time depth of field preview through the electronic viewfinder, more accurate exposure simulation, and often superior low-light autofocus performance. DSLRs rely on separate depth of field preview buttons and don’t show exposure effects until after capture. Both systems handle basic aperture priority functions similarly, but mirrorless cameras offer more intuitive and predictive shooting experiences.
Should I always use the widest aperture for portraits?
Not necessarily. While wide apertures like f/1.4 or f/1.8 create beautiful background separation, they may be too shallow for some portrait situations. For headshots, f/2.8 often provides better overall sharpness while still creating pleasing background blur. For couples or small groups, f/4 ensures both people stay in focus. Consider your creative intent, lens performance characteristics, and subject positioning when choosing aperture settings for portraits.
How do I choose between different metering modes in Aperture Priority?
Matrix or evaluative metering works best for most general photography, analyzing the entire scene to determine optimal exposure. Use center-weighted metering when your main subject is centrally positioned and significantly different in brightness from the surroundings. Spot metering is ideal for high-contrast situations where you want to expose for a specific area of the scene, such as a performer on a dark stage or a subject backlit by bright sunlight.
