
- 8 stunning landscape examples with full camera settings and technical breakdowns
- 4 key lessons from real-world landscape photographers
- Step-by-step challenge plan from morning scouting to evening sharing
- Recommended camera settings for golden hour, waterfalls, night sky, and storms
Landscape photography is one of the oldest and most beloved genres in the medium. From Ansel Adams’ iconic black-and-white vistas of Yosemite to the vivid color work of modern photographers like Marc Adamus and Max Rive, the desire to capture the natural world has driven photographers into the field since the earliest days of the camera.
What makes landscape photography endlessly compelling is its accessibility paired with its difficulty. Anyone can point a camera at a mountain and press the shutter. But creating an image that conveys the scale, mood, and emotional weight of being there? That takes understanding of light, composition, timing, and technical craft. The gap between a snapshot and a landscape photograph is enormous.
This week’s Sunday Photo Challenge takes you outdoors with a focused mission: capture one landscape photograph that makes a viewer feel something. Not just see a pretty place – but feel the cold morning air, the warmth of golden light, or the raw power of a stormy coast. Below you’ll find 8 real-world examples from photographers using everything from entry-level crop sensors to full-frame mirrorless bodies, plus the settings and techniques that made each shot work.
Inspiration: 8 Real-World Landscape Examples
Each of these photos was shot by a different photographer with different gear and in different conditions. Pay attention to how they each solve the core landscape challenge: translating a three-dimensional experience into a two-dimensional image.
1. Behnam Mohsenzadeh – Canon EOS 90D
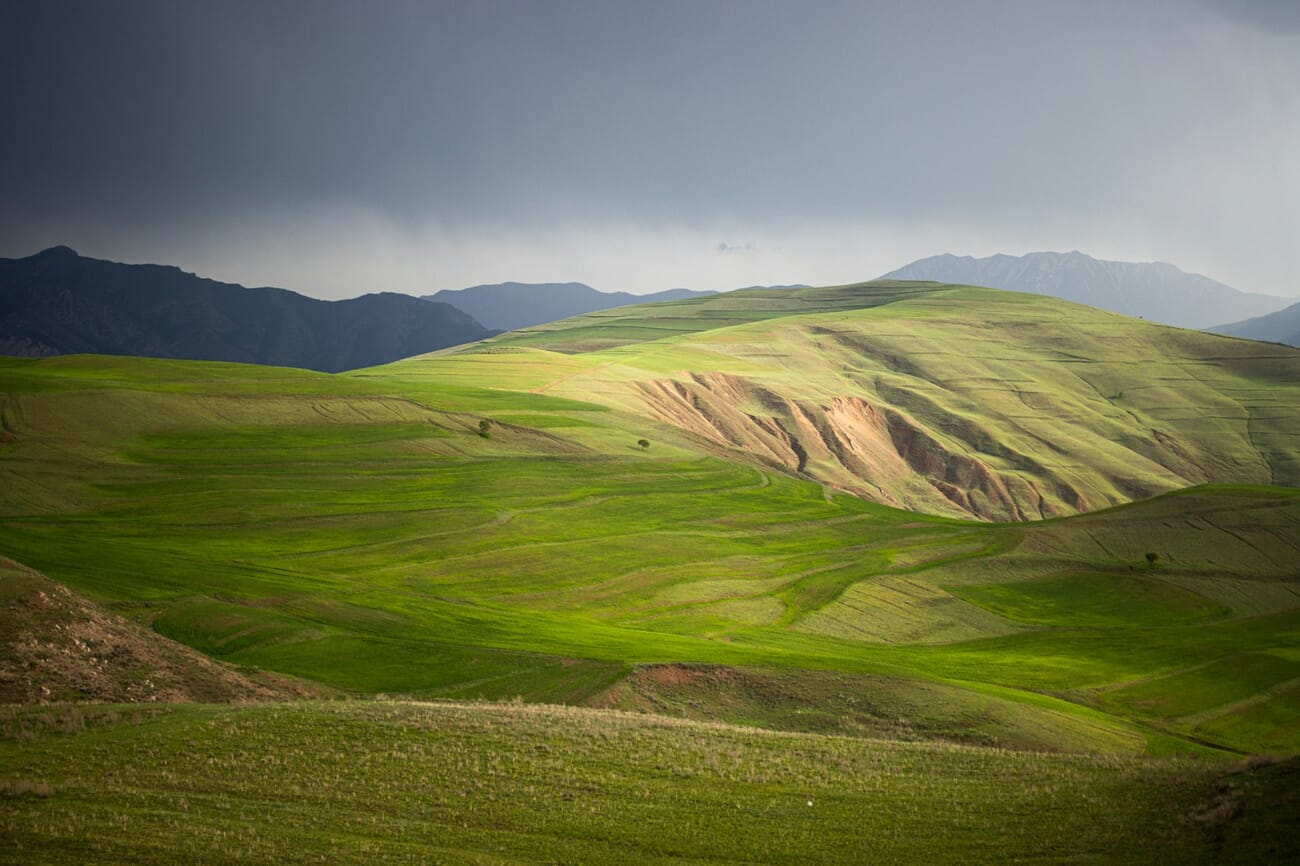
Shot at 35mm | f/1.8 | 1/1250s | ISO 100
Shooting wide open at f/1.8 is an unconventional choice for landscapes, but it works brilliantly here. The shallow depth of field isolates the foreground hill while the receding layers of green fade into a dreamy bokeh. This is landscape photography that breaks the rules – instead of chasing front-to-back sharpness, Mohsenzadeh uses selective focus to guide the viewer’s eye along the rolling terrain. The low ISO of 100 ensures zero noise, and the fast 1/1250s shutter freezes any wind movement in the grass.
2. Elliot Cullen – Canon EOS 700D
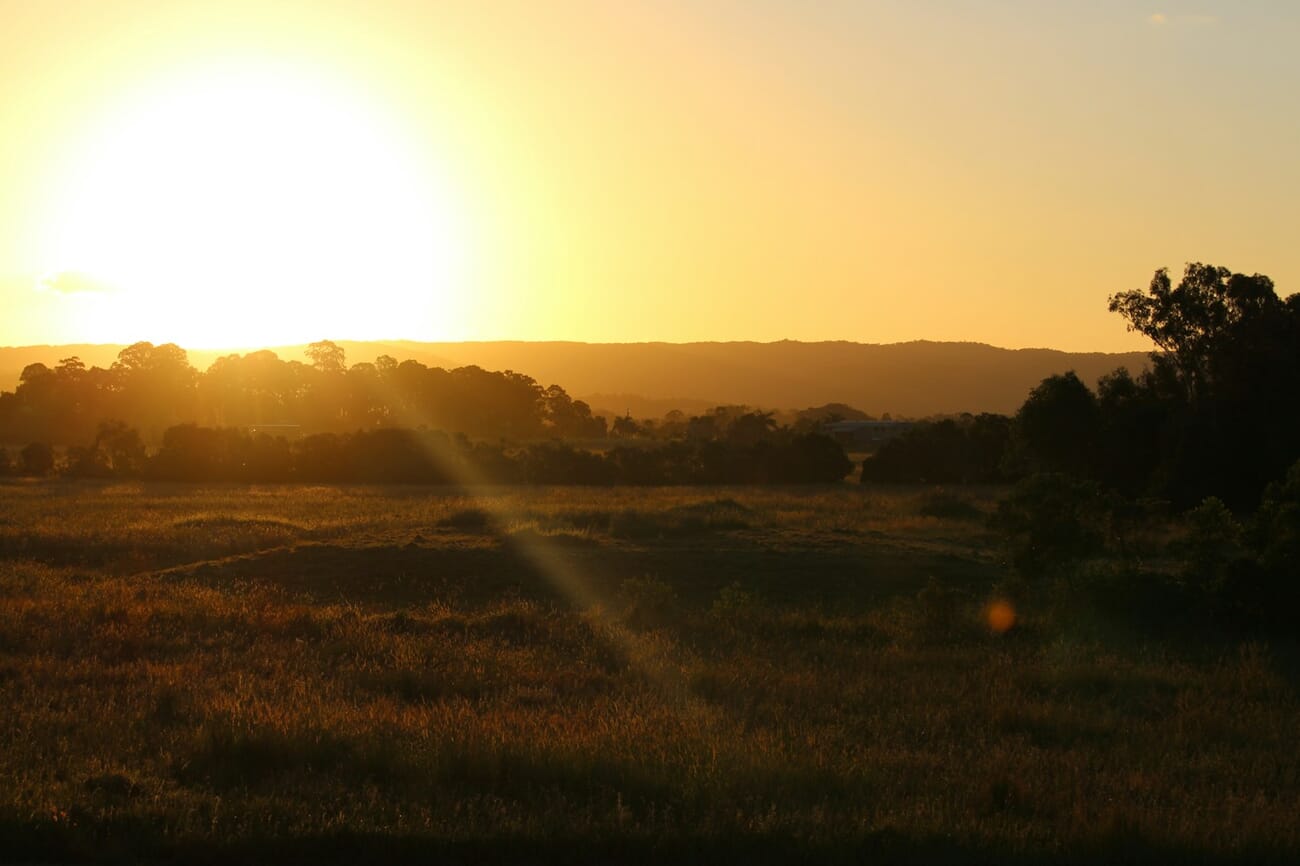
Shot at 55mm | f/8 | 1/320s | ISO 100
This is a textbook example of golden hour magic. Cullen chose f/8 – the sweet spot for most lenses where sharpness peaks – and caught the sun at that perfect low angle where every blade of grass glows. The 55mm focal length compresses the field just enough to stack the golden layers without losing the sense of depth. At ISO 100, the image is clean and rich with color. The warm backlight creates a natural vignette that frames the composition beautifully.
3. Griffin Wooldridge – Canon EOS R5
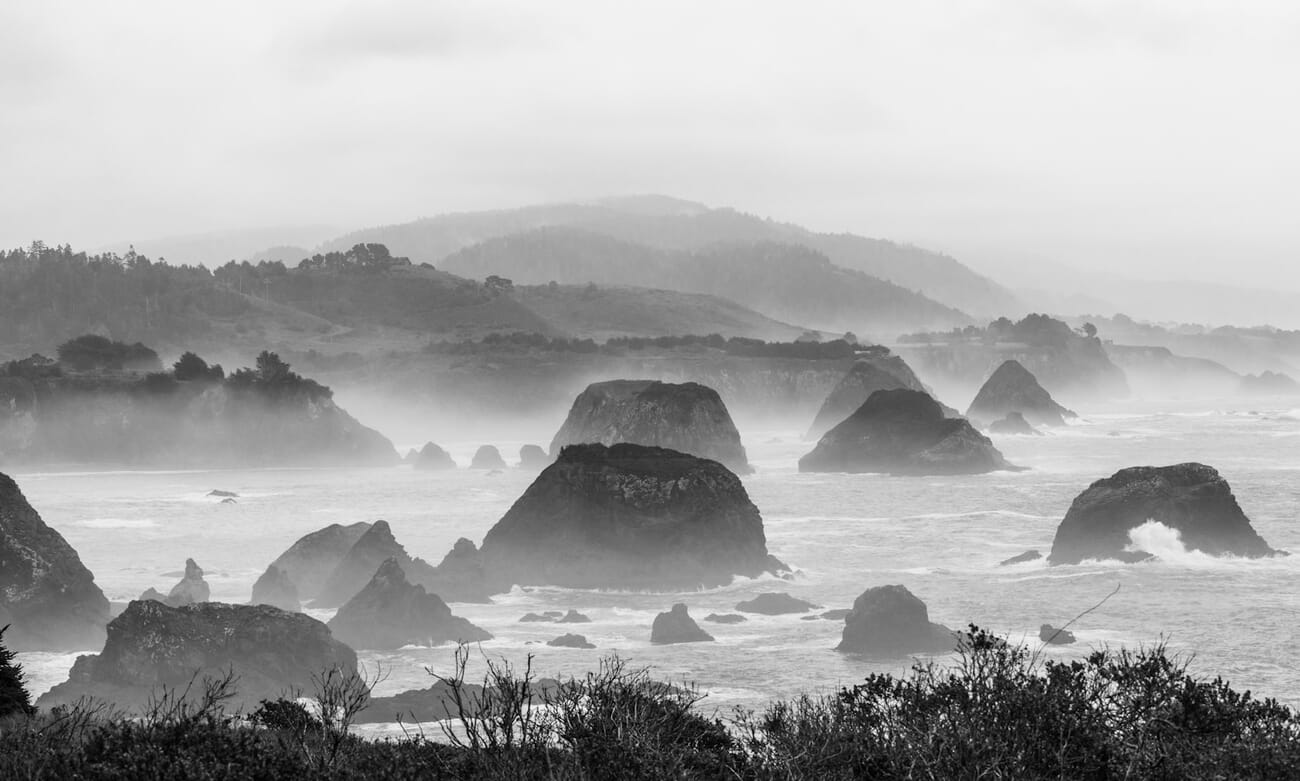
Shot at 100mm | f/11 | 1/125s | ISO 400
Wooldridge makes an interesting choice shooting a seascape at 100mm instead of the typical wide angle. This telephoto compression stacks the rock formations and distant hills into distinct layers, creating an almost painterly sense of depth. The f/11 aperture keeps everything sharp from the foreground rocks to the misty horizon, while the 1/125s shutter speed preserves some texture in the moving water rather than smoothing it completely. The mist adds natural atmosphere that no filter can replicate.
4. Wilson Stratton – Canon EOS R100
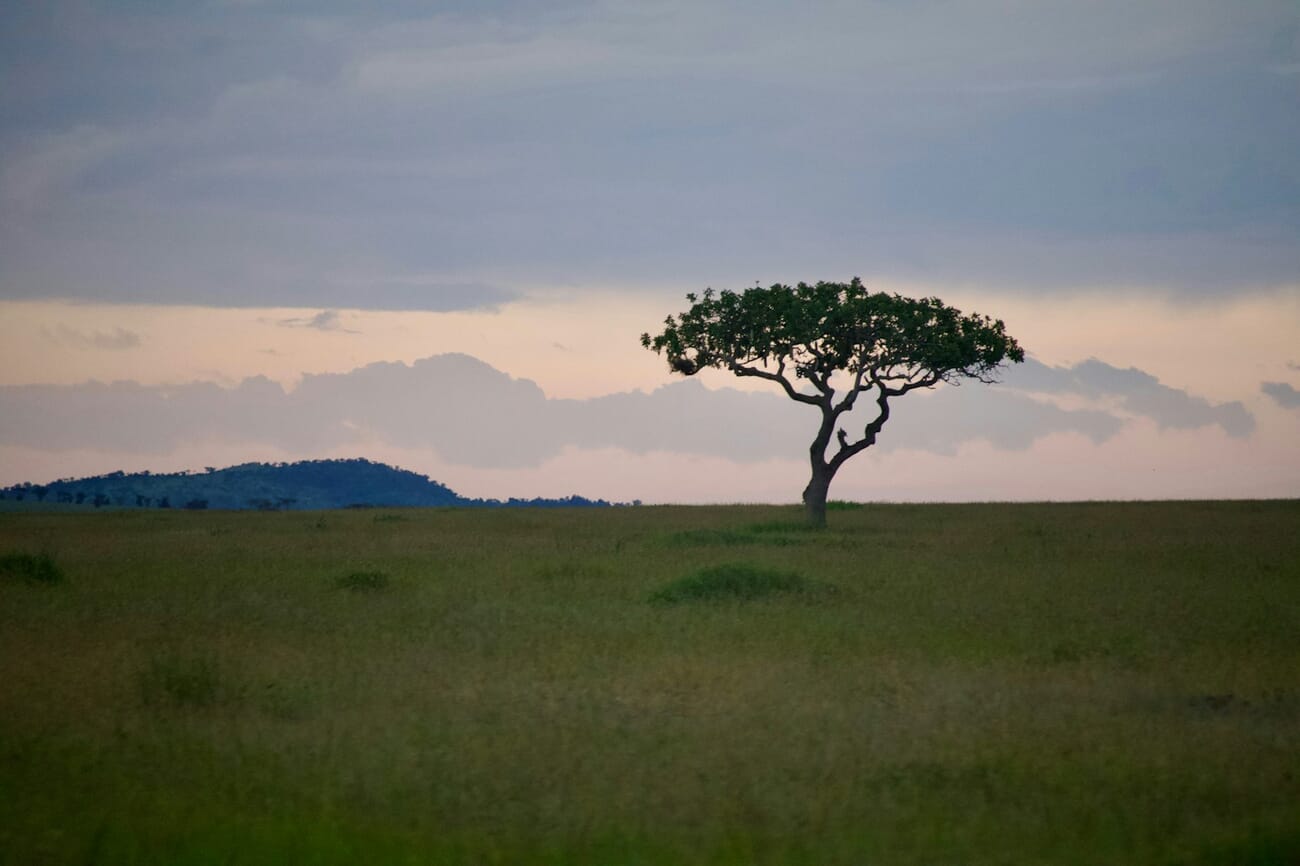
Shot at 210mm | f/8 | 1/400s | ISO 200
At 210mm, Stratton isolates this lone tree from its surroundings, turning a simple subject into a powerful minimalist composition. The telephoto compression flattens the field into clean horizontal bands of color, making the tree the undeniable focal point. The f/8 aperture provides edge-to-edge sharpness, and the fast 1/400s shutter eliminates any branch movement. This photo proves you don’t need dramatic mountains or waterfalls – sometimes the most compelling landscapes are the simplest ones.
5. Dimitri Kolpakov – Fujifilm X-T20
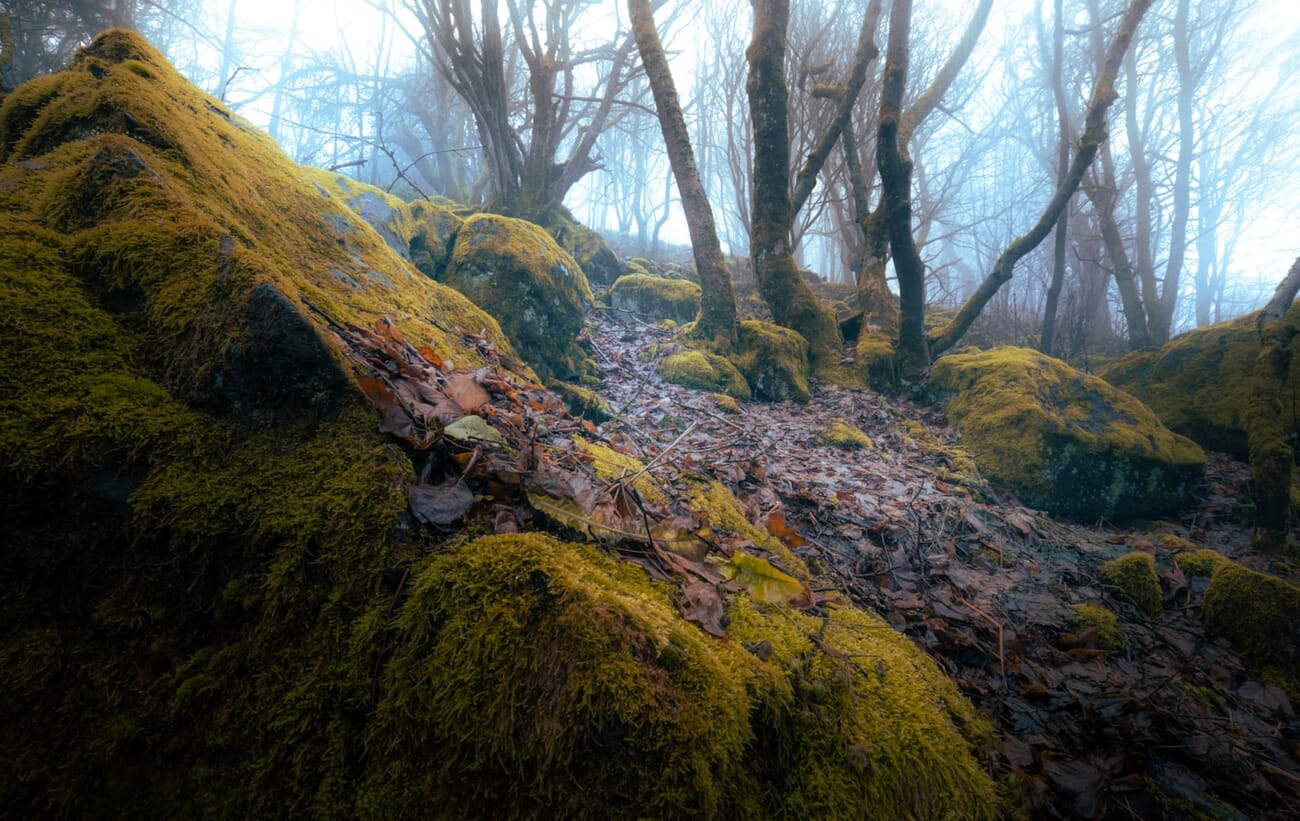
Shot at 10.5mm | f/14 | 0.6s | ISO 200
This is landscape photography that rewards patience. Kolpakov waited for the fog to settle into the forest, then used a 0.6-second exposure to capture every detail of the moss-covered rocks while maintaining atmosphere. The ultra-wide 10.5mm focal length encompasses the entire scene without distortion, and f/14 ensures depth of field from the nearest rock to the farthest tree. The ISO 200 keeps noise minimal while allowing the slower shutter speed needed in these low-light conditions. The Fujifilm color science renders the greens with remarkable subtlety.
6. Ash Farz – Sony A6400
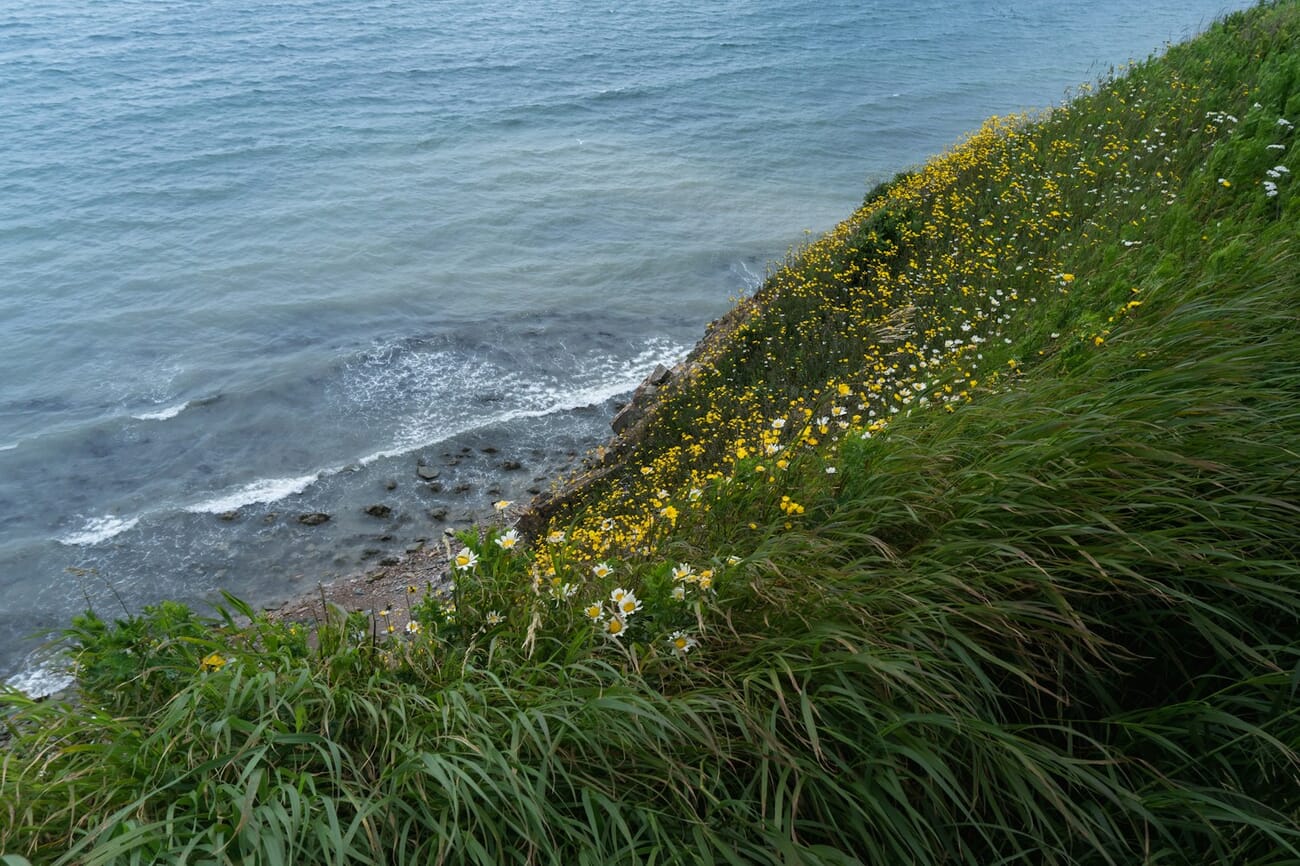
Shot at 16mm | f/10 | 1/400s | ISO 250
Farz uses the classic elevated viewpoint to create dramatic scale, and the 16mm wide angle pushes the cliff edge into the foreground while the ocean stretches endlessly beyond. The f/10 aperture balances sharpness across the frame, and the fast 1/400s shutter freezes the wave patterns far below. What makes this shot work is the composition – the cliff creates a strong diagonal that leads the eye from the bottom corner out toward the horizon, giving the image a sense of vertigo and adventure.
7. Nicolas Encina – Canon EOS Rebel SL2
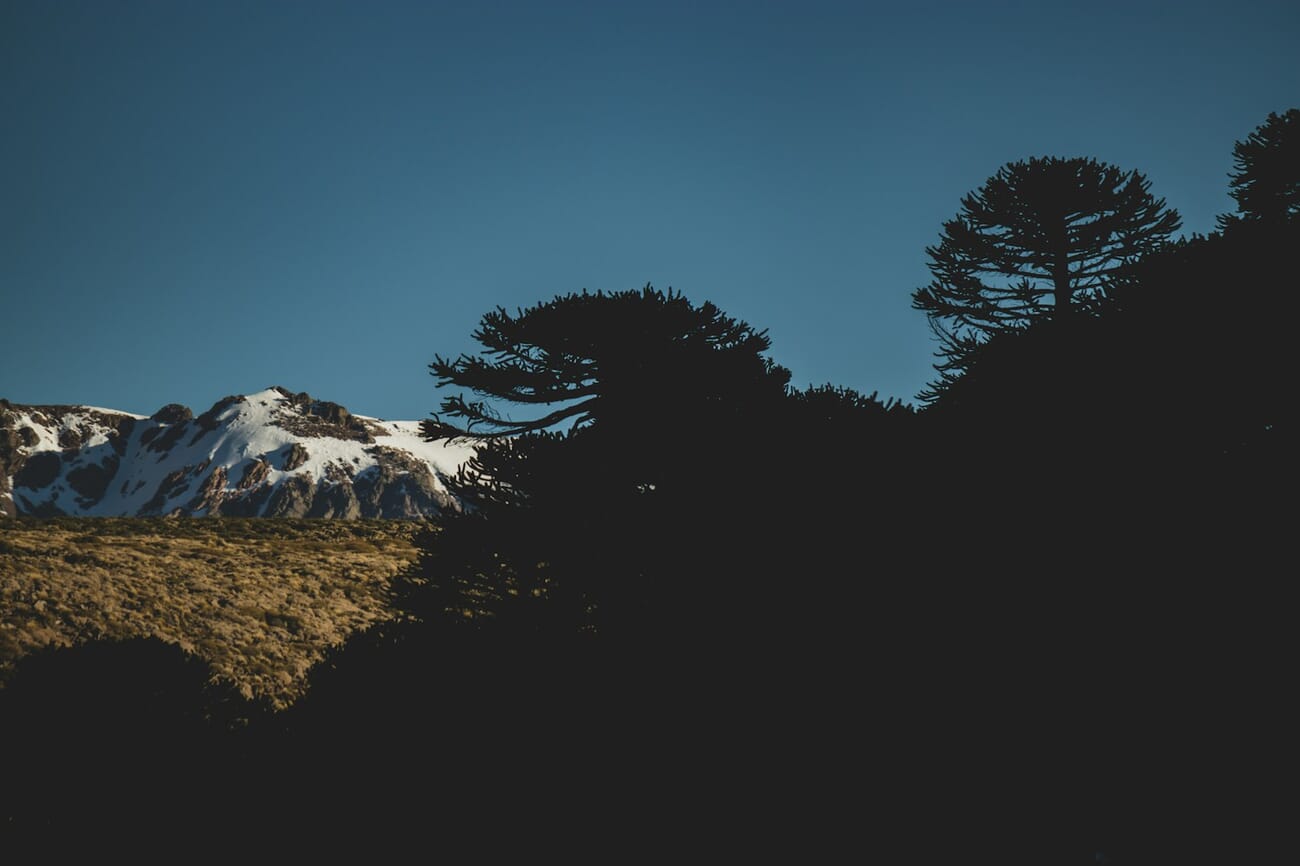
Shot at 250mm | f/5.6 | 1/400s | ISO 100
Encina shoots at 250mm to isolate the snow-capped peak from surrounding terrain, creating a clean layered composition with trees as a natural frame. At ISO 100 and f/5.6, the image is tack sharp where it matters while the slightly wider aperture separates the mountain from the foreground trees. The 1/400s shutter is fast enough to counteract any hand-held shake at this long focal length. Snow scenes are notoriously tricky for metering – the exposure here is spot-on, preserving detail in both the bright snow and darker tree line.
8. Marshall Iden – Nikon D5300
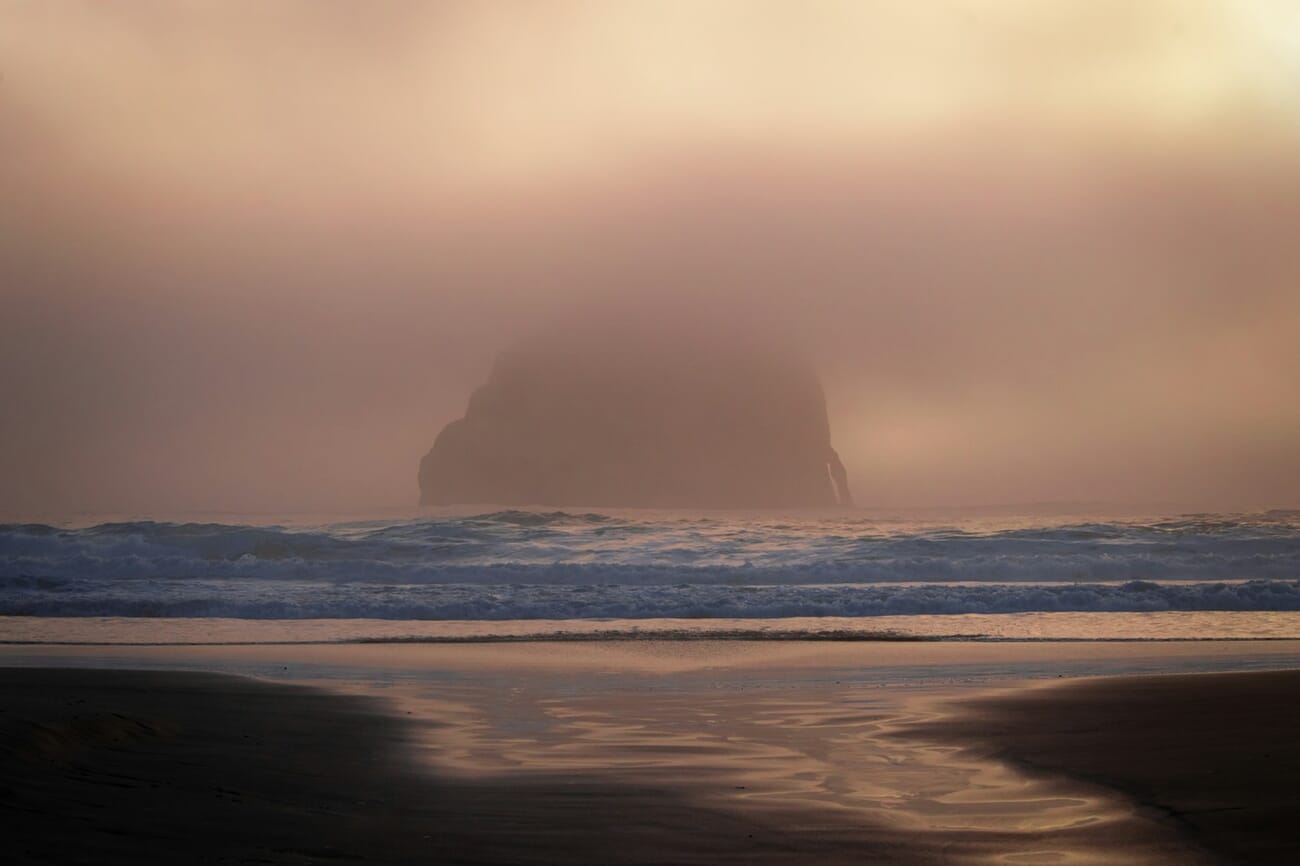
Shot at 55mm | f/14 | 1/800s | ISO 800
Iden captures the drama of a misty sunrise where the rock formation becomes a silhouette against the soft morning light. The f/14 aperture creates a starburst effect from the sun while keeping everything in focus. At 55mm, the framing compresses the rock and horizon into a balanced composition. The higher ISO 800 is a tradeoff for the fast 1/800s shutter – likely chosen to freeze the crashing waves around the rock base. The mist diffuses the light into beautiful gradient tones that would be impossible to recreate in post-processing.
What These Photos Teach Us
1. Focal Length Shapes the Story
Notice how dramatically the feel changes between Kolpakov’s 10.5mm forest scene and Encina’s 250mm mountain isolation. Wide angles (10-24mm) immerse the viewer inside the landscape, creating depth through foreground interest and leading lines. Telephoto lenses (100-250mm) compress layers and isolate subjects, turning landscapes into minimalist compositions. There’s no “correct” focal length for landscapes – Wooldridge’s 100mm seascape and Stratton’s 210mm lone tree prove that telephoto landscapes can be just as powerful as wide-angle vistas.
2. Weather Is Your Best Creative Tool
The most striking images in this collection weren’t shot in perfect sunshine. Kolpakov’s fog transforms an ordinary forest into something ethereal. Wooldridge’s coastal mist creates natural depth layers. Iden’s misty sunrise adds drama that clear skies could never match. Professional landscape photographers check weather obsessively – not to avoid bad conditions, but to find interesting ones. Fog, storms, dramatic clouds, and the transition between weather systems produce images that stand out from the millions of blue-sky-and-green-grass snapshots.
3. Simplicity Wins
Stratton’s lone tree and Cullen’s golden field are the simplest compositions in this set – and among the strongest. When everything in your frame serves the image, nothing distracts. Before pressing the shutter, ask: can I remove anything from this frame? A tighter crop, a step to the left, a longer lens – anything that eliminates distractions strengthens the image. The best landscape photographs often have one clear subject, not a panorama of everything visible.
4. Technical Settings Serve the Vision
Mohsenzadeh shoots a landscape at f/1.8 – breaking the “always use f/8 to f/16” rule – because shallow focus served his creative vision. Kolpakov uses a 0.6-second exposure because the scene demanded it. Iden pushes ISO to 800 for a faster shutter. None of these photographers let textbook settings dictate their images. Learn the rules, understand why they exist, then break them when the moment calls for it. Your settings should match your intent, not a chart.
Your Landscape Photography Challenge Plan
Here’s your step-by-step plan for this week’s challenge. Set aside one day – a weekend morning works best – and commit to the full process from scouting to sharing.
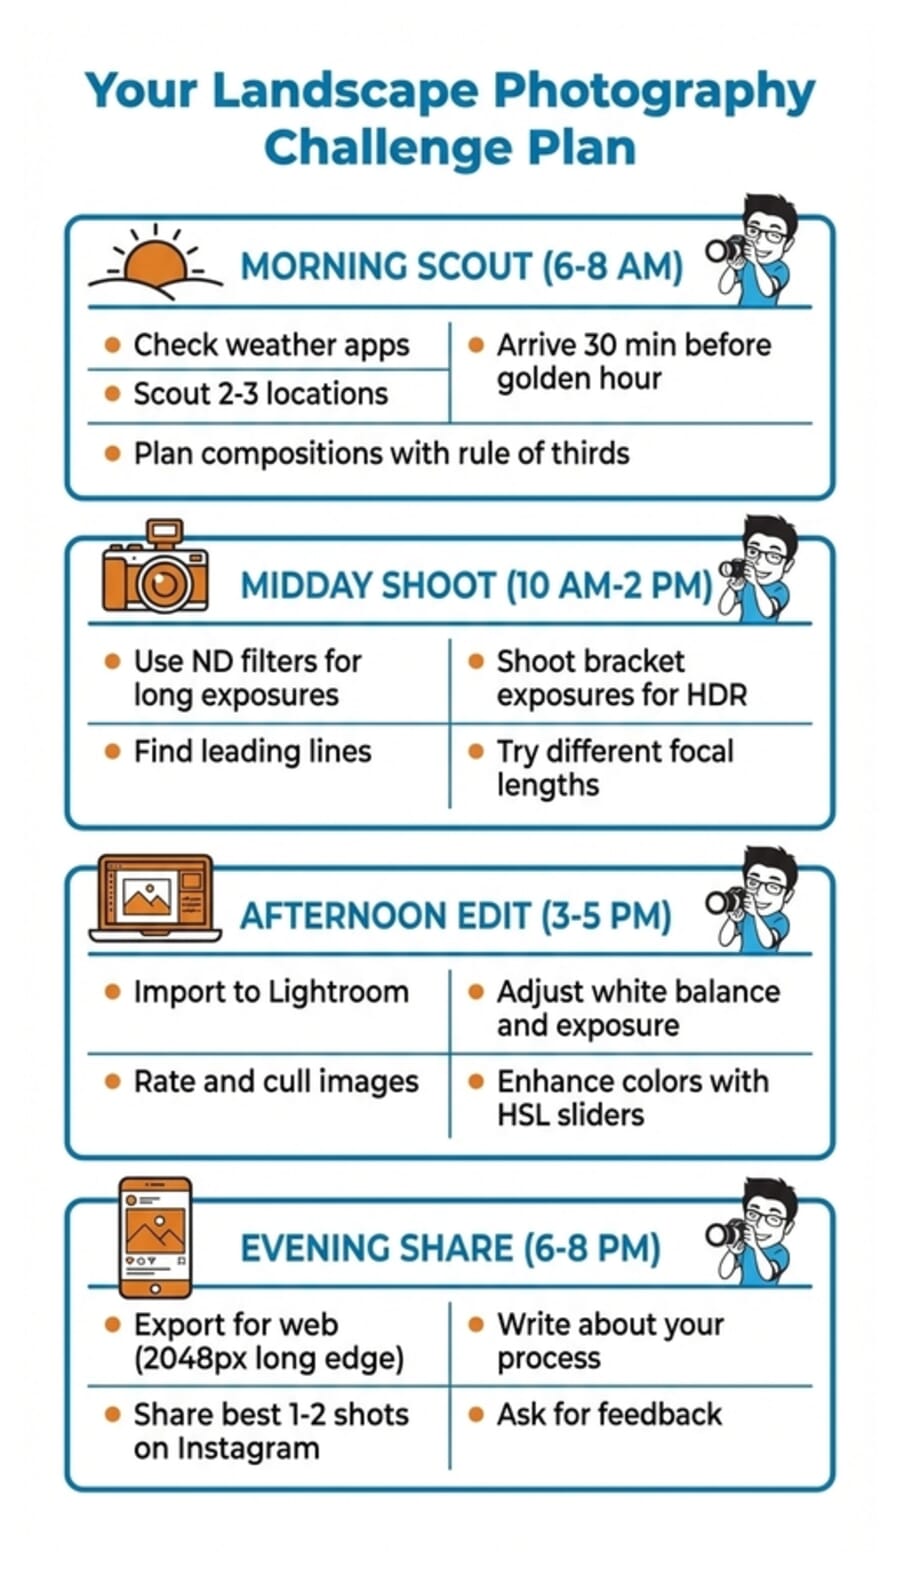
Morning Scout (6-8 AM)
Start the night before by checking weather apps and sunrise/sunset times. Use Google Maps satellite view to identify potential locations within driving distance – look for water features, elevation changes, or interesting foreground elements. Arrive at your chosen spot 30 minutes before golden hour starts. Walk the area and find at least three different compositions before taking a single photo. Use your phone to take reference shots of each setup so you can quickly return to the best one when the light peaks.
Midday Shoot (10 AM – 2 PM)
Most photographers pack up after golden hour, but midday light has its own strengths – especially for forests, canyons, and waterfalls where direct overhead light reduces contrast. Bring an ND filter for long exposures of moving water. Try multiple focal lengths at each location: start wide to establish the scene, then zoom in to find intimate details. Shoot bracket exposures (3 shots at -2, 0, +2 EV) for scenes with high dynamic range. Aim for at least 50 frames across different compositions.
Afternoon Edit (3-5 PM)
Import everything into Lightroom and start by rating your images 1-5 stars. Be ruthless – only your absolute best should get 4-5 stars. For your top picks, start with white balance correction (landscapes shot at golden hour often benefit from pushing warmth slightly). Adjust exposure, recover highlights in the sky, open shadows in the foreground. Use the HSL panel to fine-tune greens and blues. Finish with a subtle vignette to draw the eye inward. Resist the urge to over-saturate.
Evening Share (6-8 PM)
Export your single best image at 2048px on the long edge, 85% quality JPEG. Post it to Instagram or your preferred platform with a brief caption about the location, conditions, and what you learned. Tag it #SundayPhotoChallenge. Then do something most photographers skip: look at your image on your phone screen (not your calibrated monitor) and ask if it still has impact at small size. If yes, you nailed it.
Recommended Camera Settings
These four scenarios cover the most common landscape situations you’ll encounter. Use them as starting points, then adjust based on the specific conditions and your creative intent.
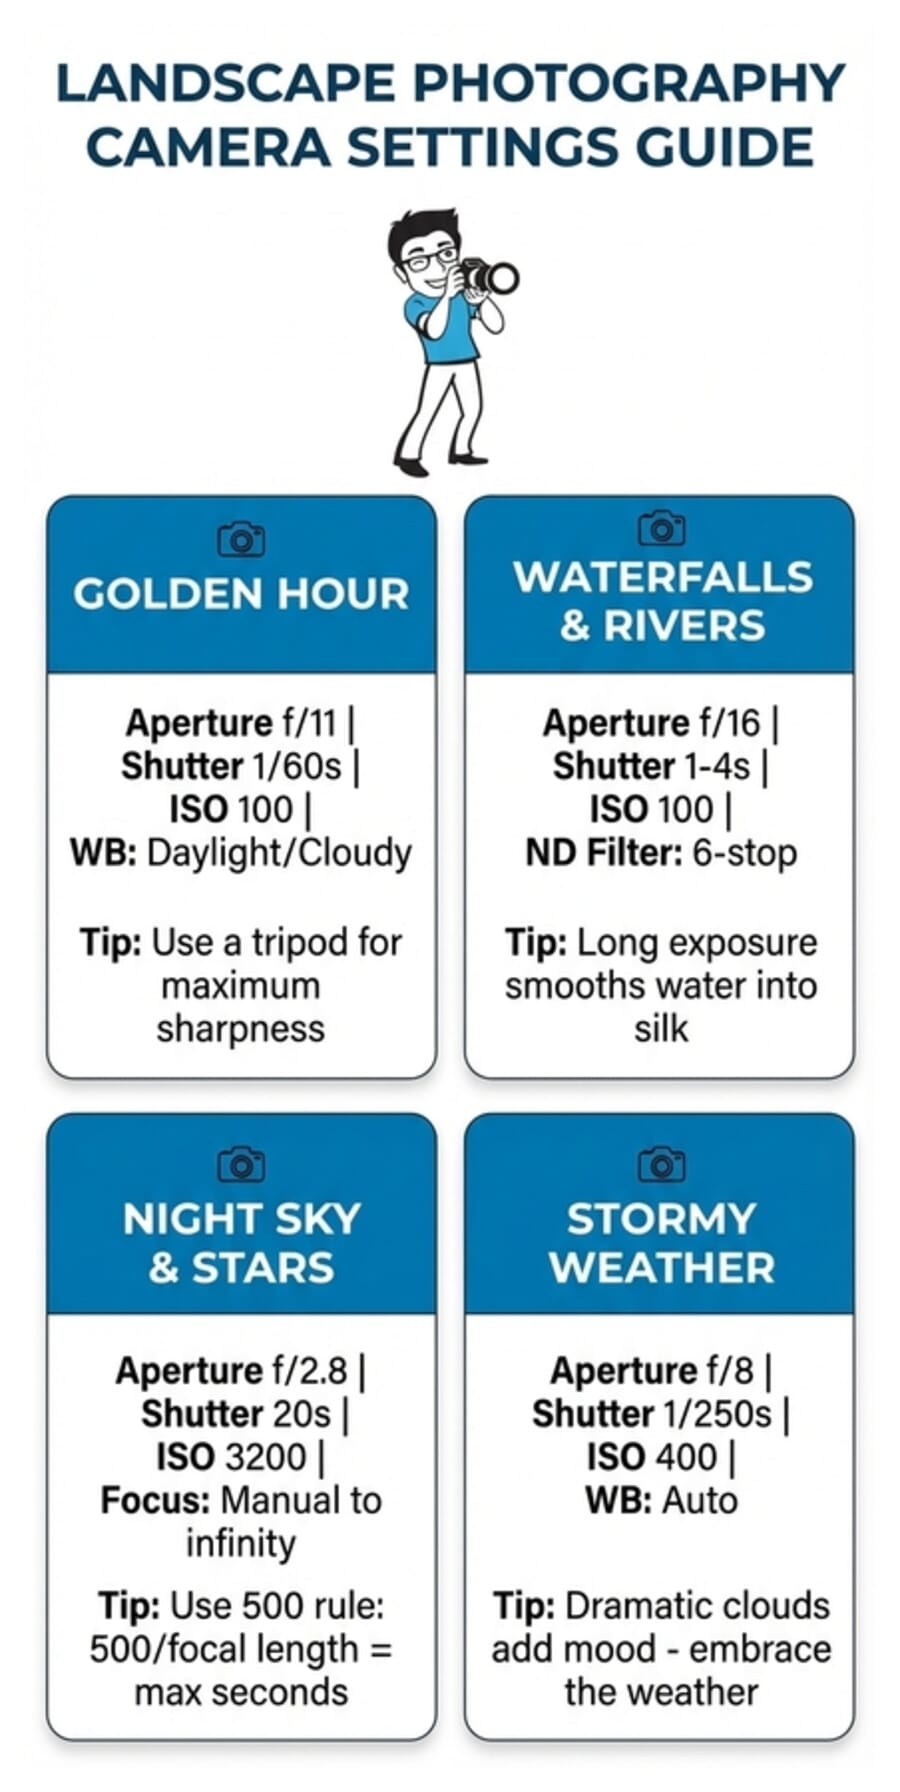
Golden Hour Landscapes
Aperture: f/11 | Shutter: 1/60s | ISO: 100 | White Balance: Daylight or Cloudy
The f/11 sweet spot gives you sharp results across the frame on most lenses. Use a tripod at 1/60s for maximum sharpness at base ISO. Set white balance to Daylight to preserve the natural warmth of golden hour light – Auto WB often neutralizes the warm tones you came for. If shooting handheld, increase ISO to 400 and shutter to 1/250s.
Waterfalls and Rivers
Aperture: f/16 | Shutter: 1-4 seconds | ISO: 100 | Filter: 6-stop ND
Long exposures turn rushing water into smooth silk. A 6-stop ND filter is essential for achieving 1-4 second exposures in daylight. Use f/16 for maximum depth of field (don’t go beyond f/16 on most lenses to avoid diffraction softening). A polarizing filter stacked with the ND removes glare from wet rocks and boosts color saturation in surrounding foliage.
Night Sky and Stars
Aperture: f/2.8 | Shutter: 20 seconds | ISO: 3200 | Focus: Manual to infinity
Use the widest aperture your lens offers to gather maximum light. Apply the 500 rule to calculate maximum shutter speed before stars trail: 500 divided by your focal length equals maximum seconds (for a 24mm lens: 500/24 = 20 seconds). Focus manually on a bright star using live view at 10x magnification. Shoot RAW – you’ll need the extra data for noise reduction in post. A fast wide-angle prime (14mm f/2.8 or 24mm f/1.4) is ideal.
Stormy Weather
Aperture: f/8 | Shutter: 1/250s | ISO: 400 | White Balance: Auto
Stormy conditions mean rapidly changing light, so Auto WB is practical here. The faster 1/250s shutter freezes rain and wind-blown elements. Keep ISO at 400 to maintain a fast enough shutter speed in dim conditions while keeping noise manageable. Watch for brief moments when light breaks through clouds – these create dramatic spotlight effects on the landscape that can transform an ordinary scene into something extraordinary.
Frequently Asked Questions
What is the best lens for landscape photography?
A wide-angle zoom in the 16-35mm range (full frame) or 10-24mm (APS-C) is the most versatile starting point. But as this challenge shows, telephoto lenses from 70-200mm can create equally compelling landscapes through compression and subject isolation. If you can only buy one lens, a 24-70mm f/2.8 covers both wide and moderate telephoto compositions.
Do I need a tripod for landscape photography?
For golden hour, long exposures, and night photography – yes, a tripod is essential. But plenty of great landscapes are shot handheld, especially with modern image stabilization. If you’re shooting above 1/250s in good daylight, a tripod is optional. For this challenge, bring one if you have it, but don’t let the lack of one stop you from shooting.
What are the best camera settings for landscape photography?
Start with aperture priority mode at f/8 to f/11, ISO 100, and let the camera choose shutter speed. This gives you the sharpest results with maximum depth of field. Adjust from there based on conditions: wider aperture in low light, smaller aperture for maximum depth, longer shutter for motion blur in water. Always shoot RAW for maximum editing flexibility.
How do I make my landscape photos more interesting?
Three things make the biggest difference: foreground interest (something compelling in the bottom third of the frame), interesting light (golden hour, storms, fog), and a clear subject. Most boring landscape photos suffer from the same problem – they try to capture everything and end up saying nothing. Pick one element that drew you to the scene and make that the star.
Can I shoot good landscapes with a smartphone?
Modern smartphones produce impressive landscape photos in good light. The ultra-wide lenses on recent iPhones and Samsung Galaxy phones are excellent for wide vistas. The main limitations are dynamic range in high-contrast scenes (bright sky + dark foreground), long exposure capability, and low-light performance. For this challenge, use whatever camera you have – composition and timing matter more than gear.