
- Focus points are the spots where your camera measures distance and locks focus – modern mirrorless cameras have 400-700+ points covering nearly the entire frame.
- AI subject detection has revolutionized autofocus – cameras now automatically find and track eyes, faces, animals, and vehicles in real time.
- Use AF-S (Single) for still subjects and AF-C (Continuous) for anything moving – see the AF mode decision flowchart.
- Single-point AF gives you precise control for portraits, while wide/tracking modes handle fast action and sports.
- Manual focus still wins for macro, astrophotography, and video work where autofocus struggles.
What Are Focus Points?
Focus points are specific locations in your camera’s viewfinder where the autofocus system can lock onto a subject. Think of them as tiny sensors scattered across the frame, each capable of measuring distance and achieving sharp focus.
When you half-press the shutter button, your camera activates these focus points to determine what’s sharp. The point (or points) that lock onto your subject light up in the viewfinder, confirming focus.
The number and placement of focus points directly affects how easily you can focus on subjects in different parts of the frame. More points spread across a wider area means more flexibility in composition – you won’t need to “focus and recompose” nearly as often.
DSLR vs Mirrorless Focus Systems
This is where the biggest leap in autofocus technology has happened. The difference between DSLR and mirrorless focus systems is dramatic.
DSLR cameras use a dedicated autofocus sensor sitting below the mirror. This sensor typically has 9 to 61 focus points clustered in the center of the frame. The edges and corners? Mostly a dead zone for autofocus.
Mirrorless cameras embed focus points directly on the imaging sensor itself. This means focus points can cover nearly the entire frame – 90% or more. Cameras like the Sony A1 II offer 759 phase-detection points spread edge to edge.
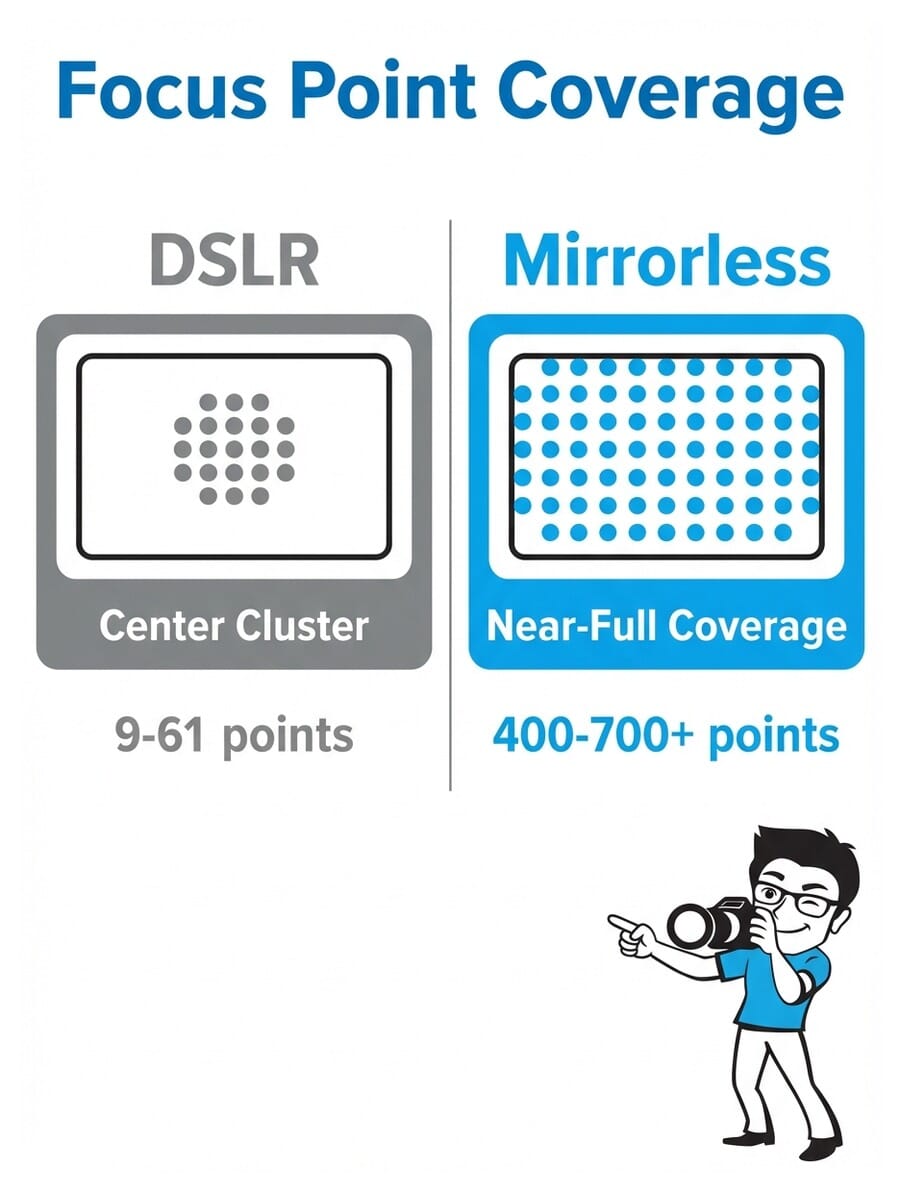
Here’s what this means in practice:
- DSLRs: You often need to focus on a center point, then recompose your shot. This introduces a small margin of error, especially at wide apertures.
- Mirrorless: You can place a focus point directly on your subject anywhere in the frame. No recomposing needed.
- Tracking: Mirrorless cameras can follow a moving subject across the entire frame. DSLRs lose tracking once the subject leaves the central AF zone.
Try this: Set your camera to single-point AF and try placing the focus point in each corner of the frame. On a DSLR, you’ll find the points stop well before the edges. On a mirrorless camera, you can focus on subjects right at the frame edge.
Types of Focus Points
Not all focus points are created equal. There are two main types you’ll encounter in camera specs:
Standard (single-line) points detect contrast along one axis only – either horizontal or vertical. They work fine in most situations but can struggle with subjects that lack detail in that particular direction.
Cross-type points detect contrast along both horizontal and vertical axes simultaneously. This makes them faster, more accurate, and more reliable in difficult conditions. Most modern cameras use cross-type points for the majority of their AF array.
In mirrorless cameras, this distinction matters less because the on-sensor phase-detection AF (PDAF) pixels work differently from DSLR AF modules. Modern mirrorless systems use a hybrid approach combining phase detection for speed with contrast detection for precision – giving you the best of both worlds.
AI Subject Detection: The Game-Changer
Forget manually selecting focus points for most situations. AI-powered subject detection is the single biggest advancement in autofocus technology, and it’s changed how photographers work.
Modern cameras can automatically identify and track:
- Human eyes and faces – even partially obscured or in profile
- Animals – dogs, cats, birds, horses (eye detection works on many species)
- Birds – dedicated bird AF mode on Sony, Canon, Nikon, and Fujifilm bodies
- Vehicles – cars, motorcycles, trains, aircraft
- Insects – newer cameras like the Nikon Z5 II and Canon R5 II detect tiny subjects
The practical impact is huge. For portraits, you no longer need to manually place a focus point on the eye – the camera finds it automatically. For wildlife, the camera tracks a bird as it flies erratically through the frame. You just compose and shoot.
Try this: Enable eye detection AF on your camera, then photograph a friend walking toward you. Watch how the focus box snaps to their eye and follows it as they move. Switch between face/eye and animal detection if you have a pet nearby.
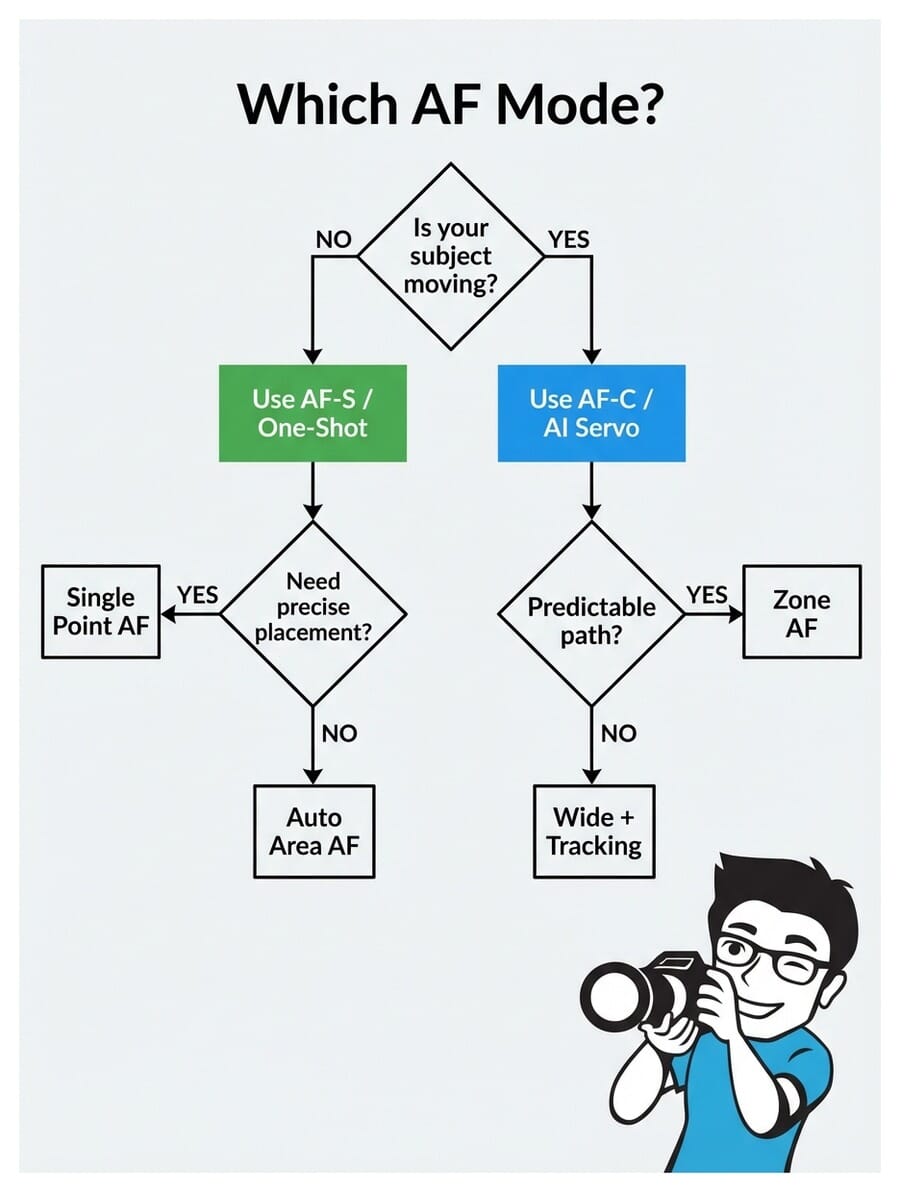
AF Modes Explained: AF-S vs AF-C
Your camera’s autofocus mode controls how focus behaves after it locks on. There are two main modes, and choosing the right one makes or breaks your shot.
AF-S / One-Shot AF (Single)
AF-S (Nikon/Sony) or One-Shot AF (Canon) locks focus once when you half-press the shutter. It stays locked until you release and press again. Perfect for:
- Portraits (subject holding still)
- Landscapes
- Architecture
- Product photography
- Any static subject
AF-C / AI Servo (Continuous)
AF-C (Nikon/Sony) or AI Servo (Canon) continuously adjusts focus as long as you hold the shutter half-pressed. The camera predicts where a moving subject will be at the moment of exposure. Use it for:
- Sports and action
- Wildlife and birds in flight
- Children and pets
- Street photography
- Any moving subject
Pro tip: Many photographers leave their camera in AF-C permanently. Modern continuous AF is so good that it works for still subjects too – it just keeps confirming focus. The only downside is slightly higher battery drain.
AF Area Modes: Where to Focus
While AF modes control how focus works, AF area modes control where the camera looks for subjects. Here are the main options:
Single-Point AF
You manually select one focus point. The camera only focuses on whatever falls under that specific point. This gives you maximum control and is ideal for precise work like portraits (lock onto the near eye) or creating beautiful bokeh with a specific subject.
Zone / Group AF
The camera uses a cluster of focus points in a defined area. You position the zone over your subject, and the camera picks the best point within that zone. Great for subjects that move unpredictably within a general area – like a basketball player driving to the hoop.
Wide Area / Tracking AF
The camera uses a large portion (or all) of the frame to find and track subjects. Combined with AI subject detection, this is incredibly powerful. Point your camera at a scene, and it automatically finds the nearest face or eye.
Auto-Area AF
The camera decides everything – which points to use, what to focus on. Works surprisingly well with modern AI, but can occasionally focus on the wrong subject when multiple options exist.
Focusing for Portraits
Portrait photography demands precise focus. When shooting at wide apertures like f/1.4 or f/1.8, your depth of field is razor-thin – sometimes just a few centimeters. Missing focus by even a small amount means the difference between tack-sharp eyes and a soft, unusable shot.
Recommended settings:
- AF Mode: AF-S (for posed portraits) or AF-C (for candid/moving subjects)
- AF Area: Single-point or Eye AF (if available)
- Focus target: Always the nearest eye to camera
- Aperture: f/1.4-f/2.8 for background blur, f/4-f/5.6 for groups
If your camera has Eye AF, use it. It’s the single most useful feature for portrait photography. The camera finds the subject’s eye and tracks it continuously – even as they move, turn, or tilt their head. Check out our best camera settings for portraits for more detailed guidance.
Try this: Set your lens to its widest aperture (lowest f-number). Focus on someone’s eye from 2 meters away. Now check the image at 100% zoom – is the eye sharp but the ear already soft? That’s how thin your depth of field is, and why precise focus matters so much at wide apertures.
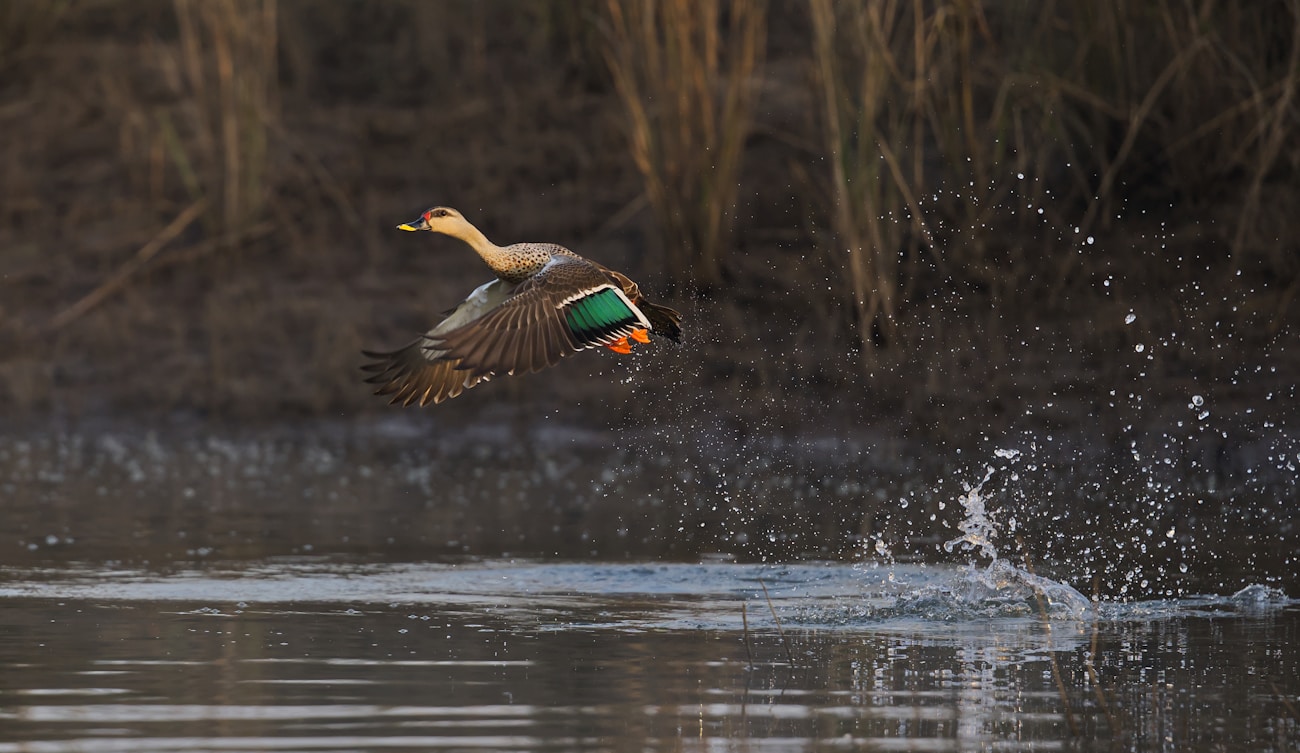
Focusing for Action and Sports
Action photography is where your autofocus system earns its keep. Subjects are moving fast, changing direction, and you often have a fraction of a second to nail the shot.
Recommended settings:
- AF Mode: AF-C / AI Servo (always continuous)
- AF Area: Zone AF for predictable movement, Wide + Tracking for erratic subjects
- Shutter speed: 1/500s minimum, 1/1000s or faster for fast action
- Burst mode: High-speed continuous shooting (10-30fps depending on camera)
- Subject detection: Enable animal/bird AF for wildlife, or human detection for sports

For birds in flight, use Wide + Tracking AF with bird detection enabled. Point your camera at the bird, half-press the shutter to initiate tracking, and the camera handles the rest. Modern cameras like the Sony A9 III and Nikon Z9 can track subjects at up to 120fps with near-perfect accuracy.
For more tips on shooting in challenging conditions, see our guide to low light photography and outdoor camera settings.
Focusing for Landscapes
Landscape photography requires a different approach to focus. Instead of isolating one subject, you typically want everything sharp from foreground to background.
Recommended settings:
- AF Mode: AF-S (nothing is moving)
- AF Area: Single-point (place it precisely)
- Aperture: f/8-f/11 for maximum sharpness, f/16 when you need extreme depth of field
- Focus distance: Focus about 1/3 into the scene (hyperfocal distance)
- Tripod: Highly recommended at narrow apertures for stability

The hyperfocal distance technique maximizes depth of field. Instead of focusing on infinity, you focus at a specific distance where everything from half that distance to infinity appears sharp. Many photographers use apps like PhotoPills or HyperFocal Pro to calculate this.
Understanding the exposure triangle is essential for balancing aperture (depth of field) with shutter speed and ISO in landscape work.
When to Use Manual Focus
Despite incredible autofocus technology, there are situations where manual focus is still the better choice:
Macro Photography
At extreme close-up distances, depth of field is measured in millimeters. Autofocus can hunt back and forth without locking. Manual focus with focus peaking (a colored highlight showing what’s sharp) gives you far more control.

Astrophotography
Autofocus can’t lock onto stars. Switch to manual focus, use live view at maximum magnification, and carefully focus on a bright star until it appears as a tight pinpoint. Many astrophotographers tape their focus ring once set.
Video Production
While camera autofocus in video has improved dramatically, professional videographers often prefer manual focus for creative control. Focus pulls (smoothly shifting focus between subjects) are a cinematic technique that requires manual operation. Focus peaking and magnification assist tools make this easier on mirrorless cameras.
Common Focus Mistakes and How to Fix Them
Even experienced photographers run into focus problems. Here are the most common issues and their solutions:
1. Photos are consistently front or back focused
Your lens may need AF fine-tuning (called AF Micro Adjustment on Nikon, AF Microadjustment on Canon). Most cameras let you calibrate individual lenses. Shoot a test chart at a 45-degree angle and check if focus lands in front of or behind the target.
2. Autofocus hunts back and forth without locking
- The subject may lack contrast (plain wall, clear sky) – find an edge or texture to focus on
- Light may be too low – use an AF assist beam or switch to manual focus
- You may be too close (closer than the lens’s minimum focus distance)
3. Camera focuses on the background instead of the subject
Switch from Auto-Area to Single-Point AF or enable subject detection. The camera can’t read your mind about what matters – you need to tell it, either by selecting a focus point or letting AI detection find the right subject.
4. Moving subjects are blurry
Check two things: Are you in AF-C mode? And is your shutter speed fast enough? Focus tracking won’t help if your shutter speed is too slow to freeze motion. Use at least 1/500s for moderate movement, 1/1000s+ for fast action.
5. Focus is sharp in live view but soft in the final image
This is usually camera shake, not a focus issue. Use a tripod, enable image stabilization, or increase your shutter speed. A good rule: your shutter speed should be at least 1/(focal length) – so 1/200s for a 200mm lens.
Learn more about mastering your metering modes and indoor camera settings to complement your focus technique.
How many focus points do I actually need?
For most photography, anything above 100 phase-detection points with good frame coverage is plenty. The difference between 400 and 700 points is minimal in practice. What matters more is the quality of subject detection and tracking algorithms. A camera with 400 points and excellent AI tracking will outperform one with 700 points and mediocre software.
Does Eye AF work with glasses or sunglasses?
Eye AF works well with regular glasses on most modern cameras. Sunglasses can cause problems since the camera relies on detecting the eye itself. In challenging cases, switch to face detection mode instead. Some newer cameras (like the Sony A1 II and Nikon Z6 III) have improved algorithms that handle partial eye obstruction better than older models.
What is the difference between AF points and AF area modes?
Focus points are the physical sensors (or sensor pixels) that detect focus. AF area modes determine how many of those points the camera uses at once and how it selects them. Think of focus points as individual workers and AF area modes as the management strategy – single-point puts one worker on the job, zone assigns a team, and wide/tracking deploys the entire workforce.
Can I just leave my camera in AF-C all the time?
Yes, many photographers do exactly this. Modern AF-C is smart enough to hold focus on still subjects while being ready to track if they start moving. The only downsides are slightly higher battery consumption and the fact that AF-C won’t prevent you from firing the shutter if focus isn’t locked (AF-S blocks the shutter until focus confirms). For critical still subjects where you want guaranteed focus confirmation, AF-S is still preferable.
When should I switch to manual focus?
Switch to manual focus for macro photography (extreme close-ups where AF hunts), astrophotography (AF can’t lock on stars), creative video focus pulls, and any low-contrast scene where autofocus struggles. Also consider manual focus when shooting through obstacles like fences or glass where AF might lock onto the wrong surface. Use focus peaking and magnification on mirrorless cameras to assist.
Featured image: Photo by Joseph Agboola on Unsplash.