
- Master 20 go-to cute poses that work for any body type – from standing and sitting to creative prop-based shots.
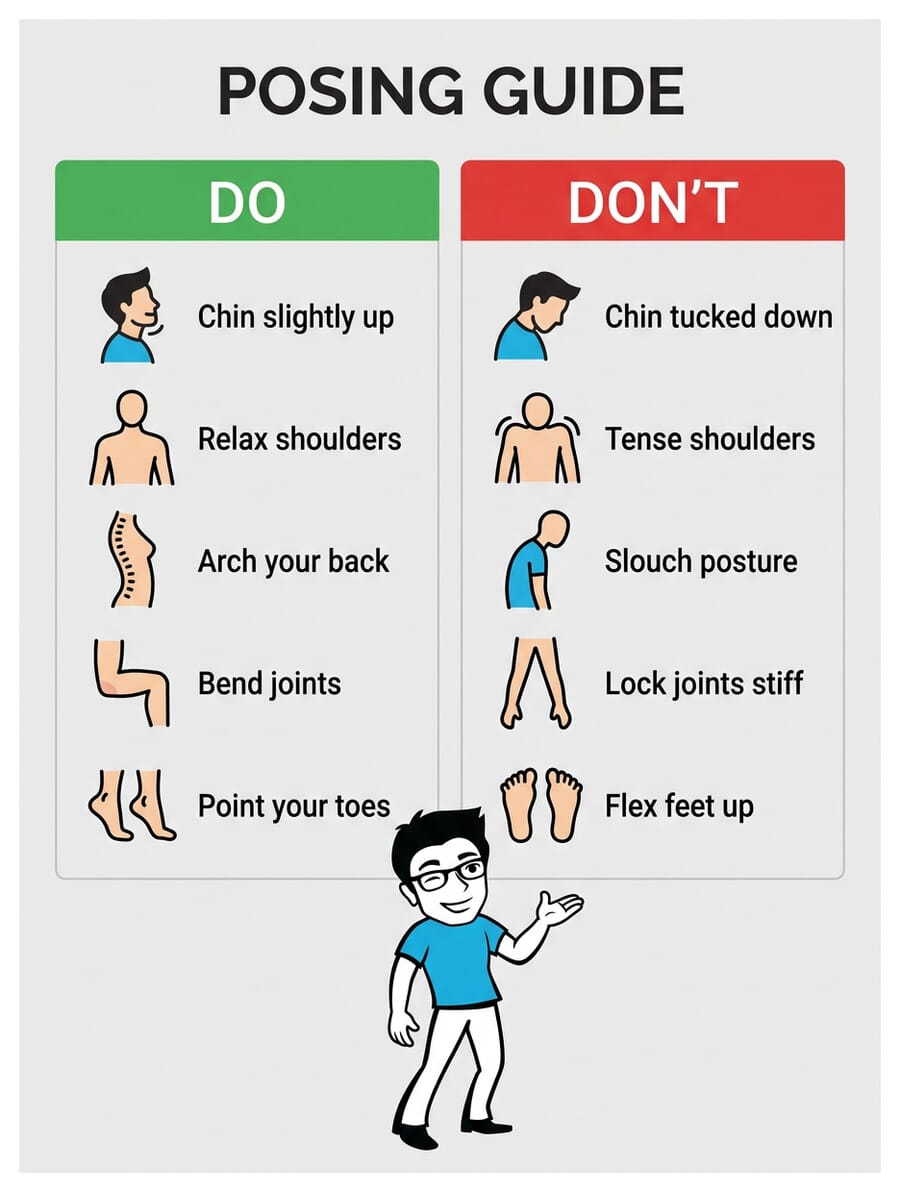
- Key posing principles: keep your chin slightly up, relax your shoulders, bend at least one joint, and shoot from eye level for the most flattering results.
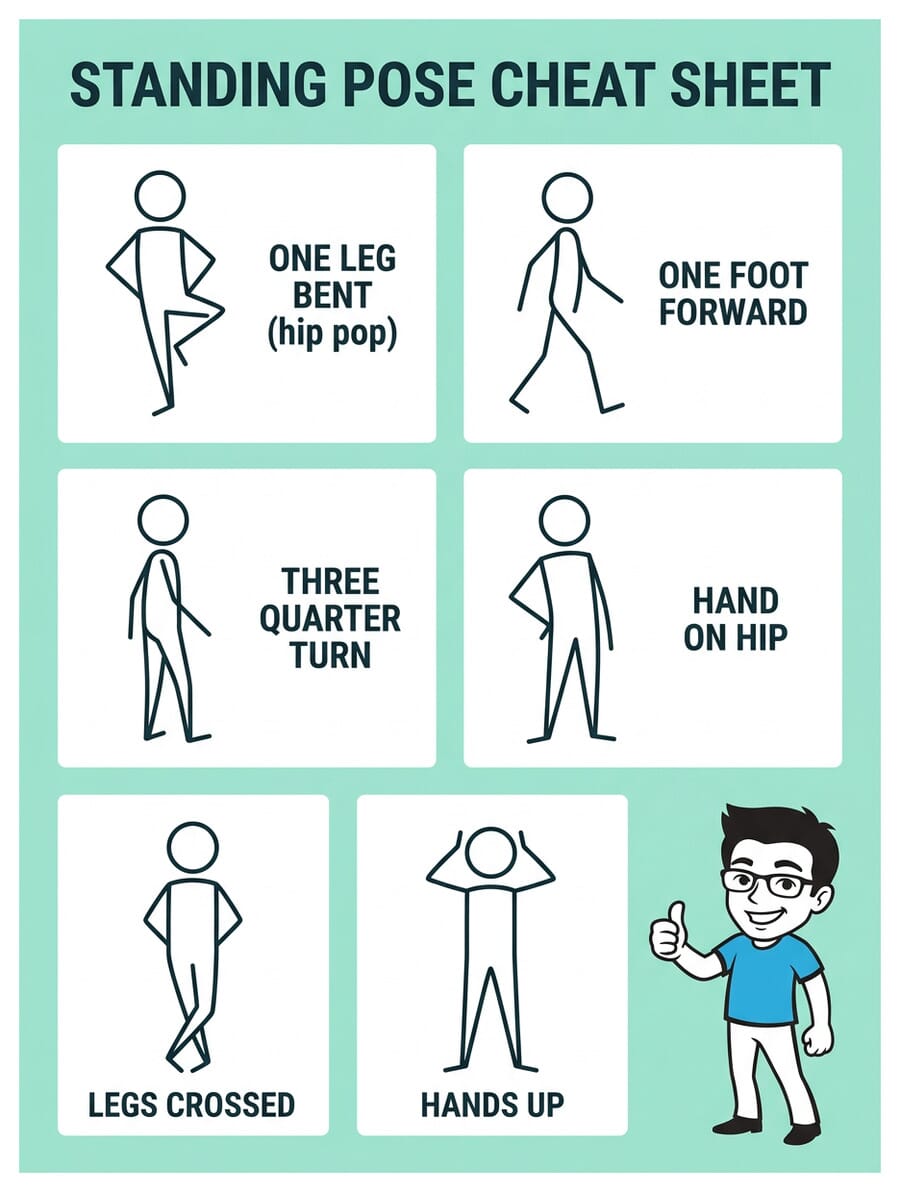
- Standing poses like the three-quarter view and hand-on-hip create natural curves, while sitting poses like criss-cross add visual interest.
- Always give your hands something to do – play with hair, adjust sunglasses, or hold a prop to avoid awkward idle hands.
- Use flattering camera angles – slightly above eye level is universally slimming, while low angles project power and confidence.
- Test your posing knowledge with our Instagram Posing Quiz at the end of this guide.
Your Instagram feed is only as strong as your poses. A great outfit, perfect lighting, and a beautiful background won’t save a photo if the pose feels stiff or unnatural.
The good news? Posing is a skill you can learn. You don’t need to be a professional model – you just need to know a handful of reliable go-to poses and understand the basics of what makes them work.
This guide breaks down 20 cute poses for Instagram with practical, step-by-step instructions for each one. You’ll learn exactly how to position your body, which camera angles work best, and how to make every pose look natural rather than forced.
1. One Leg Up, One Leg Down
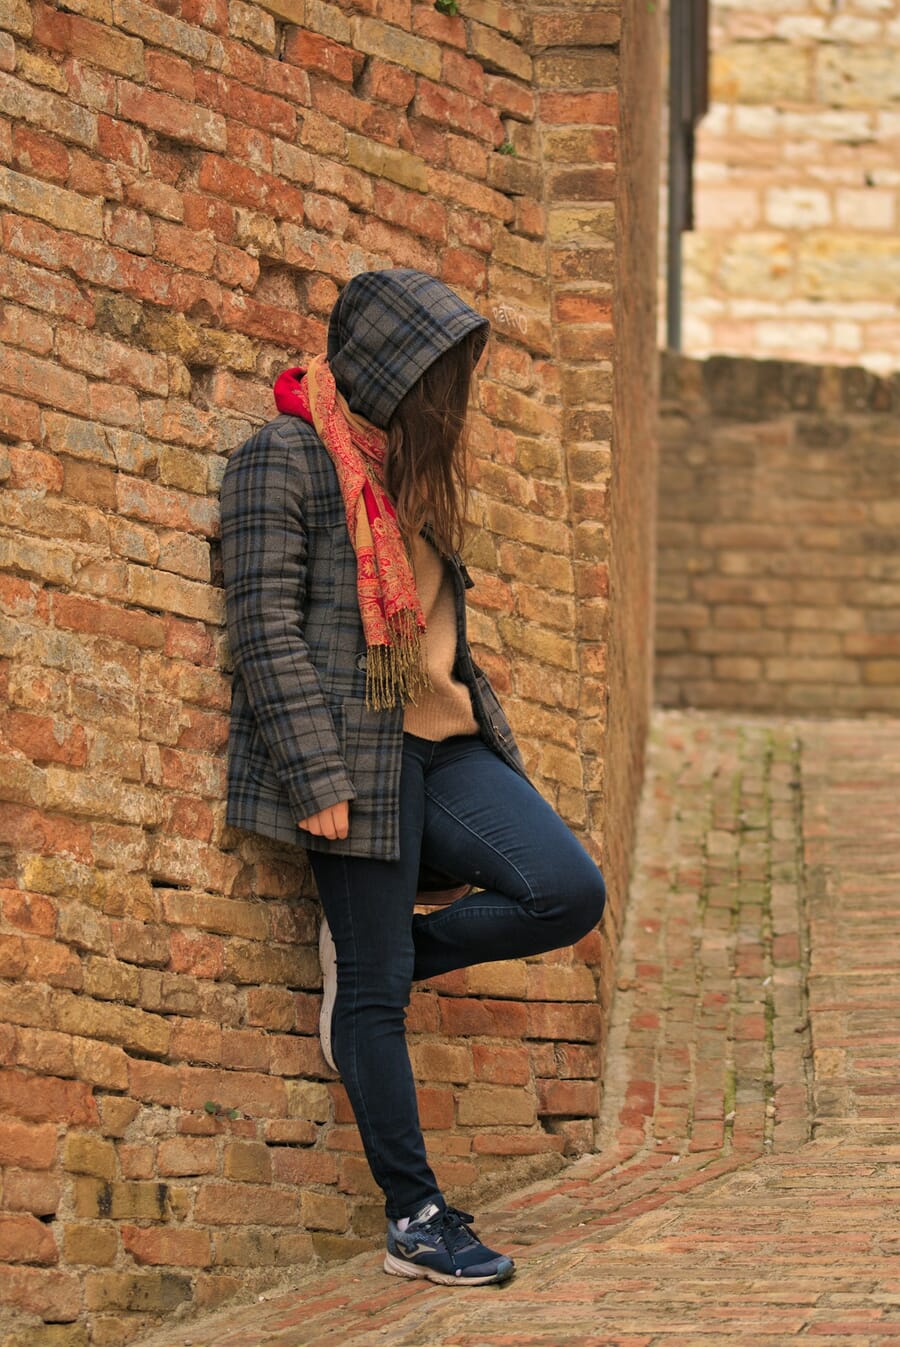
This is one of the most versatile poses in your arsenal because it works whether you’re standing, leaning against a wall, or sitting. The concept is simple: one leg stays straight while the other bends at the knee. That asymmetry creates instant visual interest and makes the pose feel dynamic rather than stiff.
How to do it: If you’re leaning against a wall, place the sole of one foot flat against the wall behind you with the knee bent outward. Keep your supporting leg straight. If you’re just standing, lift one foot slightly off the ground like a flamingo. The key is keeping the bent leg relaxed – don’t force the knee too high.
Camera tip: Shoot this from eye level or slightly below to emphasize the full body line. Turn your phone to portrait mode and frame from mid-thigh up for a flattering crop. Natural side lighting works beautifully here – position yourself so the light falls across your body at roughly a 45-degree angle.
Why it works: The bent leg creates a triangle shape that draws the viewer’s eye upward through the frame. It also shifts your weight to one side, which naturally creates subtle curves in the hips and torso that look great on camera.
2. One Leg Bent
A close cousin of the previous pose, this standing variation focuses on the hip pop – one of the most flattering movements in portrait photography. When you bend one knee while keeping the other leg straight, the hip on the bent-knee side naturally drops, creating a gentle S-curve through your body.
How to do it: Stand with your weight on one leg. Slightly bend the opposite knee and let your hip fall to the weighted side. Don’t exaggerate it – just let gravity do the work. Your shoulders should stay relatively level while your hips create the curve. Place your hands on your thighs or let one arm hang naturally.
Camera tip: This pose photographs best from a few feet away with a slight zoom rather than up close with a wide-angle lens. Wide-angle distortion from phone cameras can exaggerate proportions unfavorably. Step back a few feet and use your phone’s 2x zoom if available.
Why it works: The S-curve is one of the most universally flattering shapes in photography composition. It mimics natural resting posture, so the pose reads as relaxed and confident rather than posed.
3. One Foot Forward
Want that effortless “caught mid-stride” look? Throw one foot forward. This pose creates the illusion of movement and makes for dramatic walking shots without actually needing to walk. The extended leg creates compositional lines that lead the viewer’s eye straight up to your face.
How to do it: Start by standing normally, then extend one foot about 12-18 inches in front of the other. Here’s the key detail: point your toe like a ballet dancer. A pointed toe elongates the leg line and looks far more elegant than a flexed foot. Keep your weight on the back foot so the front leg looks relaxed and natural.
Camera tip: This pose offers great flexibility with shooting angles. Try it from a low angle (phone near ground level, angled up) to make legs look longer and add a sense of power. Or shoot from eye level for a more editorial feel. Golden hour side lighting is ideal for highlighting the leg extension.
Why it works: The forward foot creates a triangular composition that’s inherently pleasing to the eye. It also elongates the entire body line, adding a few visual inches of height.
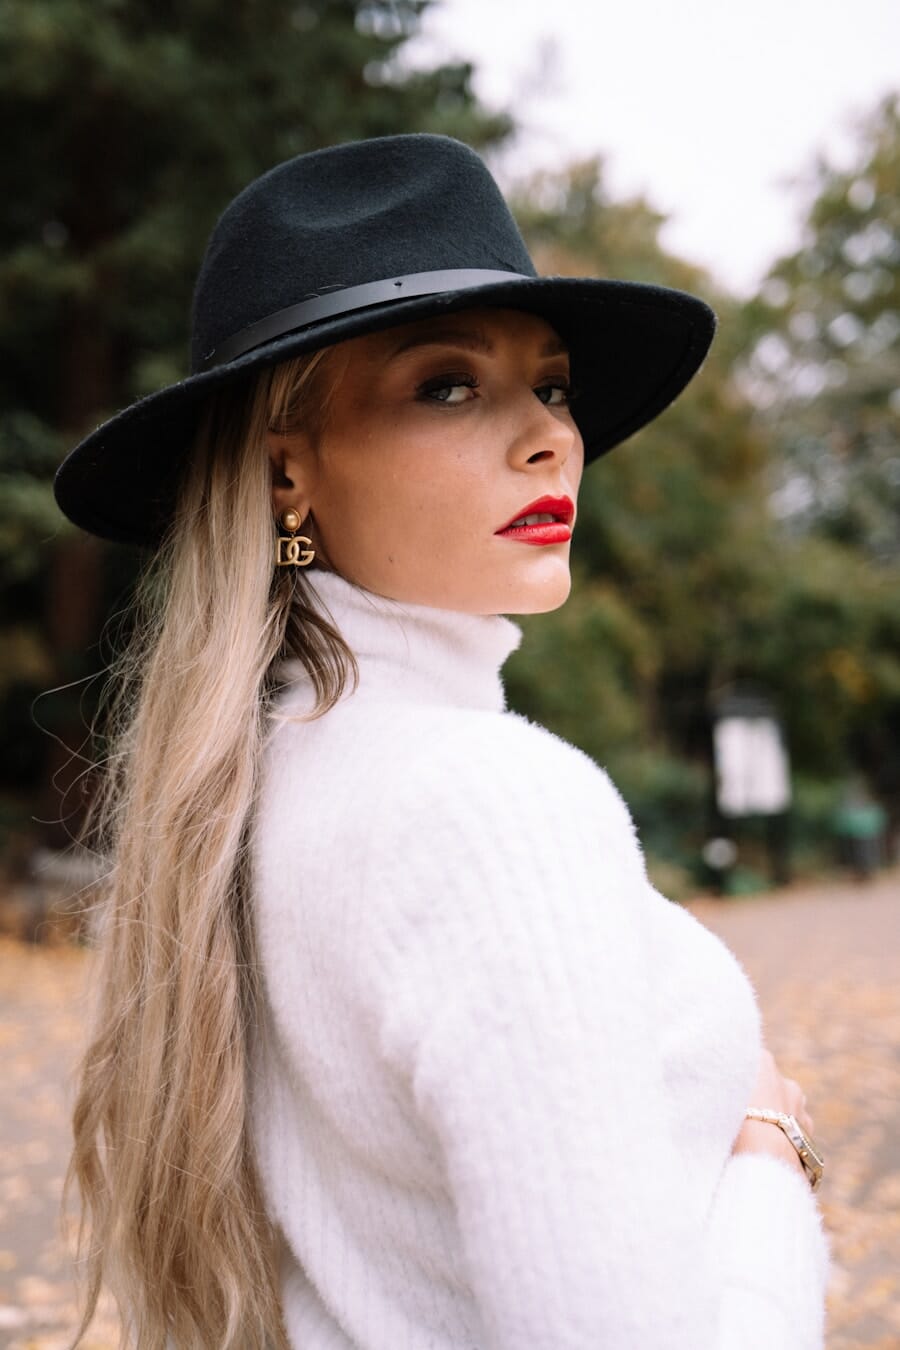
4. Three-Quarter View
If you only learn one pose from this entire guide, make it this one. The three-quarter view is the foundation of flattering portrait photography and works for virtually every body type. Instead of facing the camera straight on, you turn approximately 45 degrees away.
How to do it: Start by pointing your hips toward the camera. Then rotate your upper body about 45 degrees to one side so one shoulder is closer to the camera than the other. Your face can either follow the shoulder rotation or turn back toward the camera for a more engaging look. Experiment with a slight chin tilt – either up for confidence or down for a more intimate feel.
Camera tip: The three-quarter view works at any distance, but it’s especially flattering for half-body and full-body shots. Avoid using the front-facing camera for this one – the quality difference matters when you’re showing body lines. Ask a friend to shoot, or use a tripod with a self-timer.
Why it works: Facing the camera straight-on makes the body look wider. The 45-degree angle showcases your curves while naturally slimming the torso. Professional photographers have used this angle for decades because it adds depth and dimension.
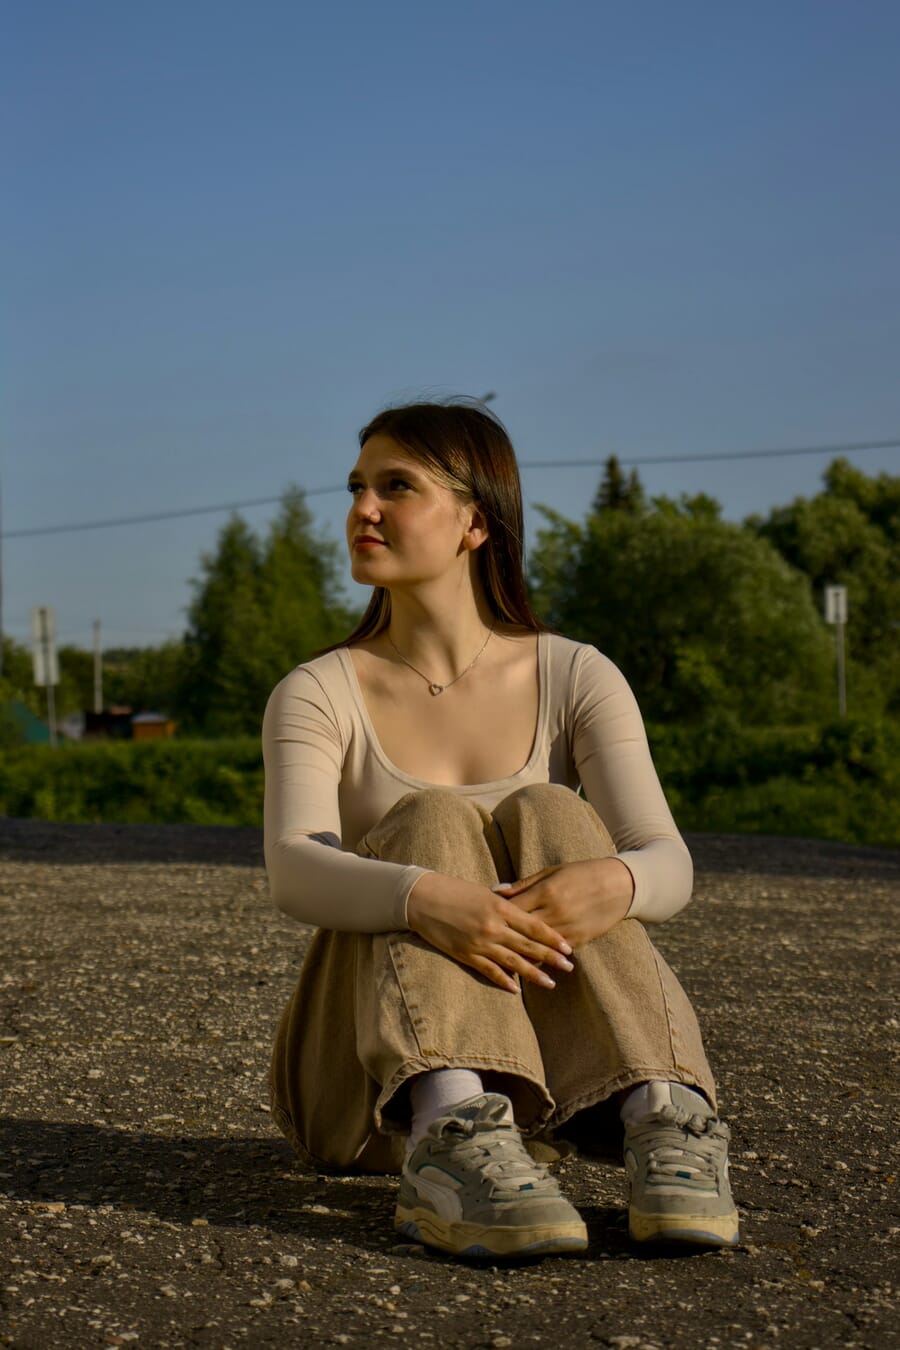
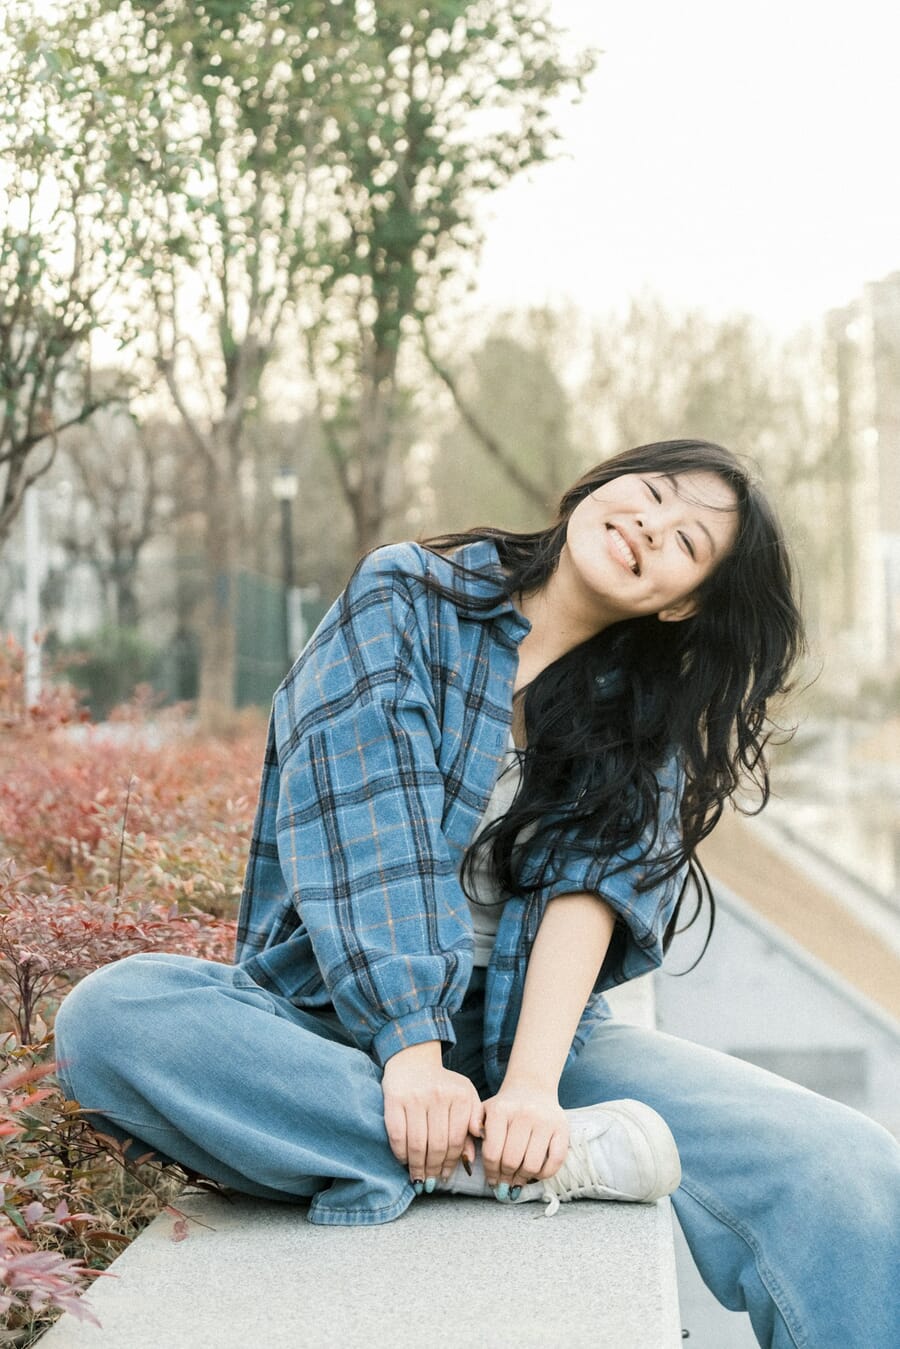
5. Criss-Cross
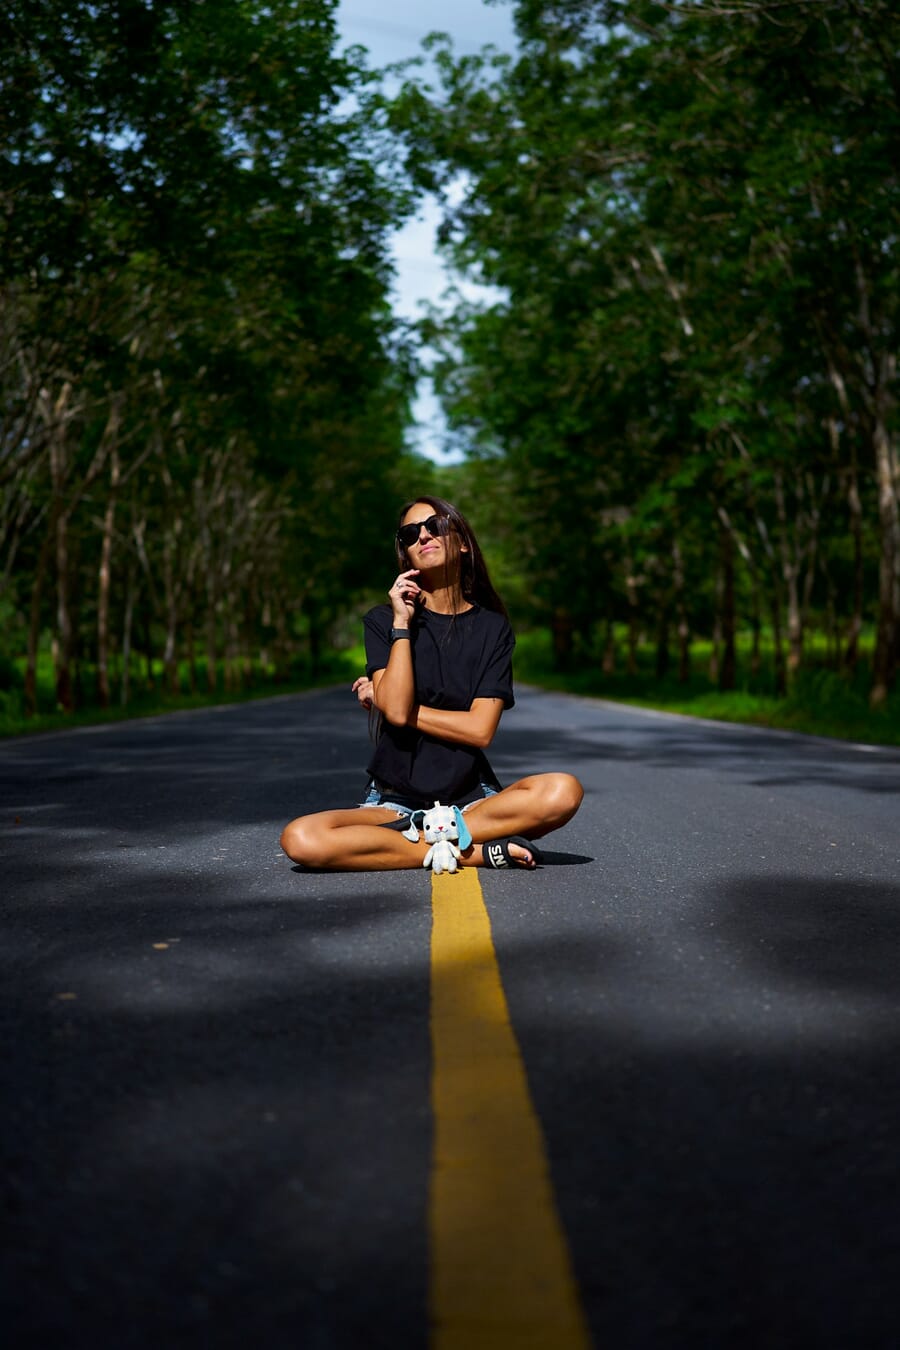
Sitting on the ground immediately changes the energy of a photo – it feels casual, approachable, and authentic. The criss-cross (or cross-legged sit) is one of the most photogenic sitting positions because it creates multiple visual layers and keeps the eye moving around the frame.
How to do it: Sit on the ground with your legs crossed casually. Don’t force a perfect pretzel shape – a relaxed cross is more natural. Once settled, experiment with your upper body: lean forward with elbows on your knees, rest your chin in one hand, or sit upright with hands resting lightly on your knees. Keep one foot with the sole showing for added visual texture.
Camera tip: Shoot from a slightly higher vantage point – about 30-45 degrees above eye level. This angle slims the face and draws attention away from legs (which can look bulky when compressed against the ground). Avoid shooting from below, which can create unflattering chin shadows.
Why it works: The crossed legs create a stable visual base while the upper body remains free to express personality. It’s also one of the few sitting poses that works equally well on grass, pavement, a dock, or any flat surface.
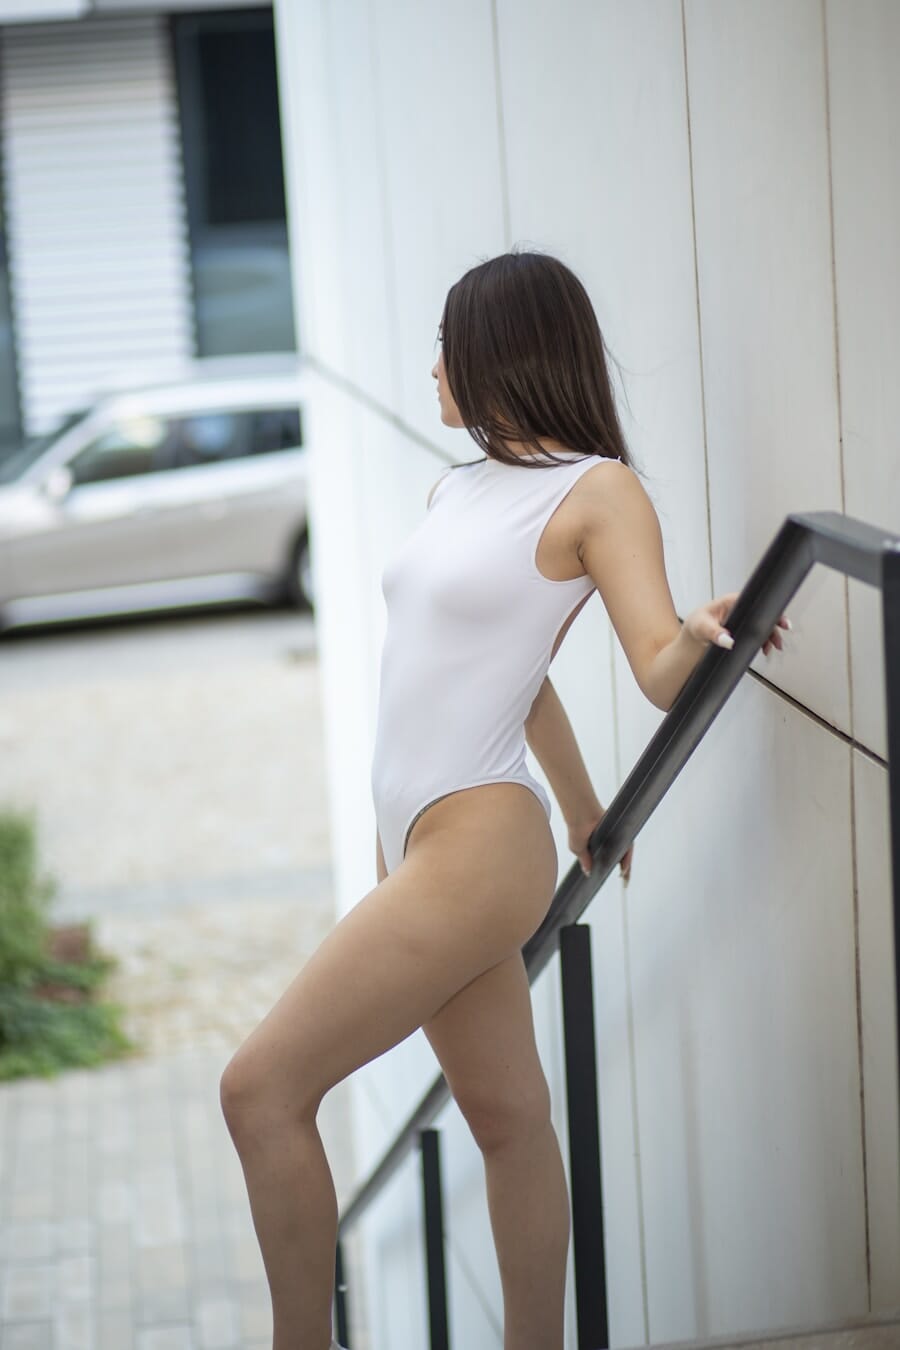
6. Lean and Arch – Back to Object
Walls, fences, railings, and pillars are everywhere – and they make fantastic posing props. The back-to-object lean uses any flat surface behind you to create an effortless, editorial look. The arch in your back is what separates this from just standing near a wall.
How to do it: Place your shoulder blades against the wall or fence. Rest your elbows or forearms on the surface behind you for support. Now the important part: push your chest slightly forward and let your lower back arch naturally away from the wall. Your feet should be about a foot away from the wall’s base. Experiment with one leg crossed in front of the other.
Camera tip: Side angles work best for this pose – shoot from a 30-degree angle rather than straight on to capture the arch in your back. If you’re using a phone camera, enable portrait mode to blur the wall texture and keep the focus on you. Soft, overcast light is ideal to avoid harsh wall shadows.
Why it works: The lean gives you something to rest against (which naturally relaxes muscles), while the arch creates flattering body lines. It’s a go-to pose for fashion and lifestyle content because it looks effortless but photographs beautifully.
7. Lean and Arch – Front to Object
The reverse of the previous pose, the front lean (sometimes called the “vacation pose”) is what you naturally do when you lean over a balcony railing to admire a view. It’s one of the most naturally flattering poses because it mimics real, candid behavior.
How to do it: Face a railing, fence, or ledge at roughly hip height. Lean your upper body forward over it, resting your forearms on the surface. Let your back arch naturally – don’t force it. Cross one leg behind the other for added elegance. Look back over your shoulder toward the camera, or gaze into the distance for a more contemplative mood.
Camera tip: The photographer should position themselves slightly to the side (about 30-45 degrees) and at your eye level or slightly below. This captures the full body line from the back arch to the crossed legs. Works beautifully during golden hour when the warm backlight outlines your silhouette.
Why it works: Leaning forward naturally engages your core and creates a subtle arch that’s flattering from behind. It’s also one of the easiest poses to execute because it uses real body mechanics – you’re literally just leaning on something.
8. Over the Knees
This seated pose creates a compact, cozy frame that feels intimate and personal. Unlike the criss-cross, both feet stay flat on the ground with knees pointing upward, giving your arms a natural resting place.
How to do it: Sit on the ground with both feet planted firmly, knees bent and pointing up. Rest your elbows on your knees and let your hands hang loose – or bring one hand up to rest your chin on. Lean forward slightly from the waist to avoid looking stiff. Keep your back relatively straight rather than hunching.
Camera tip: Shoot from directly in front at eye level (which means the photographer needs to be sitting too). This creates an intimate, face-to-face feel. Alternatively, shoot from slightly above to show the full pose including the legs. For phone photography, prop the phone against something stable and use the self-timer.
Why it works: The raised knees create a natural frame around the face and upper body, directing attention exactly where you want it. It also feels genuinely candid – like someone caught you lost in thought – which is pure Instagram gold.
9. Chair Sit
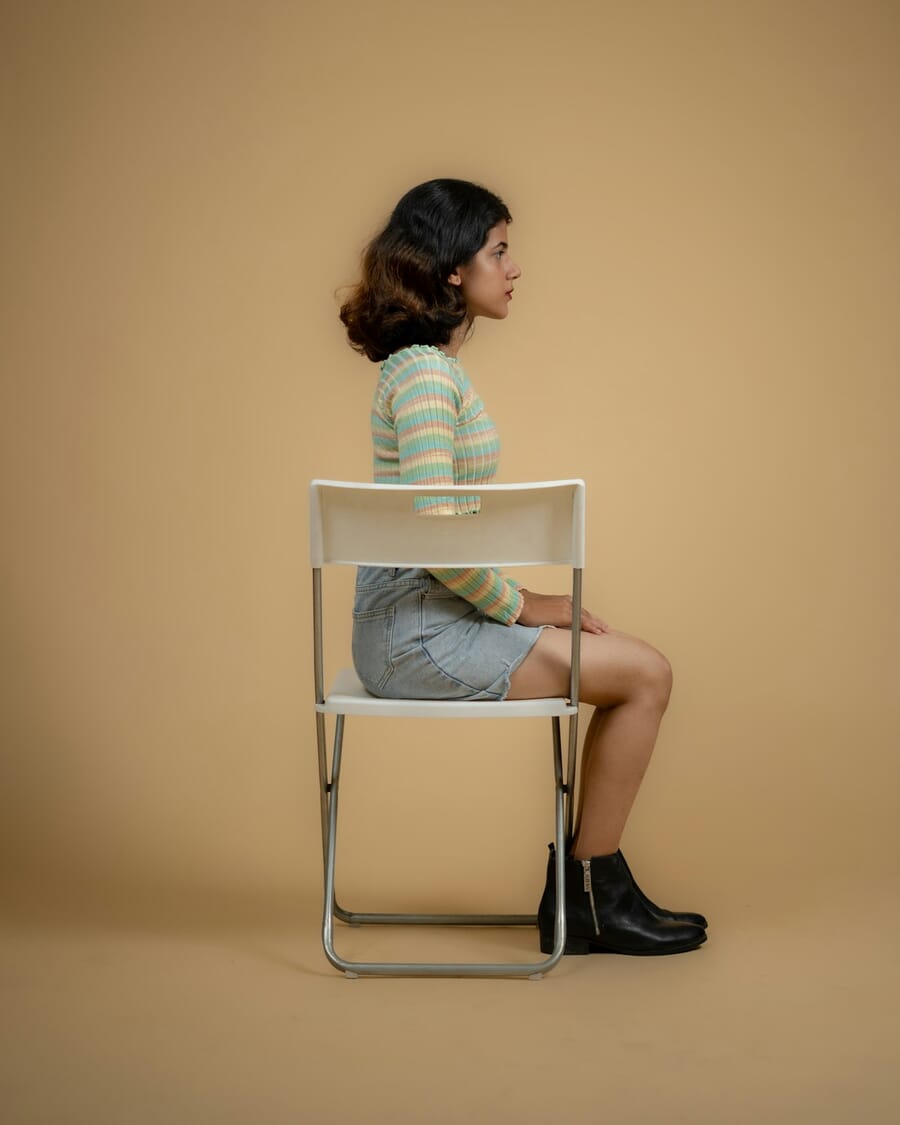
Chairs are posing props hiding in plain sight. Cafes, parks, hotel lobbies – they’re everywhere, and they immediately add context and interest to your shot. The secret to chair poses? Never sit all the way back.
How to do it: Sit on the very front edge of the chair. This might feel uncomfortable at first, but it prevents the camera from catching you in a slouch. With your weight forward, you can arch or straighten your back freely. Your legs have full range of motion: cross them at the ankle, extend one foot forward, or angle them to the side. Keep one hand on the chair arm or armrest for a relaxed look.
Camera tip: For full-body chair shots, the photographer should be at your eye level or slightly above. This captures both the elegant seated posture and the leg positioning. If shooting yourself, set the phone across from you at table height. The portrait mode on most phones works well to separate you from the chair and background.
Why it works: Sitting at the edge creates an alert, engaged posture that reads as confident on camera. The chair provides natural arm-resting options while the forward position keeps your body lines clean and defined.
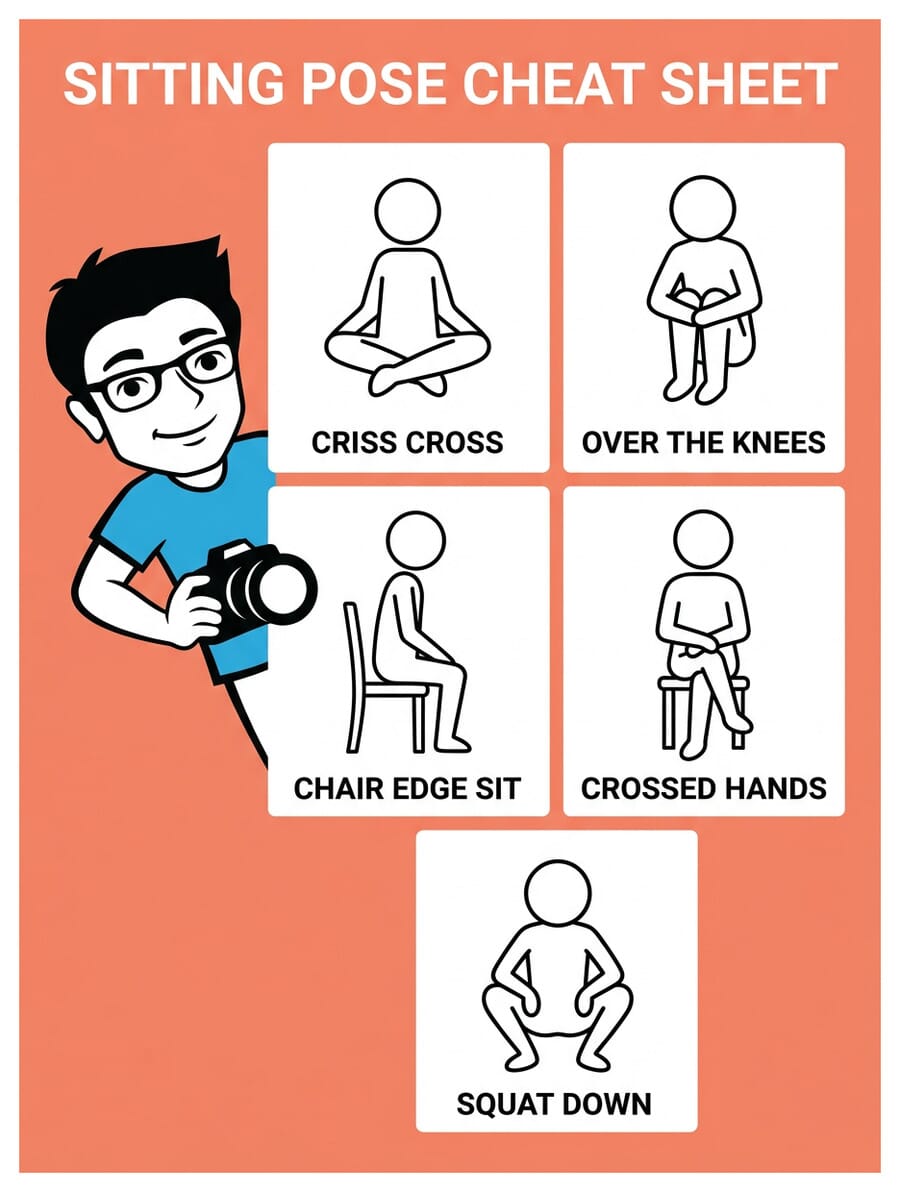
10. Crossed Hands
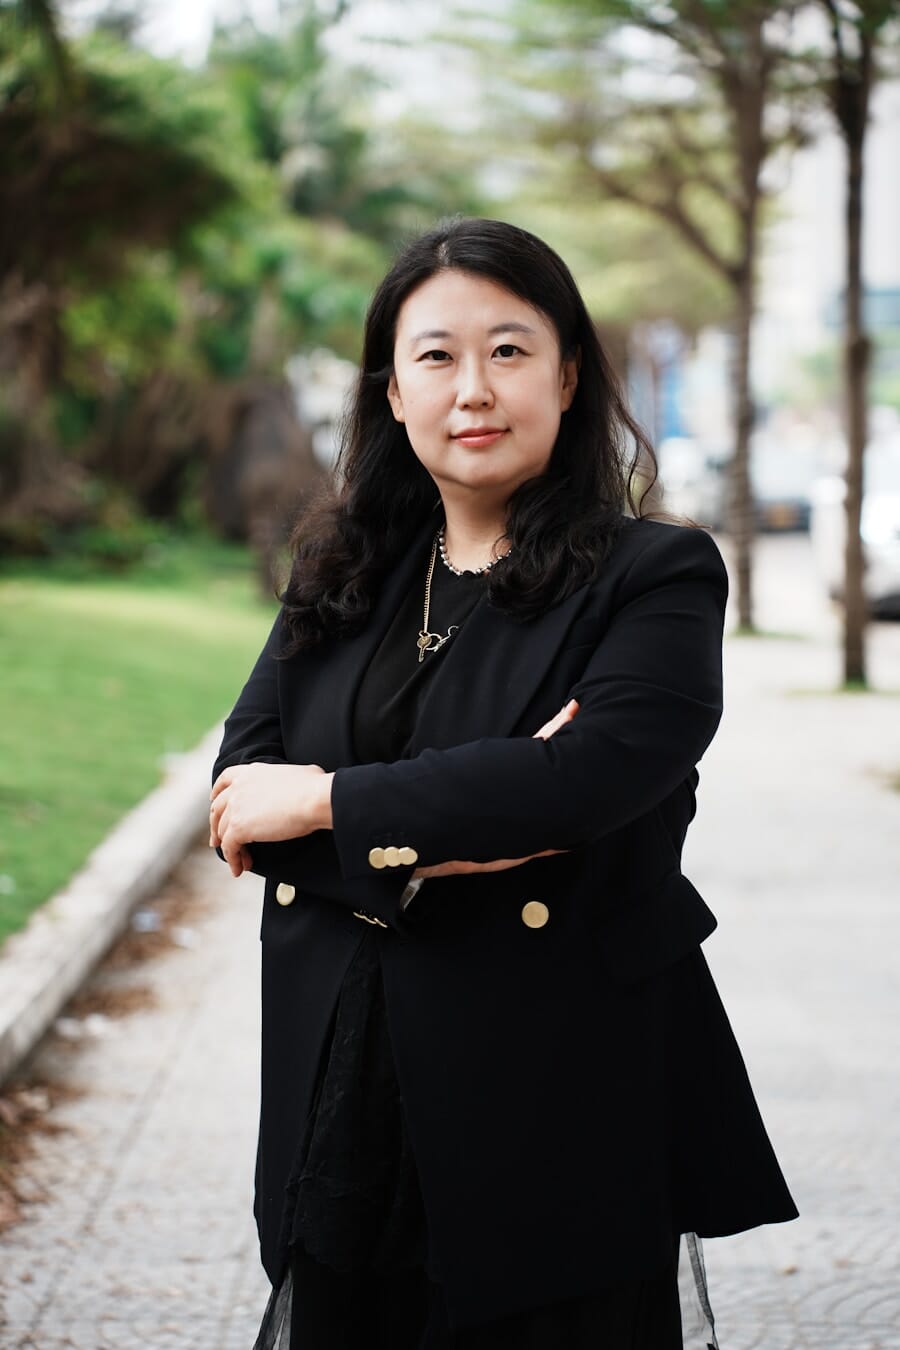
The crossed hands pose is a subtle power move. When your arms cross casually over your body, they create an X-shape that draws the viewer’s eye straight to your face. It works standing or seated and solves the eternal problem of what to do with your hands.
How to do it: Cross your arms loosely across your torso – not the tight, defensive “I’m angry” cross, but a gentle, relaxed layering of one forearm over the other. Let your hands drape naturally rather than gripping your arms. For a softer variation, cross at the wrists instead of the forearms and rest your hands on opposite shoulders.
Camera tip: Works best as a half-body or close-up shot since the arm positioning is the star of the pose. Shoot from slightly above to capture the X-shape clearly. Even, diffused lighting (like shade or overcast sky) is ideal so shadows don’t complicate the arm lines.
Why it works: The X-shape creates strong compositional lines that guide the eye upward to the face. Psychologically, the pose reads as confident and self-assured – qualities that perform exceptionally well on Instagram.
11. Hands Raising Up
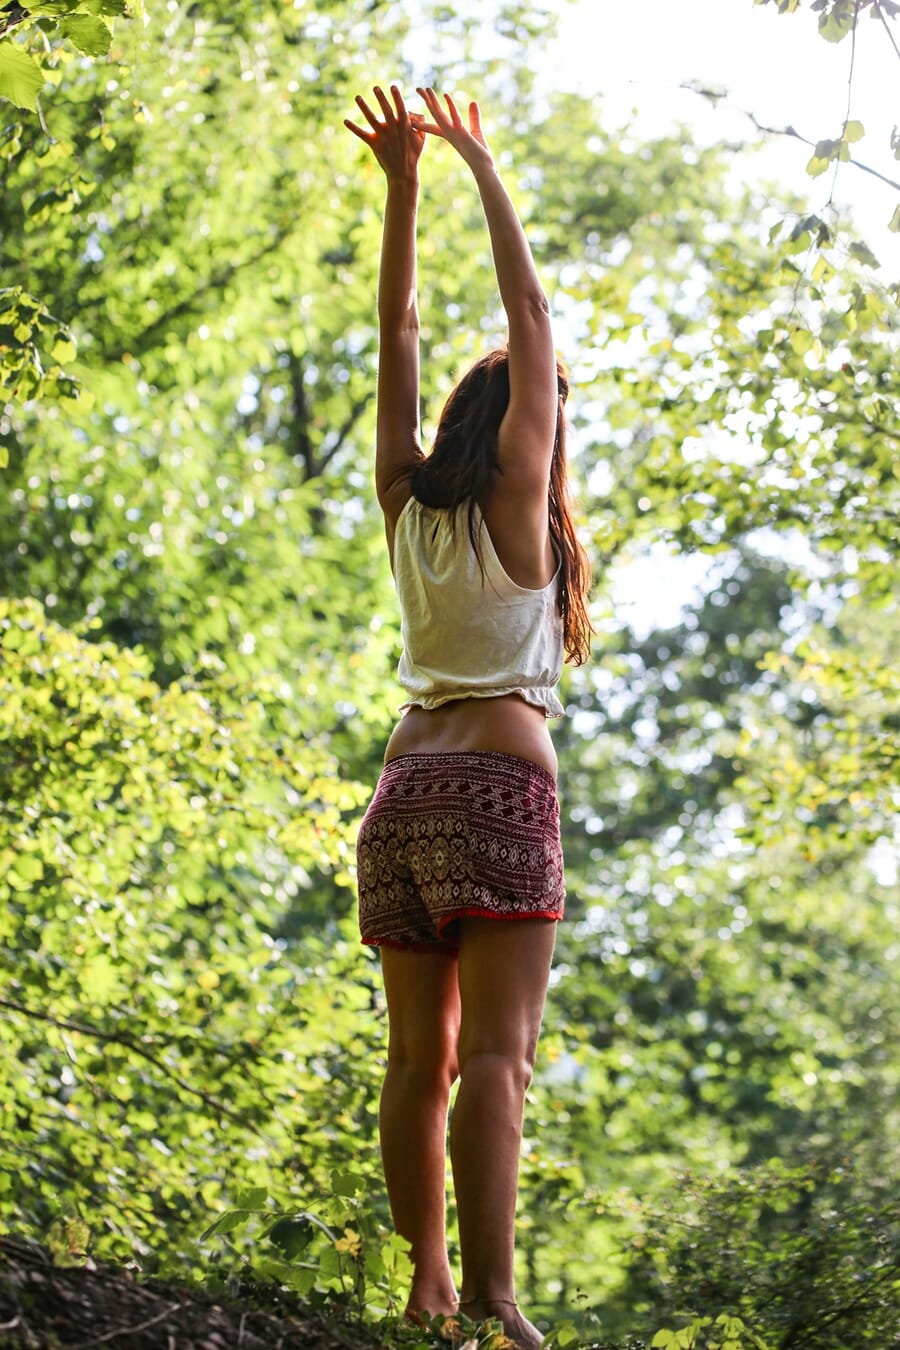
Few poses communicate pure joy and freedom like raised hands. This standing pose stretches the entire body upward, creating a longer silhouette and an unmistakable sense of energy. It’s the go-to pose for travel photos, concert shots, and “feeling myself” moments.
How to do it: Stretch both arms above your head with hands open for a carefree look, or bend one arm so your hand rests behind your head while the other reaches up. For a more casual variation, reach one arm straight up and grab the opposite elbow with the other hand. Keep your shoulders down even as your arms go up – shrugging creates tension.
Camera tip: This pose shines when shot from a lower angle, which emphasizes the upward stretch and makes you look taller. Backlit situations (like sunset behind you) create a stunning silhouette effect with this pose. Use burst mode – movement shots work better with multiple frames to choose from.
Why it works: The upward stretch elongates the torso and lifts the ribcage, naturally creating a slimmer waistline. Arms above the head also signals openness and positivity, emotions that resonate strongly with Instagram audiences.
12. Hand on Hip
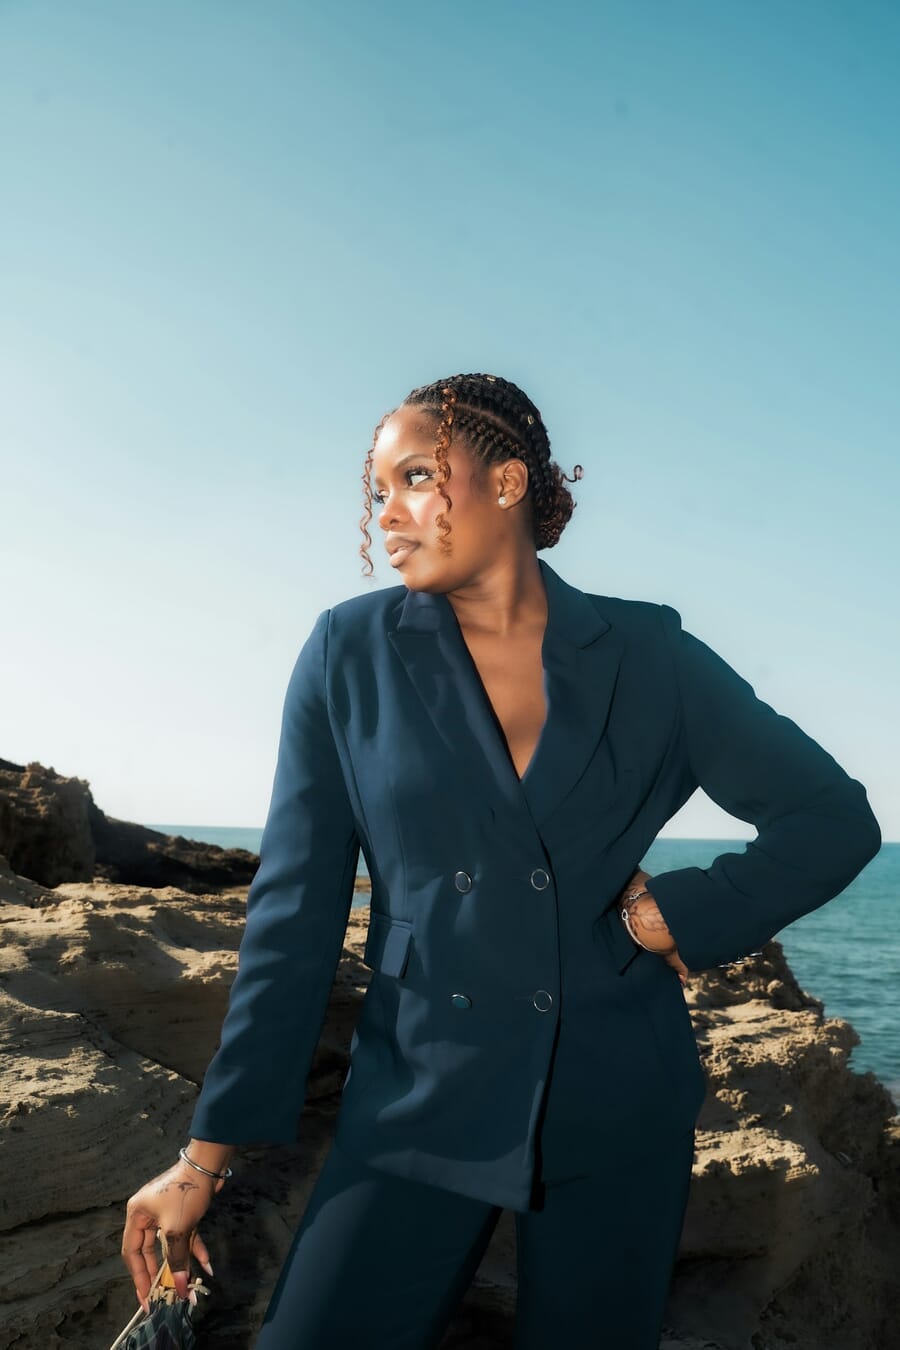
The classic hand-on-hip is one of the most universally flattering poses, and there’s actual science behind why. When you place your hand on your hip, it creates a triangle of negative space between your arm and torso. That gap visually slims the waist and adds structure to an otherwise straight body line.
How to do it: Place one hand on your hip with fingers forward and thumb behind (or vice versa). Bend the elbow at roughly 90 degrees so the triangle of space is visible. Pop the hip slightly on the same side for added curve. Keep the other arm relaxed at your side, in a pocket, or holding something. Don’t press the hand flat against your hip – keep the fingers light and relaxed.
Camera tip: Make sure the camera can see the triangle of space between your arm and body – that’s the whole point. If you’re shooting with a phone, ask your photographer to step back enough to capture the full pose. Flat, even lighting works well so the negative space reads clearly.
Why it works: The negative space triangle is a visual slimming trick used by every red carpet photographer. It separates the arm from the body, defines the waist, and gives the pose a sense of confident attitude. Combine it with the one-leg-bent from pose #2 for a dynamic combination.
13. Squat Down
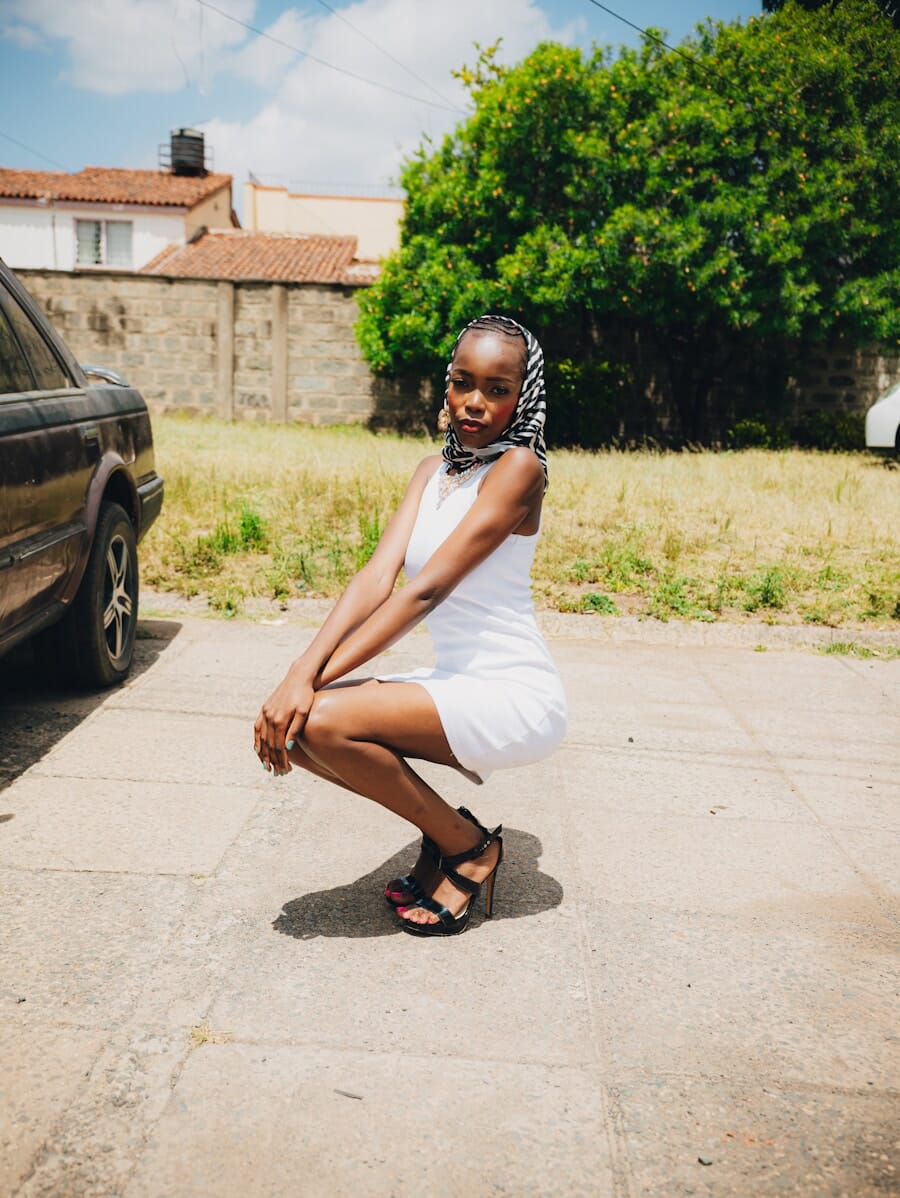
The squat pose has become an Instagram staple because it projects confidence and breaks the monotony of standard standing shots. It’s especially effective for showcasing shoes, pants, or full outfits from a unique angle.
How to do it: Drop into a comfortable squat with your weight on your heels (not your toes – that creates an unstable, tense look). Keep your back arched and your chin up. Arms can rest on your knees, hang between your legs, or one hand can touch the ground for balance. For a variation, extend one leg out to the side while squatting on the other.
Camera tip: This pose works beautifully from ground level – have the photographer (or prop your phone) at the same height as your face while squatting. This creates a powerful, engaging shot. From above, the squat can look awkward, so stick to eye level or below. Use a timer and burst mode if you’re shooting solo.
Why it works: The low position is unexpected and eye-catching in a feed full of standing shots. Keeping the back arched and chin up prevents the pose from looking slouchy and instead projects casual confidence.
14. Hands in Pockets
The hands-in-pockets pose is effortlessly cool. It solves the “what do I do with my hands” problem instantly and creates a casual, confident vibe that works for everything from street style to travel content.
How to do it: Slide your hands into your front pockets (jeans, jacket, or coat pockets all work). The key detail: don’t bury your entire hand. Keep your thumbs hooked over the pocket edge, or leave your thumb and index finger visible. This prevents the hands from visually disappearing and keeps the pose looking intentional. Shift your weight to one leg and let the other relax for a natural stance.
Camera tip: Full-body shots work best to show the complete outfit and pocket positioning. The full-body portrait rules apply: shoot from waist height, leave some space above the head and below the feet, and avoid cutting off at the joints (knees, elbows, ankles).
Why it works: Pockets give hands a natural resting place, which relaxes the entire body. The visible thumbs or fingers maintain hand presence in the shot without requiring any specific hand positioning. It reads as “I didn’t try too hard” – which is exactly the Instagram aesthetic many people aim for.
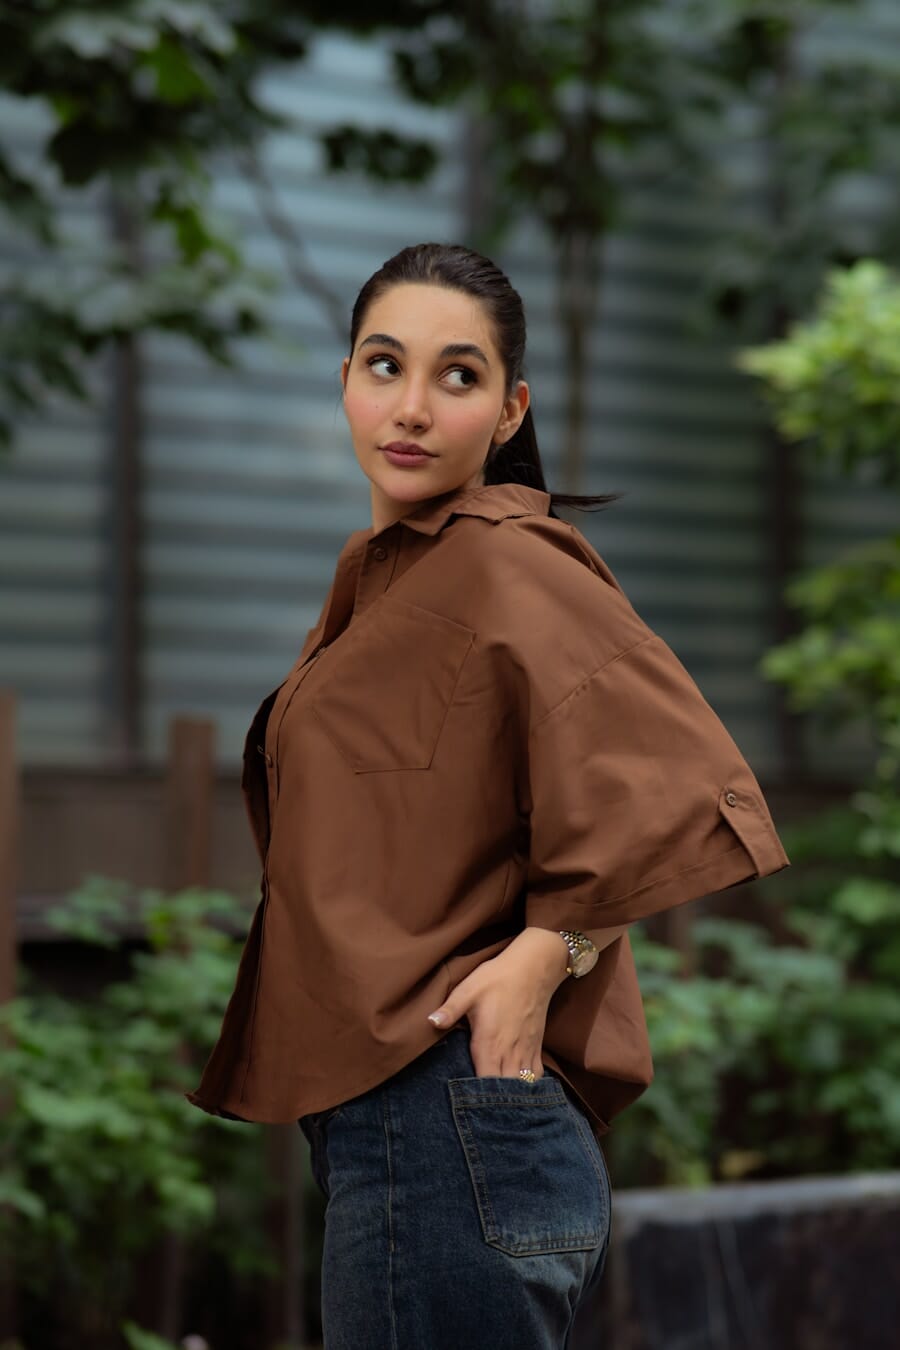
15. Over the Shoulder
There’s something magnetic about a glance over the shoulder. It creates an air of mystery and allure that straight-on shots simply can’t match. This is a favorite among both portrait photographers and fashion influencers for good reason.
How to do it: Position your body at a three-quarter or full angle away from the camera. Now turn your head to look back over one shoulder. Here’s the critical detail: don’t turn too far. Your head should rotate just enough to glance back – roughly 90 degrees from where your chest is facing. If your neck starts straining, open up the camera-side shoulder slightly to reduce the rotation needed.
Camera tip: The photographer should be positioned roughly where your shoulder line points. For sunset shots, position the light source behind you so it catches the turned side of your face. This creates a beautiful rim-light effect on the jawline and hair. Shoot slightly above your eye line for the most flattering facial angle.
Why it works: The partial face reveal creates natural curiosity. Psychologically, we’re drawn to faces, and a partially hidden one increases engagement. The body positioning also creates interesting layering – shoulder, neck, face – that adds visual depth.
16. Smile and Lean Forward
Sometimes the best pose is simply a genuine smile and a lean toward the camera. This pose works because it creates an immediate emotional connection with anyone viewing the photo. It’s warm, inviting, and universally appealing.
How to do it: Start by thinking of something that genuinely makes you happy – a real smile always looks better than a forced one. Then lean your upper body slightly forward toward the camera, about 10-15 degrees. You can rest your chin on one hand for a playful look, or clasp your hands together in front of you. The lean shouldn’t be dramatic – just enough to create a sense of leaning in to share a secret.
Camera tip: This is a close-up or half-body pose. Shoot from eye level for the most natural, conversational feel. Natural window light or open shade provides the soft, even lighting that makes smiles look their best. Avoid harsh overhead sun, which creates unflattering shadows under the eyes and nose.
Why it works: The forward lean breaks the invisible barrier between subject and viewer. Combined with a genuine smile, it creates photos that feel like a real moment rather than a posed shot. These types of photos consistently get higher engagement because they feel personal and authentic.
17. Standing with Legs Crossed
Need to show off a full outfit from head to toe? Standing with legs crossed is one of the best poses for it. The leg cross adds visual interest to the lower half of the frame while keeping the upper body open and visible.
How to do it: Stand with your feet together, then cross one ankle in front of the other so the foot points slightly outward. Shift your weight onto the back foot for balance. Keep your upper body relaxed – hands on hips, in pockets, or holding a bag. The cross should be subtle, not a deep pretzel twist. A slight cross is more flattering than an exaggerated one.
Camera tip: Full-body framing is essential for this pose since the legs are the focal point. Make sure the camera captures from at least mid-shin down to the shoes. Shoot against a simple background (solid wall, plain sidewalk) so the outfit and pose aren’t competing with a busy scene for attention.
Why it works: Straight, parallel legs can look rigid in photos. The cross creates a dynamic diagonal line that adds movement and femininity to the pose. It’s also a natural position – many people cross their ankles when standing casually – so it reads as authentic.
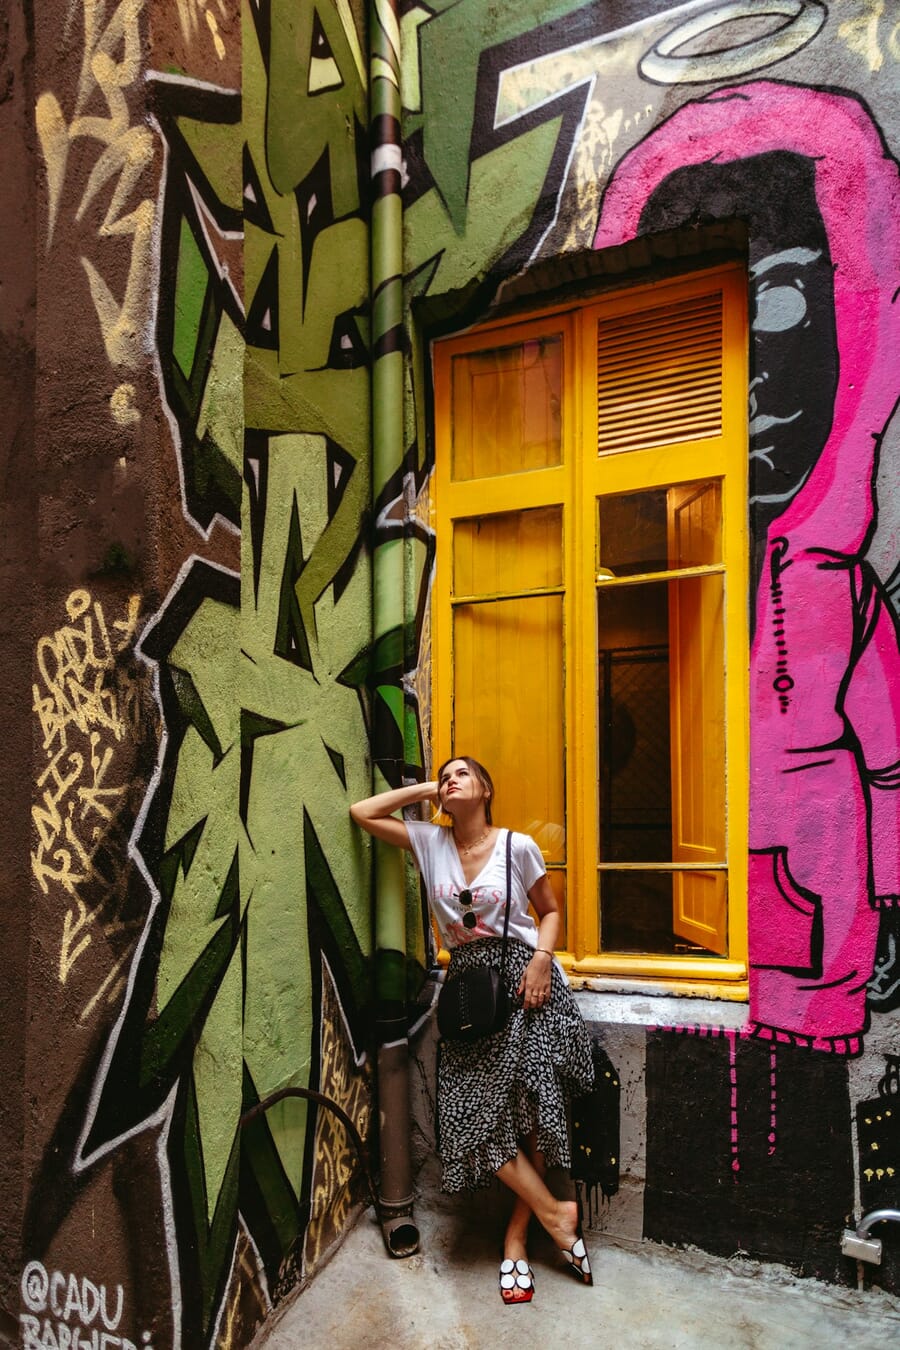
18. Fix Your Sunglasses
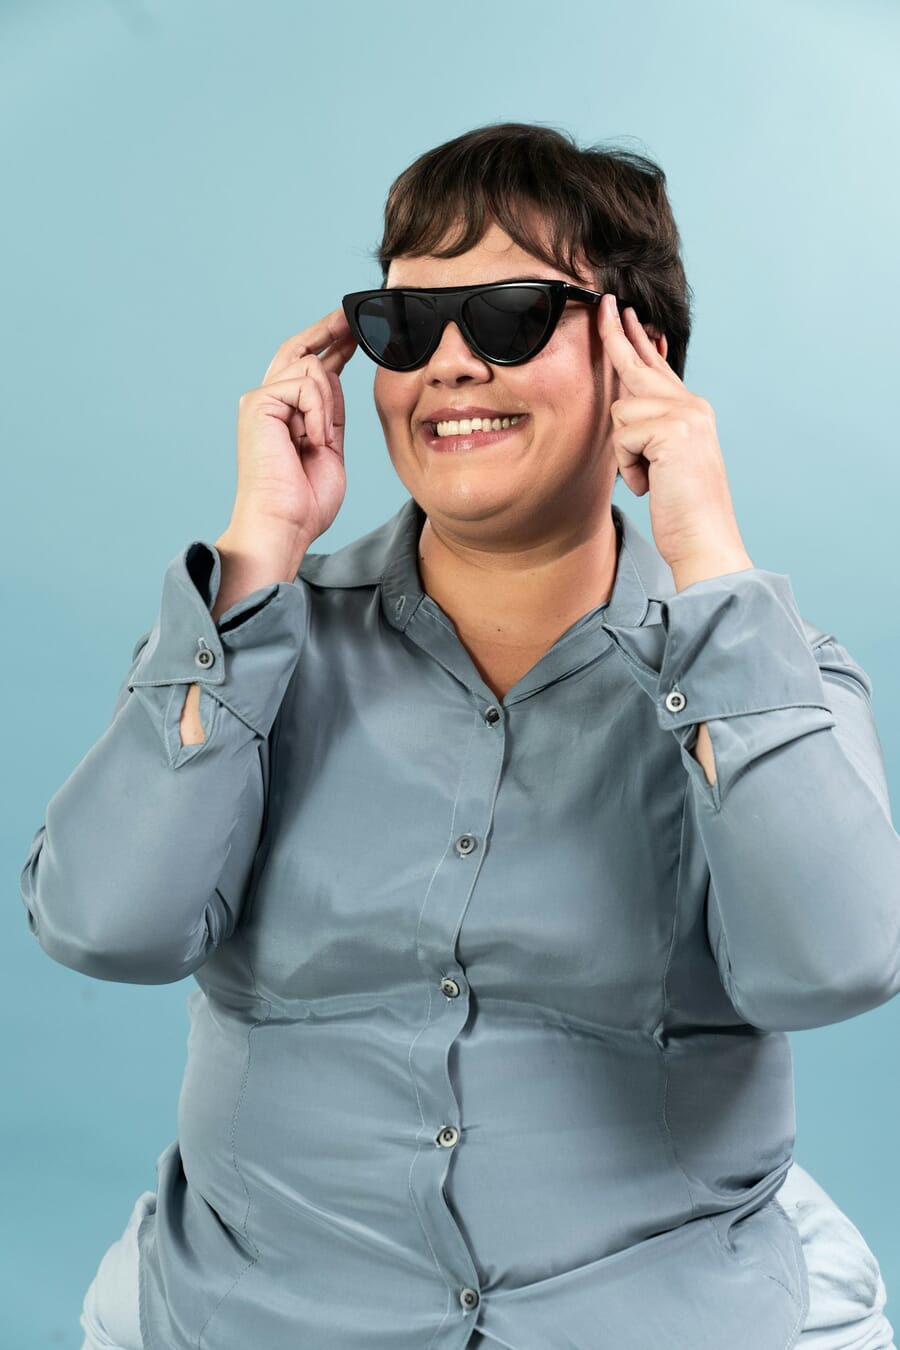
Pretending to adjust, put on, or take off your sunglasses is an Instagram classic for a reason. It gives your hands something purposeful to do, frames your face, and creates that coveted “caught in the moment” look that dominates fashion feeds.
How to do it: Hold the frame of your sunglasses with one hand, fingers lightly touching the temple piece or the bridge. You can be mid-removal (glasses halfway down your nose, eyes peeking over the top), mid-push-up (adjusting them higher on your face), or holding them away from your face entirely. Keep the movement frozen at the most visually interesting point.
Camera tip: Shoot from slightly below eye level to create a powerful, editorial look. Make sure the sunglasses don’t completely hide your eyes unless that’s the intentional vibe – half-revealing shots tend to perform better because they show personality. Bright, direct sunlight is actually ideal here since, well, you’re wearing sunglasses.
Why it works: The sunglasses serve as both a prop and a face-framing device. The gesture of adjusting them implies movement and spontaneity, which feels more genuine than a static pose. It’s also incredibly versatile – this works with any outfit, location, or mood.
19. Play with Hair

Playing with your hair is the ultimate “hands need something to do” solution and creates some of the most naturally beautiful portraits. Hair movement adds life, texture, and energy to photos that static poses can’t match.
How to do it: Try these variations: (1) The run-through – slide your fingers into your hair near the roots and pull gently through to the tips. (2) The lift – gather hair in one hand and lift it up and away from your neck, creating an elegant line. (3) The tuck – sweep hair behind one ear while looking slightly away from camera. (4) The toss – flip your hair to one side with a gentle head turn (best captured in burst mode).
Camera tip: Hair movement is best captured with burst mode or video-to-still extraction. Have the photographer shoot in continuous mode while you do 3-4 repetitions of the hair movement. Review the frames and pick the one where the hair is in the most flattering position. Backlight or side-light makes hair glow beautifully, especially during golden hour.
Why it works: Hair movement breaks the stillness of a photo and creates natural, flowing lines that draw the eye. The touching gesture also reads as intimate and self-assured. It works standing, sitting, squatting – literally in any position, making it one of the most versatile pose add-ons in your toolkit.
20. Use a Prop
When all else fails, grab a prop. A book, coffee cup, hat, flower bouquet, balloon, skateboard, camera – literally anything you can interact with adds instant interest to your photos and solves the “what do I do with my hands” problem permanently.
How to do it: Choose a prop that fits your setting and aesthetic. Then interact with it naturally rather than just holding it statically. Read the book (or pretend to). Sip the coffee. Smell the flowers. Put on the hat. The more natural the interaction, the more candid and engaging the shot will feel. Try multiple angles and interactions with the same prop – variety gives you more options.
Camera tip: Position the prop at different heights – held up near your face for close-ups, at waist level for half-body shots, or on the ground beside you for full-body poses. Make sure the prop doesn’t block your face unless that’s the creative intent. For phone cameras, tap the screen to focus on your face rather than the prop to keep the subject sharp.
Why it works: Props add storytelling context (a book says “thoughtful,” a coffee cup says “casual morning”), give hands a natural purpose, and create additional visual interest. They’re also excellent conversation starters in comments – people love asking about unique props.
What to Keep in Mind When Posing
Before you head out with your phone to practice these poses, here are the fundamental portrait photography principles that make every pose look better:
Keep your chin slightly up. This elongates the neck, defines the jawline, and avoids the dreaded double-chin shadow that appears when the chin drops. You don’t need to tilt dramatically – just think about gently pressing your forehead toward the camera while keeping your chin lifted.
Relax your muscles. Tension shows up in photos as stiff shoulders, clenched hands, and a rigid neck. Before each shot, roll your shoulders back and down, shake out your hands, and take a deep breath. Relaxed muscles photograph dramatically better than tense ones.
Bend at least one joint. Straight, locked limbs look robotic on camera. Always have at least one bend in the pose – a bent knee, a flexed elbow, a tilted head. Bends create curves, and curves create flattering photos. This is the single most impactful posing rule.
Arch your back gently. A slight arch in the lower back straightens your posture, pushes the chest forward, and accentuates natural body curves. It’s the difference between looking slouchy and looking confident.
Shoot from eye level. While creative angles have their place (we covered a few above), eye-level shooting is the most universally flattering angle for faces. Start here and experiment from this baseline.
Best Camera Angles for Instagram
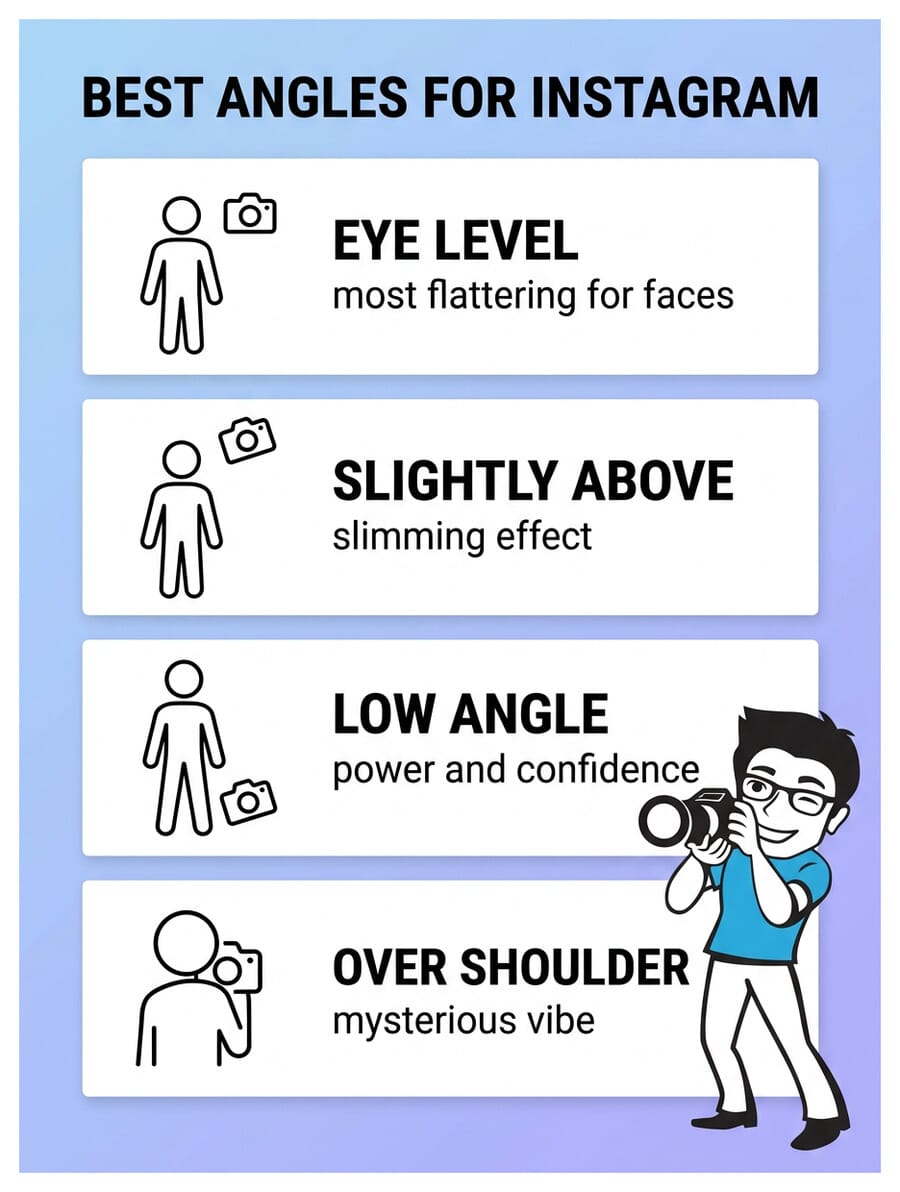
The angle your phone or camera is held at can make or break a pose. Here’s a quick reference:
- Eye level: The safest, most flattering angle for faces. Minimal distortion, natural proportions.
- Slightly above (15-30 degrees): Slims the face and body, emphasizes eyes, works great for selfies and close-ups.
- Low angle (camera below eye level): Elongates legs, projects power and confidence. Best for full-body shots.
- High angle (camera well above): Useful for sitting poses and group shots. Slims the entire body but can make you look smaller.
Test Your Posing Knowledge
Think you’ve mastered these 20 cute poses? Put your knowledge to the test with this quick quiz on Instagram posing techniques:
What is the most flattering pose for Instagram photos?
The three-quarter view (turning roughly 45 degrees away from the camera) is widely considered the most universally flattering pose. It naturally slims the torso, accentuates curves, and adds depth and dimension to the image. Combine it with a hand on the hip and a slight chin lift for the best results.
How do I look natural in posed Instagram photos?
The key is to relax your muscles and move between poses rather than holding one position rigidly. Roll your shoulders before shooting, think of something that genuinely makes you smile, and have the photographer shoot in burst mode while you make small adjustments. The best shots often come between deliberate poses.
What should I do with my hands in Instagram photos?
Give your hands a purpose: place one on your hip, run fingers through your hair, hold a prop, adjust sunglasses, slide them into pockets (with thumbs visible), or rest them on your knees if sitting. The golden rule is that idle, dangling hands look awkward on camera, so always assign them a task.
What camera angle is most flattering for selfies?
A slightly elevated angle (camera held about 15-30 degrees above eye level) is most flattering for selfies. This angle slims the face, emphasizes the eyes, and minimizes the appearance of a double chin. Avoid holding the camera below your face, as this creates unflattering upward angles.
Do these poses work for all body types?
Yes. These 20 poses are based on fundamental portrait photography principles (asymmetry, S-curves, negative space, leading lines) that flatter every body type. The key is experimenting with each pose to find the subtle variations that feel and look best on your specific frame. What matters most is confidence and relaxation – tension shows on camera regardless of body type.
How can I take good Instagram pose photos with just a phone?
Use your phone’s rear camera (higher quality than front-facing), set a 3-10 second self-timer, and prop the phone on a stable surface or use a small tripod. Enable portrait mode for background blur, shoot during golden hour or in open shade for the best lighting, and take multiple shots in burst mode. Review and select the best frame afterward.
Featured image: Photo by Patrick Pahlke on Unsplash.
