
- You don’t need expensive gear to start — a camera with a fast lens (f/1.4–f/2.8) and the willingness to show up at local shows is enough.
- The photo pit has unwritten rules — learn the three-song limit, pit etiquette, and how to request credentials before your first big show.
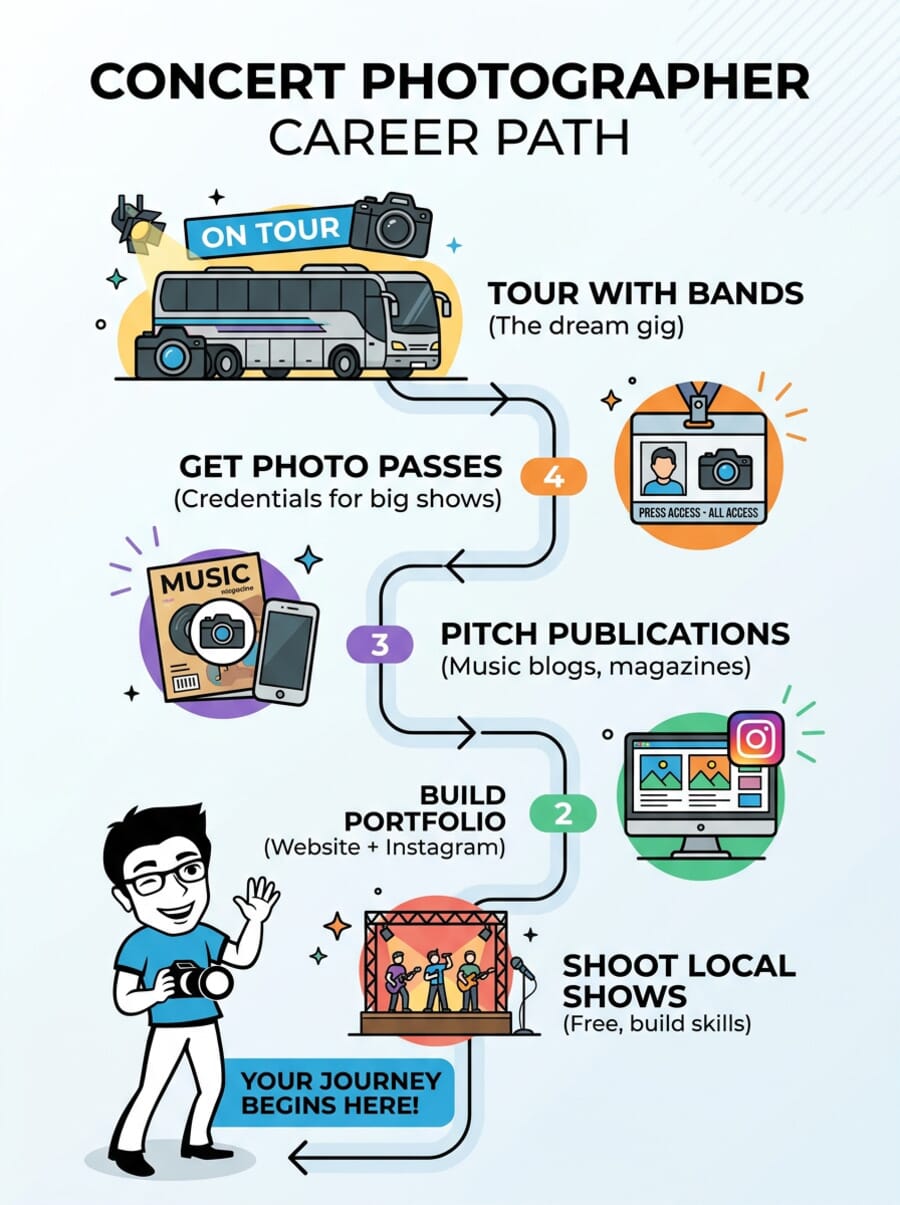
- Building a portfolio and online presence is how you get noticed by bands, publications, and promoters.
- Concert photography income comes from multiple streams — editorial work, licensing, tour photography, merch, and prints.
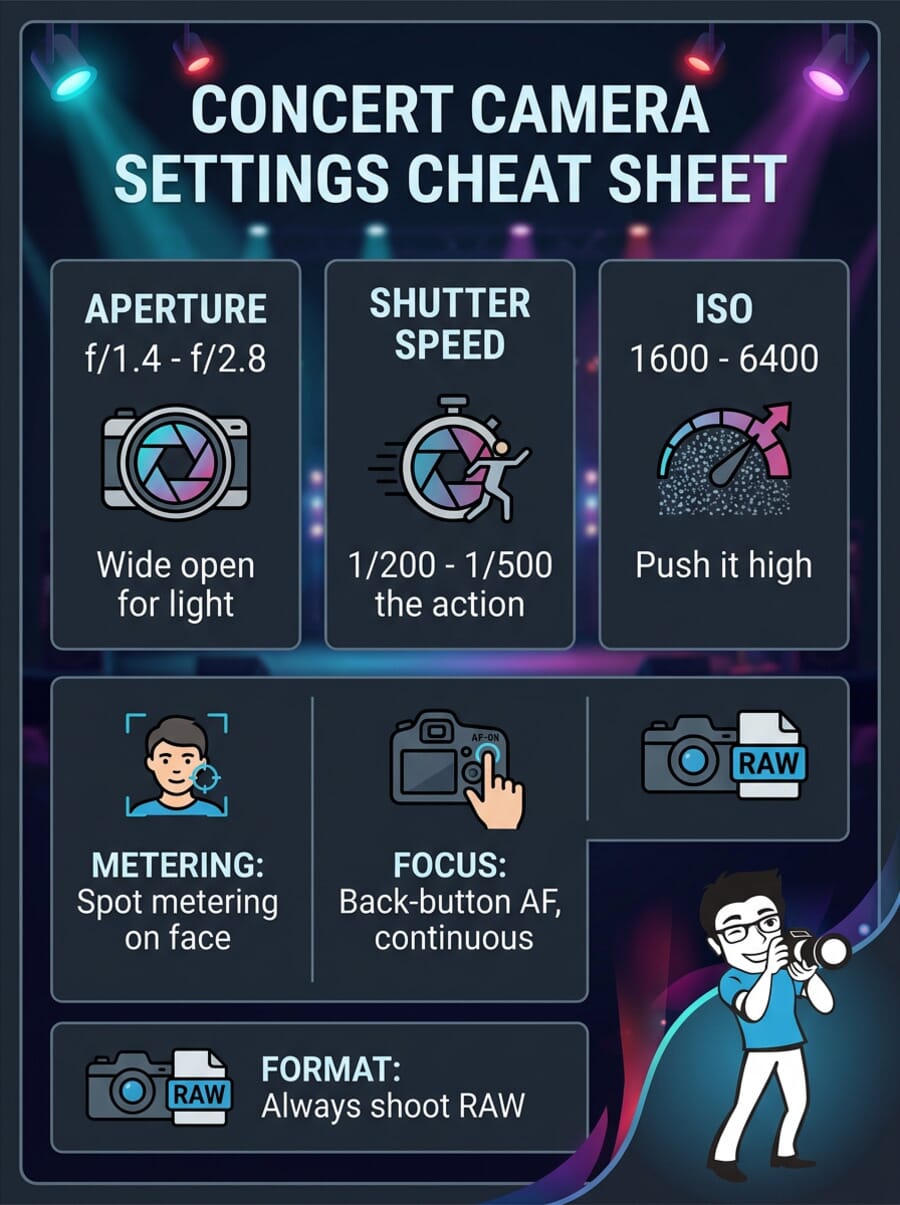
- Master your camera settings for low-light stages: shoot wide open, push ISO to 1600–6400, and use continuous autofocus.
- Test your knowledge with our concert photography quiz at the end.
Band photography is one of the most exciting niches in the industry. You’re inches from the stage, working under dramatic lighting, capturing split-second moments of raw energy. No two shows are the same. No two shots are the same.
But getting into it? That’s where most people get stuck. How do you get access? What gear do you actually need? How do you turn free gigs into paid work?
This guide covers everything — from your first local show to pitching major publications and touring with bands. Whether you’re picking up concert photography as a passion project or building a career, here’s how to make it happen.
Essential Gear for Concert Photography
Concert venues are some of the most challenging environments to shoot in. The lighting changes constantly, subjects move fast, and you’ve got roughly three songs to get the shot. Your gear needs to handle all of that.
Here’s what matters most:
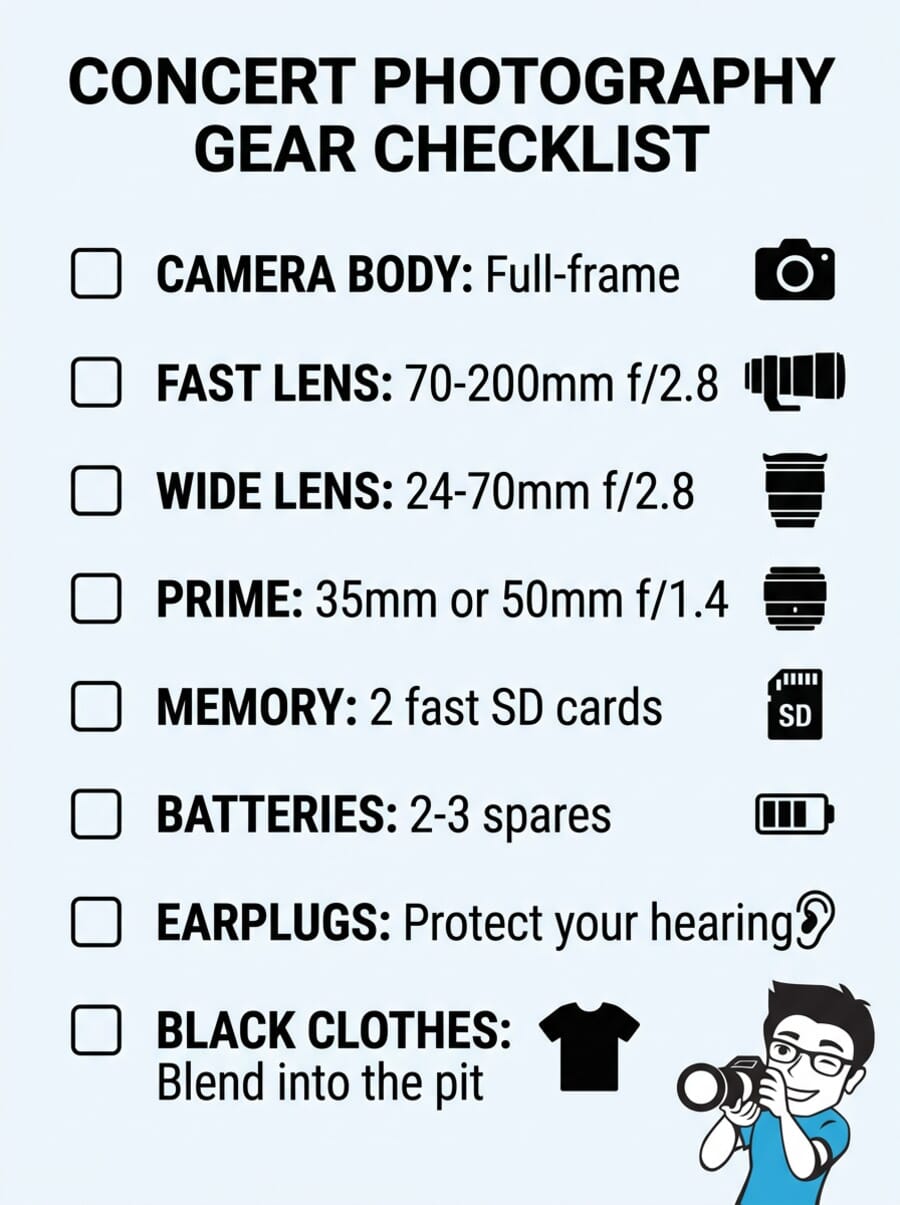
Camera Body
A full-frame mirrorless camera is ideal. The larger sensor handles high ISO better, which is critical when you’re shooting at ISO 3200–6400 under stage lights. Sony’s A7 series, Canon’s R6 line, and Nikon’s Z6 series are all popular choices among concert photographers.
That said, you can absolutely start with an APS-C body. Cameras like the Fujifilm X-T5 or Sony A6700 perform well in low-light conditions and cost significantly less. The key is having a body with good autofocus tracking and clean high-ISO performance.
Lenses
Lenses matter more than the body in concert photography. You need fast glass — lenses with wide maximum apertures that let in enough light.
- 70-200mm f/2.8 — The workhorse. Gets you tight shots from the pit or further back. This is the lens most concert photographers reach for first.
- 24-70mm f/2.8 — Perfect for wider shots of the full stage, crowd interaction, and environmental context.
- 35mm or 50mm f/1.4 — A fast prime is great for intimate small-venue shows where you’re close to the performers. The extra stop of light over f/2.8 makes a real difference.
If you’re on a budget, start with a 50mm f/1.8 — it’s cheap, fast, and forces you to move around and work your angles. You can always upgrade later. Check our photography equipment guide for more on building your kit.
Accessories
- Extra batteries — Bring at least two spares. You’ll burn through power shooting bursts in dark venues.
- Fast memory cards — Two high-speed SD or CFexpress cards. Never risk running out of storage mid-set.
- Earplugs — High-fidelity earplugs (like Etymotic or Loop) protect your hearing without killing the sound quality. You’ll be right next to the speakers.
- Black clothing — You want to be invisible in the pit. Dark clothes help you blend in and avoid distracting the performers or audience.
Getting Started: Your First Gigs
Every concert photographer started the same way: shooting local bands at small venues. This is the most important step, and it’s where most of your learning happens.
Start Local
Hit up bars, clubs, and community venues in your area. Many small shows don’t require a photo pass — you can shoot from the audience. This is where you develop your eye for stage lighting, learn how to anticipate movement, and build a body of work.
Reach out to local bands directly through Instagram or after shows. Most are thrilled to have someone photographing them. Offer to shoot for free in exchange for permission to use the images in your portfolio. It’s a win-win: they get content, you get experience.
Free Shows and Festivals
Outdoor festivals, free concerts in parks, and community events are goldmines for practice. You often don’t need credentials, the stages are bigger, and the lighting can be spectacular. These are also great opportunities to practice with different indoor and venue settings.
Build Relationships
Concert photography is a relationship business. Get to know the bands, venue staff, promoters, and other photographers. Be reliable — show up when you say you will, deliver photos promptly, and be easy to work with. Word travels fast in the local music scene, and your reputation opens doors.
The Photo Pit: What to Expect
The photo pit is the space between the stage and the crowd barrier. It’s where credentialed photographers work, and it comes with its own set of rules and customs.
The Three-Song Rule
At most larger concerts, photographers are allowed to shoot the first three songs only, no flash. After the third song ends, you leave the pit. This is industry standard and non-negotiable at most venues.
Three songs sounds like plenty, but it goes fast. You need to be prepared before the band hits the stage — know your settings, have your lens choice ready, and have a mental shot list of what you want to capture.
Pit Etiquette
The pit is a shared workspace. Here’s how to be a professional:
- Move around — Don’t camp in one spot. Rotate positions so everyone gets their shots.
- Stay low when crossing — Duck under other photographers’ lenses when moving past them.
- Keep your bag out of the way — Set it down outside the active shooting zone or keep it tight against your body.
- Don’t lean on the stage — It blocks other shooters and annoys the band’s crew.
- Count your songs — Leave promptly when the third song ends. Overstaying makes everyone look bad.
- Be friendly — Say hi to other photographers and security. These are people you’ll see again and again.
How to Get a Photo Pass
Photo passes come from one of three sources, depending on the size of the show:
- Small shows — Contact the band directly.
- Medium shows — Reach out to the band’s publicist or PR agency.
- Large shows — Go through the venue or promoter (Live Nation, AEG, etc.).
Request your pass 2–3 weeks before the show. Include a brief introduction, links to your portfolio, and where the photos will be published. Be professional but concise — publicists get hundreds of these requests.
Don’t be discouraged by rejections. Some artists limit press access. Keep building your portfolio and reputation, and the approvals will come.
Building Your Portfolio and Online Presence
Your portfolio is everything in concert photography. It’s what gets you photo passes, editorial gigs, and hired by bands. Treat it like your business card.
Build a Website
A dedicated photography website gives you credibility that social media alone can’t. Include your best concert shots (curated — quality over quantity), an about page, and a contact form. Platforms like Squarespace, SmugMug, and Format make it easy. See our roundup of the best photography portfolio sites for options.
Social Media Strategy
Instagram remains the primary platform for concert photographers. Post consistently, use relevant hashtags (#concertphotography, #musicphotographer, #livemusicphotography), and always tag the bands and venues. When artists repost your work, it exposes you to their audience.
Threads and X (Twitter) are useful for networking with music journalists, PR teams, and other photographers. Engage with the music community — don’t just broadcast your work.
Curate Ruthlessly
Only show your absolute best work. Five stunning photos from a show beat 50 mediocre ones. Every image in your portfolio should make someone stop scrolling.
Getting Credentials and Working With Publications
Working with music publications is one of the fastest ways to get consistent photo passes and build your name. Blogs, online magazines, and local media outlets all need photographers.
How to Pitch
Start with local and mid-tier music blogs. Search for publications that cover your local scene or the genres you shoot. Send a short email with:
- A link to your portfolio
- 3–5 of your best concert shots attached
- A short pitch about what you can offer (coverage of specific shows, a review with photos)
Many publications need both photos and written reviews. If you can deliver both, you instantly become more valuable. For more on getting published, check our guide on how to submit photos to a magazine.
Editorial Work
Once you have relationships with publications, you can start pitching specific stories — artist profiles, festival coverage, album release events. Editorial work often doesn’t pay much upfront, but it gives you published credits and consistent pit access, which opens doors to higher-paying gigs.
How Band Photographers Make Money
Let’s be honest: concert photography isn’t a get-rich-quick path. Most photographers piece together income from multiple sources. But the money is there if you’re strategic about it.
Income Streams
- Tour photography — Getting hired to tour with a band is the dream gig. You document the entire experience — shows, backstage, travel. Pay varies wildly, from expenses-only to daily rates of $500+.
- Editorial commissions — Magazines and online outlets pay per assignment or per published image. Rates range from $50 to $500+ per shoot depending on the publication.
- Licensing — Bands, labels, and promoters may want to license your photos for album art, social media, posters, or merchandise. Always negotiate usage rights upfront.
- Prints and merchandise — Some concert photographers sell fine art prints directly to fans. This works best when you have iconic shots of popular bands.
- Band promo shoots — Many bands need professional press photos outside of live shows. These portrait and lifestyle sessions can pay well — $200–$1,000+ per session.
- Content creation — Building a following around your concert photography through blogs, YouTube, or teaching creates additional revenue through ads, sponsorships, and courses.
The Business Side: Contracts, Licensing, and Rights
Understanding the legal and business side of concert photography protects your work and your income.
Copyright Basics
As the photographer, you own the copyright to your images by default — even if you were given a free photo pass. However, many venues and artists now include usage restrictions in their photo agreements. Some require you to sign contracts that limit how you can use the images (editorial only, no commercial sales, etc.).
Read every agreement before signing. If a contract asks you to surrender copyright entirely, negotiate or walk away. Your images have long-term value.
Model Releases and Venue Contracts
For editorial use (news, reviews, social media), you generally don’t need a model release. For commercial use (ads, merchandise, stock photography), you do. Know the difference — it matters legally.
Some venues require you to agree to their terms before granting pit access. These can include restrictions like:
- Photos may only be used to promote the specific show or venue
- No use of photos in paid advertisements
- The venue or artist gets non-exclusive usage rights
Always keep copies of any agreements you sign and track which images fall under which restrictions.
Pro Shooting Tips for Concert Photography
Concerts are technically demanding. Here are the settings and techniques that experienced concert photographers rely on.
Camera Settings
- Aperture: Shoot wide open — f/1.4 to f/2.8. You need every bit of light you can get.
- Shutter speed: 1/200s minimum to freeze motion. Go to 1/500s for energetic performers who jump and move a lot. Drop to 1/80s intentionally for motion blur effects.
- ISO: Don’t be afraid to push it. ISO 1600–6400 is normal for concerts. Modern cameras handle high ISO remarkably well, and a sharp photo with noise beats a blurry photo shot at ISO 400.
- Metering: Spot metering on the performer’s face. Stage lighting is wildly uneven — evaluative metering will get fooled constantly.
- Focus: Continuous autofocus (AF-C) with back-button focus. Track the performer’s face or eyes. If your camera has eye-detect AF, use it.
- Format: Always shoot RAW. Concert lighting produces extreme color casts that you’ll want to correct in post.
If you’re new to shooting in manual mode, concerts are a great way to learn. The conditions force you to make quick exposure decisions — it’s the fastest way to internalize the relationship between aperture, shutter speed, and ISO. You can also use aperture priority mode with auto-ISO as a starting point.
Positioning and Composition
Where you stand matters as much as your settings:
- Shoot from different angles — Don’t just stand center-pit the whole time. Move to the sides for profiles, shoot low for dramatic angles, step back for wide environmental shots.
- Watch the light — Stage lighting creates pockets of dramatic light. Wait for moments when the performer steps into a spotlight or a wash of color hits them. These are your strongest shots.
- Anticipate the action — Learn the songs. If you know when the chorus hits or when the guitarist steps forward for a solo, you can be in position before the moment happens.
- Include the crowd — Some of the most powerful concert photos show the relationship between performers and fans. Turn around occasionally.
Understanding how high contrast lighting works will make you a better concert photographer. Stage lighting is all about dramatic contrasts between bright spots and deep shadows.
Post-Processing
Editing is where concert photos really come together. Stage lighting often produces heavy color casts — red, blue, purple — that need correcting or enhancing depending on the mood you want.
Adobe Lightroom Classic is the industry standard for concert photo editing. Its batch processing capabilities let you apply adjustments across hundreds of images quickly, and the noise reduction tools handle high-ISO grain well.
Develop a consistent editing style. Bands and publications will come to recognize your look, and consistency is what turns a collection of photos into a cohesive portfolio. For a deep dive into mastering your essential camera settings, check our guide.
Common Mistakes to Avoid
These are the mistakes that trip up most beginners (and some experienced shooters too):
- Using flash — Flash is almost always prohibited at concerts. It distracts the performers and ruins the stage lighting that makes concert photos look so good. Even if it’s technically allowed, don’t use it.
- Chimping — Constantly checking your LCD screen between shots. You’ll miss the best moments. Trust your settings and review later.
- Oversharing — Posting 200 photos from a single show. Edit down to your 10–15 best images. Nobody wants to scroll through redundant shots.
- Ignoring the business side — Not tracking your usage rights, not watermarking client deliverables, or not keeping proper records. Photography is a creative business — treat it like one.
- Waiting to be “ready” — You’ll never feel ready. Start shooting local shows now with whatever gear you have. The best camera is the one you’re actually using.
- Neglecting your hearing — Seriously, wear earplugs. Tinnitus is permanent and it sneaks up on you. High-fidelity earplugs let you hear the music while protecting your ears.

Test Your Concert Photography Knowledge
Think you’ve got the basics down? Take our quick quiz to test what you’ve learned about shooting in the pit, gear choices, and concert photography etiquette.
Frequently Asked Questions
Do I need expensive gear to start concert photography?
No. A camera with decent high-ISO performance and a fast lens (even a 50mm f/1.8) is enough to get started. Focus on developing your skills and building relationships first — you can upgrade gear as you progress.
How do I get my first photo pass?
Start by reaching out to local bands directly. As you build a portfolio, pitch yourself to music blogs and local publications who can credential you for larger shows. Always request passes 2–3 weeks in advance.
Can I sell concert photos?
It depends on the usage rights. Editorial use (reviews, social media) is generally fine. Commercial use (ads, merchandise, stock) usually requires permission from the artist or venue. Always check your photo pass agreement for restrictions.
What camera settings should I use at a concert?
Shoot wide open (f/1.4–f/2.8), use a shutter speed of at least 1/200s, push ISO to 1600–6400, use spot metering on the performer’s face, and shoot in continuous autofocus with RAW format.
Is concert photography a good career?
It can be a fulfilling career, but most photographers combine it with other work — band promo shoots, editorial assignments, and content creation. Building multiple income streams is key to making it financially sustainable.
Featured image: Photo by Gading Ihsan on Unsplash.
