
- High contrast lighting creates bold separation between light and shadow – learn what it is and when to use it.
- Natural light techniques like window light and harsh midday sun are the easiest ways to start.
- In the studio, one-light setups with flags give you full control over contrast ratios.
- Classic portrait patterns like split and Rembrandt lighting are built on high contrast principles.
- Curves and AI masks are the fastest way to enhance contrast in post.
- Avoid the biggest mistakes: blown highlights and crushed blacks that lose important detail.
What Is High Contrast Lighting?
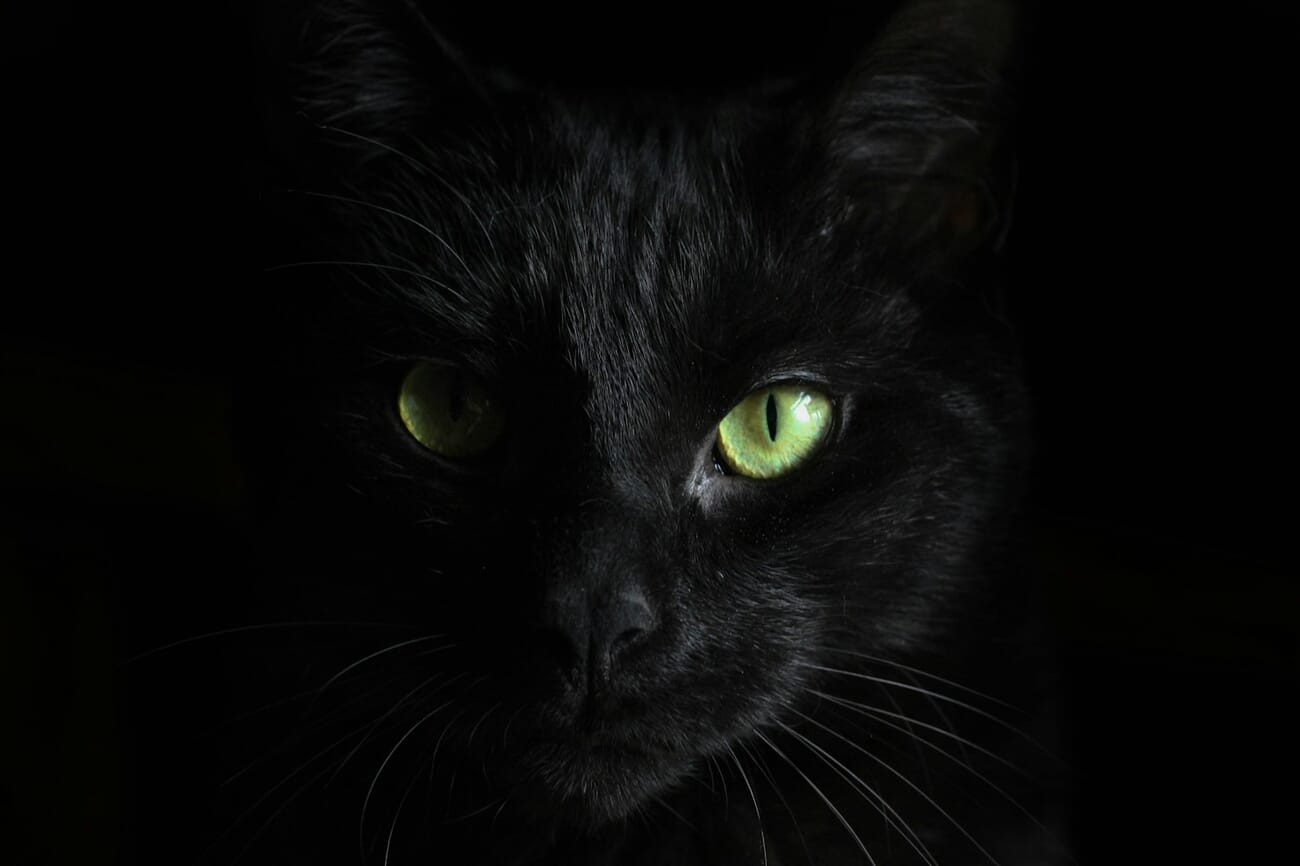
High contrast lighting refers to any lighting scenario where there is a large difference in brightness between the lightest and darkest areas of a scene. In photography, this translates to bright highlights sitting directly next to deep shadows with relatively few midtones in between.
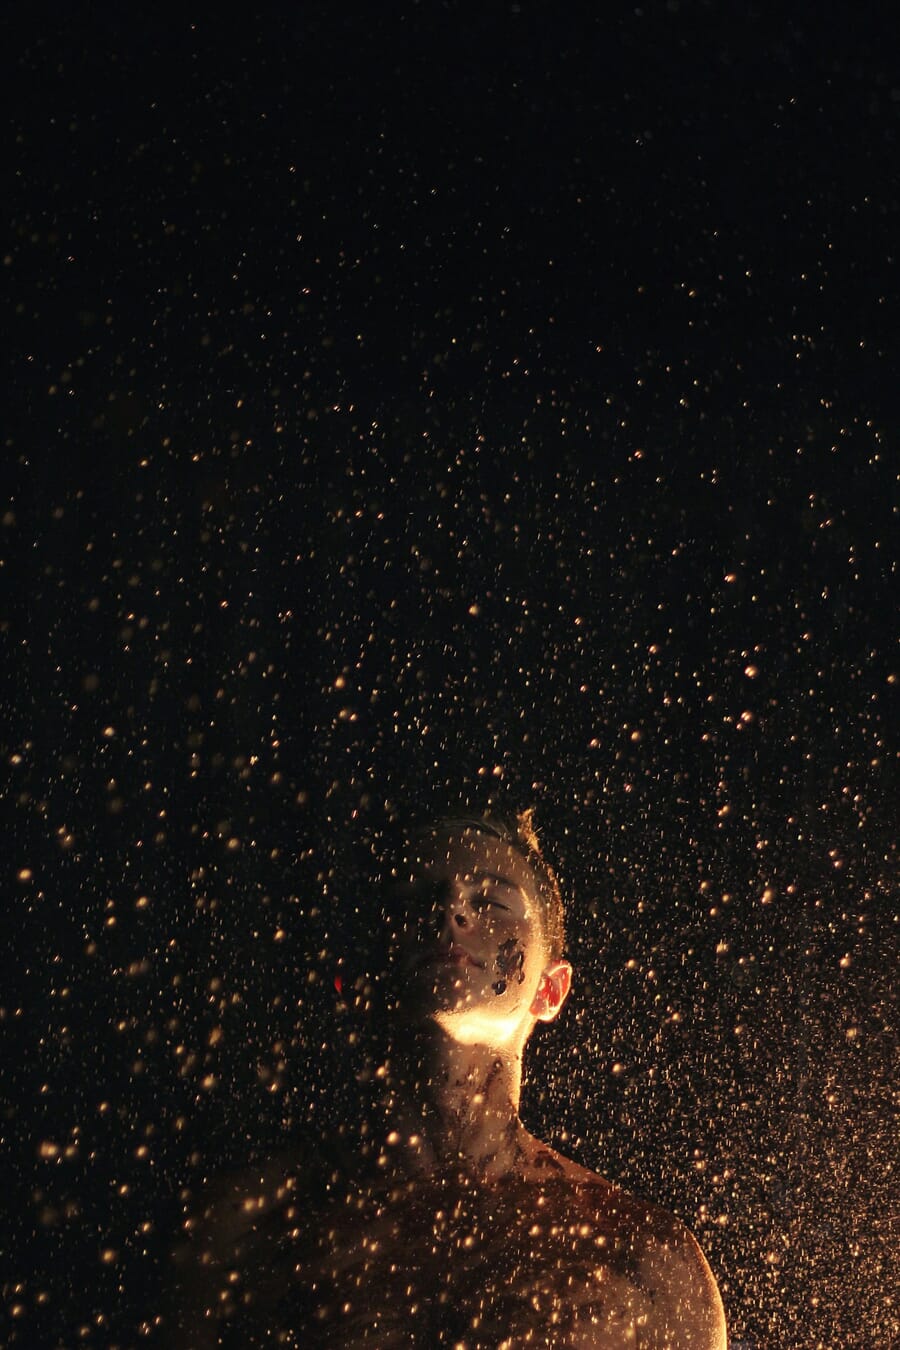
Think of a face lit by a single window in a dark room. One side glows with warm light while the other falls into near-black shadow. That dramatic separation is what makes high contrast lighting so visually powerful – it draws the eye, creates depth, and adds emotional weight to an image.
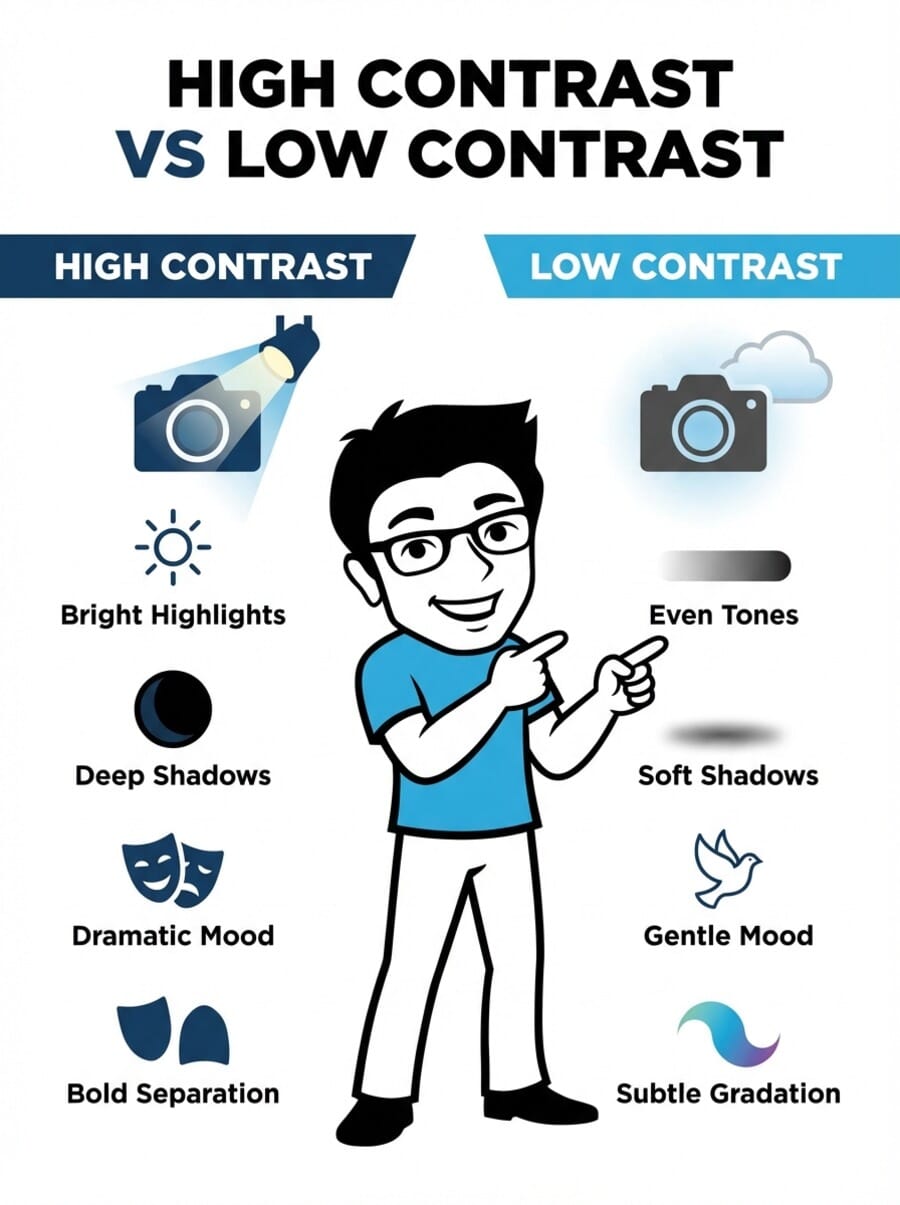
The opposite – low contrast lighting – produces images where the tonal range is compressed. Everything sits in the midtones, shadows are gentle, and the overall feel is soft and even. Both have their place, but high contrast is the go-to technique when you want drama, mystery, or visual punch.
High Contrast vs Low Contrast: Understanding the Difference
The simplest way to understand contrast in photography is through lighting ratios. A lighting ratio compares the brightness of the lit side of a subject to the shadow side.
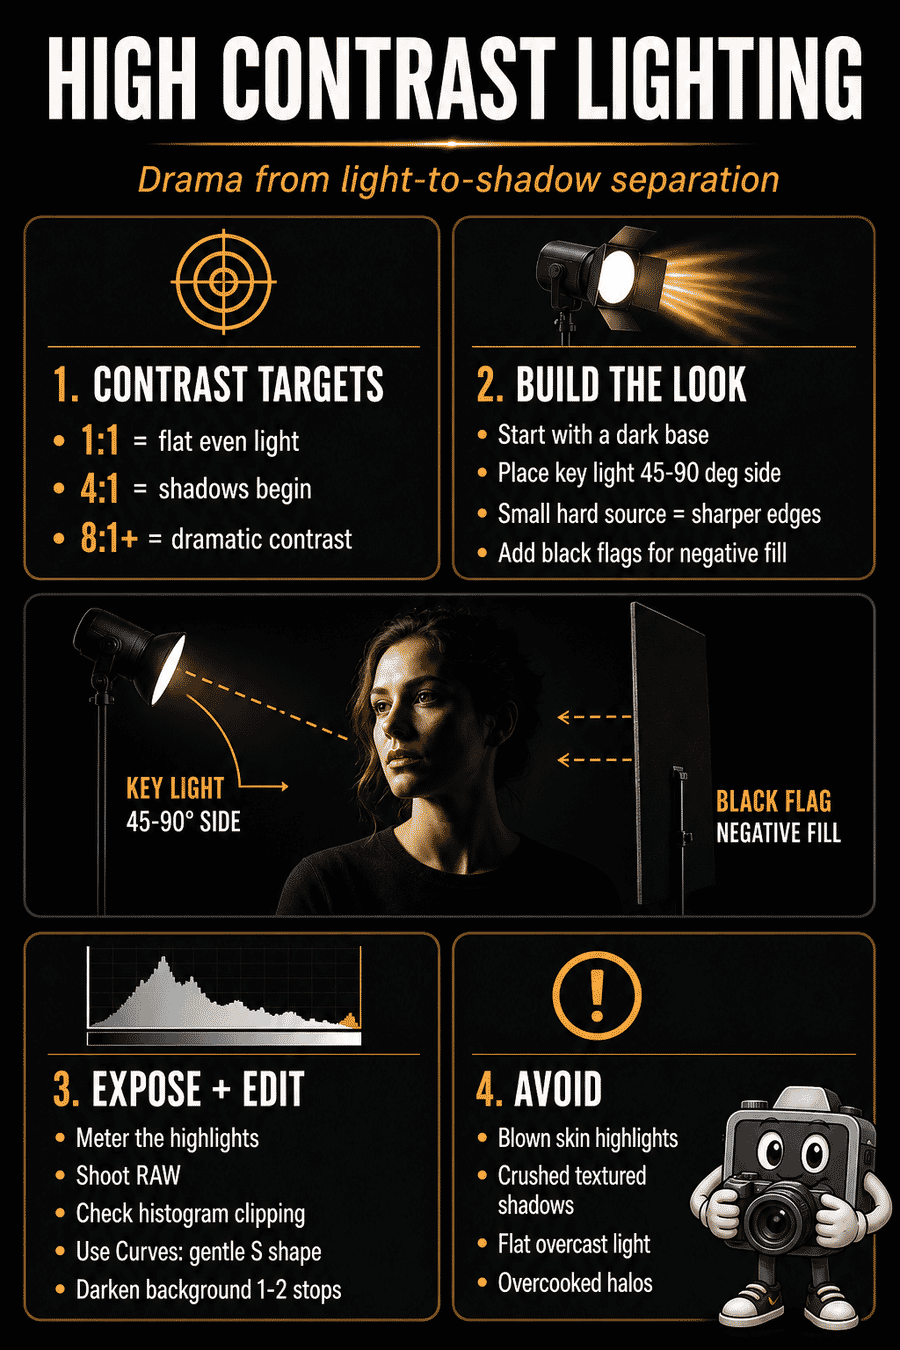
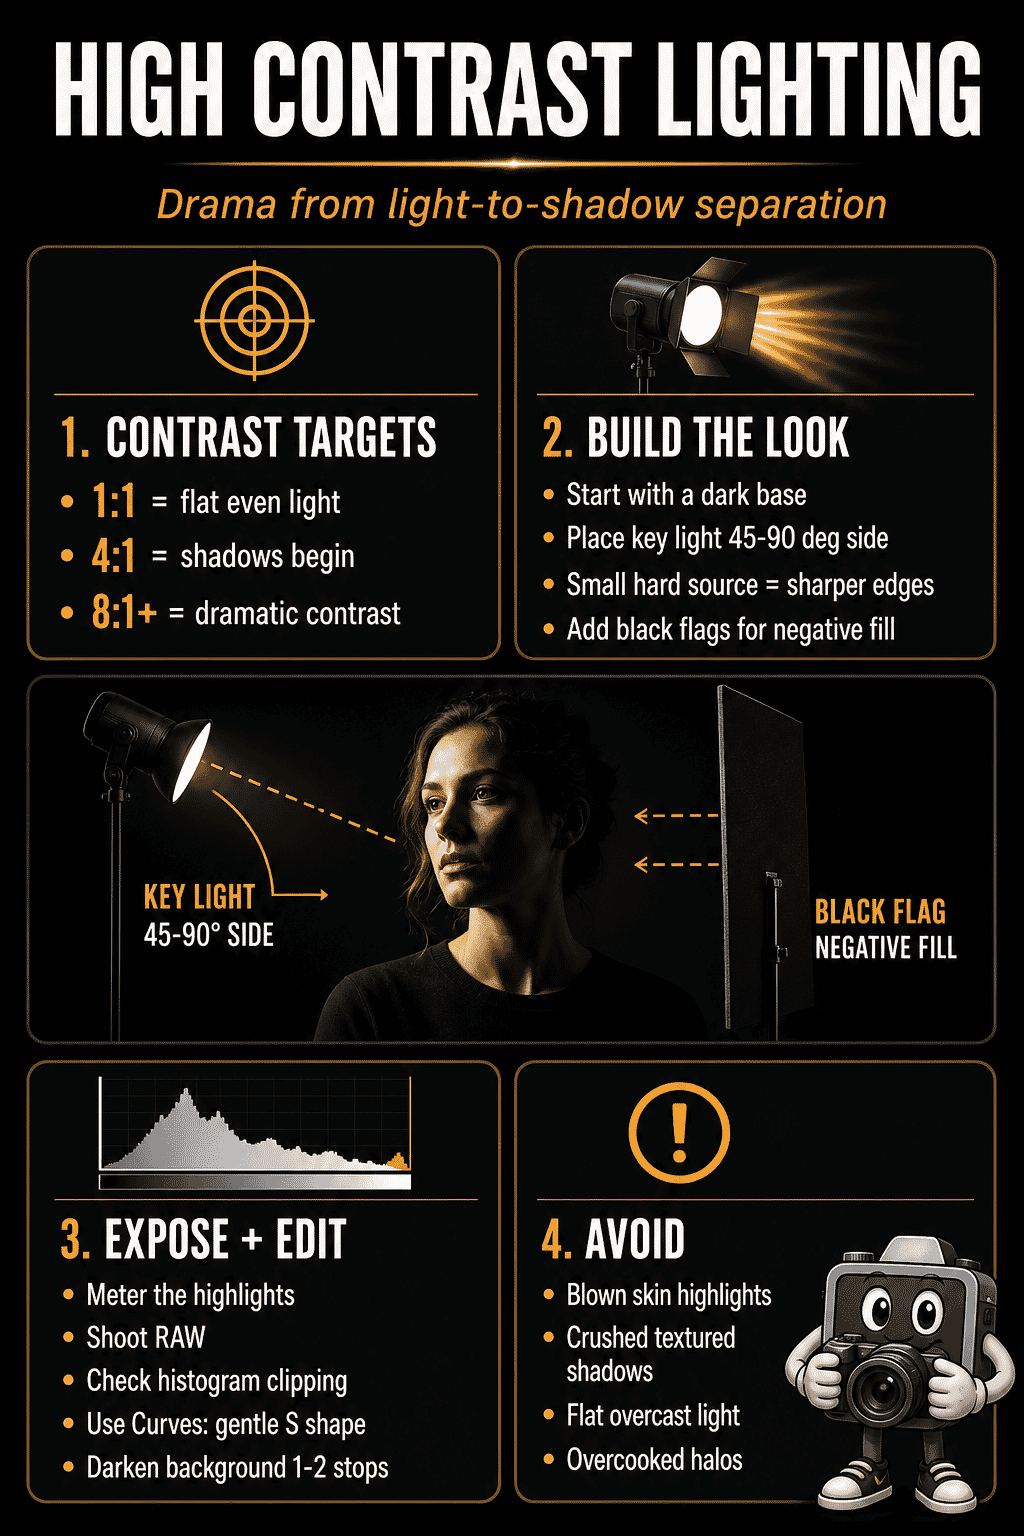
- 1:1 ratio – Equal light on both sides. Flat, even illumination. This is low contrast.
- 2:1 ratio – One stop difference. Subtle shading, natural-looking. Still relatively low contrast.
- 4:1 ratio – Two stops difference. Noticeable shadows begin to form. Medium contrast.
- 8:1 ratio and beyond – Three or more stops difference. Deep shadows, dramatic mood. This is high contrast territory.
In studio work, photographers control these ratios precisely by adjusting the power of their key light relative to their fill light. Outdoors, the sun and surrounding environment create natural contrast ratios that shift throughout the day. For a comprehensive look at how the angle of your light source changes everything, see our guide to light direction in photography.
Dynamic Range and High Contrast
Dynamic range is your camera sensor’s ability to capture detail in both the brightest highlights and the deepest shadows simultaneously. It is measured in stops, and it directly affects how you work with high contrast scenes.
Modern mirrorless cameras routinely deliver 14-15 stops of usable dynamic range. The Sony A7R V, Nikon Z8, and Canon R5 Mark II all push well beyond what was possible even five years ago. This means you can shoot a high contrast scene, expose for the highlights, and still recover significant shadow detail in post-processing.
Understanding dynamic range matters because it changes your approach to high contrast lighting:
- Expose to the right (ETTR) – With modern sensors, slightly overexposing protects shadow detail. You can pull highlights back more cleanly than you can push shadows up.
- Shoot RAW – JPEG files compress tonal data. RAW files preserve the full dynamic range your sensor captures, giving you maximum flexibility with high contrast edits.
- Use the histogram – Your camera’s histogram shows tonal distribution. In a high contrast scene, expect data pushed toward both ends with a gap in the middle. Use it to ensure you are not clipping important highlights. For a deeper look at exposure fundamentals, see our guide to the exposure triangle.
When to Use High Contrast Lighting
High contrast lighting is not appropriate for every situation, but when used intentionally, it transforms ordinary subjects into compelling images. Here are the genres where it works best.
Portraits
High contrast portrait lighting sculpts the face, emphasizes bone structure, and creates a mood that flat lighting simply cannot achieve. Techniques like split lighting (light on exactly half the face) and Rembrandt lighting (the signature triangle of light on the shadow-side cheek) are classic high contrast approaches. For a complete overview of all the patterns, see our guide to portrait lighting patterns. And for detailed camera settings for portrait work, check our portrait camera settings guide.
Street Photography
Midday sun casts hard shadows from buildings, awnings, and architectural features. Street photographers use these pockets of light and dark to frame subjects, create leading lines of shadow, and add graphic quality to urban scenes.
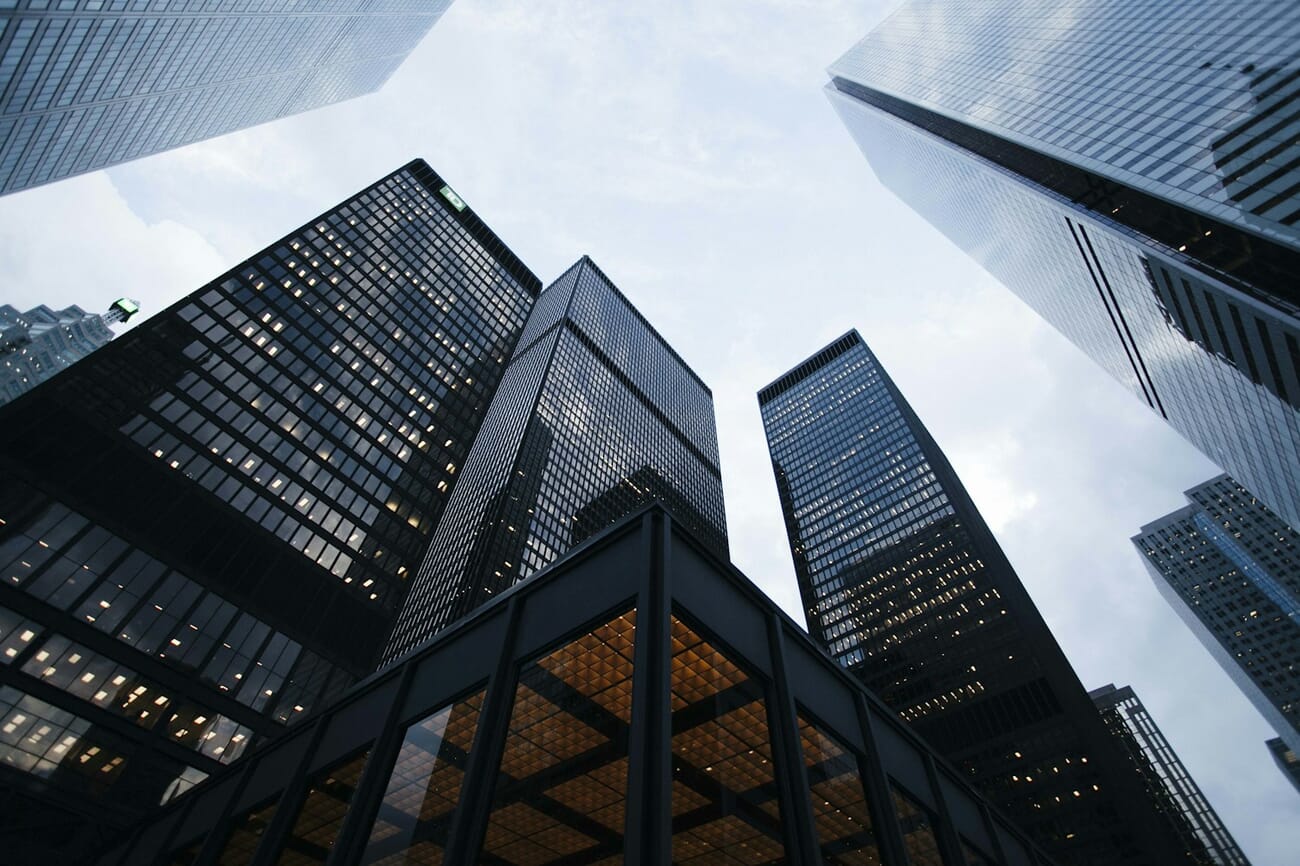
Landscape and Architecture
Golden hour and blue hour provide natural high contrast as the low sun creates long shadows across terrain. Architecture benefits from directional light that reveals texture in stone, concrete, and glass while casting deep geometric shadows.
Black and White Photography
High contrast and black-and-white photography are natural partners. Without color to carry visual interest, B&W images rely entirely on tonal contrast to create separation, depth, and impact. Strong directional light makes the difference between a flat gray conversion and a striking monochrome image.
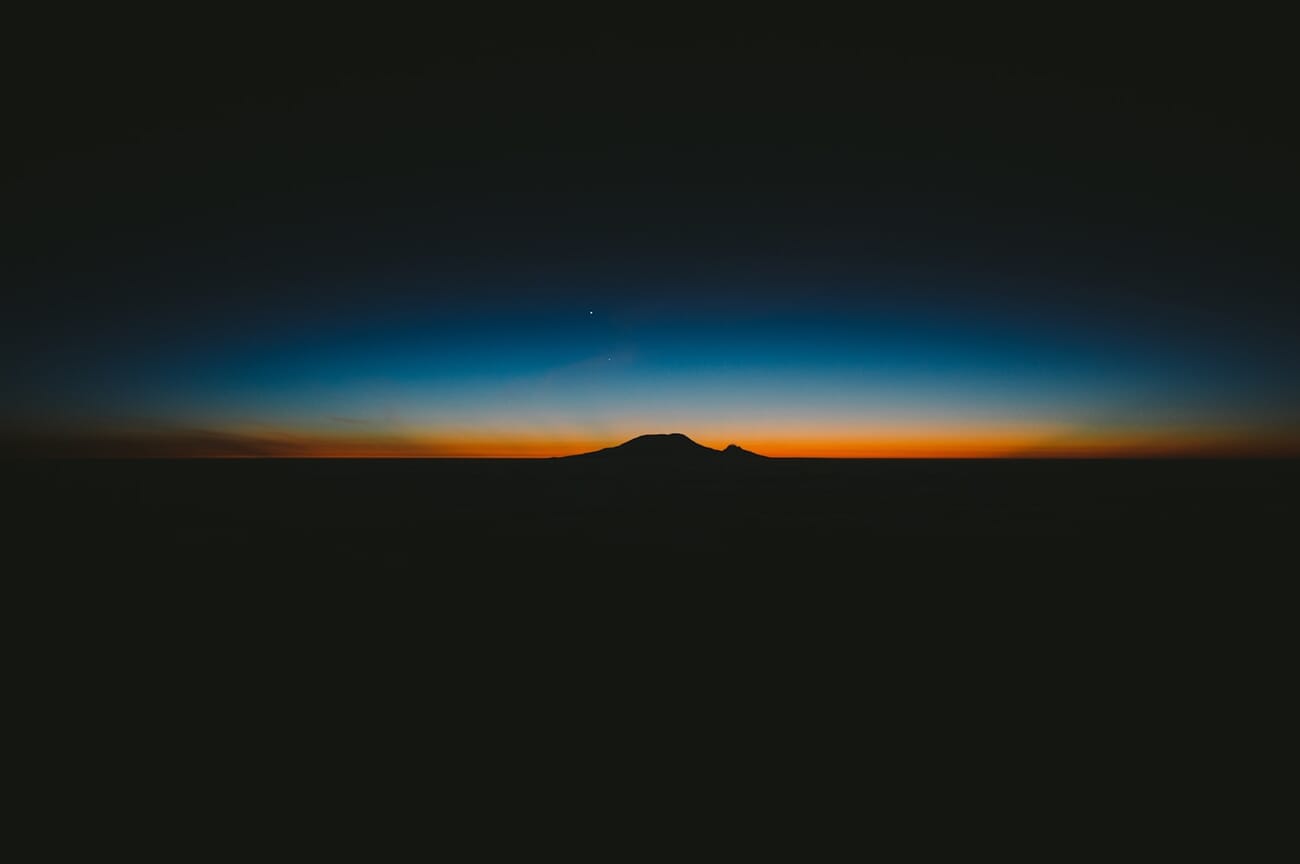
Silhouettes and Backlit Subjects
Silhouettes represent the most extreme form of high contrast – the subject is entirely dark against a bright background. Position your subject between your camera and a strong light source (sunset, window, studio backdrop light) and expose for the bright background. The result is pure shape and outline with no detail in the subject itself. For more techniques on working with shadows as a creative element, explore our shadow photography guide.
Creating High Contrast with Natural Light
You do not need a studio to create high contrast images. Natural light offers several reliable ways to achieve dramatic contrast with no equipment at all.
Window Light
A single window in a dark room is one of the most accessible and effective sources of high contrast light. Place your subject near the window, facing perpendicular to it. The side closest to the window receives strong illumination while the far side falls into shadow. The smaller the window and the darker the room, the higher the contrast.
Tips for window light portraits:
- Use a north-facing window for consistent, diffused light without direct sun
- Move the subject further from the window to increase the shadow side darkness
- Close curtains on surrounding windows to reduce ambient fill
- Add a white reflector on the shadow side if you want to soften (but not eliminate) contrast
Harsh Midday Sun
Most photographers avoid midday sun, but it is actually ideal for high contrast work. The overhead sun creates hard-edged shadows under overhangs, trees, and architectural features. Look for subjects partially in shade and partially in direct sun – the transition zone between light and shadow is where the drama lives.
Golden Hour Side Light
The low angle of golden hour sun creates long, dramatic shadows while also adding warm color. Position your subject so the sun hits them from the side at roughly 90 degrees. The warm highlights against cool shadows produce both tonal and color contrast simultaneously.
Studio High Contrast Setups
In the studio, you have complete control over contrast ratios. The key principle is simple: high contrast comes from a dominant key light with minimal fill. Here are the essential setups.
The One-Light Setup
A single light source with no fill or reflector naturally creates maximum contrast. The lit side of the subject receives all the light; the shadow side gets nothing. This is the simplest and most dramatic studio setup.
- Light position: 45 degrees to the side and slightly above the subject for classic dramatic lighting
- Modifier: A small, bare reflector or beauty dish keeps light hard and directional. Larger softboxes reduce contrast.
- Background: Use a dark gray or black background. Place it far from the key light so no spill reaches it.
Using Flags and Gobos
Flags (opaque black panels) and gobos (go-between boards) block light from reaching specific areas. They are essential for increasing contrast in situations where ambient light or wall bounce is filling in your shadows. Place a flag on the shadow side of your subject to absorb any bounced light and deepen the darkness.
Even a simple V-flat (two large black foam core boards hinged together) positioned behind and to the side of the subject can dramatically increase contrast by absorbing reflected light.
Split and Rembrandt Lighting Patterns
These are the two most popular high contrast portrait lighting patterns:
- Split lighting: Light positioned at exactly 90 degrees to the subject, illuminating one half of the face while the other half remains in complete shadow. Creates the strongest possible contrast on a face.
- Rembrandt lighting: Light positioned at about 45 degrees, creating the signature inverted triangle of light on the shadow-side cheek. Named after the Dutch painter who favored this natural-looking dramatic light.
Both patterns work with a single light source. The difference is simply the angle of the light relative to the subject’s face. Loop lighting offers a slightly softer variation where the shadow from the nose creates a small loop on the cheek – still directional, but less extreme than split or Rembrandt.
High Key vs Low Key: The Spectrum of Contrast
High contrast lighting is closely tied to two specific photographic styles – high key and low key – which represent opposite ends of the tonal spectrum.
Low key images are dominated by dark tones. The background is black or near-black, shadows are deep, and bright highlights punctuate the darkness to create the characteristic moody atmosphere. Low key lighting typically uses a key light positioned behind or to the side of the subject with minimal fill. It is inherently high contrast because the range between the specular highlights and the deep shadows is extreme.
High key images are the opposite – bright tones dominate, shadows are minimal, and the overall feel is clean, airy, and optimistic. While high key photography might seem low contrast at first glance, it can still involve high contrast elements. A dark-skinned subject against a pure white background, for example, creates strong tonal contrast even in a high key setup.
For high contrast dramatic work, low key is the more common approach. It emphasizes shadow, mystery, and depth – the qualities most photographers associate with “high contrast lighting.”
High Contrast Portraits: Step by Step
Here is a practical workflow for creating a high contrast portrait, whether you are using natural light or studio flash.
Step 1: Control the Ambient Light
High contrast starts with a dark base. In a studio, turn off overhead lights and close blinds. Outdoors, find a location with deep shade nearby (a doorway, an alley, under an overhang). The darker your starting point, the more dramatic your key light will appear.
Step 2: Position Your Key Light
Place a single directional light source 45-90 degrees to the side of your subject. The further to the side you go, the more extreme the contrast. Start at 45 degrees (Rembrandt pattern) and adjust based on the look you want.
Step 3: Choose Your Modifier (or Don’t)
Smaller, harder light sources create sharper shadow edges and higher perceived contrast. A bare flash or small reflector produces the hardest light. A strip softbox creates a narrow band of light. A large softbox or umbrella softens shadows and reduces contrast – use these only if you want a more gradual falloff.
Step 4: Meter and Expose
Meter for the highlights on the lit side of the face. Set your exposure so the bright side looks properly exposed. Let the shadows fall where they may – that is the whole point. Check your histogram to make sure you are not clipping the highlights completely, but do not worry about shadow detail unless you want to recover it later. For a quick reference on exposure settings, grab our camera settings cheat sheet.
Step 5: Refine with Flags and Negative Fill
If the shadows are not dark enough (common in rooms with white walls that bounce light everywhere), add black flags or V-flats on the shadow side. These absorb ambient and reflected light, deepening the shadows without changing your key light.
Save this high contrast lighting cheat sheet — it compresses the whole shoot workflow into one saveable reference before you head into editing.
Post-Processing for High Contrast
Post-processing can enhance the contrast you captured in-camera or even create high contrast effects from flat-lit images. Here are the most effective tools and techniques.
Curves: The Most Powerful Contrast Tool
The tone curve is the single most effective tool for contrast adjustment. The classic S-curve – pulling highlights up and shadows down – increases contrast while preserving midtone detail. The steeper the S, the more extreme the contrast.
- Gentle S-curve: Subtle contrast boost, good for most images
- Deep S-curve: Dramatic contrast, ideal for low key and B&W
- Lifted blacks: Pull the bottom-left point up slightly for a filmic, faded shadow look that is still high contrast in the midtones
Lightroom AI Masks
Lightroom Classic‘s AI masking lets you select subjects, skies, and backgrounds with a single click. For high contrast work, this is transformative:
- Select Subject – then darken the background independently to increase separation
- Select Background – reduce exposure by 1-2 stops to deepen shadows around the subject
- Luminance Range mask – target only the shadows or highlights for selective contrast adjustment
- Intersect masks – combine Subject + Luminance Range to affect only the shadows on the subject while leaving highlight detail intact
Dodge and Burn
The oldest contrast technique in photography – dodge (lighten) and burn (darken) specific areas. In Photoshop, use a soft brush on a 50% gray layer set to Overlay blend mode. Paint white to lighten highlights and black to deepen shadows. This gives you surgical precision over where contrast is applied.
Common Mistakes and How to Fix Them
Blown Highlights
The problem: Pure white areas with zero detail, especially on skin, clothing, or important textures.
The fix: Enable highlight warnings (blinkies) on your camera’s LCD. Reduce exposure until highlights retain detail. In post, use the Highlights slider to recover blown areas – modern RAW files can recover 1-2 stops of highlight detail, sometimes more.
Crushed Blacks
The problem: Shadow areas that have collapsed into featureless black with visible noise when pushed in post.
The fix: High contrast does not mean losing all shadow detail. Decide which shadows should be black (background, deep crevices) and which should retain texture (skin, clothing folds). Use the Blacks slider and shadow curve point to maintain subtle detail where needed.
Over-Processing in Post
The problem: Pushing contrast too far in editing creates halos around edges, unnatural skin tones, and a generally “overcooked” look.
The fix: Get the contrast right in-camera as much as possible. Use curves for global contrast instead of the Contrast slider (which affects the entire range uniformly). Apply sharpening and clarity conservatively. Step away from your edit, come back with fresh eyes, and reduce intensity by 10-20% from whatever you initially thought looked good.
Shooting at the Wrong Time
The problem: Trying to create high contrast images under overcast skies or in evenly lit environments where no amount of post-processing will add genuine contrast.
The fix: Wait for the right light. Harsh, directional light – whether from the sun, a window, or a strobe – is essential. You cannot manufacture contrast from flat light without it looking fake.
Frequently Asked Questions
What is the best camera setting for high contrast photography?
Shoot in manual mode, expose for the highlights (the brightest part of the scene you want to retain detail in), and let the shadows go dark. Use spot metering to meter precisely off the highlight area. Shoot RAW so you have maximum flexibility to adjust contrast in post-processing.
Can you create high contrast lighting without studio equipment?
Yes. A single window in a darkened room provides excellent high contrast light. Midday sun with hard shadows works well for street and architectural photography. Any scenario where a single directional light source dominates – without fill from walls, reflectors, or other ambient sources – will create high contrast naturally.
What is the difference between high contrast and HDR photography?
They are opposite approaches. High contrast emphasizes the difference between light and shadow, often intentionally losing detail in the darkest or brightest areas. HDR (High Dynamic Range) photography uses multiple exposures to compress the full range of a scene into a single image, reducing contrast so that detail is preserved everywhere.
Is high contrast lighting good for portraits?
It depends on the mood you want. High contrast lighting adds drama, mystery, and visual depth to portraits – ideal for editorial, fine art, or character-driven work. It emphasizes texture and bone structure. For softer, more flattering portraits (headshots, family photos), lower contrast lighting is usually preferred.
Featured image: Photo by Unsplash.


