Portrait photography is more than just taking pictures of people—it’s about capturing the essence of human emotion, personality, and connection. Since the invention of the camera in the 1800s, portrait photography has evolved from stiff, formal studio shots to dynamic, intimate storytelling.
What sets great portrait photography apart is the photographer’s ability to create a comfortable environment where genuine expressions can emerge. Whether it’s a professional headshot, a candid street portrait, or an environmental portrait that tells a story about someone’s life, the best portraits reveal something authentic about the subject.
The magic happens in the connection between photographer and subject. A skilled portrait photographer acts as both director and psychologist, guiding poses while capturing unguarded moments. This balance between technical skill and human intuition is what transforms a simple photograph into a compelling portrait that viewers can’t look away from.
When you buy through links on our site, we may earn a commission at no cost to you. We evaluate products independently. Commissions do not affect our evaluations.
Key Takeaways
- Understanding Portrait Photography
- 8 Inspiring Portrait Examples
- Lessons from Master Portraits
- Your Challenge Action Plan
- Essential Camera Settings
- Common Questions Answered
Inspiration: 8 Real-World Portrait Examples
1. Classic Headshot by Emma Rodriguez

Camera: Canon EOS R6 Mark II
Lens: 85mm f/1.2L
Settings: f/2.8, 1/125s, ISO 400
Location: Home studio with natural window light
This professional headshot demonstrates perfect use of natural light from a large north-facing window. Rodriguez positioned her subject at a 45-degree angle to the window, creating beautiful Rembrandt lighting with a small triangle of light on the shadow side of the face. The 85mm lens at f/2.8 provides excellent subject separation while keeping facial features flattering and natural.
2. Street Portrait by Marcus Chen

Camera: Sony A7R V
Lens: 50mm f/1.4 GM
Settings: f/2.0, 1/250s, ISO 800
Location: Brooklyn street corner during golden hour
Chen’s candid street portrait captures a jazz musician during a performance break. Shot wide open at f/2.0, the background melts away while the subject’s weathered hands and expressive eyes tell a story of decades spent perfecting his craft. The golden hour lighting adds warmth and dimension to the subject’s face.
3. Environmental Portrait by Sarah Kim

Camera: Fujifilm X-T5
Lens: 23mm f/2 R WR
Settings: f/4.0, 1/60s, ISO 1600
Location: Local bakery at dawn
This environmental portrait shows a baker in her element, surrounded by fresh loaves and flour-dusted surfaces. Kim used a wider angle lens to include contextual elements while keeping the subject as the clear focal point. The higher ISO was necessary for the early morning ambient light, but the film-like grain adds character to the image.
4. Family Portrait by David Thompson

Camera: Nikon Z9
Lens: 70-200mm f/2.8 S
Settings: f/5.6, 1/160s, ISO 250
Location: Public park during overcast afternoon
Thompson’s family portrait benefits from the natural softbox effect of overcast skies. Shot at 135mm to compress the background and create intimacy, the f/5.6 aperture ensures all family members are in sharp focus. The telephoto compression creates beautiful background blur while maintaining connection between subjects.
5. Creative Self-Portrait by Lisa Park

Camera: Canon EOS R5
Lens: 35mm f/1.8 Macro IS STM
Settings: f/2.8, 1/100s, ISO 640
Location: Home with creative lighting setup
Park’s artistic self-portrait uses creative shadow play from window blinds to add visual interest. The 35mm lens creates slight environmental context while maintaining focus on facial expression. The creative use of natural patterns demonstrates how everyday elements can enhance portrait composition.
6. Business Portrait by Alex Rivera

Camera: Sony A7 IV
Lens: 90mm f/2.8 Macro G OSS
Settings: f/4.0, 1/80s, ISO 200
Location: Modern office with controlled lighting
Rivera’s corporate portrait balances professionalism with approachability. The macro lens provides exceptional sharpness and pleasing background compression. Controlled studio lighting creates even illumination while maintaining natural skin tones. The subject’s confident but relaxed expression perfectly suits the business context.
7. Child Portrait by Rachel Green

Camera: Fujifilm X-H2S
Lens: 56mm f/1.2 R
Settings: f/1.8, 1/320s, ISO 400
Location: Backyard during afternoon play
Green captures a child’s genuine laughter during backyard play. The fast shutter speed freezes motion while the f/1.8 aperture isolates the subject from a busy background. The 56mm focal length provides comfortable working distance, allowing natural expressions without intimidating the young subject.
8. Senior Portrait by James Wilson

Camera: Nikon Z7 II
Lens: 105mm f/2.8 VR Macro
Settings: f/3.5, 1/125s, ISO 320
Location: Urban alley with interesting textures
Wilson’s senior portrait uses urban textures to create visual interest while keeping focus on the subject’s personality. The macro lens provides beautiful detail rendering and subject separation. The choice of location and styling reflects the subject’s interests while maintaining timeless appeal.
What These Photos Teach Us
1. Focal Length Shapes the Story
Notice how different focal lengths create entirely different feels: 35mm includes environmental context, 85mm-105mm provides classic portrait compression, and 50mm offers natural perspective similar to human vision. Choose your focal length based on the story you want to tell.
2. Aperture Controls Attention
The examples show strategic aperture choices: f/1.8-f/2.8 for strong subject isolation, f/4.0-f/5.6 for group shots or when environmental context matters. Your aperture choice directs the viewer’s eye exactly where you want it.
3. Light Quality Trumps Light Quantity
From window light to overcast skies, these photographers prioritized soft, even illumination over bright light. The most flattering portraits often use diffused light sources that minimize harsh shadows while maintaining dimension.
4. Environment Supports the Subject
Whether it’s a baker’s kitchen or a jazz musician’s street corner, the best environmental portraits use location to reinforce the subject’s personality or profession. The background should enhance, not compete with, your subject.
Your Challenge Action Plan
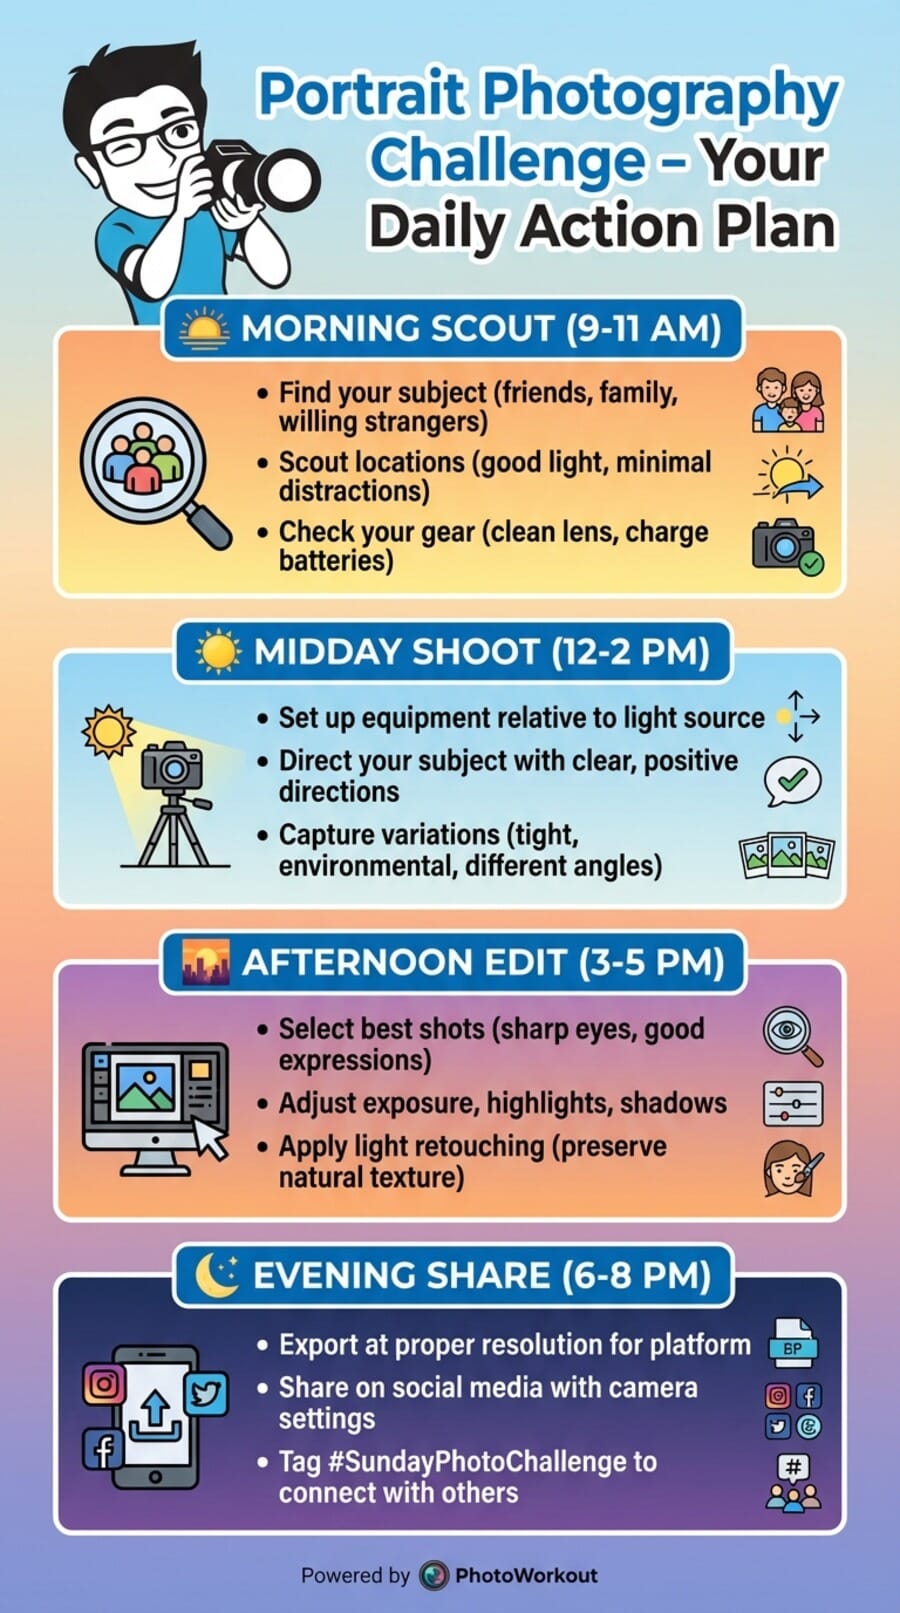
Morning Scout (9-11 AM)
- Find Your Subject: Approach friends, family, or willing strangers. Explain the challenge and ask for 15-20 minutes of their time.
- Scout Locations: Look for interesting backgrounds, good light quality, and minimal distractions. Window light indoors often works better than harsh outdoor sun.
- Check Your Gear: Clean your lens, charge batteries, and set initial camera settings. Test your autofocus performance.
Midday Shoot (12-2 PM)
- Set Up Equipment: Position your subject relative to your chosen light source. For window light, try both straight-on and 45-degree angles.
- Direct Your Subject: Give clear, positive directions. “Tilt your chin slightly toward me” works better than “not like that.”
- Capture Variations: Shoot tight headshots, environmental portraits, and everything in between. Try different expressions and angles.
Afternoon Edit (3-5 PM)
- Select Best Shots: Look for sharp focus on eyes, good expressions, and pleasing light. Don’t just pick the first good one—compare similar shots carefully.
- Adjust Exposure/Colors: Subtle adjustments to exposure, highlights, and shadows. Portrait skin tones should look natural, not over-processed.
- Apply Light Retouching: Remove temporary blemishes but preserve character lines and natural skin texture. When in doubt, less is more.
Evening Share (6-8 PM)
- Export Final Images: Export at appropriate resolution for your sharing platform. Instagram prefers 1080×1080 or 1080×1350 pixels.
- Share on Social Media: Post your favorite shot with details about camera settings and your experience with the challenge.
- Tag #SundayPhotoChallenge: Connect with other participants and see how they interpreted the same challenge differently.
Recommended Camera Settings
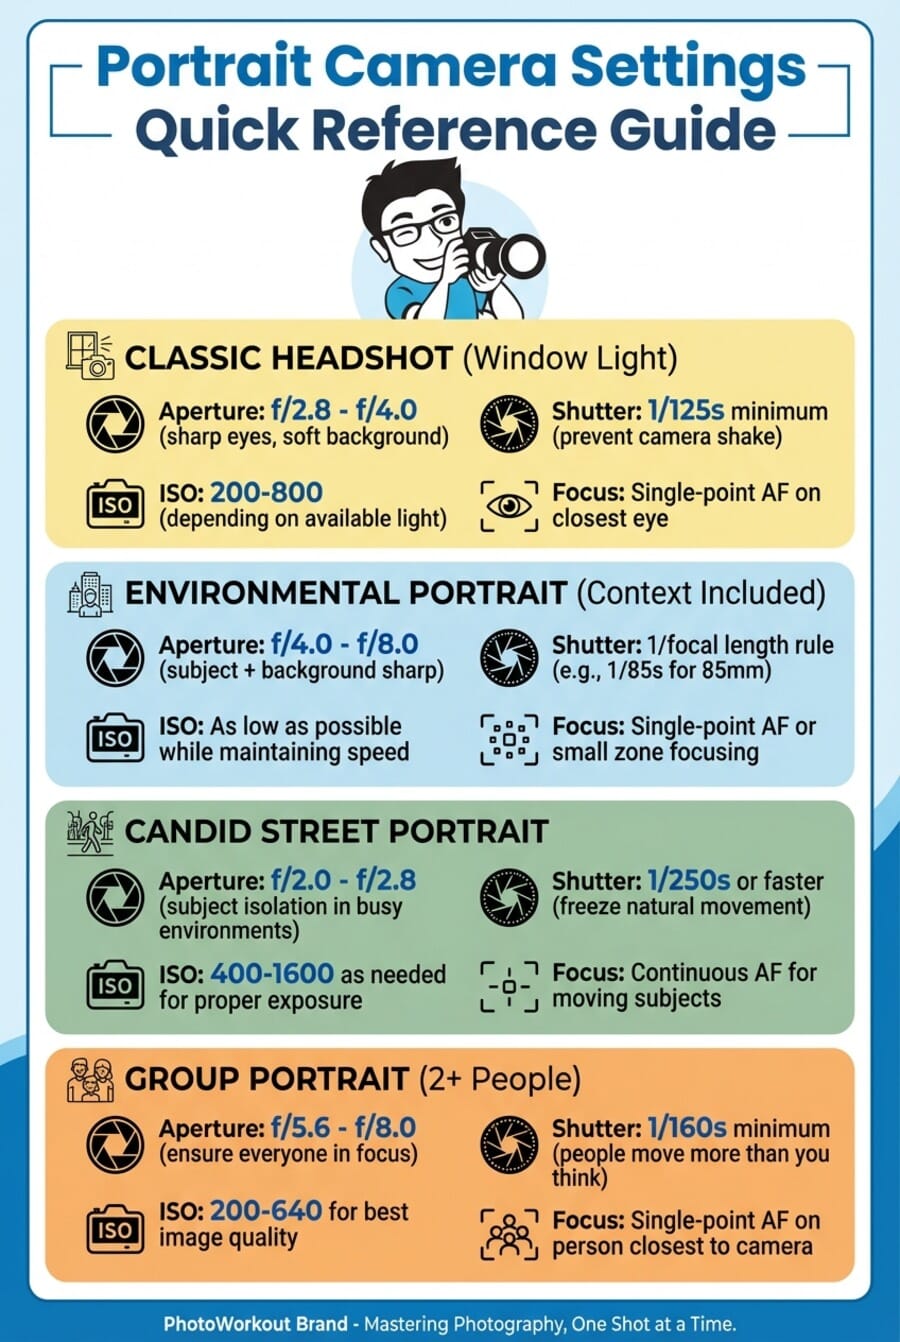
Classic Headshot (Window Light)
- Aperture: f/2.8 – f/4.0 for sharp eyes with soft background
- Shutter Speed: 1/125s minimum to prevent camera shake
- ISO: 200-800 depending on available light
- Focus Mode: Single-point AF on closest eye
Environmental Portrait (Context Included)
- Aperture: f/4.0 – f/8.0 to keep both subject and relevant background sharp
- Shutter Speed: 1/focal length rule (e.g., 1/85s for 85mm lens)
- ISO: As low as possible while maintaining proper shutter speed
- Focus Mode: Single-point AF or small zone focusing
Candid Street Portrait
- Aperture: f/2.0 – f/2.8 for subject isolation in busy environments
- Shutter Speed: 1/250s or faster to freeze natural movement
- ISO: 400-1600 as needed for proper exposure
- Focus Mode: Continuous AF for moving subjects
Group Portrait (2+ People)
- Aperture: f/5.6 – f/8.0 to ensure everyone is in focus
- Shutter Speed: 1/160s minimum (people move more than you think)
- ISO: 200-640 for best image quality
- Focus Mode: Single-point AF on person closest to camera
FAQ
What’s the best focal length for portraits?
85mm-105mm lenses are considered ideal for traditional portraits because they provide flattering compression and comfortable working distance. However, 50mm works great for environmental portraits, and 35mm can create interesting context. The “best” focal length depends on your style and the story you want to tell.
How do I make people comfortable during a portrait session?
Start with conversation before picking up your camera. Ask about their interests, compliment something genuine, and explain what you’re trying to achieve. Take a few test shots to let them get used to the camera, then gradually guide them into more specific poses. Remember: relaxed photographers create relaxed subjects.
Should I always focus on the eyes?
Yes, for traditional portraits the eyes should be tack sharp—specifically the eye closest to the camera if your subject is at an angle. However, creative portraits might intentionally focus on hands, accessories, or other meaningful elements. When in doubt, sharp eyes are rarely wrong.
What if my subject blinks during the shot?
This is why portrait photographers take multiple shots of each pose. Use continuous shooting mode (burst mode) for 3-5 frames per pose, especially during natural expressions or laughter. Review images on your camera’s LCD to catch blinks before moving to the next setup.
How do I handle harsh outdoor lighting?
Seek open shade (under trees, building overhangs, or on the shadowed side of buildings) rather than direct sunlight. If you must shoot in bright sun, position your subject so the light comes from behind them and use fill flash or a reflector to light their face. Golden hour (first/last hour of sunlight) provides the most flattering natural light.