
- 8 stunning portrait examples with full camera settings and technical breakdowns
- 4 key lessons from working portrait photographers
- Step-by-step challenge plan from morning scouting to evening sharing
- Recommended camera settings for 4 common portrait scenarios
Portrait photography is the art of capturing people – their expressions, their personality, their story. It is one of the oldest and most enduring genres of photography, stretching back to the daguerreotype studios of the 1840s where sitting for a portrait was an event. Today, with fast autofocus systems and sharp wide-aperture lenses, the technical barriers have largely disappeared. What remains is the harder challenge: making a genuine connection with your subject and translating that into a single frame.
What separates a snapshot from a portrait? Intent. A good portrait reveals something about the person in it – confidence, vulnerability, joy, contemplation. The photographer’s job is to create the conditions where that something can emerge, whether through careful lighting, a well-chosen location, or simply knowing when to press the shutter during a conversation. The best portrait photographers are not just technically skilled; they are observers of people.
This week’s challenge: capture one portrait that tells a story about your subject. It does not have to be a stranger in a studio – your partner reading a book by the window, a friend laughing at a cafe, a child concentrating on a puzzle. The 8 examples below show how different photographers approach the same genre with wildly different tools and techniques, and they will give you a roadmap for your own shoot.
Inspiration: 8 Real-World Portrait Examples
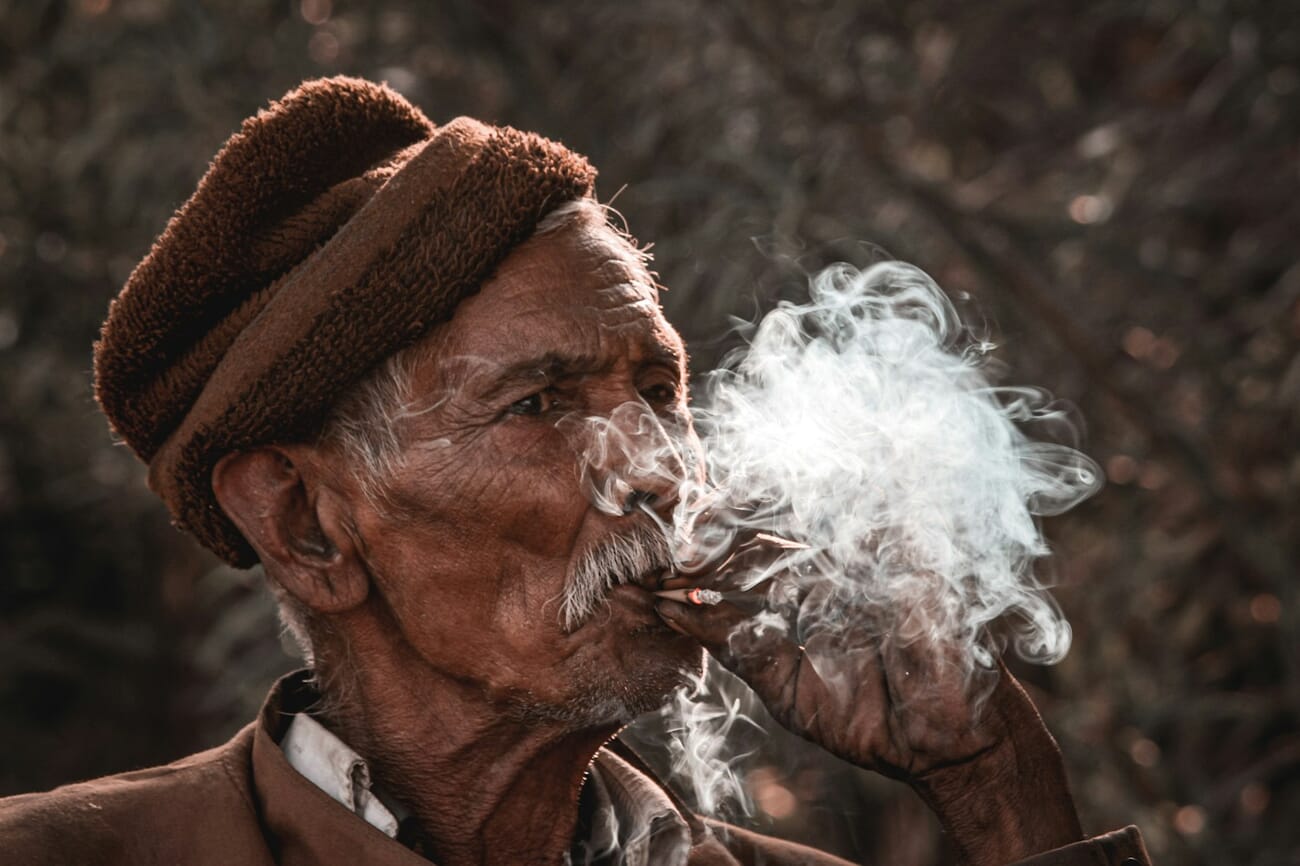
1. Jyotirmoy Gupta – Nikon D5200
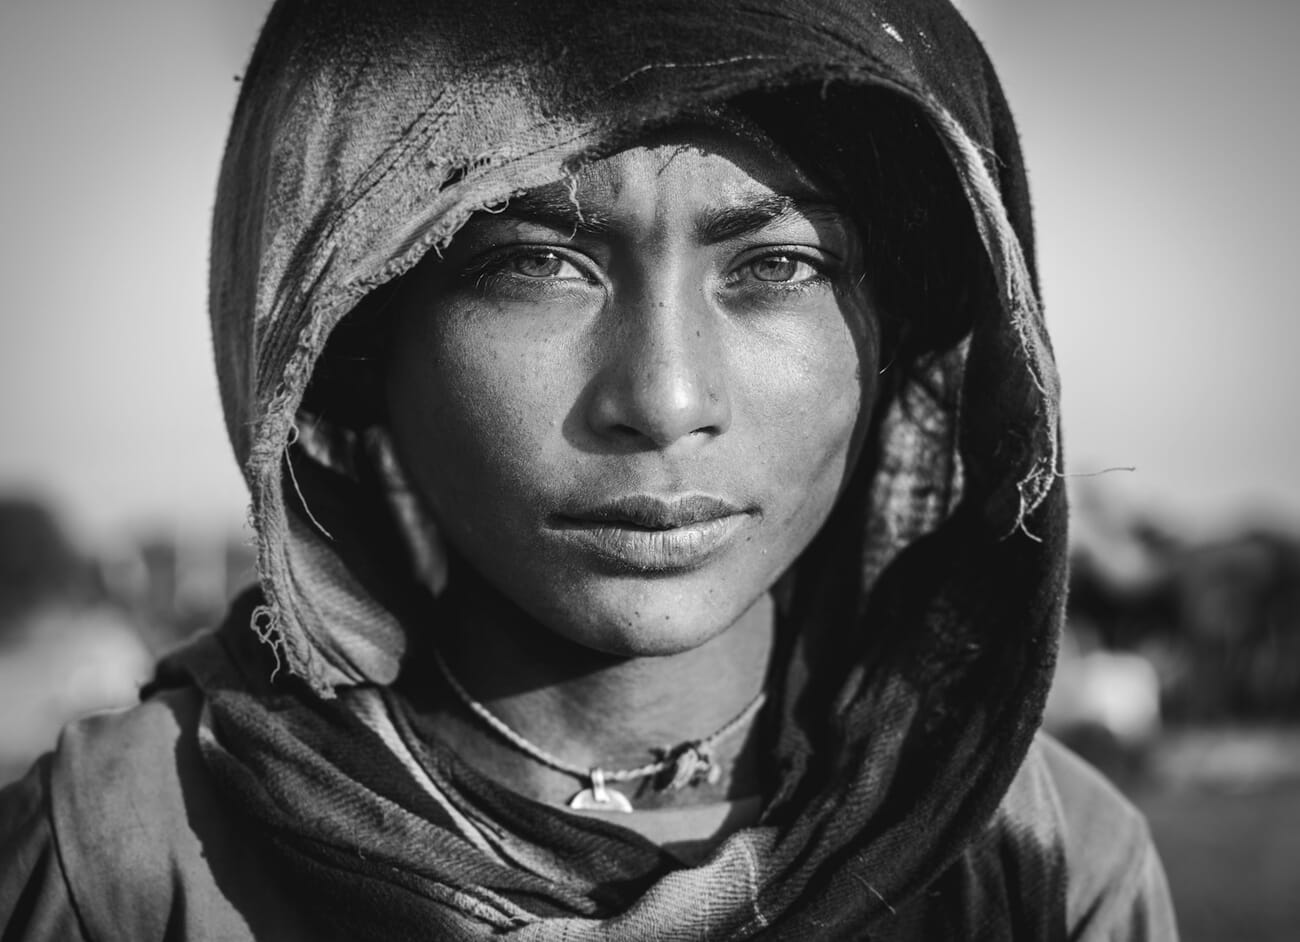
Camera settings: Nikon D5200 | 35mm | f/2.8 | 1/400s | ISO 100
This monochrome portrait demonstrates the power of simplicity. By stripping away color, Gupta forces the viewer to focus entirely on form, texture, and expression. The 35mm focal length at f/2.8 provides enough background separation while keeping the environmental context intact – you can sense the space around the subject without it competing for attention. The fast 1/400s shutter speed at ISO 100 tells us this was shot in bright conditions, likely using the harsh midday light that many photographers avoid but that works beautifully for high-contrast black and white.
2. Branislav Rodman – Canon EOS 5D Mark III
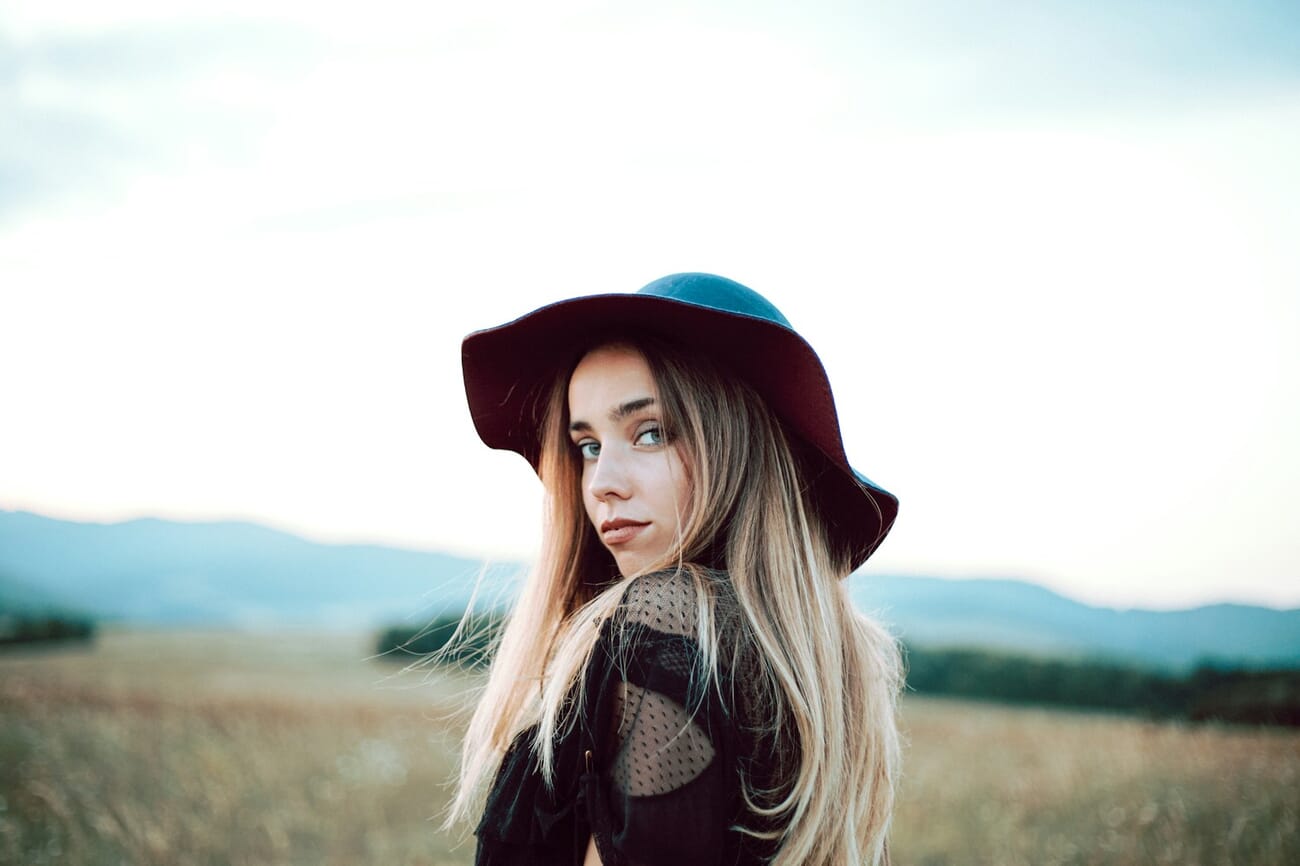
Camera settings: Canon EOS 5D Mark III | 50mm | f/1.8 | 1/160s | ISO 250
Rodman leverages the classic 50mm focal length wide open at f/1.8 to create dreamy background separation while maintaining sharp focus on the eyes. The Canon 5D Mark III’s full-frame sensor at this aperture produces a beautifully smooth bokeh that turns the background into a wash of soft color. The slightly elevated ISO of 250 and 1/160s shutter speed suggest open shade or overcast conditions – ideal for portrait photography as the diffused light wraps evenly around the subject’s face without harsh shadows.
3. Fakhri Labib – Sony A6000
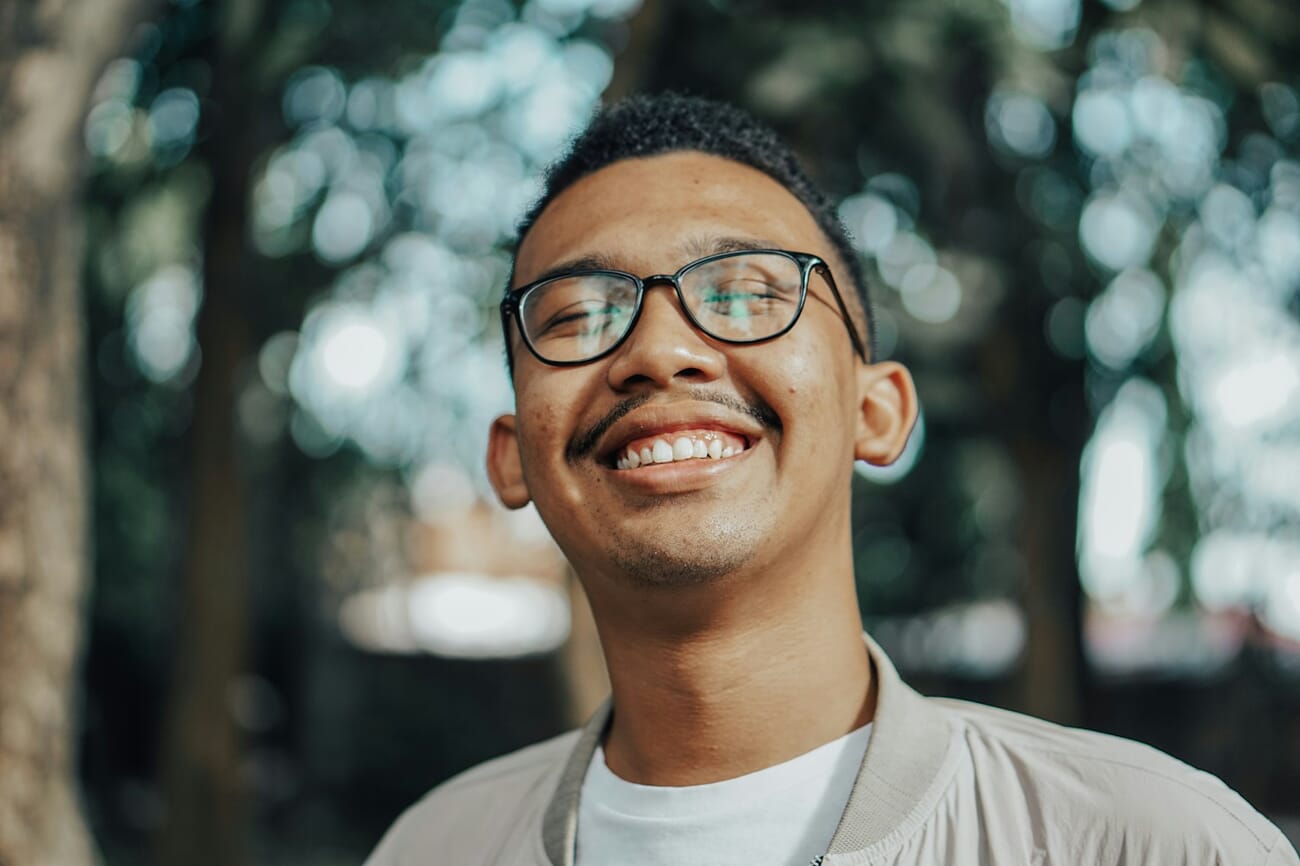
Camera settings: Sony A6000 | 50mm | f/1.8 | 1/350s | ISO 125
This portrait proves you do not need a full-frame camera to create compelling portraits. Labib’s Sony A6000 with its APS-C sensor paired with a 50mm lens gives an effective 75mm field of view – a classic portrait focal length. The genuine smile and natural body language make this image feel candid rather than posed. Shot at f/1.8 wide open, the shallow depth of field draws attention to the subject’s expression while the fast 1/350s shutter speed freezes any micro-movement for tack-sharp results.
4. Ingridi Alves – Canon EOS 70D
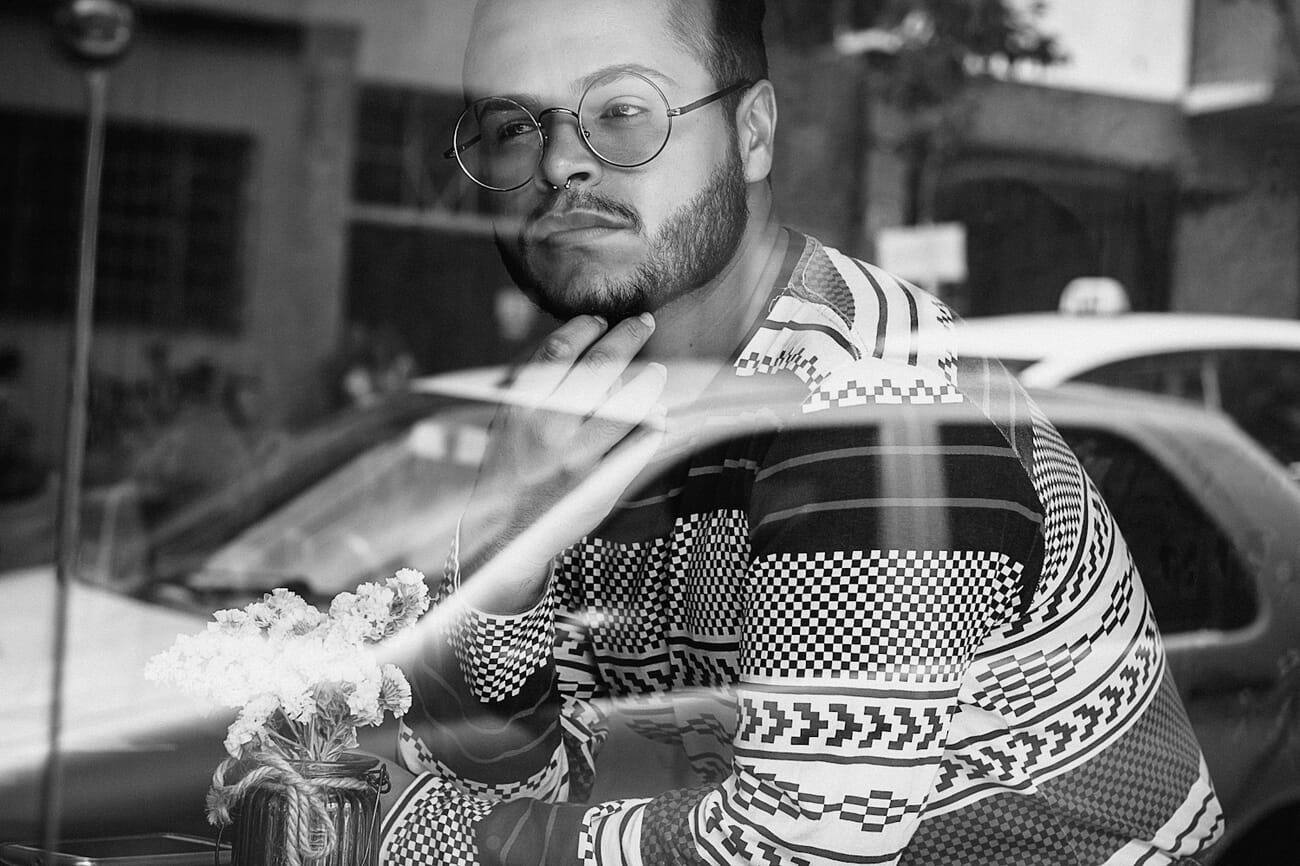
Camera settings: Canon EOS 70D | 50mm | f/4.0 | 1/125s | ISO 100
Window light is the original portrait lighting setup, and Alves uses it masterfully here. The single directional source creates a natural Rembrandt lighting pattern with a bright side and a shadow side that sculpts the subject’s features. At f/4.0, there is enough depth of field to keep the entire face sharp while still separating the subject from the background. The low ISO 100 ensures clean, noise-free shadows in the darker areas of the frame – critical when working with high-contrast directional light.
5. Mohammad Reza – Fujifilm X-T10
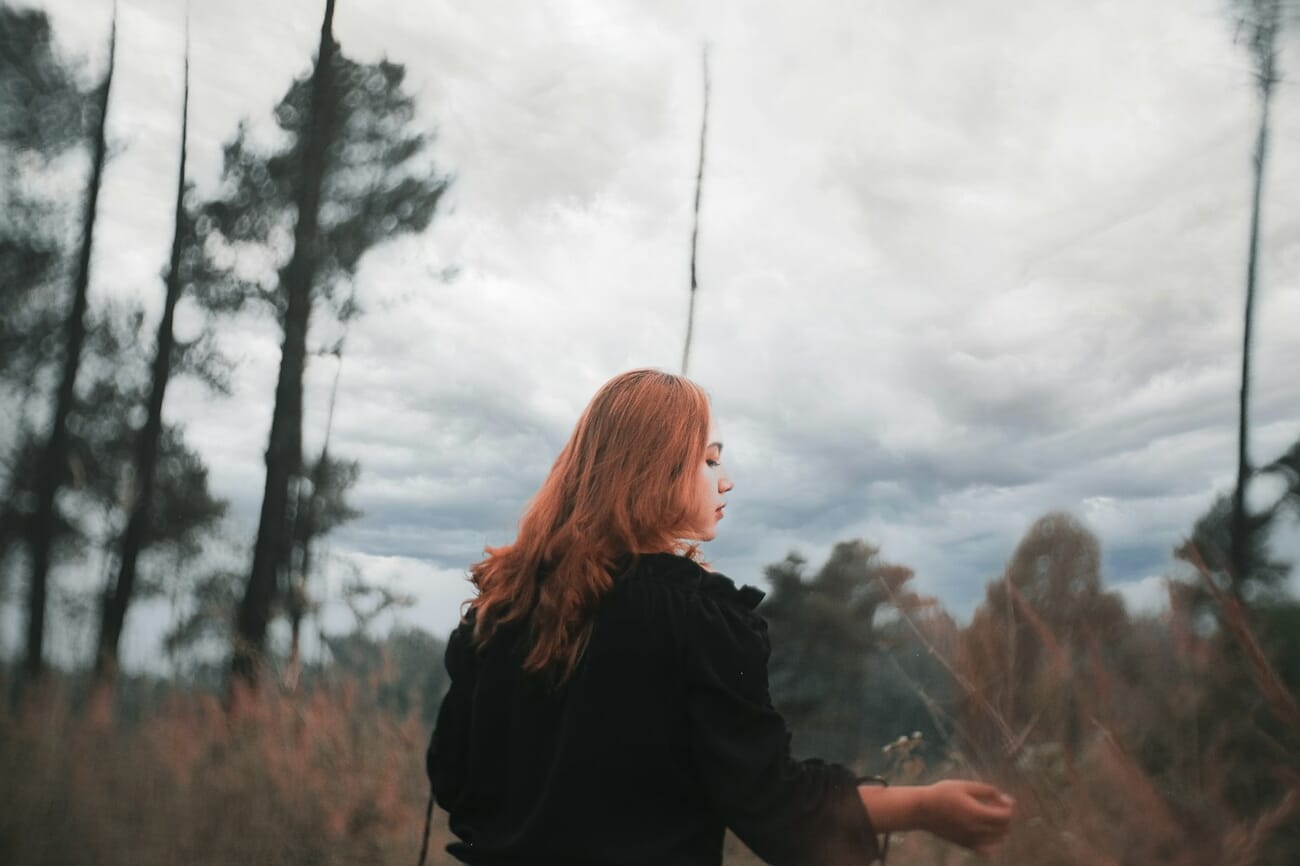
Camera settings: Fujifilm X-T10 | 24mm | 1/1600s | ISO 800
Reza breaks the portrait photography rules in the best way possible. Instead of a tight headshot with a telephoto lens, he uses a wide 24mm focal length to place the subject within her environment. The tall grass creates a natural frame, and the warm color palette suggests golden hour timing. The Fujifilm X-T10’s signature color science adds a film-like quality that is hard to replicate in post-processing. At 1/1600s, even with wind moving the grass, everything freezes in perfect clarity.
6. Petr Ruzicka – Sony A7 II
Camera settings: Sony A7 II | 50mm | f/1.8 | 1/800s | ISO 100
Ruzicka demonstrates why the Sony A7 II remains a favorite among portrait photographers on a budget. The full-frame sensor at f/1.8 produces the kind of shallow depth of field and creamy bokeh that APS-C cameras struggle to match. The fast 1/800s shutter speed at ISO 100 indicates bright outdoor conditions, possibly direct sunlight, yet the exposure is perfectly controlled. The 50mm focal length on full frame gives a natural perspective without the compression of longer lenses.
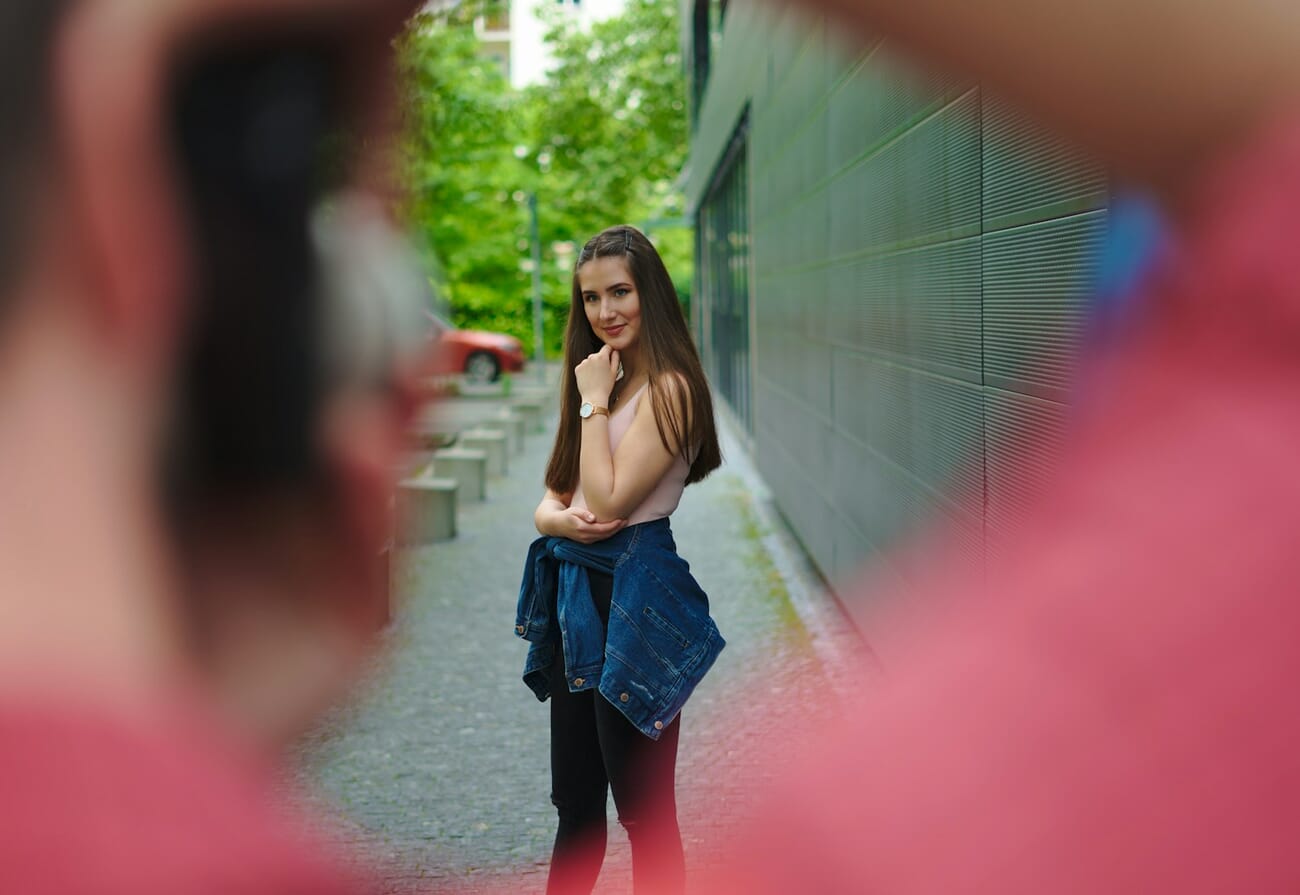
7. Prince Patel – Canon EOS 700D
Camera settings: Canon EOS 700D | 194mm | f/9 | 1/60s | ISO 200
This image showcases an unconventional portrait approach – using a telephoto zoom at 194mm to compress the background dramatically. At f/9, Patel has stopped down significantly from wide open, yet the extreme focal length still provides noticeable background compression that flattens the planes and creates a painterly quality. The 1/60s shutter speed is slow for a 194mm lens, suggesting either steady hands, image stabilization, or a deliberate creative choice. This telephoto compression technique is particularly effective for street-style environmental portraits.
8. Angelo Pantazis – Nikon D700
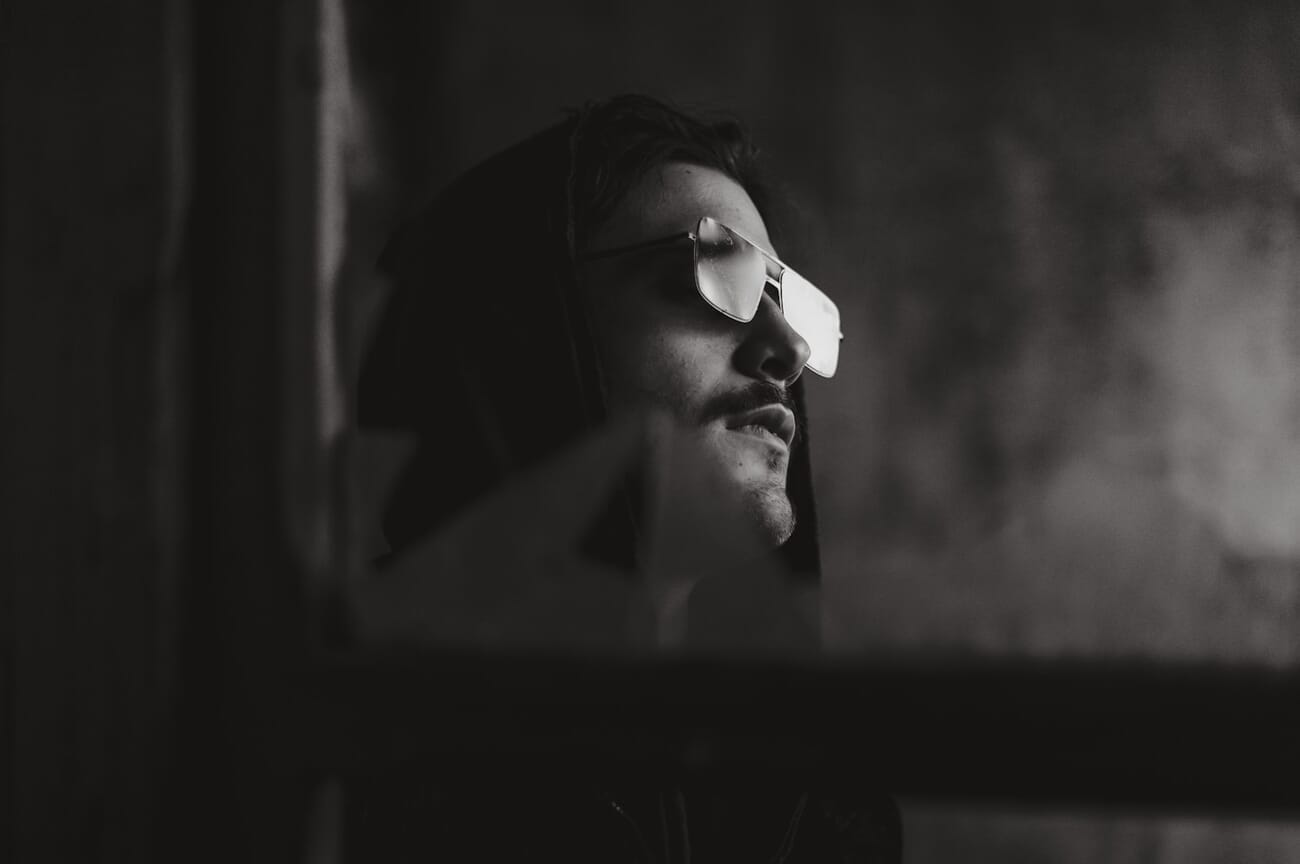
Camera settings: Nikon D700 | 50mm | f/1.4 | 1/640s | ISO 1000
Pantazis pushes the 50mm f/1.4 to its widest aperture, creating an extremely thin plane of focus that demands precise technique. The Nikon D700 at ISO 1000 handles the higher sensitivity with the kind of grain that actually enhances a black and white portrait rather than degrading it. The combination of wide aperture and the fast 1/640s shutter speed suggests challenging mixed light. The sunglasses add an element of mystery – the viewer cannot see the subject’s eyes, which inverts the usual portrait convention and creates intrigue.
What These Photos Teach Us
1. The Eyes Are Everything (Unless They Are Not)
Seven of these eight portraits follow the cardinal rule of portrait photography: focus on the eyes. Sharp eyes create an immediate connection between viewer and subject. But Pantazis’s sunglasses portrait proves that breaking this rule deliberately can be just as powerful. When you hide the eyes, the viewer’s attention shifts to other expressive elements – the jawline, the posture, the overall mood. The lesson: know the rules, then break them with purpose.
2. One Light Source Is All You Need
Not a single one of these portraits used complex multi-light setups. Alves used a window. Rodman used open shade. Gupta used direct sunlight. Reza shot at golden hour. The consistent thread is that each photographer found one good light source and positioned their subject relative to it. If you are starting out, forget about buying strobes and softboxes. Find a large window, place your subject 2-3 feet from it, and you have a professional portrait studio for free.
3. Gear Matters Less Than You Think
These 8 images were shot on cameras ranging from a $400 Sony A6000 to a professional Canon 5D Mark III. Labib’s APS-C portrait holds its own against any of the full-frame shots here. The common thread is not expensive gear but deliberate choices – the right aperture for the intended look, proper exposure for the lighting conditions, and a focal length that matches the creative vision. A 50mm f/1.8 lens costs under $200 on any system and can produce stunning portraits.
4. Environment Tells the Story
Reza’s wide-angle field portrait and Patel’s compressed telephoto shot both use the environment as a storytelling device, but in completely different ways. The wide angle includes the environment as context – you see where the subject is and what surrounds them. The telephoto compresses it into an abstract backdrop. Neither approach is better; they serve different purposes. When planning your portrait, ask yourself: does the location add to the story, or distract from it? Your answer determines your focal length.
Your Portrait Photography Challenge Plan
Follow this four-phase plan to capture your best portrait this Sunday. Each phase builds on the last, from preparation through to sharing your final image with the community.
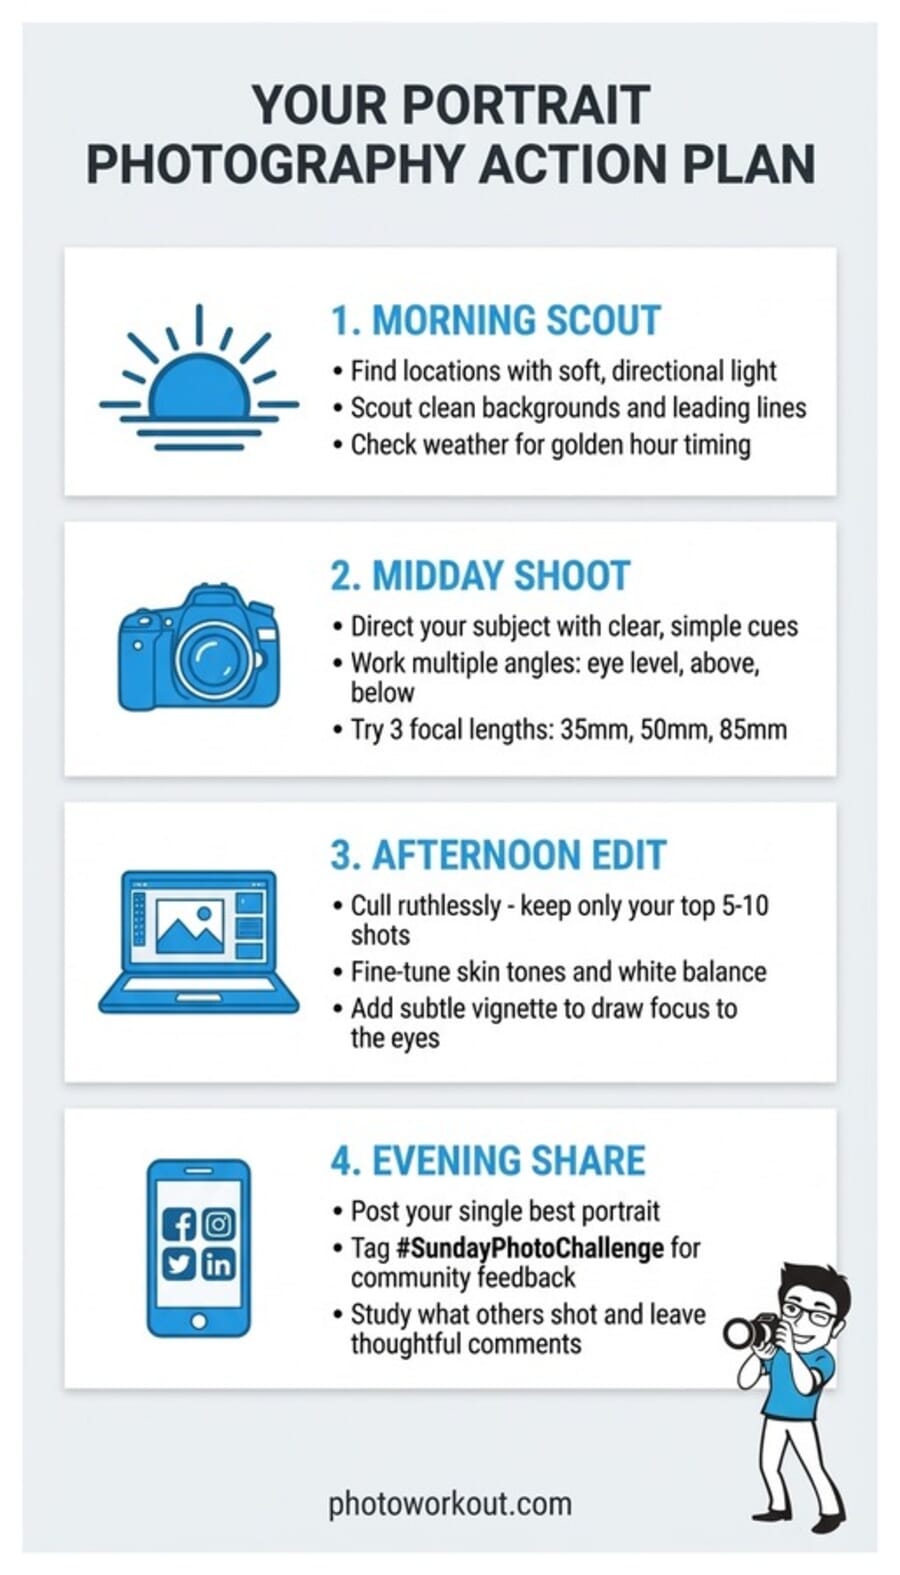
Morning Scout
Before you pick up your camera, find your location and light. Walk around your neighborhood or home looking for spots with soft, directional light – large windows, covered porches, the shaded side of buildings. Check what time the sun creates the best quality light at each spot. Note backgrounds that are clean and uncluttered, or that add interesting texture when thrown out of focus. If you are shooting outdoors, check the weather forecast and plan for golden hour (the first and last hour of sunlight).
Midday Shoot
Arrive at your scouted location with your subject. Start with simple, natural poses – standing, leaning against a wall, sitting. Give clear but gentle direction: “Turn your chin slightly to the left” works better than “Pose for me.” Shoot from multiple angles: eye level, slightly above (most flattering for most faces), and below (for a powerful, commanding feel). Try at least two different focal lengths if you have a zoom lens – a wider shot that includes the environment and a tighter crop that isolates the face. Shoot more than you think you need; you can always delete later.
Afternoon Edit
Import your photos and be ruthless in your culling. Look for the frames where the expression is most genuine, the eyes are sharpest, and the light falls most beautifully. From a session of 50-100 shots, narrow it down to your top 5-10. In post-processing, pay special attention to skin tones (avoid over-saturating or shifting them too warm/cool), white balance (skin should look natural under the light you shot in), and a subtle vignette that draws the viewer’s eye to the subject’s face.
Evening Share
Pick your single best portrait and share it with the community. Post it on Instagram or your preferred platform with the tag #SundayPhotoChallenge. In your caption, mention what camera and lens you used, what kind of light you worked with, and one thing you learned during the shoot. Then spend 15 minutes looking at other photographers’ challenge submissions and leave thoughtful, specific feedback – not just “nice shot” but “I love how the window light creates that triangle of light on the cheek.”
Recommended Camera Settings for Portrait Photography
Portrait settings vary dramatically depending on your lighting situation. Here are four common scenarios with specific starting points you can adjust from.
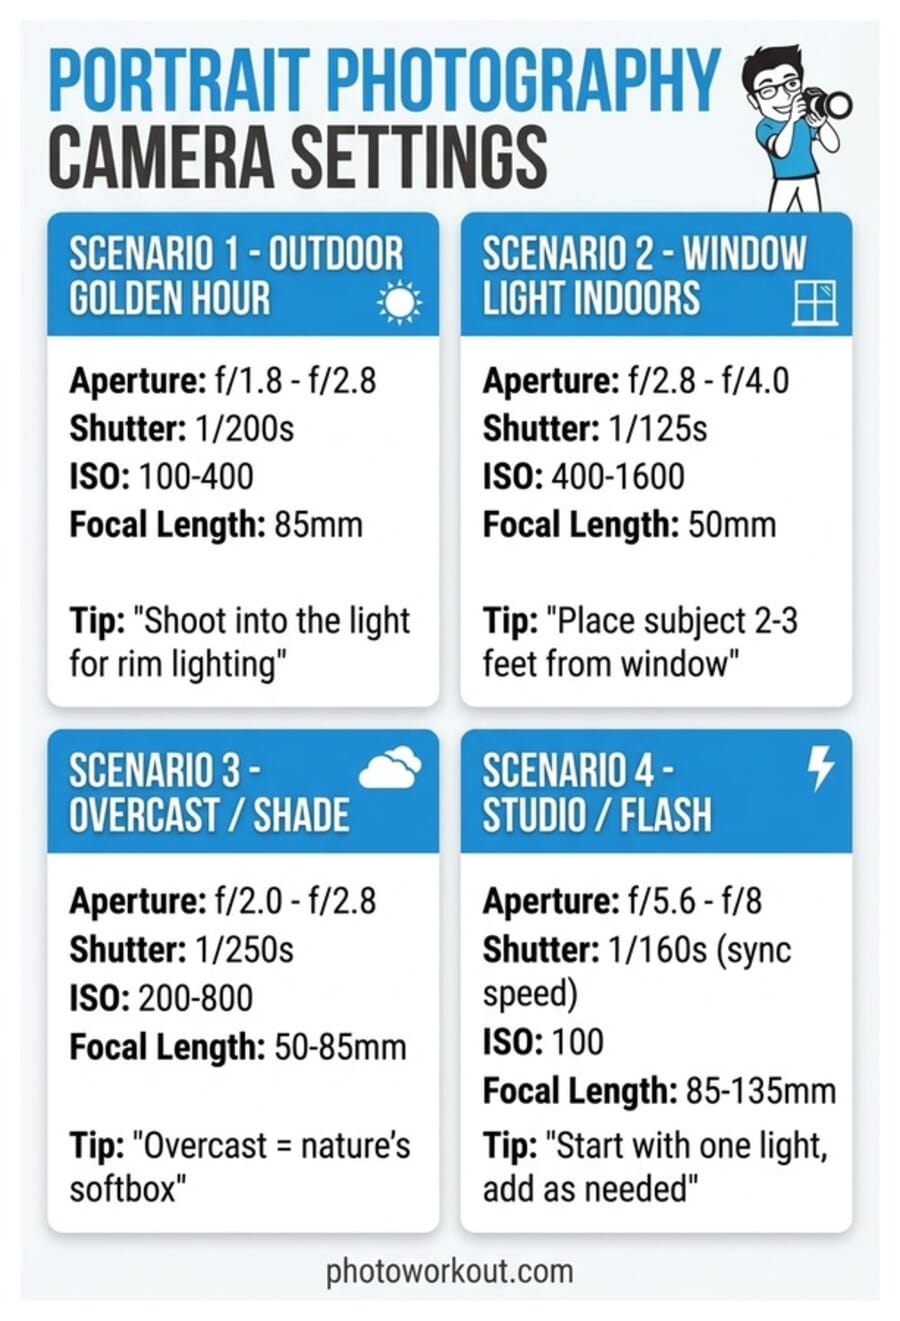
Outdoor Golden Hour
The warm, directional light during the first and last hour of sunlight is portrait photography gold. Set your aperture between f/1.8 and f/2.8 for maximum background blur, your shutter speed at 1/200s or faster (to freeze any movement), and keep ISO at 100-400. Use a focal length of 85mm if you have it – the compression and background separation at this focal length during golden hour is stunning. Position your subject so the sun hits them from behind or from the side for rim lighting and a warm glow.
Window Light Indoors
Position your subject 2-3 feet from a large window (not in direct sunlight – a north-facing window or one with sheer curtains is ideal). Set aperture to f/2.8-f/4.0 for enough depth of field to keep the full face sharp. Shutter speed can drop to 1/125s since your subject should be relatively still. You will likely need ISO 400-1600 depending on the window size and time of day. A 50mm lens works beautifully here. If the shadows on the far side of the face are too dark, place a white reflector or even a piece of white poster board opposite the window to fill them in.
Overcast or Open Shade
Cloud cover acts as nature’s giant softbox, diffusing sunlight into soft, even illumination with no harsh shadows. This is actually one of the best conditions for portrait photography. Open your aperture to f/2.0-f/2.8 for pleasing background blur, set shutter speed at 1/250s, and let ISO float between 200-800 as needed. Any focal length from 50mm to 85mm works well. The challenge with overcast light is that it can look flat, so look for a direction to the light (it is rarely perfectly even) and position your subject to take advantage of it.
Studio or Flash
If you are using a speedlight or studio strobe, your settings are dictated by the flash sync speed of your camera (typically 1/160s-1/250s). Set shutter speed to your sync speed, ISO to 100 for maximum image quality, and control exposure purely with aperture – typically f/5.6 to f/8 for enough depth of field to keep the entire face sharp. Use an 85mm or 135mm focal length for the most flattering perspective. Start with a single light source in a large softbox or umbrella at 45 degrees to your subject, and only add additional lights once you have mastered one-light setups.
Frequently Asked Questions
What is the best focal length for portrait photography?
The classic portrait focal lengths are 50mm, 85mm, and 135mm on a full-frame camera (or their APS-C equivalents: 35mm, 56mm, and 85mm). The 85mm is generally considered the sweet spot because it provides flattering facial perspective with enough working distance to not crowd your subject. However, as our examples show, compelling portraits can be shot at any focal length from 24mm to 200mm – what matters is understanding how each focal length changes the relationship between subject and background.
Do I need an expensive camera for portrait photography?
No. Fakhri Labib’s example in this article was shot on a Sony A6000, a camera you can find used for under $400. The most important investment for portraits is a fast prime lens – a 50mm f/1.8 costs under $200 on virtually every camera system (Canon, Nikon, Sony, Fujifilm) and will produce dramatically better portraits than a kit zoom lens. Spend your money on glass, not bodies.
How do I make my subject look natural and relaxed?
The biggest mistake beginners make is saying “just be natural” – which makes most people freeze up. Instead, give specific micro-directions: “Shift your weight to your back foot,” “Look past my left shoulder,” “Take a deep breath and let it out slowly.” Between posed shots, keep shooting during the transitions – the most natural expressions often happen when people think you are not photographing. Playing music, telling jokes, or having a genuine conversation while you shoot also helps enormously.
Should I shoot portraits in RAW or JPEG?
Always RAW. Portrait post-processing often involves adjusting skin tones, recovering highlight detail in bright skin areas, and fine-tuning white balance – all of which benefit enormously from the extra data in a RAW file. JPEG compression bakes in processing decisions you cannot fully undo later. If storage is a concern, shoot RAW+JPEG so you have JPEGs for quick sharing and RAW files for your final selects.
What time of day is best for outdoor portraits?
The golden hour (roughly the first hour after sunrise and the last hour before sunset) produces the most universally flattering portrait light – warm, directional, and soft. But do not write off other times. Overcast midday provides beautifully even light. Open shade (the shadow side of a building) works at any time. Even harsh noon sun can create striking high-contrast portraits, especially in black and white. The key is not avoiding certain times but understanding how to work with whatever light you have.
Related Posts
Get the Sunday Photo Challenge in Your Inbox
A new creative photography challenge every Sunday morning. No spam, unsubscribe anytime.