
- The key to a pure white background is making the backdrop 1-2 stops brighter than your subject – then expose for the subject.
- You don’t need expensive gear – a white bedsheet, poster board, or seamless paper all work as DIY backdrops.
- One flash behind the subject plus a reflector in front creates a clean white background on a budget.
- For the most consistent results, use a two-flash setup: one for the background, one as your key light.
- Natural light works too – shoot against an overcast sky or position your subject near a large window with a white wall behind them.
- Gray backgrounds and light spill are the two most common problems – see troubleshooting tips for quick fixes.
- Post-processing in Lightroom or Photoshop can clean up any remaining imperfections for a perfectly pure white result.
- Test your knowledge with our white background portrait quiz.
Why White Background Portraits Work
A pure white background strips away every distraction and puts the viewer’s attention exactly where it belongs: on the person in front of the camera.
This technique is everywhere – from LinkedIn headshots and passport photos to magazine covers and e-commerce catalogs. It looks clean, professional, and timeless. But getting that background truly white (not gray, not cream – white) is trickier than it seems.
The good news? You don’t need a professional studio. With the right technique, you can nail white background portraits in your living room, garage, or even outdoors. This guide walks you through every method – from natural light to multi-flash setups – plus the post-processing tricks that guarantee a perfectly clean result.

The Science Behind a White Background
Before you set up any gear, you need to understand one fundamental principle: a white background only appears white if it’s brighter than your subject.
Here’s why. When you set your exposure to properly light a person’s face, anything significantly brighter than that exposure level gets “blown out” to pure white. That’s exactly what you want for the background.
The technical target is making the background 1-2 stops brighter than your subject. One stop brighter gives you a very light gray that’s easy to push to white in editing. Two stops brighter gives you pure white straight out of camera.
This applies regardless of your light source – window light, flash, continuous LED, or the sun. The physics doesn’t change. Once you internalize this concept, every white background method becomes intuitive.
How to Meter for White Backgrounds
Your camera’s automatic metering will try to make everything 18% gray – which is the opposite of what you want. There are two reliable approaches:
- Spot meter on the subject’s face – Fill the frame with the face, note the settings, then switch to manual mode and dial those in. The background will blow out naturally.
- Use a handheld light meter – Take an incident reading at the subject’s position, then a second reading at the background. The background should read 1-2 stops higher. See our light meter guide for details.
DIY White Backdrops (Budget-Friendly Options)
You don’t need to spend hundreds on professional seamless paper or muslin to get started. Here are practical DIY options ranked by effectiveness:
- Seamless paper roll (9ft wide) – The gold standard. Costs $25-40, provides a wrinkle-free sweep from wall to floor. Savage and Widetone are popular brands. This is what most studios use.
- White muslin or cotton fabric – Cheap and reusable, but wrinkles easily. Iron or steam it before shooting. Hang from a curtain rod or PVC frame.
- White bedsheet – The cheapest option. Use a tightly woven sheet to avoid texture showing through. Double up for better opacity.
- White poster board – Great for headshots where you only need a small background area. Tape multiple boards together for wider coverage.
- White wall – If you have one, it works. The surface needs to be smooth and matte (not glossy paint, which creates hotspots).
Pro tip: Whatever backdrop you choose, create a “sweep” – curve the material from the wall down to the floor with no visible seam. This eliminates the line where the wall meets the floor and creates an infinite white look.

Method 1: White Background with Natural Light
No flash? No problem. Natural light can produce beautiful white background portraits if you work with the right conditions.
Outdoor: Using the Sky as Your Backdrop
The sky is a massive, free white backdrop – you just need the right angle. Here’s how:
- Overcast days are ideal. A cloudy sky is already nearly white, making it easy to blow out completely.
- Shoot from a low angle. Get low so the sky fills the background behind your subject. A hill, stairs, or even crouching works.
- Expose for the face. Spot meter on the subject, which will naturally overexpose the sky to white.
- Avoid including the sun. Direct sun causes flare and uneven exposure. Keep it behind the subject or out of frame.
On clear days, shoot in the late afternoon with the subject facing away from the sun. The brightest part of the sky behind them will blow out to white when you expose for the shaded face.
Indoor: Window Light + White Wall
This is one of the easiest setups for beginners:
- Place your subject 3-5 feet in front of a white wall
- Position a large window to the side of the subject (45-degree angle)
- Place a white reflector on the opposite side to fill shadows
- Aim a desk lamp or LED panel at the white wall behind the subject to boost its brightness
The window provides beautiful, soft light on the subject’s face, while the extra light on the wall pushes the background toward pure white. This setup works especially well for headshots.
Method 2: One Flash Setup
A single off-camera flash opens up far more control than natural light alone. Here’s a reliable one-flash method:
Step-by-Step: Single Flash White Background
- Step 1: Position your subject 4-6 feet in front of a white backdrop.
- Step 2: Place the flash behind the subject, pointing at the backdrop. Set it to about 1/2 power.
- Step 3: Take a test shot. The background should be bright white. If it’s gray, increase flash power or move the flash closer to the backdrop.
- Step 4: Your subject will likely be a silhouette at this point. Place a large white reflector in front of them (a poster board works). The flash bouncing off the backdrop will reflect back onto the subject’s face.
- Step 5: Adjust the reflector angle until the subject’s face is evenly lit. Take the final shot.
The key here is that the flash does double duty: it lights the backdrop directly and lights the subject indirectly via the reflector. It’s an elegant, budget-friendly solution.

Method 3: Two Flash Setup (Best Results)
Two flashes give you independent control over the background and subject lighting. This is the most reliable method for consistently pure white backgrounds.
Step-by-Step: Two Flash White Background
- Flash 1 (Background light): Place it behind the subject, aimed at the backdrop. This is dedicated to making the background pure white.
- Flash 2 (Key light): Position it in front and to one side of the subject (about 45 degrees). Modify it with a softbox or umbrella for softer light.
Setting the ratios:
- Set your background flash first. Fire it alone and check the backdrop – it should read pure white (histogram pushed to the right edge).
- Then add the key light and adjust its power until the subject’s face is properly exposed.
- The background light should be 1-2 stops brighter than the key light. If your key light reads f/5.6, the background should read f/8 to f/11.

Key Light Placement Options
Where you place the key light dramatically changes the mood of the portrait:
- 45-degree angle (classic) – The most flattering position for most faces. Creates gentle shadows that add dimension. This is a standard loop lighting setup.
- Directly in front (flat lighting) – Minimizes shadows for a clean, commercial look. Great for ID photos and corporate headshots.
- Above and centered (butterfly lighting) – Creates a small shadow under the nose. Classic beauty lighting for fashion and glamour.
- 90-degree side (split lighting) – Lights exactly half the face for dramatic, high-contrast results.
For most white background portraits, the 45-degree position with a large softbox is the safest starting point. Check our complete portrait lighting guide for more patterns.
Camera Settings for White Background Portraits
The right camera settings depend on your light source, but here are proven starting points:
With Flash
- Mode: Manual (M)
- ISO: 100 (lowest native ISO for cleanest image)
- Shutter speed: 1/160 to 1/200s (at or below your flash sync speed)
- Aperture: f/5.6 to f/8 (sharp across the face with enough depth of field)
- White balance: Flash preset or 5500K
- Format: RAW (essential for white balance and exposure adjustments)
With Natural Light
- Mode: Manual or Aperture Priority
- ISO: 200-800 (depending on available light)
- Aperture: f/2.8 to f/5.6 (wider to let in more light)
- Shutter speed: 1/125 or faster (to freeze any movement)
- Exposure compensation: +1 to +2 stops (to push the background toward white)
- White balance: Auto or Daylight
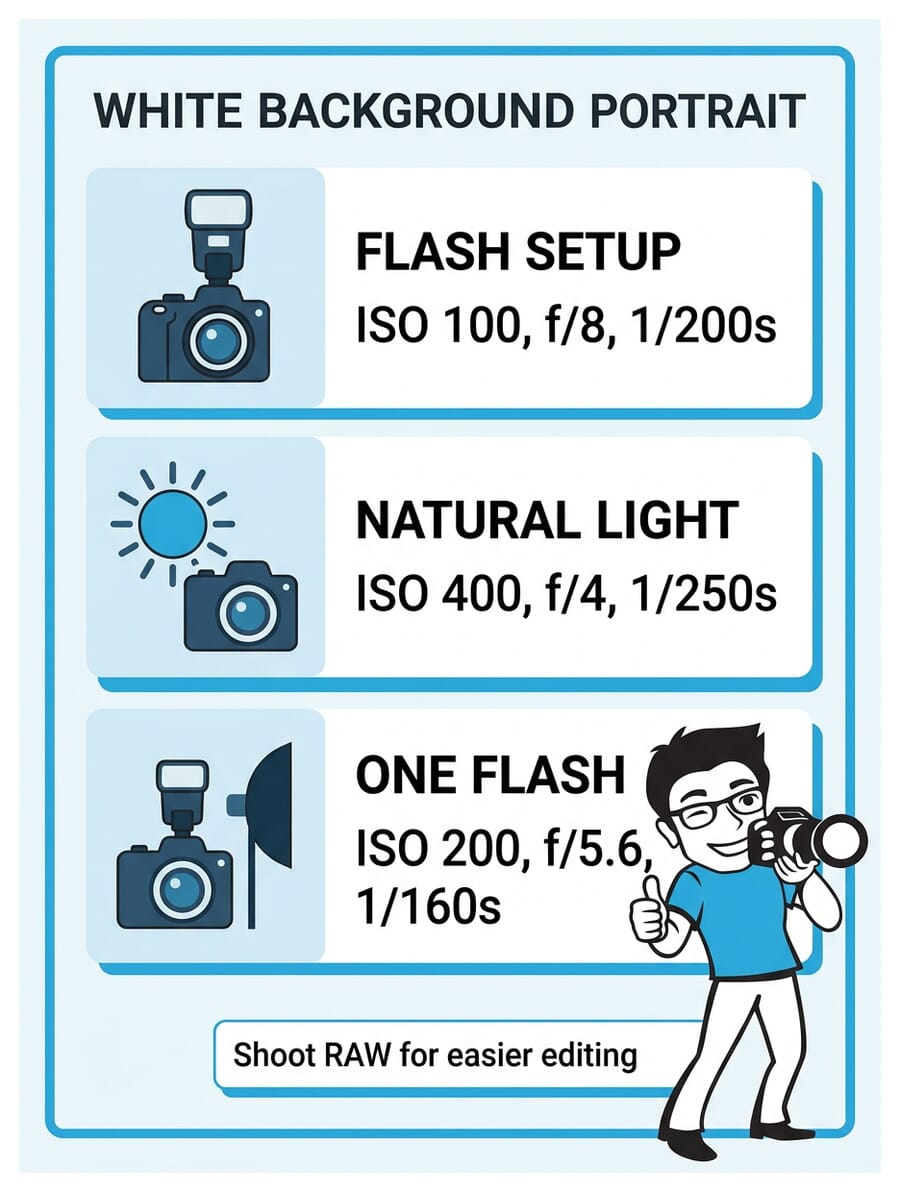
Key tip: Always shoot in RAW format. Even if your background isn’t perfectly white in-camera, RAW files give you the latitude to push the whites in post-processing without degrading image quality. For a deeper dive into exposure fundamentals, see our best camera settings for portraits guide.
Why Subject-to-Backdrop Distance Matters
One of the most common mistakes beginners make is placing the subject too close to the backdrop. Here’s why distance is critical:
- Light spill prevention: When the subject stands right against the backdrop, light from the background wraps around them, creating an unwanted halo or glow on the edges of hair and clothing. A 4-6 foot gap eliminates this.
- Shadow control: Distance between subject and backdrop means the subject’s shadow falls on the floor, not on the white background.
- Independent lighting: With separation, you can light the backdrop and the subject independently, giving you full control over both exposures.
- Depth of field: Greater distance means the backdrop is further from the focal plane, making any subtle imperfections (wrinkles, seams) blur away.
Ideal distances: Subject should be 4-6 feet from the backdrop, and the camera should be 6-10 feet from the subject. For full-body portraits, you’ll need more distance (and a wider backdrop).
Common Problems and How to Fix Them
Even experienced photographers run into these issues. Here’s how to diagnose and fix the most common white background problems:

Problem: Background Looks Gray, Not White
Cause: The backdrop isn’t receiving enough light relative to the subject.
Fix: Increase the power of your background light. Move it closer to the backdrop. If using natural light, add a desk lamp or LED panel aimed at the wall. In post, push the Whites and Highlights sliders up.
Problem: Light Spill (Halo Effect on Subject)
Cause: Subject is too close to the backdrop, or the background light is too powerful and wrapping around the subject’s edges.
Fix: Move the subject at least 4 feet from the backdrop. Reduce background flash power slightly. Use black flags or V-flats on either side to block light spill from reaching the subject.
Problem: Subject Too Dark (Silhouette)
Cause: All the light is going to the backdrop with nothing lighting the subject’s face.
Fix: Add a key light or reflector aimed at the subject. Even a large white poster board reflecting background light back onto the face makes a big difference.
Problem: Background White in Center, Gray on Edges
Cause: A single light source creates a hotspot in the center with falloff toward the edges.
Fix: Use two background lights, one on each side, aimed at opposite sides of the backdrop. This creates even coverage. Alternatively, move a single light further back and feather it across the backdrop.
Problem: Warm or Cool Color Cast on White
Cause: Mixed lighting (daylight + tungsten), or incorrect white balance setting.
Fix: Use one type of light only. Set white balance manually or use a gray card. Shoot RAW and adjust in post.
Post-Processing: Perfecting the White Background
Even with a great in-camera result, post-processing takes your white background from “almost there” to “flawless.” Here’s the workflow:

In Lightroom
- Boost the Whites slider (+50 to +100) until the background reads pure white. Hold Alt/Option while dragging to see which areas still have detail.
- Push Highlights (+30 to +60) to further brighten the backdrop.
- Use the Adjustment Brush painted over any remaining gray areas on the backdrop. Boost exposure and whites on that brush to +2 or more.
- Check the histogram: The right edge should show a spike at pure white (255). If there’s a gap, the background isn’t truly white.
- Protect the subject: Use an AI mask (Select Subject) to isolate the person, then invert it. This lets you blast the background to white without affecting skin tones.
In Photoshop
For more stubborn backgrounds or pixel-perfect results:
- Levels adjustment: Drag the white point slider left until the background reads 255, 255, 255 in the Info panel.
- Select Subject + Refine Edge: Use Select > Subject, then invert the selection. Fill the background with pure white (#FFFFFF).
- Brush cleanup: Switch to a soft white brush on a new layer and paint over any stubborn gray areas near the edges of the subject.
- Check at 100%: Zoom in around the subject’s edges. Use the Pen tool or Refine Edge Brush for tricky areas like flyaway hairs.
Quick test: Create a solid white layer behind your image. If you can see any difference between the background and the white layer, it’s not pure white yet.

Smartphone White Background Portraits
Modern smartphones can produce surprisingly good white background portraits. Here’s how to maximize your results:
- Use Portrait Mode – The computational blur helps separate the subject from the background, and some phones (iPhone, Pixel) offer a “High Key Mono” or “Studio Lighting” effect that simulates a white background.
- Maximize natural light – Stand the subject near a large window with a white wall or sheet behind them. Phones handle bright, even lighting much better than dim conditions.
- Tap to expose for the face – On both iPhone and Android, tap the subject’s face to set focus and exposure there. The bright background will blow out naturally.
- Lock exposure – On iPhone, long-press to lock AE/AF so the exposure doesn’t shift between shots.
- Edit in Snapseed or Lightroom Mobile – Push the whites and highlights to clean up any gray areas. Use the brush tool for targeted adjustments.
Limitation: Phone sensors are small, so the dynamic range is more limited than a dedicated camera. Getting a truly pure white background in-camera is harder – plan to do more cleanup in editing.
Advanced Tips for Professional Results
Once you’ve mastered the basics, these techniques will take your white background portraits to the next level:
Use V-Flats for Light Control
V-flats are large foam boards (typically 4×8 feet) hinged in the middle. Place one on each side of the subject with the black side facing them. The black surface absorbs light spill from the background, preventing it from wrapping around the subject. Flip to the white side to use them as reflectors instead.
Gel Your Background Lights
Want a white background with perfectly neutral skin tones? Gel your background lights with a 1/4 CTO (warm) gel and set your camera white balance to tungsten. The gelled background light renders as neutral white, while the ungelled key light creates slightly cool, crisp skin tones. This is an advanced high-key technique used in commercial work.
Light the Floor Sweep
For full-body shots, the floor portion of the sweep often goes gray. Add a third light (or a reflector) aimed at the floor to keep it white. Position it low and behind the camera to minimize shadows. This is especially important for product photography and e-commerce work.
Shoot Tethered
Connect your camera to a laptop and review images on a calibrated monitor as you shoot. This lets you check for gray areas, color casts, and exposure issues in real time – much more reliable than the small camera LCD.


Essential Equipment Checklist
Here’s what you need for each setup level:
Budget Setup ($0-50)
- White bedsheet or poster boards
- Large window for natural light
- White foam board as reflector
- Desk lamp or LED panel for background boost
- Any camera or smartphone
Intermediate Setup ($100-300)
- Seamless paper roll (9ft) + backdrop stand
- One speedlight or strobe
- Wireless flash trigger
- 5-in-1 reflector (white, silver, gold, black, diffuser)
- Light stand
Professional Setup ($500+)
- Seamless paper or vinyl backdrop
- Two strobes with softboxes
- Wireless trigger system
- V-flats for light control
- Light meter
- Tethering cable + laptop
White Background Portrait Quiz
Think you’ve mastered white background portraits? Test your knowledge with this quick quiz:
Frequently Asked Questions
What f-stop should I use for white background portraits?
For flash setups, f/5.6 to f/8 is the sweet spot. It provides enough depth of field to keep the entire face sharp while allowing your flash to properly expose both the subject and the background. With natural light, you may need to open up to f/2.8-f/4 to let in enough light.
Can I create a white background without flash?
Yes. Use a large window as your key light and position the subject in front of a well-lit white wall. On overcast days, you can also shoot outdoors using the bright sky as your backdrop by shooting from a low angle.
Why does my white background look gray in photos?
The background isn’t receiving enough light. It needs to be 1-2 stops brighter than your subject to appear pure white. Add more light to the backdrop, move your lights closer to it, or increase flash power. You can also push whites in post-processing.
How far should the subject stand from the white backdrop?
4-6 feet is ideal. This distance prevents light spill (halo effect) from the bright background wrapping around the subject, eliminates shadows on the backdrop, and allows you to light the subject and background independently.
Do I need expensive equipment for white background portraits?
No. A white bedsheet, natural window light, and a piece of white foam board as a reflector can produce excellent results. Professional gear makes the process faster and more consistent, but the fundamentals work with any budget.
How do I prevent light spill from the white background onto my subject?
Increase the distance between subject and backdrop to at least 4 feet. Use V-flats or black flags on either side of the subject to absorb stray light. Reduce the power of the background lights if the spill is severe.
Featured image: Photo by Vitaly Gariev on Unsplash.
