
- The exposure triangle (aperture, shutter speed, ISO) controls every photograph – master these three settings and you can shoot in any scenario.
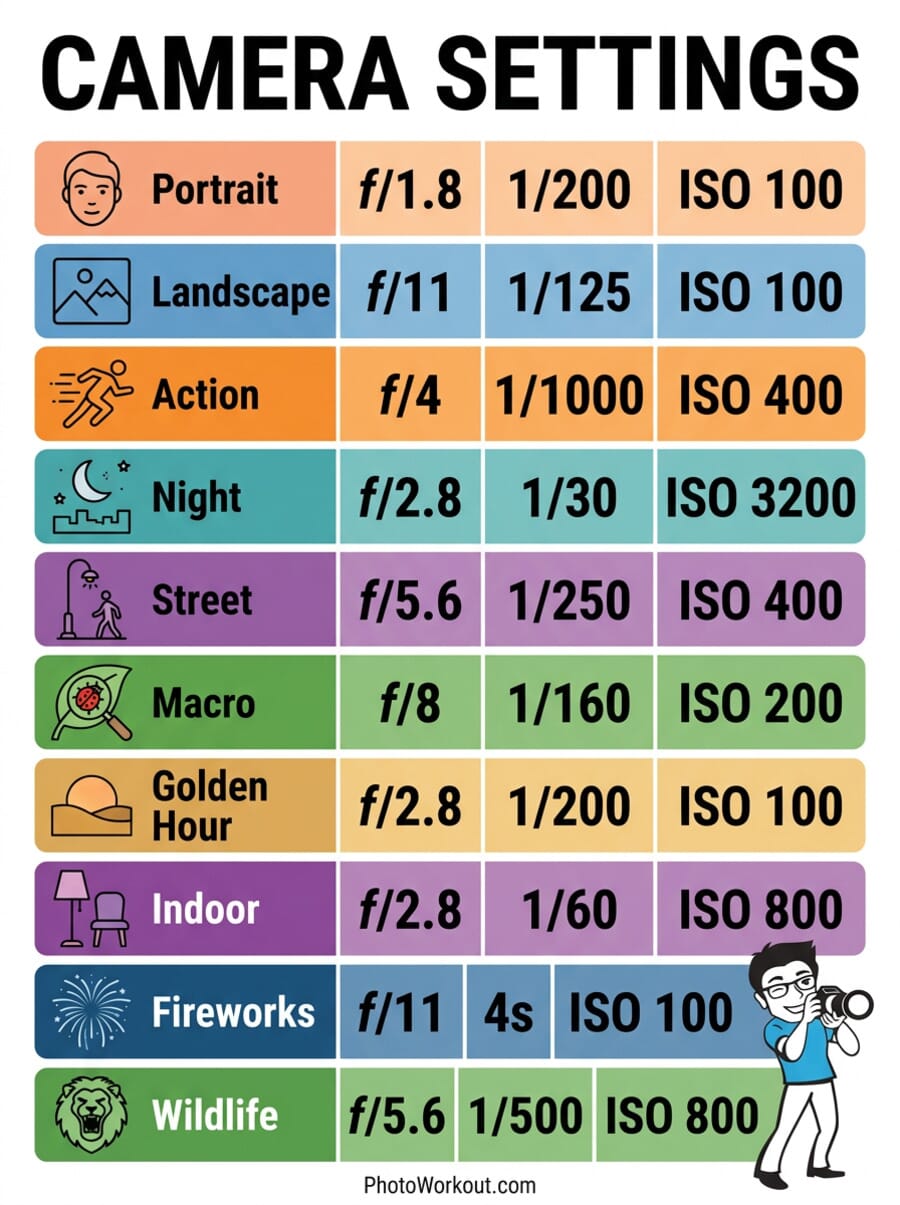
- Use the scene-specific cheat sheet as a starting point: portraits at f/1.8-2.8, landscapes at f/8-11, action at 1/500s+, and night at high ISO.
- Aperture Priority (A/Av) is the most versatile shooting mode for beginners moving off full auto.
- White balance and focus mode selection are just as important as exposure settings for getting the shot right.
- Take the quiz at the end to test how well you have mastered camera settings.
Camera Settings Cheat Sheet: The Only Reference Guide You Need
Switching from Auto mode to manual camera settings is the single biggest leap any photographer can make. But remembering which aperture works for portraits, what shutter speed freezes action, or when to bump ISO can feel overwhelming.
This cheat sheet strips camera settings down to practical, easy-to-reference recommendations for every common shooting scenario. Bookmark it, print it, or save the infographics to your phone – then pull it up whenever you need a quick reminder in the field.
The Exposure Triangle Cheat Sheet
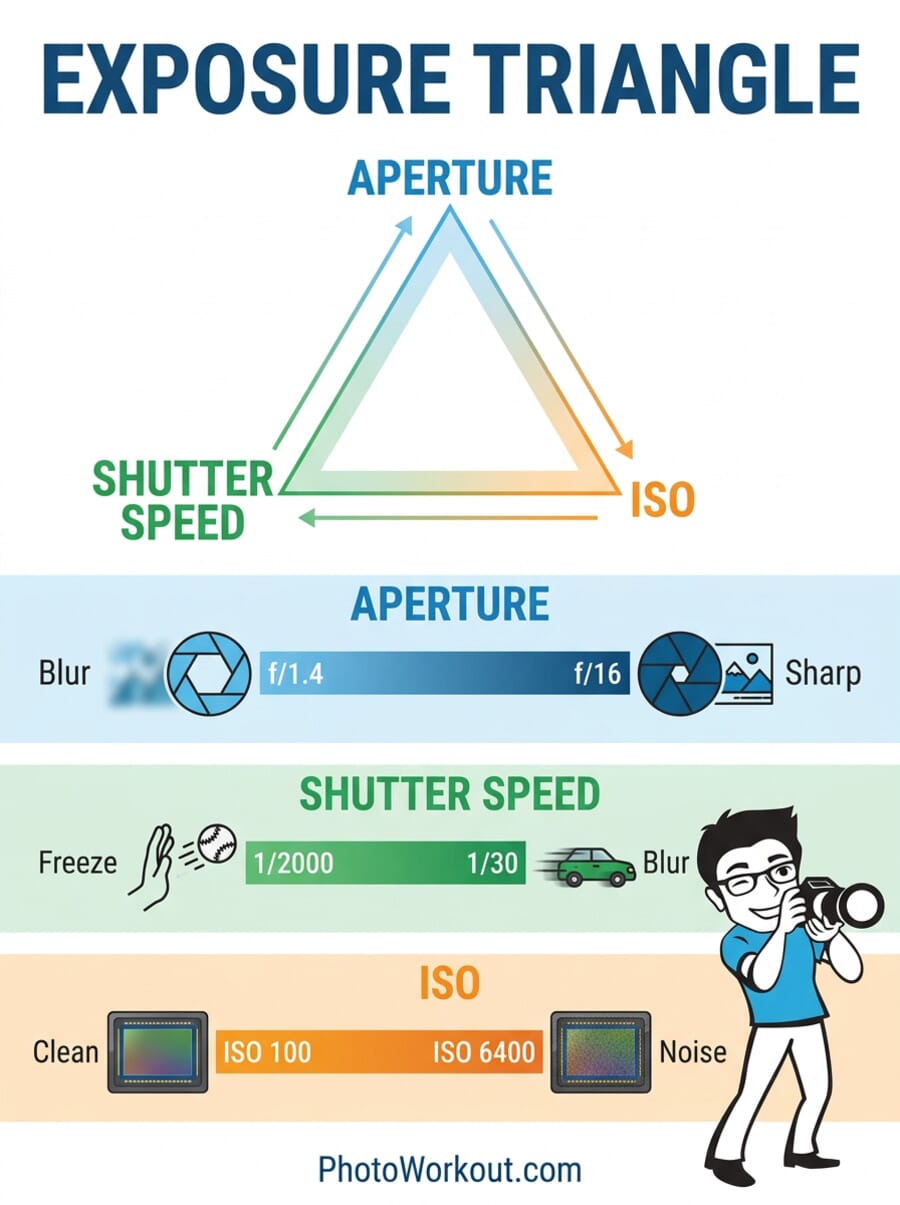
Every photograph is built on three settings that work together: aperture, shutter speed, and ISO. Change one, and you need to compensate with the others. Understanding this relationship – called the exposure triangle – is the foundation of all manual shooting.
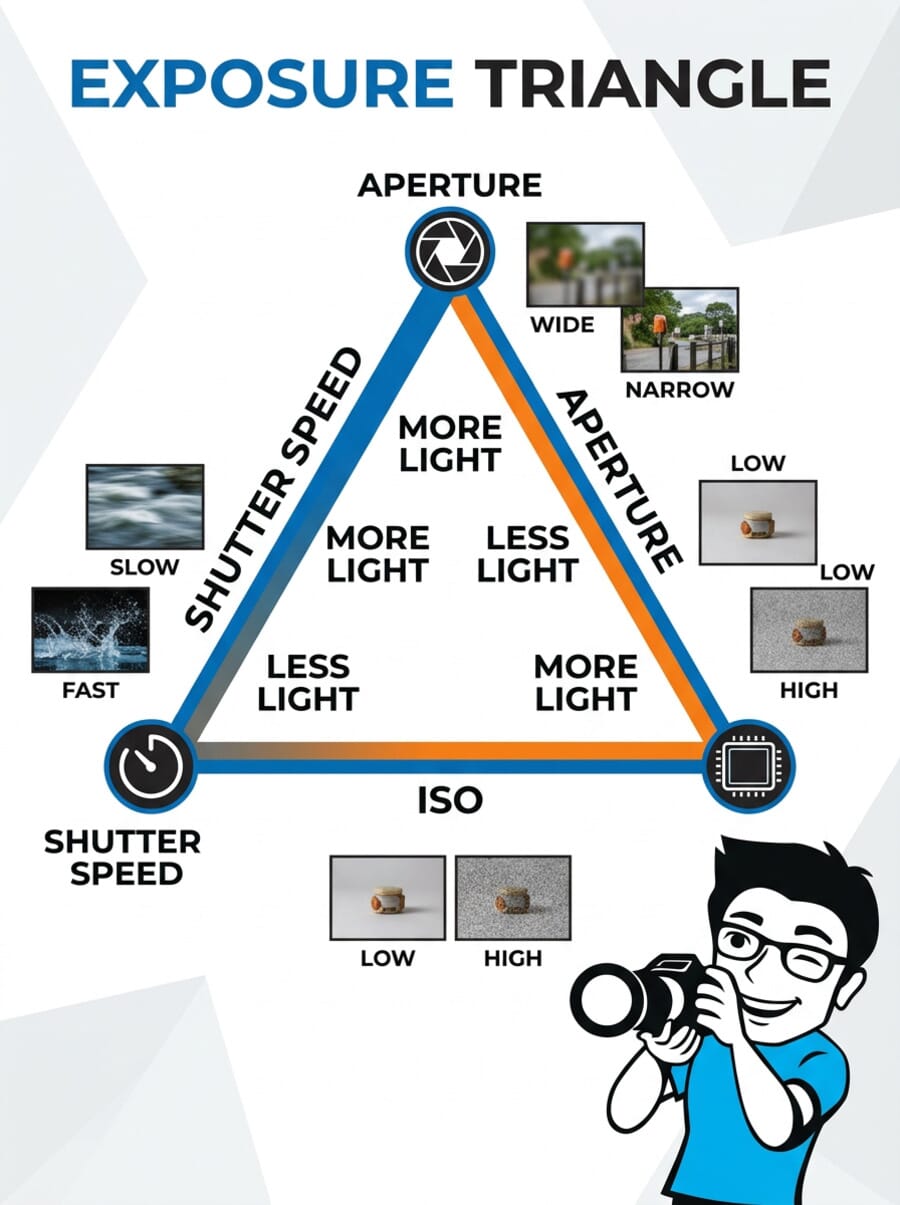
Aperture (f-stop)
What it controls: How much light enters through the lens and how much of the scene is in focus (depth of field).
- Low f-number (f/1.4-2.8) = wide opening = more light = blurry background (shallow depth of field)
- High f-number (f/8-16) = narrow opening = less light = sharp front to back (deep depth of field)
- Sweet spot for sharpness: f/8-11 on most lenses
For a deeper dive into how wide vs. narrow aperture affects your images, check out the full guide.
Shutter Speed
What it controls: How long the sensor is exposed to light and whether motion appears frozen or blurred.
- Fast (1/500s+) = freezes action, less light
- Medium (1/60-1/250s) = general handheld shooting
- Slow (1/30s or slower) = motion blur, more light, tripod recommended
- Handheld rule of thumb: Keep shutter speed at least 1/focal length (e.g., 1/200s for a 200mm lens)
ISO
What it controls: Sensor sensitivity to light. Think of it as a brightness amplifier.
- Low (100-400) = cleanest image, least noise, best for bright conditions
- Medium (800-1600) = slight noise, good for indoor/overcast
- High (3200-6400+) = visible grain, necessary for low light
- General rule: Keep ISO as low as possible while maintaining the aperture and shutter speed you need
Shooting Mode Cheat Sheet
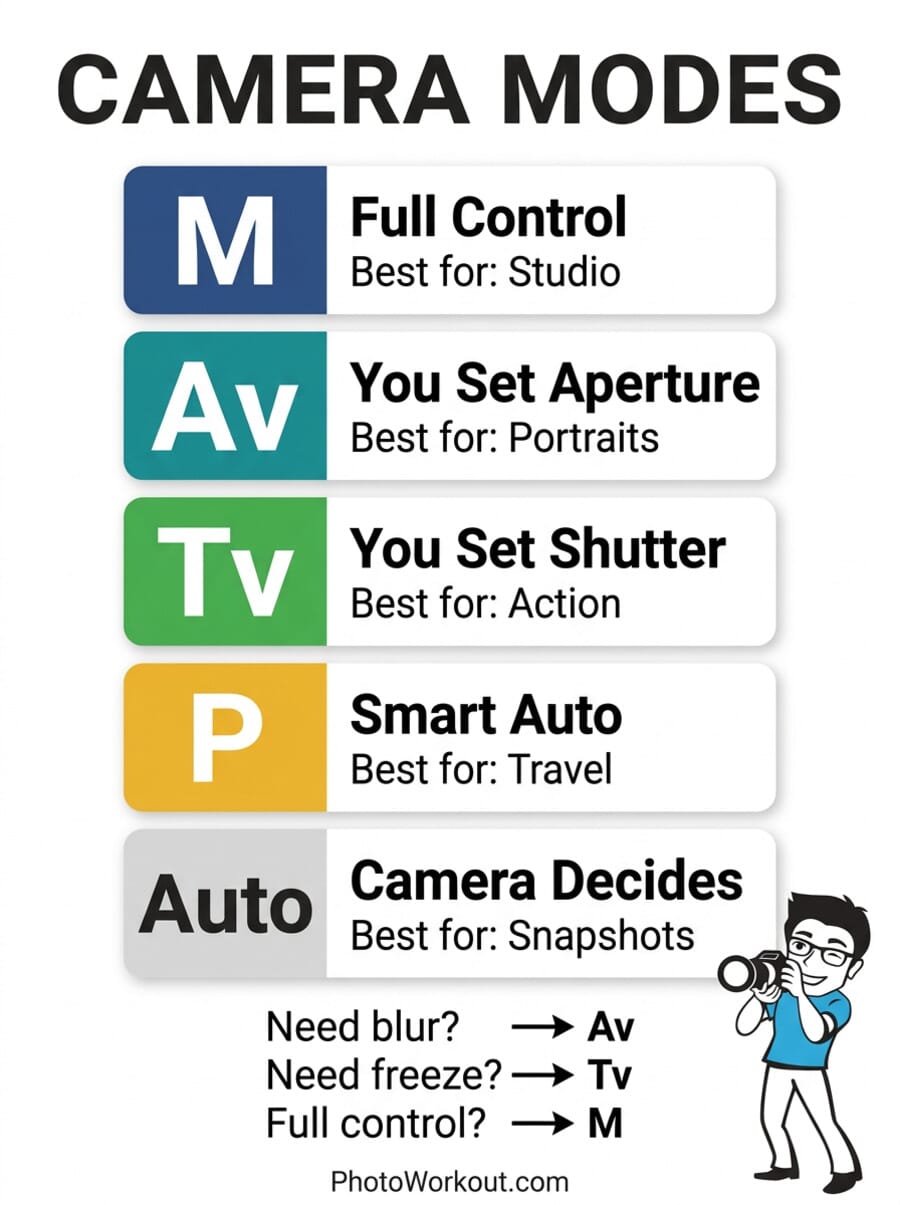
Camera mode dials can be intimidating, but each mode simply controls how much you decide vs. how much the camera decides. Here is when to use each one:
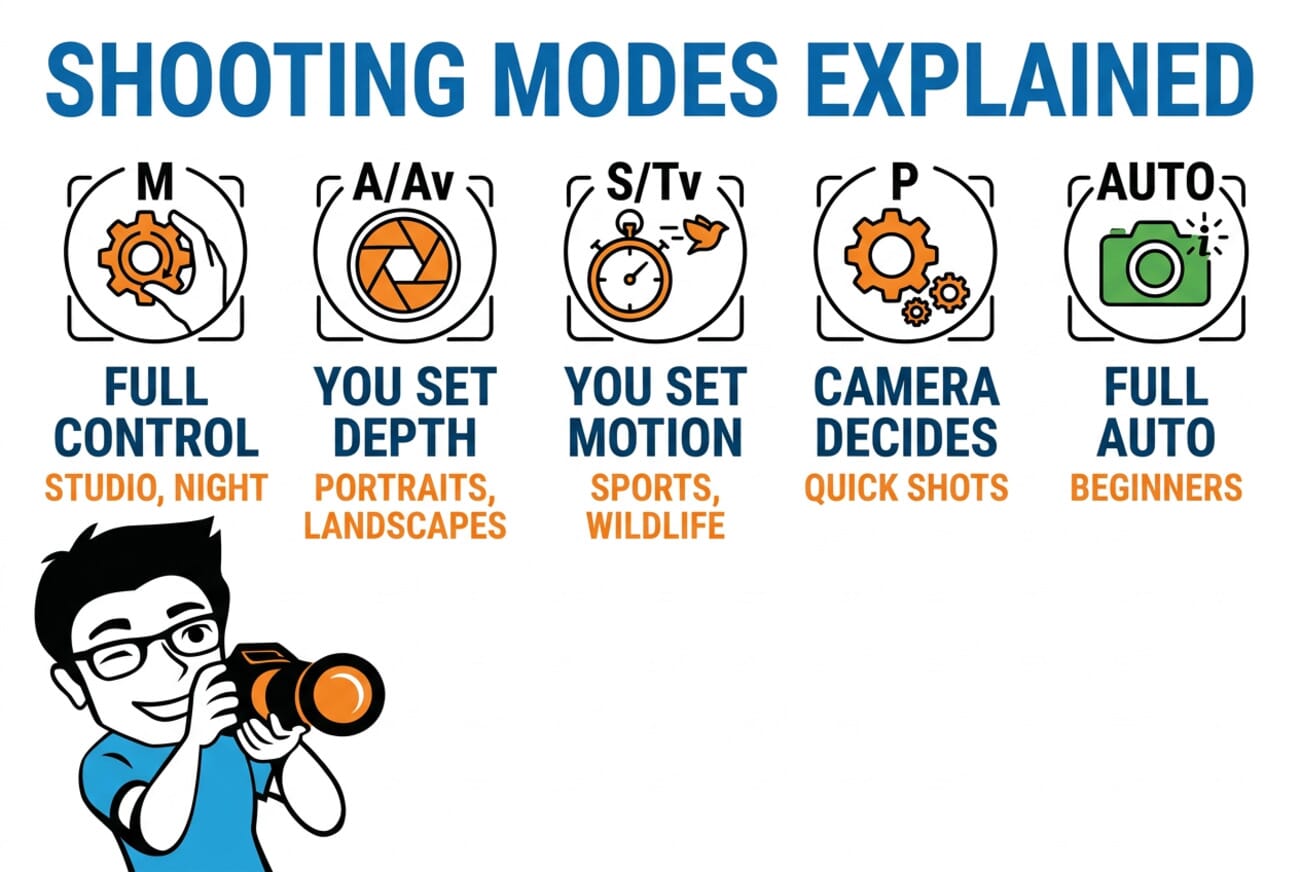
- Manual (M) – Full control over aperture, shutter speed, and ISO. Best for studio work, night photography, and any situation where lighting stays consistent. See the complete manual mode guide for step-by-step instructions.
- Aperture Priority (A/Av) – You set the aperture; the camera picks shutter speed. The most popular mode among professionals for portraits, landscapes, and street shooting.
- Shutter Priority (S/Tv) – You set the shutter speed; the camera picks aperture. Ideal for sports, wildlife, and any scenario where controlling motion blur matters most.
- Program (P) – Camera picks both aperture and shutter speed but lets you override with a quick dial shift. Good for casual shooting when speed matters more than precision.
- Auto – Camera controls everything. Fine for snapshots, but limits creative control.
Best starting point for beginners: Aperture Priority (A/Av) with Auto ISO. This gives control over depth of field while the camera handles the rest.
Scene-Specific Settings Cheat Sheet
This is the core of the cheat sheet – recommended starting settings for 10 common photography scenarios. Use these as a baseline, then adjust based on your specific lighting and creative goals.

Portraits
Aperture: f/1.8-2.8 | Shutter: 1/200s | ISO: 100-400
A wide aperture creates that creamy, blurred background (bokeh) that separates the subject from the environment. Keep shutter speed fast enough to avoid motion blur from slight head movements. For more detail, read the full portrait camera settings guide.

Landscapes
Aperture: f/8-11 | Shutter: varies | ISO: 100
Narrow aperture keeps everything sharp from the foreground to the horizon. Use a tripod if shutter speed drops below 1/60s. ISO stays at base for maximum image quality. Explore the complete landscape photography settings guide for advanced techniques.
Action and Sports
Aperture: f/2.8-5.6 | Shutter: 1/500s+ | ISO: 400-3200
Fast shutter speed is non-negotiable for freezing movement. Open up the aperture and raise ISO to compensate for the short exposure time. Use continuous autofocus (AF-C) and burst mode.
Night and Low Light
Aperture: f/1.4-2.8 | Shutter: 1/30s or slower | ISO: 1600-6400
Open the aperture as wide as it goes, slow the shutter (use a tripod for anything below 1/60s), and push ISO higher. Modern cameras handle high ISO remarkably well. For dedicated techniques, see the low light photography guide.

Street Photography
Aperture: f/5.6-8 | Shutter: 1/250s | ISO: Auto
A moderate aperture gives enough depth of field to keep subjects sharp even if focus is slightly off. Auto ISO lets the camera adapt as you move between sun and shade. Zone focusing at f/8 is a classic street technique.
Macro
Aperture: f/8-16 | Shutter: 1/200s+ | ISO: 200-800
Depth of field is razor-thin at close distances, so narrow apertures are essential. Use a tripod or flash to maintain fast shutter speeds. For inspiration, see the flower macro photography guide.

Golden Hour
Aperture: f/8 | Shutter: 1/125s | ISO: 100-200
Beautiful light means low ISO and moderate settings. The warm tones handle themselves – just expose for the subject and let the golden light do the heavy lifting. Check the outdoor camera settings guide for more tips.
Indoor and Events
Aperture: f/2.8-4 | Shutter: 1/100s | ISO: 800-3200
Indoor lighting is typically dim and mixed. Open up the aperture and raise ISO. Keep shutter speed above 1/80s to avoid blur from subject movement. Read the full indoor photography settings guide and the event photography tips for more.
Fireworks
Aperture: f/8-11 | Shutter: Bulb / 2-4 seconds | ISO: 100
Long exposure captures the full light trails. A tripod is mandatory. Use a remote shutter release or 2-second timer to avoid camera shake. Start with 2-second exposures and adjust based on the brightness of the display.
Wildlife
Aperture: f/4-5.6 | Shutter: 1/1000s+ | ISO: 400-1600
Animals move unpredictably, so ultra-fast shutter speeds are essential. Use the widest aperture your telephoto lens allows (often f/5.6 at 400-600mm). Continuous AF with animal eye detection makes a huge difference if your camera supports it.
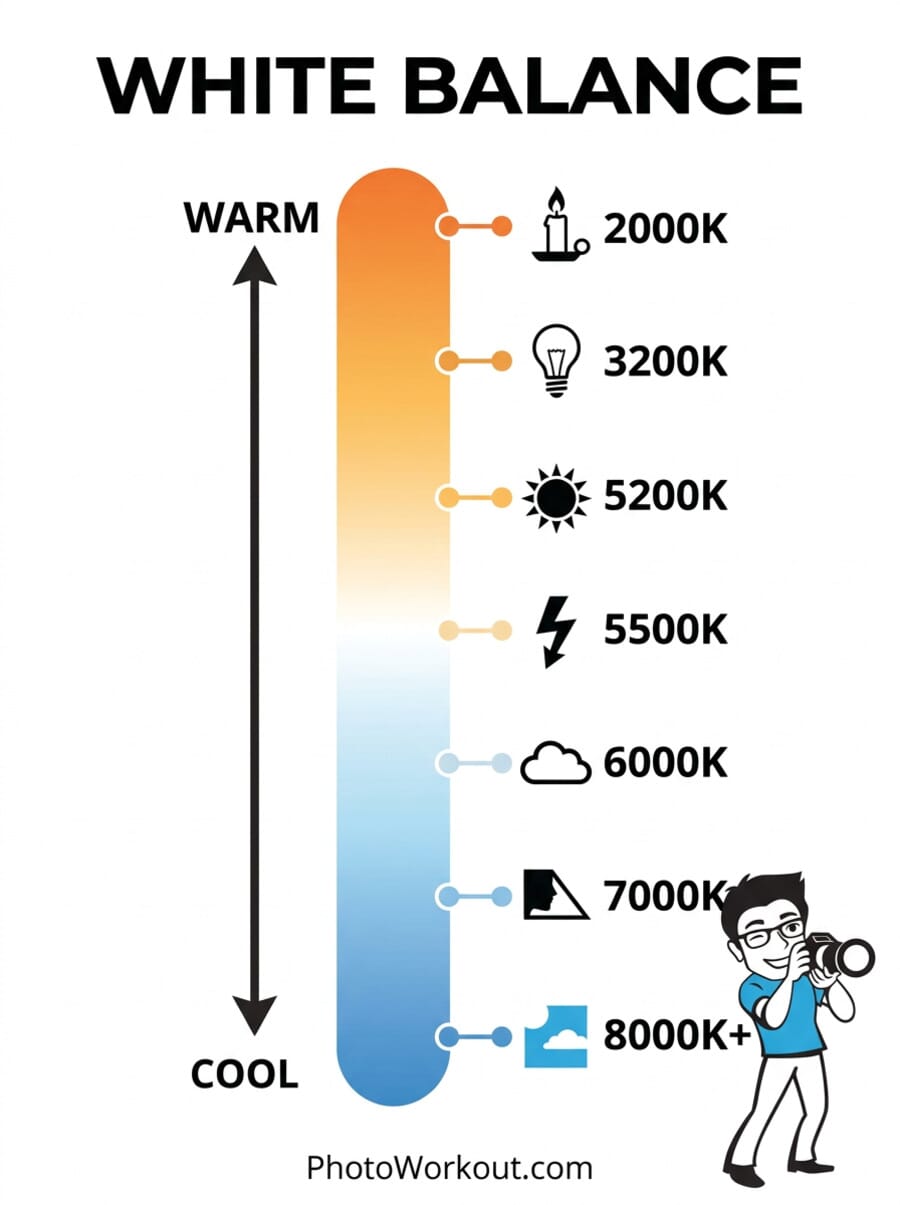
White Balance Cheat Sheet
White balance controls the color temperature of the image – whether it looks warm (orange) or cool (blue). Most cameras measure this in Kelvin (K).
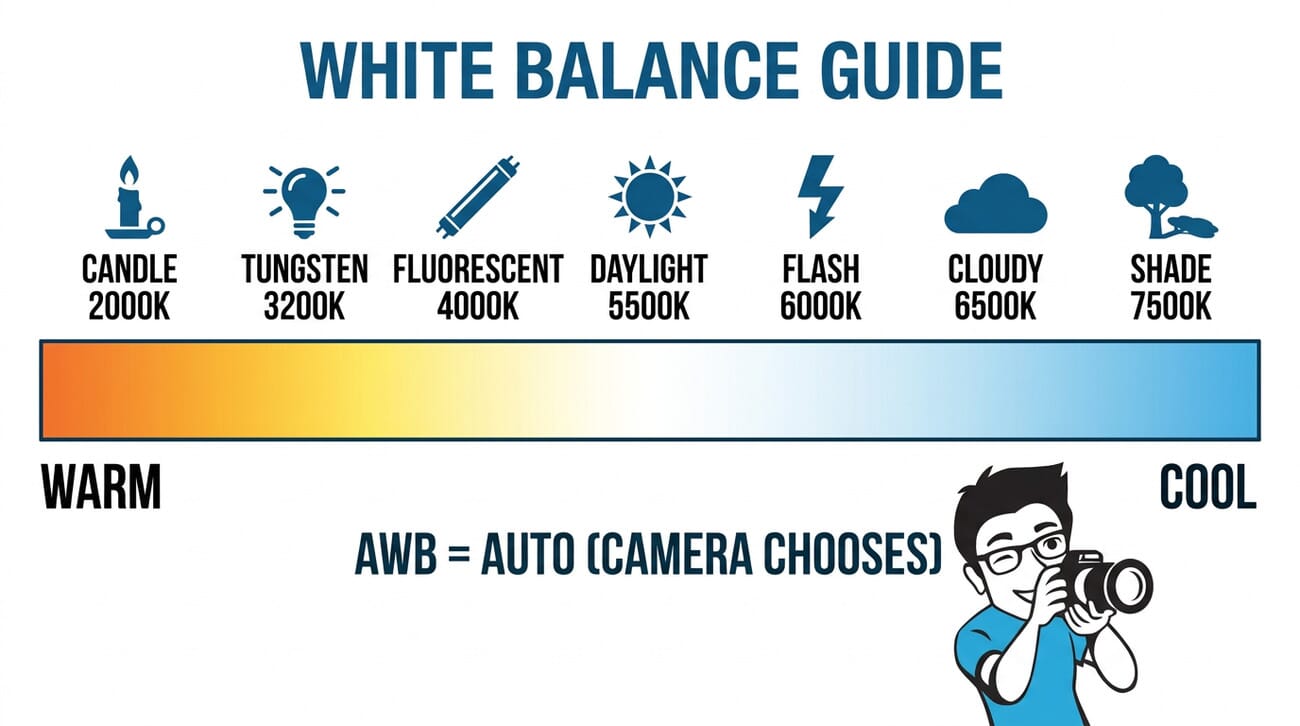
- Auto (AWB) – Works well 80% of the time. Let the camera decide.
- Daylight (~5500K) – Direct sunlight, outdoor midday
- Cloudy (~6500K) – Overcast skies, slightly warm tone
- Shade (~7500K) – Open shade, warmer than cloudy
- Tungsten (~3200K) – Indoor incandescent/warm bulbs, cools the image
- Fluorescent (~4000K) – Office/tube lighting, corrects green cast
- Flash (~6000K) – When using camera flash
Pro tip: Shoot in RAW format. White balance can be adjusted perfectly in post-processing with zero quality loss. This gives complete freedom to correct or creatively shift color temperature after the shot.
Focus Mode Cheat Sheet
Choosing the right focus mode and focus point is just as critical as getting exposure right. The wrong focus mode means missed shots, no matter how perfect the settings are.
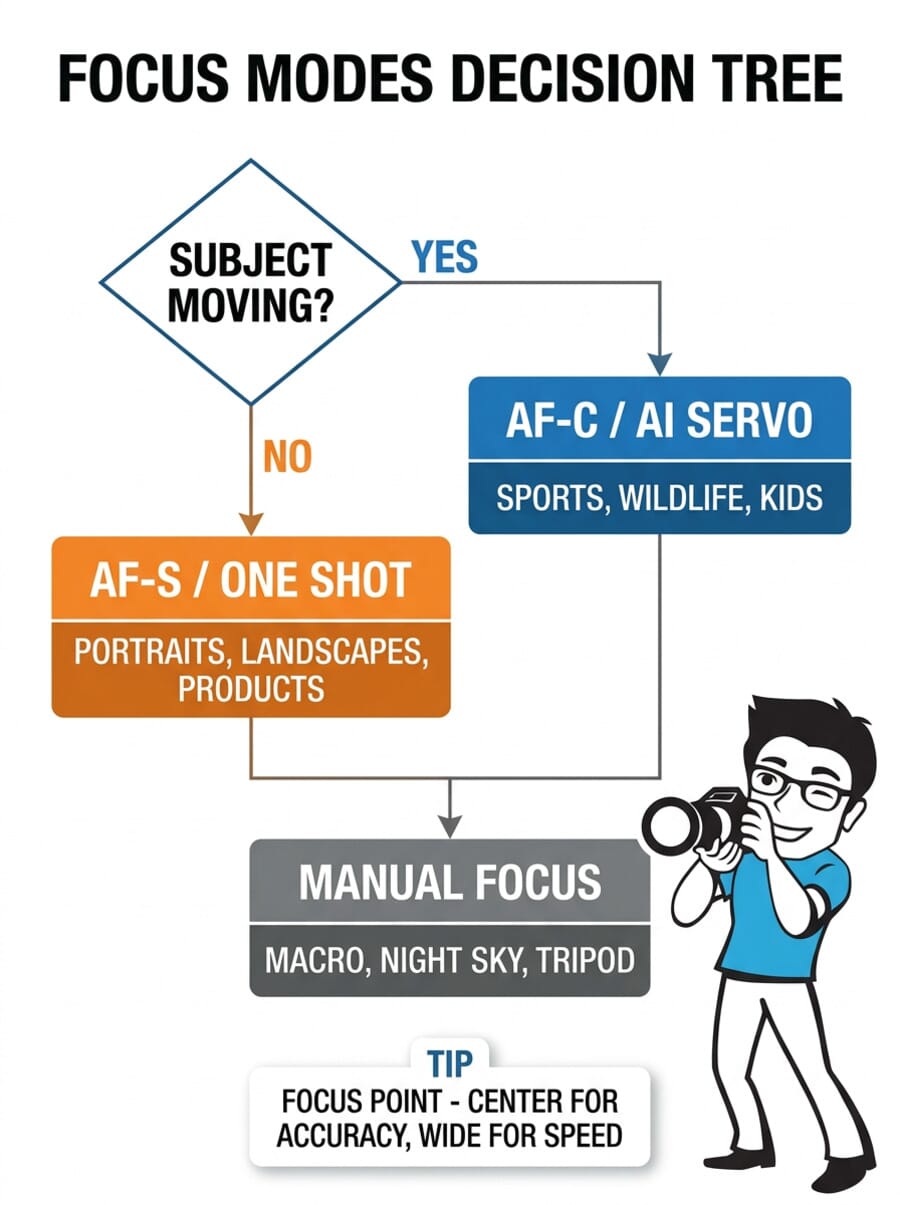
AF-S / One-Shot (Single Autofocus)
Focus locks when you half-press the shutter. Best for stationary subjects: portraits (posing), landscapes, architecture, products, still life. The camera confirms focus with a beep or indicator before allowing the shot.
AF-C / AI Servo (Continuous Autofocus)
Focus continuously tracks the subject as long as the shutter button is half-pressed. Essential for moving subjects: sports, wildlife, kids playing, pets, birds in flight. Pair with burst shooting for the best hit rate.
Manual Focus
Turn the focus ring yourself. Use for specialty scenarios where autofocus struggles: macro photography (extremely close distances), astrophotography (focusing on stars), focus stacking, and shooting through obstacles like fences or glass.
Focus Point Selection
- Single point – Maximum precision. You choose exactly where to focus. Best for controlled situations.
- Zone/Area – Camera picks focus within a region. Good for tracking subjects across a portion of the frame.
- Wide/Auto – Camera uses all focus points. Fast but less precise. Good for quick snapshots and fast-moving subjects.
- Eye AF – Automatically detects and locks onto eyes. A game-changer for portraits and wildlife on modern cameras.
Bonus: Metering Modes Quick Reference
Your camera’s metering mode determines how it measures light to calculate exposure. The right choice prevents blown highlights and crushed shadows.
- Evaluative/Matrix – Reads the entire scene. Best all-around choice for 90% of situations.
- Center-weighted – Prioritizes the center of the frame. Good for centered subjects with bright/dark backgrounds.
- Spot – Measures only a tiny area (2-5% of frame). Precise control for tricky lighting – backlit subjects, stage performers, moon photography.
Quick Reference Card
Here is everything above condensed into a pocket-sized reference. Screenshot this or print it out for quick access in the field:
Exposure Basics:
- Low f-number = blurry background, more light
- High f-number = everything sharp, less light
- Fast shutter = freeze action, less light
- Slow shutter = motion blur, more light
- Low ISO = clean image, less sensitive
- High ISO = grainy image, more sensitive
Quick Settings by Scene:
- Portraits: f/1.8-2.8 | 1/200s | ISO 100-400
- Landscapes: f/8-11 | varies | ISO 100
- Action: f/2.8-5.6 | 1/500s+ | ISO 400-3200
- Night: f/1.4-2.8 | 1/30s or slower | ISO 1600-6400
- Street: f/5.6-8 | 1/250s | ISO Auto
- Macro: f/8-16 | 1/200s+ | ISO 200-800
- Golden Hour: f/8 | 1/125s | ISO 100-200
- Indoor: f/2.8-4 | 1/100s | ISO 800-3200
- Fireworks: f/8-11 | 2-4s | ISO 100
- Wildlife: f/4-5.6 | 1/1000s+ | ISO 400-1600
Mode Selection:
- Control depth of field? Use Aperture Priority (A/Av)
- Control motion? Use Shutter Priority (S/Tv)
- Control everything? Use Manual (M)
- Subject still? Use AF-S | Moving? Use AF-C
These settings are starting points, not rules carved in stone. Photography is creative – once comfortable with these baselines, experiment with breaking them deliberately. Slow shutter on purpose for motion blur, push ISO higher for gritty street shots, or go wide open at f/1.4 for dreamy portraits. The cheat sheet gets you shooting confidently; practice and experimentation make you a photographer.
Test Your Camera Settings Knowledge
Think you have the settings memorized? Take this quick quiz to see how well you understand camera settings, exposure, and shooting modes.
What camera settings should a beginner start with?
Start with Aperture Priority mode (A/Av) with Auto ISO. Set aperture based on your subject – f/5.6 for general shooting, f/2.8 for portraits, f/8 for landscapes. This gives creative control over depth of field while the camera handles the rest.
Should I shoot in RAW or JPEG?
RAW whenever possible. RAW files preserve all sensor data, allowing full control over white balance, exposure, and color in post-processing with no quality loss. JPEG is fine for quick sharing when you do not plan to edit.
How do I avoid blurry photos?
Three main causes: (1) Slow shutter speed – keep it above 1/focal length for handheld shots. (2) Wrong focus mode – use AF-C for moving subjects. (3) Camera shake – use a tripod, enable image stabilization, or brace against a solid surface.
What is the best ISO setting?
The lowest ISO that still allows the aperture and shutter speed you need. In bright daylight, ISO 100. Indoors, ISO 800-3200. At night, ISO 1600-6400. Modern cameras handle high ISO much better than older models, so do not be afraid to raise it when needed.
When should I use manual mode instead of auto?
Use manual mode when lighting is consistent and you want repeatable results – studio photography, long exposures, panorama stitching, flash photography, and any time the camera meter is being fooled (backlit subjects, snow scenes, dark stages). For changing conditions, Aperture or Shutter Priority is often more practical.
Can I print this cheat sheet?
Save the infographic images from this page directly to your device. They are designed to be saved, printed, or kept on your phone as a quick reference while shooting. The scene settings grid works especially well as a printed card to keep in your camera bag.
Featured image: AI-generated illustration.