
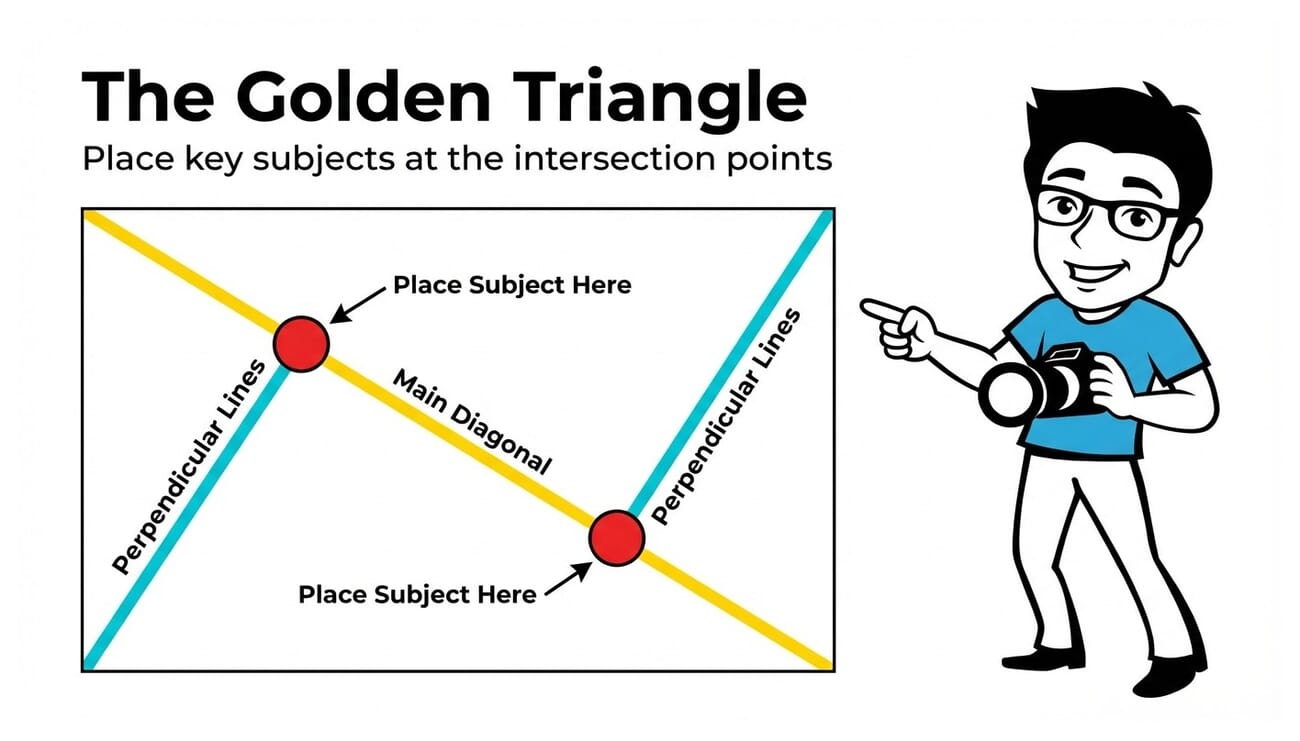
- The golden triangle divides your frame with a diagonal line and two perpendiculars, creating natural intersection points for placing subjects.
- It works best for scenes with strong diagonal elements — roads, rivers, staircases, shorelines — giving images a sense of movement and depth.
- Unlike the rule of thirds, the golden triangle emphasizes diagonal energy, making it ideal for dynamic, action-oriented compositions.
What Is the Golden Triangle in Photography?
The golden triangle is a composition technique that uses diagonal lines to guide where you place subjects in a photograph. It’s been used by painters for centuries and translates perfectly to photography.
Here’s how it works: draw an imaginary diagonal line from one corner of your frame to the opposite corner. Then, from each of the two remaining corners, draw a line that meets the diagonal at a 90-degree angle. This creates four triangles within your frame — and two intersection points where your key subjects should go.
Those intersection points are the power positions. When you place your main subject at one of these points, your composition feels balanced yet dynamic — because the diagonal lines create a natural sense of movement that static grids can’t match.
The golden triangle is particularly effective when your scene already contains strong diagonal elements: a winding road, a sloping hillside, a staircase, or a river cutting through a valley. Instead of fighting these diagonals, the golden triangle uses them as the backbone of your composition.
How the Golden Triangle Works
The golden triangle divides your frame into four triangular sections using three lines:
- The main diagonal — runs from one corner to the opposite corner (typically top-left to bottom-right, but it can go either direction).
- Two perpendicular lines — each starts from one of the remaining corners and meets the main diagonal at a right angle.
- Two intersection points — where the perpendicular lines meet the diagonal. These are your focal points.
What makes these intersection points special is that they sit along the diagonal — so any subject placed there naturally connects to the flow of the image. Your viewer’s eye enters through one corner, follows the diagonal, pauses at the subject, and continues through the frame.
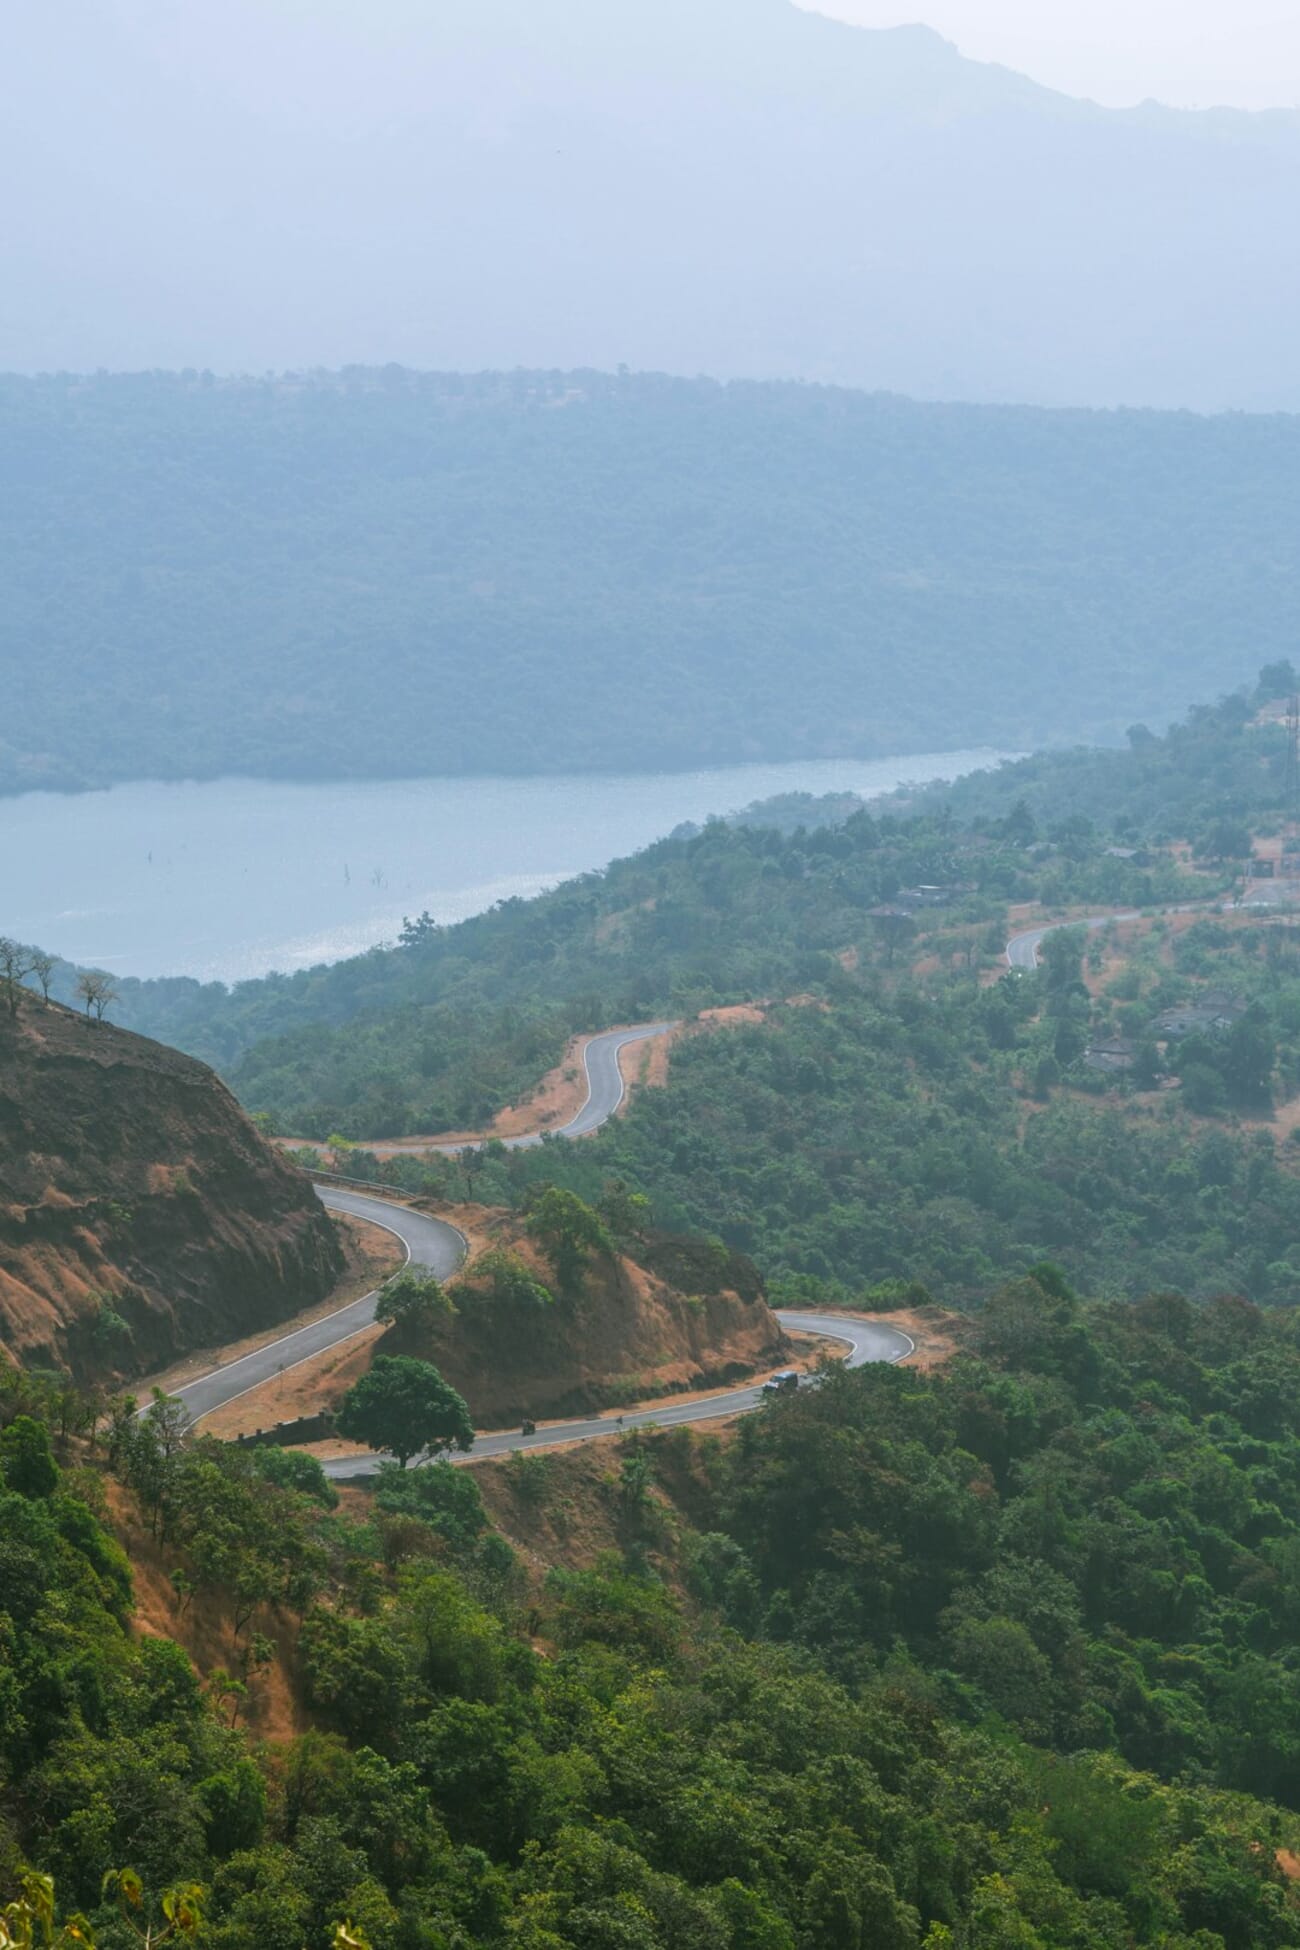
In the image above, the winding road creates a natural diagonal through the frame. If you overlay the golden triangle, the road follows the main diagonal while the surrounding mountains fill the remaining triangular sections — creating depth and guiding the viewer’s eye from foreground to background.
The key insight is this: the golden triangle doesn’t just tell you where to place subjects. It tells you how to orient your entire composition around diagonal energy. If you want to learn more about using diagonals effectively, check out our guide on diagonals in photography.
Golden Triangle vs Rule of Thirds
The rule of thirds is the composition technique most photographers learn first. It divides the frame into a 3×3 grid, giving you four intersection points for subject placement. It’s reliable, intuitive, and works for almost any scene.
So when should you use the golden triangle instead?
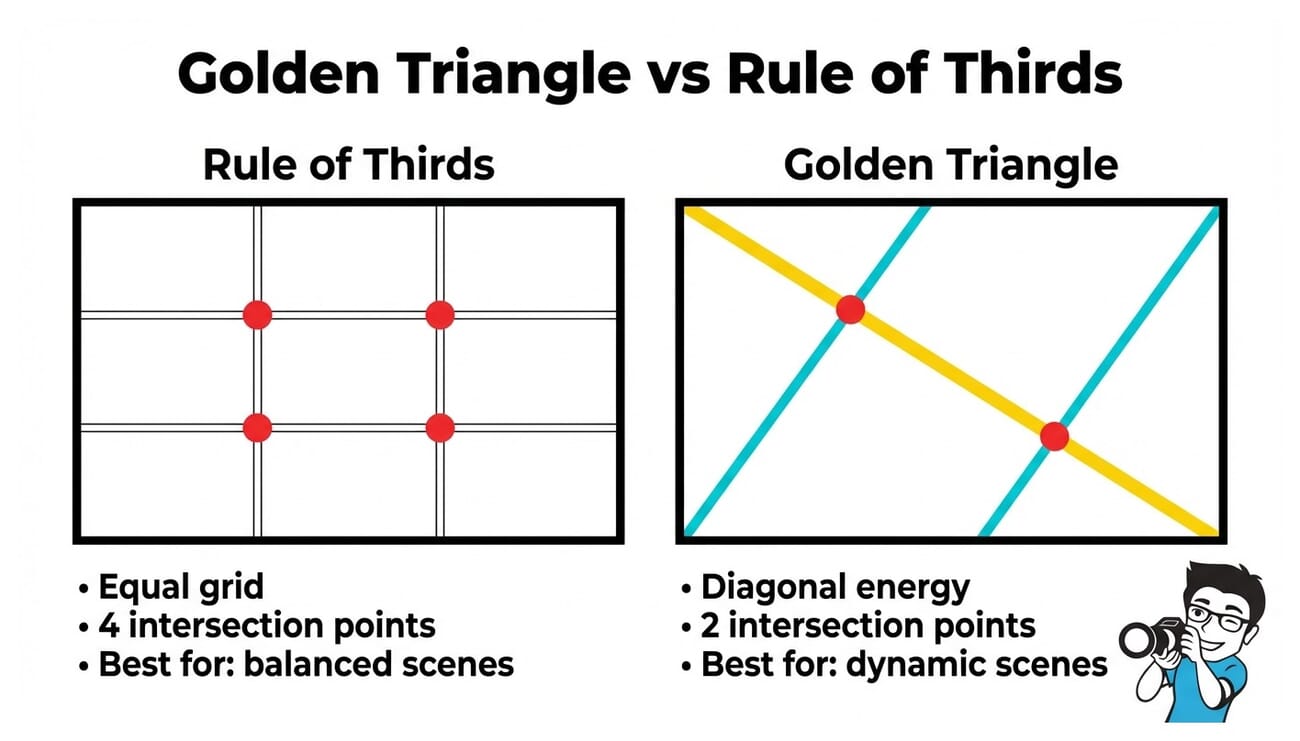
The difference comes down to diagonal vs horizontal/vertical energy:
- Rule of thirds — works best when your scene has strong horizontal or vertical lines (horizons, buildings, standing figures). It creates a balanced, stable feel.
- Golden triangle — works best when your scene has strong diagonal elements (roads, rivers, staircases, sloping terrain). It creates a dynamic, energetic feel.
Think of it this way: if your scene already has prominent diagonals, forcing it into a thirds grid fights the natural flow. The golden triangle works with those diagonals instead of against them.
That said, neither technique is universally better. Many great compositions use elements of both. The golden triangle is simply another tool in your toolkit — and it’s one that many photographers overlook. For a deeper dive into composition frameworks, see our guide to the golden ratio.
How to Apply the Golden Triangle in Practice
Using the golden triangle in the field is simpler than it sounds. Here’s a step-by-step approach:
Step 1: Find a Strong Diagonal
Before you even think about the golden triangle, scan your scene for diagonal elements. Look for roads, pathways, fences, rivers, shorelines, rooflines, or shadows that cut across the frame at an angle. These are your starting points.
Step 2: Align the Diagonal
Position your camera so the dominant diagonal runs roughly from one corner to the other. It doesn’t need to be perfectly corner-to-corner — close is good enough. The goal is to establish diagonal flow through the frame.

Step 3: Place Your Subject at an Intersection
Position your main subject near one of the two intersection points — where the perpendicular lines would meet the diagonal. This puts your subject along the natural flow of the image while giving it visual weight.
Step 4: Use Leading Lines to Reinforce the Composition
The remaining triangular sections can contain supporting elements that guide the eye. A row of trees, a fence, or shadows can serve as secondary leading lines that reinforce the diagonal movement.
Pro tip: Many cameras and editing tools include a golden triangle crop overlay. In Adobe Lightroom, press O while in the crop tool to cycle through overlays — including the golden triangle. Photoshop’s crop tool also offers this overlay under the “Overlay Options” menu.
Golden Triangle with Different Subjects
The golden triangle works across genres. Here’s how to apply it to different types of photography:
Landscapes
Landscapes are where the golden triangle truly shines. Rivers, roads, shorelines, and mountain ridges naturally create diagonal lines through the frame. Align these with the main diagonal, then place a focal point — a lone tree, a cabin, a peak — at an intersection.
Architecture and Street Photography
Staircases, escalators, railings, and building edges all provide strong diagonals. In street photography, look for receding alleyways, crosswalks at an angle, or shadows cast across pavement. These elements fit naturally into the golden triangle framework.

For more on using geometric shapes in composition, check out our guide on triangles in photography.
Portraits
In portraits, the golden triangle is less about literal diagonal lines and more about the angle of the body. A subject leaning, looking, or reaching across the frame creates an implied diagonal. Position the face or eyes at an intersection point for a natural, engaging composition.

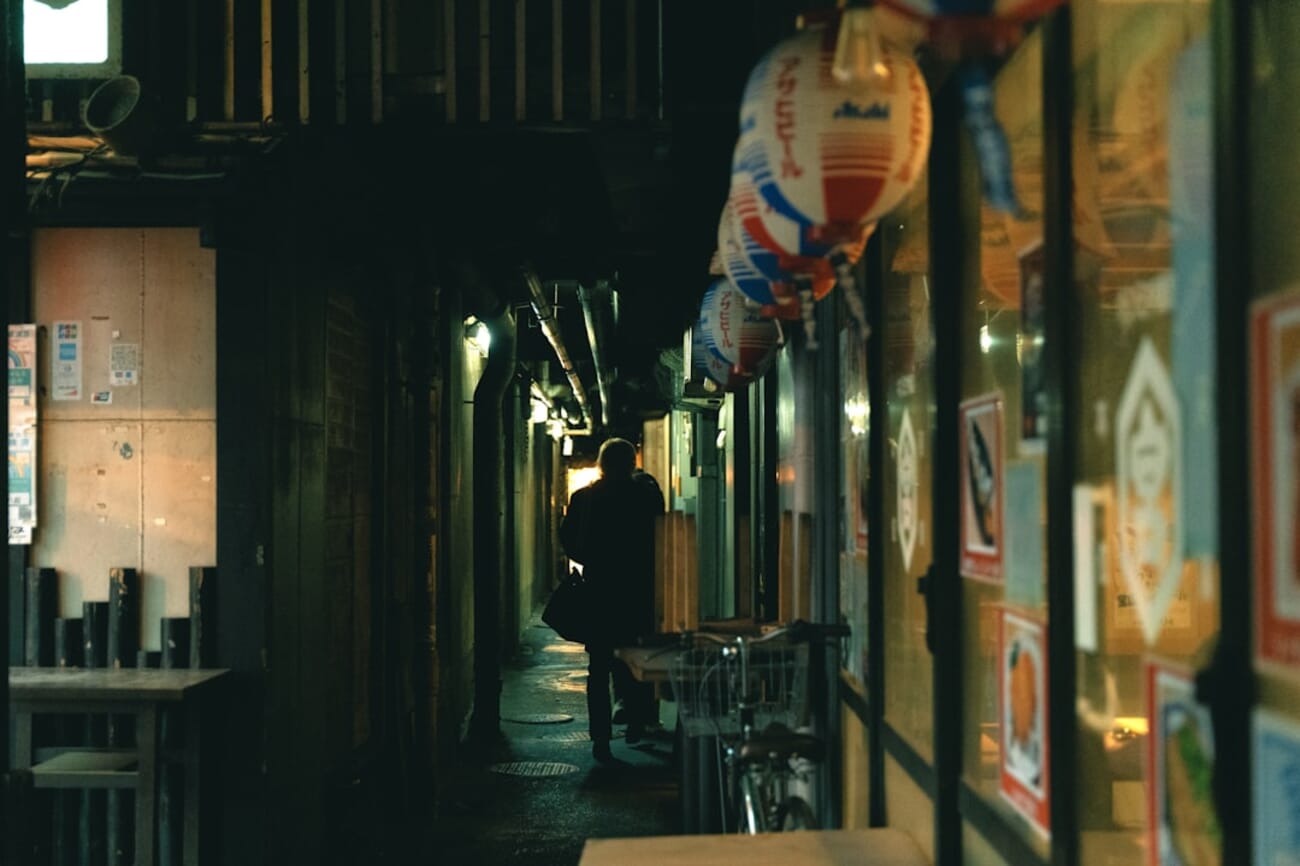
Street and Urban Scenes
Narrow alleyways, train tracks, and corridors create dramatic diagonals that pull the viewer into the scene. The golden triangle helps you position a subject — a pedestrian, a bicycle, a sign — at the point of maximum visual impact.
Using Software Tools for Golden Triangle Composition
You don’t have to visualize the golden triangle from memory. Modern editing software includes crop overlays that project the golden triangle directly onto your image:
- Adobe Lightroom — In the Crop & Straighten tool, press O to cycle through overlays (thirds grid, golden ratio, golden triangle, diagonal). Press Shift+O to rotate the overlay orientation.
- Adobe Photoshop — Select the Crop tool, then look for the overlay dropdown in the options bar. Choose “Golden Triangle” from the list.
- Capture One — The Crop tool includes golden triangle and golden spiral overlays in the Composition Guide dropdown.
- Smartphone cameras — Most phone cameras offer a basic grid overlay (rule of thirds), but some advanced camera apps like ProCamera and Halide include golden triangle overlays.
Using these overlays during cropping is one of the easiest ways to practice the golden triangle. Import a batch of photos, enable the overlay, and experiment with crops that align key elements with the diagonal and intersection points. Over time, you’ll start seeing the golden triangle in the viewfinder without any overlay at all.
If you’re learning composition techniques more broadly, our ultimate guide to composition covers all the major frameworks including the golden triangle, rule of thirds, and more.
Common Mistakes to Avoid
The golden triangle is a powerful tool, but it’s easy to misuse. Here are the most common mistakes photographers make:
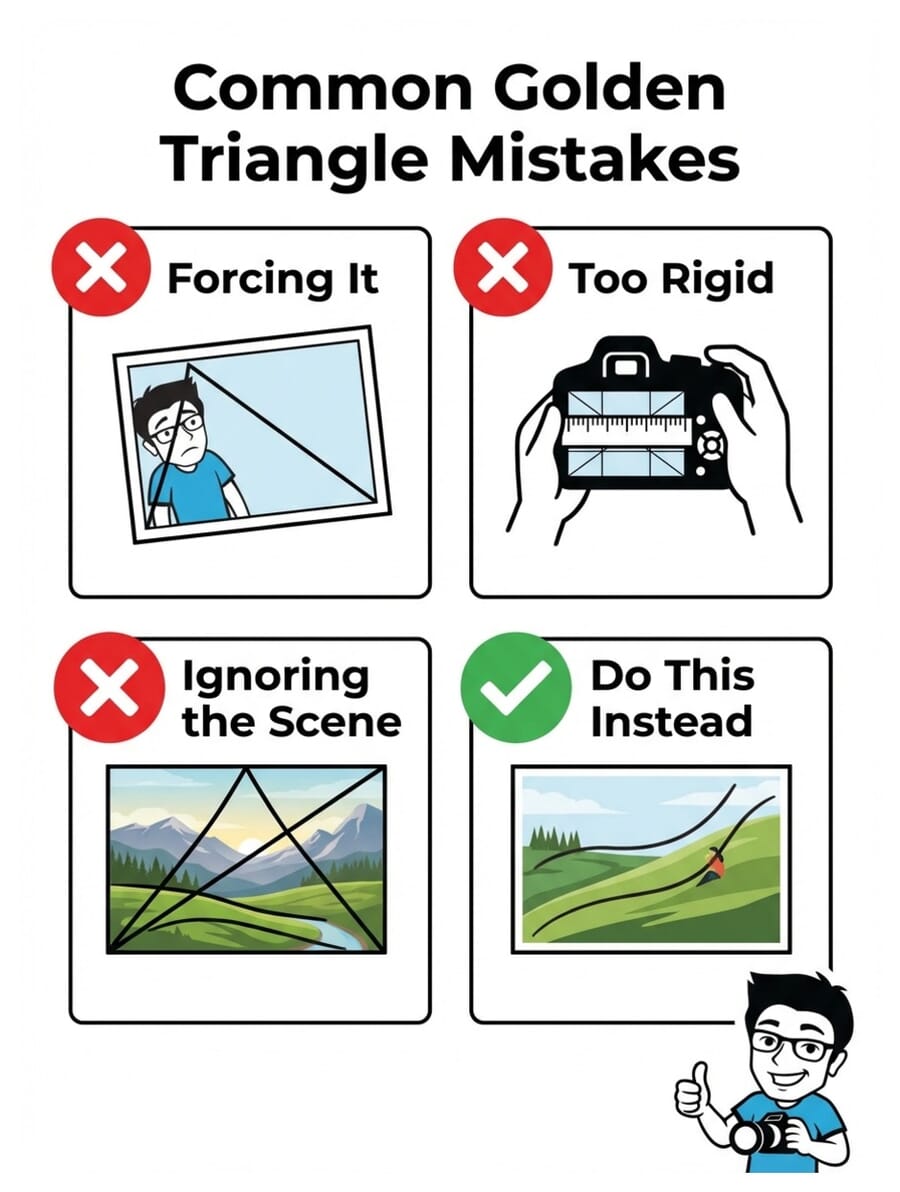
1. Forcing the Composition
Not every scene has a natural diagonal. If you’re standing in front of a flat horizon with no diagonal elements, the golden triangle isn’t the right tool. Use the rule of thirds or symmetry instead. The golden triangle works best when the scene already suggests diagonal movement.
2. Being Too Rigid
Your subject doesn’t need to sit exactly on the intersection point. Close is good enough. Composition rules are guidelines, not laws — and a slightly off-center placement often looks more natural than a pixel-perfect one.
3. Ignoring Other Composition Principles
The golden triangle is one tool among many. Don’t forget about simplicity, framing, patterns, and color theory. The best compositions often combine multiple techniques — a golden triangle placement with a complementary color scheme, or a diagonal leading line framed within a natural archway.
4. Overcomplicating It
Some photographers try to fit every element into the golden triangle framework. Your background, secondary subjects, and negative space don’t all need to align with the overlay. Focus on placing your main subject at an intersection point and letting the rest of the scene breathe.
Frequently Asked Questions
What is the golden triangle in photography?
The golden triangle is a composition technique that divides the frame using a diagonal line from corner to corner, plus two perpendicular lines from the remaining corners. Subjects placed at the two intersection points appear balanced and dynamic. It’s especially effective for scenes with strong diagonal elements like roads, rivers, and staircases.
When should I use the golden triangle instead of the rule of thirds?
Use the golden triangle when your scene contains strong diagonal elements — winding roads, sloping terrain, staircases, or rivers. The rule of thirds works better for scenes dominated by horizontal or vertical lines, like flat horizons or architectural facades. Many photographers use both depending on the scene.
How do I see the golden triangle overlay in Lightroom?
In Lightroom’s Crop & Straighten tool, press the O key to cycle through composition overlays. This includes the rule of thirds grid, golden ratio, golden triangle, and diagonal overlays. Press Shift+O to rotate the overlay orientation.
Can I use the golden triangle for portraits?
Yes. In portraits, the golden triangle works with the angle of the subject’s body or gaze. Position the face or eyes at one of the intersection points, and use the subject’s posture or a leading line in the background to reinforce the diagonal. It creates a more dynamic feel than centered or thirds-based compositions.
Can I use the golden triangle with a smartphone?
Most smartphone camera apps only offer a basic thirds grid, but advanced apps like ProCamera and Halide include golden triangle overlays. You can also apply the golden triangle during editing by using the crop tool in Lightroom Mobile or Snapseed, which offer composition overlay options.
