
- Snapseed is a free, professional-grade photo editor for iOS and Android — and Google just revived it with a massive 3.0 redesign after years of silence.
- The basic editing workflow covers Tune Image, Crop, Rotate, and White Balance — everything you need for quick, polished smartphone photos.
- Snapseed’s advanced tools (Selective edit, Curves, Healing) still outclass built-in phone editors like Google Photos and Apple Photos for precise, manual control.
- New in 3.0: a built-in film camera with Kodak Portra, Fujifilm Superia, and Polaroid simulations — shoot and edit in one app.
- Not sure if you still need Snapseed? Check our comparison with built-in AI editors and decide.
- Test what you learned with our Snapseed editing quiz.
When you buy through links on our site, we may earn a commission at no cost to you. We evaluate products independently. Commissions do not affect our evaluations.
What Is Snapseed (and Why It Still Matters)
Snapseed is Google’s free photo editing app for iOS and Android. Originally built by Nik Software (the same team behind the legendary Nik Collection used by professional photographers), Google acquired it in 2012 and made it free.
For years, Snapseed was the mobile photo editor — the app that serious photographers actually used on their phones. Then Google went quiet. No meaningful updates between 2021 and mid-2025. People started wondering if it was abandoned.
Meanwhile, your phone got smarter. Apple Intelligence, Samsung Galaxy AI, and Google Photos’ Magic Editor can now erase objects, adjust lighting, and enhance photos with a single tap. So why would anyone still open Snapseed?
Because AI editors make choices for you. Snapseed lets you make the choices yourself.
When you want to brighten just one person’s face, push shadows in one corner without blowing out another, or fine-tune a Curves adjustment exactly the way you envision it — that’s where Snapseed still has no free competitor. And with the recent 3.0 redesign, Google clearly isn’t done with it yet.
Snapseed 3.0: The Big Comeback
After years of near-silence, Google surprised everyone in mid-2025 by launching Snapseed 3.0 — a complete redesign, starting with iOS. The Android update is confirmed and expected later in 2026.
Here’s what changed:
- Redesigned interface — A cleaner home screen with three clear sections: Faves, Looks, and Tools. The bottom toolbar is more intuitive, and export moved to the top-right corner.
- New Faves system — Save your most-used tools to a quick-access bar so you’re not digging through menus every time.
- Updated Looks (filters) — New vintage-inspired presets join the existing library, including film-style looks that pair with the new camera feature.
- Built-in camera — The biggest addition. Snapseed now has a full camera mode with film simulations, manual controls, and the ability to shoot with your editing Looks applied in real-time. More on this below.
- Improved tool controls — Slider adjustments feel more responsive, and the editing UI is less cluttered overall.
Snapseed’s product manager, Giles Ochs, confirmed on Reddit that the team began work on the Android update in November 2025. If you’re on Android, the core editing tools haven’t changed — you’ll just need to wait a few months for the visual refresh.
Getting Started: Import Your Photo
Open Snapseed and tap anywhere on the blank home screen (or tap the + button) to import a photo from your camera roll. You can also open images directly from your phone’s gallery by sharing them to Snapseed.
Snapseed supports both JPG and RAW files — one of the few free mobile editors that handles RAW. If you shoot in RAW on your iPhone or Pixel, Snapseed can work with those files directly, giving you far more editing latitude than a compressed JPG.
Once your photo is loaded, you’ll see the main editing interface. The bottom toolbar gives you access to Looks (presets/filters), Tools (individual editing adjustments), and Export options.
The Snapseed Editing Interface
Snapseed’s interface is built around swipe gestures, which is what makes it feel different from most mobile editors:
- Swipe left/right to adjust the strength of any tool
- Swipe up/down to switch between different parameters within a tool (e.g., switching between Brightness, Contrast, and Saturation inside Tune Image)
- Tap and hold anywhere to see a before/after comparison
- Pinch to zoom for detailed inspection
This gesture system means you can make precise adjustments without fiddly sliders covering your photo. It takes a minute to get used to, but once you do, it’s faster than any slider-based editor.
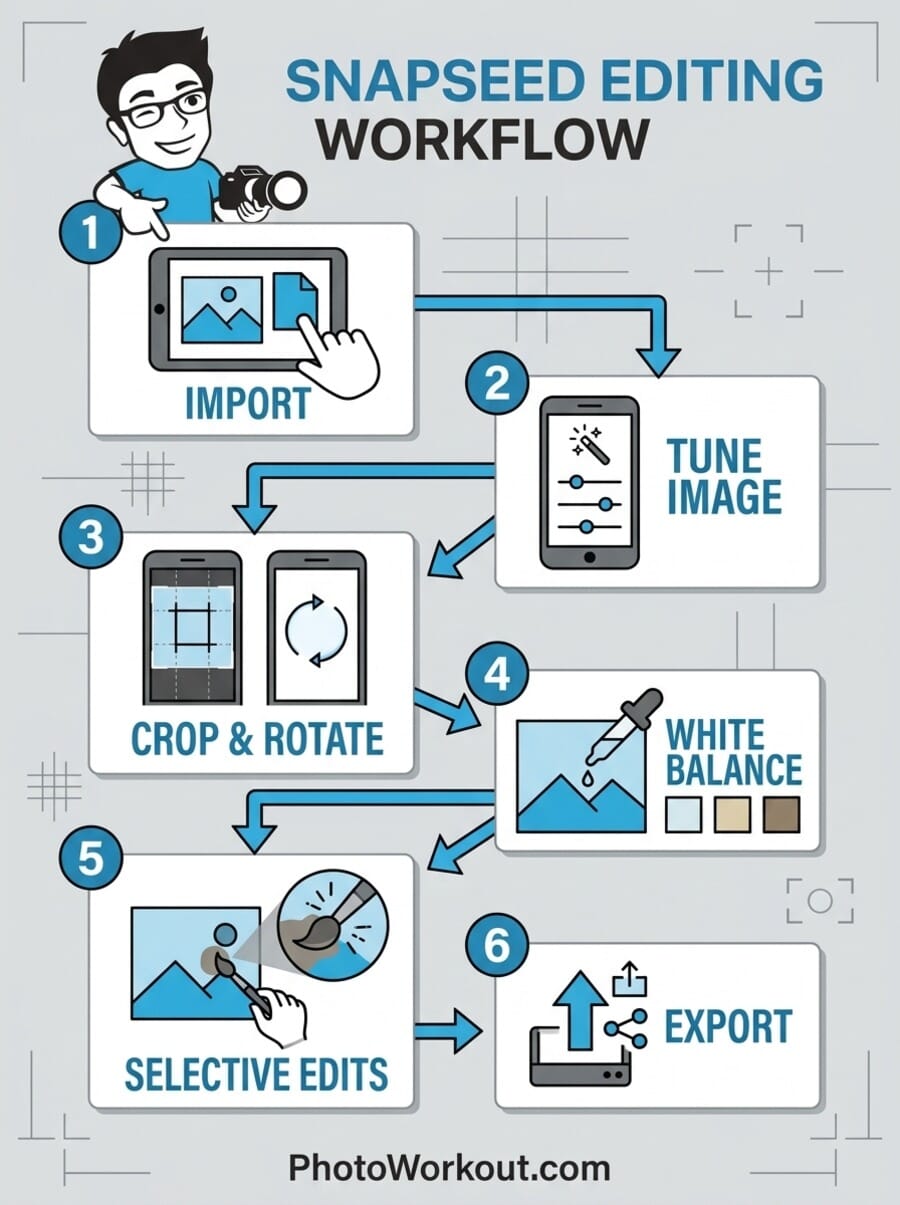
Basic Edits: The Essential Workflow
Start every edit with these fundamental tools. They’ll handle 80% of what most photos need.
1. Tune Image — Your Starting Point
Open Tools → Tune Image. This is Snapseed’s all-in-one exposure tool, and it’s where every edit should begin.
Swipe up/down to cycle through the parameters:
- Brightness — Overall lightness/darkness. Start here if your photo is too dark or washed out.
- Contrast — The difference between lights and darks. A small bump (+15 to +25) adds punch to flat smartphone photos.
- Saturation — Color intensity. Go easy — +10 to +20 is usually enough. Push it too far and skin tones go orange.
- Ambiance — Snapseed’s unique slider that adds depth by adjusting contrast and saturation together. Positive values create a vivid, HDR-like look; negative values mute the image.
- Highlights — Recover blown-out bright areas (pull left) or brighten them further (push right).
- Shadows — Open up dark areas without affecting the rest of the image.
- Warmth — Shift color temperature warmer (golden) or cooler (blue).
Pro tip: Don’t max out any single slider. Small, combined adjustments look more natural than one big push. Try +20 Brightness, +15 Contrast, +10 Ambiance as a starting point — then fine-tune from there.
2. Crop — Tighten Your Composition
Open Tools → Crop and choose an aspect ratio. The most useful presets:
- Free — Drag to any ratio you want
- 1:1 — Square (ideal for Instagram profile photos and grid posts)
- 4:5 — Instagram’s portrait format (maximum feed real estate)
- 16:9 — Cinematic widescreen
- 3:2 — Classic photo ratio (matches most camera sensors)
Use the crop tool to remove distracting edges, center your subject, or reframe the composition entirely. A tighter crop almost always makes a smartphone photo more compelling.
3. Rotate — Straighten Your Horizon
Nothing screams “casual snapshot” like a tilted horizon. Open Tools → Rotate and swipe to straighten. Snapseed shows a grid overlay to help you align with horizontal or vertical lines in the scene.
If the auto-level suggestion (tap the icon) looks right, accept it. Otherwise, manually adjust — even a 1-2° correction can make a landscape photo feel dramatically more polished.
4. White Balance — Fix Color Casts
Indoor photos often have an orange or yellow cast from warm lighting. Outdoor shots in shade can look blue. Tools → White Balance fixes this.

You have two controls:
- Temperature — Swipe left for cooler (blue) or right for warmer (orange)
- Tint — Swipe left for green or right for magenta (useful for correcting fluorescent lighting)
You can also tap the eyedropper icon and select something in the photo that should be neutral gray or white. Snapseed will automatically calculate the correct white balance from that reference point.
5. Details — Add Crispness
Tools → Details gives you two controls:
- Structure — Enhances texture and fine detail without making the image look over-sharpened. Great for landscapes, architecture, and food photos.
- Sharpening — Traditional sharpening that enhances edges. Use sparingly — too much creates ugly halos around objects.
Pro tip: Structure is usually more useful than Sharpening for smartphone photos. A value of +20 to +40 adds visible clarity without artifacts. Skip Sharpening entirely unless the image is genuinely soft.
Advanced Edits: Where Snapseed Shines
These tools are what separate Snapseed from basic built-in editors. No other free mobile app offers this level of precise, localized control.
Selective Tool — Edit Specific Areas
The Selective tool is Snapseed’s killer feature. Tap anywhere on your photo to drop a control point, then adjust brightness, contrast, saturation, or structure for just that area.
How to use it:
- Tap to place a control point on the area you want to adjust
- Pinch to resize the affected area (a red highlight shows what’s selected)
- Swipe up/down to choose Brightness, Contrast, Saturation, or Structure
- Swipe left/right to adjust the value
- Add multiple control points for different areas
This is incredibly powerful. Brighten a face without blowing out the sky. Boost saturation on a flower without affecting the background. Darken a distracting bright corner. No layers, no masks — just tap and swipe.
Curves — Full Tonal Control
The Curves tool gives you the same kind of control found in Photoshop and Lightroom — on your phone. Open Tools → Curves and you’ll see a diagonal line on a histogram.
Tap to add points on the curve, then drag them:
- Pull the middle up — Brightens midtones (most common edit)
- Pull the bottom-left up — Lifts blacks for a faded/matte film look
- S-curve (pull highlights up, shadows down) — Classic contrast boost
- Switch channels — Edit Red, Green, or Blue curves individually for creative color grading
Curves is where Snapseed has a massive advantage over Google Photos and Apple Photos — neither offers anything close to this level of tonal control for free.
Healing Tool — Remove Unwanted Objects
Spot a power line, trash can, or photobomber ruining your shot? Tools → Healing lets you paint over unwanted objects, and Snapseed intelligently fills the area using surrounding pixels.

Tips for better healing results:
- Zoom in first — Pinch to zoom before painting for more precise selection
- Use small strokes — Multiple small swipes work better than one big one
- Works best on simple backgrounds — Sky, grass, water, walls. Complex patterns may look patchy.
- Undo mistakes — Tap the undo arrow if a result looks off, then try again with a slightly different selection
Vignette — Focus Attention
A subtle vignette darkens the edges of your photo, naturally drawing the viewer’s eye toward the center. Open Tools → Vignette and swipe left/right to control the intensity.
The key word is subtle. A value of -20 to -40 is usually enough. If you can obviously see the darkening, you’ve gone too far.
The New Snapseed Camera (iOS)
The 3.0 update introduced something entirely new: a built-in camera with film simulations and manual controls. As of March 2026, this feature is available on iOS only — Android users will get it in a future update.
Tap the camera icon in the top-right corner of the home screen (on the latest iOS version) to open it. Here’s what you get:
Film Simulations
Snapseed’s camera includes 11 film emulations that apply in real-time through the viewfinder:
- Kodak Portra 400 — Warm, soft tones beloved by portrait photographers
- Kodak Gold 200 — Vivid, slightly warm consumer film look
- Kodak E200 — Slide film with punchy colors
- Fujifilm Superia — Cool-toned consumer film classic
- Fujifilm Pro 400H — Clean, slightly desaturated with green-shifted shadows
- Agfa Optima & Scala — European film emulations
- Polaroid 600 — Instant film with faded, nostalgic tones
- Technicolor — Vintage cinema-inspired color science
You can also shoot using your saved Looks and custom edit stacks — meaning you can create a personal editing style once, then apply it at the moment of capture.
Pro Mode Manual Controls
Toggle the PRO switch in the camera view to unlock manual control over:
- ISO
- Shutter speed
- Focus (manual focus ring)
If you’ve ever wanted a free alternative to apps like Halide or ProCamera, Snapseed’s new camera mode covers the basics. It won’t replace a dedicated camera app for serious manual shooting, but for creative film-style photography it’s surprisingly capable — and completely free. For more on controlling your phone’s camera settings, see our smartphone exposure guide.
Snapseed vs Built-In AI Editors: Which Should You Use?
Your phone already has powerful editing tools baked in. Google Photos has Magic Editor and Magic Eraser. Apple Photos has Clean Up (object removal) and various Apple Intelligence adjustments. Samsung Gallery offers Galaxy AI editing features.
So when does Snapseed still make sense? Here’s the honest comparison:
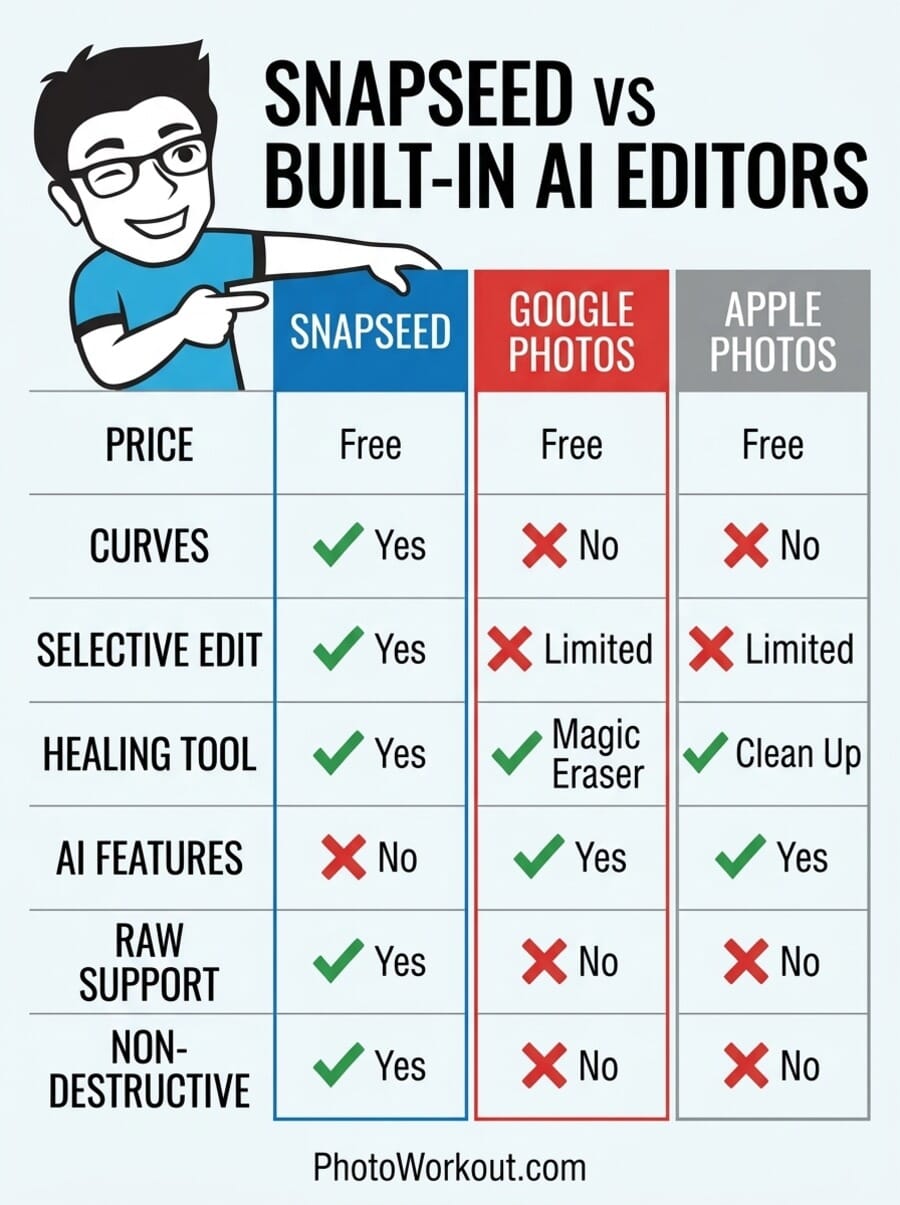
Use Built-In AI Editors When:
- You want one-tap fixes — auto-enhance, auto-color, auto-crop
- You need to erase someone from a photo (Magic Eraser/Clean Up is faster for large objects)
- You want AI scene recomposition (e.g., Google Photos’ Reimagine feature)
- You just want to quickly share a photo without leaving your gallery app
Use Snapseed When:
- You need selective, localized edits — adjusting specific areas without affecting the whole photo
- You want Curves for precise tonal control and color grading
- You’re editing RAW files on your phone
- You want non-destructive editing with a full edit stack you can go back and modify
- You want the Healing tool for precise, controlled object removal (AI erasers can be heavy-handed)
- You want film-style processing with the new camera mode
The bottom line: AI editors are faster for simple fixes. Snapseed is better when you want creative control. Many photographers use both — quick edits in Google Photos or Apple Photos, then Snapseed for photos that deserve more attention.
Using Looks (Filters) as a Starting Point
Tap Looks at the bottom of the editing screen to browse Snapseed’s preset filters. Scroll through options like Portrait, Smooth, Pop, Accentuate, Faded Glow, Morning, and many more.
The smart way to use Looks:
- Apply a Look first as a creative starting point
- Then fine-tune with Tools — adjust Tune Image, add selective edits, tweak the white balance
- Save your custom Looks — once you’ve dialed in an editing style you like, save it as a personal preset for one-tap application on future photos
This workflow (Look → Tools → Save) is how professionals build a consistent aesthetic across their phone photography. It’s far more flexible than Instagram’s one-dimensional filter system.
Snapseed’s Non-Destructive Editing Stack
One of Snapseed’s most underappreciated features is its non-destructive editing stack. Every edit you make is stored as a separate step that you can go back and modify, reorder, or delete — even after saving.
Tap the Edit Stack icon (the overlapping squares icon at the top) to see your full edit history. From here you can:
- Tap any step to re-edit it with different values
- Delete a step if you changed your mind
- See exactly which tools were applied and in what order
This means you never paint yourself into a corner. Applied too much Saturation three steps ago? Go back and dial it down without losing your Curves adjustment and Selective edits. Built-in phone editors don’t offer this — once you save, your edits are baked in.
Exporting Your Edited Photo
When you’re done editing, tap Export (top-right corner in the 3.0 redesign). You have three options:
- Save — Overwrites the original with your edits (not recommended)
- Save a Copy — Creates a new file with your edits, keeping the original intact (recommended)
- Export — Saves a flattened copy without the edit stack (smaller file, but edits are permanent)
Always use Save a Copy unless you have a specific reason not to. It preserves the original and keeps your edit stack intact for future tweaks. Once your edited photos are saved, you’ll want a system for keeping them organized — our guide to organizing your photo library covers that.
Best Snapseed Alternatives
Snapseed isn’t the only option for serious mobile editing. Here are the best alternatives, depending on what you need:
- Adobe Lightroom Mobile (free/premium) — The industry standard for RAW editing, with cloud sync across devices. The free tier covers basics; Premium ($9.99/mo) unlocks Healing, Selective Masking, and AI Presets. More powerful than Snapseed, but not free.
- Google Photos — Already on your phone. Magic Editor, Magic Eraser, and one-tap adjustments handle quick fixes well. Lacks Snapseed’s Curves and Selective precision, but you can’t beat the convenience.
- Apple Photos — For iPhone users, the built-in editor keeps improving. Clean Up (object removal), auto adjustments, and Apple Intelligence features make it surprisingly capable for simple edits.
- VSCO (free/premium) — Strong film-style presets and a solid community. The free tier is limited; VSCO Pro ($59.99/year) adds all presets and advanced tools.
- Darkroom (iOS) — Fast, clean interface with batch editing and Curves. Free for basic use, Premium unlocks advanced features. Popular with serious iPhone photographers.
For a deeper comparison of editing options beyond mobile, check out our guide to the best AI photo editor software. And if you’re just getting started with photo editing in general, our photo editing for beginners guide covers the essential concepts.
Frequently Asked Questions
Is Snapseed still free?
Yes, Snapseed is completely free with no in-app purchases, subscriptions, or ads. Every tool and feature is available to all users. This makes it one of the best values in mobile photo editing.
Is Google still updating Snapseed?
Yes. After years of minimal updates, Google launched a major 3.0 redesign for iOS in mid-2025, followed by regular feature updates including a built-in camera with film simulations. The Android version update is confirmed and expected later in 2026.
Can Snapseed edit RAW photos?
Yes. Snapseed supports RAW files (DNG format) from smartphones and cameras. This gives you significantly more editing latitude than working with compressed JPGs — especially for recovering highlights and shadows.
Is Snapseed better than Lightroom Mobile?
They serve different needs. Snapseed is completely free with excellent selective editing and Curves. Lightroom Mobile offers cloud sync, more powerful masking tools, and integration with the Adobe ecosystem, but the best features require a paid subscription. For casual editing on a phone, Snapseed is hard to beat on value.
Is there a Snapseed desktop app?
No. Snapseed is mobile-only (iOS and Android). Google discontinued the desktop version years ago. For desktop editing with similar precision, consider dedicated photo editing software.
Does Snapseed have AI features?
Not in the way Google Photos or Apple Photos do. Snapseed doesn’t offer AI scene recognition, auto-recomposition, or generative fill. Its strength is manual, precise editing control. If you want AI-powered editing, check our roundup of AI photo editing tools.
Test Your Snapseed Knowledge
Think you’ve mastered Snapseed’s editing tools? Take this quick quiz to find out.


