Key Takeaways: High Key Photography Essentials
- High key = bright backgrounds + minimal shadows: The technique creates airy, uplifting images by keeping backgrounds significantly brighter than subjects
- Lighting matters more than camera settings: Success depends on controlling light ratios between subject and background
- Multiple approaches work: Achieve high key results with natural light (overcast days, backlight), studio flash, or LED continuous lighting
- Smartphone-friendly technique: Modern phones with Portrait mode can create high key looks by exposing for bright backgrounds
- Opposite of low key: While high key emphasizes brightness and optimism, low key uses dark backgrounds for drama and mystery
- Post-processing enhances the effect: Lifting shadows, increasing exposure, and reducing contrast in editing reinforces the high key aesthetic
Introduction
High key photography creates bright, airy images that feel optimistic and clean. The technique appears throughout fashion, beauty, product photography, and portraits—anywhere a fresh, uplifting mood serves the subject.
This guide covers everything needed to create consistent high key images: the underlying principles, practical lighting setups for various situations, smartphone techniques, and post-processing approaches that enhance the effect.
What Is High Key Photography?
High key photography uses predominantly light tones with minimal shadows. The background appears significantly brighter than the subject, creating an ethereal, almost glowing quality. This approach reduces contrast and eliminates harsh shadows, producing images that feel light, positive, and approachable.
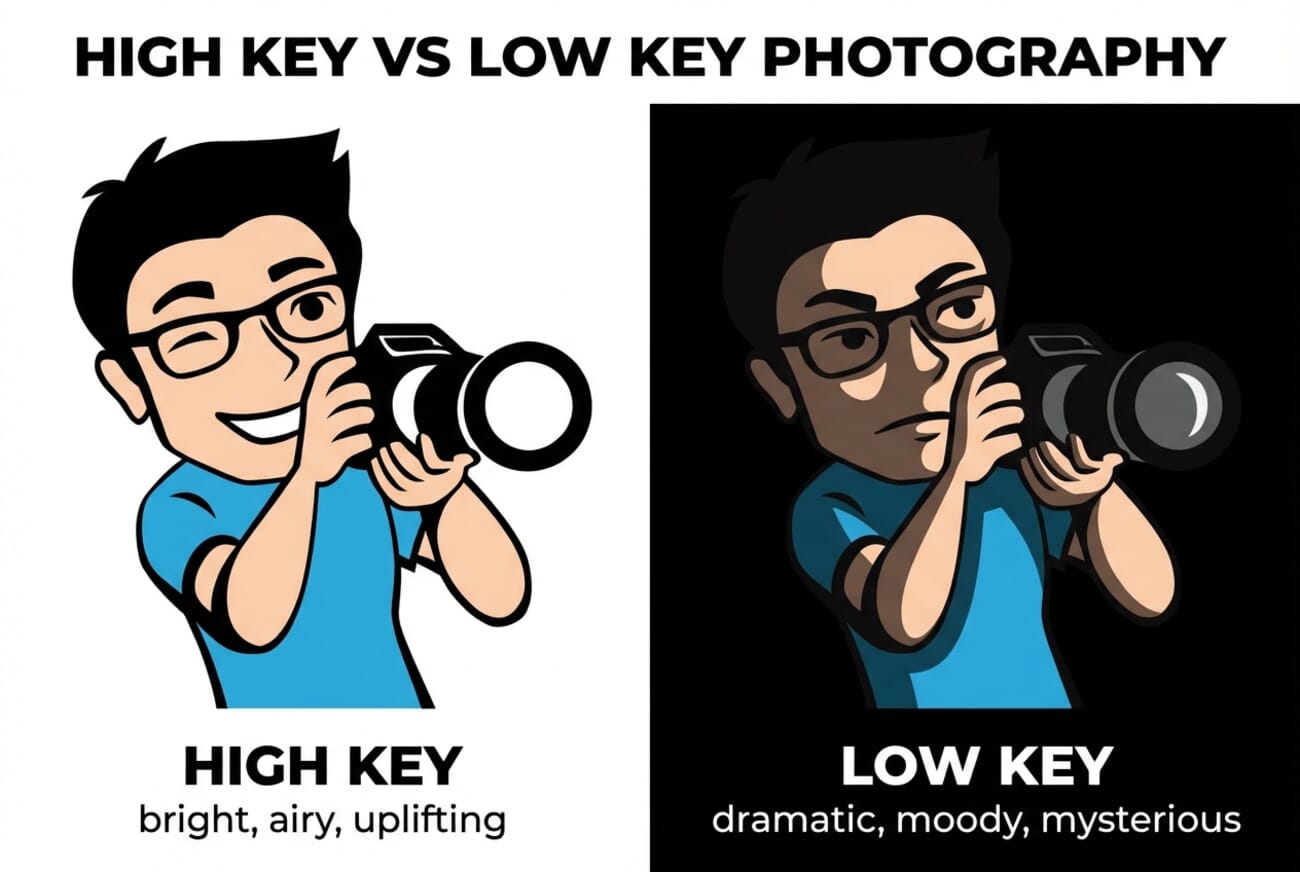
The opposite approach—low key photography—uses dark backgrounds and dramatic shadows to create moody, mysterious images. Understanding both techniques provides complete control over the emotional impact of photographs.
Related: Low Key Photography Guide
How High Key Photography Works
High key success depends on one fundamental principle: the background must be significantly brighter than the subject. This can happen naturally (shooting toward bright sky) or artificially (lighting a white backdrop separately from the subject).
The key technical elements:
- Background brightness: 1-2 stops brighter than the subject creates the high key effect
- Fill light: Reduces shadows on the subject to maintain the airy feel
- Exposure: Expose for the subject, allowing the background to blow out (lose detail)
- White balance: Neutral or slightly cool tones enhance the clean aesthetic
Natural Light High Key Setups
Overcast Days
Cloud cover creates nature’s largest softbox—soft, even illumination perfect for high key photography. The diffused light minimizes shadows while the bright sky provides a naturally high key background.
Technique: Position subjects with open sky behind them. Expose for the face, allowing the sky to blow out to pure white. A reflector from below fills any remaining shadows under the chin and eyes.
Sunny Day Backlight
Shooting into the sun creates dramatic backlight with a naturally bright background. The challenge: preventing the subject from becoming a silhouette.
Technique: Position the sun behind the subject. Use a large reflector or fill flash to illuminate the face. Expose for the subject’s skin, letting the background blow out. The result: glowing rim light around the subject with a bright, high key background.
Related: Best Time to Take Pictures Outside
Window Light
A bright window provides excellent high key opportunities indoors. Position subjects facing the window with a white wall or backdrop behind them, or shoot toward the window itself for a naturally blown-out background.
Studio High Key Setups
Flash/Strobe Setup
The classic studio high key setup uses separate lighting for subject and background:
- Background lights: Two flashes or strobes aimed at a white backdrop, set 1-2 stops brighter than the key light
- Key light: Main light on the subject, typically through a softbox for flattering illumination
- Fill light or reflector: Reduces shadow contrast on the subject
This setup provides complete control—adjust the background lights to achieve the desired brightness without affecting subject exposure.
Related: Off-Camera Flash Guide
LED Continuous Lighting
LED panels offer advantages for high key photography: instant visual feedback shows exactly how the final image will look. This makes balancing subject and background lighting intuitive.
Setup: Use two LED panels to illuminate a white backdrop evenly. Add a third panel with diffusion as the key light on the subject. Adjust panel brightness until the background appears 1-2 stops brighter than the subject on the camera’s exposure meter.
LED setups also work for video, making them versatile investments for content creators shooting both stills and motion.
Smartphone High Key Photography
Modern smartphones can achieve impressive high key results, especially for social media content where the bright, clean aesthetic performs well.
Using Portrait Mode
Portrait mode’s computational background blur combined with bright backgrounds creates a smartphone-friendly high key look:
- Position subjects against bright windows, white walls, or open sky
- Tap on the subject’s face to set exposure
- Use the exposure slider (if available) to slightly brighten the overall image
- The artificial bokeh softens the bright background for a professional look
Editing for High Key on Mobile
Apps like Lightroom Mobile, Snapseed, and VSCO can enhance the high key effect:
- Increase exposure slightly
- Lift shadows significantly
- Reduce contrast
- Add slight fade to blacks (raises the black point)
- Desaturate slightly for a cleaner look
High Key Camera Settings
While lighting creates the high key effect, camera settings optimize the capture:
- Aperture: f/4-f/8 keeps subjects sharp while softening backgrounds
- ISO: Keep low (100-400) for clean files with room to push exposure
- Exposure compensation: +0.5 to +1 stop helps achieve the bright look
- Metering: Spot metering on the subject prevents the bright background from fooling the meter
- White balance: Daylight or slightly cool (5500-6000K) enhances the clean aesthetic
Related: Camera Metering Modes Explained
Post-Processing High Key Images
Editing reinforces and perfects the high key look:
Essential Adjustments
- Exposure: Increase slightly if the image isn’t bright enough
- Highlights: Can push higher—clipped highlights are acceptable in high key
- Shadows: Lift significantly to reduce contrast and maintain the airy feel
- Whites: Push toward clipping for maximum brightness
- Blacks: Raise the black point—true blacks can feel out of place
- Contrast: Reduce overall contrast for a softer look
Color Considerations
High key images often benefit from subtle desaturation or a slight cool/neutral color grade. Overly warm or saturated colors can fight the clean, airy aesthetic. Consider reducing vibrance slightly while maintaining natural skin tones.
Common High Key Photography Genres
- Fashion and beauty: Clean backgrounds keep focus on clothing and makeup
- Product photography: White backgrounds are e-commerce standard
- Newborn and baby portraits: Soft, pure aesthetic suits innocent subjects
- Headshots: Professional, approachable look for corporate and acting portraits
- Food photography: Bright, fresh feeling enhances appetite appeal
Related: White Background Portrait Guide
Conclusion
High key photography creates bright, optimistic images through careful control of light ratios. Whether working with natural light outdoors, studio strobes, LED panels, or a smartphone, the principle remains constant: keep backgrounds significantly brighter than subjects while filling shadows to maintain the airy aesthetic.
Start with the simplest approach—overcast day portraits or window light—to understand the look. Progress to controlled studio setups as skills develop. Post-processing provides the final polish, pushing images toward that clean, ethereal high key feel that makes subjects glow.