
- Follow the 3-2-1 backup rule: 3 copies, 2 different media types, 1 offsite location.
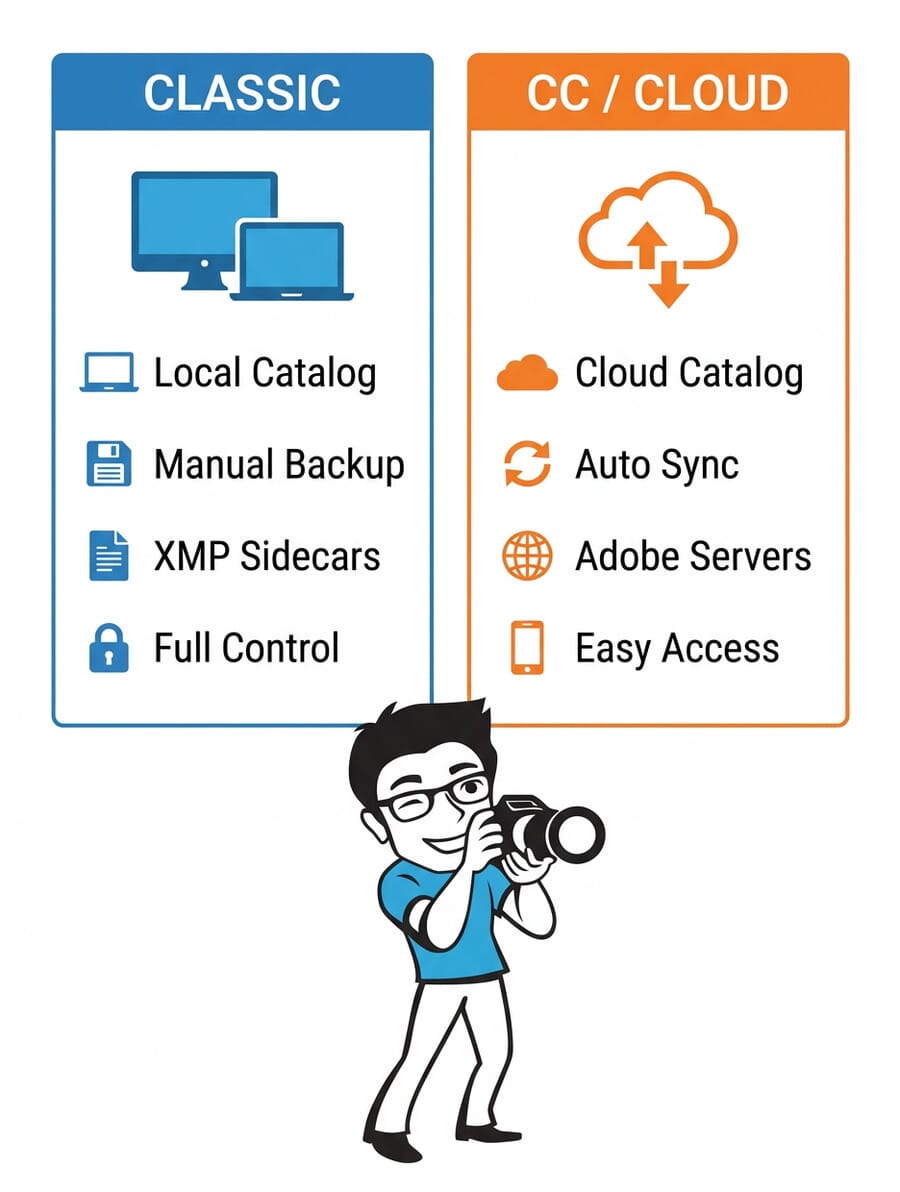
- Lightroom Classic stores locally (you manage backups); Lightroom CC syncs to Adobe’s cloud automatically.
- Back up your Lightroom catalog separately from your photos – it holds all your edits and metadata.
- Organize folders by category and shoot name, then mirror that structure with Collections inside Lightroom.
- Enable XMP sidecar files to save edit data alongside your RAW files as a safety net.
- Choose between cloud storage and NAS based on your library size, budget, and access needs.
- Test your Lightroom backup knowledge with our quick quiz at the end.
When you buy through links on our site, we may earn a commission at no cost to you. We evaluate products independently. Commissions do not affect our evaluations.
Why Backing Up Your Lightroom Photos Matters
Hard drives fail. Memory cards corrupt. Laptops get stolen. If you’ve spent hours culling, editing, and organizing thousands of photos in Lightroom, losing that work isn’t just inconvenient – it can be devastating.
A solid backup strategy protects both your original image files and your Lightroom catalog (which stores all your edits, ratings, keywords, and Collections). Lose the catalog without a backup, and every adjustment you’ve ever made is gone – even if the photos themselves survive.
This guide walks you through a complete backup and organization system for Lightroom, covering both Lightroom Classic and Lightroom CC. Whether you’re a hobbyist with a few thousand photos or a professional managing hundreds of thousands of images, these practices will keep your work safe.

Lightroom Classic vs Lightroom CC: Backup Differences
Before setting up your backup system, you need to understand which version of Lightroom you’re using – because they handle files very differently.
Lightroom Classic (Desktop)
- Local catalog file (.lrcat) stores all edits, metadata, and organizational data on your computer
- Photos stay where you put them – on your hard drives, external drives, or NAS
- You are responsible for backups – nothing syncs to the cloud automatically
- XMP sidecar files can save edit data alongside your RAW files
- Smart Previews let you edit offline without the original files connected
Lightroom CC (Cloud-Based)
- Cloud-first approach – full-resolution originals upload to Adobe’s servers
- Automatic sync across all your devices (desktop, tablet, phone)
- Adobe handles redundancy on their end – but you’re trusting a third party
- Storage depends on your plan – 20GB (Photography plan) or 1TB+ (Lightroom plan)
- No local catalog file to back up separately
Bottom line: If you use Lightroom Classic, you need a manual backup strategy. If you use Lightroom CC, Adobe handles cloud storage – but you should still keep a local copy of your originals. Never rely on a single point of failure.
The 3-2-1 Backup Rule for Photographers
The 3-2-1 backup rule is the gold standard for data protection, and it applies perfectly to photography workflows:
- 3 copies of your data (the original + 2 backups)
- 2 different media types (e.g., external hard drive + cloud storage, or SSD + NAS)
- 1 offsite copy (cloud backup, or a drive stored at a different physical location)

Here’s what this looks like in practice for a Lightroom photographer:
- Copy 1: Original photos on your primary external hard drive or SSD
- Copy 2: Cloned backup on a second external drive (synced weekly or after each shoot)
- Copy 3: Cloud backup through a service like Backblaze, iDrive, or Adobe Creative Cloud storage
This approach ensures that even if two of your storage devices fail simultaneously (or your house floods, or your laptop is stolen), you still have a complete copy of every photo and every edit you’ve ever made.
Backing Up Your Lightroom Catalog
Your Lightroom Classic catalog file (.lrcat) is just as important as your photos – arguably more so. It contains:
- Every edit, crop, and adjustment you’ve made
- Star ratings, flags, and color labels
- Keywords, titles, and captions
- Collection and Collection Set organization
- Virtual copies and history states
Setting Up Automatic Catalog Backups
Lightroom Classic has a built-in catalog backup feature. To configure it:
- Go to Edit > Catalog Settings (Windows) or Lightroom > Catalog Settings (Mac)
- Click the General tab
- Under “Back Up Catalog,” select Every time Lightroom exits or Once a day, when exiting Lightroom
- Choose a backup location that is different from your catalog’s current drive
Important: Lightroom’s built-in backup only copies the catalog file – not your actual photos. Your photos need their own separate backup strategy (covered in the 3-2-1 section above).
Also, check the two boxes during backup: “Test integrity before backing up” and “Optimize catalog after backing up.” This catches catalog corruption early and keeps performance snappy.
Where to Store Catalog Backups
Don’t store your catalog backup on the same drive as the working catalog. Good locations include:
- A separate external drive
- A folder that syncs to a cloud service (Dropbox, Google Drive, OneDrive)
- Your NAS device
Old catalog backups pile up fast. Periodically delete older backups to free space – keeping the last 3-5 copies is usually sufficient.
XMP Sidecar Files: Your Edit Safety Net
XMP sidecar files are small text files that Lightroom Classic can write alongside your RAW photos. They contain your develop settings, metadata, ratings, and labels in a standard format that other software (like Adobe Camera Raw, Capture One, or Bridge) can read.
To enable automatic XMP writing:
- Go to Edit > Catalog Settings > Metadata
- Check “Automatically write changes into XMP”
Why this matters for backups: If your catalog file ever gets corrupted beyond repair, you can rebuild a new catalog and re-import your photos. Lightroom will read the XMP sidecar files and restore most of your edits automatically. It’s not a perfect backup (you’ll lose Collections and some history), but it recovers the most critical data – your actual develop settings.
The trade-off is slightly slower performance when editing (Lightroom writes to disk with each change) and extra files alongside your RAWs. For most photographers, the safety net is worth it.
Folder Organization Best Practices
A clean folder structure on your hard drives makes backups easier, file recovery faster, and your entire workflow smoother. Here’s how to set it up:
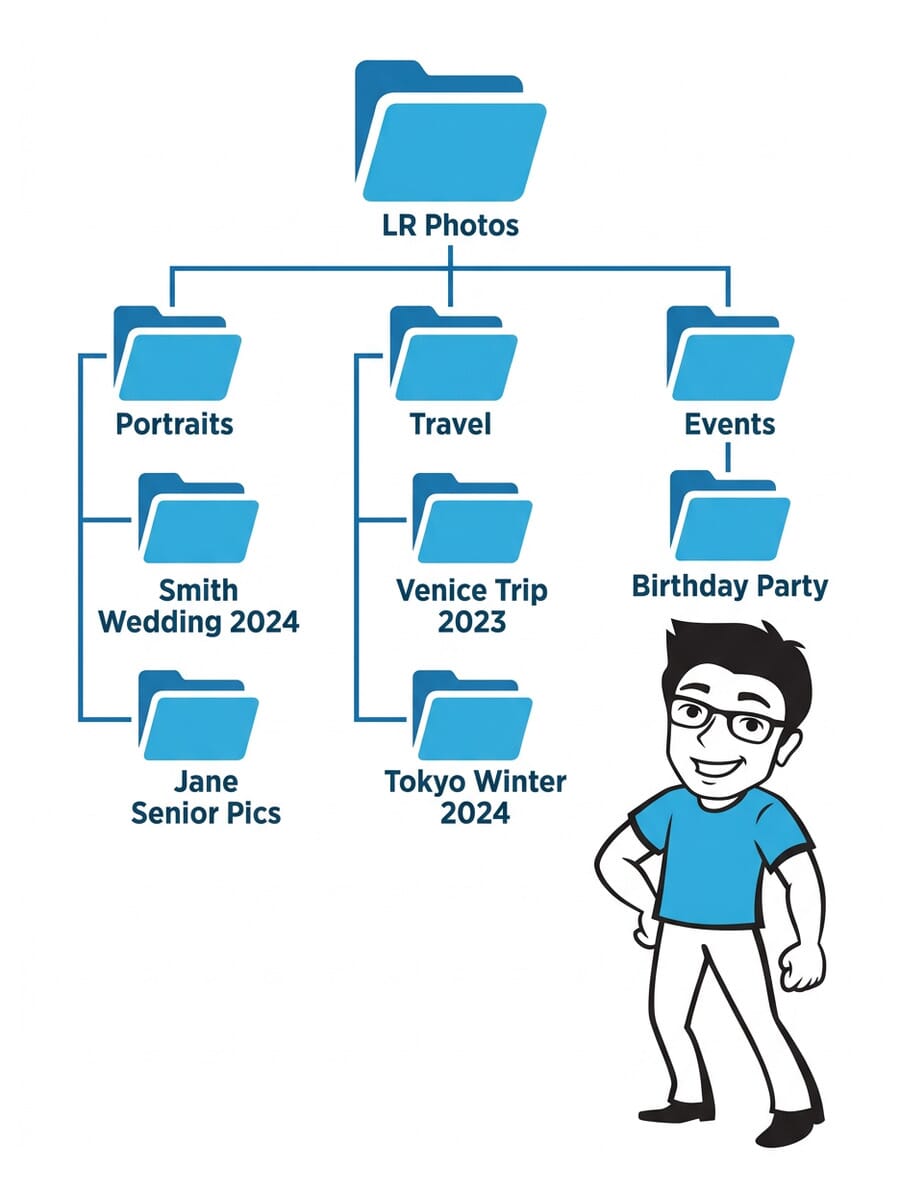
Start with One Root Folder
On your external drive, create a single root folder – something like “LR Photos” or “Photo Archive.” Everything lives inside this folder. This makes cloning and backing up the entire drive straightforward.
Organize by Category, Then by Shoot
Inside your root folder, create category folders that match your photography genres:
- Portraits
- Travel
- Events
- Product
- Personal
Inside each category, create one folder per shoot with a descriptive name: “Smith-Wedding-June-2024” or “Tokyo-Street-Photography-March-2025.” Avoid vague names like “Photos” or “New Folder.”
Pro tip: Don’t organize folders by date alone. While Lightroom lets you filter by date (Library > Filter Bar > Metadata > Date), a category-based structure is far more intuitive when you need to find something quickly.

Never Move Files Outside Lightroom
Once you’ve imported photos into Lightroom Classic, never rename or move files using your operating system’s file browser. Lightroom tracks file locations in its catalog. If you move a file outside of Lightroom, it shows up as “missing” with a question mark icon.
If you need to reorganize, do it within Lightroom’s Library module by dragging folders in the Folders panel. Lightroom will update both the catalog references and the actual files on disk.
Collections and Collection Sets: Your Editing Workflow
Collections in Lightroom Classic (called Albums in Lightroom CC) are virtual groupings that don’t affect your actual file structure. They’re the backbone of an efficient editing workflow.
Mirror Your Folder Structure
Create Collection Sets that match your category folders (Portraits, Travel, Events, etc.). Then for each imported shoot, drag the folder into the corresponding Collection Set. This gives you a clean, organized workspace in the Collections panel.
The Three-Collection Editing System
For each shoot, create three Collections inside your Collection Set:
- Full Shoot – All imported images from the session
- Picks – Flagged images (press P to flag) that made the first cut
- Selects – Your best 4-5 star images, ready for editing and delivery
This three-tier system keeps your culling process structured. You never need to scroll through hundreds of rejects to find your final edits. Collections exist only in your Lightroom catalog – they don’t create duplicate files on your hard drive.
Photo Renaming Strategy
Camera-generated filenames like DSC_0042.NEF or IMG_7831.CR3 tell you nothing about the content. Renaming your photos makes them searchable and identifiable even outside of Lightroom.
To batch rename in Lightroom Classic:
- Select all photos in a Collection (Ctrl+A / Cmd+A)
- Go to Library > Rename Photos
- Choose Custom Name – Sequence
- Enter a descriptive name like “Smith-Wedding” – Lightroom adds sequential numbers automatically
A good naming convention includes the subject or event and optionally the date: “Colorado-Landscape-Sept2024-001.NEF” is infinitely more useful than “DSC_0042.NEF.”
Lightroom renames the actual files on disk, so this carries over to your backups too. Just make sure you rename after importing, not before.
Cloud Storage vs NAS: Which Is Right for You?

For your offsite backup (the “1” in 3-2-1), you have two main options:
Cloud Storage
- Backblaze Personal Backup (~$9/month) – Unlimited storage, backs up your entire computer + connected external drives automatically
- iDrive (~$80/year for 5TB) – Good for backing up multiple computers
- Adobe Creative Cloud Storage – Included with your Photography plan (20GB) or Lightroom plan (1TB+)
- Google One / Dropbox / OneDrive – General-purpose cloud storage that works for photo backups (note: Google Photos no longer offers unlimited storage on any plan)
Best for: Photographers who want set-and-forget offsite backup. The initial upload can take days or weeks for large libraries, but after that it’s incremental.
NAS (Network Attached Storage)
- Synology or QNAP devices with RAID configuration for redundancy
- Fast local network speeds – much faster than cloud for large file transfers
- One-time hardware cost (plus drives) vs ongoing monthly subscription
- Can sync to cloud for additional offsite protection (Synology Hyper Backup, for example)
Best for: Photographers with large libraries (1TB+) who want fast local access and are comfortable with a bit of technical setup. A NAS with cloud sync gives you the best of both worlds.
If you’re looking for reliable external storage to pair with your backup strategy, check our guide to the best external hard drives and SSDs for photographers.
Smart Previews: Edit Without Your Drives Connected
Smart Previews are compressed DNG copies of your photos that Lightroom Classic can generate during import. They let you browse and even edit your entire library without having your external drives connected.
To build Smart Previews:
- During import, check “Build Smart Previews” in the import dialog
- Or select photos in the Library module and go to Library > Previews > Build Smart Previews
Smart Previews are stored inside your catalog’s data folder and are much smaller than the originals (roughly 1-2MB each vs the full RAW file). They’re not a replacement for backing up your originals, but they add a layer of resilience. If a drive fails, you still have low-resolution copies of every image plus all your edits intact.
When you reconnect the original drive, Lightroom seamlessly switches back to the full-resolution files and applies any edits you made using Smart Previews.
Drive Syncing: Keeping Backups Current
Having a second backup drive is only useful if it’s kept up to date. Manually copying folders is error-prone and tedious. Instead, use dedicated sync software:
- Mac: Carbon Copy Cloner or ChronoSync – both support scheduled, incremental cloning
- Windows: FreeFileSync (free) or SyncBack – reliable folder mirroring tools
- Cross-platform: rsync (command line) – powerful and free, though less user-friendly
Set up a sync schedule that matches your shooting frequency. If you shoot daily, sync daily. If you shoot once a week, sync weekly. The key is consistency – a backup from six months ago won’t save you from a drive failure that happened yesterday.
Sync tip: These tools only copy new and changed files, so after the initial clone, syncs are fast. A typical weekly sync for a photographer who shoots 500-1000 photos per week takes just a few minutes.
Should You Use Keywords? It Depends
Keywording is a polarizing topic among photographers. Some swear by it; others consider it a waste of time. Here’s when it makes sense:
- Stock photographers: Keywords are essential – they’re how buyers find your images
- Large archives (50,000+ images): Keywords help you find specific photos years later
- Client work: Basic keywords (client name, event type) help with organization
And when it probably doesn’t:
- Hobbyists with a solid folder/Collection system: Your category structure already does the job
- Small libraries: If you can find any photo within 30 seconds using Collections, keywords add overhead without much benefit
If you do keyword, keep it simple. Use broad terms (landscape, portrait, wedding, urban) rather than trying to tag every detail. Lightroom’s AI-powered search (available in newer versions) can identify subjects and scenes automatically, reducing the need for manual tagging. For more on organizing your editing workflow in Photoshop, we have a separate guide.
Your Lightroom Backup Checklist
Here’s a quick-reference checklist to make sure your backup system is solid:
- Photos stored on an external drive (not your laptop’s internal storage)
- Second copy of photos on a separate backup drive, synced regularly
- Cloud backup running (Backblaze, iDrive, or similar)
- Lightroom catalog backup set to “Every time Lightroom exits” or “Once a day”
- Catalog backups stored on a different drive than the working catalog
- “Automatically write changes into XMP” enabled in Catalog Settings
- Smart Previews built for your full library
- Descriptive folder names (category > shoot name)
- Photos renamed with meaningful custom names
- Old catalog backups cleaned up periodically
If you’re building or upgrading your editing setup, make sure you have enough processing power to handle Lightroom smoothly – our guide to the best desktops for photo editing can help, and proper monitor calibration ensures your edits look consistent across devices.
Test Your Lightroom Backup Knowledge
Think you’ve got the backup basics down? Take this quick quiz to test what you’ve learned:
Frequently Asked Questions
Does Lightroom’s built-in backup save my photos?
No. Lightroom’s built-in catalog backup only saves the catalog file (.lrcat), which contains your edits, metadata, and organizational data. Your actual photo files need a separate backup – use the 3-2-1 rule with external drives and cloud storage.
Is Lightroom CC automatically backed up to the cloud?
Yes, if you’re using Lightroom CC (the cloud-based version), your full-resolution photos sync to Adobe’s servers automatically. However, you should still keep a local copy of your originals. Adobe’s terms of service don’t guarantee perpetual storage, and if you cancel your subscription you lose access after a grace period.
Should I enable XMP sidecar files in Lightroom Classic?
Yes, for most photographers it’s worth enabling. XMP files save your develop settings alongside your RAW files, so if your catalog ever gets corrupted, you can recover your edits by re-importing the photos. The slight performance trade-off is worth the safety net.
How often should I back up my Lightroom photos?
Back up after every major shoot or at least once a week. Set your catalog backup to run every time Lightroom exits (or daily). Use sync software to keep your backup drives current, and let cloud backup run continuously in the background.
Can Smart Previews replace a proper backup?
No. Smart Previews are compressed, lower-resolution copies meant for offline editing convenience. They’re not a substitute for backing up your full-resolution original files. Think of them as an extra safety layer, not your primary backup.
Featured image: Photo by Jakub Zerdzicki on Unsplash.
Tip: Before updating to Lightroom Classic 15.2, always back up your catalog first — the new AI culling model will recalculate existing scores.
