
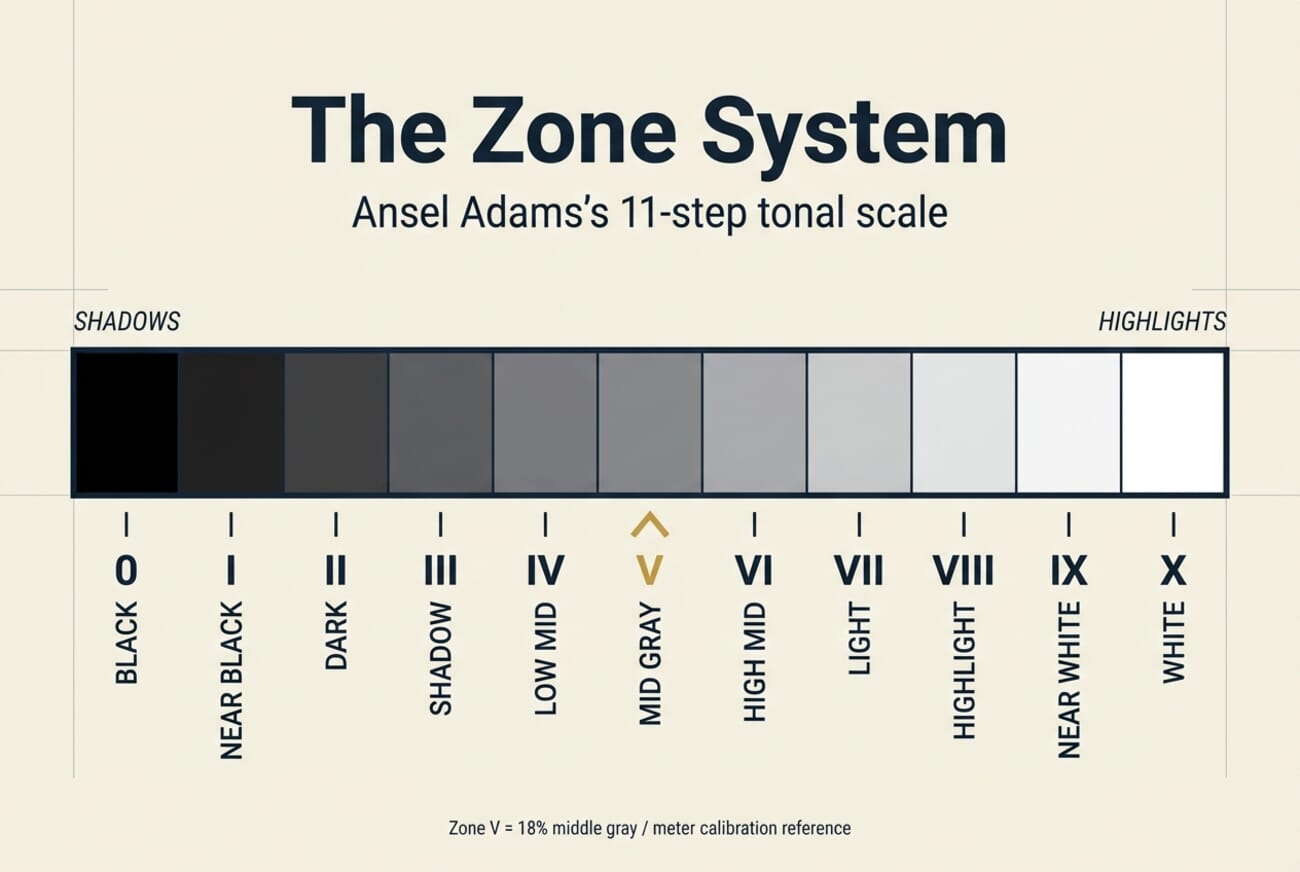
- The Zone System divides the tonal range of a scene into 11 zones (0 through X), from pure black to pure white — giving photographers a language for thinking about exposure in terms of rendered tone rather than just meter readings.
- Ansel Adams and Fred Archer built it for large-format black-and-white film in the 1940s, but the mental model transfers directly to digital: the histogram is the modern zone meter, and the RAW file is the modern negative.
- Zone V is the reference — 18% middle gray. Everything a camera meter reads is calibrated around Zone V by default, which is why pure white subjects underexpose and pure black subjects overexpose without compensation.
- ETTR (Expose To The Right) is the Zone System applied to digital: push the histogram as far right as possible without clipping highlights, then recover shadows in post. It produces cleaner shadow detail than exposing for middle gray.
- Digital Zone System mastery pays off most in black-and-white conversions. Lightroom’s and Capture One’s B&W panels let you remap each original color channel to a specific target zone, giving direct control over how the world renders in monochrome.
- The Zone System isn’t obsolete in the age of AI metering — it’s the antidote to it. AI metering decides for you; Zone thinking decides deliberately. The two tools answer different questions.
The Zone System is the most practical mental model ever built for thinking about exposure. It was developed by Ansel Adams and Fred Archer in the 1940s for large-format black-and-white film, and it survives intact because the fundamental problem it solves — how to deliberately translate a real-world scene into a specific rendered tonal range — is the same problem every photographer still faces, whether the medium is 4×5 sheet film or a 60-megapixel mirrorless sensor.
This guide walks through the system in modern terms: what the 11 zones are, how to read a digital histogram as a zone meter, how to apply ETTR and modern aperture-priority workflows on current mirrorless bodies, and how the zone framework becomes especially powerful for black-and-white digital conversions in Lightroom and Capture One. It closes with the one question competitors won’t answer directly: is the Zone System still relevant now that cameras have AI-driven metering? (Short answer: yes, but for different reasons than in 1950.)
What Is the Zone System?
The Zone System divides the full tonal range a photograph can record into 11 discrete zones, numbered with Roman numerals from 0 (pure black, no detail) to X (pure white, no detail). Each zone represents approximately one stop of exposure — moving up one zone doubles the light; moving down halves it. Zone V sits in the middle: 18% reflective gray, the tone every conventional camera meter is calibrated to produce.
Ansel Adams and Fred Archer, teaching together at the California School of Fine Arts in 1940, built the system to address a specific frustration of the film era: a photographer could meter a scene, expose according to the meter, develop the negative “normally,” and still end up with results that didn’t match what they saw. The meter read everything as Zone V, regardless of whether the subject was a snowbank (should render as Zone VIII) or a black cat (should render as Zone II). Exposing “as metered” therefore produced gray snow and gray cats. The Zone System fixed this by teaching photographers to previsualize — decide in advance which zone each important subject area should render as, then meter + expose + develop to make it so.
The genius of the system isn’t the 11-step scale. The scale is just a vocabulary. The genius is the discipline of thinking about exposure in terms of rendered tone — asking “how bright should this snow actually look in the final print?” before asking “what does my meter say?” That discipline transfers directly to digital, and it’s exactly what separates deliberate photographers from photographers who are basically letting the camera guess.
The 11 Zones, Explained in Plain English
Each zone has a classic subject it’s associated with, which makes the scale easier to internalize than a raw number scale would be:
- Zone 0 — pure black, no detail. The print substrate at its darkest. Deep shadow inside a cave with no secondary light.
- Zone I — near black with the faintest hint of texture. Night sky away from city light.
- Zone II — dark, some detail. Black fabric in shade, wet asphalt at night.
- Zone III — shadow with clear detail. Dark foliage in open shade. The shadow zone you want to preserve detail in.
- Zone IV — low midtone. Dark skin, dark green grass under direct sun.
- Zone V — 18% middle gray. The meter’s reference value. Average-tone skin, weathered wood, green grass.
- Zone VI — high midtone. Average light skin in sunlight, a gray sidewalk in shade.
- Zone VII — light, full detail. Pale skin in sunlight, weathered white-painted wood. The highlight zone you want to preserve detail in.
- Zone VIII — bright highlight, minimal texture. White shirts in direct sun, snow in open light.
- Zone IX — near white, texture barely visible. Specular highlights, sunlit snow fields.
- Zone X — pure white, no detail. Direct reflections of the sun, sky near the sun, bare light sources.
The mental shortcut every Zone System practitioner learns: Zones III and VII are the endpoints of “full detail.” Below Zone III, shadow detail is lost. Above Zone VII, highlight texture starts crushing. Those two zones define the working range a photographer has to fit every important subject area into.
The Zone System for Digital Photography in 2026
The film-era Zone System required testing your specific film + developer combination to determine its exposure index and development times. Digital removes that testing step entirely — a modern RAW file’s response curve is standardized, and a well-exposed RAW can be pushed or pulled in post without the penalty film paid for similar moves. What survives intact is the thinking. A photographer who can look at a scene and say “I want the sky at Zone VII and the foreground rocks at Zone III” has more exposure control than one who points the camera and shoots.
The Histogram Is the Modern Zone Meter
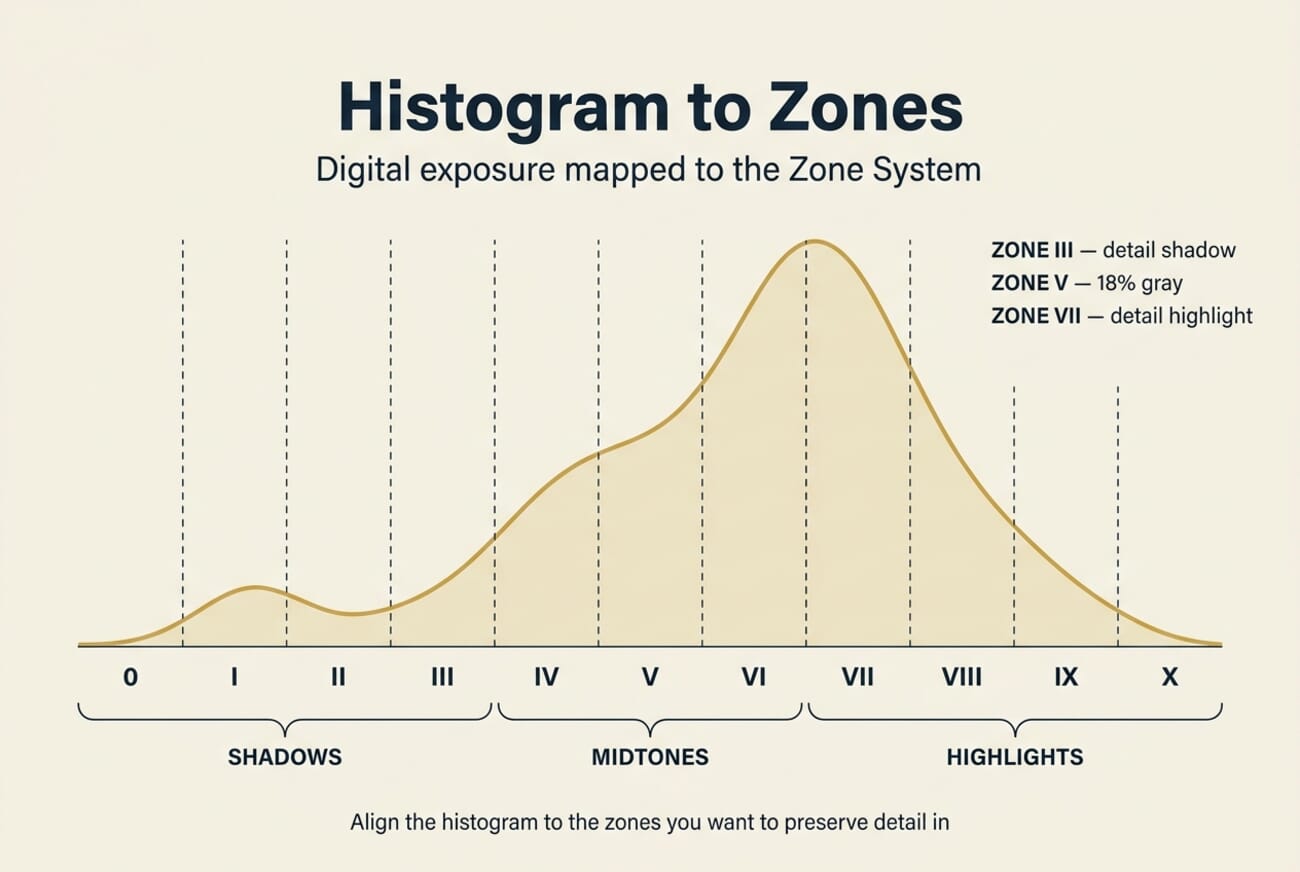
On a digital camera, the luminance histogram is the direct visualization of the Zone System. A histogram’s horizontal axis runs from Zone 0 on the left to Zone X on the right; the vertical axis shows how much of the frame falls into each tonal zone. Modern mirrorless bodies — Sony’s Alpha 7 V, Fujifilm’s X-T5, Nikon’s Z8, Canon’s R5 Mark II — all display a live histogram in the electronic viewfinder, meaning you can literally watch the zones shift in real time as you change aperture, shutter speed, or ISO. That’s a capability no film photographer ever had, and it turns exposure from guesswork into a direct visual check.
Practical rules for reading a histogram as a zone meter:
- Data piling against the left edge means Zone 0 is clipped. Shadow information is gone.
- Data piling against the right edge means Zone X is clipped. Highlight information is gone — and unlike clipped shadows, clipped highlights can’t be recovered from RAW.
- A well-exposed digital frame typically fills the histogram from roughly Zone II to Zone VIII, with no clipping on either end.
- The histogram is drawn from the JPEG preview, not the RAW file. There is typically ~2/3 stop of additional headroom in the RAW above what the histogram shows as clipping — useful for ETTR (see below).
Expose to the Right (ETTR): The Digital Zone System in One Technique
ETTR — “Expose To The Right” — is the modern embodiment of Zone System thinking. The principle: a digital sensor records the most information in the brightest stops it captures, because the linear sensor response means each successive stop holds roughly double the data of the one below it. Pushing the histogram as far right as possible (without clipping highlights) therefore maximizes the data captured for the scene, with the practical effect of cleaner, less noisy shadows after you pull them down in post.
The ETTR workflow, in three steps:
- Meter normally, then add exposure compensation (usually +⅓ to +1 stop) until the brightest important highlight sits just at the right edge of the histogram — but not over it. Watch the zebras or highlight-clipping overlay if your camera has one (Sony’s Zebra at 100%+, Fujifilm’s clipping highlights warning, Canon’s AF highlight alert).
- Shoot RAW. This is non-negotiable — ETTR on JPEG wastes the technique because JPEGs are 8-bit and have already committed to a specific tonal curve.
- In post, pull exposure back down by the amount you compensated up. Shadows will have markedly less noise than a normally-exposed shot of the same scene.
ETTR is most valuable in scenes with wide dynamic range where you know you’ll want to lift shadows — landscapes at golden hour, low-light interiors, astrophotography, wedding reception rooms. It’s less useful for scenes with important highlight detail that’s at the edge of clipping (studio strobes on white backgrounds, bright snow fields) because any miscalculation sends you into hard clipping — which is permanent.
Live Tools on Modern Mirrorless Bodies
Current-generation mirrorless cameras make Zone System thinking faster than it ever was on film or early DSLRs. The key tools to enable in the menu:
- Live histogram in the viewfinder — watch the zones update as you recompose or change settings. Available on Sony Alpha (menu: Display Rotation → Histogram), Fujifilm X-series (DISP BACK button cycles through info overlays), Nikon Z (info display), Canon R (INFO button cycle).
- Zebras / highlight-clipping alert — a striped overlay on image areas that are clipped or near-clipped. Sony calls them Zebras (set the threshold to 100%+ for clip detection); Fujifilm and Canon call it Highlight Warning. Use it to detect Zone X intrusions before pressing the shutter.
- Spot meter + AEL lock — meter a specific area (Zone V reference), lock that reading with AEL, then recompose. This is the digital equivalent of the spot meter reading a single gray card on a film set.
- Exposure simulation preview — the EVF shows what the final exposure will look like at current settings. Makes previsualization immediate rather than imaginative.
On the Sony Alpha 7 V specifically, enabling Highlight Weighted Metering (under Exposure menu) gives you a metering mode that biases toward protecting highlights — effectively a one-click ETTR assistant. Fujifilm’s X-T5 has a similar Center-Weighted Highlight-Priority metering via its dedicated metering dial. Both are purpose-built for Zone System photographers who want the camera’s automation working with them rather than averaging their decisions away.
The Zone System in the Field: A Practical Workflow
Here’s the workflow a Zone-System-literate photographer runs through on a typical scene, using a modern mirrorless body:
- Previsualize. Look at the scene and decide what each important subject area should render as. Sky → Zone VII. Skin → Zone VI. Dark foliage → Zone III. This takes 3 seconds once you’ve internalized the zones.
- Spot-meter the reference. Pick one subject area you want at a specific zone — say, skin at Zone VI. Switch to spot metering, meter that area, note the reading.
- Apply zone compensation. The meter always reads Zone V. If you want skin at Zone VI (one stop brighter than the meter assumes), add +1 stop of exposure compensation. If you want snow at Zone VIII (three stops brighter), add +3 stops.
- Verify with the histogram. After the exposure compensation, check the live histogram. Are the shadows down at Zone II–III (should be) and highlights up at Zone VII–VIII (should be) without clipping either end? If yes, shoot.
- Check zebras. One final glance to confirm no highlight areas you care about are in the clipping-alert overlay.
- Shoot RAW. Always. RAW preserves the zone flexibility for post-processing.
For high-contrast scenes that exceed the sensor’s dynamic range — roughly more than 10 stops between the brightest highlight and the deepest shadow you want to preserve — the Zone System’s old answer was exposure-and-development variation (“N-1” or “N+2” developing). The modern digital equivalent is bracketing and blending in post or using a graduated ND filter in the field, then restoring zone relationships in Lightroom or Capture One’s tone curve.
The Zone System Meets Black-and-White Digital Conversion
This is where the Zone System earns its keep in 2026. Black-and-white digital conversion — whether from a color RAW in Lightroom/Capture One or shot directly on a monochrome-only body like the Ricoh GR IV Monochrome — requires exactly the skill the Zone System teaches: deciding in advance what tonal value each element of the scene should have in the final image.
In a color image, tonal decisions are partially automatic — green foliage reads as a specific gray in monochrome conversion depending on how the conversion algorithm maps the color. The Zone System turns that from automatic to deliberate: you decide which color should map to which zone, then use Lightroom’s HSL/B&W panel or Capture One’s Black & White tool to implement the mapping.
Lightroom B&W Workflow
- Open the RAW in Lightroom Classic 15.2. In the Basic panel, set Treatment to Black & White.
- Open the B&W panel (below HSL when Black & White is selected). Each of the 8 color sliders — Red, Orange, Yellow, Green, Aqua, Blue, Purple, Magenta — controls how its original hue maps to a monochrome zone.
- For a classic landscape conversion: push Blue to −50 (darkens the sky to ~Zone IV–V), Orange to +30 (brightens skin and warm rocks to ~Zone VI–VII), Green to −20 (nudges foliage toward Zone III–IV).
- Use the Targeted Adjustment Tool (the small circle icon, top-left of the B&W panel) to drag directly on areas of the image — it auto-detects the dominant color under your cursor and adjusts the correct slider. Much faster than guessing.
- Finish with the Tone Curve to place shadows and highlights at the exact zones you previsualized at capture.
Capture One B&W Workflow
- In the Color tool tab, enable the Black & White tool. Six color sliders for zone mapping (Red, Orange, Yellow, Green, Cyan, Blue), plus a separate Split Tone panel if you want subtle color overlays.
- Capture One’s B&W tool is more aggressive than Lightroom’s — smaller slider moves produce larger tonal shifts. Start with ±20 ranges, not ±50.
- Use the Levels tool (not Curves) to set the black and white endpoints precisely at Zone 0 and Zone X. Capture One’s Levels has a reliable auto-black-point detector.
- For film-emulation looks, layer a Film Styles preset on top — Capture One’s built-in ones approximate Tri-X, HP5, and Delta 100 tonal responses surprisingly accurately.
Both workflows converge on the same Zone System outcome: deliberate placement of each original subject area at a specific final monochrome zone. That deliberate placement is what distinguishes a Zone-System-aware B&W conversion from a “desaturate and move on” conversion — and it’s visible in the final image.
Frequently Asked Questions
Is the Zone System still relevant now that cameras have AI metering?
Yes, but for a different reason than in 1950. AI metering modes on current mirrorless bodies (Sony AI-AF metering, Canon EOS iTR AF + iSA, Nikon 3D color matrix metering III) are extraordinarily good at producing a technically-acceptable exposure — they’ll protect highlights, lift shadows, and center the histogram intelligently based on scene recognition. What they can’t do is know your creative intent. If you want the shadow under a subject’s hat to render as Zone II (moody, near-black) rather than Zone IV (opened-up, detailed), AI metering doesn’t have that information. The Zone System is the language for communicating that intent to the camera — and to yourself when reviewing images later. Think of AI metering as a strong default and Zone thinking as deliberate override.
Do I need a handheld meter to use the Zone System on digital?
No. The camera’s spot meter plus the live histogram replaces the handheld meter for 95% of Zone System applications. Handheld meters remain useful for controlled studio work where you want incident rather than reflected readings, and for flash measurement (where cameras don’t help), but for normal field photography the built-in tools are sufficient.
What’s the fastest way to internalize the 11 zones?
Pick one hour a week for a month. Walk around with your camera, meter a specific subject area, and before looking at the histogram, predict out loud which zone it’ll render as. Then check. After 30–40 reps the zones become second-nature — exactly like how photographers eventually internalize what f/2.8 vs f/8 looks like without consciously calculating.
How does ETTR interact with the Zone System?
ETTR is the Zone System applied to digital’s technical characteristics. In classic film Zone System, the goal was to place Zone III at a specific shadow-detail point and let the highlights fall where they fell (adjusting development to control highlight density). In digital ETTR, you place the brightest important highlight at Zone VIII or IX (as far right as possible without clipping Zone X), and let the shadows fall where they fall — then lift them in post, where digital has more flexibility than film ever did. Same framework, different endpoint anchor.
Does the Zone System apply to color photography?
Yes — the zones describe luminance, which is independent of color. Green foliage at Zone IV has the same tonal value as a gray rock at Zone IV, just a different hue. The Zone System in color works exactly the same as in B&W up until the post-processing stage, where color adds another dimension of decisions. Ansel Adams himself wrote very little about color Zone System because he shot almost exclusively monochrome, but the framework is hue-agnostic.
Bottom Line
The Zone System is not a historical curiosity. It’s the most durable mental model in photography — a language for thinking about exposure in terms of rendered tone rather than meter math — and modern mirrorless cameras plus RAW-aware post-processing make it faster to apply than it ever was on film. The investment is a few weeks of practice spot-metering real scenes and predicting zones before checking the histogram. The payoff is the difference between photographers who know what their images are going to look like before they press the shutter, and photographers who are deferring that decision to a camera’s default algorithm. In an era where AI metering is getting very good at producing acceptable defaults, knowing the zones is what keeps you in charge of your own work.
Image credit: editorial concept photography and Zone System infographics by PhotoWorkout.
References and further reading on the Zone System and its digital application:
Foundational Works
- Adams, Ansel — The Negative (Book 2 of The Camera, The Negative, The Print) – The canonical Zone System reference, originally published 1948
- Archer, Fred R. & Adams, Ansel — Exposure Record (1940 California School of Fine Arts teaching notes) – Original co-development of the Zone System at CSFA
Digital Application
- Reichmann, Michael — Expose to the Right (Luminous Landscape) – The canonical ETTR reference that translated Zone System thinking into digital workflow
- Adobe Lightroom — Black & White panel documentation – Official Lightroom B&W conversion reference
- Capture One — Black & White tool documentation – Capture One's B&W conversion workflow
Manufacturer Metering Documentation
- Sony Alpha 7 V — Exposure metering modes guide – Highlight Weighted Metering and spot meter details
- Fujifilm X-T5 — Photometry / metering documentation – Center-weighted highlight-priority metering


