
- A light meter measures the intensity of light to help you determine the correct exposure settings (aperture, shutter speed, ISO).
- Every camera has a built-in reflective meter — learn to read the exposure indicator bar and use exposure compensation to override it.
- Incident meters (handheld) measure light falling on the subject and give more accurate readings than reflective meters, especially in tricky lighting.
- Modern mirrorless cameras use AI-driven metering that tracks subjects and adjusts exposure in real time — a huge leap over traditional matrix metering.
- Dedicated handheld meters are still essential for studio strobes, film photography, and cinematography where in-camera metering falls short.
- Smartphone light meter apps work surprisingly well for ambient light readings, but they can’t meter flash or strobe light.
When you buy through links on our site, we may earn a commission at no cost to you. We evaluate products independently. Commissions do not affect our evaluations.
What Is a Light Meter?
A light meter is a device that measures the intensity of light in a scene and translates that measurement into camera settings — specifically aperture, shutter speed, and ISO. These three settings form the exposure triangle, and getting them right is the difference between a properly exposed photograph and a washed-out or muddy one.
Every digital camera has a light meter built in. It’s the system that powers your camera’s auto exposure and semi-automatic modes. But understanding how that meter thinks — and when it gets fooled — is what separates photographers who consistently nail exposure from those who rely on luck and Lightroom sliders.
Light meters come in two fundamental types: the reflective meter inside your camera, and the incident meter found in handheld devices. Each measures light differently, and knowing when to use which one is a core photography skill.
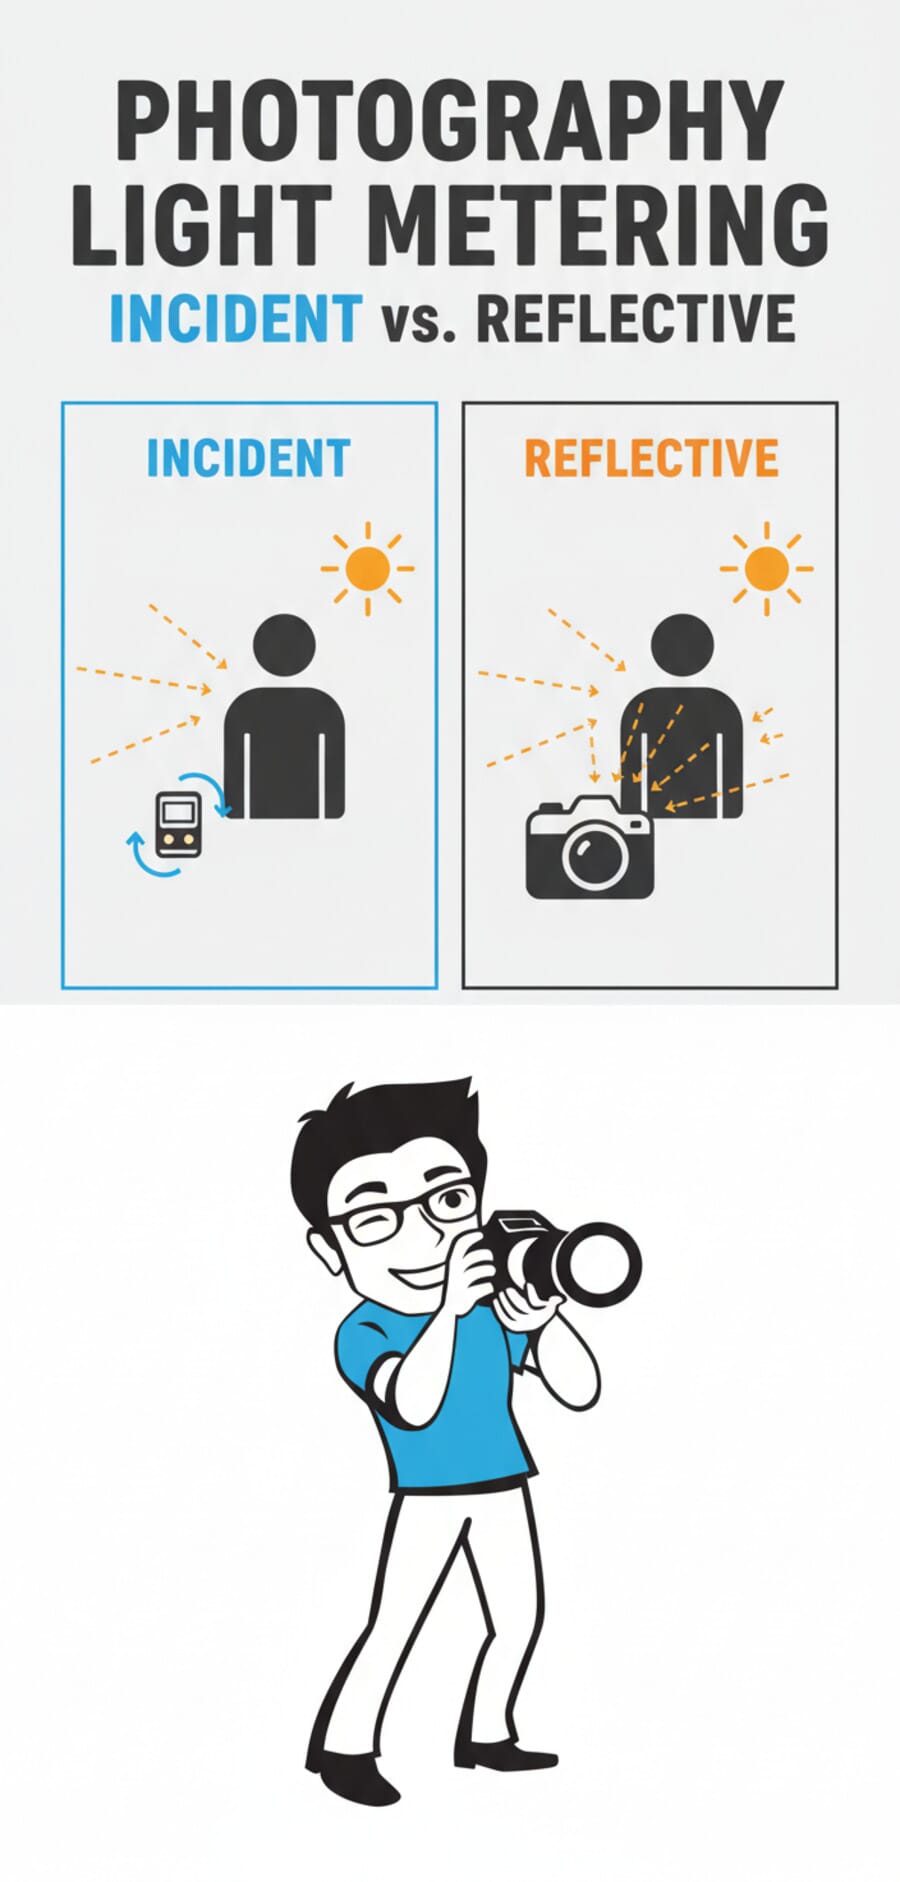
Types of Light Meters: Incident vs Reflective
This is the most important distinction in metering, and it trips up photographers for years. Here’s the difference:
Reflective Metering
A reflective meter measures light bouncing off your subject back toward the camera. This is what your camera’s built-in meter does — it reads the light reflected from whatever you’re pointing at.
The problem? Reflective meters assume everything is middle gray (18% reflectance). Point your camera at a snow-covered field, and the meter thinks it’s looking at a gray scene that’s too bright. It underexposes, turning white snow into dingy gray. Photograph a black cat on a dark couch, and the meter overexposes, trying to brighten everything to middle gray.
As Rosanne Olson explains in ABCs of Beautiful Light, you can work around this by metering off an 18% gray card placed in the same light as your subject — the gray card gives the reflective meter exactly what it expects.
Incident Metering
An incident meter measures the light falling on the subject, not the light reflecting off it. You hold the meter at the subject’s position, point the white dome (lumisphere) toward the camera, and take a reading.
Because incident meters measure the light source directly, they aren’t fooled by how bright or dark the subject is. A white wedding dress and a black tuxedo in the same light will produce the same incident reading — and both will be correctly exposed.
When to Use Which
- Reflective metering — Best for landscapes, wildlife, and any situation where you can’t walk up to your subject. Also the only option when shooting with your camera’s built-in meter.
- Incident metering — Best for portraits, studio work, product photography, and any controlled lighting setup. Gives more consistent results across varying subject tones.
In-Camera Metering Modes Explained
Your camera’s reflective meter doesn’t just take one reading — it can analyze the scene in different ways depending on the metering mode you select. Here are the main options:

Matrix / Evaluative Metering
Matrix metering (Nikon) or evaluative metering (Canon) divides the entire frame into a grid of zones and analyzes brightness, color, and distance across all of them. The camera then compares the pattern against a database of thousands of common scenes to determine exposure.
This is the default mode on most cameras and works well for evenly-lit scenes, landscapes, and general shooting. It struggles with high-contrast scenes where the subject is much brighter or darker than the background.
Center-Weighted Metering
Center-weighted metering reads the entire frame but gives roughly 60-80% of the weight to the central area. It’s more predictable than matrix metering because it doesn’t use scene-recognition algorithms — the behavior is consistent and easy to compensate for.
Many experienced photographers prefer center-weighted metering precisely because of this predictability. Once you learn how it responds, you can quickly dial in exposure compensation without guessing what the camera’s AI is doing.
Spot Metering
Spot metering reads only a tiny area of the frame — typically 1-5% of the viewfinder, centered on your focus point or the center of the frame. It’s the most precise metering mode and gives you surgical control over exposure.
Use spot metering when your subject is backlit, when there’s extreme contrast in the scene, or when you need to meter a specific tone. For example, spot-meter a person’s face in a silhouette scenario to expose for the face rather than the bright background.
Highlight-Weighted Metering
Highlight-weighted metering prioritizes preserving highlights — it exposes to prevent blowing out the brightest parts of the scene. This mode is particularly useful for stage performances, spotlit subjects, and any situation where clipped highlights would ruin the shot.
AI-Based Metering in Modern Mirrorless Cameras
The latest generation of mirrorless cameras has dramatically improved metering by integrating it with subject detection AI:
- Sony Real-Time Tracking metering — Sony’s latest Alpha bodies (A7RV, A9III, A1II) can link metering to their real-time subject tracking. When the camera locks onto a face or eye, it biases exposure for that subject regardless of background brightness.
- Canon EOS R intelligent metering — Canon’s R-series cameras use deep learning to detect subjects and scenes, adjusting metering weight toward recognized subjects. The R5 II and R1 take this further with improved face/eye-priority metering.
- Nikon subject-detection metering — Nikon’s Z8 and Z9 integrate their 3D tracking with metering, maintaining proper exposure even as subjects move across the frame.
These AI-driven systems are a genuine leap forward. They handle scenarios like backlit portraits and spotlit performers that would have tripped up traditional matrix metering.
How to Use Your Camera’s Light Meter
Here’s a step-by-step guide to reading and using your camera’s built-in meter effectively:
Step 1: Find the Exposure Indicator
Look through your viewfinder or at your LCD. You’ll see an exposure indicator bar — a scale that typically runs from -3 to +3 with a center zero point. When the indicator is at zero, the camera considers the scene correctly exposed based on its metering.
Step 2: Choose Your Metering Mode
For most situations, start with matrix/evaluative metering. Switch to spot metering when you need precise control — backlit subjects, stage performances, or high-contrast scenes.
Step 3: Half-Press to Meter
In any auto or semi-auto mode (P, A/Av, S/Tv), half-pressing the shutter activates the meter and locks in a reading. The exposure indicator updates to show where the camera thinks exposure sits.
Step 4: Read and Adjust
If the indicator shows 0 but you know the scene needs different treatment:
- Bright subjects (snow, white walls) — Dial in +1 to +2 stops of exposure compensation to keep them bright
- Dark subjects (black fabric, night scenes) — Dial in -1 to -2 stops to keep them dark
- Backlit subjects — Use +1 to +1.5 stops, or switch to spot metering on the subject’s face
Step 5: Use Exposure Lock (AE-L)
The AE-L button (auto exposure lock) lets you lock a meter reading, then recompose without the exposure changing. This is essential when your subject isn’t centered:
- Point the camera at what you want to meter (e.g., a face)
- Half-press to meter, then press AE-L to lock
- Recompose your shot
- Take the photo with the locked exposure
Step 6: Check the Histogram
After shooting, check your histogram. It’s the most reliable way to verify exposure. A well-exposed image shows data spread across the histogram without being crushed against the left (underexposed) or right (overexposed) edges.
Handheld Light Meters

While in-camera meters handle most situations, there are times when a dedicated handheld light meter is the better tool. Here’s when and how to use one.
When to Use a Handheld Meter
- Studio strobes and flash — Your camera’s meter can’t read a flash burst before it fires. A handheld meter with flash metering capability measures the strobe output directly.
- Film photography — Film can’t be reviewed instantly. Getting exposure right in-camera matters more, and incident readings are more reliable than reflective ones for film.
- Cinematography — Video shooters need consistent exposure across scenes. Handheld meters ensure lighting ratios stay constant.
- Lighting ratio measurement — When setting up multiple lights, a handheld meter lets you measure each light independently to control contrast ratios.
How to Take an Incident Reading
- Set your meter to incident mode (white lumisphere extended)
- Set the ISO to match your camera or film
- Hold the meter at the subject’s position
- Point the lumisphere toward the camera (not toward the light source)
- Press the measure button
- Read the suggested aperture/shutter speed combination and set your camera accordingly
How to Take a Reflective (Spot) Reading
- Set your meter to reflective/spot mode
- Point the meter at your subject from the camera position
- Aim at a midtone area (skin, green grass, gray concrete)
- Take the reading and apply it to your camera
- Adjust if metering a non-midtone surface (add exposure for bright subjects, subtract for dark ones)
Recommended Handheld Light Meters
If you’re looking for a handheld meter, check out our full light meter buying guide. Here are three solid options at different price points:
- Sekonic L-308X Flashmate — Compact, affordable, handles both ambient and flash. The go-to entry-level meter for most photographers.
- Sekonic L-858D SpeedMaster — Professional-grade with wireless flash triggering, touch screen, and HSS flash metering. The choice for serious studio work.
- Kenko KFM-1100 — Budget-friendly alternative with incident and reflective metering. Solid build quality for the price.
Smartphone Light Meter Apps
Your smartphone camera sensor can double as a basic reflective light meter, and several apps do a surprisingly good job of it. Check our best light meter apps roundup for detailed reviews. Here are the top options:
Top Light Meter Apps
- myLightMeter Pro (iOS/Android) — Clean interface modeled after classic handheld meters. Shows aperture/shutter/ISO combinations and supports spot metering. One of the most accurate phone-based meters available.
- Lux Light Meter (iOS/Android) — Measures illuminance in lux and foot-candles. More useful for video/cinematography where you need absolute light level measurements.
- Lightmate (iOS) — Simple, focused on giving you quick exposure readings for film photography. Great companion for analog shooters.
When Phone Apps Are Good Enough
- Quick ambient light readings for film photography
- Scouting a location before a shoot
- Checking lighting ratios in a pinch
- Learning how light meters work (zero cost to start)
When They’re Not
- Flash metering — Phone apps can’t meter strobe/flash bursts
- Precise incident readings — Phones only do reflective metering
- Professional studio work — The margin of error is too high for critical exposures
- Low light — Phone sensors introduce noise and inaccuracy in dim conditions
When You Still Need a Dedicated Light Meter
In-camera meters and phone apps cover 90% of situations. But there are specific workflows where a dedicated handheld meter isn’t just nice to have — it’s necessary:
Studio and Strobe Photography
When working with studio strobes, your camera’s meter is blind to the flash output until the moment of exposure. A flash meter lets you measure each light independently, set precise ratios between key, fill, and rim lights, and nail exposure on the first frame.
As Rosanne Olson notes, to get an accurate strobe reading, you should turn the ambient light’s influence out of your meter reading by using a fast enough shutter speed (typically your sync speed) — this isolates the strobe’s contribution.
Film Photography
Film shooters can’t chimp — there’s no instant review to verify exposure. Getting it right in-camera is critical, especially with slide film (transparency) which has very narrow exposure latitude. A handheld incident meter takes the guesswork out of exposure for film.
Cinematography and Video
Video requires consistent exposure across shots in a scene. If the lighting changes between takes, a handheld meter provides an objective reference that doesn’t shift with camera angle or framing.
Large Format and Zone System
Photographers using the Zone System (developed by Ansel Adams and Fred Archer) rely on precise spot meter readings of individual tones in a scene. They place each tone on a specific zone and develop accordingly. This meticulous approach requires accurate, repeatable meter readings that a handheld spot meter provides.
Common Light Metering Mistakes
Even experienced photographers make these metering errors. Here’s what to watch for:
1. Metering Off the Wrong Tone
The most common mistake: pointing your camera at a bright sky or dark background when you actually want to expose for a person’s face. The meter dutifully exposes for what you pointed it at, and your subject comes out too dark or too bright.
Fix: Use spot metering on your subject, or meter and lock (AE-L) before recomposing.
2. Ignoring Dynamic Range
No meter can solve a scene that exceeds your camera’s dynamic range. If the contrast between highlights and shadows is too extreme, you’ll need to decide what to sacrifice — or use HDR techniques, fill flash, or reflectors to reduce contrast.
3. Not Using Exposure Compensation
Many photographers treat the meter reading as gospel and never touch exposure compensation. The meter is a suggestion, not a command. Scenes that are predominantly bright or dark will always need compensation.
Rule of thumb: “Expose right for light, left for dark.” Bright scenes need positive compensation; dark scenes need negative.
4. Forgetting to Reset Metering Mode
Switching to spot metering for a tricky shot and then forgetting to switch back is a classic mistake. You’ll get erratic exposures on the next 50 shots until you notice. Make it a habit to check your metering mode when you start each session.
5. Trusting the LCD Preview
Your camera’s LCD brightness setting affects how the image looks on the back of the camera. A bright LCD makes underexposed images look fine; a dim LCD makes proper exposures look dark. Always check the histogram instead of trusting the preview image.
FAQ
Do I need a light meter if I shoot digital?
For most digital photography, your camera’s built-in meter combined with histogram review is sufficient. However, if you shoot with studio strobes, work with flash regularly, or need precise lighting ratios, a handheld meter is still valuable. The ability to meter flash output independently is something no in-camera meter can do.
What is 18% gray and why does it matter for metering?
18% gray (also called middle gray) is the reflectance value that all reflective light meters are calibrated to. The meter assumes everything it reads reflects 18% of the light hitting it. This works for average scenes but fails with very bright or very dark subjects — which is why exposure compensation exists.
Which metering mode should I use for portraits?
For portraits, evaluative/matrix metering works well in even lighting. Switch to spot metering when your subject is backlit or when there’s a significant difference between subject and background brightness. Modern mirrorless cameras with face-detection metering handle portraits especially well in evaluative mode.
Can I use my phone as a light meter for film photography?
Yes, apps like myLightMeter Pro and Lightmate give reasonably accurate ambient light readings for film photography. They’re reflective meters only (like your camera’s meter), so they’re subject to the same limitations with bright/dark subjects. For critical work or slide film, a dedicated incident meter is more reliable.
How accurate are smartphone light meter apps?
In consistent ambient light, the best smartphone apps are typically within 1/3 to 1/2 stop of a dedicated meter — accurate enough for negative film and digital photography where you have some exposure latitude. They struggle in low light, can’t meter flash, and don’t offer true incident readings.
What’s the difference between spot metering and partial metering?
Spot metering reads approximately 1-5% of the frame, while partial metering covers about 8-10% (Canon terminology). Partial metering is a middle ground between spot and center-weighted — more targeted than center-weighted but more forgiving than spot. Not all cameras offer partial metering.