
- Shoot in RAW to preserve maximum dynamic range for post-processing flexibility.
- Set aperture between f/8 and f/11 for the sharpest results across most lenses.
- Use hyperfocal distance or focus stacking to keep everything sharp from foreground to horizon.
- Control shutter speed with ND filters and a tripod for creative long exposures or tack-sharp detail.
- Shoot during golden hour or blue hour — light quality matters more than any camera setting.
- Take the quiz at the end to test how well you’ve mastered the technique.
Landscape photography is one of the most rewarding genres — but it’s also one where camera settings make a massive difference. A slight change in aperture, shutter speed, or focus point can turn a flat snapshot into a frame-worthy image. For specific product recommendations, see the guide to the best filters for outdoor photography.
This guide covers every setting that matters for landscape work. Whether you’re shooting golden hour from a mountain ridge or capturing silky waterfalls with a long exposure, these techniques apply to any camera — mirrorless or DSLR, crop sensor or full frame.
Each section below focuses on a specific setting or technique, with practical recommendations you can apply immediately. The settings aren’t just theory — they’re the same approaches used by working landscape photographers to consistently produce sharp, well-exposed, emotionally compelling images.
Shoot in RAW for Maximum Flexibility
The single most important setting for landscape photography isn’t aperture or ISO — it’s your file format. Switch your camera to RAW (or RAW + JPEG if you want quick previews).
RAW files capture all the data your sensor records, giving you dramatically more latitude in post-processing. With a RAW file, you can recover blown highlights, pull detail from deep shadows, and fine-tune white balance without any quality loss. JPEG files bake in compression and processing decisions that can’t be reversed.
This matters enormously for landscapes because outdoor scenes often have extreme dynamic range — bright skies above dark foregrounds. RAW gives you the headroom to balance these exposures in software like Lightroom, Capture One, or any capable RAW converter.
- RAW advantages: 12-14 bits of data per pixel (vs. 8 bits for JPEG), lossless editing, white balance correction after the fact
- Trade-off: Larger file sizes (25-60 MB per image depending on resolution), requires post-processing
- Tip: Use the fastest memory card you can afford — large RAW files can slow down burst shooting and buffer clearing
One common concern: RAW files require editing software. But you don’t need expensive tools. Free options like darktable and RawTherapee handle RAW files from virtually every camera. Even basic adjustments — recovering a blown sky or lifting shadow detail in a dark foreground — make a dramatic difference that’s impossible to achieve with JPEG.
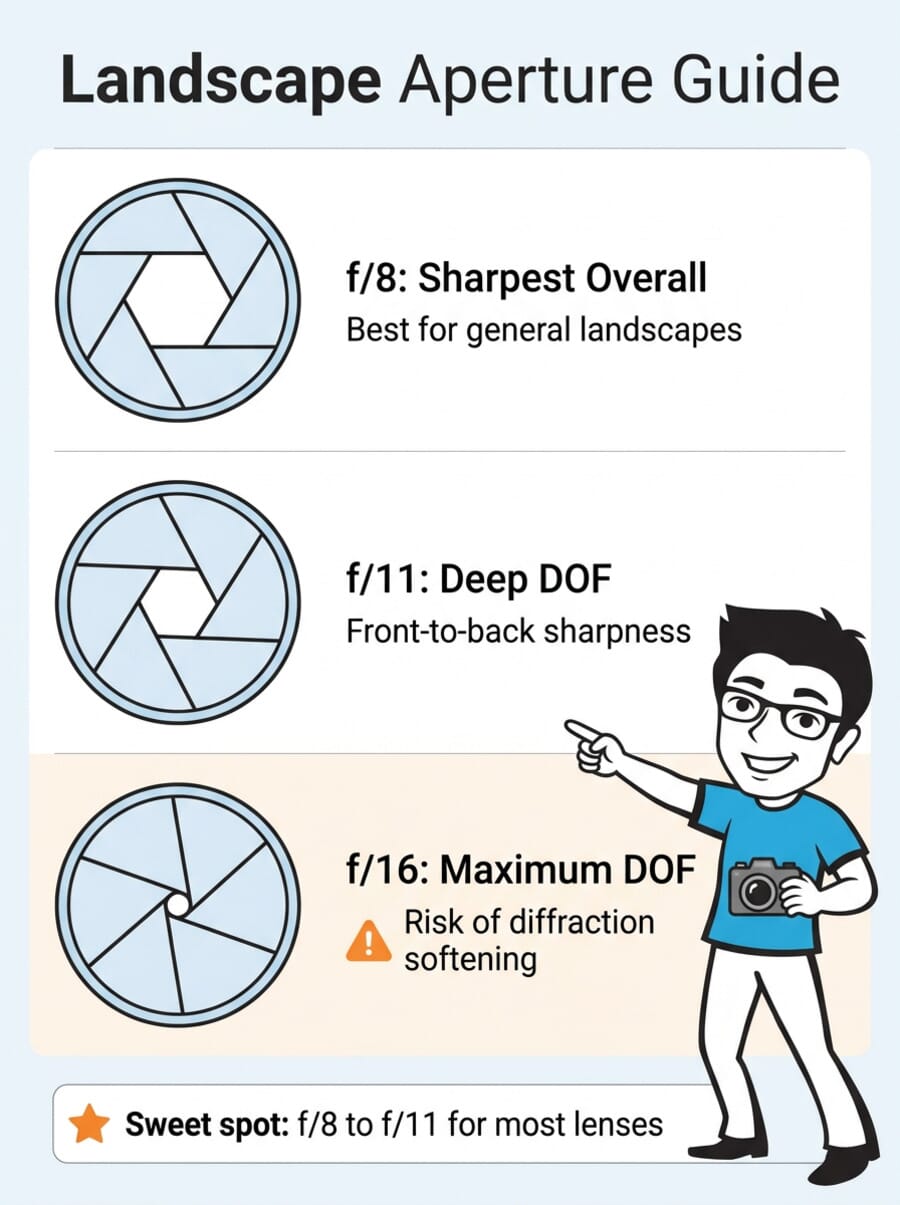
Aperture: Finding the Sweet Spot (f/8–f/16)
Aperture controls depth of field — how much of the scene appears sharp from front to back. For landscapes, you almost always want deep depth of field, which means using a narrow aperture (higher f-number).
Most lenses produce their sharpest results between f/8 and f/11. This is the optical sweet spot where lens aberrations are minimized but diffraction hasn’t started softening the image. Going narrower — f/16 or f/22 — increases depth of field but introduces diffraction, which reduces overall sharpness across the entire frame.

When to use each range:
- f/8: Best overall sharpness. Use when everything in the scene is at a similar distance (no extreme near foreground).
- f/11: Excellent balance of sharpness and depth of field. Works for most landscape situations.
- f/14–f/16: Maximum depth of field with slight diffraction trade-off. Use when you need foreground elements just a foot or two from the lens to be sharp alongside distant mountains.
- f/22+: Avoid unless intentionally creating a starburst effect on a point light source. Diffraction will noticeably soften the entire image.
Set your camera to Aperture Priority mode (A or Av) and let the camera choose shutter speed. This gives you direct control over depth of field while maintaining proper exposure. For deeper understanding of how aperture, shutter speed, and ISO interact, review the exposure triangle.
One important nuance: the sweet spot varies by lens. A high-end prime lens might be razor-sharp at f/5.6, while a budget zoom may not peak until f/8 or f/9. Check lens reviews on sites like LensTip or the-digital-picture.com for sharpness charts specific to your glass. As a safe default, f/8 to f/11 works for the vast majority of landscape lenses.
Mastering Focus: Hyperfocal Distance and Focus Stacking
Getting the entire landscape sharp requires more than just a narrow aperture — you need to focus at the right distance. Point-and-shoot autofocus often picks a subject in the middle of the frame, leaving the foreground or background soft.
Hyperfocal Distance
Hyperfocal distance is the focus distance that maximizes depth of field for a given aperture and focal length. When you focus at the hyperfocal distance, everything from half that distance to infinity falls within acceptable sharpness.
For example, with a 24mm lens at f/11 on a full-frame camera, the hyperfocal distance is roughly 1.7 meters. Focus there, and everything from about 0.85 meters to infinity will appear sharp.
How to find and use it:
- Apps: PhotoPills or HyperFocal Pro calculate hyperfocal distance for any camera, lens, and aperture combination. Enter your settings and read the distance.
- Focus peaking: Switch to manual focus and enable focus peaking in your camera’s menu. This highlights in-focus edges with a colored overlay, making it easy to nail the hyperfocal point.
- Magnified live view: Zoom into the live view display at 5x or 10x to verify critical sharpness at the focus point.
Focus Stacking
When the scene has extreme depth — a flower inches from the lens with mountains in the background — even hyperfocal distance won’t get everything sharp at a reasonable aperture. This is where focus stacking comes in.
Take multiple shots with the focus shifted from near to far, then merge them in software. Each frame captures a different depth slice, and the software combines only the sharpest portions. The result is an image with front-to-back sharpness at optimal apertures (f/8) — no need to stop down to diffraction-inducing f/22.
- In-camera focus bracketing: Many modern mirrorless cameras (Sony, Nikon Z, Fujifilm, OM System) offer built-in focus bracketing. Set the number of shots and step size, and the camera automatically shifts focus between frames.
- Manual method: Take 3-5 shots, manually adjusting the focus ring between each. Start with the nearest element and work toward infinity.
- Software: Merge the stack in dedicated focus stacking software like Helicon Focus, Zerene Stacker, or Photoshop’s Auto-Blend.
- Cameras with built-in stacking: Some cameras even composite the stack internally. Check our guide to the best focus stacking cameras for options.
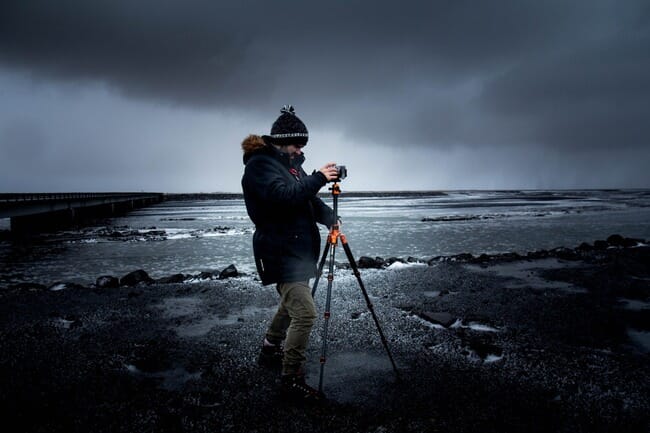
Shutter Speed: From Sharp to Silky
Shutter speed in landscape photography serves two purposes: ensuring sharp handheld shots, or creating intentional motion blur for creative effect. Your approach depends entirely on the scene.
Sharp Landscapes
For tack-sharp results without a tripod, follow the reciprocal rule: use a shutter speed at least as fast as 1/(focal length). With a 24mm lens, that means 1/30s or faster. With image stabilization, you can often go 2-3 stops slower.
For the absolute sharpest results, use a sturdy tripod and a remote shutter release or the camera’s 2-second self-timer. This eliminates camera shake entirely, letting you use any shutter speed — even multi-second exposures — without blur.
Electronic shutter vs. mechanical shutter: Electronic shutters eliminate vibration from the mirror/shutter mechanism and are completely silent. However, they can introduce rolling shutter distortion with fast-moving subjects. For static landscapes on a tripod, electronic shutter is ideal. Use electronic front-curtain shutter (EFCS) as a compromise that eliminates shutter shock while avoiding rolling shutter artifacts.
Mirror lock-up (DSLRs): If you’re using a DSLR, enable mirror lock-up or use Live View mode when shooting on a tripod. The mirror slap from a DSLR’s reflex mechanism creates micro-vibrations that can soften images at shutter speeds between 1/30s and 1 second — exactly the range landscape photographers frequently use during golden hour.
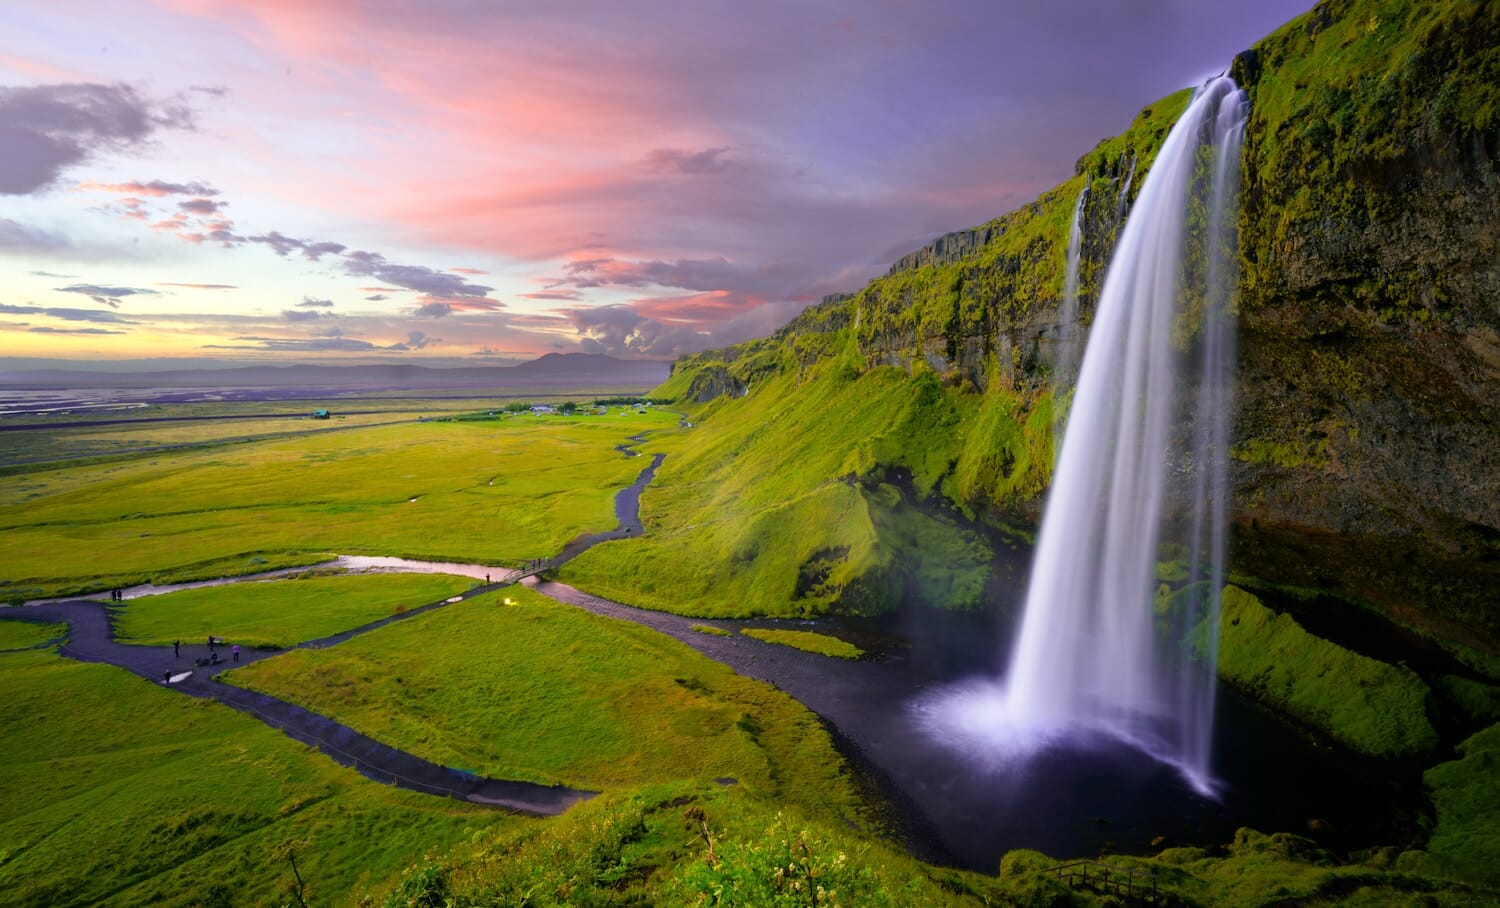
Long Exposures
Long exposures transform moving elements — water, clouds, grass — into smooth, ethereal textures. Waterfalls become silky veils. Ocean waves turn to mist. Clouds streak across the sky.
Settings for common long exposure effects:
- Silky waterfalls: 1-4 seconds at f/11-f/16, ISO 100. Use a tripod.
- Misty ocean waves: 15-30 seconds at f/11, ISO 100. Requires an ND filter during daylight.
- Streaky clouds: 60-120+ seconds at f/11, ISO 100. Requires a strong ND filter (6-10 stops).
ND Filters for Daytime Long Exposures
During daylight, even at f/16 and ISO 100, the slowest shutter speed you’ll get is around 1/30s. That’s nowhere near slow enough for silky water or streaky clouds. Neutral density (ND) filters solve this by blocking light without affecting color.
- 3-stop ND: Slows shutter by 8x. Turns 1/30s into ~1/4s. Good for waterfalls in shade.
- 6-stop ND: Slows shutter by 64x. Turns 1/30s into ~2 seconds. Great for waterfalls and rivers.
- 10-stop ND: Slows shutter by 1024x. Turns 1/30s into ~30 seconds. Essential for misty oceans and cloud streaks.
A polarizing filter can also reduce light by 1-2 stops while cutting glare and enhancing sky contrast — a useful dual-purpose tool. For a deeper dive into filter types, see our guide on choosing the right filter for your camera.
Variable ND filters offer adjustable light reduction (typically 2-8 stops) by rotating two polarizing elements. They’re convenient for run-and-gun shooting but can introduce color casts and cross-pattern artifacts at extreme settings. For critical landscape work, fixed ND filters from brands like Lee, NiSi, or Breakthrough Photography deliver cleaner results.
Exposure: Bracketing and HDR
Exposure bracketing captures multiple shots of the same scene at different exposure levels — typically one normal, one underexposed, and one overexposed. This gives you full tonal data from the deepest shadows to the brightest highlights.
Modern camera sensors have impressive dynamic range (13-15 stops on current mirrorless bodies), which often makes bracketing unnecessary for moderate contrast scenes. A single RAW file can recover 3-4 stops of shadow detail without significant noise increase. But for extreme situations — sunrise/sunset with a dark foreground, backlit scenes, or compositions with direct sun in the frame — bracketing remains the best approach.
The key advantage of bracketing over single-exposure recovery is noise. Pushing shadows 4+ stops in a single RAW file introduces visible noise, especially on older or crop-sensor cameras. Bracketed exposures capture clean shadow detail in the brighter frame and clean highlights in the darker frame, giving you noise-free results across the entire tonal range.
How to bracket effectively:
- Use AEB (Auto Exposure Bracketing): Set your camera to capture 3-5 frames at 1-2 EV intervals. The camera fires them automatically.
- Use a tripod: The frames need to align perfectly for merging. Handheld bracketing works but requires software alignment.
- Merge in post: Use HDR software like Lightroom’s Photo Merge, Aurora HDR, or Photoshop’s HDR Pro. Aim for a natural look — heavy HDR processing looks dated.
- Graduated ND alternative: A graduated neutral density filter darkens just the sky, balancing exposure in-camera. Some photographers prefer this to bracketing because it requires no post-processing merge.
For cameras with built-in HDR capabilities, check our roundup of the best HDR cameras.
White Balance for Landscapes
White balance controls the color temperature of your image — whether it appears warm (orange/golden) or cool (blue). For landscapes, this setting profoundly affects mood.
If you shoot RAW (and you should), white balance can be adjusted freely in post-processing with zero quality loss. But getting it close in-camera helps you evaluate the scene more accurately on the LCD.
Recommended white balance approaches:
- Daylight preset (~5200K): The most neutral choice for outdoor shooting. Reproduces colors as the eye sees them under direct sunlight.
- Cloudy preset (~6000K): Adds gentle warmth. Useful on overcast days to prevent images from looking flat and cool.
- Shade preset (~7000K): Adds more warmth. Can enhance golden hour tones but may look too orange during midday.
- Kelvin manual control: Set a specific color temperature (e.g., 5500K for neutral, 6500K for warm). This gives you precise, repeatable results.
- Auto White Balance (AWB): Works well in most situations but may overcorrect the warm tones of golden hour, removing the very warmth you want to capture.
Creative white balance: Don’t feel locked into “accurate” color. Some of the most compelling landscape images deliberately lean warm or cool. A slightly warm white balance (6000-6500K) during golden hour amplifies the natural warmth. A cool setting (4500-5000K) during blue hour deepens the moody blues. The key is intentionality — decide what mood you want and use white balance as a creative tool, not just a correction.
For a comprehensive breakdown, see our full guide to understanding white balance.
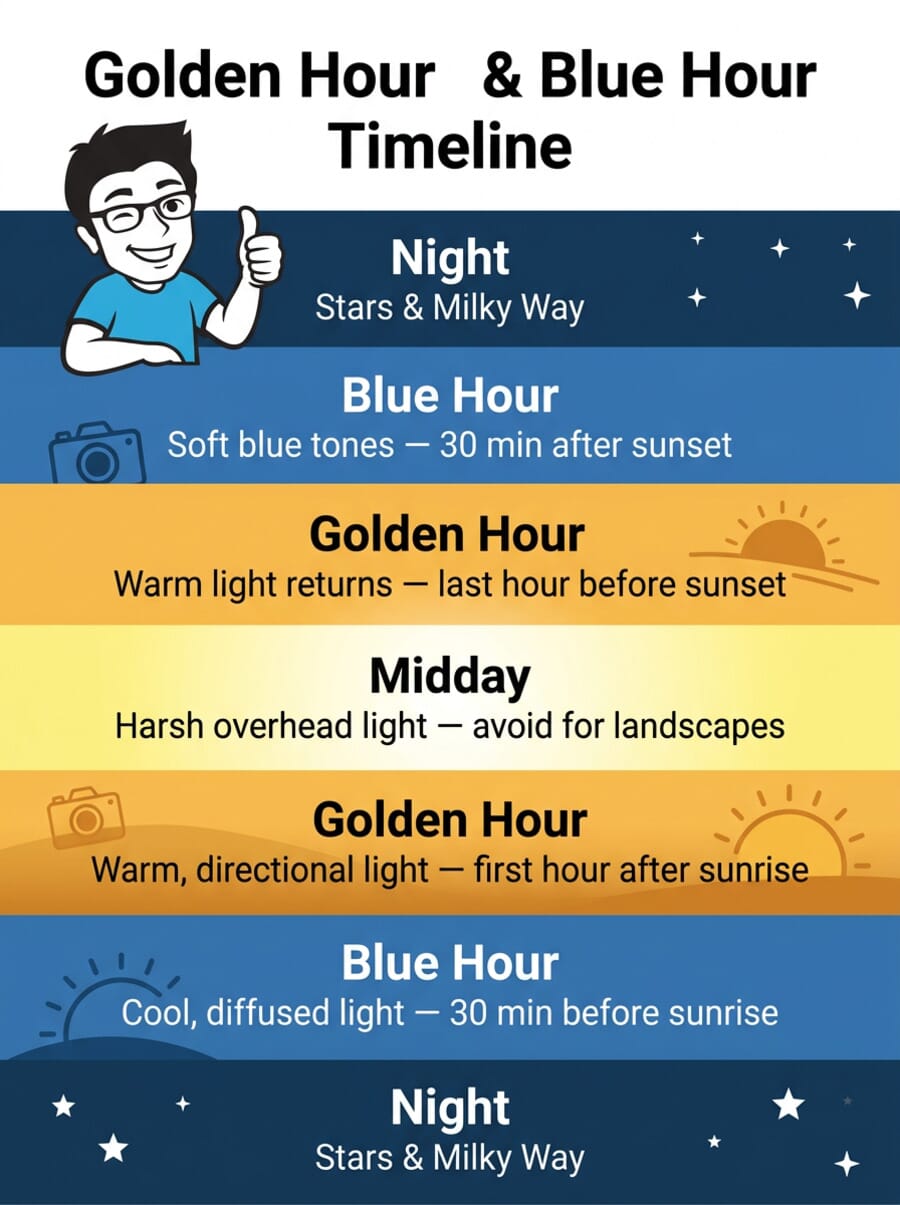
Timing: Golden Hour, Blue Hour, and Beyond
No camera setting can compensate for bad light. The quality of light matters more than aperture, ISO, or any technique — and the best landscape light happens during narrow windows around sunrise and sunset.
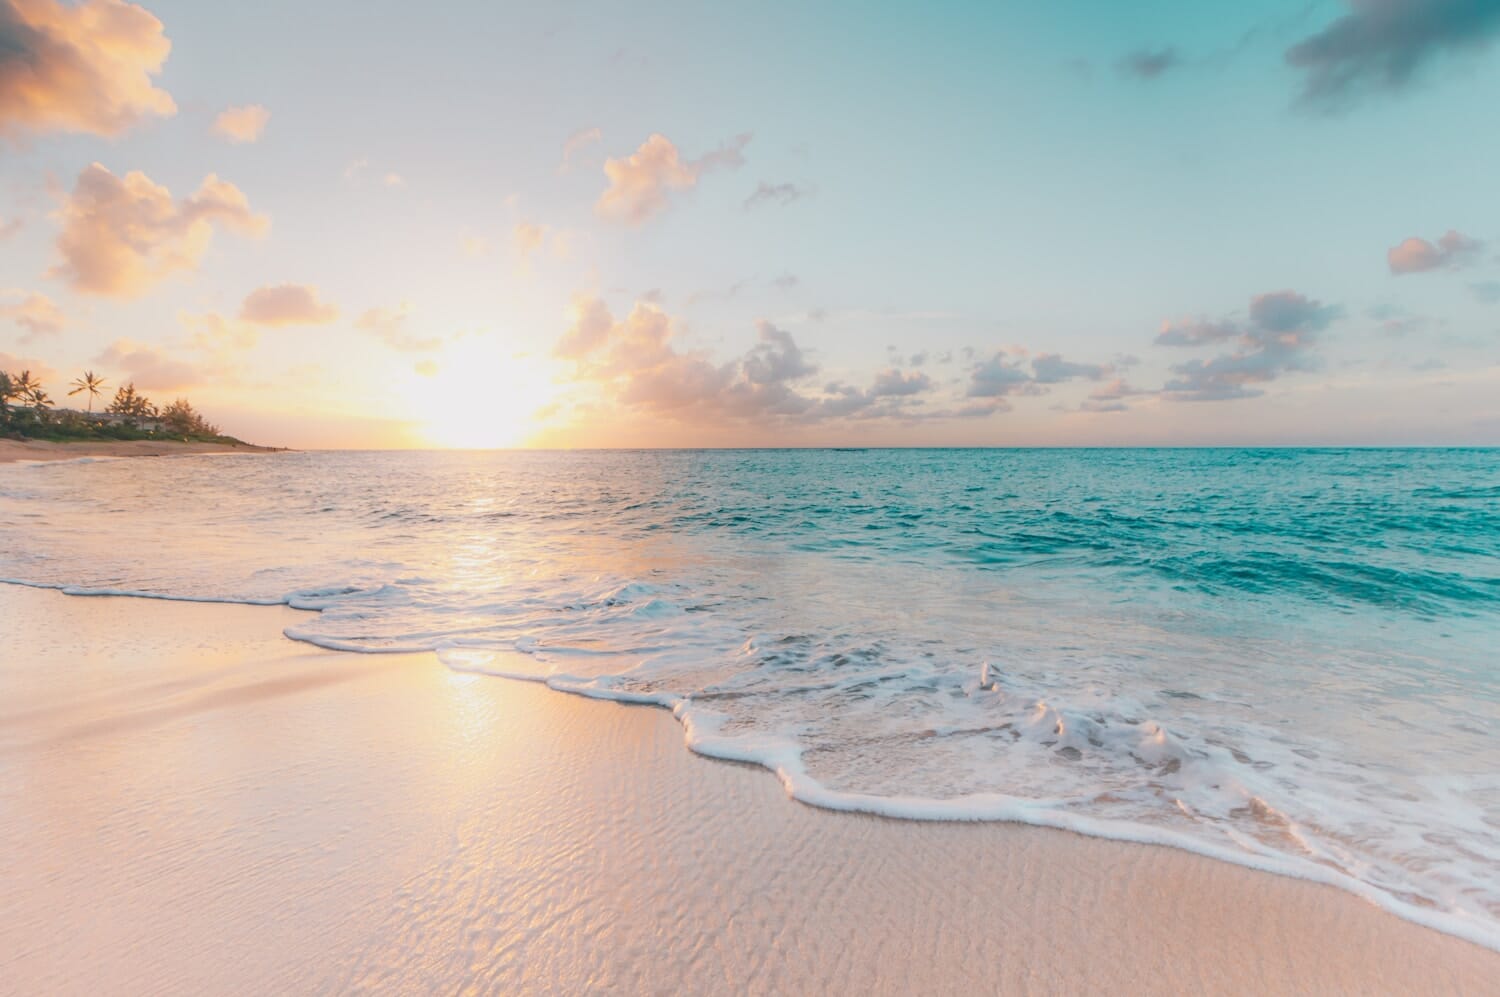
Golden hour is the first hour after sunrise and the last hour before sunset. The sun sits low on the horizon, producing warm directional light that creates long shadows, rich colors, and three-dimensional depth in landscapes. This is widely considered the best time for landscape photography.
Blue hour occurs roughly 20-30 minutes before sunrise and after sunset. The sky takes on deep blue and purple tones while the horizon may still glow warm. Blue hour light is diffused and even — excellent for moody, atmospheric scenes.
Midday light (roughly 10 AM to 3 PM) is generally the worst for landscapes. The sun is high overhead, creating harsh shadows, flat lighting, and washed-out skies. There are exceptions — overcast midday can work beautifully for forests and waterfalls, where diffused light eliminates harsh contrast and saturates greens. Midday also works for abstract compositions, desert landscapes with interesting textures, and slot canyon photography where direct overhead light creates beams.
Planning tools for tracking light:
- PhotoPills: Shows golden hour, blue hour, sun position, and Milky Way timing for any location and date. The augmented reality view shows exactly where the sun will rise and set relative to your composition. Essential for scouting locations.
- The Photographer’s Ephemeris (TPE): Maps sun and moon positions relative to terrain. Useful for planning compositions around specific light angles, especially when you need the sun at a precise position for backlighting or sidelighting effects.
- Weather apps: Clear skies aren’t always ideal. Partial cloud cover during golden hour produces the most dramatic skies — scattered mid-level clouds catch light and glow with color. Completely clear skies, paradoxically, often produce less dramatic results. Check cloud forecasts alongside sunrise/sunset times.
One habit that separates serious landscape photographers from casual shooters: arrive early and stay late. The best light changes by the minute during sunrise and sunset transitions. Getting set up 30 minutes before golden hour gives you time to compose, test exposures, and catch unexpected atmospheric moments — fog rolling through a valley, a break in the clouds, or the exact second when warm light hits a distant peak.
Using Your Camera’s Built-In Tools
Modern cameras — especially mirrorless models — include powerful tools that help you nail exposure, focus, and composition in the field. Learning to use these tools means spending less time fixing problems in post-processing.
Histogram
The histogram is a graph showing the distribution of tones in your image from pure black (left) to pure white (right). For landscapes, aim for a histogram that doesn’t clip at either end — data pushed against the left wall means lost shadow detail; data against the right wall means blown highlights.
Enable the live histogram on your EVF or LCD so you can evaluate exposure before you shoot, not after. Some cameras offer RGB histograms that show each color channel separately — useful for detecting clipping in individual colors (common with vivid sunsets).
Zebras and Highlight Warnings
Zebra patterns overlay diagonal stripes on overexposed areas of the image in your viewfinder. Set the threshold to 100% (or 100+ IRE) to see only completely blown highlights. This is faster than checking the histogram and helps you spot problem areas instantly — like a bright sky blowing out while the foreground looks fine.
Grid Overlays and Electronic Level
A crooked horizon is one of the most common landscape photography mistakes and one of the easiest to prevent. Enable the electronic level (gyroscopic horizon indicator) to keep your camera perfectly level. Most cameras also offer grid overlays (rule of thirds, golden ratio) to help with composition.
If your camera has an articulating screen, use it for low-angle compositions — placing the camera near ground level with foreground interest creates more dynamic images than shooting from standing height.
Focus Peaking and Magnification
Focus peaking highlights in-focus edges with a colored overlay (red, yellow, or white) in your viewfinder or LCD. This is invaluable when manually focusing at the hyperfocal distance — you can visually confirm which areas of the scene are in sharp focus without relying on autofocus points.
Pair focus peaking with magnified live view (5x or 10x zoom on the focus point) for pixel-level precision. This two-step verification process — peaking for rough confirmation, magnification for critical check — ensures your focus is nailed before you commit to the exposure.
Exposure Simulation and Preview
One major advantage of mirrorless cameras for landscape work is exposure simulation — what you see in the viewfinder matches what the sensor will capture. This means you can evaluate brightness, highlight clipping, and shadow detail before pressing the shutter. DSLRs show an optical view that doesn’t reflect exposure settings, making the histogram your primary tool for exposure evaluation.
Use the exposure preview with the histogram together for the most reliable results. If the histogram shows clipping and the preview confirms blown areas, dial in negative exposure compensation or switch to bracketing.
Quick Settings Reference
Use this as a starting point for common landscape scenarios. Adjust based on your specific conditions and creative intent.
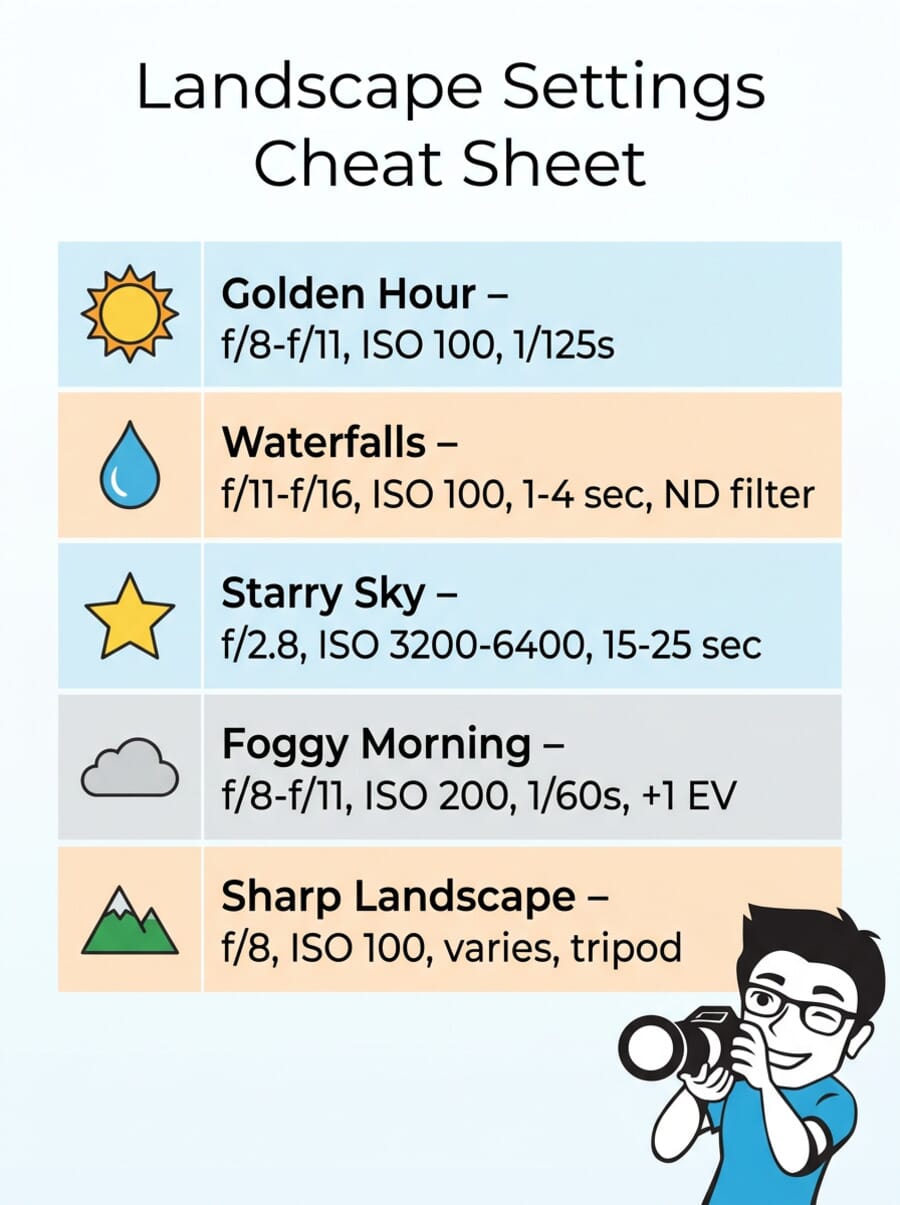
- Golden hour landscape: f/8–f/11 · ISO 100 · 1/60–1/250s · Tripod optional · Daylight or Cloudy WB
- Waterfalls (silky): f/11–f/16 · ISO 100 · 1–4 sec · Tripod required · ND filter (3-6 stops)
- Misty ocean: f/11 · ISO 100 · 15–30 sec · Tripod required · ND filter (10 stops)
- Starry sky: f/2.8 · ISO 3200–6400 · 15–25 sec · Tripod required · Manual focus on stars
- Foggy morning: f/8–f/11 · ISO 200 · 1/30–1/60s · Tripod recommended · +0.5 to +1 EV exposure compensation
- General sharp landscape: f/8 · ISO 100 · Varies · Tripod recommended · Hyperfocal focus
Keep ISO as low as possible (100 or the base ISO of your camera) in all landscape scenarios. Higher ISO introduces noise that degrades the fine detail landscapes demand. The only exception is night photography and astrophotography, where higher ISO is unavoidable.
Metering mode also matters for landscapes. Matrix/evaluative metering works well for evenly lit scenes, but it can be fooled by bright skies. Switch to spot metering or use exposure lock on a mid-tone area when shooting into the light or when the sky dominates the frame. Alternatively, use exposure compensation: +0.5 to +1 EV for snow and fog (which cameras tend to underexpose), and -0.5 to -1 EV for very bright skies that threaten to clip.
Finally, consider your shooting mode. Aperture Priority (A/Av) is the landscape photographer’s default — you set aperture and ISO, the camera picks shutter speed. Switch to Manual mode when you need full control, especially during rapidly changing light (sunset transitions) or when using ND filters (where the meter can’t always compensate accurately). Bulb mode is necessary for exposures longer than 30 seconds.
Common Landscape Photography Mistakes to Avoid
Even with the right settings dialed in, a few recurring habits quietly ruin otherwise strong landscape shots. These are the mistakes that show up most often in the field, and each one is easy to fix once you know to look for it.
- Stopping down too far. Reaching for f/22 to “get everything sharp” backfires. Diffraction softens the entire frame. Stay in the f/8 to f/11 range and use hyperfocal focus or focus stacking when you need extreme depth.
- Leaving ISO on Auto. Auto ISO can quietly climb into the hundreds or thousands in dim light, adding noise that erodes the fine detail landscapes depend on. Lock ISO to base (usually 100) and control exposure with shutter speed and a tripod instead.
- Ignoring the histogram. Trusting the rear-screen preview leads to blown skies you only discover back home. Read the histogram, or turn on zebras, and expose to protect the highlights.
- A crooked horizon. A tilted sea or skyline is the most common giveaway of a rushed shot. Turn on the electronic level and glance at it before every frame.
- Shooting only at eye level. Standing-height compositions look ordinary. Drop the camera low to a strong foreground element to build depth and lead the eye into the scene.
- Forgetting the polarizer is on. A circular polarizer left in place on an ultra-wide shot can create an uneven dark band across the sky. Rotate it back or remove it when shooting very wide.
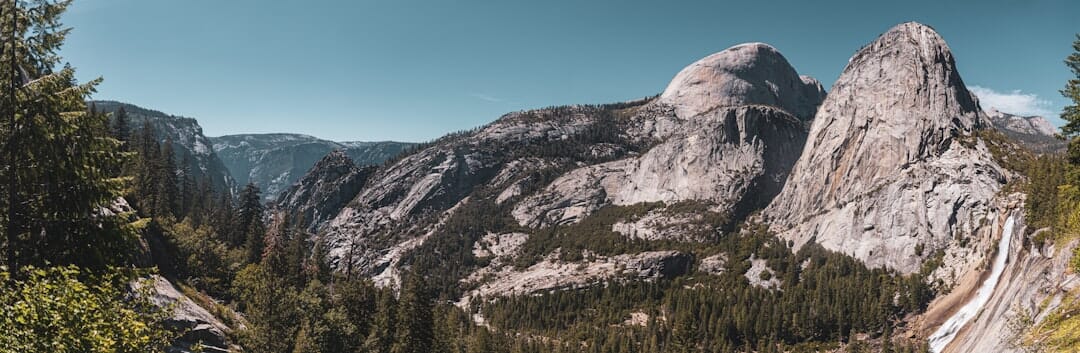
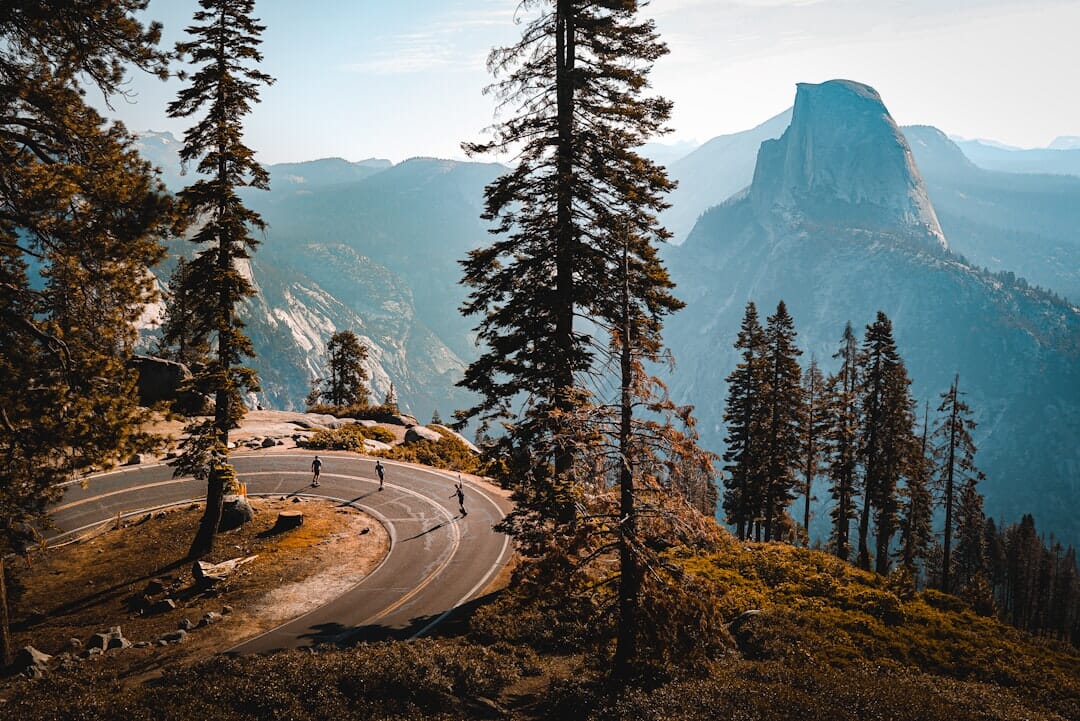
Landscape Settings in Action: Yosemite National Park
Yosemite is one of the most photographed landscapes on Earth, and for good reason. Its granite cliffs, waterfalls, and ancient forests offer endless compositions. Here are real-world examples from photographers who captured Yosemite using the same settings discussed in this guide.
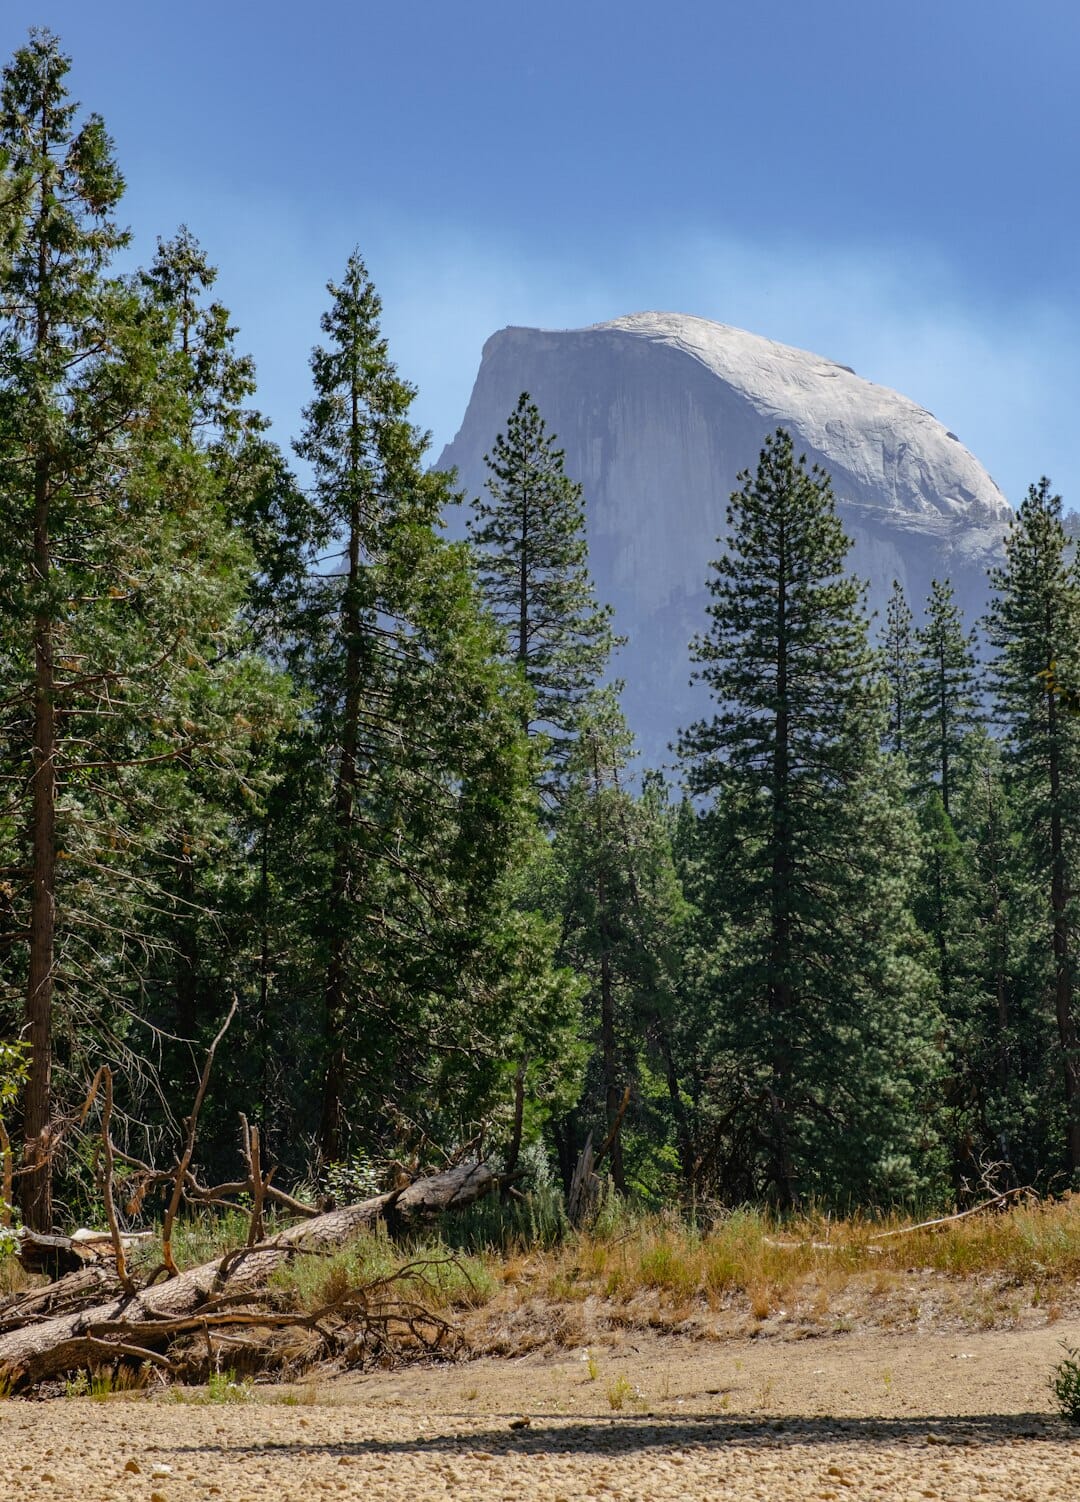
Notice how f/11 keeps everything sharp from the foreground pines to Half Dome in the distance, a textbook landscape setting for maximum depth of field.
A wider f/3.5 aperture works here because the massive granite walls sit at roughly the same distance from the camera. The 24mm wide-angle lens captures the full scale of the valley.
The f/8 sweet spot delivers sharp detail throughout the frame, while the low ISO 80 preserves maximum dynamic range in the shadows and highlights of the foliage.
Test Your Knowledge
Think you have these landscape settings down? Take this quick quiz to test your understanding.
For a quick-reference guide covering landscapes and other common scenes, check the camera settings cheat sheet.
Frequently Asked Questions
What is the best aperture for landscape photography?
The sharpest results come from f/8 to f/11 on most lenses. This range avoids both wide-open softness and the diffraction that appears at very narrow apertures like f/22. Use f/14 to f/16 only when you need extreme depth of field with very close foreground elements.
What ISO should I use for landscapes?
Use ISO 100 (or your camera’s base ISO) whenever possible. Low ISO gives you the cleanest image with the most detail and dynamic range. Only raise ISO when you cannot get a fast enough shutter speed, for example during blue hour without a tripod or when shooting stars.
Do I need a tripod for landscape photography?
A tripod is not always required, but it dramatically improves results. It enables long exposures, ensures sharp images at any shutter speed, and lets you compose more carefully. For golden hour shooting at f/8 and ISO 100 you can often get sharp handheld shots, but for anything involving slow shutter speeds (waterfalls, blue hour, bracketing), a tripod is essential.
Should I shoot RAW or JPEG for landscapes?
Always shoot RAW. Landscape scenes often have high dynamic range (bright sky, dark foreground), and RAW files give you far more latitude to recover shadows and highlights in post-processing. JPEG files permanently discard data during compression, limiting your editing options.
When do I need an ND filter for landscapes?
You need an ND filter whenever you want a slow shutter speed in bright conditions, such as silky waterfalls during daytime, misty ocean effects, or streaking clouds. A 6-stop ND is the most versatile starting point, and a 10-stop ND is needed for very long exposures (30+ seconds) in daylight.
Where should I focus for landscape photos?
Focus at the hyperfocal distance for maximum depth of field. Use an app like PhotoPills to calculate it for your lens and aperture. As a general rule, focus roughly one-third into the scene. For scenes with extreme foreground-to-background depth, use focus stacking, taking multiple shots at different focus points and merging them in software.
Is a full-frame camera necessary for landscape photography?
No. Full-frame sensors offer more dynamic range and better high-ISO performance, but modern APS-C and Micro Four Thirds cameras produce excellent landscapes. Technique (good light, a stable tripod, correct focus, and a clean base ISO) matters far more than sensor size for this genre.
Do I need a polarizing filter for landscapes?
A circular polarizer is one of the few effects you cannot fully replicate in editing. It cuts glare off water and foliage, deepens blue skies, and can reduce light by one to two stops. It is not essential, but it is the single most useful filter for daytime landscape work. Just rotate or remove it on ultra-wide shots to avoid uneven sky darkening.
Featured image: Photo by Denis Volkov on Unsplash.
Tools & References
- PhotoPills – Planning app for golden hour, blue hour, sun position, and hyperfocal distance.
- The Photographer's Ephemeris – Maps sun and moon positions relative to terrain for planning light angles.
Image Sources
- Deep depth-of-field mountain vista, Kalen Emsley via SampleShots – In-body image (aperture section).
- Wildflower foreground with distant peaks, Wynand van Poortvliet via SampleShots – In-body image (focus section).
- Photographer with tripod at sunset, Blair Fraser on Unsplash – In-body image (shutter speed section).
- Long-exposure waterfall, Robert Lukeman via SampleShots – In-body image (long exposure section).
- Golden-hour coastal landscape, Sean Oulashin via SampleShots – In-body image (timing section).
- Yosemite Half Dome, granite valley, and forest path, Daniel Salcius / Fabian Rodriguez / Jeff Hopper via SampleShots – In-body images (Yosemite examples).
- Featured image, Denis Volkov on Unsplash – Featured image.
- Aperture, golden-hour, and cheat-sheet infographics plus the vertical pin, created by PhotoWorkout – Editorial graphics.


