
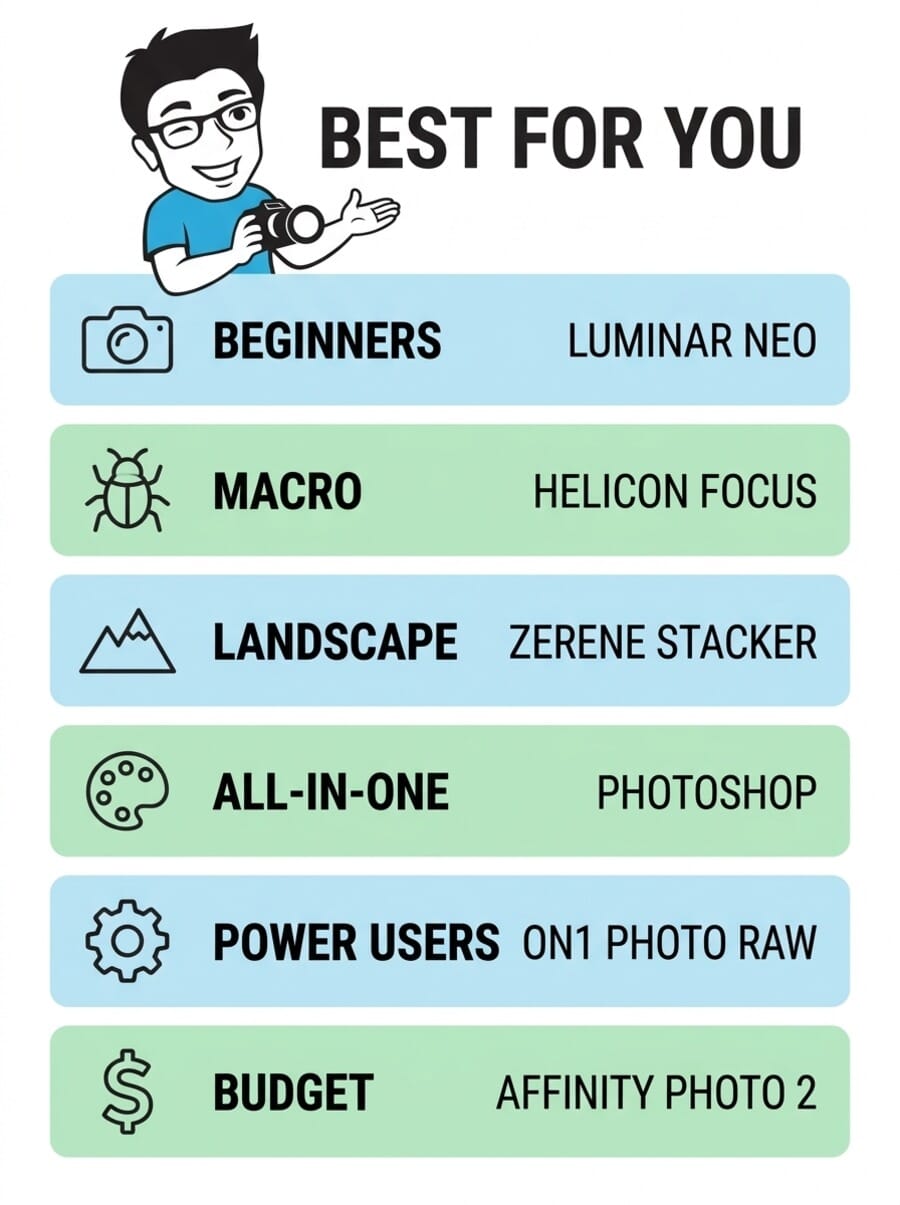
- Helicon Focus is the top dedicated focus stacking tool – three stacking algorithms, batch processing, and the fastest rendering of any option.
- Adobe Photoshop delivers reliable focus stacking through Auto-Align and Auto-Blend layers – ideal for photographers already in the Adobe ecosystem.
- Zerene Stacker excels at complex deep stacks with hundreds of images – the go-to choice for scientific and extreme macro work.
- Luminar Neo offers the simplest focus stacking workflow – perfect for beginners who want results in a few clicks.
- ON1 Photo RAW 2026 combines focus stacking with a full RAW editor, HDR merge, and panorama stitching in one app.
- Affinity Photo 2 provides capable focus stacking at a one-time price of $69.99 – no subscription required.
When you buy through links on our site, we may earn a commission at no cost to you. We evaluate products independently. Commissions do not affect our evaluations.
What Is the Best Focus Stacking Software?
Focus stacking is the technique of combining multiple photographs taken at different focus distances into a single image with front-to-back sharpness. It is essential for macro photography, where even at narrow apertures the depth of field covers only millimeters, and for landscape photography, where foreground-to-horizon sharpness often requires multiple focus points.
The right focus stacking software can make the difference between a clean, artifact-free composite and a frustrating mess of halos and misaligned edges. This guide compares the six best focus stacking software options available today – from dedicated stacking tools built for scientific precision to all-in-one photo editors that include stacking as part of a broader feature set.
Whether shooting insects at 5x magnification or stitching landscape frames together, the picks below cover every budget and skill level.
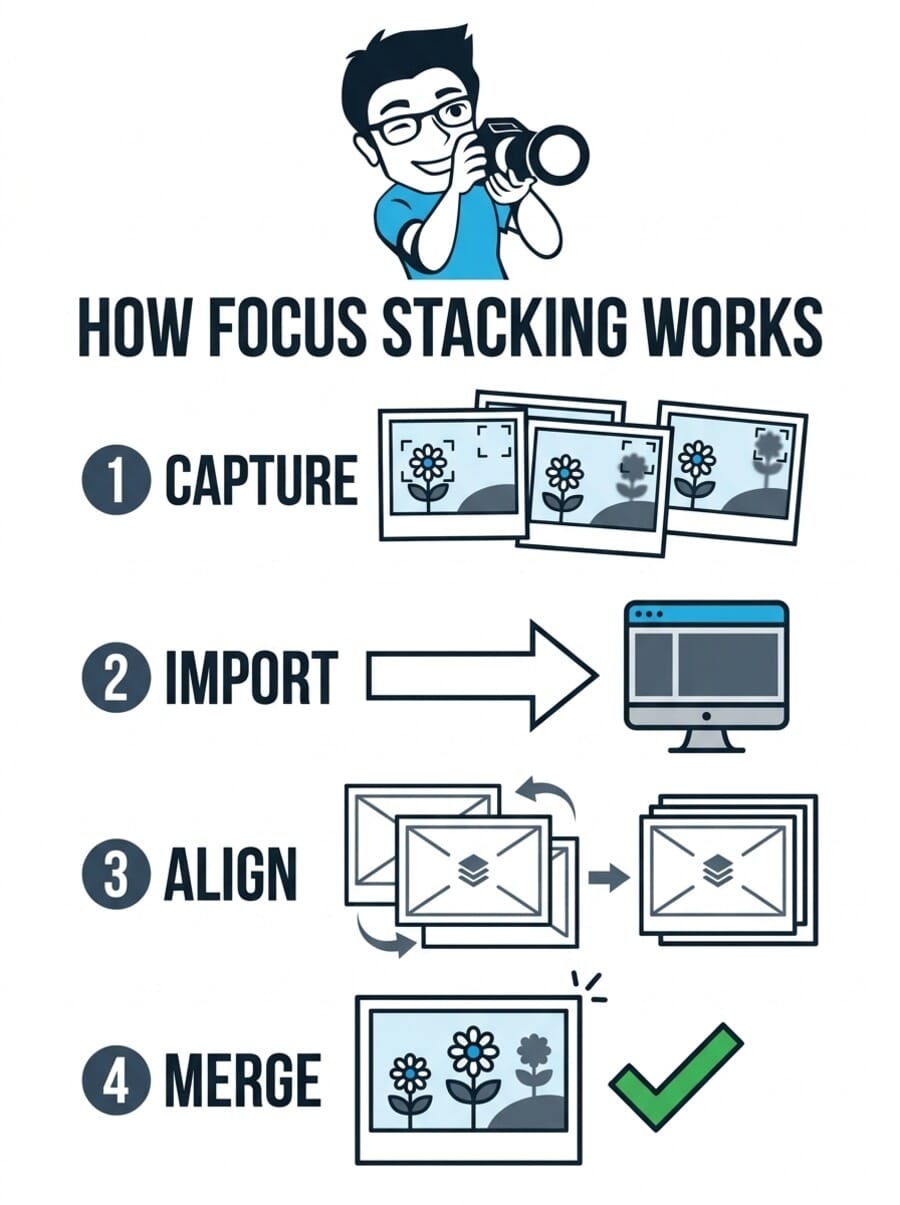
How Does Focus Stacking Work?
Focus stacking works in four basic steps. First, a series of photographs is captured with the focus point shifted slightly between each frame – either manually, using in-camera focus bracketing, or with a motorized focus rail. The number of frames depends on the subject: a landscape might need 3-5 shots, while an extreme macro subject could require 50-200+.
Next, the images are imported into focus stacking software, which automatically aligns them to correct for any slight shifts in framing (focus breathing causes a zoom-like effect when focus distance changes). The software then analyzes each frame to identify the sharpest areas and merges them into a single composite with maximum depth of field. Finally, any remaining artifacts – halos at contrast edges, misaligned areas, or blending errors – are cleaned up using retouching tools.
What to Look for in Focus Stacking Software
Not all focus stacking tools are created equal. The key factors that separate good software from great software include:
- Stacking algorithms – Different algorithms handle different subjects better. Pyramid-based methods (like Helicon’s Method C or Zerene’s PMax) preserve fine detail in hair, fur, and bristles. Depth-map methods work well for smoother subjects. The best tools offer multiple options.
- Alignment accuracy – Good alignment corrects for focus breathing, camera shake, and slight subject movement between frames. Poor alignment creates ghosting and soft edges.
- Retouching tools – Even the best algorithms produce occasional artifacts. Built-in retouching tools that let you paint corrections from individual source frames save significant time over exporting to another editor.
- Speed – For photographers processing dozens of stacks per session, rendering speed matters. GPU acceleration and multi-core support make a noticeable difference.
- RAW support – Working directly from RAW files preserves maximum quality, though some tools require pre-converted TIFFs or JPEGs.
The industry-standard focus stacking tool with three rendering methods, batch processing, and the fastest stacking speed of any dedicated option. Used by macro photographers, entomologists, and product shooters worldwide.
30-day free trial available
Helicon Focus has been the go-to focus stacking software for macro photographers and scientific imaging professionals for over a decade. It is a dedicated stacking tool – it does one thing and does it extremely well.
What sets Helicon Focus apart is its three distinct rendering algorithms. Method A (weighted average) produces clean results for simple subjects. Method B (depth map) works well for landscapes and subjects with clear depth separation. Method C (pyramid) is the standout – it excels at preserving fine detail in challenging subjects like insect hairs, mats of bristles, and overlapping structures where other algorithms produce halos or lose detail.
Speed is another major advantage. Helicon Focus processes stacks noticeably faster than competing tools, especially with GPU acceleration enabled. For photographers who shoot dozens of macro stacks in a session, this time savings adds up quickly. The batch processing mode can automatically split and stack entire folders of bracketed images, and the folder monitor watches for new files in real time.
The built-in retouching tools let you paint corrections from individual source frames onto the final composite, fixing halos and alignment artifacts without leaving the application. However, the retouching workflow is somewhat less intuitive than Zerene Stacker’s approach – it requires selecting individual source frames rather than painting between two synchronized views.
Helicon also offers Helicon Remote, a companion app that automates focus bracketing directly from a connected camera. The Pro and Premium packages include the desktop version, making it a complete capture-to-stack solution.
Pricing & Where to Buy
Helicon Focus offers three tiers (as of March 2026): Lite at $30/year or $115 lifetime, Pro Package at $55/year or $200 lifetime (includes Helicon Remote desktop), and Premium at $65/year or $240 lifetime (adds batch mode, 3D models, and mobile remote). All tiers include a 30-day free trial with full functionality and no watermarks.
- Buy from Helicon Soft – direct purchase, instant delivery
- Download free trial – 30 days, all features, no watermark
The most widely used photo editor in the world also delivers solid focus stacking through its Auto-Align and Auto-Blend layers workflow. Ideal for photographers who already use Photoshop for retouching and compositing.
Included in Photography Plan ($9.99/mo)
Adobe Photoshop is the world’s most popular photo editor, and its focus stacking capabilities are solid enough for most photographers. The process uses two features in sequence: Auto-Align Layers (to correct for focus breathing and camera movement) and Auto-Blend Layers (to merge the sharp areas from each frame).
The workflow is straightforward: load all bracketed images as layers (File > Scripts > Load Files into Stack), run Edit > Auto-Align Layers, then Edit > Auto-Blend Layers with “Stack Images” selected. Photoshop analyzes each layer, creates layer masks to isolate the sharpest regions, and blends them together. The result is usually clean and artifact-free for stacks up to 15-20 images.
Where Photoshop really shines is in post-stack retouching. If the auto-blend produces artifacts – halos at contrast edges, misaligned areas, or incorrect mask boundaries – the full power of Photoshop’s layer and masking tools is available for correction. Painting on layer masks to include or exclude specific regions from source frames is intuitive for anyone familiar with the application.
The limitation is that Photoshop offers only a single blending algorithm. For straightforward subjects (landscapes, product shots, moderate macro), it handles focus stacking very well. For extreme macro with hundreds of frames and complex overlapping structures, dedicated tools like Helicon Focus or Zerene Stacker typically produce cleaner results with fewer artifacts. Photoshop also slows down considerably with very large stacks (50+ frames of large files).
For photographers already paying for the Adobe Photography Plan ($9.99/month for Photoshop + Lightroom), focus stacking comes at no additional cost – making it the most practical first option to try.
Pricing & Where to Buy
Adobe Photoshop is available through the Creative Cloud Photography Plan at $9.99/month (as of March 2026), which includes both Photoshop and Lightroom Classic. The standalone Photoshop plan is $22.99/month. Both include 20GB of cloud storage. There is a 7-day free trial.
- Get the Photography Plan – $9.99/mo for Photoshop + Lightroom
- Photoshop standalone plan – $22.99/mo
Purpose-built for serious macro and scientific photography. Zerene Stacker excels at deep stacks with hundreds of frames and provides the most intuitive retouching workflow of any dedicated stacking tool.
One-time purchase, 30-day trial
Zerene Stacker is the other heavyweight in the dedicated focus stacking space, and it has earned a devoted following among macro photographers, entomologists, and scientific imaging professionals. Where Helicon Focus emphasizes speed and workflow automation, Zerene Stacker prioritizes output quality and retouching precision.
The standout feature is Zerene’s PMax (Pyramid Maximum) algorithm, which is specifically designed to preserve fine detail in challenging subjects. For macro subjects with overlapping structures – insect hair, plant fibers, crystalline formations – PMax consistently produces cleaner results with fewer loss-of-detail halos than competing algorithms. The DMap (Depth Map) method is also available for smoother subjects where speed matters more than extreme detail preservation.
Zerene Stacker’s retouching workflow is arguably the best of any stacking tool. The synchronized dual-panel view shows the stacked result alongside any source frame, and you can simply paint to pull detail from the source into the composite. This is significantly more intuitive than Helicon’s single-frame retouching approach, especially when fixing complex artifact patterns.
The trade-off is speed. Zerene Stacker is noticeably slower than Helicon Focus when processing large stacks, particularly with TIFF files. For photographers who shoot a few stacks per session, this is barely noticeable. For high-volume workflows with dozens of stacks, the time difference adds up. The user interface also looks dated compared to more modern tools, though every feature is functional and well-organized.
Pricing & Where to Buy
Zerene Stacker uses a one-time purchase model with no recurring fees (as of March 2026). Personal Edition starts at $89, Prosumer Edition at $169 (adds advanced features), and Professional Edition at $289 (for commercial use). Student pricing is available. A 30-day trial is included, though trial output is watermarked.
- Buy from Zerene Systems – one-time purchase, immediate delivery
- Download free trial – 30 days, all features
Skylum’s AI-powered photo editor includes a focus stacking extension that simplifies the process to just a few clicks. The best option for photographers who want results without a learning curve.
Focus stacking requires Extensions Pack
Luminar Neo is an AI-powered photo editor from Skylum that includes focus stacking as part of its Extensions Pack. For photographers who want to try focus stacking without learning a specialized tool, Luminar Neo offers the gentlest learning curve of any option on this list.
The workflow is straightforward: open the Focus Stacking extension, drag in the bracketed images, and click “Stack.” Luminar Neo handles alignment and blending automatically. The results are clean for moderate stacks (3-10 images) of cooperative subjects – landscapes, still life, and simple macro. The software also includes AI-powered editing tools for adjusting the stacked result afterward, including sky replacement, portrait enhancement, and noise reduction.
The limitation is control. Unlike Helicon Focus or Zerene Stacker, Luminar Neo does not offer any choice of stacking algorithm, adjustment of blending parameters, or source-frame retouching. If the automatic result has artifacts, the only option is to try again with different source images or export to another editor for manual correction. For deep stacks with more than 15 images, results become less reliable.
Luminar Neo is a good choice for landscape photographers who occasionally need to stack 3-5 focus points, or for flower macro photography beginners who want a simple starting point. For serious macro work or high-volume stacking, a dedicated tool will deliver better results.
Pricing & Where to Buy
Luminar Neo starts at $9.95/month for the base editor (as of March 2026). The Focus Stacking extension requires the Extensions Pack, which is included in the Pro plan or available as a separate add-on. A 7-day free trial is available.
- Get Luminar Neo – from Skylum official site
- Start free trial – 7 days, full features
A comprehensive photo editor that combines focus stacking with RAW processing, HDR merge, panorama stitching, layers, and AI-powered tools in a single application. A strong Lightroom + Photoshop alternative.
One-time purchase, 30-day trial
ON1 Photo RAW 2026 positions itself as a complete Lightroom and Photoshop replacement, and its feature list backs up that claim. Beyond focus stacking, it includes RAW processing, cataloging, layers, HDR merge, panorama stitching, AI-powered masking, and hundreds of built-in effects and presets. For photographers who want one application that does everything, ON1 Photo RAW is a compelling option.
The focus stacking workflow lives in the editing toolbar. Select multiple bracketed images, choose Focus Stack, and ON1 handles alignment and merging. The results are decent for moderate stacks – comparable to Photoshop’s Auto-Blend for most subjects. Where ON1 falls short compared to dedicated tools is in stack size handling and retouching: very large stacks (30+ images) may produce more artifacts, and there is no specialized source-frame retouching tool.
What makes ON1 Photo RAW stand out in this roundup is value. At $99.99 as a one-time purchase (as of March 2026), it replaces the need for both a RAW editor and a separate stacking tool for photographers whose stacking needs are moderate. The ON1 Photo RAW 2026 review on this site covers the broader feature set in depth.
Pricing & Where to Buy
ON1 Photo RAW 2026 is available as a one-time purchase at $99.99, or through a subscription at $7.99/month (as of March 2026). Both options include all features. A 30-day free trial with no credit card required is available.
- Buy ON1 Photo RAW 2026 – $99.99 one-time purchase
- Download free trial – 30 days, no credit card
Serif’s professional-grade photo editor offers solid focus stacking alongside HDR merge, panorama stitching, and full layer support – all for a one-time price of $69.99 with no subscription.
One-time purchase, free trial
Affinity Photo 2 from Serif is a professional photo editor that has earned a loyal following as the anti-subscription alternative to Photoshop. Its Focus Merge feature provides capable focus stacking alongside HDR merging, panorama stitching, full layer support, and RAW processing – all for a one-time price of $69.99.
The Focus Merge workflow is accessed through File > New Focus Merge. Select the bracketed images, and Affinity Photo automatically aligns and blends them. The alignment is generally reliable, and output quality for moderate stacks (3-15 images) is good – comparable to Photoshop’s results for most subjects. After merging, the full editing toolkit is available for retouching any artifacts using layers and masks.
The limitations are similar to other general-purpose editors: no choice of stacking algorithm, no source-frame retouching, and noticeable slowdowns with larger stacks. Focus Merge also does not support batch processing, so each stack must be processed individually.
For budget-conscious photographers who need occasional focus stacking alongside solid general editing capabilities – and who refuse to pay monthly subscription fees – Affinity Photo 2 is an excellent choice. The one-time price is less than a year of the Adobe Photography Plan, and it includes perpetual updates within the major version.
Pricing & Where to Buy
Affinity Photo 2 is a one-time purchase at $69.99 for Mac or Windows (as of March 2026). The iPad version is $21.99 separately. There is a free trial available with full functionality. Universal License ($99.99) includes all platforms.
- Buy Affinity Photo 2 – $69.99 one-time purchase
- Download free trial – full features, no time limit on editing
Choose the Best Focus Stacking Software
The best focus stacking software depends on how serious the stacking needs are and what else the software needs to do. For dedicated macro photographers who need the best possible output quality and efficient workflows, Helicon Focus and Zerene Stacker are the clear leaders – Helicon for speed and automation, Zerene for maximum detail preservation and retouching ease.
For photographers who need focus stacking as one feature among many, Adobe Photoshop is the safe choice if already in the Adobe ecosystem, while ON1 Photo RAW 2026 offers the most features per dollar as a one-time purchase.
Luminar Neo is the right starting point for beginners who want simplicity above all else, and Affinity Photo 2 is the best value for photographers who want capable stacking without recurring costs. Every option on this list offers a free trial – the best approach is to test 2-3 with actual bracketed images to see which algorithm handles the specific subjects being photographed.
Also Worth Trying: Topaz Photo AI
Topaz Photo AI uses machine learning to sharpen, denoise, and upscale photos in a single click. It’s particularly strong for focus stacking / sharpening — the AI models were trained on millions of real photographs and produce noticeably better results than traditional filters. Available as a standalone app or Lightroom/Photoshop plugin ($199/year or $39/month).
Frequently Asked Questions
What is focus stacking in photography?
Focus stacking is a technique where multiple photographs of the same subject are taken at different focus distances, then merged in software to create a single image with greater depth of field than any individual frame. It is commonly used in macro photography (where depth of field is extremely shallow) and landscape photography (where front-to-back sharpness is desired).
How many images do I need for focus stacking?
It depends on the subject and magnification. Landscape scenes typically need 3-5 images. Product photography might require 5-15. Macro photography at moderate magnification may need 20-50 frames. Extreme macro (5x+ magnification) can require 100-200+ images to cover the full depth of the subject.
Can I do focus stacking for free?
Yes. CombineZP is a free, open-source focus stacking tool for Windows. GIMP can perform basic focus stacking with manual layer masking. Most paid options also offer free trials – Helicon Focus provides 30 days with no watermark, while Zerene Stacker and Affinity Photo 2 offer free trials as well.
Do I need a tripod for focus stacking?
A sturdy tripod is strongly recommended. While focus stacking software can align handheld shots, keeping the camera locked down produces much cleaner results with fewer alignment artifacts. For macro work, a tripod is essentially mandatory – even small movements between frames create alignment problems that software cannot fully correct.
What cameras have built-in focus bracketing?
Many modern mirrorless cameras include focus bracketing (automatically capturing a series of images at different focus distances). Notable examples include the Nikon Z-series, Olympus/OM System cameras (which also do in-camera stacking), Sony A7R V, Canon R5/R6 series, and Fujifilm X-T5. The best cameras for focus stacking guide covers this topic in detail.
Is Helicon Focus or Zerene Stacker better?
Both are excellent, and many serious macro photographers own both. Helicon Focus is faster, has a more modern interface, and offers better batch processing workflows. Zerene Stacker produces slightly better results on very complex subjects (its PMax algorithm excels at fine detail) and has a more intuitive retouching workflow. For most photographers, either tool will deliver professional-quality results.
Disclosure: This article contains affiliate links. When you purchase through these links, we may earn a commission at no additional cost to you. This helps support our research and allows us to continue providing free buying guides. All opinions and recommendations are based on our independent research and analysis.
