Editor’s Key Takeaways: Full-Body Portrait Photography Guide
Full-body portrait photography demands more planning than headshots — photographers must manage posing, lens selection, lighting, and composition across the entire frame. This guide covers everything needed to capture stunning full-body portraits in 2026, from camera settings to posing techniques and post-processing.
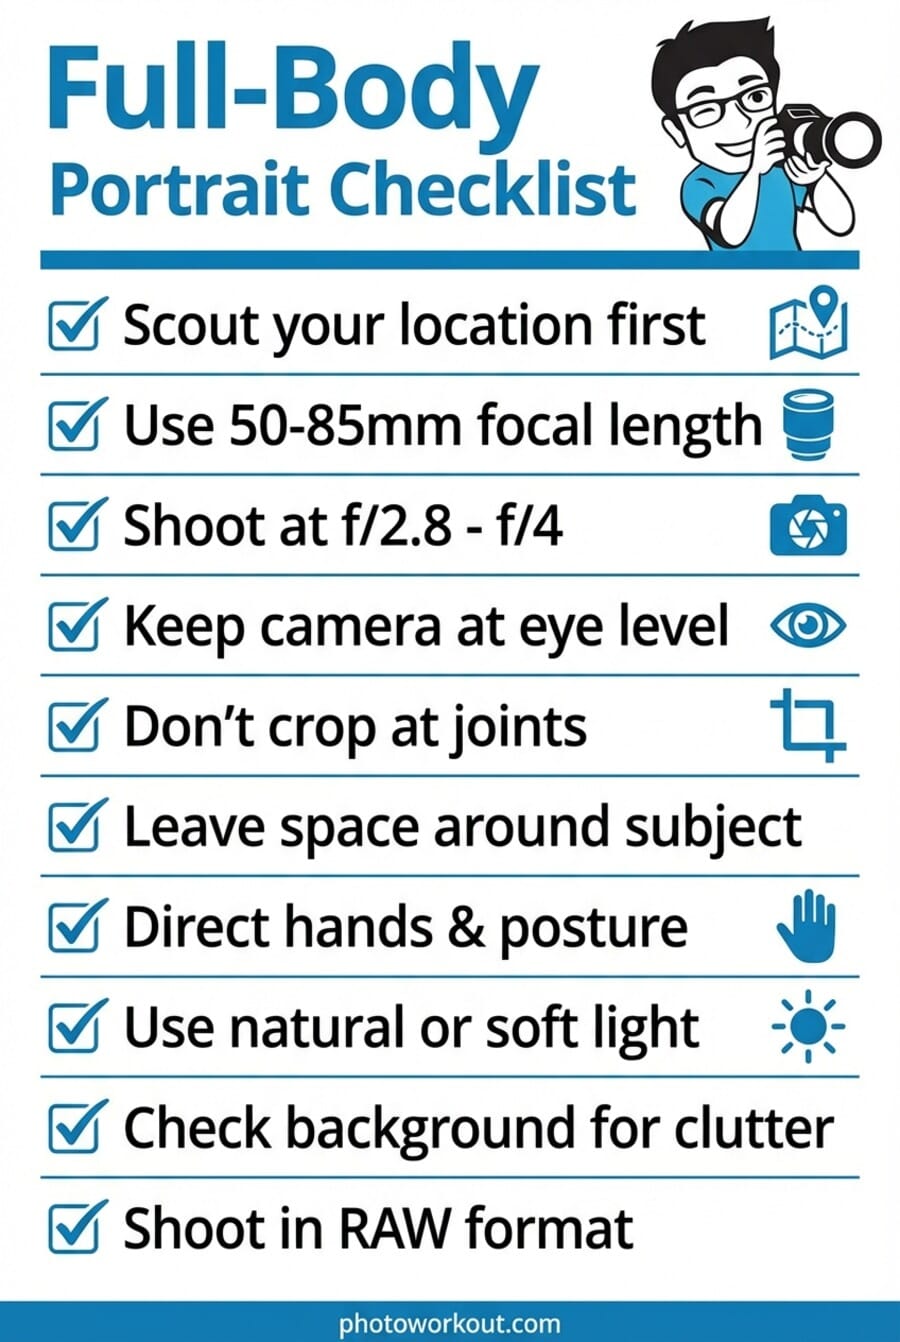
- Camera Settings: Use a focal length of 50–85mm, aperture between f/2.8–f/4, and keep ISO low for the cleanest results.
- Location Matters: Scout locations in advance — outdoor, indoor, and studio settings each offer different creative possibilities.
- Lighting Setup: Use soft, even light across the entire body — strip softboxes indoors, open shade or golden hour outdoors.
- Posing Guide: Direct the subject’s hands, weight distribution, and posture — small adjustments make dramatic differences.
- Framing & Composition: Never crop at joints, leave breathing room, and shoot at eye level or slightly below.
- Avoid Common Mistakes: Watch for distracting backgrounds, wrong focal lengths, excessive headroom, and awkward cropping.
- Best Lenses for 2026: The Sony 85mm f/1.4 GM II, Canon RF 85mm f/1.2L, and Sigma 85mm f/1.4 Art DG DN lead the pack.
- Editing Tips: Clean up backgrounds, fine-tune exposure, and maintain natural-looking skin in post-processing.
Camera Settings for Full-Body Portraits
Getting the camera settings right is the foundation of any successful full-body portrait. Unlike headshots where shallow depth of field is almost always desirable, full-body portraits require a more nuanced approach to ensure the entire subject stays sharp while still separating them from the background.
Focal Length
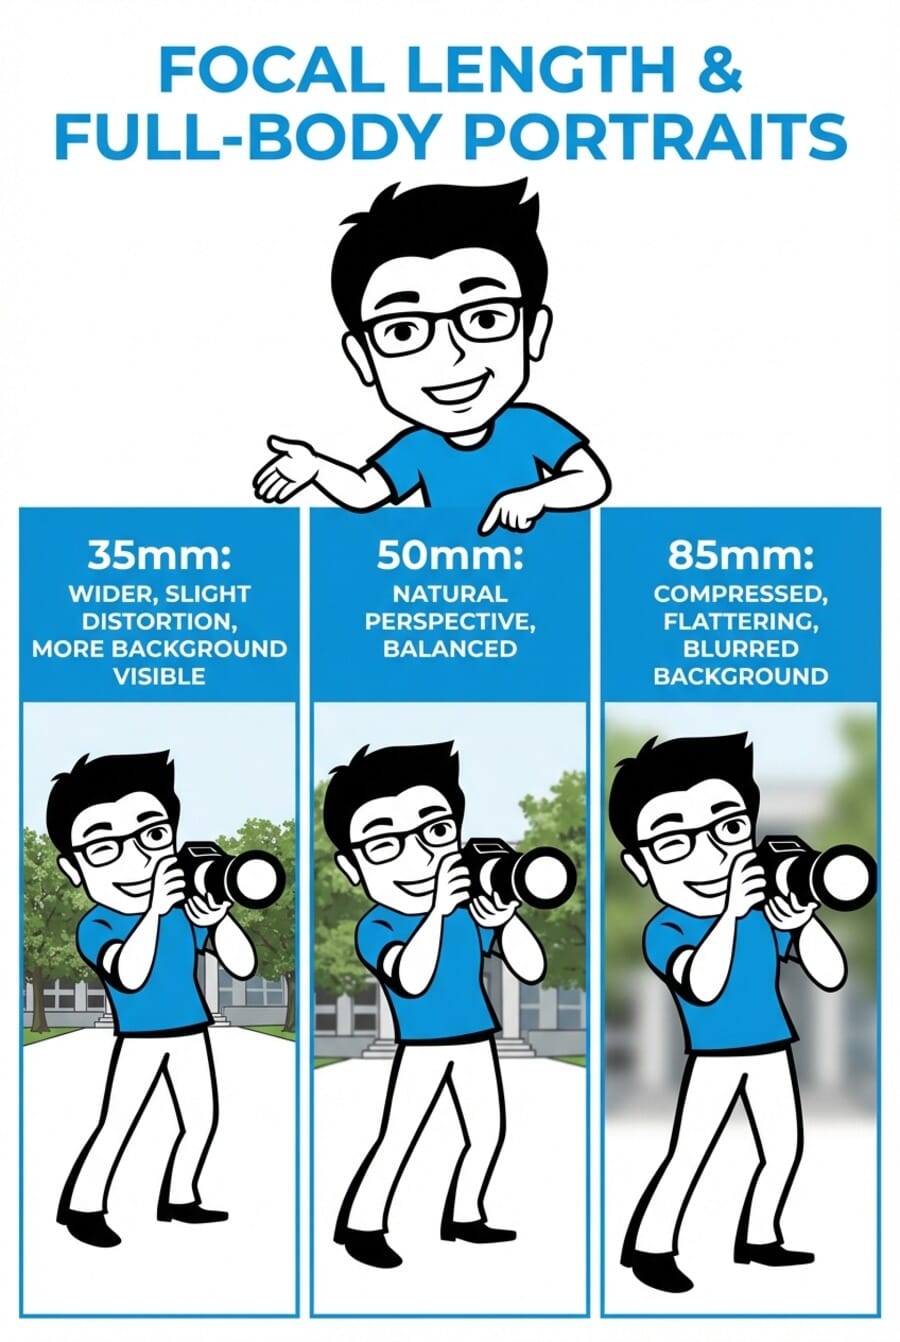
The ideal focal length range for full-body portraits is 50mm to 85mm (on a full-frame camera). This range provides natural-looking perspective without the distortion that wider lenses introduce. An 85mm lens is often considered the gold standard — it compresses the background pleasantly, flatters the subject’s proportions, and creates beautiful bokeh.
Wide-angle lenses (anything below 35mm) should generally be avoided for full-body work. They stretch the limbs closest to the camera and make the subject appear disproportionate. A 70–200mm zoom is also an excellent choice, as it offers flexibility to adjust framing without physically moving.
On APS-C or Micro Four Thirds cameras, apply the crop factor: a 35mm lens on APS-C gives roughly the same field of view as a 50mm on full-frame, and a 56mm gives approximately an 85mm equivalent.
Aperture
For most full-body portraits, an aperture between f/2.8 and f/4 strikes the right balance. This range produces a pleasantly blurred background while keeping the entire subject — from head to toe — acceptably sharp.
Shooting wide open at f/1.4 or f/1.8 with a full-body shot can be risky: the depth of field becomes so narrow that parts of the subject’s body may fall out of focus, especially if they aren’t perfectly parallel to the camera’s sensor plane. For example, if the subject has one foot forward and the photographer is shooting at f/1.4, the forward foot may be sharp while the face is soft.
That said, wider apertures (f/1.8–f/2.8) work beautifully when the subject is standing relatively flat to the camera and the photographer needs maximum background separation. For environmental portraits where both the subject and surroundings matter, stop down to f/5.6 or even f/8.
Shutter Speed
A minimum shutter speed of 1/200s is recommended for full-body portraits. Even when the subject is standing still, subtle movements — hair blowing, fabric shifting, slight swaying — can introduce motion blur at slower speeds. For action poses or walking shots, bump the shutter speed to 1/500s or faster.
As a general rule, the shutter speed should be at least double the focal length (e.g., 1/160s minimum for an 85mm lens). With modern in-body image stabilization (IBIS), photographers can sometimes get away with slower speeds, but it’s better to err on the side of a faster shutter.
ISO
Keep ISO as low as possible — ISO 100–400 in good light. Modern mirrorless cameras from Sony, Canon, and Nikon handle high ISO remarkably well, but lower ISO values preserve more dynamic range and produce cleaner files for post-processing. In low-light indoor situations, ISO 800–1600 is perfectly acceptable on current-generation cameras.
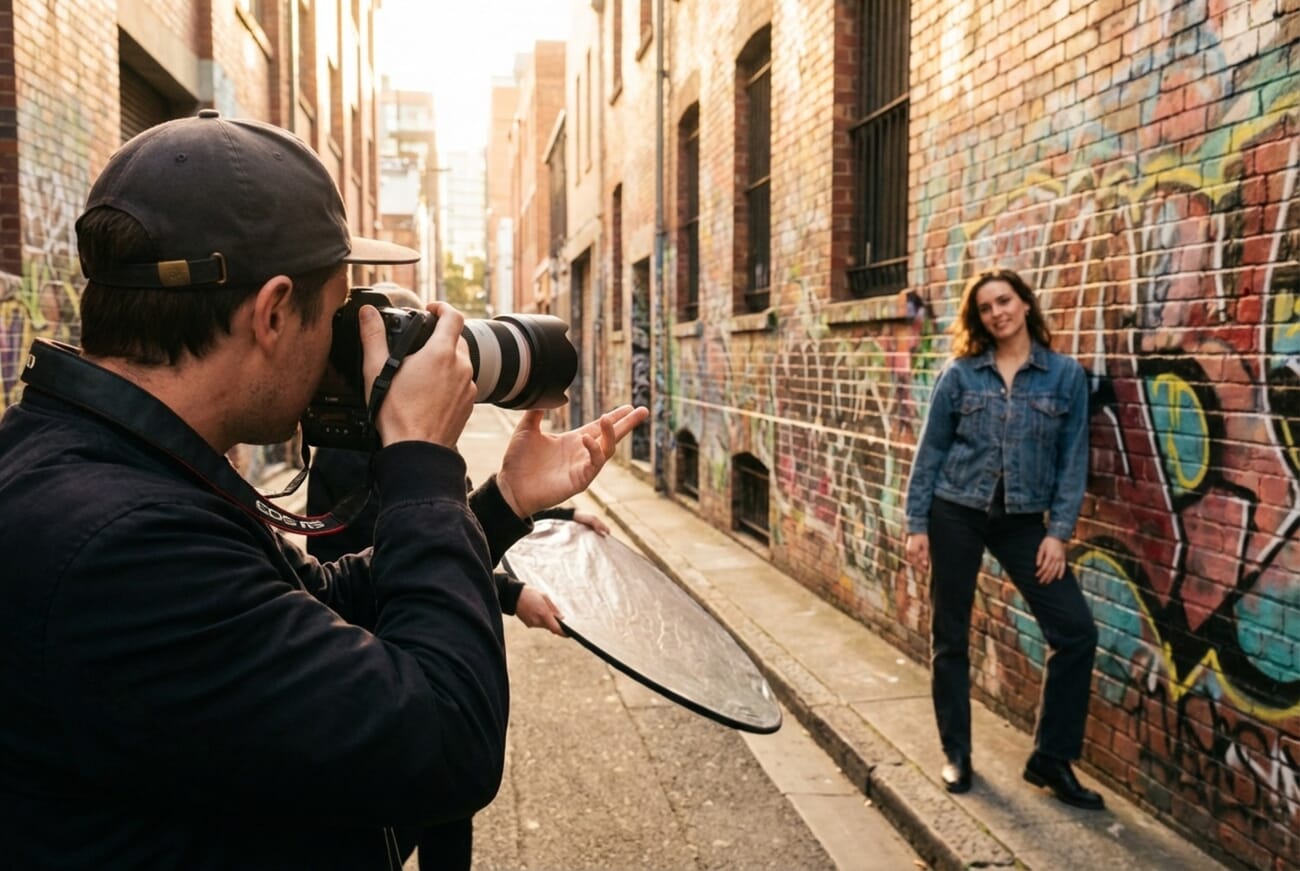
Step 1: Choose the Right Location
The location sets the tone for the entire shoot. Before worrying about lighting, posing, or camera settings, photographers should decide where the session will take place — and ideally scout the spot in advance.
Full-body portraits can be captured in three main environments, each with distinct advantages:
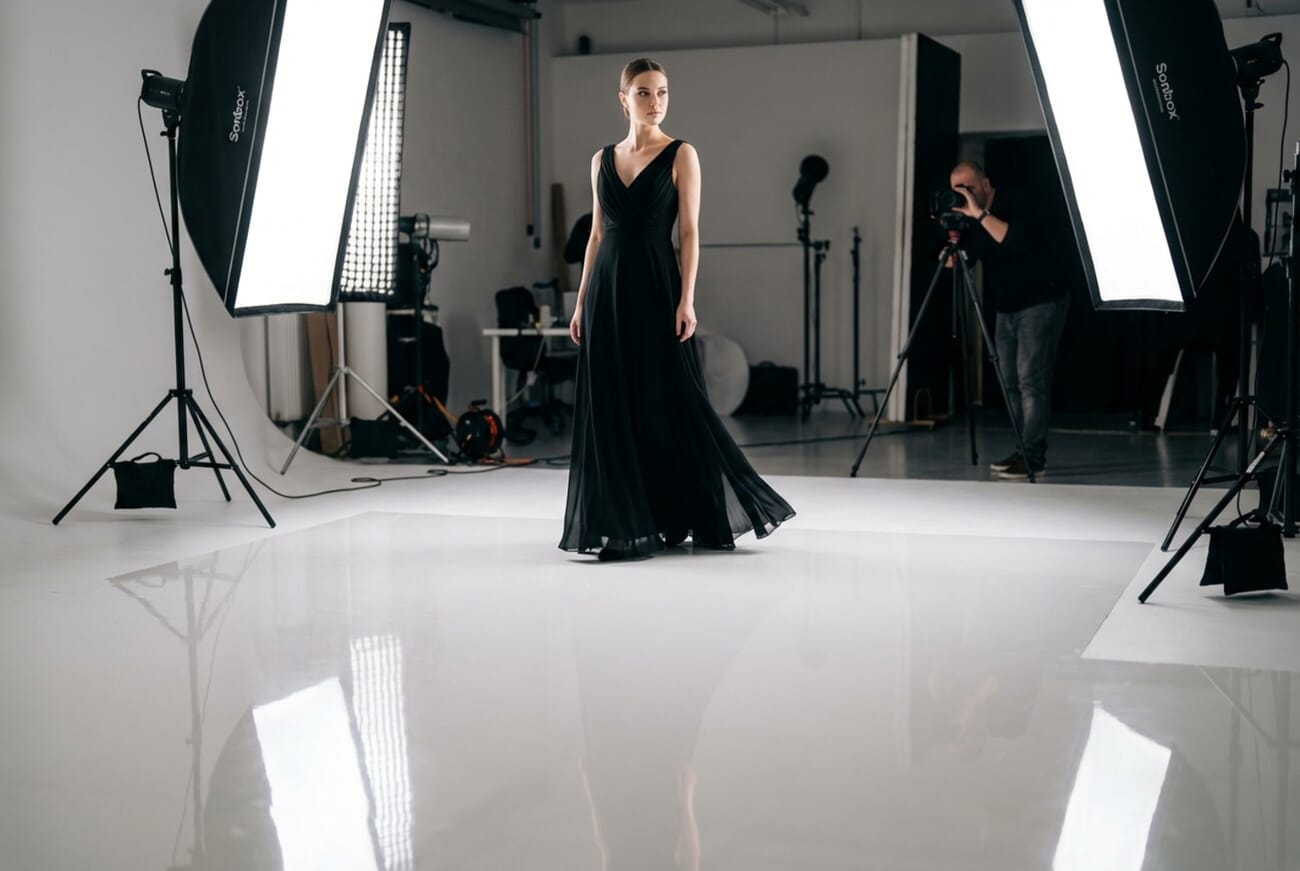
- Studio: Offers complete control over lighting and background. Ideal for commercial work, fashion portfolios, and professional headshots that include the full body. Seamless paper backdrops or painted canvas backgrounds keep the focus entirely on the subject.
- Indoor (non-studio): Locations like cafés, warehouses, hotel lobbies, and private homes add character and tell a story. Large windows provide beautiful natural light. Rearranging furniture or clearing clutter before the shoot can dramatically improve the results.
- Outdoor: Parks, urban streets, beaches, and fields offer endless variety. The background becomes part of the story. Scouting outdoor locations in advance helps identify the best angles, potential distractions, and optimal times of day for light.
When scouting, pay attention to background clutter, color harmony between the environment and the subject’s wardrobe, and the direction of natural light at the planned shooting time.
Step 2: Set Up the Lighting
Lighting a full-body portrait is more challenging than lighting a headshot because the light must cover the subject from head to toe — roughly five to six feet of vertical space. Uneven lighting is one of the most common problems in full-body work, where the face is properly exposed but the legs fall into shadow.

Indoor and Studio Lighting
For indoor full-body portraits, studio strobes paired with large modifiers are essential. A 1×4 foot strip softbox — or better yet, a 2×6 foot softbox — can illuminate an adult from head to toe in a single light source.
A reliable two-light setup works as follows:
- Key light: Position a large strip softbox at roughly 45 degrees to the subject, angled slightly downward. This serves as the primary illumination.
- Rim/separation light: Place a second light slightly behind the subject on the opposite side, creating a bright edge that separates them from the background.
- Fill (optional): A reflector or third light on the shadow side reduces contrast. A white V-flat works well for this purpose.
Because light falls off with distance, the bottom half of the subject often receives less light than the top. To counteract this, angle the key light so its center points at the subject’s midsection rather than their face, or use a second lower light aimed at the legs.
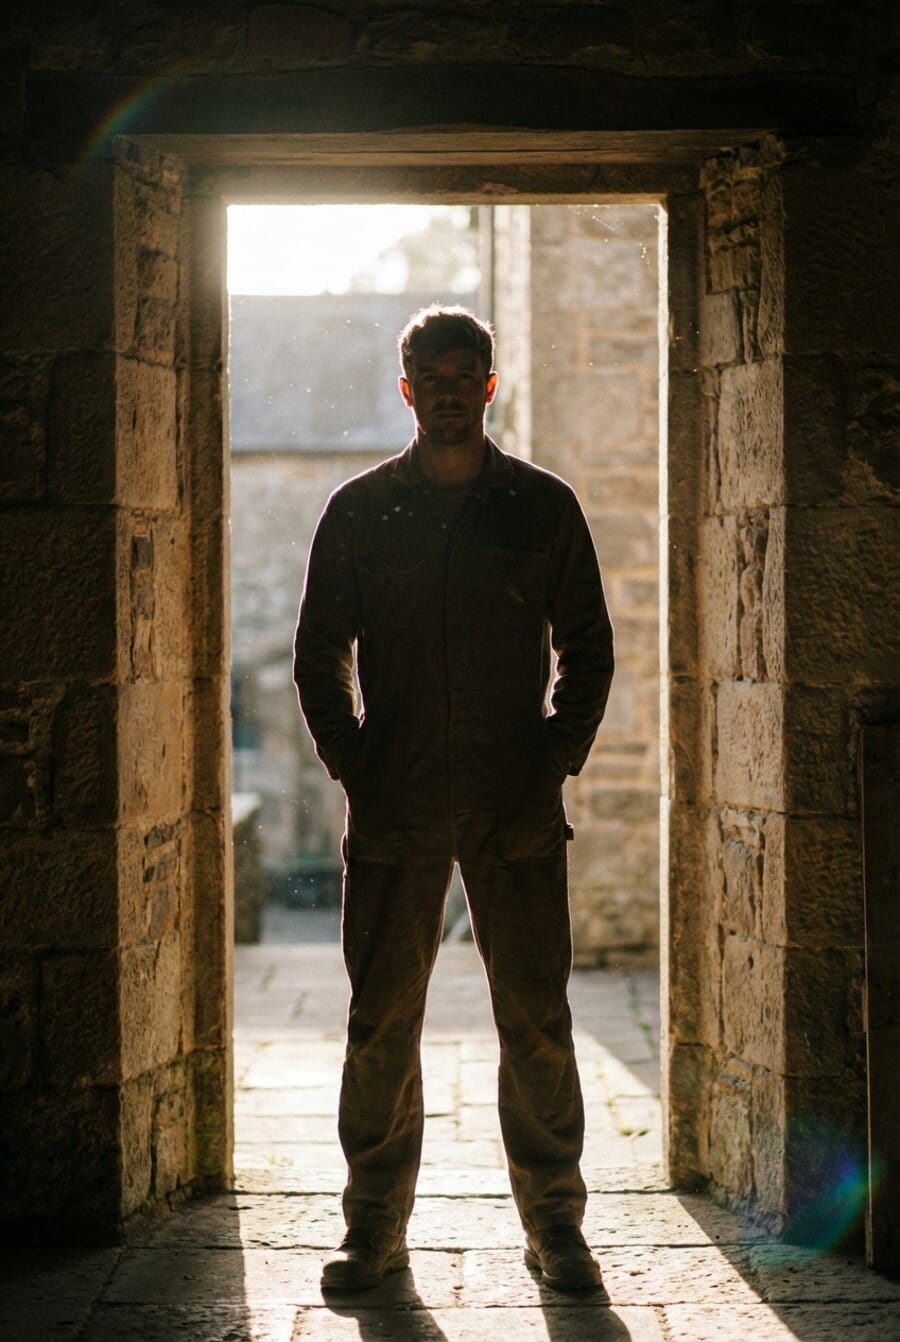
Outdoor Lighting
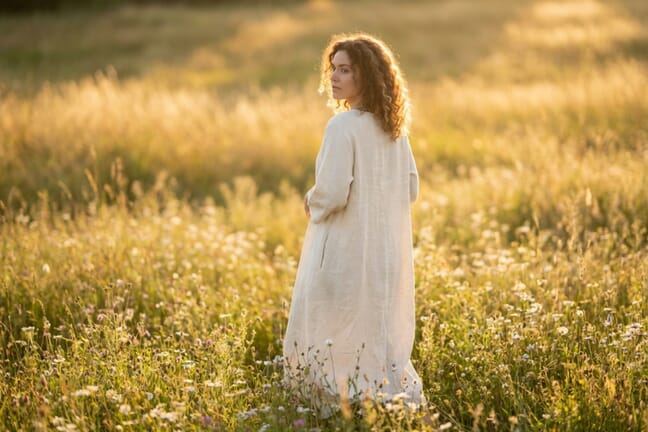
The best natural light for outdoor full-body portraits comes during golden hour (the first and last hour of sunlight) or in open shade. Direct midday sun creates harsh shadows under the eyes, nose, and chin — and these problems multiply in full-body shots where shadow patterns appear across the entire frame.
Understanding portrait lighting helps photographers make the most of any outdoor condition. On overcast days, the clouds act as a giant softbox, producing even, flattering light that works beautifully for full-body work.
For more control outdoors, a portable strobe with a softbox modifier can balance the ambient light and add dimension. Position the strobe to act as the key light while letting the sun handle the background — this technique creates professional-looking results even in challenging conditions.
Step 3: Posing Guide for Full-Body Portraits
Posing is arguably the most impactful element in full-body portrait photography. Unlike headshots where facial expression drives the image, full-body portraits require the photographer to direct every element — from the tilt of the head to the placement of the feet.
Universal Posing Fundamentals
These principles apply regardless of the subject’s gender or body type:
- Weight distribution: Having the subject shift their weight onto the back leg creates a natural, relaxed look. When weight is evenly distributed on both feet, the pose tends to look stiff and uncomfortable.
- Hand placement: Hands are one of the trickiest elements. Avoid letting them hang limply at the sides. Instead, direct the subject to place hands on hips, in pockets, touching their hair, holding a prop, or gently resting on their thigh.
- Chin forward and down: Slightly extending the chin forward and tilting it down defines the jawline and avoids a double-chin appearance — even from a distance, this subtle adjustment is visible.
- Angles over straight-on: Turning the body slightly (about 30–45 degrees) to the camera rather than standing square-on creates a more dynamic, slimming effect.
- Create space: Small gaps between the arms and torso (sometimes called “triangle gaps”) define the waist and prevent the body from looking wider than it is.
Poses for Women
Classic feminine posing often emphasizes curves and flow:
- The S-curve: Shifting the hips to one side while keeping the shoulders relatively level creates a natural S-shape through the body. This is one of the most universally flattering poses.
- Walking toward the camera: Mid-stride shots create natural movement and energy. Ask the subject to walk slowly and confidently toward the camera while looking slightly to the side.
- One leg crossed: Standing with one leg crossed in front of the other elongates the legs and adds elegance.
- Sitting on stairs or a ledge: Seated poses break the symmetry of standing shots. Have the subject sit with legs angled to one side rather than straight toward the camera.
Poses for Men
Masculine posing typically emphasizes structure, confidence, and strength:
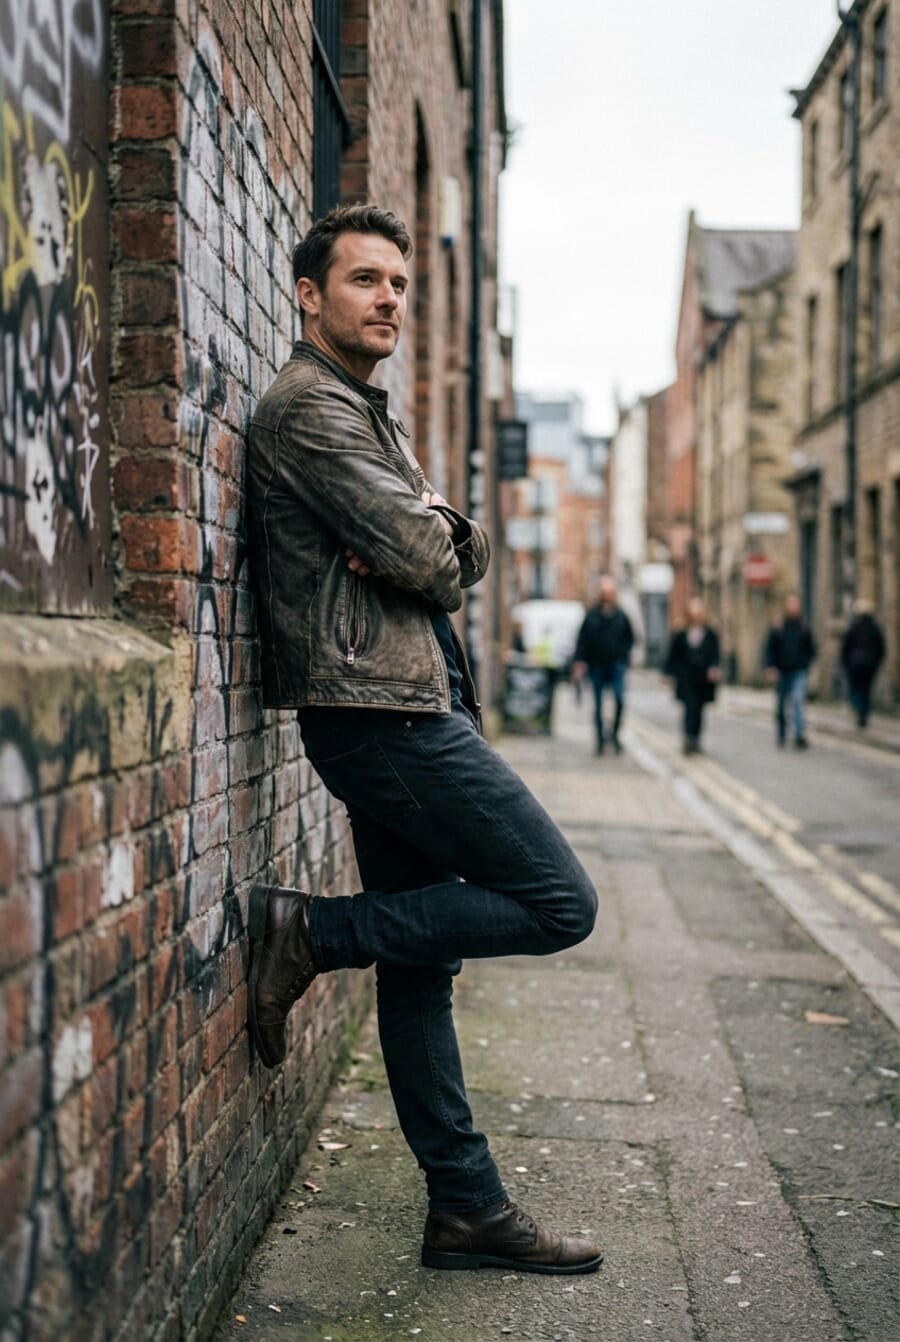
- Leaning against a wall: One shoulder or the back against a wall, arms crossed or one hand in a pocket. This conveys relaxed confidence.
- Power stance: Feet shoulder-width apart, chest slightly forward. Hands in pockets or holding jacket lapels.
- Walking with purpose: A mid-stride shot with a focused gaze creates a strong editorial look.
- Sitting casually: On a bench, steps, or the ground with legs apart and elbows resting on the knees.
Action and Movement Poses
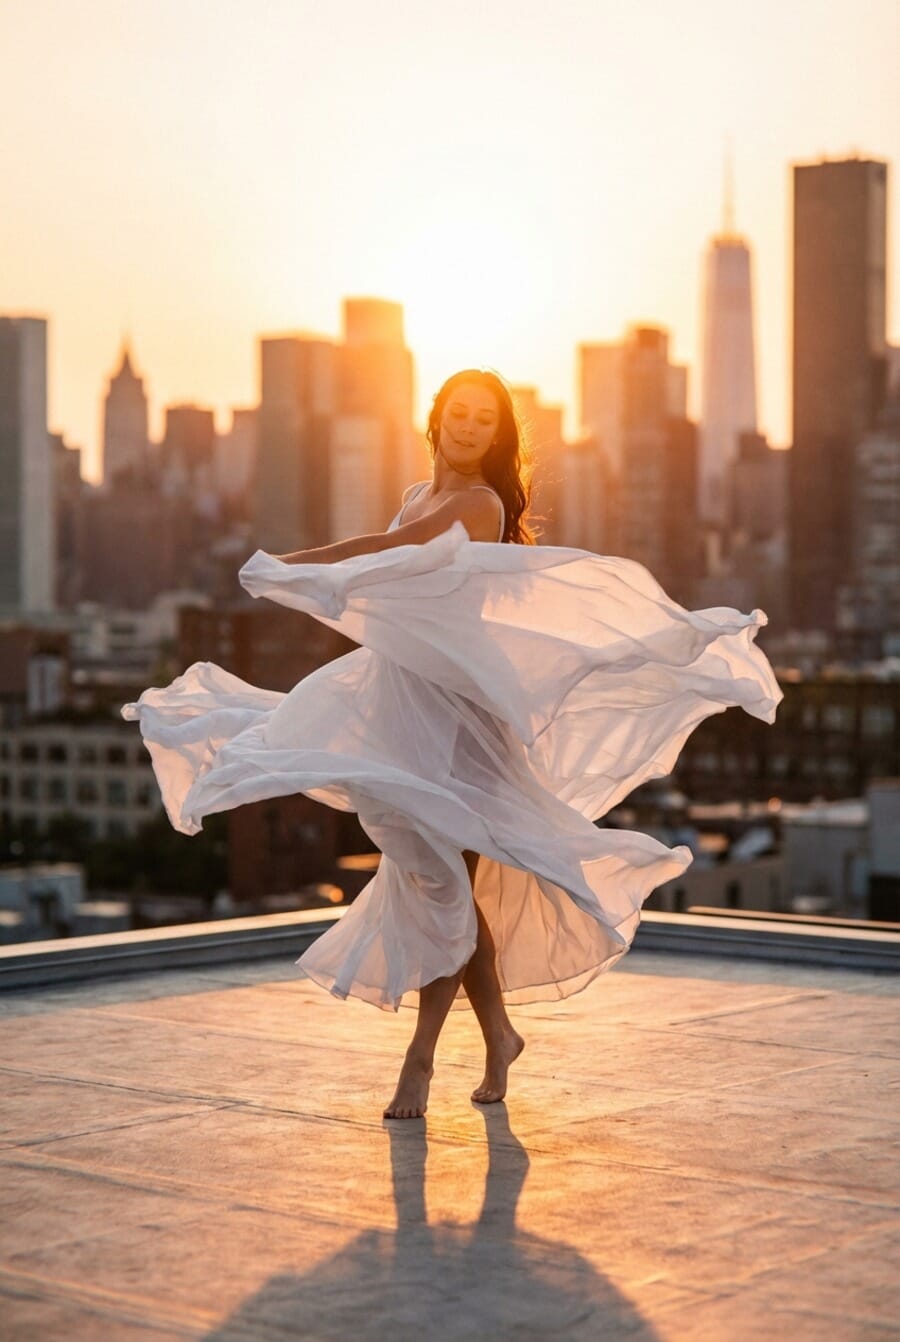
Static poses aren’t the only option. Some of the most compelling full-body portraits capture movement:
- Twirling: Especially effective with flowing dresses or skirts. Use a shutter speed of at least 1/500s to freeze the fabric mid-motion.
- Jumping: Energetic and fun. Shoot in burst mode and at 1/1000s or faster.
- Hair toss: The subject flips their hair while the photographer captures the motion. Works best with backlighting to illuminate the flying hair.
- Looking away and turning back: Ask the subject to look away, then turn back toward the camera as the photographer fires a burst. This often captures genuine, spontaneous expressions.
For all posing: communicate clearly, demonstrate poses when possible, and review the images on the camera’s LCD together with the subject. Most people aren’t professional models — they need guidance and encouragement to look their best.
Step 4: Create the Look and Expression
After positioning the subject, the next step is directing their facial expression and overall demeanor. Even in a full-body shot where the face occupies a small portion of the frame, expression matters — it sets the mood for the entire image.
Communicate clearly about where the subject should look (directly at the camera, off to the side, or downward), what emotion to convey, and how to hold their facial muscles. Regularly review the images on the camera’s LCD to see how subtle changes affect the final result.
Wardrobe plays a significant role in full-body portraits. Coordinate with the subject beforehand about clothing choices — solid colors tend to photograph better than busy patterns, and fitted clothing generally looks more flattering than overly baggy outfits. The wardrobe should complement the location and overall theme of the shoot.
Breaking the ice at the start of the session helps nervous subjects relax. Play music, make conversation, and start with simple poses before progressing to more complex ones. Remember the 80/20 rule: about 80% of a portrait session is preparation, direction, and rapport-building, while only 20% is actually pressing the shutter.
Step 5: Frame and Compose the Shot
Framing is where technical knowledge meets artistic vision. How the subject is positioned within the frame determines whether the portrait feels intentional or accidental.
Camera Height and Angle
For full-body portraits, the camera should generally be positioned at the subject’s waist to chest level — not eye level. Shooting from too high makes the subject look short, while shooting from too low can exaggerate the legs and make the head look small.
A slight low angle (camera at hip height shooting slightly upward) can be flattering, making the subject appear taller and more powerful. Experiment with the angle and check the results — even small changes in camera height noticeably alter the subject’s proportions.
Composition Guidelines
- Leave breathing room: Include space around the subject — especially above the head and below the feet. Tight cropping in full-body work feels claustrophobic.
- Rule of thirds: Place the subject slightly off-center for a more dynamic composition. The subject’s eyes often work well positioned on one of the upper third intersections.
- Leading lines: Use architectural elements, pathways, or fences to guide the viewer’s eye toward the subject.
- Negative space: Intentional empty space on one side of the frame can create a powerful, editorial look.
- Orientation: Full-body portraits work in both portrait (vertical) and landscape (horizontal) orientation. Portrait orientation maximizes the subject’s size in the frame; landscape orientation emphasizes the environment.
Common Full-Body Portrait Mistakes (and How to Avoid Them)
Even experienced photographers fall into these traps. Being aware of these common mistakes helps avoid them:
Cropping at the Joints
This is the number-one rule of full-body portrait composition: never crop at the joints. Cutting the frame at the knees, ankles, elbows, or wrists makes the subject look amputated. If the full body doesn’t fit in the frame, crop at mid-thigh or mid-calf instead — between the joints, not at them.
Too Much Headroom
Leaving excessive space above the subject’s head makes them look small and lost in the frame. A good guideline is to leave roughly the same amount of space above the head as below the feet — or slightly less above.
Distracting Backgrounds
Full-body shots include more background than headshots, which means there’s more opportunity for distractions — trash cans, parked cars, bright signs, or other people. Always scan the entire frame before pressing the shutter. Moving a few steps in any direction often eliminates distractions.
Using the Wrong Focal Length
Wide-angle lenses (24mm, 28mm, 35mm) distort the body — limbs closest to the camera appear larger, and the overall proportions look unnatural. Stick to 50mm or longer for full-body work. If space is tight indoors, it’s better to move to a larger room than to switch to a wider lens.
Ignoring the Feet
In a full-body portrait, the feet are visible and matter. Awkward foot positions — pigeon-toed, too far apart, or pointing in different directions — can ruin an otherwise strong image. Direct the subject’s feet just as carefully as their hands and face.
Indoor vs. Outdoor Full-Body Portraits
Each environment presents unique challenges and opportunities for full-body portrait photography:
Indoor Advantages
- Complete lighting control: No waiting for the right time of day or worrying about weather.
- Consistent results: Once the lighting is dialed in, every frame will be similarly exposed.
- Clean backgrounds: Seamless paper or painted backdrops eliminate distractions entirely.
- Privacy: The subject may feel more comfortable posing without public onlookers.
Indoor Challenges
- Space limitations: Full-body shots require the photographer to stand further back, which demands a larger room — at least 15–20 feet of working distance.
- Ceiling height: Low ceilings limit overhead lighting options and can cause light to bounce off the ceiling and floor unpredictably.
- Equipment needed: Studio strobes, modifiers, and stands require investment and setup time.
Outdoor Advantages
- Natural light: Free, beautiful, and infinitely varied. Golden hour and overcast skies produce gorgeous full-body portraits.
- Unlimited space: No room-size constraints — the photographer can back up as far as needed.
- Environmental storytelling: The location becomes part of the portrait, adding context and narrative.
- Variety: A single outdoor location can offer multiple distinct backdrops within a short walk.
Outdoor Challenges
- Unpredictable light: Clouds, wind, and the sun’s position change constantly.
- Harsh midday sun: Creates unflattering shadows across the entire body. Seek shade or use a reflector/diffuser.
- Background control: Pedestrians, vehicles, and other elements can intrude on the frame.
- Weather dependency: Rain, extreme heat, or cold can cut a session short.
Best Lenses for Full-Body Portraits in 2026
Lens selection dramatically impacts the quality of full-body portraits. The following lenses represent the best options available in 2026 for mirrorless camera systems:
Prime Lenses
- Sony FE 85mm f/1.4 GM II: Sony’s second-generation G Master delivers stunning sharpness, fast and silent autofocus, and beautiful bokeh — all in a compact, lightweight body. The best 85mm for Sony shooters.
- Canon RF 85mm f/1.2L USM: Canon’s flagship portrait lens produces an almost three-dimensional rendering of subjects. The f/1.2 maximum aperture creates extraordinary background blur, though it’s heavier and more expensive than f/1.4 alternatives.
- Nikon Z 85mm f/1.2 S: Nikon’s premium portrait lens for the Z-mount system. Exceptional sharpness, gorgeous bokeh, and a robust build quality.
- Sigma 85mm f/1.4 DG DN Art: Available for Sony E-mount and Leica L-mount, this lens offers G Master-level optical quality at roughly half the price. An outstanding value.
- Sony FE 50mm f/1.4 GM: When space is limited or a wider field of view is needed, this 50mm prime is an excellent option. Sharp, fast, and lightweight.
Zoom Lenses
- Sony FE 70-200mm f/2.8 GM OSS II: The gold standard for portrait zoom lenses. Covers the ideal focal range for full-body work with a constant f/2.8 aperture. Incredibly sharp and fast-focusing.
- Canon RF 70-200mm f/2.8L IS USM Z: Canon’s latest iteration for the RF mount. Compact design with outstanding image quality across the entire zoom range.
- Nikon Z 70-200mm f/2.8 VR S: Nikon’s professional portrait zoom. Excellent stabilization and razor-sharp optics.
- Tamron 70-180mm f/2.8 Di III VC VXD G2: A budget-friendly alternative for Sony shooters that doesn’t sacrifice much in optical quality. Lighter and smaller than the Sony GM equivalent.
For photographers on a budget, the 85mm f/1.8 primes from Canon (RF 85mm f/2 Macro IS STM), Nikon (Z 85mm f/1.8 S), and Sony (FE 85mm f/1.8) deliver excellent results at a fraction of the cost of their f/1.4 and f/1.2 siblings.
Editing Tips for Full-Body Portraits
Post-processing can elevate a good full-body portrait into a great one. Here are the key editing considerations:
Exposure and Color
Start with basic adjustments: exposure, white balance, highlights, and shadows. For full-body portraits, pay special attention to light falloff — the lower half of the body is often slightly darker than the upper half. Use a graduated filter or local adjustment brush to even out the exposure from top to bottom.
Background Cleanup
Full-body shots include more background area, which means more potential distractions. Use the clone stamp, healing brush, or AI-powered removal tools (available in Lightroom and Photoshop as of 2026) to eliminate distracting elements — stray trash, bright signs, or people in the background.
Skin Retouching
In full-body portraits, the subject’s face is smaller in the frame, which means heavy skin retouching is usually unnecessary. Focus on overall skin tone consistency — arms, legs, and face should match in color and luminosity. For visible skin areas, use frequency separation or dodge-and-burn techniques sparingly to maintain a natural look.
Body Proportions
Lens distortion can subtly affect body proportions. Apply lens profile corrections in Lightroom or Camera Raw to remove barrel or pincushion distortion. If the subject appears slightly stretched or compressed, minor adjustments to the transform controls can help — but avoid heavy manipulation that makes the image look unnatural.
Sharpening and Export
Apply sharpening carefully. For full-body portraits destined for web use, export at 2048px on the long edge with a moderate amount of output sharpening. For print, export at the native resolution with print-specific sharpening. Always shoot in RAW format to preserve maximum flexibility in post-processing.
Can You Shoot Full-Body Portraits on a Smartphone?
Modern smartphones — particularly flagship models from Apple, Samsung, and Google — are capable of producing impressive full-body portraits. The computational photography engines in the iPhone 16 Pro, Samsung Galaxy S25 Ultra, and Google Pixel 9 Pro can simulate shallow depth of field and handle exposure remarkably well.
Here are tips for getting the best smartphone full-body portraits:
- Use the 2x or 3x telephoto lens: Most flagship phones have a telephoto option (typically 48–77mm equivalent). This avoids the wide-angle distortion of the main camera.
- Avoid Portrait Mode for full-body: Most phone portrait modes are optimized for head-and-shoulders shots. The artificial blur can look unnatural at full-body distances. Instead, use the standard Photo mode with the telephoto lens and rely on natural background separation from distance.
- Shoot in good light: Smartphones perform best in bright, even light. Golden hour and open shade produce the most flattering results.
- Lock focus and exposure: Tap and hold on the subject to lock autofocus, then adjust exposure manually if needed.
- Edit in Lightroom Mobile or Snapseed: These free apps offer professional-level adjustments including selective edits, color grading, and sharpening.
While a dedicated camera with a fast prime lens still delivers superior results — especially in low light and for background blur — a smartphone is always available and can produce portfolio-worthy full-body portraits in the right conditions.
Full-Body Portrait Photography FAQ
What is the best focal length for full-body portraits?
The 85mm focal length is widely considered the best for full-body portraits on a full-frame camera. It provides natural perspective, flattering compression, and enough working distance to frame the entire body comfortably. A 50mm lens is a solid alternative when space is limited, and a 70-200mm zoom offers the most versatility.
What aperture should be used for full-body portraits?
An aperture between f/2.8 and f/4 works best for most full-body portraits. This range blurs the background enough to separate the subject while keeping their entire body in acceptable focus. Shooting wider than f/2 with a full-body framing risks parts of the subject falling out of focus.
How far should the photographer stand from the subject?
With an 85mm lens on a full-frame camera, the photographer typically needs to stand 12–20 feet (4–6 meters) from the subject to fit the entire body in the frame. With a 50mm lens, the distance decreases to roughly 8–15 feet (2.5–4.5 meters). The exact distance depends on the subject’s height and the desired amount of space around them.
How do you make a full-body portrait look flattering?
Several techniques help: shoot at the subject’s waist-to-chest level rather than from above, use a focal length of 50mm or longer, turn the body at a slight angle to the camera, shift weight to the back leg, and use soft, even lighting. Post-processing adjustments like lens correction and slight vignetting also enhance the final result.
Should full-body portraits be shot in portrait or landscape orientation?
Both orientations work. Portrait (vertical) orientation maximizes the subject’s size in the frame and is the most common choice. Landscape (horizontal) orientation emphasizes the environment and works well for editorial or environmental portraits where context matters. Shoot both during a session to provide more options.
Do you need a full-frame camera for full-body portraits?
No. APS-C and Micro Four Thirds cameras are perfectly capable of producing professional full-body portraits. The main difference is the crop factor, which affects the effective focal length and depth of field. A 56mm f/1.4 on APS-C produces roughly the same field of view and background blur as an 85mm f/2 on full-frame. Modern APS-C cameras like the Fujifilm X-T5 and Sony a6700 deliver excellent image quality for portrait work.
Start Shooting Full-Body Portraits Today
Full-body portrait photography requires a different mindset than headshots or half-body shots — there are more elements to manage, from posing and lighting to framing and lens choice. But the results are worth the extra effort: a well-executed full-body portrait tells a complete story about the subject, their style, and their environment.
Start with the fundamentals outlined in this guide: use a 50–85mm lens, shoot at f/2.8–f/4, direct the subject’s posing carefully, and pay close attention to framing and background. With practice, these technical decisions become second nature, leaving more mental space for creativity and connection with the subject.
