

- White balance corrects the color cast of the light source so whites render white and skin tones look natural — everything else flows from that.
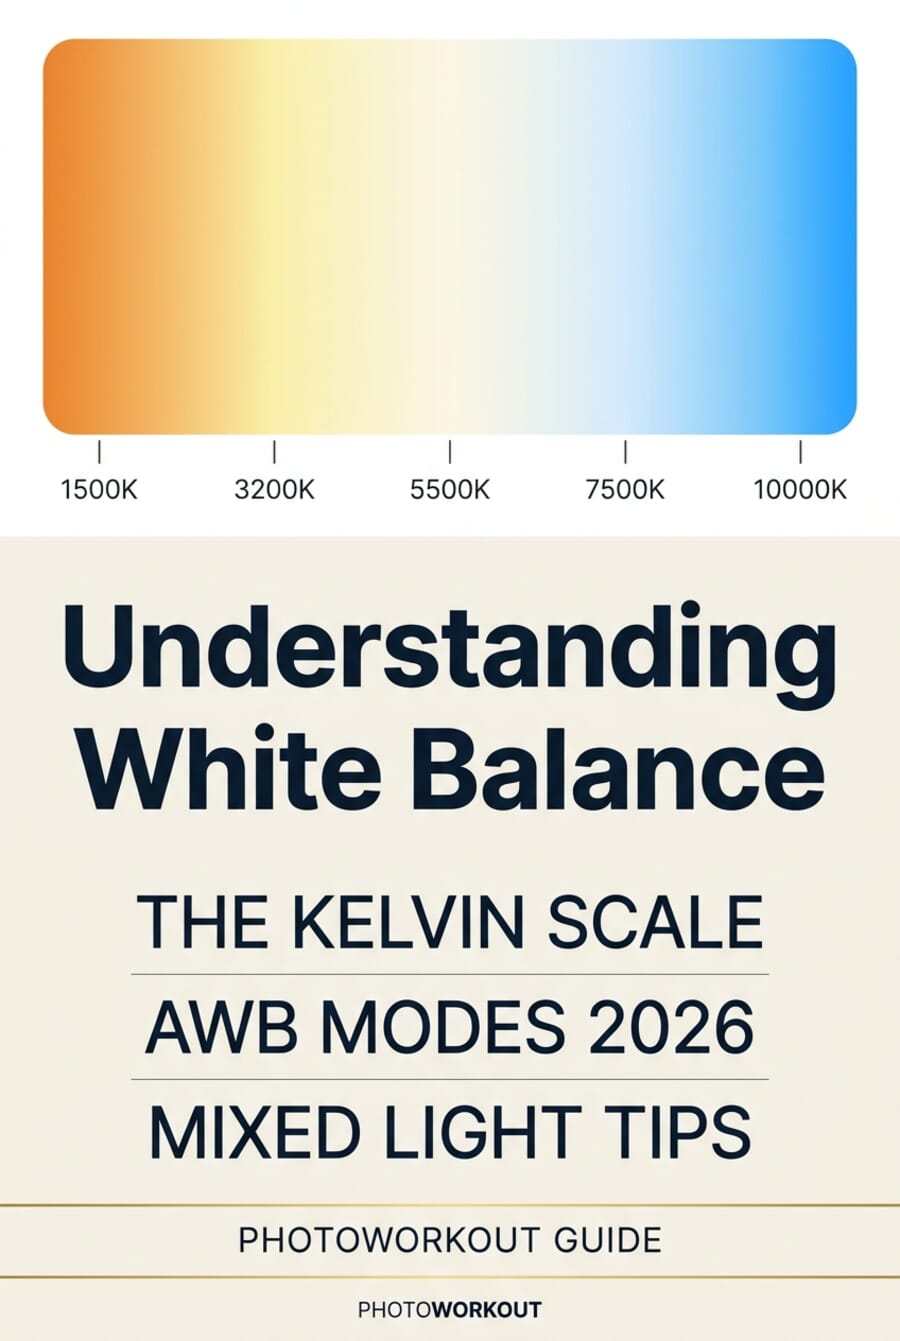
- The Kelvin scale runs from warm (1,500K candlelight) through neutral daylight (~5,500K) to cool (10,000K open blue sky). Matching the scene’s Kelvin is the shortcut to accurate color.
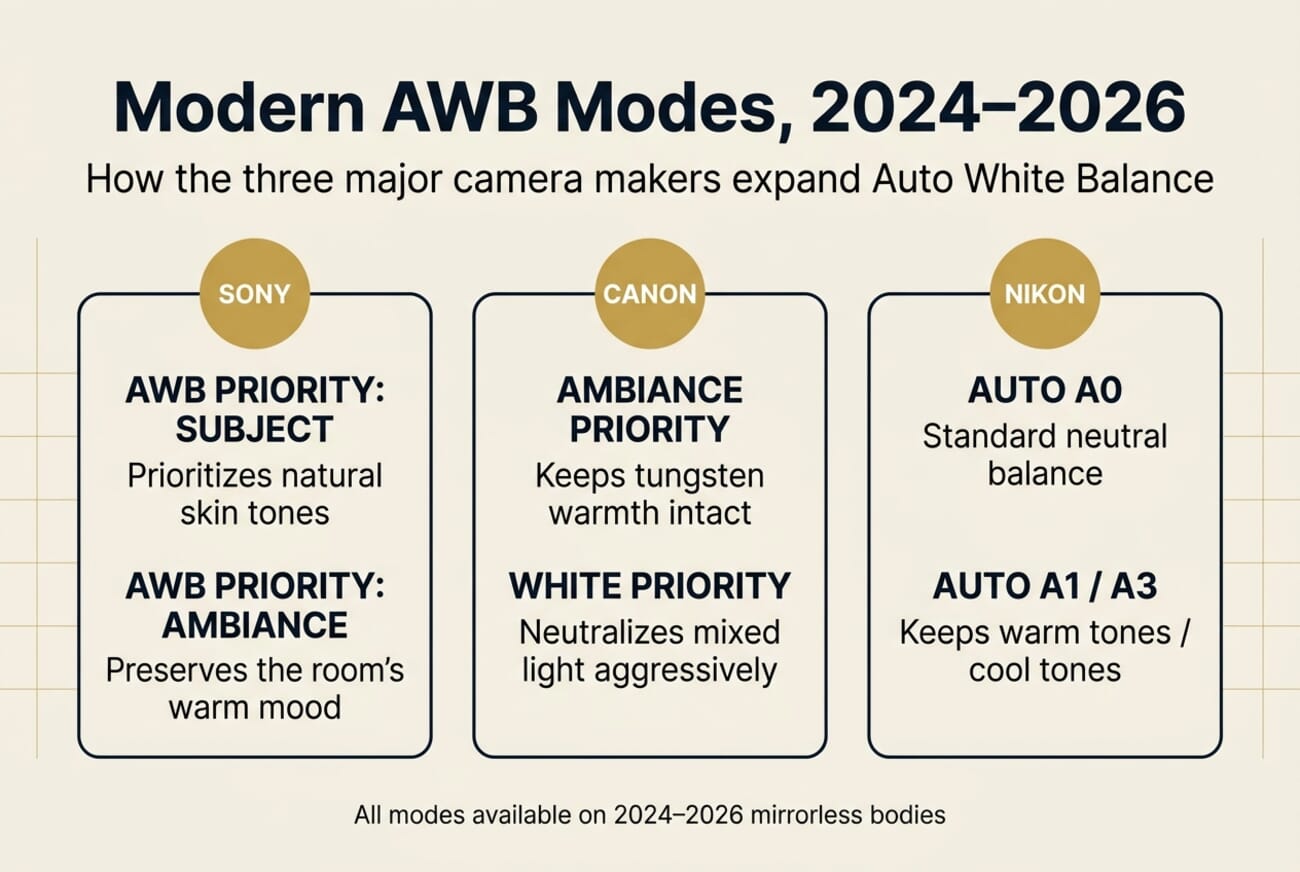
- Modern bodies ship smarter Auto White Balance: Sony splits AWB into Subject and Ambiance priority, Canon offers Ambiance vs White priority, Nikon adds Auto A1/A3 variants for keeping or removing warmth.
- Hybrid shooters should LOCK white balance on video — floating AWB causes color shifts mid-clip that are almost impossible to fix in post.
- Mixed lighting (tungsten room plus window daylight, shade patches on sun) is the hardest scenario. Choose which light source you want to read correctly and gel or color-grade the rest.
- Shoot RAW — Lightroom and Capture One let you drag the white-balance slider freely and sample a neutral surface with the eyedropper, recovering any AWB mistake losslessly.
White balance is the single camera setting that does more to make photos look “right” than any other — and more to make them look wrong when it’s off. It’s the calibration that tells the camera what color “white” is in the current lighting, so every other color lands in its proper place. Get it wrong and skin tones turn orange, snow turns blue, and white shirts turn green under office fluorescents.
Modern mirrorless cameras handle white balance better than any generation before, with smarter Auto White Balance algorithms and dedicated modes for different creative intents. But the photographer still has to understand what the camera is doing — especially in mixed-lighting setups, on video, or when shooting for a consistent color-graded look. This guide walks through how white balance actually works, what the modern 2024–2026 AWB modes do, how to handle tricky scenes, and how to recover any white-balance miss in post-processing.
What Is White Balance?
Human vision adapts automatically to different light sources. A white piece of paper looks white whether it’s lit by a tungsten lamp, an overcast sky, or a fluorescent tube — the brain quietly “knows” white is white and adjusts perception accordingly. Camera sensors have no such built-in adaptation. They record the actual wavelengths hitting the sensor, which means paper under tungsten light records a yellow-orange cast, paper in open shade records blue, and paper under cheap fluorescents records a sickly green.
White balance is the compensation step. Setting white balance to match the scene’s dominant light source effectively tells the camera, “this light source is neutral — shift the recorded colors to make that true.” Done correctly, whites render white, skin tones look natural, and every other color sits in its right place. Done incorrectly, every single color in the frame is biased toward the dominant cast.
White balance is not just error correction, though. Photographers and colorists also use it creatively — deliberately setting a cooler or warmer WB to evoke mood, suggest a time of day, or match a visual grade. Both uses matter.
The Kelvin Scale: Color Temperature Explained
Color temperature is measured in Kelvin (K). Lower numbers describe warm, reddish light; higher numbers describe cooler, bluer light. The name comes from the physics of blackbody radiation — when a theoretical black object is heated, it glows through a predictable color sequence (red → orange → yellow → white → blue) as temperature rises. Photography co-opts the same scale to describe ambient light sources.
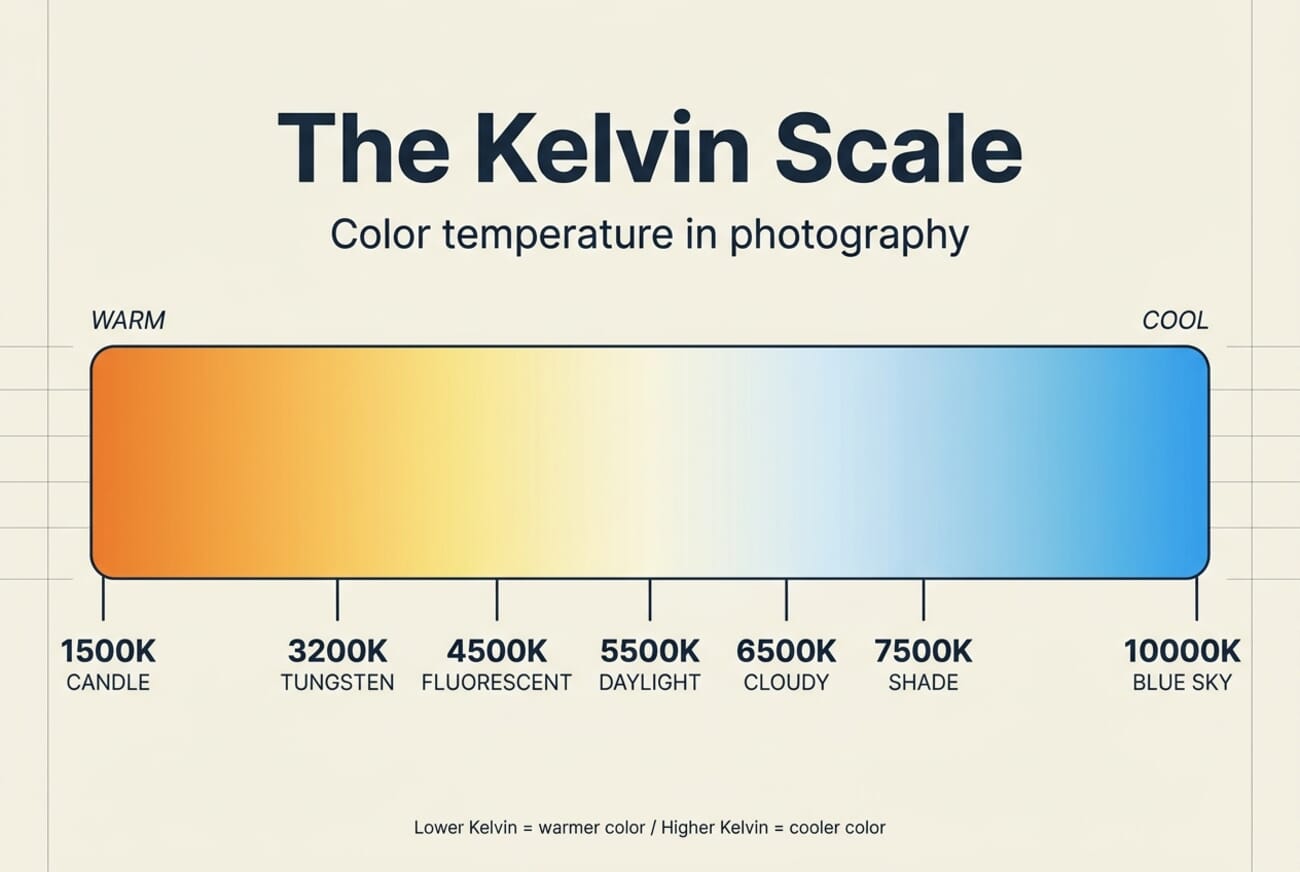
Standard reference points every photographer eventually memorizes:
- 1,500–2,000K — candle flames, firelight
- 3,000–3,400K — tungsten/halogen household bulbs
- 4,000–4,500K — cool-white fluorescent tubes, LED panels
- 5,200–5,500K — direct midday sunlight, electronic flash
- 6,000–6,500K — overcast daylight
- 7,000–8,000K — open shade on a sunny day
- 9,000–10,000K+ — clear blue sky away from the sun, high-altitude light
Camera white balance presets map directly to these zones. Setting the camera to “Tungsten” tells it to expect 3,200K light; setting it to “Shade” tells it to expect 7,000K. Auto White Balance (AWB) estimates the Kelvin value automatically from the scene.
In-Camera White Balance Modes
Every interchangeable-lens camera offers the same menu of white balance options, even if the labels vary slightly between brands:
- Auto White Balance (AWB) — the camera picks the Kelvin value scene-by-scene
- Daylight / Sunlight — fixed at ~5,500K
- Cloudy — fixed at ~6,500K, warms up overcast scenes
- Shade — fixed at ~7,500K, strongly warms cool open-shade light
- Tungsten / Incandescent — fixed at ~3,200K, cools warm bulbs
- Fluorescent — typically 4,000K with a magenta tint to counter fluorescent green
- Flash — fixed at ~5,500K (electronic flash is engineered to match daylight)
- Kelvin (K) — dial in any value manually, typically 2,500K–10,000K
- Custom / Preset — shoot a reference white or gray card in the actual scene and let the camera calibrate from that
For anything other than fixed studio conditions, AWB is the default, and on modern bodies it’s remarkably good — but every brand now ships smarter multi-mode variants that are worth understanding.
Modern AWB Modes: Sony, Canon, and Nikon in 2024–2026
Starting around 2023 and now standard across the 2024–2026 bodies, the three major mirrorless brands split plain Auto White Balance into multiple preference modes. They exist because AWB has two legitimate goals that can conflict — do you want every scene corrected to absolute neutral, or do you want the camera to preserve the mood of the ambient light? Modern AWB lets you pick.
Sony: AWB Priority Subject / Ambiance
Available on Alpha bodies from the a7 IV onward, including the rumored 67MP Alpha 7R VI expected in May 2026. Sony gives three options inside the AWB menu: Standard, Subject (prioritizes the subject’s natural skin tones even if the background goes slightly warm or cool), and Ambiance (intentionally preserves the ambient warmth of the scene — great for candlelit portraits, golden hour, cozy indoor shots). Subject is the safer default for portraits; Ambiance is the pick for mood.
Canon: Ambiance Priority vs White Priority
Canon has split AWB into two explicit modes on EOS R bodies since the R5/R6 generation — now universal on the newer R5 Mark II, EOS R6 Mark III, and R7. “Ambiance Priority” (the default) keeps the warm character of tungsten and household lighting intact; “White Priority” aggressively neutralizes mixed light to make white subjects appear truly white. Use Ambiance for restaurants, concerts, golden hour. Use White Priority for product photography, copy work, or any scene where color accuracy matters more than mood.
Nikon: Auto A0 / A1 / A3
Nikon’s Z-series uses a letter-coded Auto WB system. Auto A0 is standard neutral; Auto A1 keeps warm tones (similar to Canon Ambiance or Sony Ambiance); Auto A3 keeps cool tones (rarely used but helpful for deep shade). Available on the Z8, Z6III, Z50II, and Nikon’s entire current mirrorless lineup.
Practical takeaway: learn your brand’s “preserve warmth” mode (Sony Ambiance, Canon Ambiance Priority, Nikon A1) and keep it selected for indoor portraits, weddings, and anything shot at golden hour. Switch to the neutral mode (Sony Subject, Canon White Priority, Nikon A0) for events with mixed fluorescent+LED lighting where the goal is clean skin tones rather than mood.
White Balance for Video and Hybrid Shooters
White balance on video is non-negotiable: lock it down, manually, before rolling. Auto White Balance on a moving image can shift color temperature mid-clip as the camera re-evaluates the scene frame by frame. That produces visible temperature drifts in the final footage that are extremely hard to fix without frame-accurate color correction. Every professional hybrid shooter sets a fixed Kelvin value or a preset before recording, and holds it for the duration of the scene.
Practical video workflow:
- Switch off AWB before recording. Choose Kelvin mode or a preset that matches the scene’s dominant light source.
- For mixed-light scenes, pick the light source you want to read as “neutral” — usually the key light on the subject — and set white balance to match that. Everything else will drift warm or cool, which is often desirable creatively.
- If shooting Log/Flat color profiles (S-Log3, C-Log2, N-Log, V-Log), still set a correct white balance value in-camera. The color grade later is easier when the starting WB is right.
- Use a white reference (a piece of paper, a gray card, or a dedicated QR-coded WB target) to shoot a quick reference frame at the start of each new lighting setup — it lets the colorist sample neutral in post if needed.
- For run-and-gun vlogging, match WB to the outdoor scene (5,500K) or the indoor scene (3,200K) and accept a slight cast in the transition shots rather than letting AWB drift.
Emerging grading workflows like DaVinci Resolve 21’s new Photo page make cross-WB consistency between stills and video easier to handle, but they only work cleanly on footage that was shot with a locked WB in the first place.
Mixed Lighting Scenarios: The Hardest Case
Mixed lighting is when two or more light sources with different Kelvin values illuminate the same scene. A living room with tungsten lamps glowing at 3,000K while cool daylight at 6,500K streams through the window is the classic case. Another: a portrait subject standing where sunlight hits the shoulders while the face is in open shade at 7,500K. In both cases, no single white balance value can neutralize everything — correcting one source pushes the other further off.
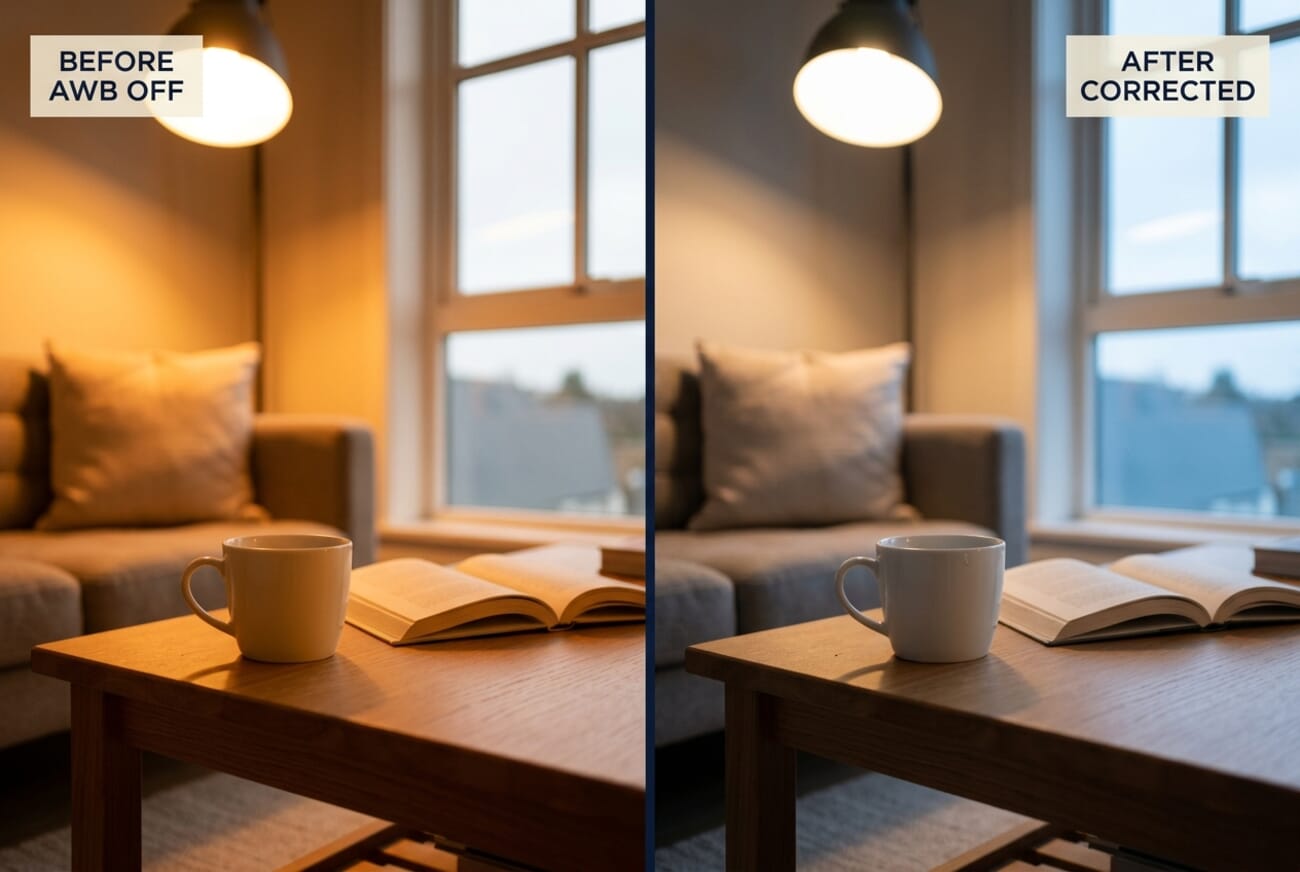
Four practical approaches to mixed-light scenes, in rough order of effort:
1. Pick a Hero Light Source and Commit
Decide which light source is illuminating the subject — that’s the one you balance for. In a tungsten room with a window, if the subject is by the lamp, set WB to 3,200K. The window behind will go slightly cool/blue, which often looks intentional and atmospheric. If the subject is by the window, set WB to 5,500–6,500K and accept that the lamp in the corner will glow warm. Either choice is correct; “wrong” is trying to average them.
2. Gel One of the Light Sources
The film-industry solution: add a color-correction gel to the off-Kelvin source so both match. CTO (color-temperature orange) gels warm daylight-balanced lights down to tungsten; CTB (color-temperature blue) gels tungsten up to daylight. For a tungsten + window scene, a 1/2 CTO gel on the window brings the daylight closer to the lamp’s 3,200K, letting a single WB setting cover both. This requires carrying gels and is most practical for controlled setups.
3. Swap the Bulb
In interior photography, replacing the offending tungsten bulb with a daylight-balanced LED (5,500K) is often simpler than gelling the window. Modern bi-color LEDs let you dial the bulb’s Kelvin to match ambient daylight exactly. For real-estate and Airbnb photography this is standard practice.
4. Fix It in Post With Localized Adjustments
Shoot the scene with the hero WB chosen (Approach #1), then use Lightroom or Capture One masks to apply a different local WB adjustment to the window area vs the lamp-lit area. Modern AI masking in Lightroom Classic 15.2 makes this fast — the “Select Sky” and “Select Subject” masks handle window vs indoor separation cleanly on most frames.
White Balance and RAW vs JPEG
Here’s the most important practical fact about white balance: if the camera is shooting RAW, the in-camera WB setting is a display hint, not a destructive choice. The RAW file records the sensor data without applying white balance — the WB value is stored as metadata that the processing software (Lightroom, Capture One, Camera RAW, DxO PhotoLab, ON1) uses to render the initial preview. Any other WB value can be dialed in losslessly at any later point.
JPEG is the opposite. JPEGs are processed by the camera using the chosen WB, baked into the file. Correcting white balance on a JPEG is possible but degrades image quality, because the camera has already discarded detail in color channels to apply the original WB. Shifting a JPEG from tungsten to daylight WB in post introduces noise, posterization, and skin-tone artifacts in a way a RAW file simply doesn’t.
The practical recommendation: shoot RAW for anything that matters. It’s the single most forgiving decision for white balance specifically, separate from the other reasons RAW is preferable (dynamic range recovery, higher bit depth, reversibility of every processing choice). If storage is a concern, most cameras offer RAW+JPEG where you get both for the cost of file size.
Correcting White Balance in Post-Processing
Both Lightroom and Capture One treat white balance as a two-slider problem: Temperature (Kelvin, warm-to-cool) and Tint (green-to-magenta, for the fluorescent or LED cast that temperature alone can’t correct). Both applications also offer an eyedropper that samples a neutral pixel in the image and recalculates WB from that sample.
Lightroom Classic Workflow
- In the Develop module, open the Basic panel. WB controls are at the top.
- Set the WB preset dropdown to As Shot (the camera’s value) or try Auto for Lightroom’s own estimate. Auto in Lightroom 15.2+ uses Adobe Sensei AI and is noticeably better than older AWB algorithms.
- If neither works, click the eyedropper icon, then click on something in the image that should be neutral gray or white — a white wall, a gray card, a white shirt. Lightroom calculates WB from that sample.
- Fine-tune with the Temperature and Tint sliders. Temperature shifts warm/cool; Tint shifts green/magenta.
- For mixed-light scenes, apply global WB to balance the subject, then use a Linear Gradient or Brush mask on the secondary light area and adjust WB locally inside the mask.
Capture One Workflow
- Open the Color tool tab. White Balance controls are the first tool.
- Start with the Mode dropdown set to As Shot, or try Auto — Capture One’s auto WB is renowned for tungsten and mixed-light scenes specifically.
- Use the Pick White Balance eyedropper to sample a neutral reference. Capture One lets you save custom WB presets per camera model, which is useful for repeated studio setups.
- The Skin Tone tab contains a dedicated skin-tone uniformity tool that goes further than WB alone — useful when WB correction gets close but skin still reads slightly wrong.
- For localized WB (mixed light), use Capture One’s Layer system — create a new layer, mask the secondary-light area, and adjust WB inside that layer independently.
Both applications let you apply the same WB to a batch of files from the same shoot — select the frames, copy the WB settings from the calibrated master, and paste. This is the standard workflow for event and wedding coverage where dozens or hundreds of frames share the same lighting conditions.
Using White Balance to Set Mood
Accurate white balance isn’t always the goal. Photographers and colorists deliberately shift WB away from technical correctness to create emotional tone:
- Warmer than accurate — golden hour portraits, “cozy” interior scenes, sunset atmosphere, nostalgic film-look grades. Push Temperature slider 200–600K warmer than neutral.
- Cooler than accurate — early-morning scenes, winter atmosphere, moody dramatic lighting, underwater-feel grades. Push Temperature 200–600K cooler than neutral.
- Teal-and-orange grade — the cinematic blockbuster look. Cool highlights (slight blue WB shift) paired with warm midtones and shadows (selective warming). Requires split-toning, not just a global WB change.
The only rule: start from a technically correct white balance as the baseline, THEN push it intentionally for mood. Trying to shortcut by leaving AWB to do the creative work is unreliable — AWB will sometimes cancel the warmth a photographer wanted to keep.
Frequently Asked Questions
What’s the difference between white balance and color temperature?
Color temperature is the physical property of the light source, measured in Kelvin. White balance is the camera’s correction applied to counteract that light source’s color cast. Setting the camera’s white balance to match the scene’s color temperature is what makes whites look white in the final image.
Should AWB always be used, or manual white balance?
AWB on 2024–2026 bodies is excellent for most single-source lighting situations. Switch to a preset or manual Kelvin value when (a) shooting video (always lock WB), (b) shooting product photography where color accuracy matters, (c) shooting mixed lighting where AWB will guess inconsistently, or (d) shooting bursts of the same subject where small WB shifts between frames would create problems in post.
What about a gray card — is it still worth using?
Yes, for two use cases. First, at the start of a studio shoot or a controlled scene — shoot a reference frame of a gray card under the hero lighting and use it to create a Custom White Balance preset. Second, as a reference sample for Lightroom or Capture One’s eyedropper in post. An 18% gray card is accurate, portable, and effectively indispensable for serious commercial work. A cheap card costs under $15.
How do I fix a JPEG with bad white balance?
Open it in Lightroom or Capture One, use the eyedropper on a neutral element, then fine-tune with the Temperature and Tint sliders. It won’t be as clean as the same correction on a RAW file — expect some color banding in skies and slight skin-tone weirdness — but modest corrections (say, 500–800K) are usually fine. For drastic corrections, the only real fix is to reshoot if possible.
What’s the best white balance for shooting video in Log/Flat mode?
Set it to whatever matches the scene’s actual hero light source — typically 5,500K for daylight scenes, 3,200K for tungsten-lit interiors, or use the camera’s Custom WB function with a white card. Log profiles don’t change the WB math; they just compress dynamic range. Starting from a correct Kelvin value makes the subsequent color grade faster and cleaner.
Bottom Line
White balance is the foundation setting every photographer eventually has to understand — not to fight with the camera, but to work with it. Modern bodies handle the routine cases brilliantly; the photographer’s job is to know when to override (video, product work, mixed light, intentional mood) and how to recover when AWB guesses wrong (shoot RAW, use the eyedropper in post). Master the Kelvin scale, pick the right 2024–2026 AWB mode for the situation, and decide up front whether you’re chasing accuracy or atmosphere. Everything else is practice.
Image credit: Kelvin scale, AWB-mode comparison, and before/after mixed-light illustrations created by PhotoWorkout.
References and further reading on white balance:
Manufacturer White Balance Documentation
- Sony — Auto White Balance Priority explanation (Alpha Universe) – Sony's official documentation of Subject vs Ambiance AWB priority modes
- Canon — Ambience Priority vs White Priority (Canon USA learn center) – Canon's explanation of Ambiance Priority and White Priority AWB modes
- Nikon — Auto White Balance settings (Nikon School) – Nikon Z-series Auto A0/A1/A3 documentation
Post-Processing Software
- Adobe — Lightroom Classic White Balance help – Official Lightroom Classic WB correction documentation
- Capture One — White Balance tool documentation – Capture One's WB tool and Skin Tone workflow
Reference
- International Commission on Illumination (CIE) — Color temperature standards – Authoritative reference for Kelvin scale and color temperature measurement standards