
- AI-powered apps (Google Photos, Apple Photos, Lightroom Sensei) now handle 80% of casual organization automatically — face grouping, smart search, and auto-memories that used to take hours of manual tagging.
- Serious photographers still benefit from a traditional DAM — Lightroom, Capture One, Mylio, digiKam, Photo Mechanic, or ACDSee — especially for RAW files and client work.
- The right storage strategy for most photographers is hybrid: local working library, second local backup, plus a cloud backup like Backblaze. That’s the classic 3-2-1 rule.
- The Simple Method (gather → consolidate → folder-structure → back up) works for casual photographers who don’t need to rank by quality.
- The Advanced Method adds ingest into a DAM, session/topic hierarchy, two-pass culling, and rating — the right workflow for serious and professional work.
- Phones are the messiest part of most libraries. Use albums, clean up screenshots weekly, and pick one sync service (iCloud Photos or Google Photos) rather than letting images pile up in five places.
- Printed photos and negatives decay. Digitize them with a flatbed scanner, camera scanning, or a mail-in service — and add metadata while the context is fresh in your mind.
- The common mistakes to avoid: vague folder names, skipping backups, over-aggressive deletion before culling, mixing originals with edits, and forgetting about phone photos entirely.
When you buy through links on our site, we may earn a commission at no cost to you. We evaluate products independently. Commissions do not affect our evaluations.
Introduction
Let’s be honest: Most photographers hate organizing their images. Sorting, culling, rating, and tagging; it’s enough to put anyone to sleep.
But while file organization isn’t a whole lot of fun, it’s an essential part of any photographic workflow. If you don’t keep your images organized, then you’ll struggle to identify your best photos for sharing and printing. You’ll also fail to find specific photos when you need them (when a client comes calling, for instance). And you won’t be prepared for that worst-case scenario when your hard drive fails and all your beautiful images disappear.
There’s no single “best” way to organize photos—it depends on your preferences, volume, and whether you shoot casually or professionally. But the methods below are proven to work in 2026, whether you’re using AI-powered tools like Google Photos and Apple Photos, professional DAM software like Lightroom Classic, or a simple folder structure. And with modern cloud backup options, you can protect your memories while keeping them accessible from anywhere.
Here’s Where to Start When Organizing Images
This guide offers two broad strategies for organizing your photos.
The first is designed for hobbyists and casual photographers. It doesn’t require an image organization program, and it won’t involve any photo ranking or culling (i.e., you won’t need to sort the best photos from the mediocre and bad photos).
The second strategy is designed for serious photographers and professionals. You’ll need a dedicated digital asset management program, and you’ll spend significant time evaluating and sorting your photos.
Both strategies work well, but they’re meant for different types of shooters with different experience levels. So pick the option that makes the most sense for you!
Programs for Photo Organization
Whether you’re a casual photographer or a professional, you’ll want to at least consider some type of photo organizational program. These tend to be relatively affordable, and they’ll help tremendously when sorting your images.
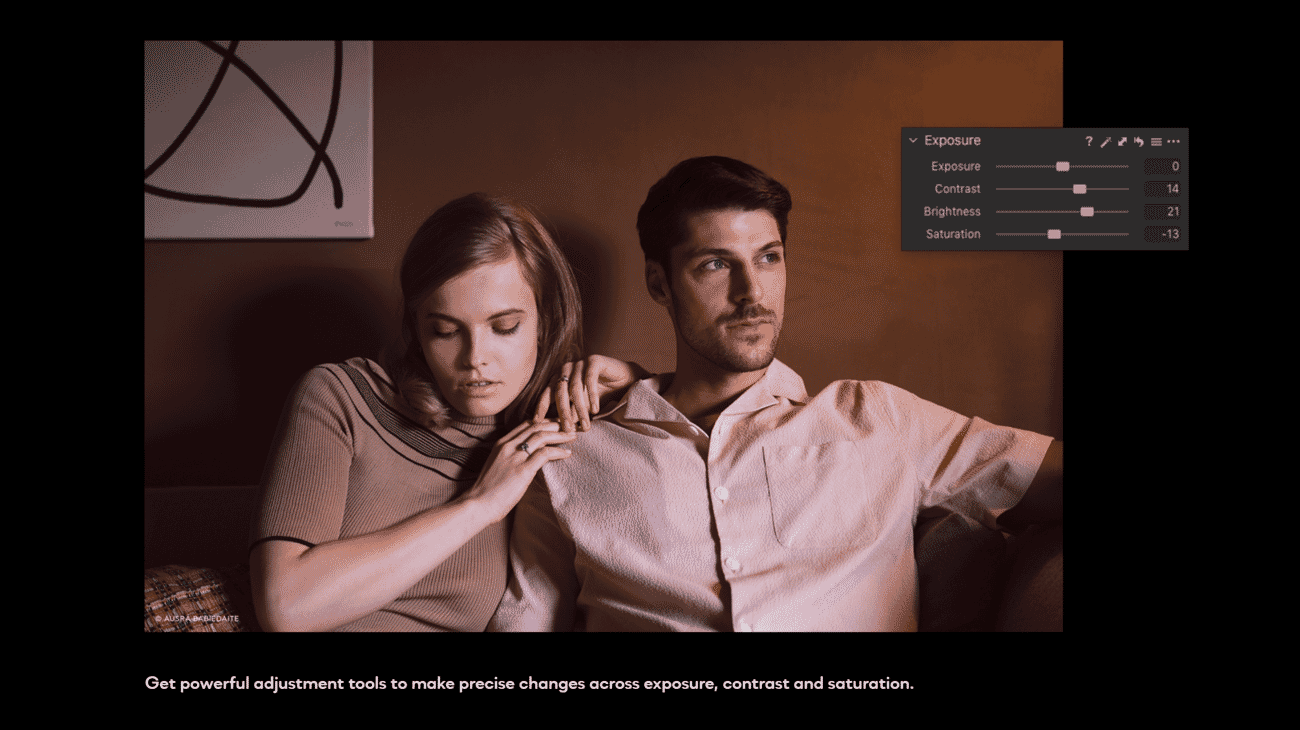
With an organizational program (also known as a digital asset management program), you’ll be able to separate out images, rank them according to quality, add keywords, and more. Most DAM programs allow for at least basic photo editing, so you can organize and enhance your photos in the same place.
Now, the industry standard for organizing images is Adobe Lightroom Classic, which allows for a tremendous balance of organizational comprehensiveness and ease of use.
Plus, you can transition rapidly between Lightroom’s organizational module and its editing module, which saves time and keeps everything generally neat and clean.
Lightroom is the right starting point for pretty much everyone, beginners included: easy to use, but sophisticated enough for professional work. For professional shooters, another strong option is Capture One Pro.
Beyond Lightroom and Capture One, a handful of other DAM tools are worth considering in 2026 depending on your workflow:
- Mylio Photos — a strong pick if you want your library synced across every device without sending originals to a third-party cloud. Mylio does peer-to-peer syncing between your Mac, PC, phone, and tablet, with optional thumbnails on lightweight devices and full originals on your main machine.
- digiKam — a free, open-source DAM that rivals paid tools for feature depth. Best for serious hobbyists who want full metadata control, face recognition, geotagging, and tag hierarchies without paying a subscription.
- Photo Mechanic — the fastest culling tool in the business, used by sports and press photographers who need to sort thousands of frames under deadline. It’s a dedicated ingest-and-cull tool rather than a full DAM, so most pros pair it with Lightroom or Capture One.
- ACDSee Photo Studio — a Windows-friendly alternative to Lightroom with a strong browser-based file manager, face recognition, and a one-time purchase option.
There’s no single “best” DAM program — it depends on your platform, budget, and how tightly you want your organization integrated with your editing. If you already edit in Lightroom, stay there. If you want cross-device sync without the cloud, try Mylio. If you want something free and powerful, digiKam is hard to beat.
AI-Powered Auto-Organization: Let the Software Do the Work
For most people, the best photo organization in 2026 is the kind you don’t have to think about. AI-powered consumer apps now do automatically what photographers used to spend hours doing manually: recognize faces, cluster by location and event, identify subjects and objects, and even build themed albums on their own. If your goal is to stop losing photos in a camera-roll jungle — not to build a client-ready portfolio — these tools will do 80% of the work for you.
Google Photos
Face grouping is Google Photos’ flagship organization feature. Once you name a face, Google finds every photo of that person going back years — across thousands of images, multiple devices, and varied lighting. You can merge or split face groups, hide specific people from search and memories, and label pets the same way. In independent 2024 benchmark testing, Google Photos identified 23% more distinct individuals across diverse lighting and angles than Apple Photos.
Smart search is the other killer feature: type “beach 2023”, “dog in snow”, or “birthday cake” and get instant results with no manual tagging required. Google Photos also auto-generates Memories — highlight reels built around trips, people, or themes — which surface old photos you’d otherwise never see again.
Best for: casual photographers who want zero-effort organization and are comfortable uploading their library to the cloud. Trade-off: your photos live on Google’s servers, which is a meaningful privacy decision for some users.
Apple Photos
Apple Photos takes the opposite approach: face recognition, object detection, and Memories all run on-device, powered by Apple’s Neural Engine. Your photos aren’t processed on Apple’s servers (beyond iCloud encryption for sync), which is a genuine privacy advantage.
The People & Pets album automatically groups everyone in your library. The For You tab surfaces past memories, birthday montages, and trip highlights. Memories themselves are auto-curated slideshows with music and Ken Burns-style transitions, generated by the iOS Photos app without your input. And because it’s all built into iOS, macOS, and iPadOS, your library syncs seamlessly across every Apple device via iCloud Photos.
Best for: Apple-ecosystem users who value on-device processing and don’t want their photo library crawled by an ad-funded cloud service. Trade-off: the search is less capable than Google’s, and on-device processing means less accurate face recognition across extreme lighting and angle variations.
Adobe Lightroom’s AI (for Serious Photographers)
If you already edit in Lightroom, you also have access to Adobe’s Sensei AI inside your catalog. People view runs face recognition across your Lightroom library, lets you name individuals, and then uses those names as searchable metadata. Adobe’s AI also powers auto-keywording suggestions, subject and sky masking, and the denoise feature that’s made culling blurry shots easier.
Lightroom’s big advantage over Google and Apple Photos is that it handles RAW files properly. Consumer cloud apps will often ignore RAWs or convert them to lossy previews. If you shoot in RAW and want organization plus non-destructive editing in the same tool, Lightroom is the right call.
When AI Isn’t Enough
AI-powered organization is excellent for everyday photos, but it has real limits:
- It struggles with RAW files outside the Adobe ecosystem.
- It can’t enforce the kind of deliberate folder structure a professional portfolio needs.
- It puts your data in the hands of the software vendor — and if you ever leave the platform, your careful face-grouping work doesn’t come with you.
- Auto-generated “memories” don’t replace a manual cull of your best shots for printing, publishing, or client delivery.
For portfolio-grade work, the best approach is usually a hybrid: let Google Photos or Apple Photos handle your phone snapshots automatically, and keep a traditional DAM (Lightroom, Capture One, Mylio, or digiKam) for your serious RAW library. That way you get effortless everyday organization plus the deliberate control you need for professional output.
Cloud vs. Local vs. Hybrid: Choosing Your Storage Strategy
Before you settle on a folder structure or a DAM, you need to decide where your photos actually live. The three options — cloud-first, local-first, and hybrid — each suit a different type of photographer. Here’s how they compare in 2026.
| Cloud-first | Local-first | Hybrid (recommended) | |
|---|---|---|---|
| Upfront cost | Low (monthly subscription) | Higher (hard drives, NAS) | Moderate |
| Ongoing cost | Scales with library size | One-time, occasional drive upgrades | Small recurring + hardware |
| Access speed | Depends on your internet | Instant, full resolution | Instant local, cloud as fallback |
| RAW-file friendly | Limited (most services compress) | Yes | Yes |
| Disaster resilience | High (provider handles redundancy) | Only as good as your last backup | Highest (local + off-site) |
| Privacy | Lower (provider can scan) | Highest (you control everything) | Medium (depends on cloud choice) |
| Best for | Casual phone photographers | Pros with large RAW libraries | Most photographers |
Cloud-first
Everything lives in Google Photos, Apple iCloud Photos, Amazon Photos, or Microsoft OneDrive. Your phone and laptop are just windows into the same library. Pro: effortless sync, zero backup work, near-infinite storage for a monthly fee. Con: most consumer cloud services don’t handle RAW files well and lock you into a specific platform. Leaving is painful.
Local-first
Your master library lives on a dedicated hard drive or a NAS (network-attached storage) at home. Backups run to a second physical drive, and optionally to a cloud service as insurance. Pro: full speed, full control, full RAW support, full privacy. Con: you have to actively manage backups — which is exactly the thing most people stop doing after month three.
Hybrid (the one we recommend)
The hybrid strategy is the best of both worlds and follows the classic 3-2-1 backup rule: three copies of your data, on two different types of media, with one copy off-site. In practice this usually looks like:
- Your working library on your computer or an external drive (copy 1).
- A second external drive or NAS that mirrors the first (copy 2).
- A cloud service like Backblaze, iDrive, or an S3-compatible provider for automated off-site backup (copy 3).
For most photographers in 2026, hybrid is the answer. You get the speed and control of local storage for your working library, and the disaster resilience of cloud for the copy you hope to never need. If your house floods, your drives die, and your laptop is stolen all in the same week, you still have your photos.
Organizing Your Photos: The Simple Method
If you’re a casual photographer or someone simply hoping to get your photos in order, then this is the method for you. It may take a bit of time, but it’ll be worth it in the end.
Step 1: Gather All of Your Images
Any good photo organization method starts here: Actually gathering all of your images in one place.
This includes all digital images, as well as all printed images. So track down any prints that you’re interested in organizing. Also grab any memory cards, backup hard drives, photos off your phone, etc.
Check your old camera bags for memory cards. Check your old cameras, too — there might be an SD card or two hiding in a card slot. Also check any old computers and flash drives.

Finally, bring all of the images together into one spot.
Step 2: Upload All Your Images to a Single Hard Drive
You’re going to need a large hard drive for this one, especially if you’ve been taking photos for a while.
If your computer hard drive doesn’t offer enough space, buy an external hard drive; you can plug one of these into your computer via a USB port, then transfer all your photos.
(How big of an external hard drive should you get? That depends on the number of photos you have! But a one- or two-terabyte drive won’t cost too much, and it’ll generally give you plenty of room for expansion.)
Note that if any of your images are prints, you’ll need to scan them onto your computer.
Step 3: Create a Folder Structure Based on Your Needs
Your folder structure will be the core of your organizational strategy, so you must get it right.
The simplest approach uses basic folders on your desktop. The same hierarchy works inside a DAM program if you’re using one.
Two folder methods work well:
1. The Year-Month System
Start by creating a folder for every year up to the present. Then create a set of subfolders within each year folder; each subfolder should correspond to a month in which you took photos.
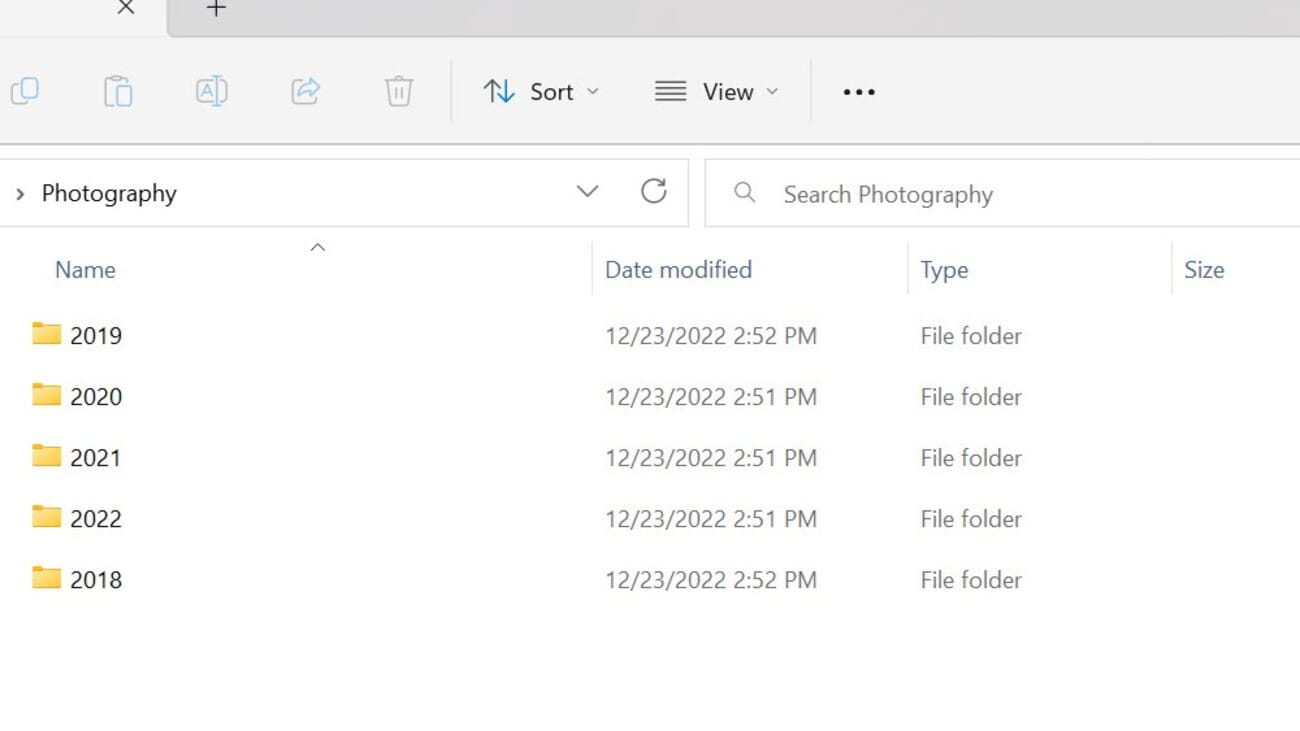
This system is easy to implement because most photos include date data. Simply drag and drop photos into the right subfolder. Then, at the end of each month, create a new subfolder and add the photos from the last 30 days.
The Year-Month system works best for casual photographers. If you don’t plan on building a portfolio, keeping images sorted by date makes them relatively easy to look back through. If you’re searching for a photo taken the previous year, for example, you can quickly hone in on a couple of possible months, skim through them, and find the photo.
There are also modified versions of this method where you create subfolders within the month folders that correspond to events (e.g., Florida vacation and Sister’s wedding). Alternatively, you can create folders within the month folders that correspond to specific dates.
2. The Topic System
This method takes more work than the Year-Month system described above, but it keeps your photos nicely organized and works especially well if you frequently post images to a portfolio website or social media.
Here’s how the topic system works:
First, skim through all your photos and identify any broad categories. Then create a folder for each of these categories. (For instance, you might create a folder for scenic images, another folder for flower images, another folder for family images, etc.)

Then sort your images into each of these folders by topic. If you have lots of files, you might consider creating subfolders to further sort by year or by subtopic (e.g., beach landscapes, mountain landscapes, desert landscapes, etc.).
When you’re done, you’ll have a true portfolio at your fingertips! Though note that you will need to work harder to locate specific photos because you won’t have the neat year-date system discussed above.
Step 4: Back Up Your Photos
It’s the final step of any image-organization process: Backing your images up. Because while images on your computer will generally stay safe, things can happen.
For instance, your computer could get viruses. Your hard drive could fail. Your room could get flooded. There could be a fire. And in each case, you’d risk losing all your precious images.
Always keep at least one backup of your photos. Two backups is better.
Many photographers like to use two different backup types:
- A physical backup (e.g., an external hard drive)
- A cloud-based backup
This approach will help diversify your photo storage methods. And while no system is foolproof, it can work quite well. At the very least, make sure you have a physical backup. External hard drives aren’t very expensive these days, and they’re worth every penny!
Organizing Photos on Your Phone (iOS and Android)
Most of the photos taken in 2026 are taken on a phone, and most of them never leave the phone. That’s fine — but it means your phone library is probably the messiest part of your whole collection. A few deliberate habits will fix that without requiring any special software.
iPhone and iOS Organization Tips
- Use Albums liberally. The Photos app lets you build albums without duplicating files. Create one per trip, project, or event. It takes 30 seconds and pays off every time you search for a specific shot later.
- Turn on iCloud Photos. This keeps your library synced across every Apple device and gives you an automatic cloud backup. Space savings kick in automatically — full-resolution originals in the cloud, smaller previews on your phone.
- Use Shared Albums for family photos. Instead of texting photos back and forth, create a shared album with specific people. Everyone contributes, everyone sees new photos, and none of it counts against your iCloud storage.
- Clear out Screenshots monthly. Screenshots are the silent killers of phone storage. The Photos app has a built-in Screenshots album — sweep through it once a month and delete what you don’t need.
- Remember Recently Deleted. Deleted photos sit in the Recently Deleted album for 30 days before they’re gone for good. Useful if you panic-delete something; also worth clearing periodically to reclaim space.
Android Organization Tips
- Google Photos is usually the right default. It ships on most Android phones and gives you face grouping, smart search, and Memories automatically. Turn on Backup & sync so your photos are safe if you lose your phone.
- Know your folder structure. Android exposes the underlying filesystem via the Files app. Your camera photos live in
DCIM/Camera/; screenshots inPictures/Screenshots/; downloaded images inDownload/. Apps like WhatsApp, Instagram, and Telegram each create their own subfolders. If your gallery app looks messy, it’s usually because one of these is dumping images into places you didn’t expect. - Samsung Gallery offers native albums and face recognition if you’re on a Samsung device and prefer not to use Google Photos. It does on-device face grouping similar to Apple’s approach.
- Use the hidden/secure folder for sensitive photos. Both stock Android and Samsung’s One UI include a secure folder that hides images from the main gallery. Better than “Private Photos” apps that rarely do what they claim.
Cross-Platform Phone Tips
Whichever phone you use, two habits make the biggest difference:
- Organize at the source. Create an album or tag the moment you take an important set of photos. Ten seconds of work now saves an hour of digging later.
- Do a five-minute weekly cleanup. Delete screenshots, duplicates, and blurry shots once a week. A phone library you’ve pruned regularly is a joy to search; one you’ve let accumulate for three years is a nightmare.
Organizing Your Photos: The Advanced Method
For serious photographers who need to cull and sort images by quality, this is the method to use.
Step 1: Gather All Your Photos in a Digital Asset Management Program
Every photo — not just the ones on your main computer. Grab images from your hard drive, memory cards, backup drives, flash drives, old computers, and anywhere else they might be hiding.
Put them all on a single hard drive — either your computer’s drive or an external one — and import them into a DAM program such as Lightroom.
The import process can take a while. A library of thousands of photos will have your computer working for a long time, so don’t expect it to finish in minutes.
Step 2: Set up a Folder Structure Based on Sessions, Topics, or a Combination of the Two
Now it’s time to create your organizational hierarchy. Different DAMs use different terms for their organizational buckets — folders, collections, albums — but they all serve the same purpose: grouping images together with a few extra, customizable options.
Two folder structures work well:
- Organize based on topic (e.g., create a folder for landscapes, a folder for portraits, and a folder for street shots). Then create a second folder within each of those folders, one that’s designed to hold the “best” files for each topic.
- Organize based on the session (this works well for photographers who frequently do client shoots). Simply create a top-level folder for each session (e.g., Product Shoot 10/2). Then within each folder, create a subfolder for your best photos. (You can also create other subfolders for photos that you’re currently editing as well photos that you’ve rejected.)
For most photographers who don’t do frequent session-based shoots, Option 1 is the better fit. A useful hybrid combines topic and session organization — create session folders within each high-level topic folder.
Using that strategy, you might have a landscape folder with date-labeled subfolders inside it, and a second subfolder within each date for the best images.
Step 3: Sort Your Photos
Now it’s time to put your organizational structure to use. Simply take your images and sort them into the top-level folders based on the topic or the session.

This can be time-consuming, especially if you have thousands of images. But it’s very important. And it’ll feel good, too – like you’re taking a messy room and making it nice and clean.
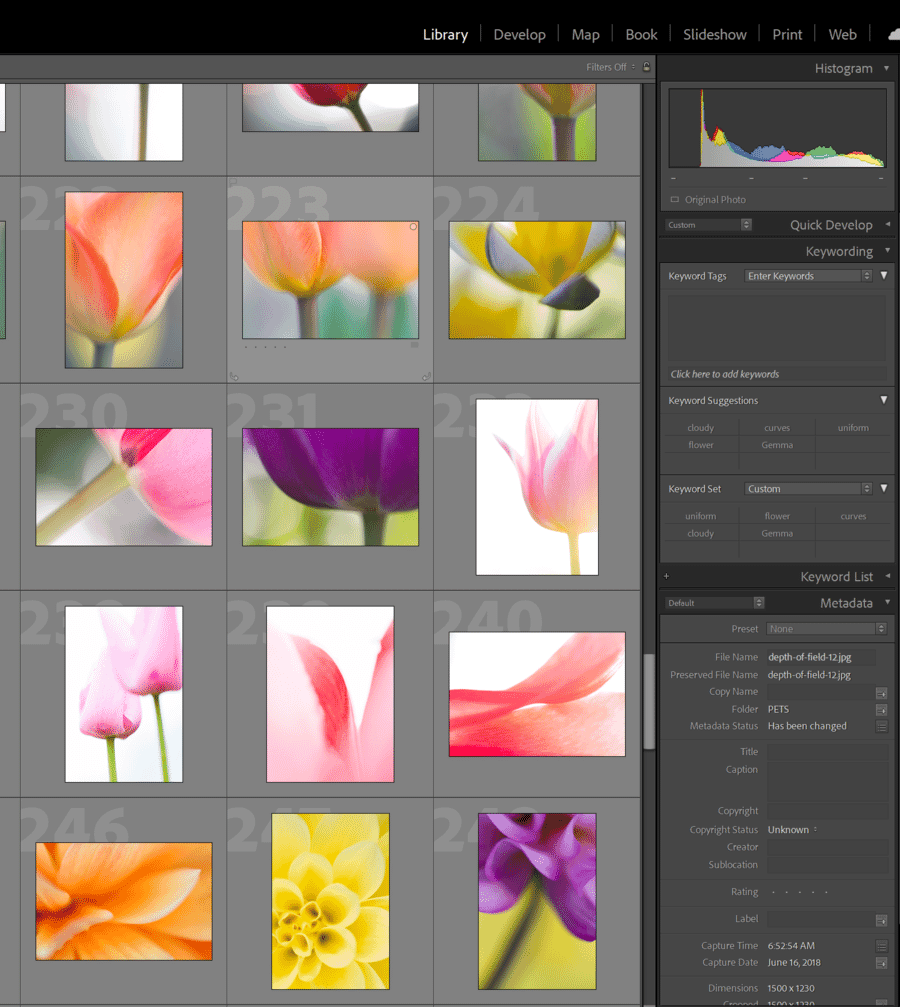
By the way, you definitely don’t need to go through every single photo in order to do a good sorting job. Instead, you can use image thumbnails to evaluate whole batches of images at once. Then you can drag groups of images into the right folders!
Step 4: Do a First Pass and Pick the Decent Images
Once you have all your images sorted, it’s time to do some culling.
Most digital asset management software includes some form of picking, which you can flag and reject images depending on their quality. So go through your images. And mark the best images as picks.
Don’t be choosy, however. Be very loose with your definition of “best.” This step isn’t about finding your top-notch images; instead, it’s about separating the decent images from the terrible ones.
If you come across images that are bad – for instance, they’re completely blurry or they’re far too underexposed – you can mark them as rejects.
Once you’ve finished this process, take all your picked images and move them into the “best” subfolder.
Step 5: Do a Second Pass and Rate Your Images More Carefully
Next, go into all your “best” subfolders, then go through the images again.
This time, use some sort of rating system. For instance, you might use stars, colors, or numbers (depending on your organizational program).
Make sure that only the absolute best, portfolio-worth images get the top rating. That way, it’s easy to find your best images for printing, uploading to your website, and posting on social media.
Step 6: Back Up Your Images Regularly
At this point, your photos should be organized. But you need to back them up, and you need to do it regularly.
It’s far too easy to lose images due to computer problems, theft, or natural disasters. Keep at least one backup hard drive. Cloud storage makes an excellent second backup.

That way, you have your images in three places at all times. And if one – or both – of your backups fails, you always have a third copy just in case.
Organizing Printed Photos and Old Negatives
For a lot of people, the biggest photo organization problem isn’t digital — it’s that box of prints in the attic, or the shoebox of negatives from a grandparent’s house. Bringing those into a modern library takes work, but it’s the most valuable organization project you’ll ever do. Prints and negatives decay. Memories decay with them. Digitizing is the only way to keep them.
Step 1: Sort before you scan
Resist the urge to scan first and sort later. Empty the box onto a clean surface, group by rough decade or event, and discard duplicates, test strips, and water-damaged prints. You’ll save hours of scanning time and end up with a library that makes sense on the other side.
Step 2: Pick a scanning method
You have three options, in order of quality and effort:
- Flatbed scanner (highest quality). A dedicated photo scanner like the Epson Perfection V600 handles prints, slides, and medium-format negatives at archival resolution. Slow — figure 1–2 minutes per print at 600 dpi — but it’s the gold standard if you want to preserve detail.
- Camera scanning (fast, good quality). Photograph each print under even lighting with a macro lens or a phone-based scanning app like PhotoScan (Google) or Photomyne. Much faster than a flatbed and good enough for most family archives. Free or nearly so.
- Mail-in services (convenient, expensive). Companies like Legacybox, ScanCafe, and ScanMyPhotos take a box of prints, negatives, slides, or even VHS tapes and return them digitized. Typical pricing is $1–$2 per print, cheaper in bulk. Use them when you have hundreds or thousands of items and value your time.
Step 3: Add metadata while it’s fresh
Old prints usually have no digital metadata. That’s your one chance to capture it. As you scan, note down approximate year, event, and people on the back of the print. Then tag the digital file accordingly — either via your DAM’s metadata fields or, for consumer apps, via filename conventions like 1978-05-family-reunion-grandma-jane.jpg. It’s the difference between a useful archive and a pile of mystery photos.
Step 4: Store the originals properly
Digitizing doesn’t mean you should throw the prints away. Store originals in acid-free archival boxes from a dedicated supplier like Gaylord Archival or Hollinger Metal Edge, kept in a cool, dry, dark place — not an attic or basement. Archival sleeves and boxes cost a few dollars each and will outlast the photos by decades.
8 Common Photo Organization Mistakes to Avoid
After years of reviewing photographer workflows, the same mistakes come up again and again. Avoid these and you’ll save yourself real pain later.
- Waiting for the “right time” to start. It never comes. Your library grows faster than your motivation. Start with 30 minutes today, not a full weekend next month.
- Vague folder names.
Misc,Stuff,To sort, andNew folderare the Bermuda Triangle of photo libraries. Use specific names —2026-03-berlin-trip, notGermany pics. - Skipping the backup step. A library that lives in one place doesn’t really exist. Drives die, phones get stolen, laptops get left on planes. Always have at least two copies — ideally three, with one off-site.
- Ignoring metadata. Your camera writes date, time, camera body, lens, and GPS into every photo. Your DAM can search on all of it. Don’t strip this data when exporting, and actively add keywords or ratings for anything you’ll want to find later.
- Deleting photos too aggressively before culling. Mark rejects first, review them once, then delete. Deleting in-the-moment means you’ll occasionally throw away the one good frame in a bad set.
- Mixing originals and edits in the same folder. Always keep your originals untouched. Edits and exports go into a separate folder or are managed by your DAM as virtual copies. That way a mistake in editing doesn’t cost you the master file.
- Not maintaining a single master library. If your photos live in five places — laptop, phone, old hard drive, iCloud, Dropbox — you don’t have a library; you have a scattered mess. Consolidate into one canonical location, even if it takes a weekend.
- Forgetting about phone photos entirely. For most photographers, the majority of photos taken in any given year live on a phone and never make it into the “real” library. Set up an automatic import from your phone to your DAM (Lightroom, Mylio, and Google Photos can all do this), or your best shots will stay stranded.
Sources and further reading for this guide:
Some links in this article may be affiliate links. PhotoWorkout earns a small commission at no extra cost to you.
Get Those Photos Organized!
Now that you’ve finished this article, you should know precisely what you need to do to get your photos cleaned up and organized.
So get started. Don’t dawdle. A clean image library is its own reward.
Just make sure to give yourself plenty of time. Image organization can be a hefty task, so you shouldn’t expect to get it done in just a day or two.
Frequently Asked Questions
Do I need software to organize my photos?
No. It’s possible to create a nicely organized collection of photos with some careful sorting on your desktop. However, software will make photo organization a lot easier because you’ll be able to quickly move images from group to group without struggling to find them.
What’s the best photo organization software?
Lightroom is a great choice for photographers of all stripes, though professionals – especially those who do regular photoshoots – should also check out Capture One Pro.
How do you organize film photos?
For lots of film photos, invest in a good-quality scanner. Scan your film, get it all on your hard drive, and then start organizing using the methods above.
How do you sort thousands of pictures?
Start by sorting based on the date. From there, you can sort the images into specific outings – or if you prefer, you can sort them by genre (landscape photos, portrait photos, macro photos, etc.).
Should I use Google Photos or Apple Photos for AI organization?
It depends on your priorities. Google Photos has the most accurate face grouping and the best smart search, but your library lives on Google’s servers. Apple Photos runs everything on-device via the Neural Engine, which is a meaningful privacy advantage, but the search and face recognition are slightly less capable. If you’re in the Apple ecosystem and value privacy, use Apple Photos. If you want the most powerful AI organization and don’t mind the cloud trade-off, use Google Photos.
What is the 3-2-1 backup rule for photos?
Keep three copies of your photo library, on two different types of storage, with at least one copy stored off-site. In practice: your working library on your computer, a mirror on an external drive or NAS, and an automated cloud backup via a service like Backblaze or iDrive. If a single event (hardware failure, theft, fire, flood) takes out one or two copies, you still have your photos. It’s the simplest rule that covers nearly every disaster scenario.


