
- Photoshop remains the gold standard for advanced photo editing — learn when to use it vs. Lightroom.
- Master the fundamentals: layers, masks, and a structured workflow form the backbone of every edit.
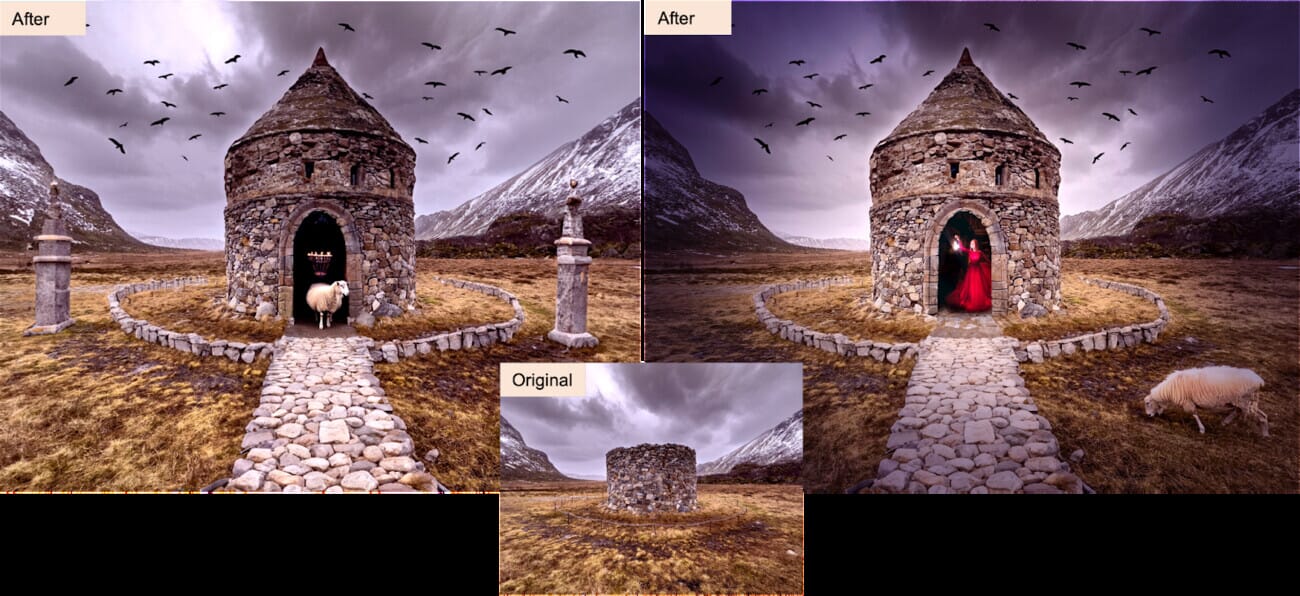
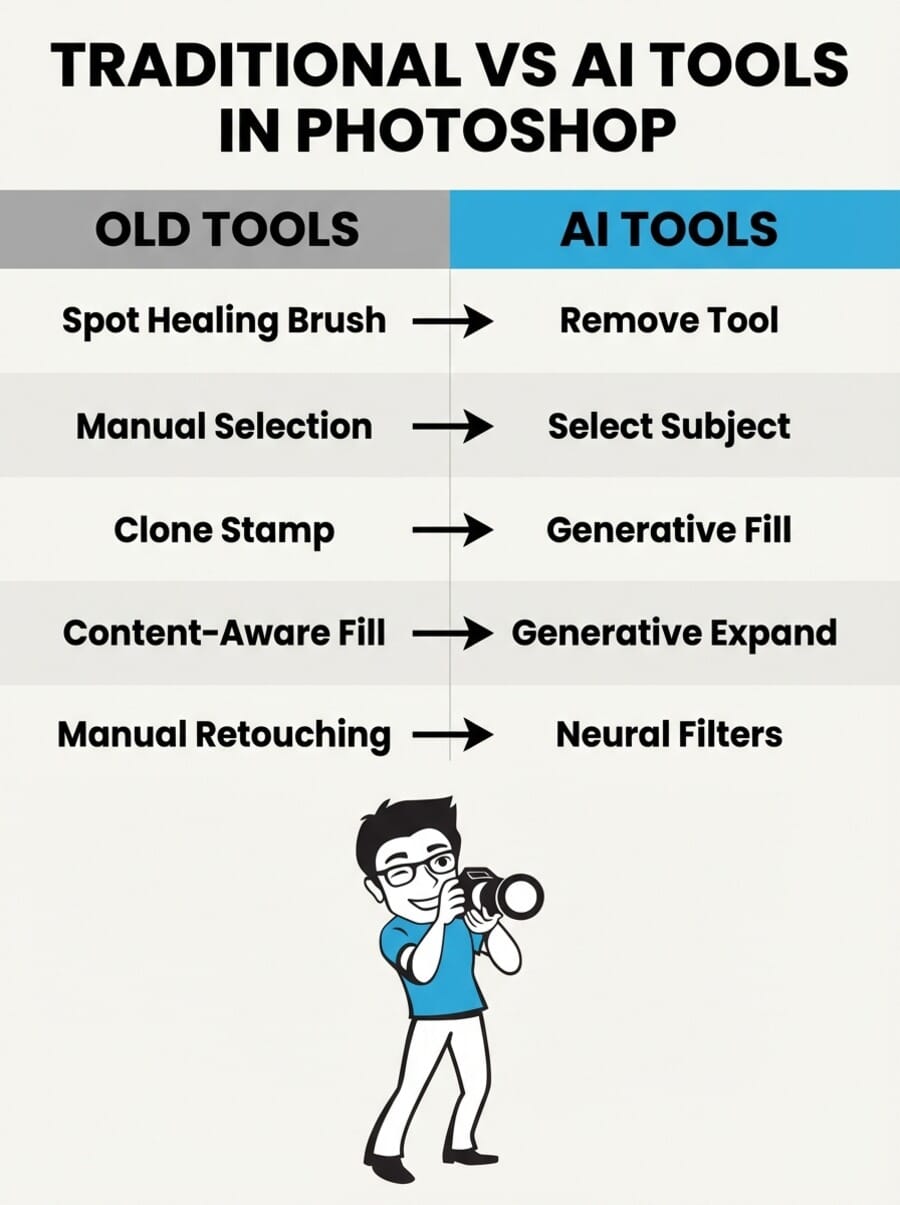
- AI tools like Generative Fill, Remove Tool, and Select Subject have transformed Photoshop since 2023.
- A solid editing workflow goes: import → crop → exposure → retouching → AI tools → layers → sharpen → export.
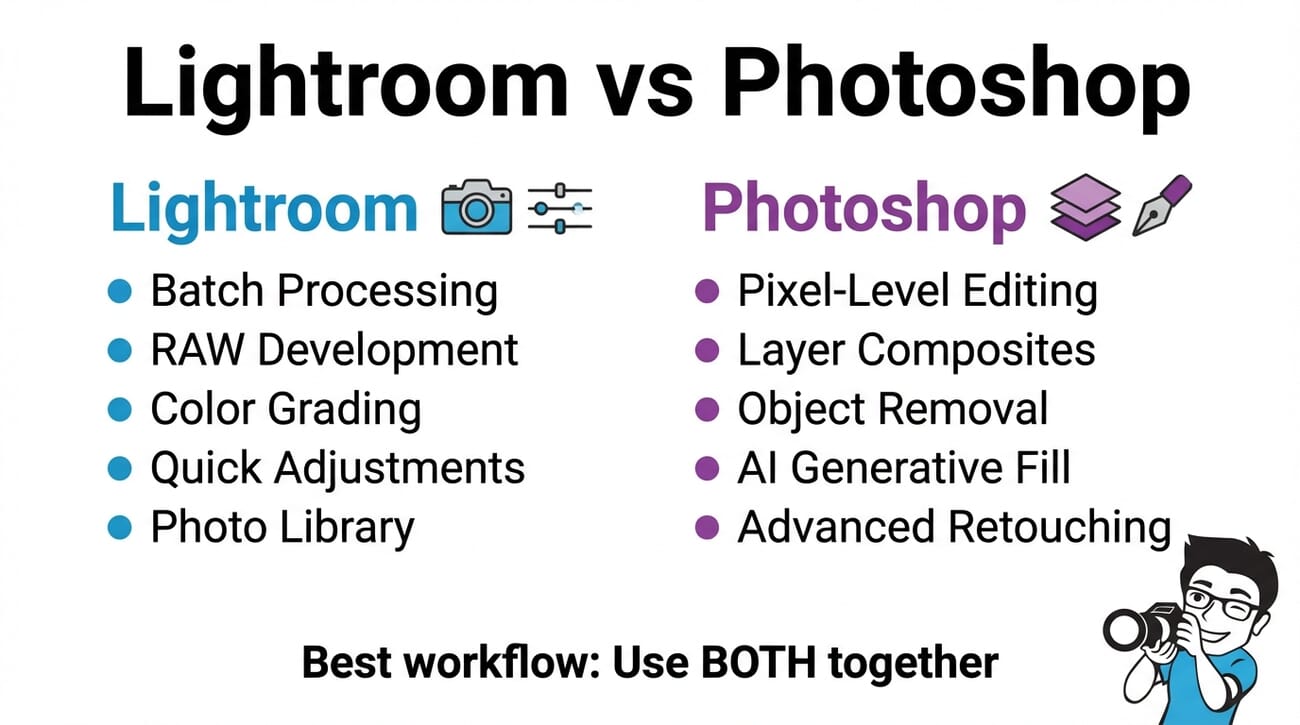
- Pair Photoshop with Lightroom for a complete editing setup — most pros use both.
When you buy through links on our site, we may earn a commission at no cost to you. We evaluate products independently. Commissions do not affect our evaluations.
Introduction
Adobe Photoshop has been the industry standard for photo editing for over three decades. But the Photoshop of 2025 looks nothing like the version many photographers learned on — AI-powered tools have fundamentally changed how we edit images. (Wondering about copyright for AI-assisted edits? The Supreme Court’s recent AI copyright ruling clarifies that human-directed work remains protectable.)
This guide covers everything you need to know about editing photos in Photoshop, from core fundamentals like layers and masks to the latest AI features like Generative Fill and the Remove Tool. Whether you’re picking up Photoshop for the first time or returning after a few years away, you’ll find a complete, modern workflow here that incorporates both traditional techniques and AI-powered tools.
We’ll walk through the essential concepts first (layers, adjustment layers, masks), then cover a practical step-by-step workflow, followed by a deep dive into the AI tools that have transformed Photoshop since 2023. By the end, you’ll have a clear understanding of how to approach any photo editing task in Photoshop — and when to reach for the classic tools versus the new AI features.
If you’re just getting started with photo editing in general, our photo editing for beginners guide is a great starting point.
When to Use Photoshop vs. Lightroom
Before diving into Photoshop, it’s worth understanding where it fits alongside Adobe Lightroom. These two programs serve different purposes, and most professional photographers use both.
Use Lightroom when you need to:
- Process RAW files and make global adjustments (exposure, white balance, color grading)
- Batch edit multiple photos from the same shoot
- Organize and catalog your photo library
- Apply presets across a set of images
Use Photoshop when you need to:
- Make pixel-level edits (retouching skin, removing objects, compositing)
- Work with layers, masks, and blending modes
- Use AI-powered tools like Generative Fill or the Remove Tool
- Create composites or manipulate specific parts of an image
- Add text, graphics, or design elements to photos
For a detailed Lightroom walkthrough, see our guide to editing photos in Lightroom.
The Photoshop Interface
Photoshop’s interface can feel intimidating at first, but once you understand the layout, navigation becomes intuitive. Here are the key areas:
- Menu Bar — File, Edit, Image, Layer, Filter, and other menus across the top
- Options Bar — Context-sensitive settings for whatever tool you have selected
- Tools Panel — The vertical toolbar on the left with all editing tools
- Panels — Layers, Properties, Adjustments, and other panels on the right (customizable)
- Canvas — The central workspace where your image lives
Tip: Go to Window → Workspace → Photography to load a workspace optimized for photo editing. This arranges panels in a layout that makes sense for photographers.
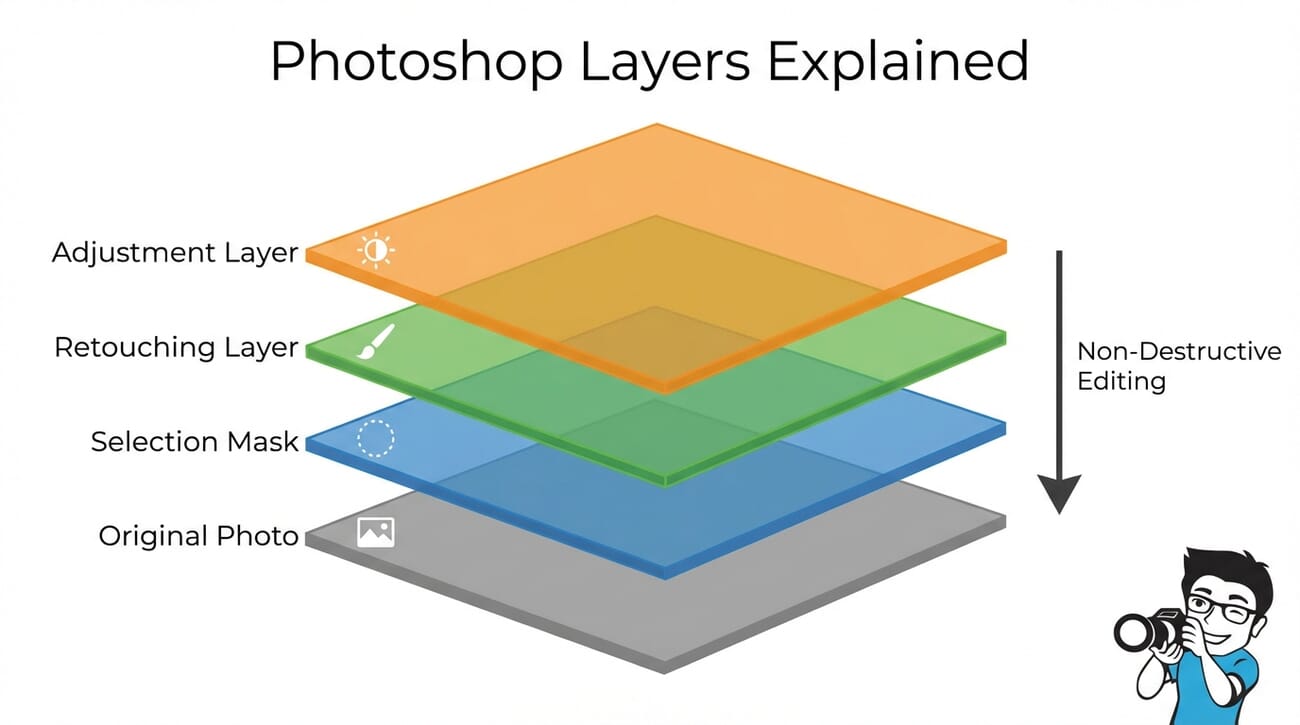
Understanding Layers: The Foundation of Photoshop Editing
Layers are the single most important concept in Photoshop. Think of them as transparent sheets stacked on top of each other — each one can hold different content, and they combine to form your final image.
Here’s why layers matter:
- Non-destructive editing — Changes happen on separate layers, so your original image stays untouched
- Selective control — You can adjust, hide, or delete any layer independently
- Compositing — Combine elements from multiple images into one
- Blending modes — Control how layers interact with each other (Multiply, Screen, Overlay, etc.)
Essential layer operations:
- Ctrl/Cmd + J — Duplicate a layer
- Ctrl/Cmd + Shift + N — Create a new empty layer
- Click the eye icon to toggle layer visibility
- Drag layers in the panel to reorder them
- Right-click a layer for options like Convert to Smart Object
Adjustment Layers and Masks
Adjustment layers apply tonal and color corrections without permanently altering your image. They sit above your photo layer and affect everything beneath them.
The most useful adjustment layers for photographers:
- Curves — The most powerful tonal control. Adjust highlights, midtones, and shadows with precision
- Levels — Quick black/white point adjustment and midtone correction
- Hue/Saturation — Target specific colors for adjustment
- Color Balance — Shift colors in shadows, midtones, and highlights separately
- Vibrance — Boost muted colors without oversaturating already-vivid ones
Layer masks control where an adjustment applies. Paint with white to reveal the effect, black to hide it. This lets you apply changes to specific areas — for example, brightening only the subject’s face while leaving the background untouched.
For more on targeted adjustments, see our guide on how to brighten a part of your image.
The Camera Raw Filter: Lightroom Inside Photoshop
Even after opening your image in Photoshop, you can access the full power of Adobe Camera Raw at any time through Filter → Camera Raw Filter (Ctrl/Cmd + Shift + A). This gives you the same sliders you’d find in Lightroom — exposure, contrast, highlights, shadows, whites, blacks, clarity, vibrance, saturation — all within Photoshop.
The Camera Raw Filter is particularly powerful when applied to a Smart Object, because it becomes a Smart Filter that you can re-edit at any time. This effectively gives you Lightroom-style editing capabilities on any layer in your Photoshop document.
Key Camera Raw panels for photographers:
- Basic — Exposure, contrast, highlights/shadows recovery, white balance
- Tone Curve — Parametric and point curves for precise tonal control
- Color Mixer — Adjust hue, saturation, and luminance of individual color ranges
- Color Grading — Split-tone effects for shadows, midtones, and highlights
- Detail — Sharpening and noise reduction with masking controls
- Lens Corrections — Remove distortion, chromatic aberration, and vignetting based on lens profiles
- Effects — Add grain, post-crop vignetting for creative looks
Many photographers use the Camera Raw Filter as their first step after opening an image, handling all global adjustments there before moving on to layer-based retouching work. It’s essentially Lightroom inside Photoshop — the best of both worlds in a single application.
Step-by-Step Photoshop Editing Workflow
Follow this workflow for consistent, professional results. The order matters — global corrections come first, detail work last.
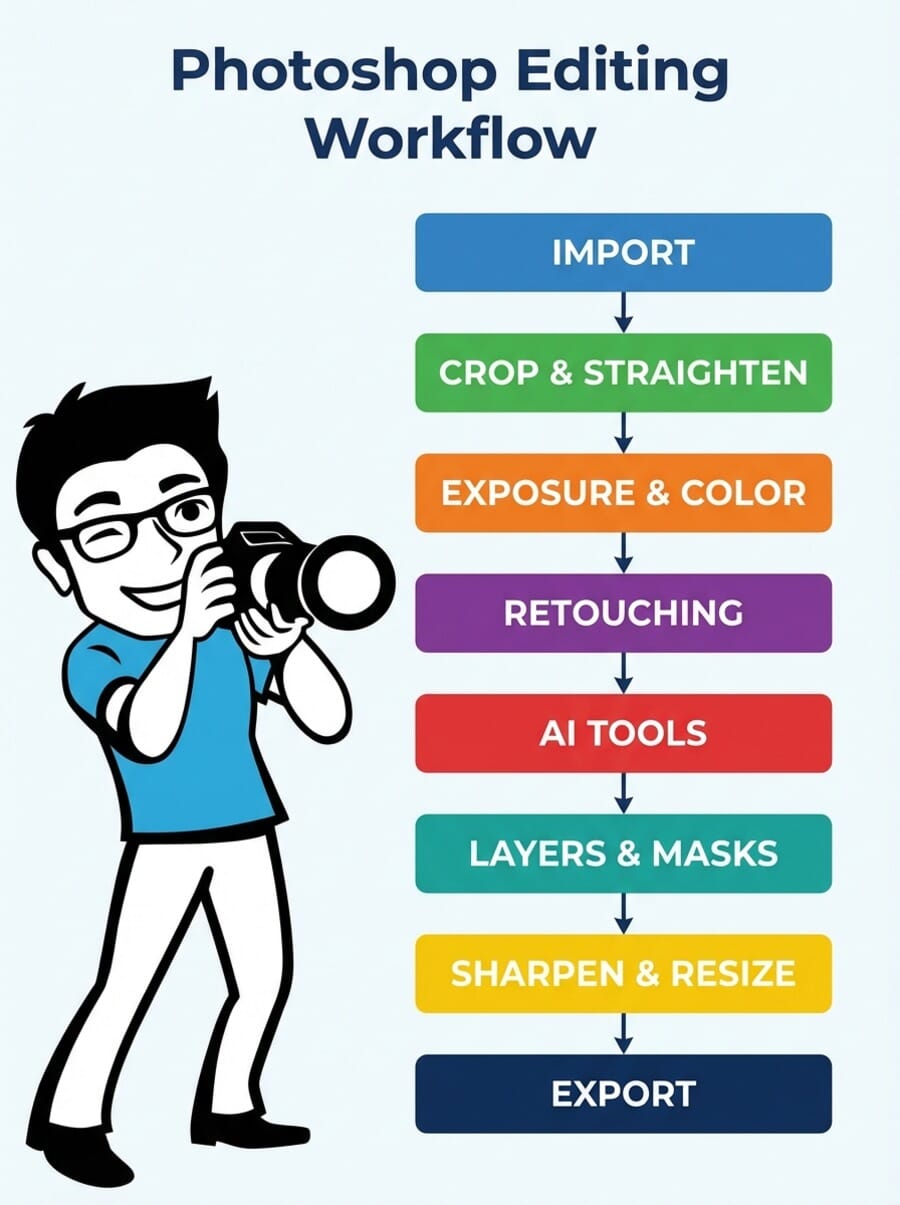
Step 1: Import and Open Your Image
Open your file via File → Open or drag it directly onto the Photoshop workspace. If you’re working with a RAW file (CR3, NEF, ARW, DNG), it will automatically open in Adobe Camera Raw (ACR) — Photoshop’s built-in RAW processor.
In ACR, make your initial global adjustments: correct exposure, set white balance, recover highlights, and open up shadows. These adjustments happen at the RAW data level, giving you far more latitude than editing a JPEG. Once satisfied, click “Open” to move into Photoshop’s main workspace.
Pro tip: Click “Open as Smart Object” instead of “Open” in ACR. This embeds the RAW file as a Smart Object, meaning you can double-click the layer later to return to ACR and adjust your RAW settings non-destructively at any point during your edit.
Step 2: Crop and Straighten
Hit C for the Crop tool. Before adjusting the frame, straighten the horizon first — click the Straighten tool in the Options bar and drag along any line that should be horizontal or vertical. Photoshop rotates the image to correct the tilt.
Then crop to your desired composition. In the Options bar, you can lock to specific aspect ratios: 3:2 (standard DSLR), 4:5 (Instagram portrait), 16:9 (cinematic/banner), or 1:1 (square). Enable “Delete Cropped Pixels” only if you’re sure — leaving it unchecked preserves the original image data outside the crop boundary.
If you realize you should have framed wider during the shoot, this is where Generative Expand (covered below) becomes invaluable — it can extend your canvas beyond the original frame with AI-generated content.
Step 3: Correct Exposure and Color
Add a Curves adjustment layer (Layer → New Adjustment Layer → Curves). Use it to:
- Set the black and white points for proper tonal range
- Adjust the midpoint for overall brightness
- Create an S-curve for added contrast
For color correction, add a Color Balance or Hue/Saturation adjustment layer. If you’re dealing with overexposed areas, our guide on how to fix overexposed photos walks through recovery techniques.
Step 4: Retouching
Create a new empty layer above your image for retouching work. The classic Photoshop retouching tools include:
- Spot Healing Brush (J) — Quick fix for blemishes and small distractions
- Clone Stamp (S) — Copy pixels from one area to another
- Healing Brush — Like Clone Stamp but blends with surrounding texture
- Patch Tool — Drag a selection to replace it with another area
For portrait retouching, the frequency separation technique lets you smooth skin while preserving texture. This works by separating the image into two layers: one for color/tone (low frequency) and one for texture (high frequency). You can then smooth skin tones on the low-frequency layer without destroying pore detail.
Another essential portrait technique is dodge and burn — creating a new layer set to Overlay blending mode at 50% gray, then painting with a soft white brush to brighten (dodge) and a soft black brush to darken (burn). This sculpts light on the face and adds dimension to portraits.
That said, Photoshop’s newer AI tools (covered below) have made many of these manual techniques optional for everyday retouching work. The Remove Tool and Neural Filters can handle in seconds what used to take minutes of careful clone-stamping.
Step 5: Sharpen and Resize for Output
Sharpening should be the last editing step. Duplicate your image layer, then go to Filter → Sharpen → Unsharp Mask. Start with these settings:
- For web: Amount 80-120%, Radius 0.5-1.0, Threshold 0
- For print: Amount 150-200%, Radius 1.0-2.0, Threshold 0
Resize for your output: Image → Image Size. For web, 2048px on the long edge at 72 DPI works well. For print, keep the full resolution and set to 300 DPI.
Step 6: Save and Export
Save your working file as a PSD (preserves layers) or TIFF (archival quality). For sharing, use File → Export → Export As:
- JPEG — Best for web and social media (quality 80-90%)
- PNG — When you need transparency
- WebP — Modern web format, smaller files than JPEG
For accurate color output, make sure you understand color management for photographers, and consider investing in a quality monitor for photo editing.
AI-Powered Editing Tools in Photoshop
Since 2023, Adobe has integrated AI-powered tools (built on Adobe Firefly) directly into Photoshop. These tools don’t replace traditional techniques — they dramatically speed up tasks that used to take minutes or hours.
For a broader look at AI in photography, see our roundup of the best AI photo editors and our deep dive into AI photo editing tools.
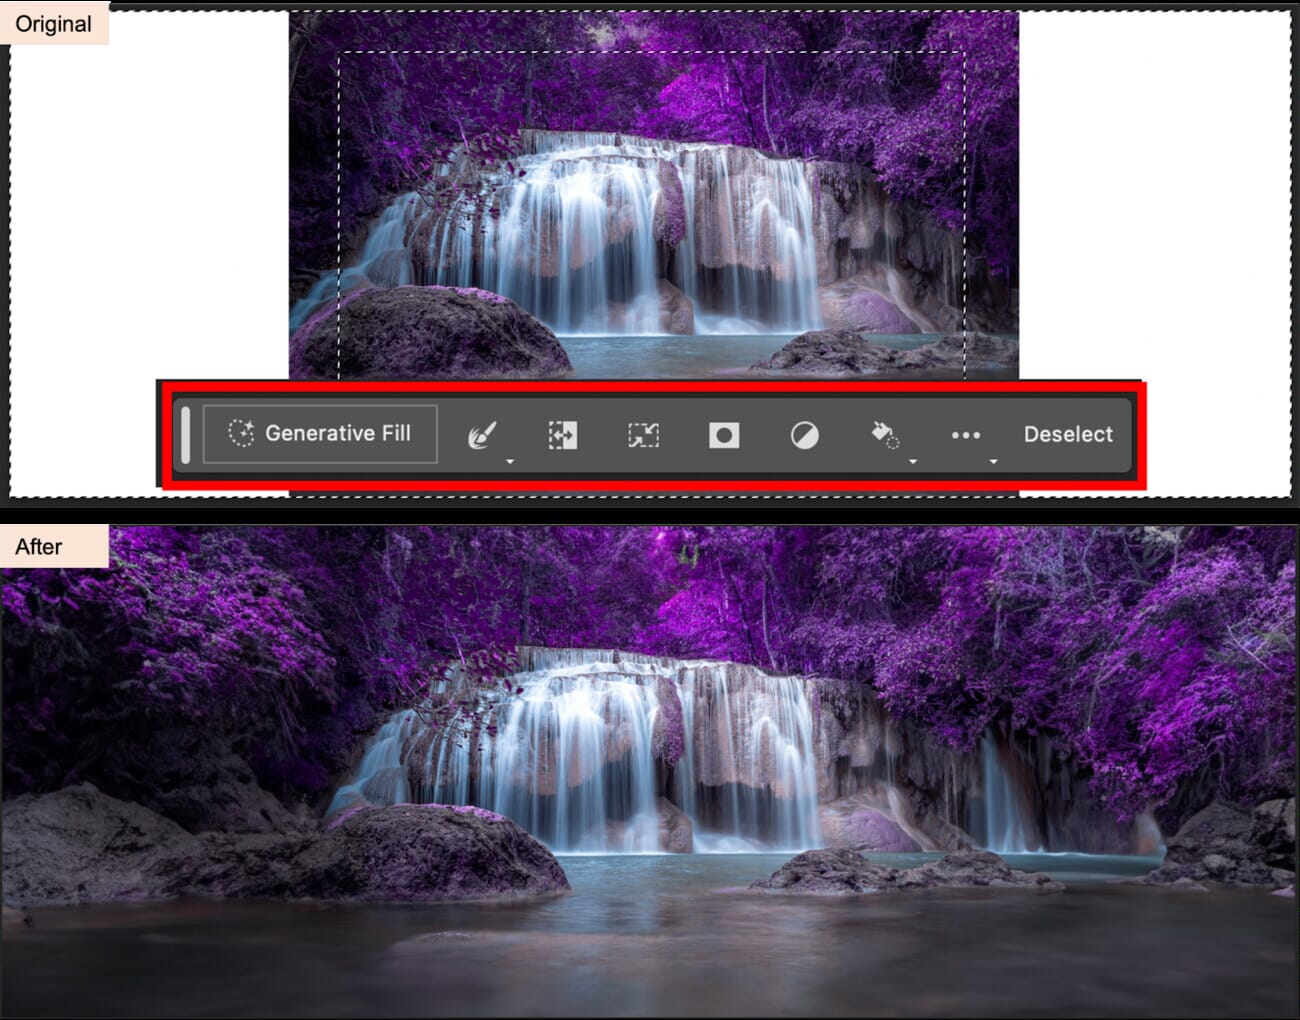
Generative Fill
Generative Fill is Photoshop’s flagship AI feature. Select any area of your image, type a text prompt (or leave it blank), and Photoshop generates contextually-aware content that blends seamlessly with the surrounding pixels.
How to use it:
- Make a selection (any selection tool works)
- Click “Generative Fill” in the contextual taskbar
- Type a prompt describing what you want (or leave blank to fill based on context)
- Photoshop generates three variations — pick the best one
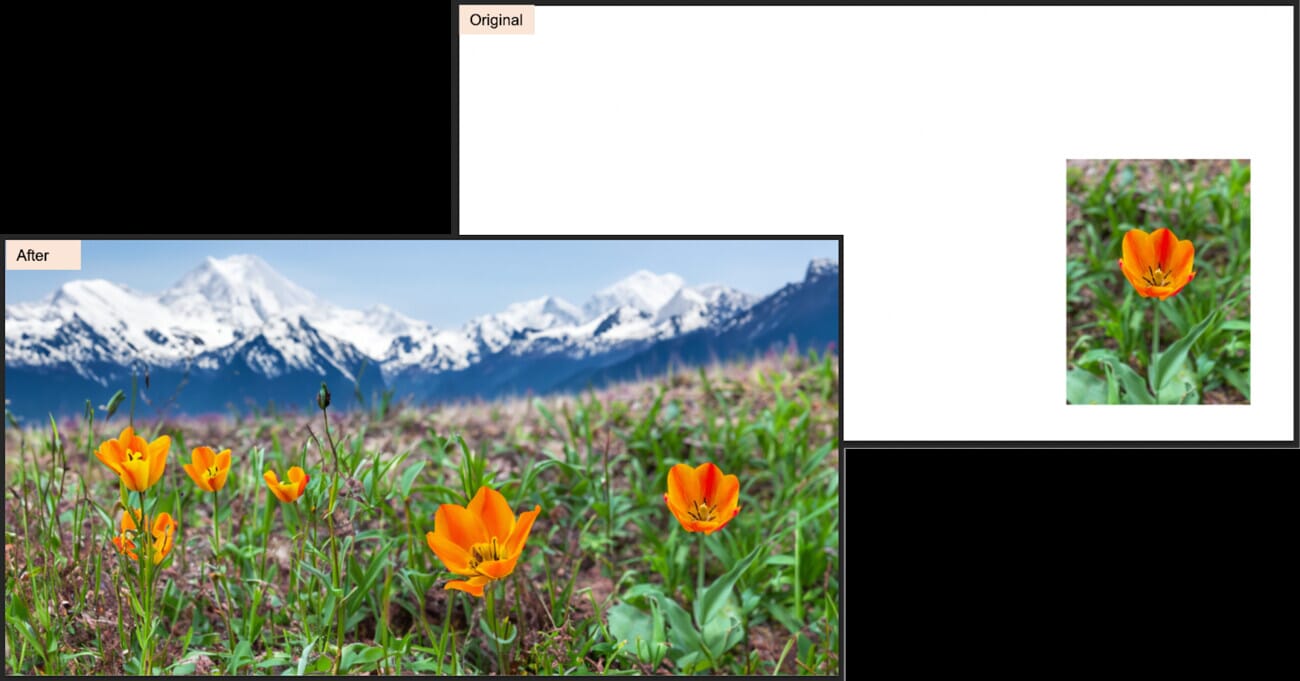
Best use cases: Extending backgrounds, adding objects to a scene, replacing skies with specific moods, removing large unwanted elements, and filling in areas after Content-Aware crop.
Generative Expand
Generative Expand lets you extend your image beyond its original borders. Use the Crop tool to drag outside the canvas, then Photoshop fills the new space with AI-generated content that matches the existing scene.
This is incredibly useful when you need a wider crop for a website banner, want to convert a landscape shot to panoramic format, or simply wish you’d framed a bit wider during the shoot. The AI analyzes the existing edges of your photo — sky gradients, ground textures, architectural lines — and generates a seamless continuation.
How to use it: Select the Crop tool, drag any handle beyond the canvas edge, and click “Generative Expand” in the contextual taskbar. You can optionally type a prompt to guide the generation (e.g., “continue the mountain range”), or leave it blank for Photoshop to infer from context.
Remove Tool
The Remove Tool (shortcut: J, in the Spot Healing Brush group) is a massive upgrade over the old Content-Aware Fill. Simply brush over any unwanted element — power lines, people, trash, signs — and Photoshop’s AI cleanly removes it while reconstructing the background.
Unlike the old Spot Healing Brush, the Remove Tool understands scene context. It handles complex removals (reflections, shadows, overlapping objects) that would have required careful manual cloning before. For landscape photographers, it’s a game-changer for removing tourists, trash cans, power lines, and other distractions without spending 20 minutes with the Clone Stamp.
Tips for best results: Brush generously over the entire object including its shadow. For large removals, work in stages rather than trying to remove everything in one pass. Zoom in to check the result at 100% — the AI occasionally creates subtle artifacts at high magnification.
AI-Powered Selection Tools
Photoshop’s selection tools have gotten dramatically smarter with AI:
- Select Subject — One-click selection of the main subject with remarkable accuracy, even with complex edges like hair
- Object Selection Tool (W) — Hover over any object and Photoshop automatically detects its boundaries. Click to select.
- Select → Sky — Instantly selects the sky in landscape photos for quick sky replacement or adjustment
These tools eliminate what used to be the most tedious part of Photoshop editing: making precise selections around complex subjects.
Neural Filters
Neural Filters (found under Filter → Neural Filters) use machine learning for tasks that were previously impossible or extremely difficult:
- Skin Smoothing — Reduces blemishes and smooths skin while maintaining natural texture
- Smart Portrait — Adjust facial expressions, age, gaze direction, and lighting after the fact
- Style Transfer — Apply the visual style of one image to another
- Photo Restoration — Automatically repair old, damaged, or scratched photos
- JPEG Artifacts Removal — Clean up compression artifacts from low-quality images
- Depth Blur — Simulate shallow depth of field on photos that were shot at narrow apertures
- Colorize — Add realistic color to black-and-white photographs automatically
Neural Filters produce results as new layers, keeping your original image intact. The quality varies by filter — Skin Smoothing and Photo Restoration work remarkably well, while some creative filters like Style Transfer may need manual refinement. Think of them as powerful starting points rather than finished edits.
Adobe Firefly Integration
Adobe Firefly — Adobe’s generative AI engine — powers all of the AI features above, including the new voice-controlled AI Assistant on mobile and also enables text-to-image generation directly within Photoshop. You can generate entirely new images from text prompts, create textures, generate patterns, and produce reference images without leaving the application.
Firefly is trained on licensed Adobe Stock content, so generated images are cleared for commercial use — a significant advantage over other AI image generators for professional photographers.
Interested in other AI-powered editing? See how Google’s Gemini AI handles photo editing.
Lightroom + Photoshop: The Complete Workflow
Most professional photographers don’t choose between Lightroom and Photoshop — they use both. Here’s the recommended combined workflow:
- Import and cull in Lightroom
- Global adjustments in Lightroom (exposure, white balance, color grading, lens corrections)
- Right-click → Edit In → Photoshop for images that need pixel-level work
- Retouching, compositing, and AI tools in Photoshop
- Save — The edited file automatically returns to your Lightroom catalog as a TIFF
- Final export from Lightroom for web, print, or client delivery
This round-trip workflow is seamless because Adobe designed the two programs to work together. Lightroom handles the catalog management and global adjustments; Photoshop handles the detail work. Neither fully replaces the other.
When to skip Lightroom and go straight to Photoshop: If you’re working on a single image that needs heavy compositing, text overlays, or complex retouching, open it directly in Photoshop. There’s no benefit to routing through Lightroom first for one-off creative projects.
How to Get Photoshop
Adobe Photoshop is available exclusively through Adobe Creative Cloud subscriptions. There is no one-time purchase option. Here are the plans relevant to photographers:
- Photography Plan — $9.99/month — Includes Photoshop, Lightroom, Lightroom Classic, and 20GB cloud storage. This is the best value for most photographers.
- Photography Plan (1TB) — $19.99/month — Same as above with 1TB cloud storage for Lightroom mobile library.
- Photoshop only — $22.99/month — Photoshop alone without Lightroom. Rarely makes sense for photographers since the Photography Plan is cheaper and includes more.
All plans include Adobe Firefly generative AI credits. The Photography Plan is the recommended starting point — you get both tools for less than the price of Photoshop alone. Adobe offers a 7-day free trial if you want to test before committing.
For structured learning to get up to speed quickly, check out our list of the best online Photoshop courses.
Smart Objects: The Key to Non-Destructive Editing
Smart Objects are one of Photoshop’s most underused features, especially among photographers who come from Lightroom. A Smart Object is a layer that contains embedded image data — when you apply filters or transformations to it, those changes remain editable and reversible.
Why Smart Objects matter:
- Non-destructive filters — Apply Camera Raw Filter, Sharpen, Blur, or any filter as a “Smart Filter” that you can toggle on/off, adjust opacity, or re-edit at any time
- Lossless scaling — Resize a Smart Object down, then back up, without quality loss (the original data is preserved)
- Linked editing — If you duplicate a Smart Object, editing the contents of one updates all copies automatically
- RAW re-editing — Open a RAW file as a Smart Object, and you can double-click it to return to Camera Raw and adjust your RAW settings at any point
How to convert: Right-click any layer and select “Convert to Smart Object.” Or when opening a RAW file in Camera Raw, hold Shift and click “Open as Object” instead of “Open.”
The main limitation: you can’t paint directly on a Smart Object or use the Clone Stamp on it. When you need to do pixel-level retouching, create a new empty layer above the Smart Object and set your retouching tools to “Sample All Layers.”
Understanding Blending Modes
Blending modes control how one layer interacts with the layers beneath it. For photographers, a handful of modes handle 90% of real-world editing needs:
- Multiply — Darkens the image. Useful for adding density to skies or creating shadow effects. Duplicate a layer, set to Multiply, and reduce opacity for a quick darkening effect.
- Screen — Lightens the image. The opposite of Multiply. Duplicate a dark image, set to Screen, and reduce opacity to brighten without blowing highlights.
- Overlay / Soft Light — Increases contrast by darkening darks and lightening lights. Soft Light is a subtler version of Overlay. Great for adding punch to flat images.
- Luminosity — Applies only the brightness values from the blending layer, ignoring color shifts. Essential when applying Curves or Levels adjustments that inadvertently shift colors.
- Color — Applies only the color/hue from the blending layer, ignoring luminosity. Useful for color grading or hand-coloring specific areas.
Quick tip: Shift + and Shift – cycle through blending modes on the selected layer, letting you quickly preview how each mode affects your image.
Essential Keyboard Shortcuts
Memorizing shortcuts dramatically speeds up your editing. Here are the ones worth learning first:
- V — Move tool
- B — Brush tool
- J — Spot Healing / Remove Tool
- W — Object Selection Tool
- S — Clone Stamp
- [ and ] — Decrease / increase brush size
- Ctrl/Cmd + Z — Undo (multiple levels)
- Ctrl/Cmd + J — Duplicate layer
- Ctrl/Cmd + T — Free Transform
- Ctrl/Cmd + Shift + E — Merge all visible layers to a new layer
- X — Swap foreground/background colors (essential when painting masks)
- Space + drag — Pan around your image
Tips for Better Photoshop Edits
- Always work non-destructively. Use adjustment layers, Smart Objects, and duplicate layers instead of editing the original pixels directly. This gives you the freedom to revisit any decision without starting over.
- Zoom to 100% regularly. What looks good at fit-to-screen may reveal problems at actual size — halos from over-sharpening, banding in gradients, or artifacts from AI tools. Press Ctrl/Cmd + 1 to jump to 100% zoom.
- Use Smart Objects for everything you can. Converting a layer to a Smart Object lets you apply filters non-destructively, resize without quality loss, and re-edit Camera Raw settings at any time.
- Name and organize your layers. Double-click a layer name to rename it. Use layer groups (Ctrl/Cmd + G) to organize related layers — for example, group all retouching layers together. “Skin retouch” is infinitely more useful than “Layer 47 copy 3.”
- Start with AI tools for speed, refine with manual tools for precision. Use Select Subject to get 90% of the way there, then clean up edges manually with Refine Edge or Quick Mask mode. Use the Remove Tool for quick cleanups, then fine-tune with the Clone Stamp if needed.
- Save versions at milestones. Use File → Save As at key points in your edit so you can go back if something goes wrong. PSD files preserve all your layers.
- Learn to use histograms. The histogram (Window → Histogram) shows the tonal distribution of your image. Gaps or spikes at the edges indicate clipping — lost detail in highlights or shadows. Keep an eye on it while adjusting Curves and Levels.
- Calibrate your monitor. No amount of careful editing matters if your screen shows inaccurate colors. A hardware calibrator (like the Datacolor SpyderX or X-Rite i1Display) ensures what you see matches what others see — and what gets printed.
- Use Actions for repetitive tasks. If you apply the same sequence of steps to many images (watermarking, resizing, sharpening for web), record it as an Action (Window → Actions). Then run it with one click — or batch-process an entire folder through File → Automate → Batch.
Frequently Asked Questions
Ready to start editing? The Adobe Photography Plan ($9.99/month) includes both Photoshop and Lightroom — it’s the best value for photographers.
Is Photoshop good for beginners?
Photoshop has a steeper learning curve than Lightroom, but its new AI tools (like Select Subject and the Remove Tool) have made it much more accessible. If you’re a complete beginner, start with Lightroom for basic edits and add Photoshop when you need pixel-level control, retouching, or compositing.
How much does Photoshop cost?
Adobe Photoshop is available through Adobe’s Creative Cloud subscription. The Photography Plan costs $9.99/month and includes both Photoshop and Lightroom — it’s the best value for photographers. There’s no one-time purchase option.
What’s the difference between Generative Fill and Content-Aware Fill?
Content-Aware Fill (the older tool) analyzes surrounding pixels to fill a selection. Generative Fill uses Adobe Firefly AI to create entirely new content based on a text prompt and image context. Generative Fill is far more powerful — it can add objects, extend scenes, and create content that never existed in the original image.
Can Photoshop’s AI tools be used for commercial work?
Yes. Adobe Firefly (which powers Generative Fill, Generative Expand, and other AI features in Photoshop) is trained on licensed Adobe Stock content and is cleared for commercial use. Adobe provides IP indemnification for Firefly-generated content.
Should I edit RAW files in Photoshop or Lightroom?
Start in Lightroom (or Adobe Camera Raw, which opens automatically in Photoshop). RAW processing — exposure, white balance, highlight recovery — is best done in a RAW processor. Then move to Photoshop for retouching, compositing, and AI-powered edits that Lightroom can’t handle.
What file format should I save my Photoshop edits in?
Save your working file as PSD (Photoshop Document) to preserve layers, or TIFF for archival quality. For sharing and web use, export as JPEG (quality 80-90%) or WebP for smaller file sizes. Never edit from a JPEG — always keep a PSD master file.
Featured image: Photo by dlxmedia.hu on Unsplash.
