
- AI tools have rewritten the beginner workflow. Lightroom’s Generative Remove, Photoshop Elements 2026, and DaVinci Resolve’s Photo Page do in one click what used to take 20 minutes.
- You don’t need a desktop to start. Snapseed, Lightroom Mobile, and the iOS Photos app on a current iPhone cover 80% of what beginners actually need.
- Skip the buying paralysis. Lightroom Classic + Photoshop Elements 2026 is the modern starter stack. DaVinci Resolve’s free tier is the best zero-cost alternative for 2026.
- Master five sliders before you touch presets: exposure, highlights, shadows, white balance, and clarity. Everything else builds on these.
- Use a starter preset pack to anchor your first 100 edits, then learn what each slider does by reverse-engineering the preset.
Photo editing in 2026 looks nothing like it did three years ago. The slider-by-slider workflow is still useful, but the heavy lifting — sky replacements, distracting-tourist removal, masking the subject — now happens with a single click. That changes the learning curve. Beginners can produce a polished image in their first week, but the gap between “clicked the AI button” and “understands what changed” is wider than ever.
This guide is the modern beginner starting point. It assumes a beginner is editing in 2026, not 2022, and that they want a workflow that scales from phone to desktop and from RAW to JPEG. Everything below is opinionated. Where there are two reasonable choices, this guide picks one and explains why.

When you buy through links on our site, we may earn a commission at no cost to you. We evaluate products independently. Commissions do not affect our evaluations.
AI Has Rewritten Beginner Photo Editing — Start Here
Three AI features are non-negotiable for a beginner in 2026. Each one handles a problem that used to be the main reason new editors quit.
Generative Remove (Lightroom Classic 15.3)
Lightroom’s Generative Remove tool finally became reliable in the 15.3 update. Brush over a tourist, a power line, a stray cup on the table, and Lightroom regenerates clean pixels behind it. The 2026 version costs no generative credits inside Lightroom Classic, which is a quiet but huge change for beginners worried about per-edit costs.
The trick worth knowing: brush a slightly larger area than the object itself. Including a few pixels of the surrounding background gives the model the context it needs to blend the patch invisibly.
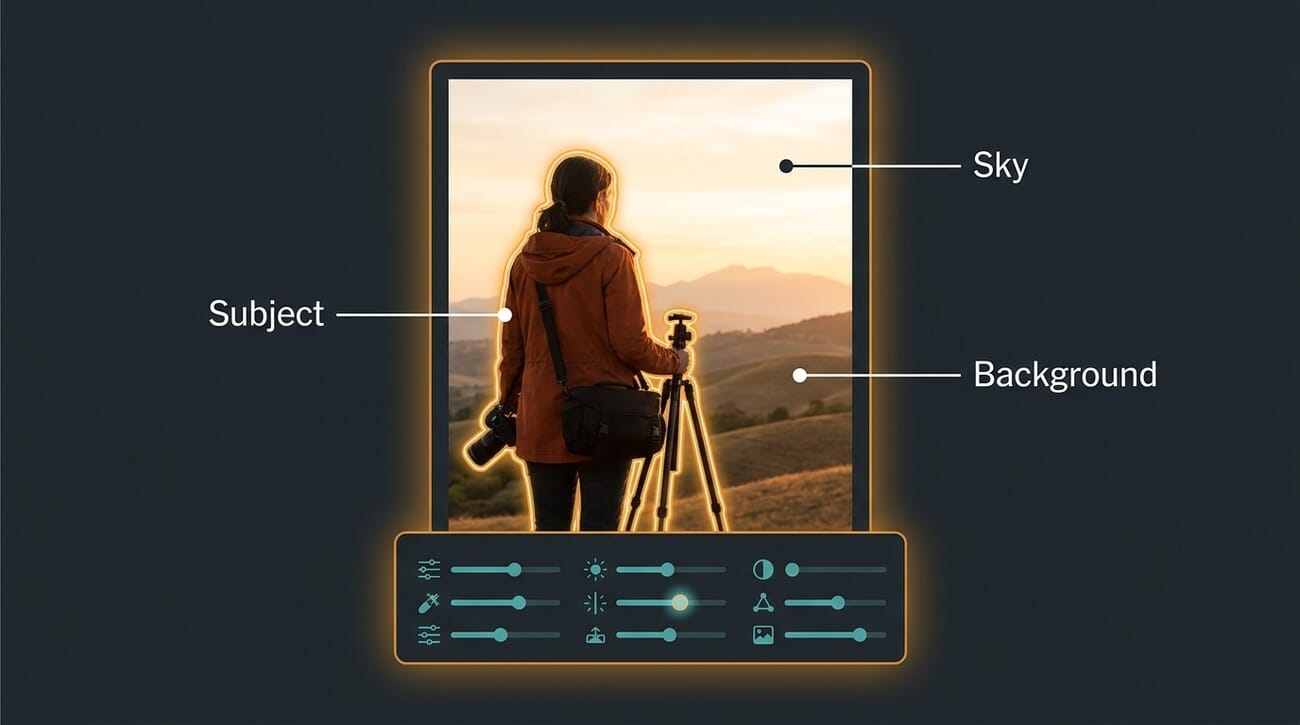
AI Subject and Sky Masks
Every modern editor — Lightroom, Photoshop Elements, DaVinci Resolve, even mobile-only Snapseed in its newer revisions — auto-detects the subject and sky in a photo. That sounds minor until a beginner realizes how much of traditional editing was about masking: brightening only the subject, deepening only the sky, sharpening only the eyes. AI masks turn each of those tasks from a 5-minute chore into a checkbox.
Use them, but verify the mask boundary at 100% zoom before committing. AI sometimes clips wispy hair, transparent sunglass lenses, or the edge between a backlit subject and a bright sky. A 10-second mask check saves a re-export.
Photoshop Elements 2026 — The AI-First Beginner Choice
Adobe split the AI generative tools out of full Photoshop and dropped them into Elements 2026 for a one-time $99.99 license. Generate Image creates background fills, Insert Object adds elements that match the lighting, Restore Photo handles old scans, and AI Remove with people detection clears crowds. The package includes 25 generative credits per month — plenty for a beginner doing one edit a day.
For a beginner who wants AI without subscribing, Elements 2026 is the best one-time-purchase software currently available. It pairs cleanly with Lightroom Classic if a beginner upgrades later.
What Photo Editing Actually Does
Photo editing is two distinct jobs that beginners often confuse: correction and interpretation. Correction fixes what the camera got wrong — exposure, white balance, lens distortion, sensor dust. Interpretation is everything else: choosing how the photo should feel, which parts the eye should land on, how much the colors should sing.
The traditional advice says to learn correction first, then move to interpretation. That order still holds in 2026. AI tools help with both, but they can’t guess what a photographer wanted the photo to feel like. That part stays human.
The five sliders that drive almost every beginner edit:
- Exposure — global brightness. Adjust until the photo looks like the scene felt.
- Highlights and Shadows — recover blown skies and lift dark foregrounds without crushing contrast.
- White Balance — fixes the orange tint of indoor light or the blue cast of overcast days. Understanding white balance is the single biggest jump in beginner photo quality.
- Clarity / Texture — adds local contrast around edges. A little goes a long way; +20 is usually too much.
- Vibrance — boosts muted colors without oversaturating already-vivid ones. Use this instead of Saturation.
Master those five and a beginner has 80% of editing covered. Everything else — split toning, tone curves, point color — is refinement.
The Best Beginner Editing Software in 2026
Four tools cover virtually every beginner scenario in 2026. The right pick depends on whether the beginner wants subscription convenience, one-time purchase, free, or mobile-first.
Adobe Lightroom Classic — The Subscription Default
Lightroom Classic remains the industry default for a reason. It handles RAW from every major camera brand, stores edits non-destructively, syncs to Lightroom Mobile, and as of 15.3 includes Generative Remove without per-use credits. The Photography Plan at $9.99/month bundles Lightroom + Lightroom Classic + Photoshop + 20GB of cloud storage.
For a beginner who already pays for Adobe at work or school, this is the obvious choice. For everyone else, the question is whether $120/year of subscription beats a one-time $99 purchase of Photoshop Elements.
Photoshop Elements 2026 — The One-Time-Purchase Pick
Elements 2026 is the no-subscription alternative most beginners should consider. It now includes the AI generative tools — Generate Image, Insert Object, Restore Photo, AI Remove with people detection — that previously required full Photoshop. Twenty-five generative credits per month covers a hobbyist easily.
Elements lacks Lightroom’s catalog and tethered import workflow, which matters for high-volume shooters but not for someone editing 10 photos a week. For trips, family events, and casual portfolio building, Elements 2026 is the better value.
DaVinci Resolve 21 Photo Page — The Free Lightroom Alternative
Blackmagic added a dedicated Photo Page to DaVinci Resolve 21 in late 2025, and the 2026 update made it genuinely competitive. It reads RAW files from Canon, Fujifilm, Nikon, and Sony, ships with AI Magic Mask for subject and sky isolation, and runs on the free version of Resolve — no subscription, no purchase, no watermark. The paid Studio version unlocks neural-engine effects for $295 one-time.
The Photo Page is the sleeper pick of 2026. For a beginner with a tight budget, no other free editor reads RAW from every camera brand and includes AI masking. The dedicated DaVinci Resolve Photo Page guide walks through the workflow in detail.
Snapseed — The Free Mobile Editor
Google’s Snapseed is still the best free mobile editor in 2026. It supports RAW, includes selective edits, and has a learning curve a beginner can clear in a single afternoon. For phone-only editors who want to skip the desktop entirely, the Snapseed beginner guide covers every tool that matters.
The honest comparison: Snapseed is excellent for casual edits, but it doesn’t scale to high-volume work. Beginners who shoot more than 50 photos a week should pair it with Lightroom Mobile.
The Mobile Editing Track
Half of beginner photographers in 2026 never touch a desktop. The mobile editing stack is now legitimate enough to take a portfolio from RAW to Instagram without ever opening a laptop, and the workflow is faster than desktop for most casual edits.

Lightroom Mobile — The Pro’s Mobile Editor
Lightroom Mobile is free for basic edits and unlocks RAW, masking, and Generative Remove with the same Photography Plan that powers desktop Lightroom. Edits sync automatically across devices, so a beginner can start on a phone and finish on a laptop without re-doing work.
The mobile UI is the simplified version of desktop Lightroom — same sliders, same masks, smaller screen. Beginners who learn here will find desktop Lightroom familiar from day one.
Snapseed for Quick Edits
For one-off edits — a single Instagram post, a quick text-message photo — Snapseed beats Lightroom Mobile on speed. The Selective tool lets a beginner brighten one specific area with a single tap. The Healing tool removes small distractions in seconds. There’s no catalog, no sync, no friction.
iOS Photos App — Don’t Underestimate It
The iPhone’s built-in Photos app got dramatically more capable in iOS 27. The 2026 version includes Clean Up (object removal), Memory Movies with AI face detection, and a one-tap Auto edit that’s genuinely good. For a beginner who isn’t ready to commit to a third-party editor, iOS Photos is a real starting point. The full breakdown of iOS 27 AI photo features covers what Apple has actually shipped.
The cap: iOS Photos doesn’t handle RAW well, doesn’t support local masks beyond AI auto-detection, and edits don’t sync to a desktop editor. It’s a great starting tool, not a destination.
The Beginner’s Step-by-Step Workflow
This is the order to edit a photo in 2026. The order matters: doing crop first changes how exposure looks, doing color before AI masks means the masks have to redo work. Follow this sequence and an edit takes three minutes instead of fifteen.
- Crop and straighten first. Composition decides what an editor is editing. Get this right before touching tones.
- Set white balance. Either pick a preset (Daylight, Cloudy) or use the eyedropper on a neutral surface in the photo.
- Adjust global exposure. Make the photo look correctly bright. Don’t overthink it.
- Recover highlights, lift shadows. Pull -50 to -80 on Highlights, +20 to +50 on Shadows for most outdoor photos.
- Add local edits with AI masks. Brighten the subject, deepen the sky, sharpen the eyes. AI masks make this a 30-second step.
- Remove distractions with Generative Remove or AI Remove. Tourists, power lines, lens dust, the photographer’s shadow.
- Apply a color grade. Either with a preset or by adjusting Vibrance and the HSL panel’s Luminance sliders.
- Sharpen for output. Sharpen lightly for screen, more aggressively for print. The Lightroom print guide covers print-specific settings.
- Export with sensible settings. JPEG quality 85, sRGB color space, long edge sized for the destination.
The first 50 edits feel slow. By edit 100 the workflow is muscle memory and the entire process drops under three minutes per photo.
A Starter Preset Pack to Skip Decision Paralysis
Decision paralysis is the single biggest reason beginners quit editing. Twenty sliders, infinite combinations, no clear right answer. A starter preset pack solves this by giving a beginner a known-good starting point for each photo type, then asking them to nudge from there.
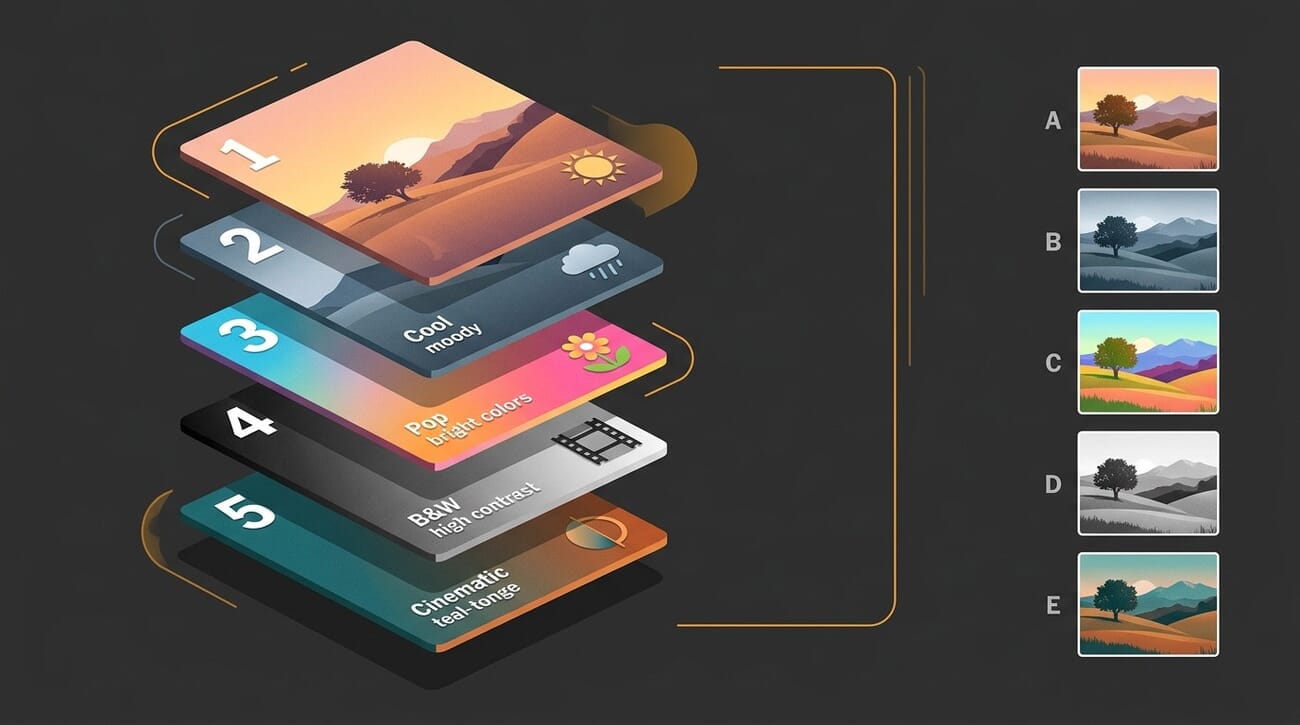
The five presets every beginner should have, ranked by how often they’ll get used:
- Bright and Clean — moderate exposure boost, slight clarity, vibrance +15. The default for most outdoor photos.
- Moody Outdoor — exposure -0.3, shadows +30, highlights -50, dehaze +15. Cloudy days, mountains, autumn.
- Warm Indoor — white balance +400 K shift, exposure +0.4, vibrance -10. Indoor portraits without flash.
- Black and White Documentary — saturation -100, contrast +20, clarity +10, slight S-curve in tones. Street photography, candid shots.
- Travel Vivid — vibrance +25, saturation +5, dehaze +10, blue luminance -15. Beaches, sunsets, vibrant city scenes.
Apply the preset, then ask one question: what’s wrong with this image now? Maybe the sky is too bright. Maybe the subject is too dark. Adjust just that. The preset handles the other 18 sliders for you.
After 100 edits, a beginner will have intuited what each preset is doing. That’s the moment to start building custom presets. Until then, working from a starter pack is faster and teaches the underlying principles by example.
Common Beginner Mistakes
The mistakes below are the ones every beginner makes — including this writer, several times. Recognizing them early saves months of confused-looking edits.
Over-editing Until It Looks Wrong
Beginners push every slider too far. Saturation +50, clarity +40, exposure +1.5. The result looks fake even when each individual slider seemed reasonable. The fix: after every edit, set the slider back to zero and look at the photo for two seconds. Most adjustments need to be 30-50% smaller than the first instinct.
Trusting AI Masks Without Checking
AI masks fail silently. They clip hair, miss eyeglass lenses, mistake water for sky. A 10-second zoom check at 100% catches every common failure. Every AI-edited photo deserves this check before export.
Editing JPEGs When RAW Was Available
RAW files contain dramatically more recoverable data than JPEGs — usually 2-3 stops of highlight and shadow detail. Every modern beginner camera, including most phones, can shoot RAW. Turn it on. The files are bigger, but the editing flexibility is the difference between rescuing a missed shot and losing it.
Ignoring the Histogram
The histogram tells a beginner whether shadows are crushed or highlights are blown — information the eye can’t reliably judge on a screen. Glance at the histogram during every edit. If either end of the histogram has a spike against the wall, recoverable detail has been lost in that direction.
Skipping the Preview-on-Real-Devices Step
An edit that looks great on a calibrated desktop monitor may look muddy on a phone or too bright on Instagram’s in-feed compression. After every export, view the result on a phone and on whichever platform it’s being posted to. Many beginners are quietly publishing photos that look very different from what they edited.
Frequently Asked Questions
What’s the easiest photo editing software for total beginners in 2026?
For total beginners, the iOS Photos app on a current iPhone or Snapseed on Android is the lowest-friction starting point. Both are free, both include AI auto-edit, and both teach the basic vocabulary (exposure, contrast, saturation) without overwhelming with options. Move to Lightroom Mobile or DaVinci Resolve’s Photo Page once those start to feel limiting.
Should a beginner pay for Lightroom or buy Photoshop Elements 2026?
For high-volume shooters who want sync between phone and laptop, the $9.99/month Lightroom plan wins. For occasional editors who shoot fewer than 200 photos a month, Elements 2026 at a one-time $99.99 is the better value — it includes the AI tools and never expires.
Is DaVinci Resolve really free for photo editing?
Yes — the free version of DaVinci Resolve 21 includes the Photo Page, RAW support for all major brands, and AI Magic Mask. The paid Studio version ($295 one-time) adds neural-engine effects and 4K+ video features. For most beginner photo editing, the free version is enough.
How long does it take to learn photo editing as a beginner?
The basic workflow can be learned in a weekend. Genuine intuition for what each slider does — the kind that lets a beginner edit confidently without overthinking — takes around 100 edited photos. Editing one photo a day, that’s about three months.
Should beginners use AI editing tools or learn the manual workflow first?
Both, simultaneously. Use the AI tools to skip the slowest manual steps (masking, distraction removal), and learn the manual sliders for the creative decisions AI can’t make for the editor (mood, color grade, where to direct the viewer’s eye). This is faster than the old “learn manual first” approach and produces better results.
What are the best free photo editing apps for phones?
Snapseed is the best free mobile editor in 2026, full stop. It supports RAW, includes selective edits, and has no ads or upsells. Lightroom Mobile is free for basic edits but requires a subscription to unlock RAW and masking. For iPhone users, the built-in Photos app handles most casual edits well.
Software releases and AI feature details verified against vendor documentation as of May 2026.
Software Documentation
- Adobe Lightroom Classic 15.3 — release notes – Generative Remove and AI masking improvements
- Adobe Photoshop Elements 2026 — feature list – AI generative tools, Restore Photo, Insert Object, $99.99 one-time pricing
- Blackmagic DaVinci Resolve 21 — Photo Page – RAW support across Canon, Fujifilm, Nikon, Sony; free version vs $295 Studio
- Snapseed — Google Play listing – Free mobile editor with RAW support and selective edits
Image Sources
- Editorial illustrations by PhotoWorkout – Original AI-generated editorial graphics created for this guide


