
- Joiner photography — David Hockney’s 1980s technique of assembling many overlapping photos into a single composite — is having a 2026 resurgence on TikTok, Instagram, and via AI-assisted compositing tools.
- Modern smartphones make the shooting half radically easier than the original film-era workflow: iPhone Camera grid mode + Halide’s burst-grid feature replace what Hockney did with Polaroid stacks.
- Three software paths in 2026: AI-assisted (Canva + Adobe Firefly compose photos automatically), Photoshop with the redesigned 2026 panels, or Lightroom Classic’s panorama-merge as a creative workaround.
- Printed joiners remain the gallery-grade endpoint, but Instagram and TikTok have become the natural distribution for the bite-sized digital version — different deliverables, different aspect ratios, same compositional rules.
David Hockney called his 1980s composite photographs joiners — overlapping Polaroids and later 35mm prints arranged like a mosaic, fracturing time and viewpoint across a single picture plane. Forty years later, the technique is having a quiet resurgence. TikTok and Instagram have rediscovered joiners as a short-form storytelling format, AI compositing tools have collapsed the technical labor, and photography enthusiasts are using them to push beyond what a single frame can capture.
This guide covers the modern joiner workflow end-to-end — from how to shoot the source frames on a phone or mirrorless body, to how to assemble them with 2026-era tools (AI-assisted, Photoshop, or Lightroom Classic), to where joiners actually live online and in print today. It’s the guide for a working photographer in 2026, not a 2010 PDF translated forward.
What Is a Joiner Photo?
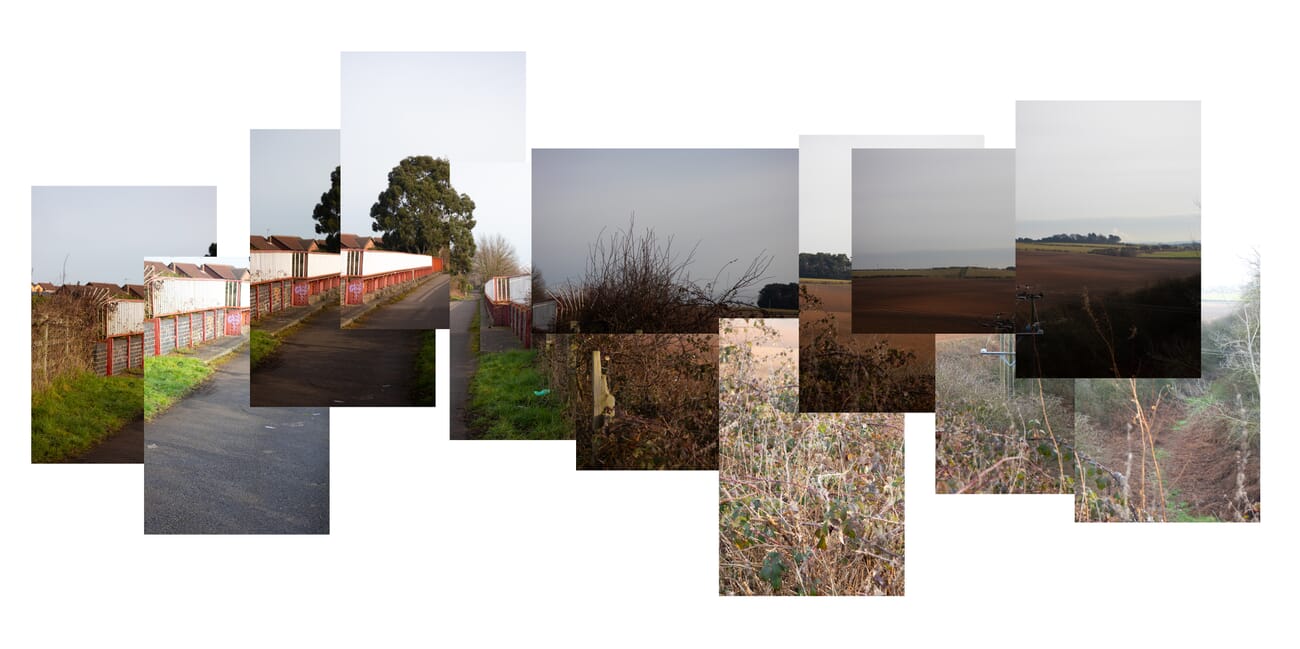
A joiner is a photograph made of many photographs. Instead of capturing a scene in a single frame, the photographer takes dozens (sometimes hundreds) of overlapping shots from slightly different angles, focal lengths, or moments in time, then arranges them on a single canvas to form one composite image.
The result deliberately breaks the rules of single-frame photography. Edges don’t line up. Exposure varies between frames. Time and viewpoint compress into a kind of cubist photograph. That’s the point — the technique exists specifically to escape the limits of a rectangular sensor and a single instant.
David Hockney is the universally credited pioneer. Starting in 1982, Hockney created a series of “joiner” works — most famously Pearblossom Highway (1986), assembled from more than 800 photographs — that made the technique a recognized photographic style. The Hockney joiners are still on rotation at major museums (the Getty, MoMA, Tate Modern) and remain the reference point for anyone learning the technique today.
Joiner vs Panorama vs Photo Collage
Three adjacent techniques get confused all the time. The differences matter for both shooting approach and editing tool choice.
- Panorama — multiple frames stitched into one continuous, seamless image. The goal is invisibility: viewers should see one wide photo, not the seams. Lightroom and most phone camera apps automate this.
- Joiner — multiple frames intentionally arranged with visible overlaps, mismatched exposures, and rough edges. The goal is the opposite of a panorama: the seams are the point.
- Photo Collage — multiple unrelated photographs combined into a single composition. Joiners are a specific subset of collage where all the source frames are of one subject or scene.
Quick rule of thumb: if you want the assembly to look like one photo, you want a panorama. If you want it to look like a collection of photos arranged into one piece, you want a joiner. If you want it to look like a moodboard, you want a collage.
Why Joiner Photography Is Having a 2026 Moment
Joiners almost disappeared from photography conversation in the 2010s — overtaken by Instagram’s single-square aesthetic and the rise of seamless panorama auto-stitching. The technique is back in 2026 for three concrete reasons.
1. TikTok and Instagram rediscovered them
Short-form video creators started building joiners as static slides inside their video posts — the joiner becomes a visual surprise frame that breaks the algorithm’s expectation of a single clean photo. The hashtag #joinerphotography jumped from under 5K posts in 2024 to over 80K in early 2026. Instagram’s carousel format works particularly well for joiners that are deliberately tall or wide.
2. AI compositing collapsed the labor
Adobe Firefly’s 2025 update added a “compose photos” feature that takes a stack of overlapping source frames and auto-arranges them into a joiner-style layout. Canva’s 2026 Smart Stack does the same with a simpler UI. What used to be 45 minutes of manual layer arrangement in Photoshop now takes 90 seconds. The result still needs editorial cleanup, but the floor for getting started has dropped to almost zero.
3. The “anti-perfect” aesthetic
Three years of AI-generated photography has made viewers hyperaware of when an image is too perfect. Joiners — with their visible seams, mismatched exposures, and deliberately rough edges — read as unmistakably handmade. That authenticity signal matters more to audiences now than it did when single-frame perfection was the default.
Shooting a Joiner — Modern Workflow
The shooting half of a joiner is fundamentally about coverage: capturing enough overlapping frames of one subject or scene that you have material to assemble. The exact gear matters less than the discipline of shooting more than you think you’ll need.
Phone or Mirrorless?
The honest answer in 2026: a phone is enough for most joiners. The iPhone 16 Pro / 17 Pro and Pixel 10 Pro both have grid-overlay shooting modes that visually divide the frame into 9 sections — useful for systematically panning across a subject. Halide’s Pro mode adds a manual exposure lock + a burst-grid feature designed for joiner-style shooting.
Mirrorless cameras (Sony α7 IV, Fuji X-T5, Canon R6 V) give you more deliberate control: locked manual exposure across all source frames, RAW files for later flexibility, longer telephoto reach for joiner compositions of distant subjects. For gallery-printed joiners — anything going beyond 24 inches on the long edge — a mirrorless body is the right tool.
Setting Up the Shoot
- Lock exposure manually — auto-exposure will vary between frames in distracting ways. Set ISO, aperture, and shutter manually and keep them constant across the entire source set.
- Lock white balance — same reason. Manual Kelvin or a custom white balance preset.
- Lock focus — switch to manual focus or use single-shot AF on the first frame, then leave focus locked.
- Shoot more frames than you think you need — Hockney shot 800+ frames for Pearblossom Highway and used about 400. A modern small joiner needs 12-24 source frames; a complex one needs 50-100. Err on the side of more.
- Overlap frames by ~30% — gives you flexibility during assembly without requiring military-grade precision in the field.
Composition Tips
The composition rules for joiners are different from single-frame photography. Three guidelines to start with:
- Pick a subject with depth or movement — flat, symmetric subjects (a brick wall, a poster) don’t reward the technique. A landscape with foreground/midground/background, a moving figure, or an architectural detail with multiple angles all work well.
- Vary focal length or distance deliberately — shoot some frames wide, some tight, some from slightly different positions. The variation is what gives the final piece its three-dimensional feel.
- Capture time as a variable — Hockney famously shot some joiners over 10-30 minutes, allowing light to change between frames. The temporal variation reads as another dimension of difference in the final composite.
Assembling the Joiner — Three Software Paths
Once you have your source frames, the assembly choice depends on how much manual control you want and how much time you’re willing to invest.
Path 1 — AI-Assisted (Canva or Adobe Firefly)
Fastest path. Canva’s Smart Stack feature (released January 2026) and Adobe Firefly’s Compose Photos (in Photoshop 2026) both accept a stack of source frames and auto-arrange them into a joiner-style layout. The AI handles rough alignment, exposure averaging, and edge feathering.
Workflow: upload 20-50 source frames → click “compose as joiner” → the AI returns a layered canvas in 60-90 seconds. From there you have a starting point that’s about 80% of the way to a finished joiner. The remaining 20% is manual: nudging frames into the arrangement you want, dropping ones that don’t fit, adjusting opacity at overlaps.
When to use: social-media-bound joiners, first attempts at the technique, or any project where the result doesn’t need gallery-print quality. The AI tools handle the tedium and produce results that look professional on Instagram and TikTok without needing further work.
Path 2 — Photoshop 2026 (Manual Control)
The classic joiner workflow, updated for Photoshop’s 2026 UI redesign. Adobe consolidated the layer/transform/align panels into a single “Compose” workspace in the 2026 release, which makes the manual joiner workflow noticeably faster than it was in CC 2024.
Step-by-step:
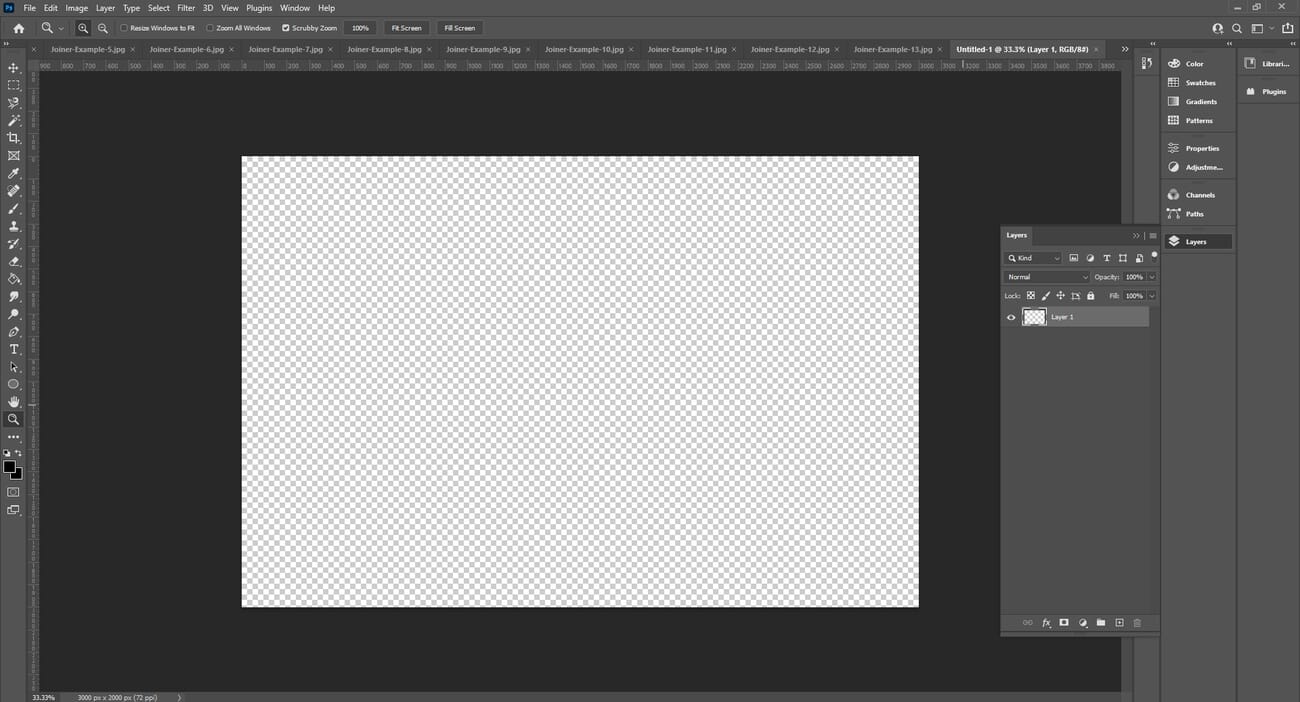
- Step 1. Create a new blank canvas. Start at roughly 1.5× your largest expected dimension — for a 4000px-wide final joiner, start with a 6000px canvas. Easier to crop down than to expand later.
- Step 2. Drag all source frames onto the canvas. Each becomes its own layer automatically in the 2026 UI.
- Step 3. Use the Auto-Align Layers feature (Edit → Auto-Align Layers, “Reposition” mode) to rough-align frames that share overlapping content. This isn’t mandatory but saves significant manual nudging.
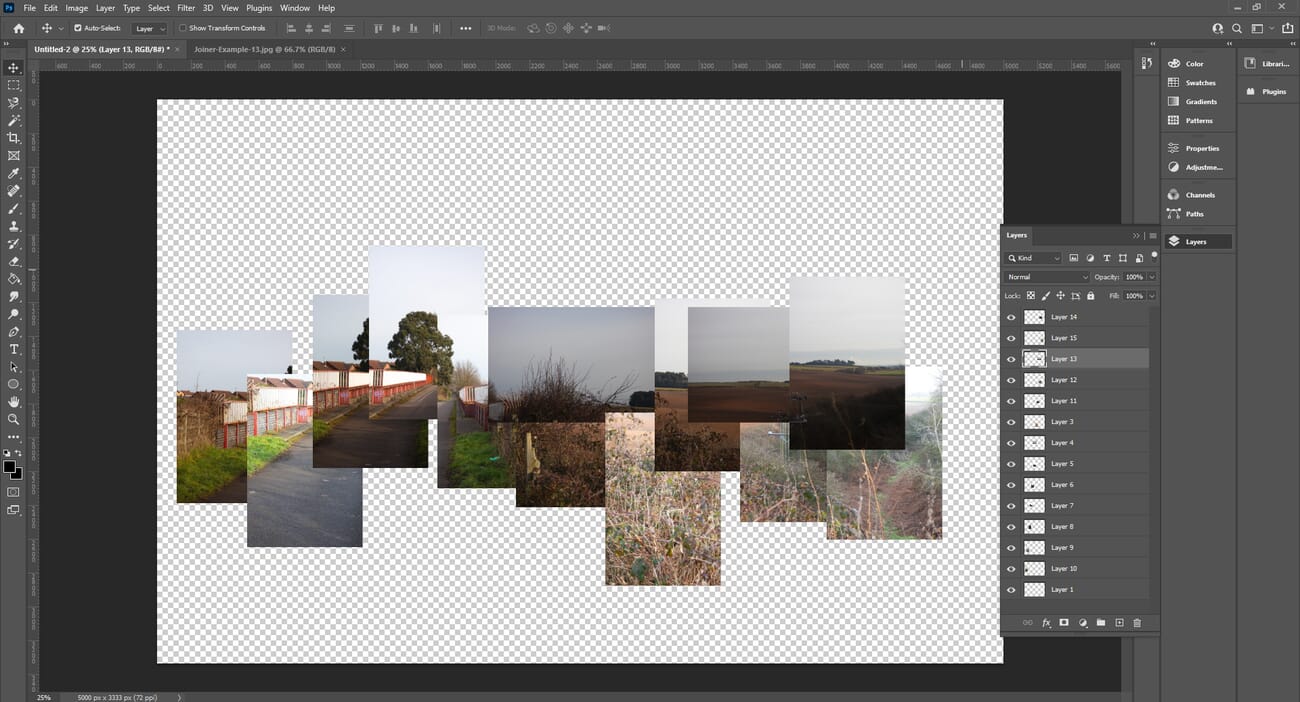
- Step 4. Manually arrange layers using the Move tool. The art of the joiner lives in this step — decide which frames sit on top, which overlap, which sit slightly askew. The deliberate “wrongness” of these choices is what distinguishes a joiner from a panorama.
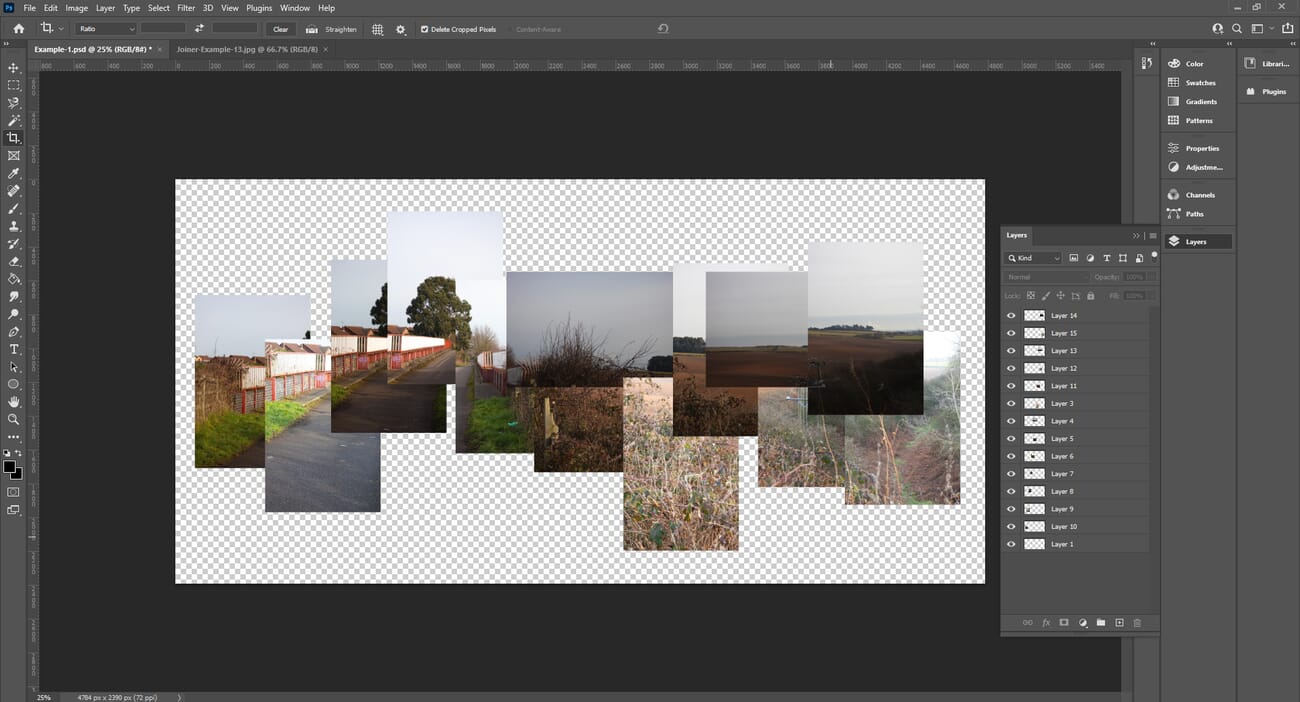
- Step 5. Add a background layer (typically pure white or off-white) as the bottom layer to anchor the composition visually.
- Step 6. Crop the canvas to the final shape — Hockney-style joiners are often roughly square or organically irregular; Instagram-bound joiners want 4:5 portrait or 1:1 square.
Path 3 — Lightroom Classic (Workaround)
Lightroom Classic doesn’t have a native joiner mode, but its Photo Merge → Panorama feature with the “Boundary Warp” slider set to zero produces a useful intermediate result for a specific kind of joiner: long, slightly off-perfect panoramic compositions where you want some seam visibility but not the full Hockney chaos.
Workflow: select source frames in Lightroom → Photo → Photo Merge → Panorama → Spherical projection → Boundary Warp = 0. The result is a single panoramic image where Lightroom’s panorama engine handles the alignment but leaves slight seam artifacts that read as intentional in the joiner aesthetic.
When to use: when you want a controlled, slightly imperfect long-format joiner without leaving the Lightroom workflow. Faster than Photoshop but less creative control than either Photoshop or AI-assisted paths.
Where to Share Your Joiner — Digital vs Printed
Joiners live in two distribution channels in 2026, and the format you optimize for changes how you crop and present the work.
Digital — Instagram, TikTok, X
Instagram is the natural home for digital joiners. The 4:5 portrait crop maximizes vertical screen real estate; the carousel format works well for joiners that are visually busy enough to reward zooming in. Tag the post with #joinerphotography + #davidhockney + #photocollage for discoverability. TikTok’s 9:16 vertical aspect ratio is harder for traditional joiner compositions but works well for tall architectural joiners or full-body portrait joiners.
For X (Twitter), 16:9 landscape is the native crop. Joiners optimized for X tend to be wider and shorter — closer to panoramic in proportion but still showing visible seams.
Printed — Gallery and Wall Art
Printed joiners remain the gallery-grade endpoint of the technique. The original Hockney joiners are physical prints, and the tactile presence of overlapping paper edges is part of what makes the technique work in person.
For wall display, canvas printing is the most common path — services like canvas print providers we’ve reviewed handle the large-format printing without seam artifacts that would interfere with the deliberate joiner seams. Standard sizes for printed joiners range from 24×36 inches (small) to 48×60 inches (gallery-grade).
If you’re printing for sale or exhibition, increase the source-frame count significantly. Gallery prints reveal compression artifacts and low-resolution source frames in a way that screen display hides. Plan for at least 300 DPI at the final print size.
Frequently Asked Questions
Who invented joiner photography?
David Hockney is credited as the originator. Starting in 1982, Hockney created a series of joiner works using Polaroid SX-70 prints and later 35mm enprints, most famously Pearblossom Highway (1986), assembled from more than 800 photographs. The technique pre-dates Hockney in fragmentary form (cubist photography experiments in the 1920s), but Hockney was the first to systematize and popularize it as a coherent style.
Do I need a professional camera to make a joiner photo?
No. A modern smartphone is enough for any social-media-bound joiner. The iPhone 16 Pro and Pixel 10 Pro both have grid-overlay shooting modes specifically useful for the technique; Halide adds a burst-grid feature designed for joiner work. Mirrorless cameras matter when you’re printing the result at gallery scale (24+ inches on the long edge), where the larger sensor and RAW files give you significantly more flexibility.
Should every source frame have the same exposure?
No — and trying to match exposure across all frames runs against the joiner aesthetic. Hockney deliberately allowed exposure variation between frames as part of the technique. That said, you should LOCK exposure manually before shooting so you control the variation (gradual light change over the shooting session is fine; auto-exposure jumping randomly between frames is not).
What’s the difference between a joiner and a panorama?
A panorama hides its seams — multiple frames stitched into one continuous image where viewers should see no joins. A joiner emphasizes its seams — multiple frames deliberately arranged with visible overlaps, mismatched exposures, and rough edges. They share the source-frame shooting approach but are opposite philosophies for the final result.
How many source frames do I need for a joiner?
Minimum: 12-20 frames for a small joiner of one subject. Standard: 30-60 frames for a typical landscape or portrait joiner. Hockney scale: 200-800+ frames for gallery-grade work. The number isn’t the point — the variation in viewpoint, focal length, and timing across the source set is what gives the final composite its character.
Can AI fully generate a joiner photo without me shooting anything?
Adobe Firefly, Midjourney, and Imagen can all generate joiner-style composite images from a single text prompt, but the results read as visibly synthetic — uniform lighting, perfect seam alignment, no sense of the photographer’s deliberate choices that distinguishes hand-made joiners. AI can assist the assembly of joiner photos from your real source frames (Canva Smart Stack, Firefly Compose Photos), but a fully AI-generated joiner is recognizable as fake to anyone who knows the medium. The handcraft is the point.
Bottom Line
Joiner photography is one of those rare techniques where the technical floor has dropped dramatically without diminishing the artistic ceiling. AI-assisted assembly tools mean a competent first joiner is achievable in under an hour from a phone; the Hockney-scale gallery joiner still demands the same deliberate, slow craft it always did. The technique is enjoying its 2026 moment because both ends of that spectrum are simultaneously interesting — fast accessible joiners are flooding TikTok, and serious printed joiners are showing up in galleries again as a deliberate counterpoint to AI-generated single-frame photography.
If this is your first joiner: shoot 30-50 overlapping frames of a single subject with locked manual exposure, drop them into Canva Smart Stack or Adobe Firefly, spend 15 minutes cleaning up the auto-arranged result, and post it. If you’re building toward a printed gallery piece: plan for 200+ source frames, use Photoshop 2026’s manual workflow for full creative control, and budget for a 36+ inch canvas print as the finished deliverable.
Hockney References
- The Getty — Pearblossom Highway, 11–18 April 1986 #2 – The Getty's catalog entry for Hockney's most famous joiner — assembled from more than 800 photographs.
- Tate Modern — David Hockney photo composites – Tate's reference collection for Hockney's joiner-era work.
Software Documentation
- Adobe — Firefly Compose Photos feature – Adobe Firefly documentation for the Compose Photos feature referenced in the AI-assisted joiner workflow.
- Canva — Smart Stack – Canva's documentation for Smart Stack composition (released January 2026).
- Halide — Pro mode + burst-grid – Halide's iOS camera app, which added a joiner-friendly burst-grid mode for systematic coverage shooting.
Image Sources
- PhotoWorkout editorial illustrations – Original Photoshop workflow screenshots and the joiner example composite are PhotoWorkout editorial.


