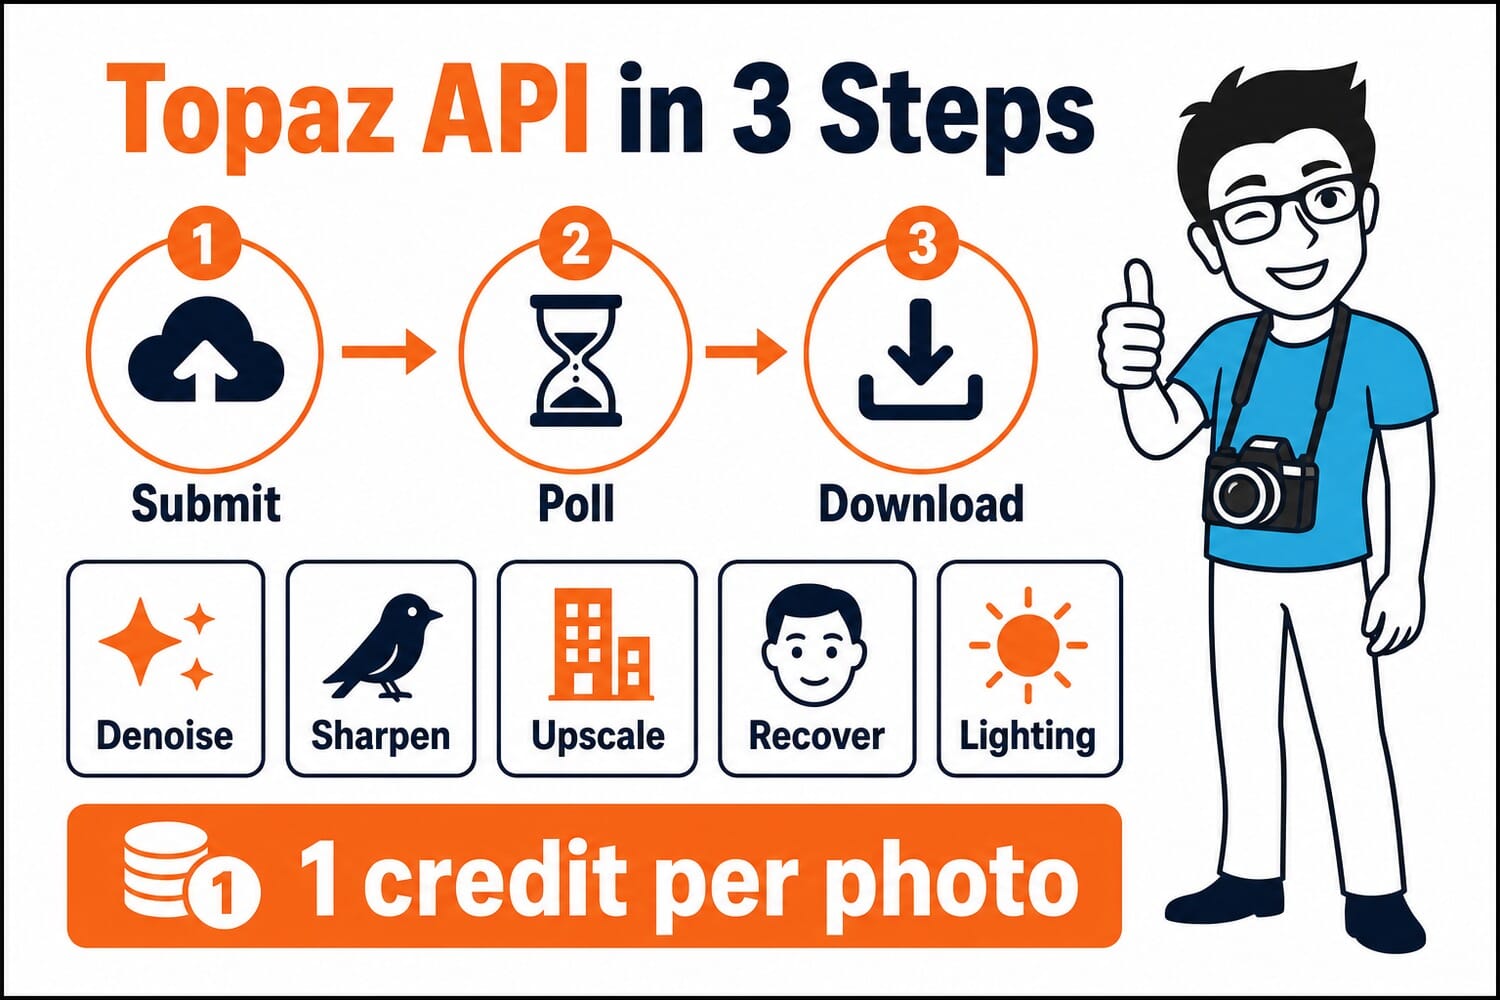


- The Topaz Labs API exposes the company’s denoising, sharpening, upscaling, face recovery, and lighting models over simple REST endpoints: submit a photo, poll a status URL, download the result.
- Pricing is per output megapixel, and it is cheap: every one of the ten test edits (up to a 4,000px upscale) cost exactly 1 credit and finished in 5 to 26 seconds.
- Standouts: face recovery rebuilt a sharp portrait from a 0.3-megapixel file, and Gigapixel turned a mushy 1,000px crop into a crisp 4,000px architectural shot.
- The honest caveats: on autopilot Denoise Max erased faint stars along with the noise (a strength 0.25 re-run brought them back), and Super Focus V3 rebuilt a chrome Chevrolet script as convincing gibberish. Match the model to the job, and check any text.
Topaz Labs sells desktop apps, but its real product has always been the models inside them. The Topaz Labs API exposes those same models directly: denoising, sharpening, upscaling, face recovery, and lighting correction, all over plain REST calls with per-photo pricing and no subscription.
With Adobe’s acquisition of the company announced last week and closing later this year, this is a good moment to see exactly what the independent Topaz stack can do. So PhotoWorkout put real credits behind the question: ten edits across nine real photos from the SampleShots library, and a running tally of what each edit cost. Every comparison below is an interactive slider; drag the handle to wipe between the original and the Topaz output.
The short version: the whole experiment cost 11 credits and about two minutes of total processing time, and several of the results are genuinely hard to believe.
When you buy through links on our site, we may earn a commission at no cost to you. We evaluate products independently. Commissions do not affect our evaluations.
How the API Works (and What It Costs)
Every Topaz image endpoint follows the same three-step pattern. You POST a photo with a model name, get back a process_id, poll a status endpoint until the job reports Completed, then hit the download endpoint for a signed result URL. Jobs in these tests finished in 6 to 26 seconds each.
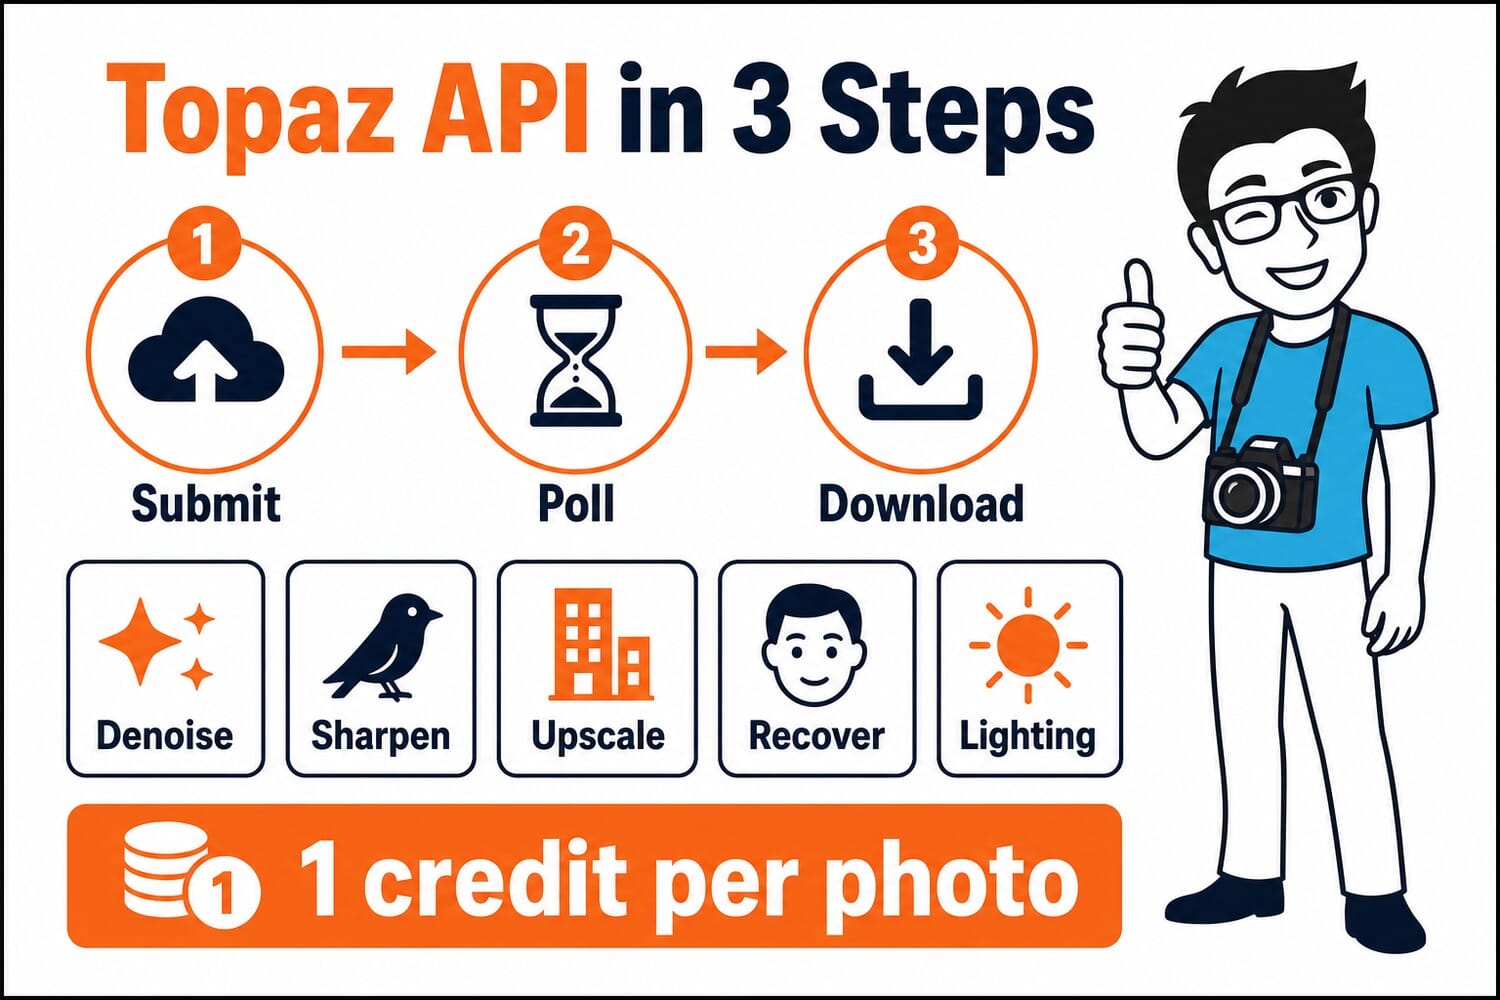
The minimal Python client is about twenty lines:
import os, time, requests

API = "https://api.topazlabs.com/image/v1"
HEADERS = {"X-API-KEY": os.environ["TOPAZ_API_KEY"]}

with open("photo.jpg", "rb") as f:
    r = requests.post(API + "/denoise-gen/async",
        headers=HEADERS,
        data={"model": "Denoise Max", "output_format": "jpeg"},
        files={"image": f})
pid = r.json()["process_id"]

while True:
    time.sleep(5)
    status = requests.get(API + "/status/" + pid, headers=HEADERS).json()["status"]
    if status == "Completed":
        break

url = requests.get(API + "/download/" + pid, headers=HEADERS).json()["url"]
open("result.jpg", "wb").write(requests.get(url).content)
Billing is per output megapixel, not per call. Precision models (Gigapixel, Denoise, GAN Sharpen, the lighting and cleanup utilities) give you 24 megapixels of output per credit; generative models are pricier per pixel, at 4 megapixels per credit for the Wonder family. In practice that means a typical web-resolution edit costs a single credit. There is also a balance endpoint (GET /account/v1/credits/balance), which made the accounting for this article easy: it started at 144 and ended at 133 after all the tests below.
One warning from the trenches: a few model pages in the docs are out of sync with the API itself. The Face Recovery page points at a restoration endpoint that only accepts the Dust-Scratch models. When a model name bounces with an error, trust the OpenAPI schema in the reference section over the model page, or reach face recovery the way this test did, through the face_enhancement parameters on the upscaling endpoints.
Test 1: Denoise Max vs an ISO 25600 Milky Way
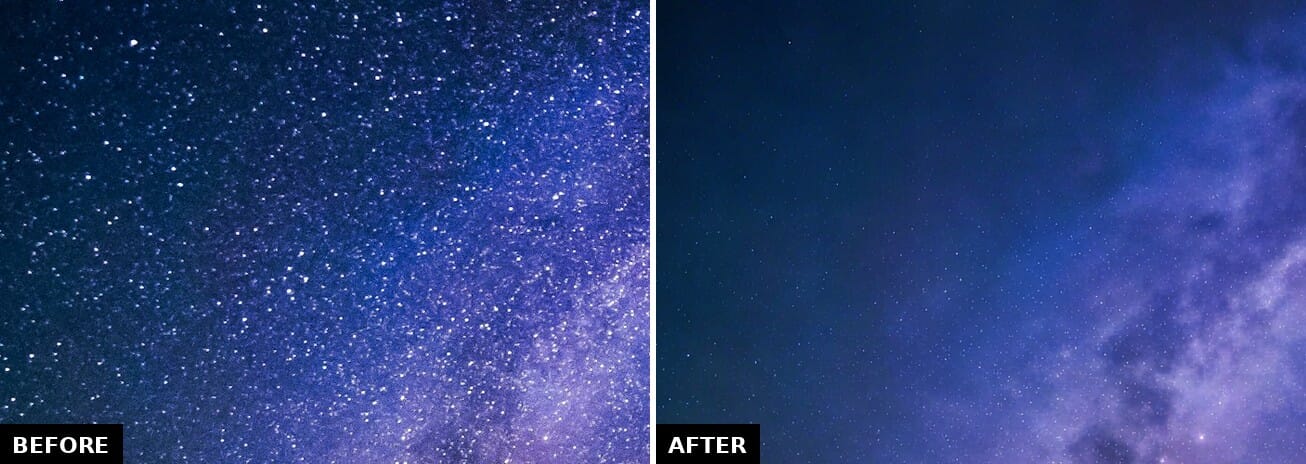
The opener is the hardest case in the set: Ryan Hutton’s Milky Way over evergreen silhouettes, shot at ISO 25600 with an 8-second exposure. At that sensitivity the sky is a storm of luminance noise. One call to denoise-gen with Denoise Max, no manual parameters, 15 seconds.
Denoise Max vs ISO 25600, full frame
The full frame looks like a win, and mostly it is. The grain is simply gone, the Milky Way core keeps its structure, and the tree silhouettes stay clean. But zoom into the star field and the tradeoff appears:
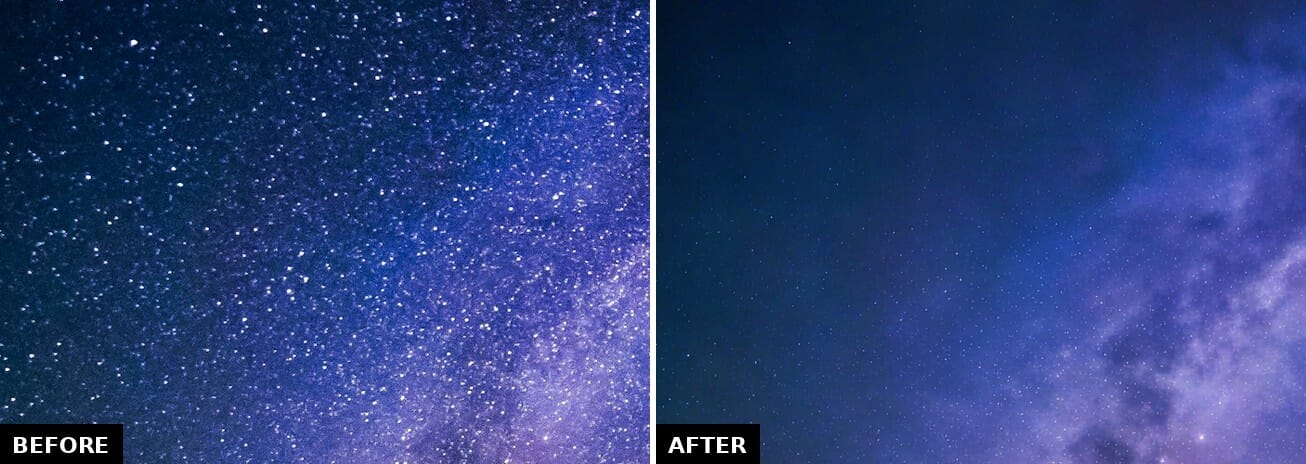
Denoise Max cannot tell a dim star from a noise speckle, and on autopilot it chooses cleanliness. Thousands of faint stars vanish along with the grain. For portraits, events, and wildlife this behavior is exactly right. For astrophotography, pass a lower strength value, or this becomes a very effective star remover. Where this sits against Lightroom and Capture One is covered in PhotoWorkout’s three-way denoise comparison.
Test 2: Sharpen Wildlife on a Songbird at ISO 12800
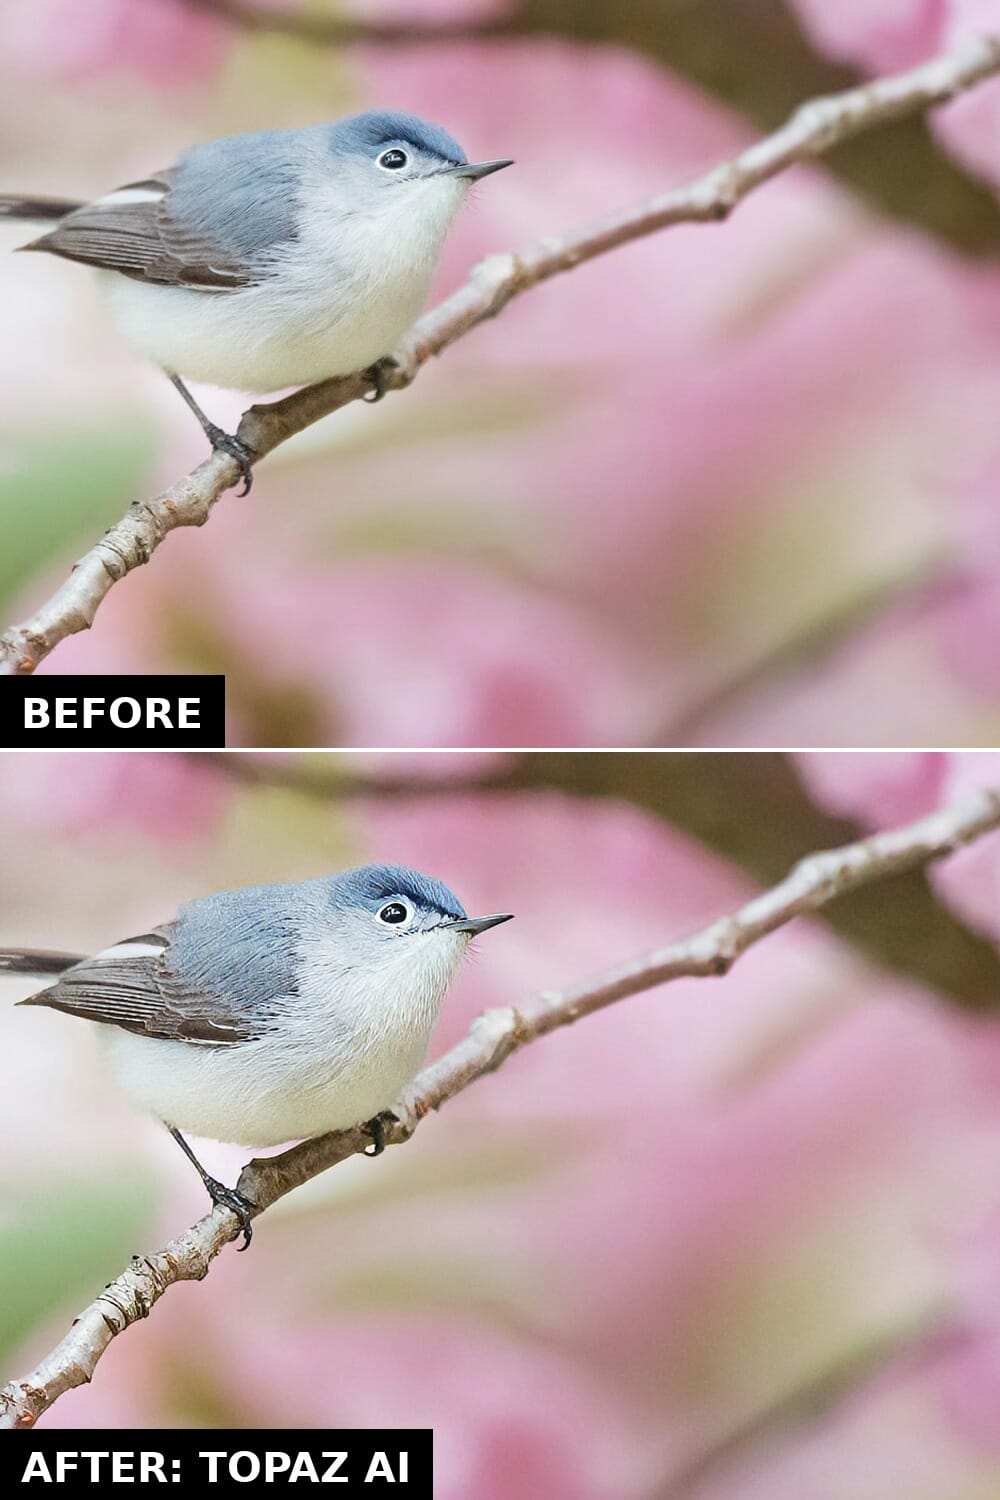
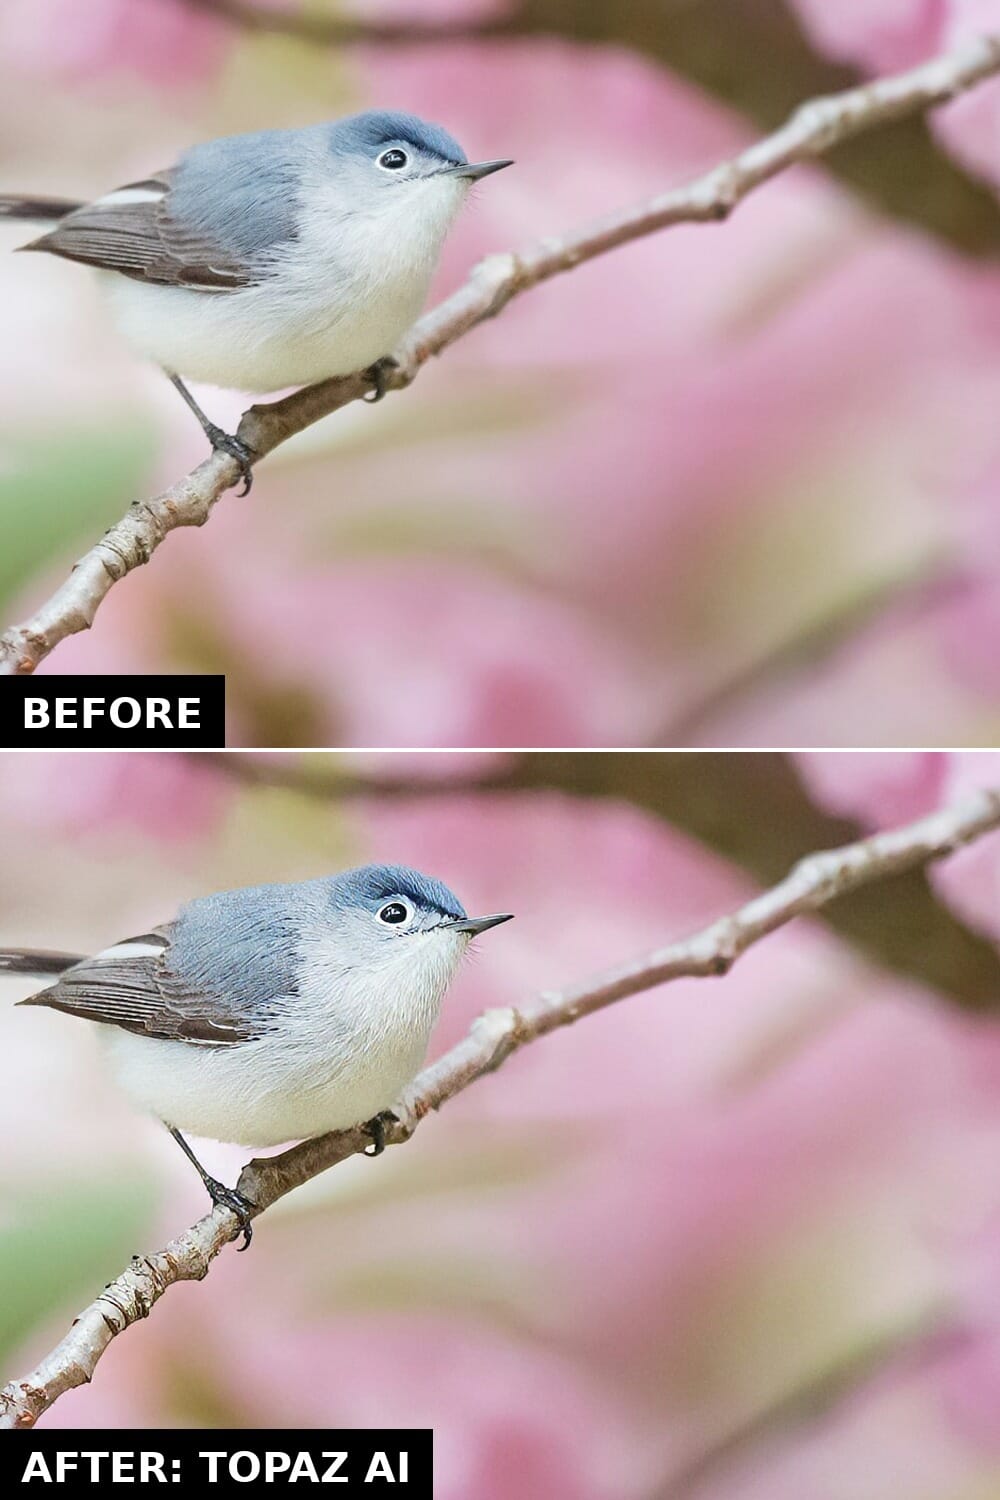
Ray Hennessy’s blue-gray gnatcatcher among cherry blossoms was shot at 500mm, 1/500s, ISO 12800: a classic wildlife compromise where the light forced sensitivity up and fine feather detail suffered. The Sharpen endpoint has a dedicated Wildlife model tuned for fur and feathers.
Sharpen: Wildlife on an ISO 12800 songbird
This was the cleanest win of the five. Feather texture on the breast and wing, the catchlight in the eye, even the lichen on the branch all come back, and critically, the soft pink background stays soft. A generic sharpener would have crunched the bokeh into texture. 26 seconds, 1 credit, and the subject-aware restraint is what separates it from a Photoshop unsharp mask.
Test 3: Gigapixel, 1,000px In, 4,000px Out
For upscaling, the test needed a ground truth. So this one started from Sean Pollock’s 6,000px architectural shot, downscaled to a deliberately mushy 1,000px web thumbnail, then sent through Gigapixel Standard V2 asking for 4x. That way the output can be judged against what the scene actually looks like at high resolution, not against imagination.
Gigapixel 4x at 100 percent
At web size the before and after look identical, which is itself the point: Gigapixel does not restyle the image. At 100 percent, mullions and window grids that had dissolved into mush resolve back into clean geometry. Compared with the original 6,000px file, the reconstruction is honest; it slightly regularizes the repeating window pattern in a way a pixel-peeper would catch, but nothing is invented wholesale. This was also the fastest job of the set at 6 seconds. For the wider field of upscaling tools, see the photo enlargement software roundup.
Test 4: Face Recovery From a 0.3-Megapixel File
This is the use case every family archivist cares about: a portrait that only survives as a tiny file. Aiony Haust’s studio portrait was downscaled to 400px wide (0.2 megapixels, roughly an old forum avatar) and sent to the generative upscaler with face_enhancement enabled and creativity kept low.
Face recovery from a 400px file
The result is the most startling of the five. Eyes, eyelashes, lip texture, and the knit pattern of the sweater are all rebuilt, and a side-by-side against the real full-resolution original shows the recovered face staying faithful to the person rather than drifting toward a generic AI face. That fidelity is the whole game with generative face tools, and it is why the face_enhancement_creativity parameter matters: at low values the model restores, at high values it starts to imagine. Keep it low for real people.
Test 5: Adjust Lighting on a Night Cityscape
The final test gave the exposure model a hard, stylized subject: Pawel Nolbert’s neon-soaked Tokyo aerial, full of crushed shadows and blown highlights by design. Adjust V2 runs on the lighting endpoint, again fully on autopilot.
Adjust V2 on a night cityscape
The change is real but conservative: shadow districts and the dark park gain visible detail while the neon keeps its punch. On an image this deliberately graded, subtle is the correct answer, and it suggests the model is safe to run in an automated pipeline without producing HDR soup. If you want drama, this is not the model for it; if you want a batch of underexposed event photos quietly fixed, it is.
Test 6: The Astro Fix, Denoise Max at Strength 0.25
Test 1 ended with a caveat: on autopilot, Denoise Max ate the faint stars along with the grain. The docs say a lower strength value should fix that, so this follow-up put one more credit behind the claim. Same ISO 25600 Milky Way frame, same model, one manual parameter: strength=0.25.
The astro fix: Denoise Max at strength 0.25
The fix works. The star field that autopilot classified as noise survives almost completely, while the ugly chroma grain still drops to a level that prints cleanly. The lesson generalizes: autopilot is tuned for the average photo, and the average photo does not contain ten thousand point light sources. When the subject is unusual, one manual parameter is often the difference between a failed edit and a keeper. Eight seconds, 1 credit.
Test 7: Super Focus V3 on a Genuinely Soft Frame
Super Focus V3 is Topaz’s generative rescue model for out-of-focus photos, the ones a normal sharpener cannot save. The main test frame is the kind every photographer has too many of: a handheld laptop close-up by the photographer John, shot in dim light at 1/30s and ISO 2500, with the focus drifting just off the plane. One call, 5 seconds, 1 credit.
Super Focus V3 on a soft handheld frame
This is the real-world win the model exists for: the VGA port’s pins resolve individually, the vent slots turn crisp, and the countertop gets its granite texture back. Just as telling is what it leaves alone. The typing fingers are blurred by motion, not by focus, and the model declines to invent sharp fingers; Topaz ships a separate Motion Blur model on the sharpen endpoint for that job. A rescue tool that knows which blur it can reverse is a rescue tool you can trust in a batch pipeline.
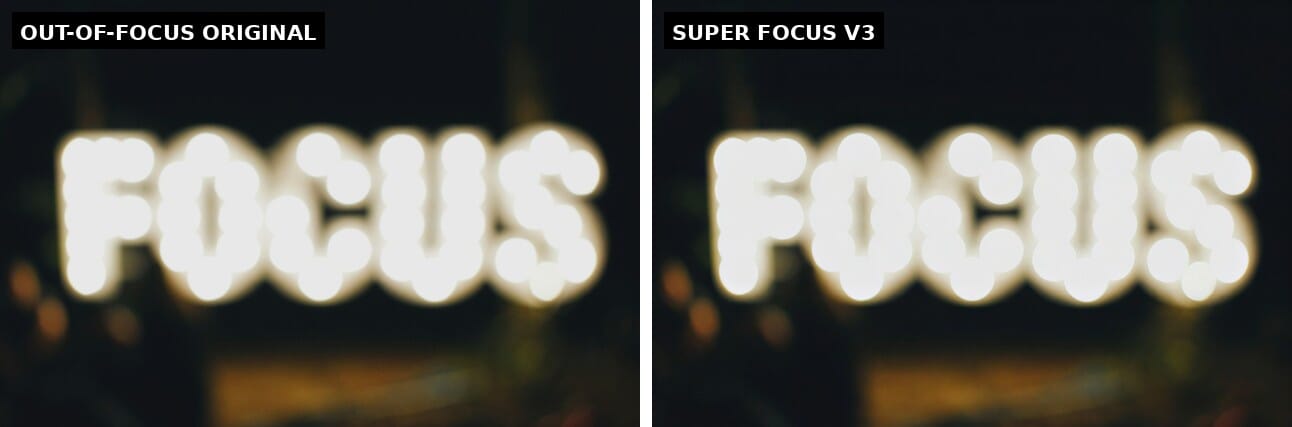
Two more credits went into probing the edges of what “rescue” means. First, the limit case: Stefan Cosma’s marquee sign, so far out of focus that the bulbs have melted into blobs, and, no better test subject exists, it literally spells “Focus.”
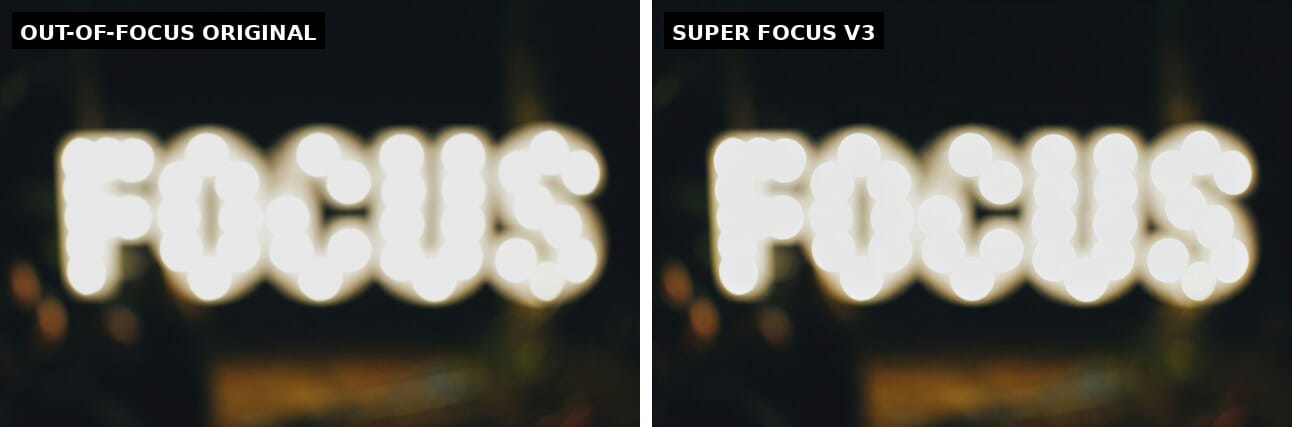
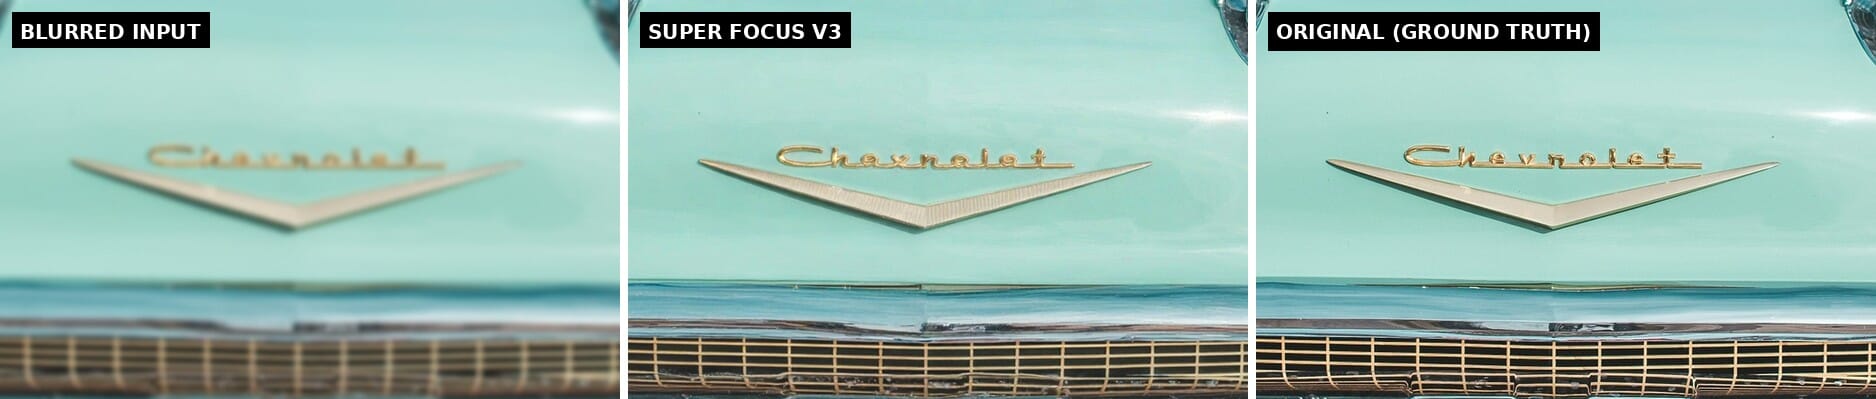
Second, a synthetic stress test with a known answer: a razor-sharp 1957 Chevrolet was artificially defocused, then handed back to the model to undo. At full-frame view the recovery looks perfect. The 100 percent crop against the untouched original reveals the generative tradeoff:
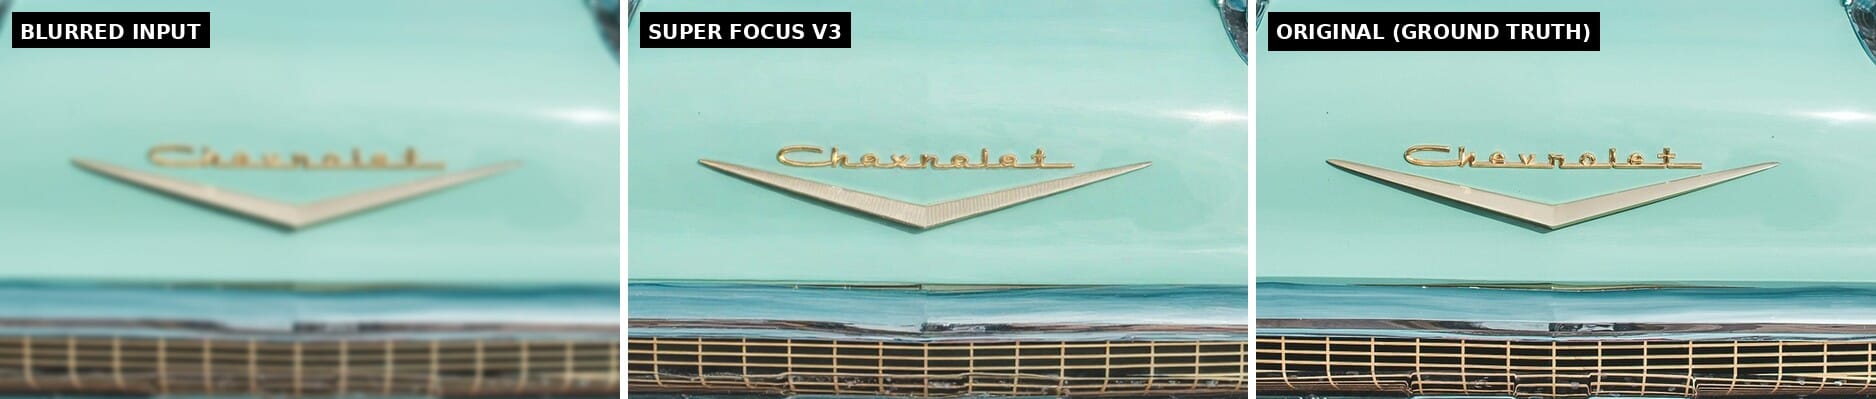
The cursive “Chevrolet” script comes back as convincing-but-wrong letterforms. Where blur has destroyed information, a generative model invents structure that looks right at a glance and falls apart under inspection. For textures, surfaces, and edges that is exactly what you want; for logos, license plates, and any text you care about, it is a reason to keep generative sharpening away and reach for a text-aware model instead. Which is the next test.
Test 8: Text Refine on 800 Pixels of Neon Signage
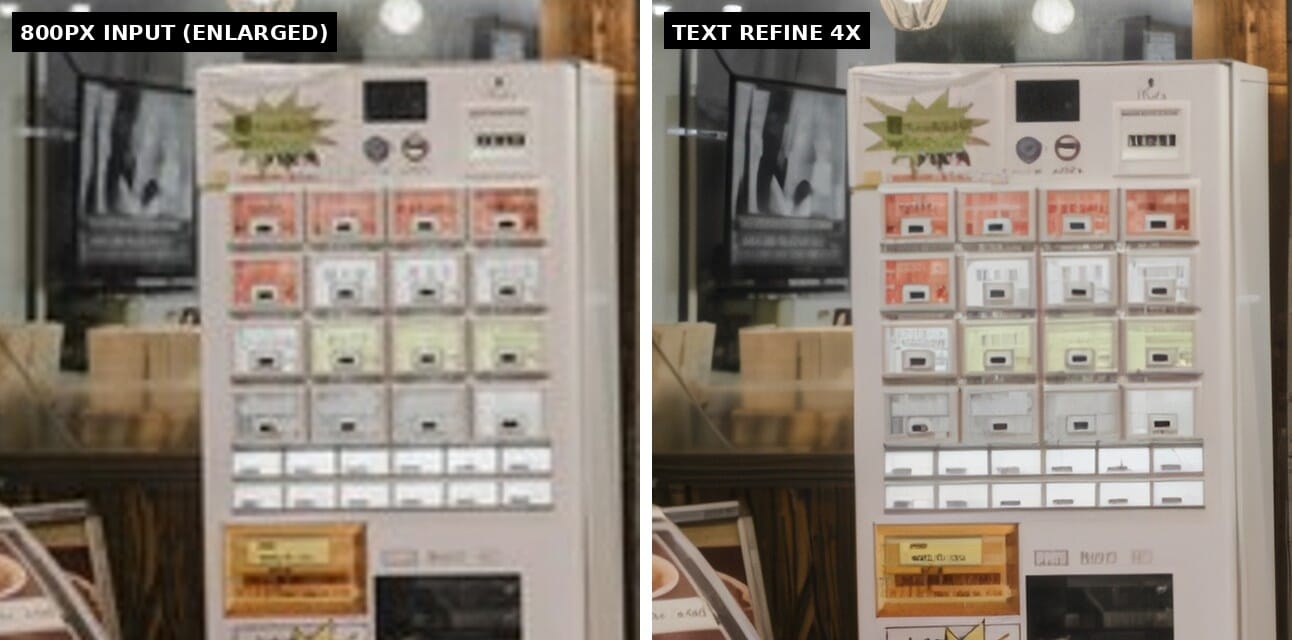
Text is the classic upscaler killer: generic models turn lettering into melted plastic. Topaz ships a dedicated Text Refine model on the Gigapixel endpoint for exactly this case. The test: take Redd Francisco’s Tokyo noodle shop, crush it down to an 800px thumbnail, then ask Text Refine for 4x back to 3,200px.
Text Refine at 4x on storefront signage
On the large katakana it is a clean win: strokes come back with crisp, faithful edges, and unlike the Chevrolet emblem in Test 7, nothing is misspelled, because the model sharpens the shapes that are actually there rather than inventing new ones. The flip side shows up in the small print:
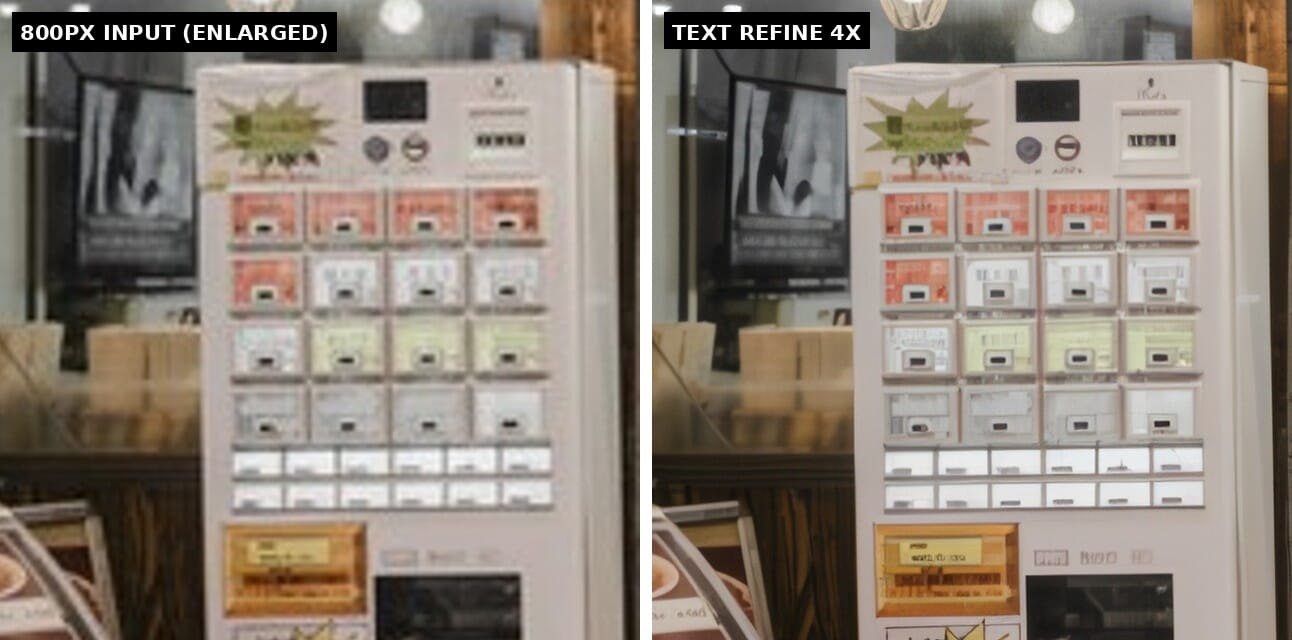
The vending machine’s tiny button labels, which were destroyed by the downscale, stay soft rather than being replaced with invented characters. After Test 7, that restraint reads as a deliberate design choice, and it is the right one: an upscaler that fabricates legible text would be a liability in any archival or forensic context. Six seconds, 1 credit.
The Scorecard, and Who This Is Actually For
| Test | Model | Time | Verdict |
|---|---|---|---|
| ISO 25600 astro denoise | Denoise Max | 15s | Great, but eats faint stars on autopilot |
| Songbird sharpening | Sharpen: Wildlife | 26s | Cleanest win: subject-aware, bokeh untouched |
| 4x architectural upscale | Gigapixel Standard V2 | 6s | Faithful to ground truth, minor pattern smoothing |
| 0.3MP face recovery | Recovery V2 + face enhancement | 10s | The showstopper: identity preserved |
| Night cityscape exposure | Adjust V2 | 16s | Deliberately subtle, pipeline-safe |
| Astro re-run, manual strength | Denoise Max (strength 0.25) | 8s | The fix works: stars survive, grain still drops |
| Soft handheld laptop close-up | Super Focus V3 | 5s | Real-world win: ports and textures resolve, motion blur honestly left alone |
| Heavily defocused marquee sign | Super Focus V3 | 7s | The limit case: bulbs regain shape, the word stays soft |
| Synthetic defocus stress test | Super Focus V3 | 8s | Striking full-frame recovery, but rebuilds script lettering wrong |
| 800px signage at 4x | Text Refine | 6s | Big text crisp and faithful; destroyed small print stays soft |
Who should care? Three groups. Photographers with a backlog problem: culling-adjacent batch work like denoising a whole event shoot stops being an overnight desktop job and becomes a script. Developers: photo products can bolt on professional-grade enhancement without training anything. And archives or studios sitting on low-resolution history: the face recovery result above is one credit per photo.
The context that makes this more than a tech demo: these are the exact models Adobe is buying, and the API’s pay-per-photo model (no subscription, credits never expire) is precisely the kind of pricing that tends not to survive acquisitions. The desktop apps are reviewed in depth in the Topaz Photo Pro review; if you want to try the API while it is still priced like this, Topaz’s API page has the details and a credit calculator.
Frequently Asked Questions
How much does the Topaz Labs API cost?
You buy credits and spend them per output megapixel. Precision models (Gigapixel, Denoise, GAN sharpening, lighting) yield 24 megapixels of output per credit; generative Wonder-family models yield 4. Every edit in this test, including a 4,000px upscale, cost exactly 1 credit. Credits do not expire and there is no subscription.
Are the API results different from the Topaz desktop apps?
Same model families, different packaging. The desktop apps add previews, local processing, and manual masking; the API gives you autopilot parameter selection plus optional overrides on every call. For batch work the API is dramatically faster than driving a desktop app, and you pay per photo instead of per license.
Is Denoise Max safe for astrophotography?
Not on default settings. In this test it removed faint stars along with the ISO 25600 noise, because a dim star and a noise speckle look identical to the model. The follow-up test confirmed the fix: re-running the same frame with strength=0.25 kept the star field while still clearing most of the grain. Manual parameters, not autopilot, for astro.
Will the API survive the Adobe acquisition?
Nobody outside Adobe knows. Adobe has said Topaz products continue as standalone offerings and the models will fold into Firefly Services, which is Adobe’s own API surface. The deal closes in the second half of 2026; existing credits and the current pay-per-use pricing are the parts most worth watching.
The Bottom Line
Eleven credits bought ten professional-grade edits, several genuine surprises, and a clear picture of the limits. The face recovery and wildlife sharpening results justify the API on their own; the astro pair is the reminder that autopilot has opinions, and that one manual parameter is usually enough to overrule them. The Chevrolet emblem is the other lesson: generative models rebuild structure convincingly, so check anything with text before trusting it.
As a piece of infrastructure, this is the most photographer-friendly pricing model in the AI editing market right now: no subscription, no expiring credits, one coin per photo. Enjoy it while it is still independent.
Topaz Labs API Documentation
- Topaz Labs Developer Docs: Image API Quickstart – The submit, poll, download workflow and authentication used for all five tests
- Topaz Labs Developer Docs: Tier Pricing – Per-megapixel credit pricing for the precision and generative model families
- Topaz Labs Developer Docs: Model Selection – Which model to pick per task, across Gigapixel, Wonder, Sharpen, and Denoise
Image Sources
- Milky Way at ISO 25600: photo by Ryan Hutton – Source photo for the Denoise Max test, via Unsplash, curated on SampleShots
- Songbird in cherry blossoms: photo by Ray Hennessy – Source photo for the Wildlife sharpen test and the vertical pin, via Unsplash, curated on SampleShots
- Skyscrapers: photo by Sean Pollock – Source photo for the Gigapixel upscale test, via Unsplash, curated on SampleShots
- Studio portrait: photo by Aiony Haust (featured image and face recovery test) – Source photo for the face recovery test and the featured image, via Unsplash, curated on SampleShots
- Tokyo at night: photo by Pawel Nolbert – Source photo for the Adjust Lighting test, via Unsplash, curated on SampleShots
- 1957 Chevrolet: photo by Courtney Cook – Source photo for the Super Focus V3 test, via Unsplash, curated on SampleShots
- Tokyo noodle shop: photo by Redd Francisco – Source photo for the Text Refine test, via Unsplash, curated on SampleShots
- Handheld laptop close-up: photo by John – Source photo for the Super Focus V3 main test, via Unsplash, curated on SampleShots
- Out-of-focus Focus sign: photo by Stefan Cosma – Source photo for the Super Focus V3 limit-case test, via Unsplash, curated on SampleShots
- Workflow infographic and before/after composites: stylized PhotoWorkout illustrations – Editorial graphics created by PhotoWorkout; all edits produced with the Topaz Labs API as described