
- Still life & product ideas — from dark moody setups to hands-in-frame compositions that sell.
- Portrait ideas — gel lighting, projectors, Renaissance styles, and creative props that transform studio sessions.
- Pet portrait ideas — action shots, dramatic lighting, and ring light tricks for four-legged subjects.
- Each idea includes specific camera settings, lighting setups, and technique tips you can use right away.
- Test your studio knowledge with our quick quiz at the end.
A photography studio gives you something no outdoor location can: total control. You choose the light, the backdrop, the mood — everything. But that freedom can be overwhelming when you’re staring at a blank seamless paper wondering what to shoot.
These 20 studio photoshoot ideas cover still life, portraits, and pet photography — each with real camera settings and lighting tips so you can actually recreate them. Whether you’re working in a rented studio or a home setup, there’s something here for every skill level.
Still Life & Product Ideas
Still life and product photography are where studio work really shines. You control every variable — light angle, background color, prop placement — and the subject holds perfectly still. Here are five ideas to push your product shots beyond the standard white-background look.
1. Use Apple Boxes to Play with Levels
Apple boxes are the unsung heroes of studio photography. These sturdy wooden boxes come in four standard sizes (full, half, quarter, and pancake) and let you create multi-level compositions that guide the viewer’s eye through the frame.
Stack products at different heights to create visual hierarchy. Place the hero product highest, supporting items lower. This works especially well for food photography, cosmetics, and any collection of related items.
Camera settings: Use f/5.6–f/8 to keep multiple levels in focus. A 50mm or 85mm lens at moderate distance avoids perspective distortion. Light from a 45-degree angle with a softbox to create subtle shadows that emphasize the height differences between levels.
Pro tip: Cover apple boxes with fabric or paper that matches your scene. Raw wood can work for rustic shoots, but it’s distracting in clean commercial work.
2. Total Blackout
While most product shots happen on white seamless paper, an all-black setup creates drama that stops viewers mid-scroll. The key is separation — without it, your product disappears into the background.
Set up a triangle lighting arrangement: one key light in front aimed at the product, and two rim lights behind at 45-degree angles. The rim lights create a thin edge of light that separates the product from the black backdrop.
Camera settings: Shoot at f/8, ISO 100, and adjust shutter speed to control ambient spill. Use a snoot or grid on your rim lights to prevent light from hitting the background. Black velvet absorbs more light than black paper — use it when you need the deepest blacks.
This technique is particularly effective for dark-colored products like electronics, watches, and bottles where the high contrast makes details pop.
3. Tell a Story, Set the Scene
A studio is a blank canvas — and the best product photographers treat it like a film set. Instead of isolating products, build a miniature world around them that communicates lifestyle and context.
Shooting a coffee brand? Build a morning scene: worn wooden table, open book, steam rising from the cup, warm window-style lighting from a large softbox placed camera-left. Every prop should reinforce the narrative without competing with the hero product.
Camera settings: Use f/2.8–f/4 with an 85mm lens to keep the product sharp while props fall into a soft background. Shoot tethered to a laptop so your client (or you) can evaluate composition in real time. A polarizing filter helps control reflections on glossy surfaces.
Pro tip: Collect props over time. Thrift stores are goldmines for vintage items that photograph beautifully. Keep a prop box in your studio organized by theme (rustic, modern, holiday, etc.).
4. Bold, Colorful Backgrounds

Color psychology is real — and bold backgrounds create emotional responses that white seamless never will. Complementary color pairings (blue product on orange background, green on magenta) create visual tension that demands attention.
Invest in a set of colored seamless paper rolls or get reusable painted canvas backdrops. For smaller products, even large sheets of colored card stock work perfectly.
Camera settings: Shoot at f/5.6 with your white balance set to a custom Kelvin value. Auto white balance often tries to “correct” bold colors. Use a gray card for accurate color reproduction, and slightly overexpose the background (+0.5 stop) to keep colors vibrant without looking muddy.
Lighting tip: Light the product and background separately. Use an umbrella or softbox for the product, and a bare strobe for the background to keep the color fully saturated.
5. Use Hands in the Frame
Hands in product shots do two powerful things: they show scale and they humanize the product. A perfume bottle held elegantly between fingers tells a completely different story than the same bottle sitting on a table.
Hand models are a real profession for a reason, but you can get great results with anyone who has well-groomed nails and steady hands. Apply a thin layer of unscented moisturizer to reduce dry skin showing up in close-ups.
Camera settings: Use f/4 with a macro or 100mm lens for tight hand-and-product compositions. Focus on the product label or logo, letting the fingers fall slightly soft. A reflector underneath fills shadows under the hand. Shoot at 1/160s or faster to avoid motion blur from small hand movements.
Pro tip: Direct your hand model with specific instructions: “Grip loosely,” “Fingertips only,” “Tilt 15 degrees toward camera.” Vague direction leads to awkward, tense-looking hands.
Portrait Ideas
Studio portraits are all about lighting control and creative vision. Unlike outdoor work, you’re not chasing golden hour or fighting harsh midday sun. Everything is intentional. Here are ten ideas that go beyond the standard headshot, each with specific lighting setups you can replicate.
6. Bold Colored Portraits
Take those bold backgrounds from product photography and apply them to portraits. A saturated yellow, pink, or electric blue backdrop transforms a standard headshot into something that stops the scroll on any social media feed.
The secret is lighting the subject and background independently. Use a key light with a beauty dish for the subject, and a separate strobe aimed at the background. This gives you independent control over background color intensity.
Camera settings: f/5.6, ISO 100, 85mm lens. Set your key light at roughly 45 degrees and slightly above eye level. Match your subject’s outfit to complement (not match) the background — a white top on a vivid background is a safe starting point.
Color tip: Warm skin tones look best against cool backgrounds (blue, purple, teal). Cool skin tones pop against warm backgrounds (orange, yellow, coral). Avoid backgrounds that match skin tone — it creates a washed-out look.
7. Beauty Portrait
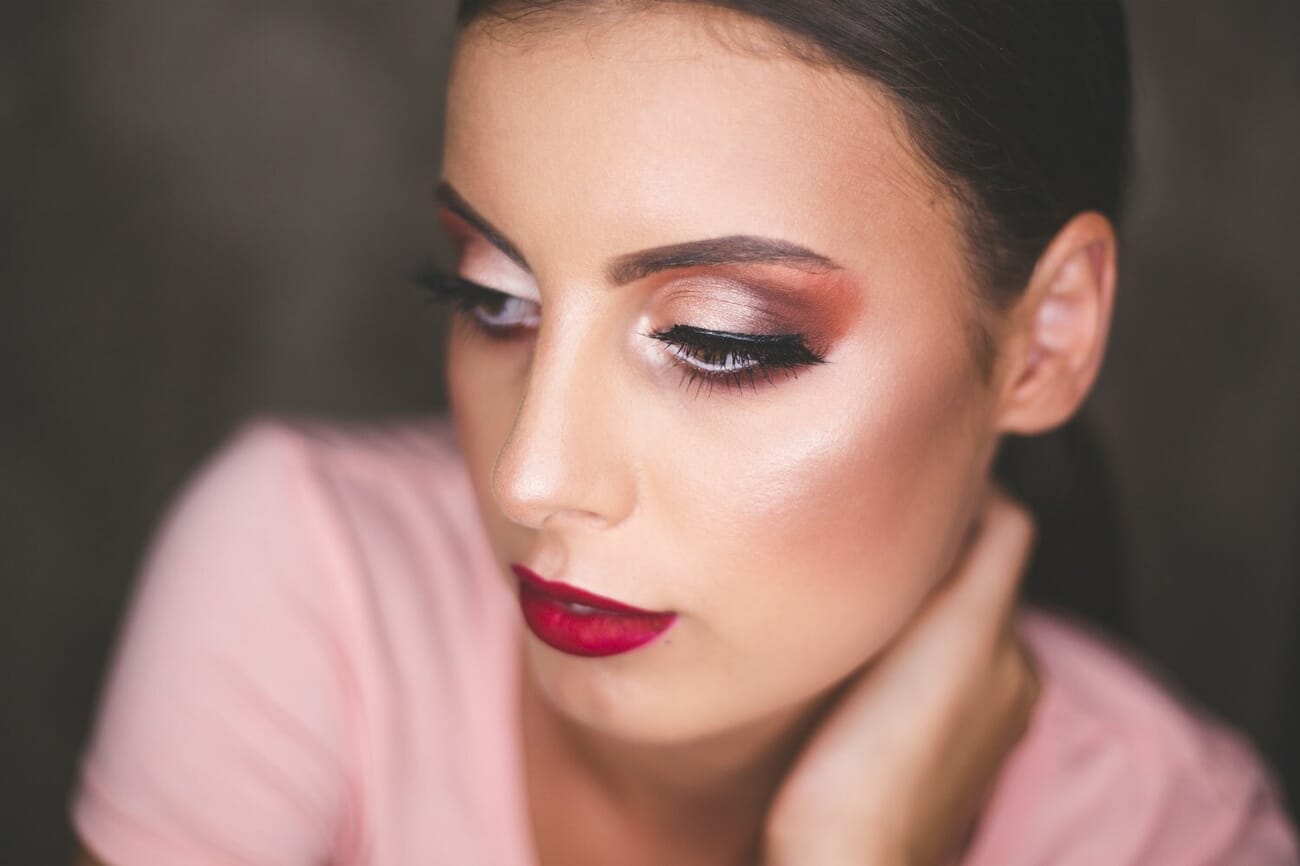
The beauty portrait is a studio staple — tight framing on the face, flawless lighting, emphasis on makeup and skin. It’s the bread and butter of fashion, cosmetics, and influencer photography.
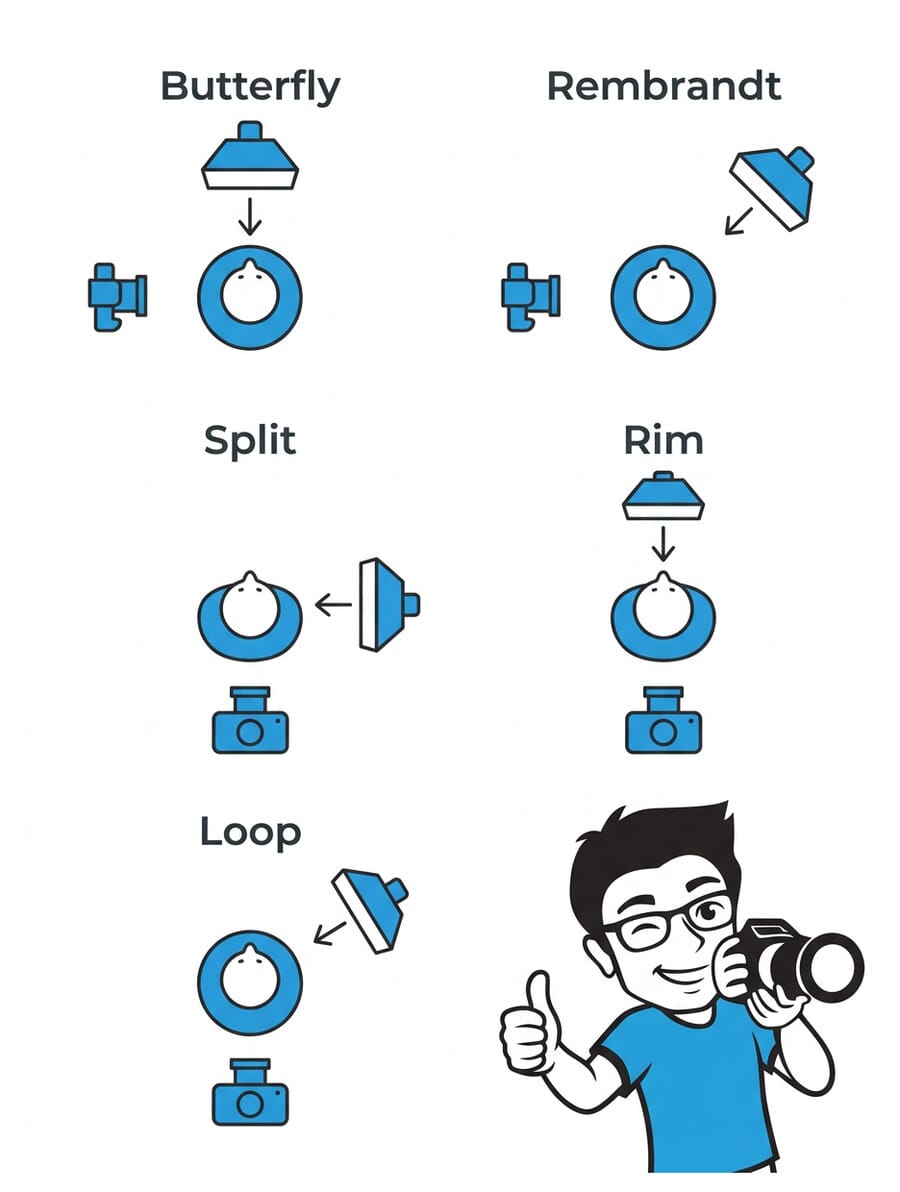
The classic setup is butterfly lighting: position your key light directly above and in front of the subject, angled down at about 25 degrees. Place a white reflector under the chin to fill the shadow under the nose and jawline. The result is the signature “butterfly” shadow beneath the nose.
Camera settings: f/4–f/5.6 with a 100mm or 85mm lens at close range. Focus on the near eye. Shoot at the lens’s sharpest aperture for maximum skin detail. Use a silver reflector for more contrast, white for softer fill.
Pro tip: Have your subject tilt their chin slightly downward and look up toward the lens. This opens up the eyes and creates a more flattering jaw angle. Try unconventional angles — shoot from slightly below for a powerful feel, or from directly above for an editorial look.
8. Gel Lighting
Color gels are thin transparent filters that attach to your lights to change the output color. They’re cheap, portable, and capable of transforming a plain studio portrait into something that looks like a music video still.
The most popular gel combination is blue and orange (complementary colors) — blue on the rim/hair light, warm orange on the key. For a cyberpunk aesthetic, try magenta and cyan. RGB LED panels achieve the same effect without physical gels, but traditional gels give you more precise color control.
Camera settings: Set white balance to daylight (5500K) so the gel colors render accurately. Shoot at f/2.8 for a shallow depth of field that lets the colored light bleed into the background beautifully. ISO 200–400, depending on gel density (gels reduce light output by 1–2 stops).
Try combining gels with different lighting patterns — Rembrandt lighting with a red gel creates an intense, cinematic mood that’s hard to achieve any other way.
9. Use a Projector
A projector turns your studio into an infinite backdrop generator. Project anything — patterns, landscapes, abstract textures, even video — directly onto your subject or the wall behind them. The controlled darkness of a studio is exactly what projectors need to look their best.
How to set it up: Place the projector 6–10 feet from your subject. For projection onto the subject’s face/body, darken all studio lights and let the projector be your only light source. For background projection, light your subject separately and project onto a white wall behind them.
Camera settings: Use f/2.8–f/4 and a slower shutter speed (1/60s–1/125s). Faster shutters can create banding artifacts from the projector’s refresh rate. ISO 400–800 may be necessary since projectors aren’t as bright as studio strobes. Shoot in manual mode — auto exposure will fight you.
Creative ideas: Project window blinds shadows for a film noir look. Project botanical patterns for organic textures on skin. Project the subject’s own image back onto them for a surreal doubled effect.
10. The Renaissance Portrait
Recreating the painterly quality of Rembrandt, Caravaggio, and Vermeer in a photo studio has become hugely popular. The style uses a single dramatic light source, rich earthy tones, and classical poses to create images that look like they belong in a museum.
Lighting setup: Use one large softbox or window-style modifier positioned high and to one side — mimicking the window light that Old Masters painted by. No fill light. Let the shadows go dark and natural. A warm gel (CTO 1/4) on the key light adds the golden tone of oil paintings.
Camera settings: f/4, ISO 100, 50–85mm lens. Shoot in RAW and reduce clarity slightly in post for a softer, painterly feel. Drop saturation on everything except warm tones (reds, golds, browns). Add subtle grain to mimic canvas texture.
Styling: Draping fabrics, floral arrangements, and muted earth-tone clothing complete the look. Have your subject hold a piece of fruit, a book, or simply rest their chin on their hand — all classic Renaissance gestures. A dark backdrop (deep brown or black) eliminates any modern studio feel.
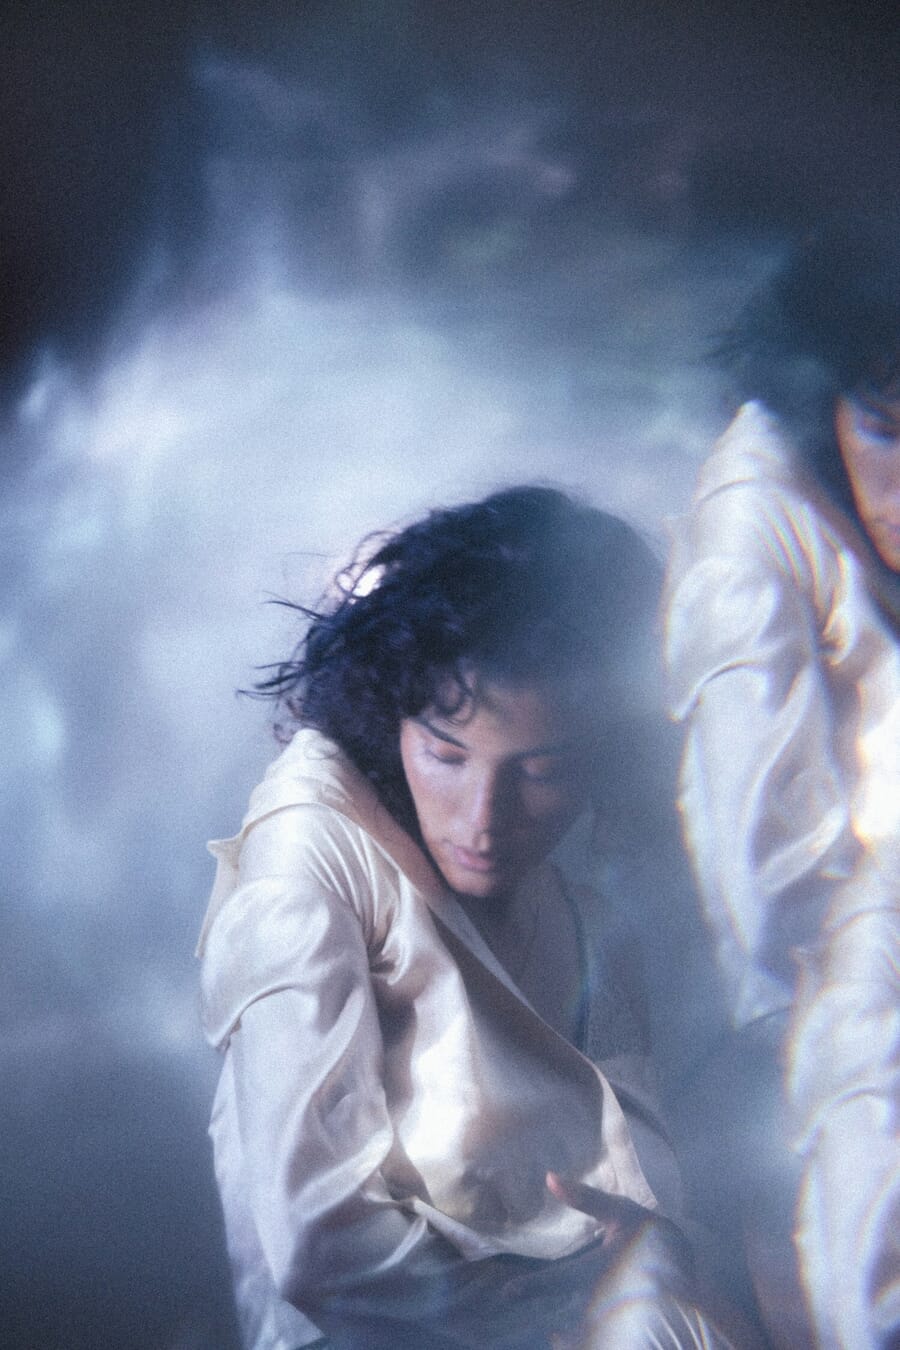
11. Emotive Fabric

Fabric is one of the most versatile studio props. Silk catches light in ways that create ethereal, almost liquid highlights. Linen adds texture and warmth. Tulle creates dreamy, soft-focus effects when placed between the lens and subject.
Lighting setup: Position your key light directly overhead (top-down) to emphasize every fold and crease in the fabric. This creates deep shadows in the valleys and bright highlights on the ridges, giving the image incredible three-dimensional depth.
Camera settings: f/4–f/5.6 with an 85mm lens. Use a fast shutter (1/200s+) if you’re having an assistant toss or wave the fabric for motion shots. For static draping, f/8 gives you the sharpness to capture fabric texture in detail.
Creative approach: Convert to black and white for a fine-art look, or use monochromatic color schemes (all red fabric on red background) for a bold editorial statement. The fabric itself becomes the compositional element — let it flow, bunch, and create organic lines through the frame.
12. Glitter Portraits
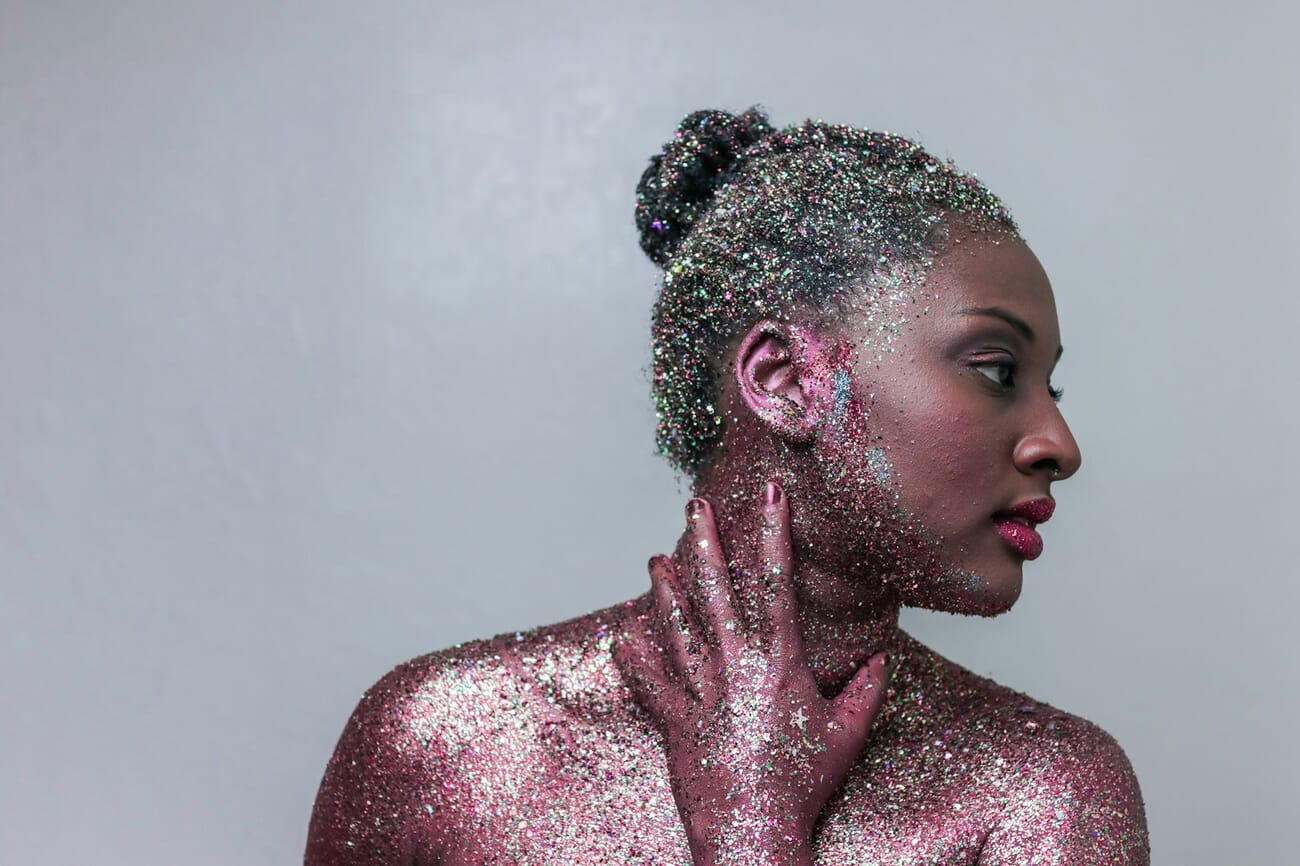
Glitter under studio lighting creates thousands of tiny catch lights across your subject. It’s sparkly, it’s fun, and it photographs incredibly well — but only if you light it correctly.
Lighting tip: Use a hard light source (bare strobe, beauty dish without sock) positioned close to the lens axis. Hard light creates sharp specular highlights on each glitter particle. Soft light kills the sparkle effect — avoid large softboxes for this one.
Camera settings: f/5.6–f/8, ISO 100. Use a ring flash or on-axis key light for the most even glitter coverage. A fast shutter (1/200s) freezes any falling glitter particles. Bump up your sharpening slightly in post to make each glitter speck pop.
Safety first: Always use cosmetic-grade glitter — never craft glitter, which has sharp edges and isn’t safe for skin or eyes. Biodegradable cosmetic glitter is widely available and photographs just as well. Apply with aloe vera gel for easy cleanup.
13. Shoot Through Objects
Placing objects between your lens and subject creates foreground interest, light effects, and organic distortion that you can’t replicate in post-processing. This is one of the most affordable creative techniques you can try — no expensive gear needed.
Objects to try: Glass prisms (rainbow light refraction), crystals (angular distortion), sheer fabric (dreamy softness), cling wrap (ethereal haze), copper wire (warm frame), flowers or leaves (natural framing with color).
Camera settings: Use a wide aperture (f/1.4–f/2.8) to throw the foreground object completely out of focus, turning it into a wash of color or light. Focus manually on your subject. A longer focal length (85mm+) compresses the effect beautifully.
Pro tip: Hold the object right at the edge of the lens barrel so it only affects part of the frame. Half-clear, half-distorted images create a compelling visual contrast that draws the eye to the sharp subject.
14. Bubbles
Soap bubbles are translucent, reflective, and unpredictable — a perfect combination for creative studio portraits. Each bubble acts as a tiny spherical mirror, reflecting the studio environment and creating rainbow iridescence.
Lighting setup: Use a dark background (black or deep blue) and backlight the bubbles with a strobe from behind the subject. The backlighting makes each bubble glow and reveals the rainbow swirls on their surface. Add a subtle fill light from the front for the subject’s face.
Camera settings: f/2.8–f/4, ISO 200, shutter 1/200s to freeze the bubbles in mid-air. Use continuous shooting mode — bubbles are fleeting and you’ll want many frames to choose from. An 85mm lens gives you enough working distance that you won’t accidentally pop bubbles near the lens.
Pro tip: Use a commercial bubble machine rather than blowing them manually for consistent, abundant bubbles. Place the machine above and behind the subject for a “falling bubbles” effect. Glycerin added to the solution makes bubbles last longer and photograph better.
15. LED Light Tubes
LED tube lights (also called light wands or pixel tubes) have become one of the most popular studio accessories. Brands like Nanlite PavoTube and Quasar Science offer RGB tubes that can cycle through millions of colors and even create animated effects.
How to use them: Mount tubes vertically on stands flanking your subject for a futuristic, neon-lit look. Or hold them just out of frame as a practical fill light that adds color to specific areas. You can also place them on the ground behind your subject as colored rim lights.
Camera settings: These are continuous lights, so adjust exposure with shutter speed and ISO. Start at f/2.8, ISO 400, 1/125s, and adjust from there. Set white balance to daylight (5500K) to let the colors render true. Higher ISOs (800–1600) may be needed since tube lights aren’t as powerful as strobes.
Creative idea: Arrange multiple tubes at different angles behind your subject, each set to a different color. The result is a multi-colored gradient wash that creates a unique backdrop for every single shot — no two frames will look exactly alike.
Pet Portrait Ideas
Pet photography in a studio comes with unique challenges — your subject won’t take direction, may be nervous in an unfamiliar space, and moves unpredictably. But the results can be spectacular. Here are five ideas specifically designed for our four-legged friends.
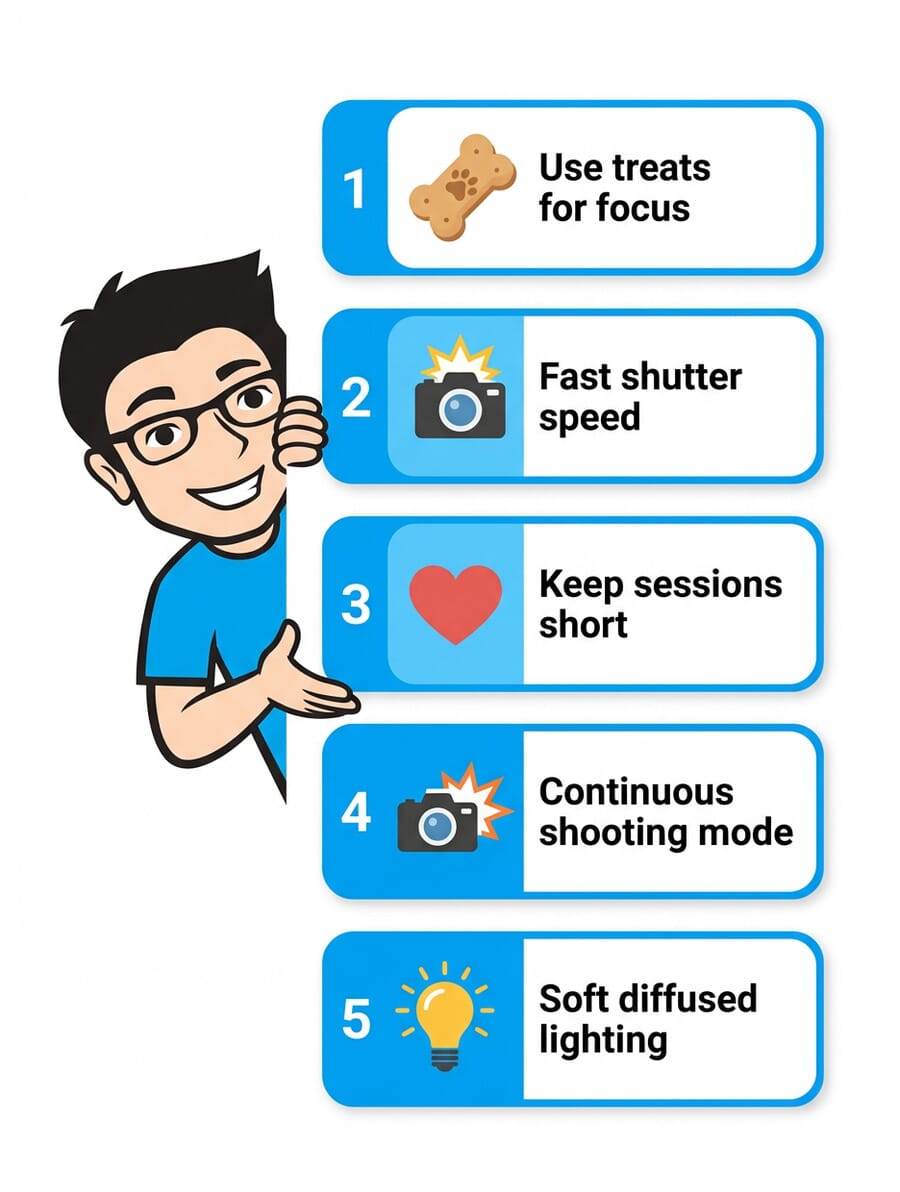
16. Catching Treats
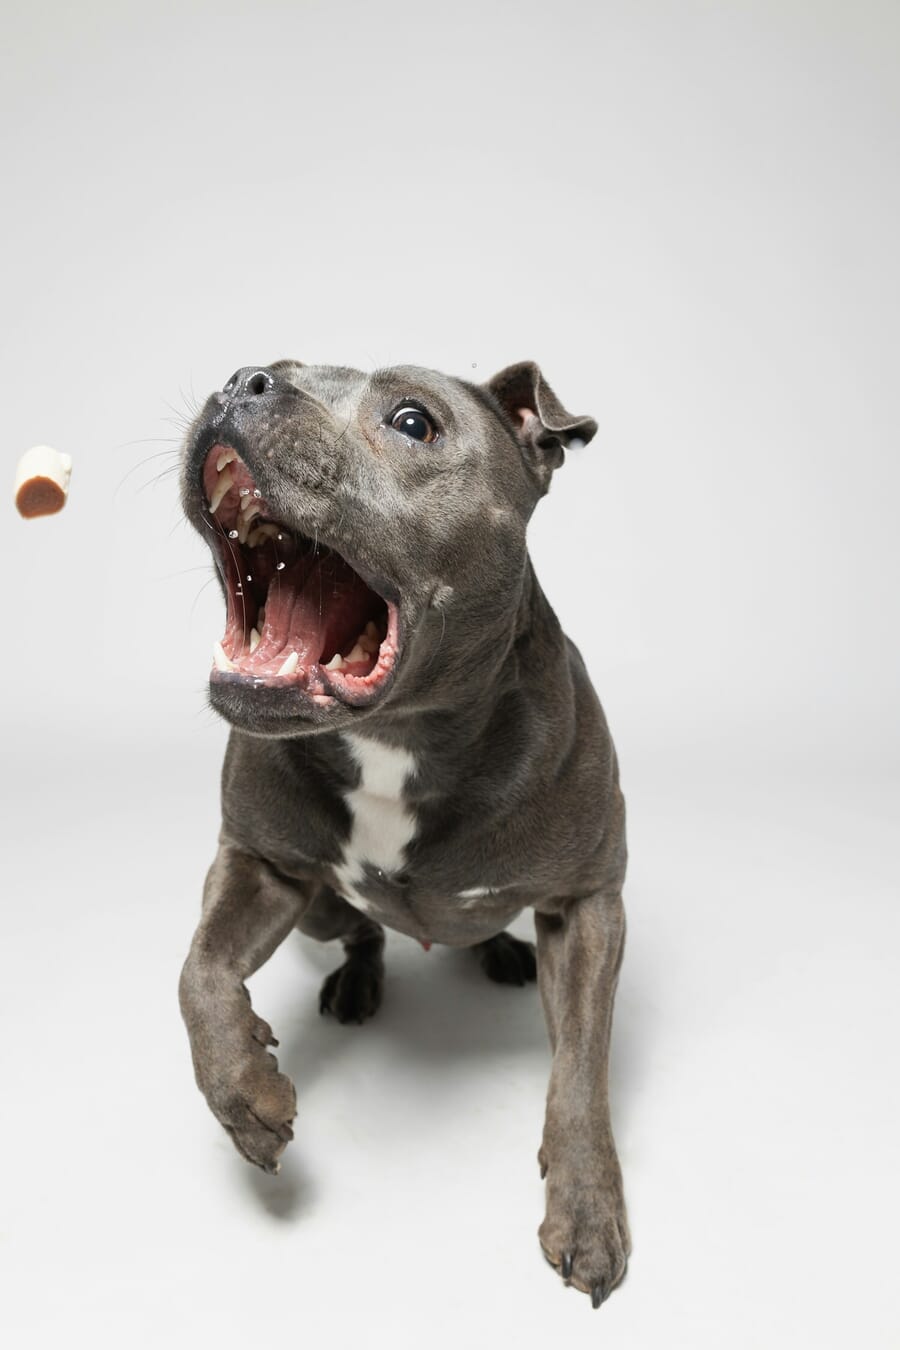
The treat-catch shot is a pet photography classic — the wide-open mouth, the focused eyes, the mid-air freeze. It’s hilarious, endearing, and pet owners absolutely love these images. Studios are ideal because you control the lighting and eliminate outdoor distractions.
Lighting setup: Use strobes with high-speed sync capability. Continuous lights work too, but strobes give you sharper action-freezing power at their minimum flash duration (often 1/5000s or faster). Two lights at 45 degrees provide even coverage.
Camera settings: f/5.6, ISO 400, continuous autofocus (AI Servo/AF-C) locked on the dog’s face. Use a 70–200mm lens so you can keep distance and not intimidate the animal. Shoot in 10–20 fps burst mode. You’ll take hundreds of frames — that’s normal.
Pro tip: Have an assistant toss the treats from directly beside the camera. This keeps the dog looking toward the lens. Use small, visible treats (cheese cubes work great) and keep sessions to 15–20 minutes before the dog gets overstimulated.
17. Go for Drama
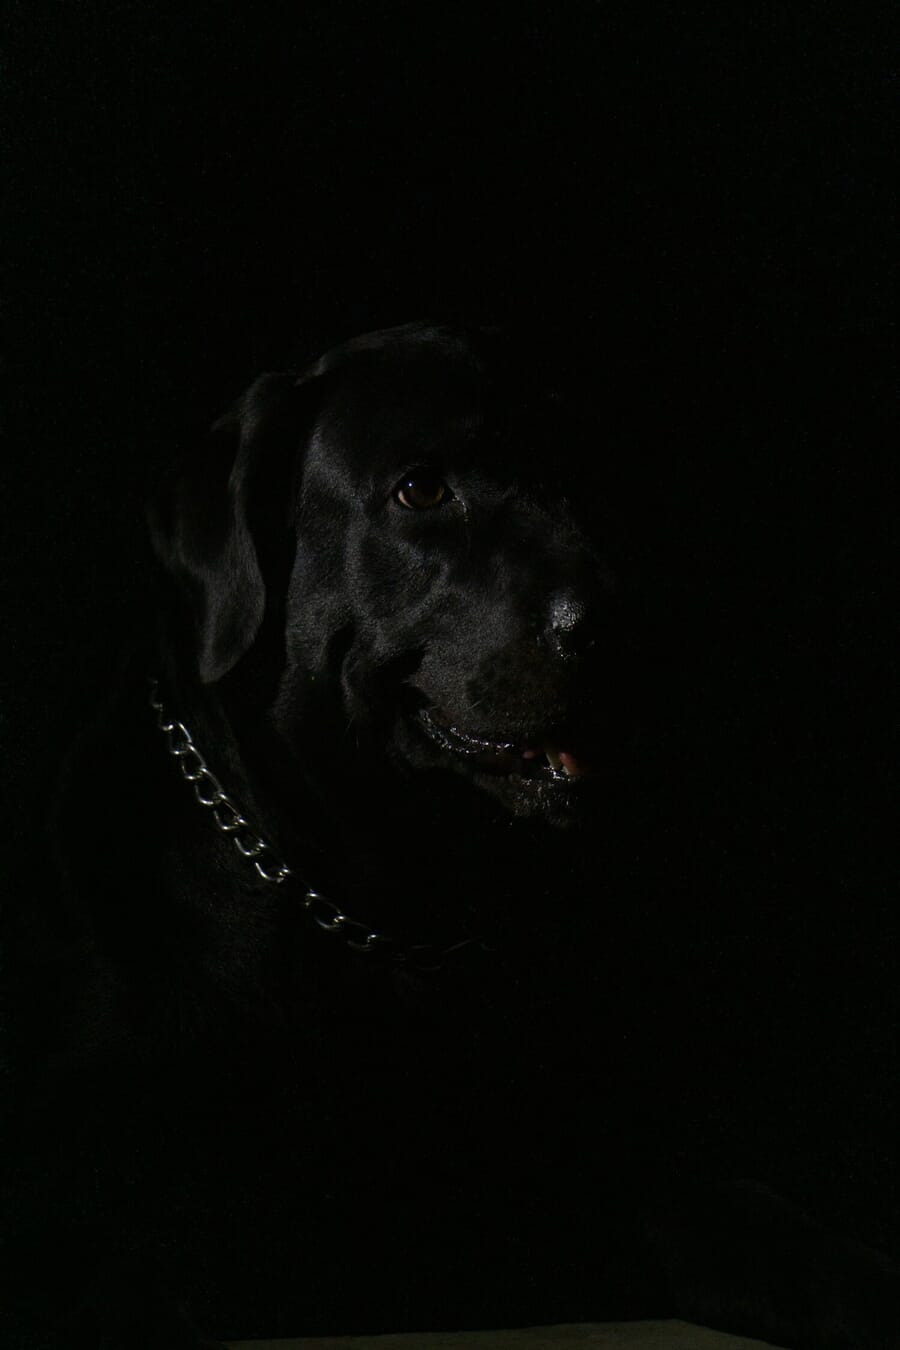
Animals look absolutely stunning in dramatic, moody lighting — and they’re much more cooperative subjects than you’d expect. Dogs, cats, and even birds respond to calm, low-light environments by settling down, which makes dramatic portraits easier to capture than action shots.
Lighting setup: Use a single key light — either a split lighting setup (light at 90 degrees) or Rembrandt style (45 degrees, slightly above). A dark background (black or dark gray) deepens the mood. Use a grid on your softbox to control spill and keep the background dark.
Camera settings: f/4, ISO 200, 85mm lens. Focus on the nearest eye. For dark-furred animals, add a subtle hair/rim light from behind to separate them from the background — this is critical for black dogs against black backgrounds.
Pro tip: Play with the texture of fur. Side lighting reveals every strand and whisker, creating incredible detail. Shoot at the highest resolution your camera allows — these make stunning large prints.
18. Use Character Props
Pet owners love seeing their animals in character — and social media goes wild for costumed pets. Think wizard hats, tiny bow ties, superhero capes, seasonal costumes, or themed scenes (a cat in a tiny detective outfit, a dog as a chef with a miniature toque).
How to approach it: Start with comfortable, non-restrictive accessories like bandanas, hats that sit loosely, or themed backgrounds (no tight costumes that stress the animal). Build the scene around the prop — a “chef” dog needs a tiny kitchen setup, a “wizard” cat needs books and candles.
Camera settings: f/4, ISO 200, 50–85mm lens. Use off-camera flash bounced into an umbrella for soft, even lighting that doesn’t spook animals. Continuous LED panels at low power are even less intrusive — no sudden flashes to startle your subject.
Safety first: Never force a costume on a pet. Watch for stress signals (panting, flattened ears, attempts to remove the item). Have treats ready as positive reinforcement, and keep costumed sessions under 10 minutes. The best shots come from animals that are comfortable and curious, not stressed.
19. Happy Smiles
The “smiling dog” portrait is one of the most commercially valuable pet photos you can take. Pet owners display these everywhere — framed on walls, printed on mugs, shared endlessly on social media. The key is making the studio a positive experience first and worrying about photography second.
Getting the smile: Dogs “smile” when panting happily — so a brief play session before shooting gets them warmed up and mouth-open happy. Squeaker toys held just above the lens get ear-perked, alert expressions. Treats create focused, eager faces. Combine all three throughout the session.
Camera settings: f/4, ISO 200, 70–200mm lens zoomed to 135mm. This focal length flatters facial proportions (short-nosed breeds especially). Use a white or light gray background for clean, bright images. Two softboxes at 45 degrees create even, flattering light without harsh shadows.
Pro tip: Shoot at the pet’s eye level — get on the floor if needed. Images shot from above feel disconnected, while eye-level creates an emotional bond between viewer and subject. A low tripod or beanbag keeps you stable while lying on the studio floor.
20. Ring Light Pet Portraits
Ring lights are famous for the distinctive circular catchlight they create in eyes — and that effect is even more striking in animal portraits, where the eyes are the focal point of every image.
Three ways to use a ring light with pets:
- Shoot through it: Position the ring light around your lens. The even, shadowless illumination is perfect for straight-on pet portraits and creates that signature ring catchlight.
- As a frame: Have the pet sit or peek through the ring for a fun, playful composition. Works especially well with smaller dogs and cats.
- As accent lighting: Place the ring light behind or above the pet as a halo effect. The circular shape adds a whimsical, almost angelic quality to the image.
Camera settings: f/4, ISO 400 (ring lights aren’t very powerful), 85mm lens. Since ring lights produce very flat, even illumination, add a second light from the side for some dimension. Shoot at the pet’s eye level for the best catchlight effect — the ring reflection should be centered in both eyes.
Test Your Studio Photography Knowledge
Think you’ve absorbed all 20 ideas? Put your studio knowledge to the test with this quick quiz:
Studio Photoshoot FAQ
What basic equipment do I need for a studio photoshoot?
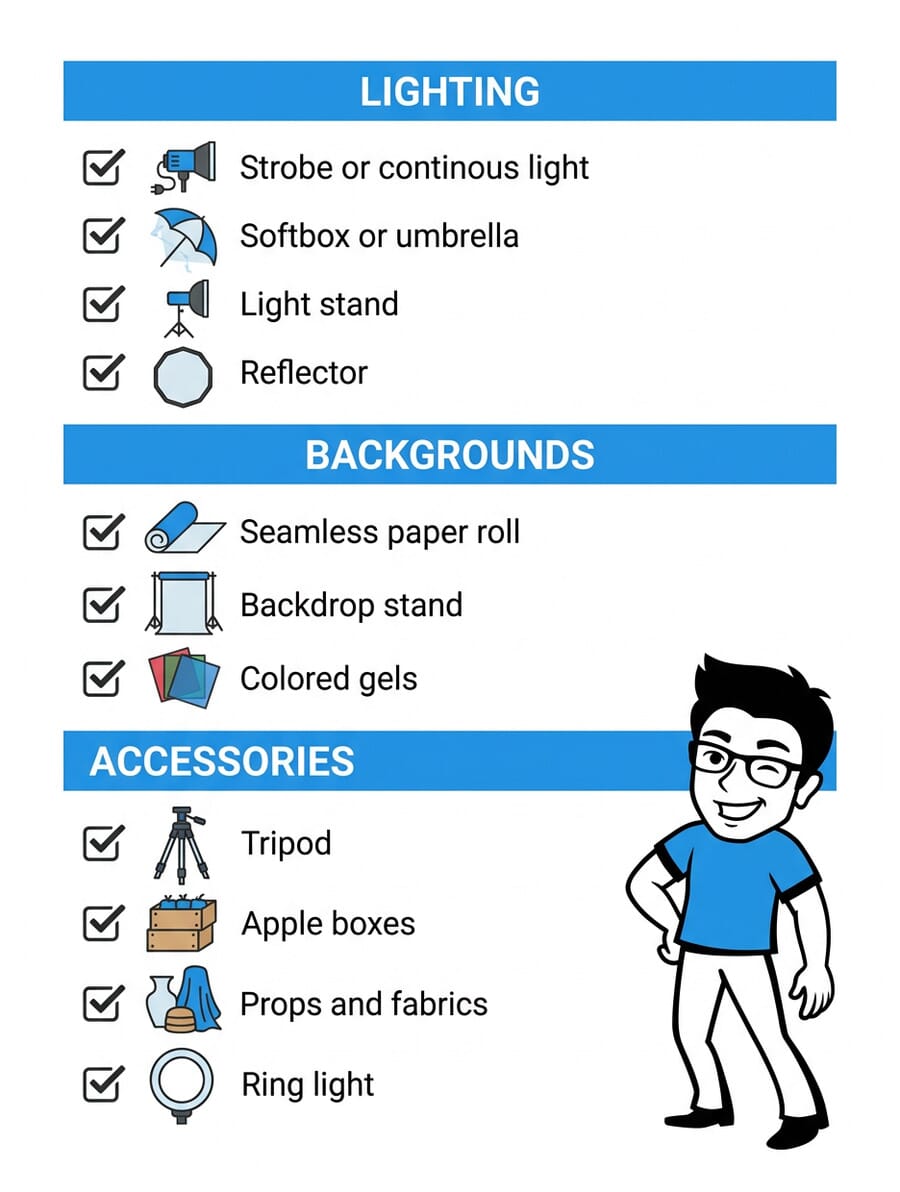
At minimum, you need a camera, one light source (a strobe or continuous LED), a light modifier (softbox or umbrella), a backdrop (seamless paper or fabric), and a light stand. Apple boxes, reflectors, and a tripod are helpful additions. You can build a functional home studio for under $500.
What is the best lens for studio portraits?
An 85mm f/1.4 or f/1.8 is the classic choice for studio portraits — it provides flattering perspective compression and beautiful background separation. A 50mm f/1.4 works well in smaller spaces, and a 70-200mm f/2.8 gives you flexibility to shoot tight and wide without moving.
Should I use continuous lights or strobes for studio photography?
Strobes are more powerful and freeze motion better (essential for pet action shots and fabric tosses). Continuous lights let you see exactly what you’re going to get, which is easier for beginners and better for video. Many photographers use a mix of both depending on the situation.
How do I choose the right background color?
White is versatile and works for most subjects. Black creates drama and is ideal for low-key lighting setups. Gray is the most flexible — it can appear white or black depending on how you light it. Colored backgrounds should complement your subject without competing for attention. When in doubt, use a neutral tone.
How do I keep pets calm during a studio session?
Give the pet 10-15 minutes to explore the studio space before shooting. Use treats generously as positive reinforcement. Keep sessions short (20-30 minutes). Avoid sudden flash pops — use modeling lights first so the pet adjusts. Have familiar toys and blankets from home. Some photographers play calming music designed for animals.
Can I create these setups in a home studio?
Most of these ideas work in a 10×12 foot room or larger. For product and still life, even a kitchen table with a window and reflector is enough. Portrait work needs slightly more space for light placement. The key is controlling ambient light — use blackout curtains to eliminate window light when needed.
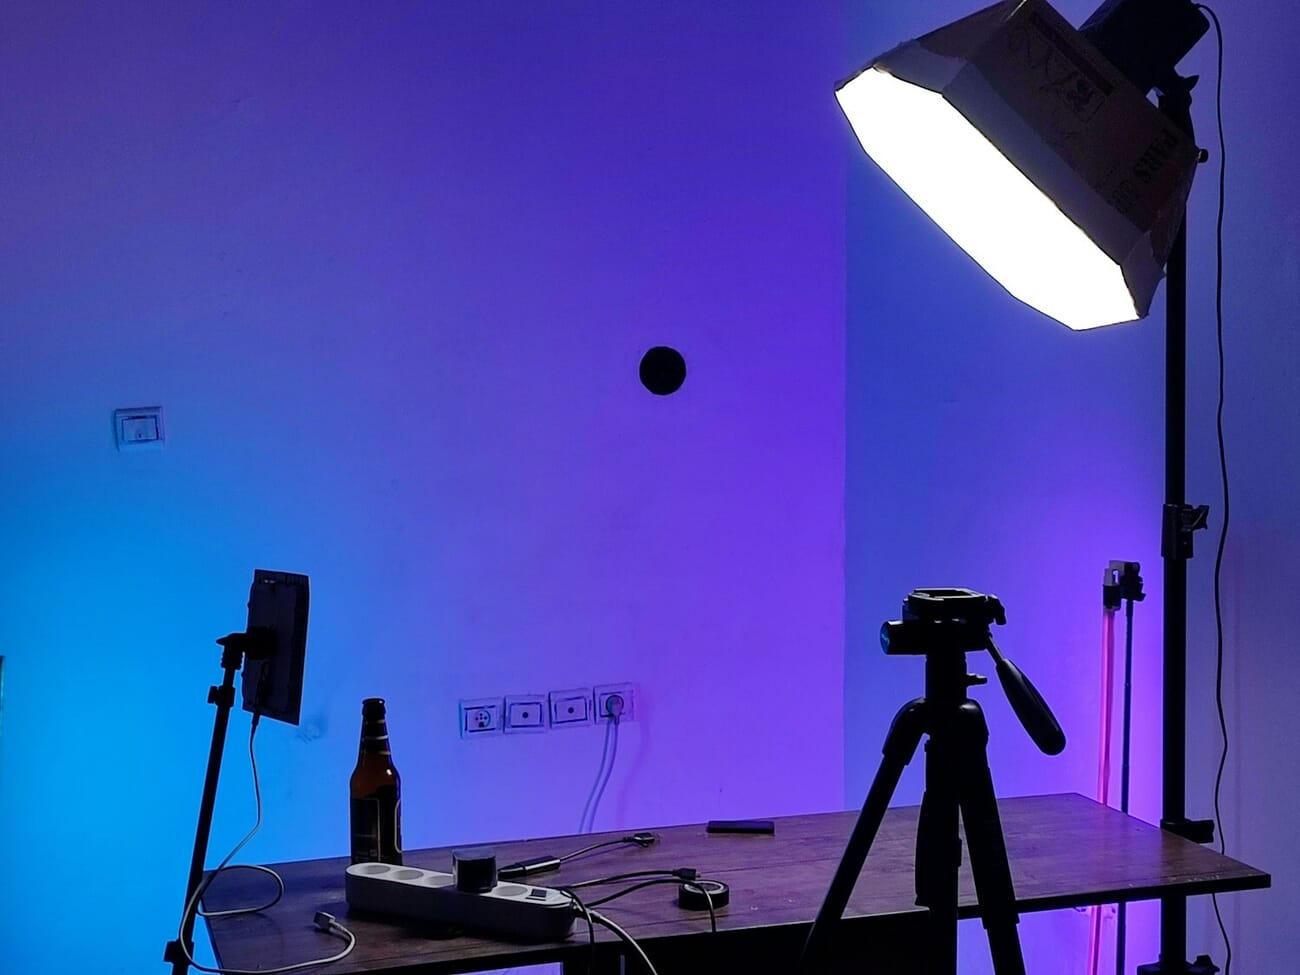
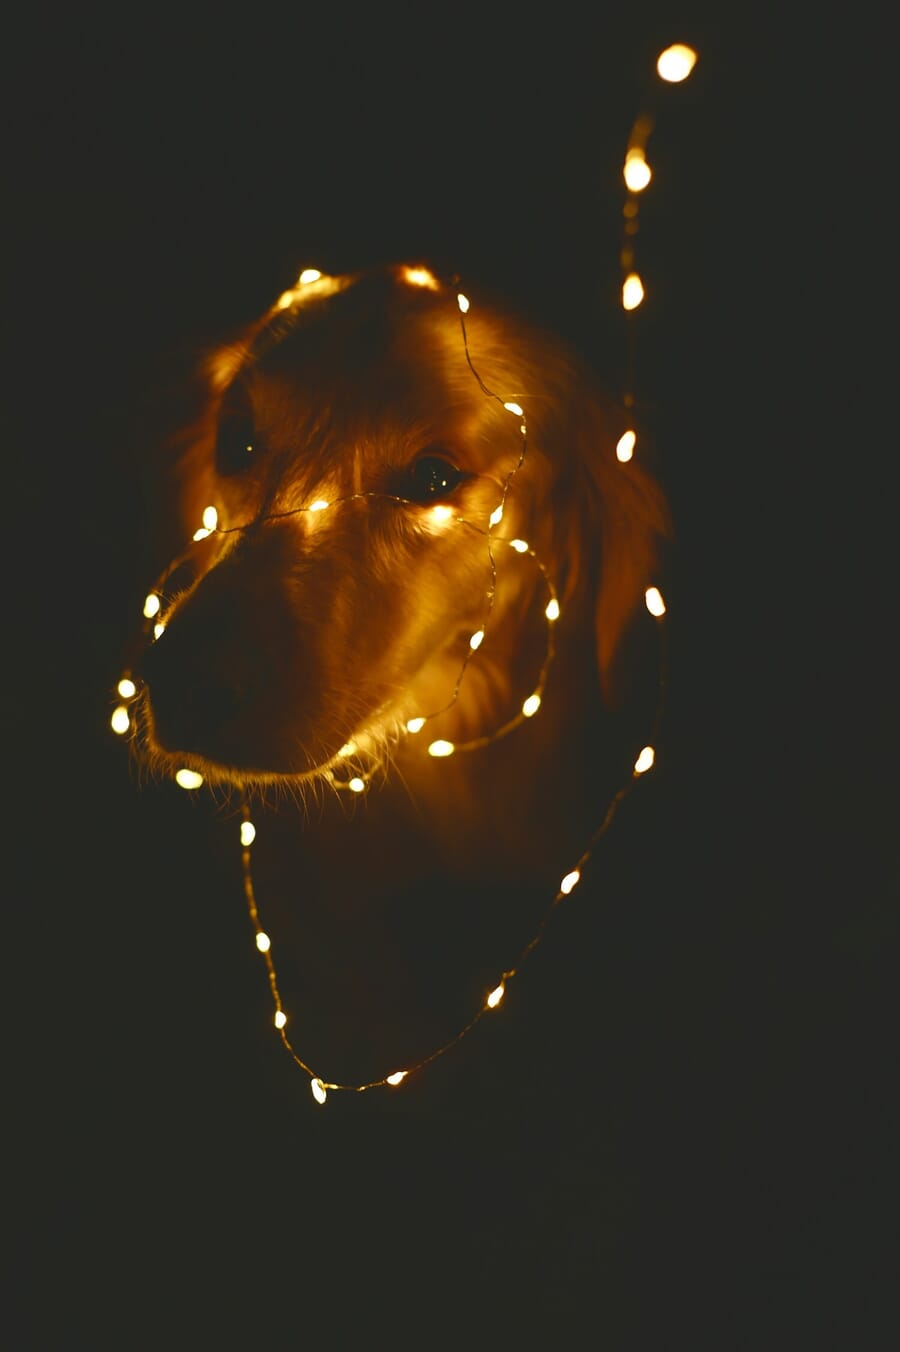
Featured image: Photo by Vitaly Gariev on Unsplash.
