In headshot photography, where capturing the essence of an individual’s personality is paramount, the nuances of camera gear and settings become indispensable tools for photographers. Among these, understanding white balance and utilizing the appropriate lenses and camera settings can significantly elevate the quality of headshot portraits.
White balance, often overlooked by amateurs but crucial for professionals, determines the color temperature of an image. In the context of headshot photography, where skin tones vary widely, achieving accurate white balance is vital. As each individual possesses a unique skin tone, ensuring that the captured image accurately represents these nuances can make or break a headshot. In this article, I delve into the intricacies of white balance, exploring the Kelvin scale and practical techniques for achieving precise color reproduction in headshot photography.
Furthermore, I’ll go over the significance of selecting the right camera gear, including lenses and camera bodies, to achieve the desired composition and perspective in headshot portraits. From understanding focal lengths to optimizing camera settings, every aspect of the photographer’s toolkit plays a pivotal role in capturing compelling headshot images.
Headshot Camera Gear & Settings:
White Balance and Understanding the Kelvin Scale
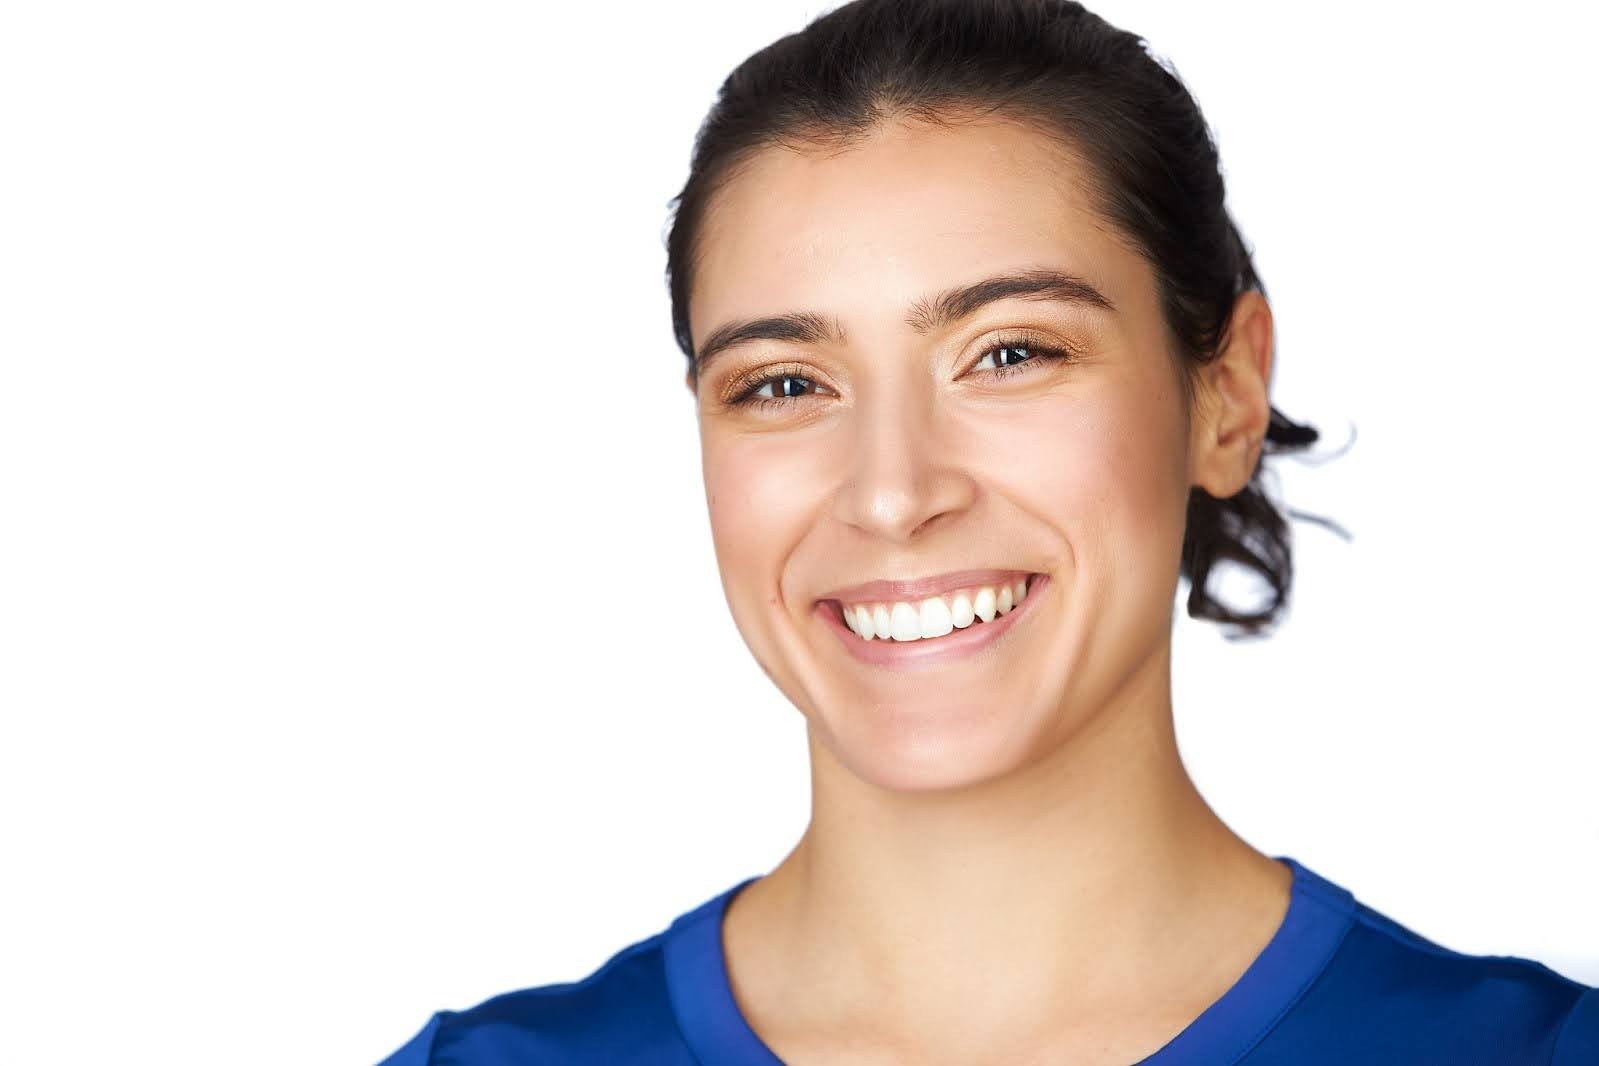
White balance is basically going to be choosing what the camera or what the picture is going to see as pure white, or grays and blacks with no color mixed into it. So that’s important, especially in headshots because people’s skin tones are all unique. I don’t care if you’re related, close family members, everybody’s skin tone is going to be different and unique. So that is such a vital part of the headshot, especially because although people may not know what color balance is, the layman looking at a headshot is going to tell if somebody looks too orange or they look too blue or there are too many greens or too much maroon in the skin. So the white balance, when you set it, is going to determine that.
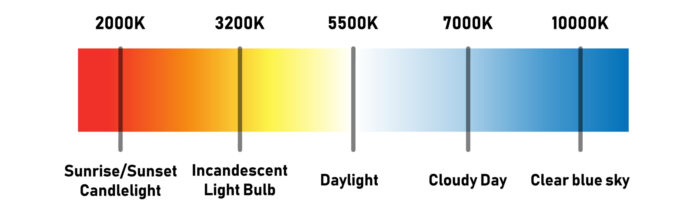
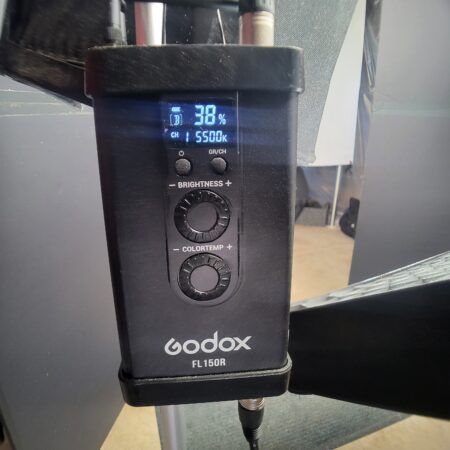
The way that I was taught and that I utilize is, in my camera, there’s an option to do custom white balance. What I do is I set my lights at 5500. White balance goes by the Kelvin scale, where 5500 is considered what they call daylight balance. So if you go outside, usually it’s going to be around 5500 Kelvin. As you go lower in number, you’re going to get more orange. Tungsten lighting and orange lighting are on the lower end of things and blue lighting is going to be on the higher end of things.
So 5500 is what I set my lights at. And then I’m looking at the shot and comparing. But one of the things that you can do that will help you is most photo settings, if you’re shooting tethered, most cameras that are decent quality are going to have what they call custom white balance. What you do is you take a gray card – you can make one or you can go out and buy one – and there are ways to expose what you’re setting to on it.
What I’ll do is I’ll get my lights set up and then hold the gray card in front of my face and I have a remote shutter for my camera. You can buy one for $20 and it just hooks in there without worrying about it, or you can get somebody to do it for you. I hold it where the model is going to be standing in the lights, take a quick picture, and then I have that. The camera knows that that’s supposed to be gray, so that gives you a good starting point. Then what you do is, depending on your camera, you go in and you set it to custom white balance, and you use that picture to set the custom white balance.
One of the tricks I’ve learned is, most of the time, somebody’s going to have something on them in the photo that is white or gray. If they’re smiling with teeth, their teeth should be close to white in most cases, or the whites of their eyes. I zoom in on the photo and I’ll grab that. In most photo editing software, there’s a little selection tool for the white balance and when you click on something that’s supposed to be gray, it’ll adjust everything else in the photo to match that as a gray or white. It’s the same thing as the gray card, but it’s just a little trick that’ll get me close to where I want to be white balance-wise.
And then it’s really based on the skin tone. I’ll talk more about the post-processing side of things in another article so I won’t get into it too much right now, but basically with the white balance you want to get the color of their skin tone as close as you can while you’re shooting. One, it’s going to make your work on the back end a lot easier. And two, you don’t want to show somebody photos of themselves and they look like an Oompa Loompa. You want to get it close, especially when you’re showing a client.
White Balance in Post-Processing
It took me a while to figure out in Capture One that there’s actually a way of saving the custom style.
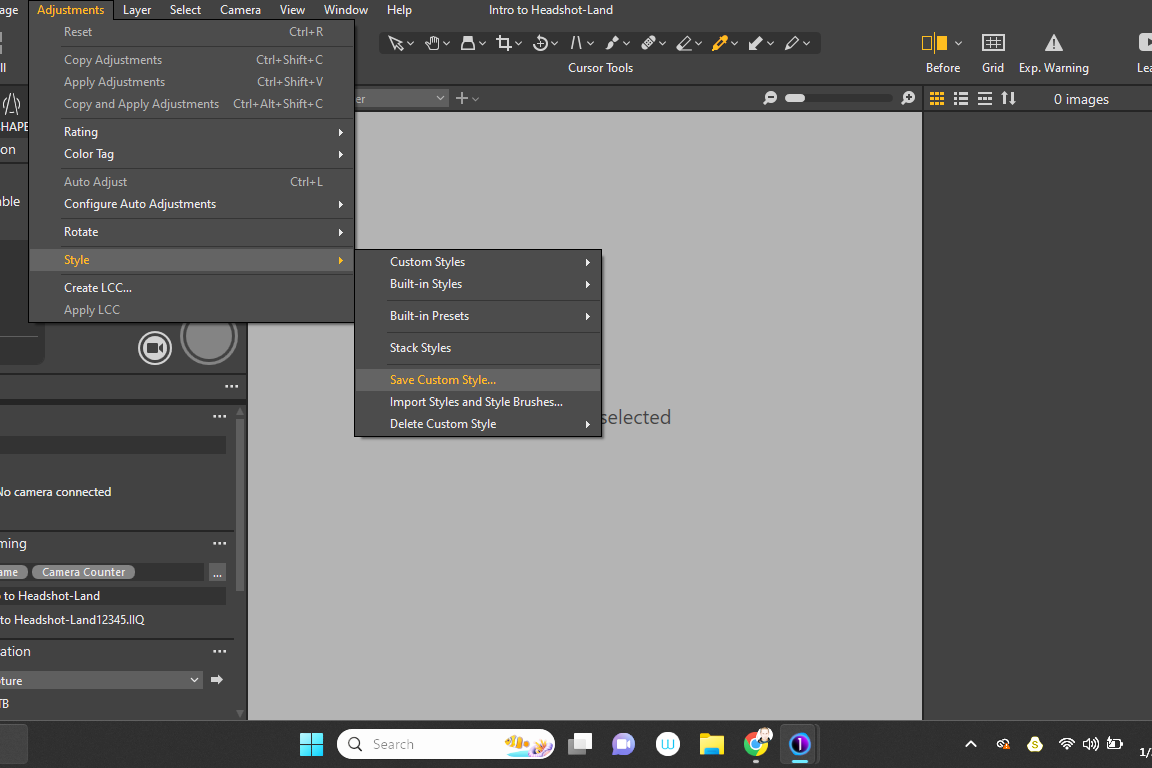
Again, we’ll get into that more later, but what I do is set my settings in Capture One, like white balance and the lighting. I’m going to lock in what I feel are the closest color settings and light settings in Capture One and save it as a custom style. Then in the tether menu, which is a separate menu, when you scroll down, there are a bunch of different options, but one of them is Apply Custom Style, and you can go through and see all the custom styles or settings that you made over time, and you select the one that you just made.
What that does is that every photo you take after that in Capture One is going to automatically apply those settings. So it makes it really easy because the other option is to physically go through and apply the settings to each picture that you take. If I do this automatically in Capture One, I’m able to see the whole gamut of the session, all the pictures, so I can tell if they look orange in the beginning and then start looking bluer. I’m able to see that so they stay pretty consistent.
The Headshot Photographer’s Camera and Lens
I use mirrorless, and the nice thing about that is that most of almost all the mirrorless cameras out there nowadays, regardless of brand, have live view so you can see exactly what you’re photographing and what it’s going to look like.
You can set it so that if you’re using flash, it won’t give you that preview, but usually, it’s better to set it up so that it’s going to show you a preview of what the photo is going to look like before you even take the picture. So that’s extremely helpful.
I have the Canon EOS R. It’s a mid-tier – not quite a beginner camera, but it’s not quite one of those $6,000 top-of-the-line, crazy, shoots 20-30 frames a second type cameras either. I think I paid about $2,000 with a lens. It’s a few years old, but it does the job.

If I want, I can shoot at about seven to 10 frames per second, which is perfect. I don’t need any more than that. For headshots, I don’t need 30 frames a second. Maybe if I was doing sports photography, yeah, sure, that would come in handy, or wildlife trying to capture a bird taking off or something, that might come in handy, but I don’t need it for what I do.
I have three lenses: a 35mm, a 50mm, which is great for walking around and stuff like that, but the one I use for headshots is 100mm.
You can use a 70-200 zoom lens if you want. I prefer a fixed focal length lens, but you could certainly use that. It’ll make it easier because you won’t have to back up the tripod and move it in closer, depending on where your setup is. But I find it a little bit sharper and it has better image quality. Basically between 85 and probably 135mm is where I would stick for the focal length for a headshot.
One of the reasons behind that is that when you get to wider angles, or tighter angles, it’s going to start messing with the facial features. Because you have to be closer in, that’s actually what makes it distorted. It’s not the lens itself, it’s because you have to be so close to somebody with, say, a 40mm lens or 50mm lens. So I find 100mm is the best for me.
It’s also about making people comfortable; I set up about three to five feet from where my subject is, so it’s perfect for me because I feel like we’re having a conversation. If I was shooting at 200, I’d be all the way back, 20 feet away. It would be kind of awkward. But on the flip side, I don’t want to be right in your face either. So it gives me that comfortable distance where we’re just having a conversation. That’s what I want the session to be like; I don’t want it to feel like it’s intrusive.
I’d say 50 is good if you want a portrait of somebody, but for a headshot, specifically because you are trying to get close up on their head, I would go a little bit higher than that, just from a personal perspective. Not that you can’t make it work with that, you’re just going to be a lot closer.
For my headshot preference, I want a bit of a tighter crop. I want you as close as possible because I want your facial expression and your face to be the highlight of it. Hair is beautiful, and people have all sorts of beautiful hairstyles, but that’s not the focus. You have dangly earrings, I don’t want that to be the focus. You’re the person that I want to be highlighted in a headshot.

My Settings for Professional Headshots
My more current settings are typically ISO 400, shutter 1/320, and f/4 aperture. Sometimes the shutter may go to 1/200 or so, and the ISO stays between 100 and an absolute max of 800. I will raise the ISO to 400 or 800 if someone is sensitive to the bright lighting, as it allows me to lower the lights a bit.
I always keep the aperture at f/4 though so the depth of field is always the same. The shutter is at least 1/160 so if they laugh or move a tiny bit, a shot isn’t ruined by motion blur. Other than that, the settings can flux a bit to allow the lighting to be adjusted depending on the exact needs.
Fine-Tuning Your Headshot Toolkit
When it comes to headshot camera gear and settings, it’s not just about technical stuff – it’s about capturing the real essence of the person in front of the lens. Whether it’s nailing the perfect white balance to show off someone’s unique skin tone or choosing the right lens to highlight their personality, every decision matters.
So, armed with this knowledge, it’s time to dive in and start your own journey. Remember, the key is experimentation and finding what works best for you. Whether you’re a seasoned pro or just starting out, there’s always something new to discover in the world of headshot photography.
Disclosure/Disclaimer: As an Amazon Associate, we earn from qualifying purchases. Certain content was provided "as is" from Amazon and is subject to change or removal at any time. Product prices and availability: Amazon prices are updated daily or are accurate as of the date/time indicated and are subject to change. Any price and availability information displayed on Amazon.com at the time of purchase will apply to the purchase of this product.