
- Exposure controls how bright or dark your photo looks – and your smartphone gives you more control over it than you think.
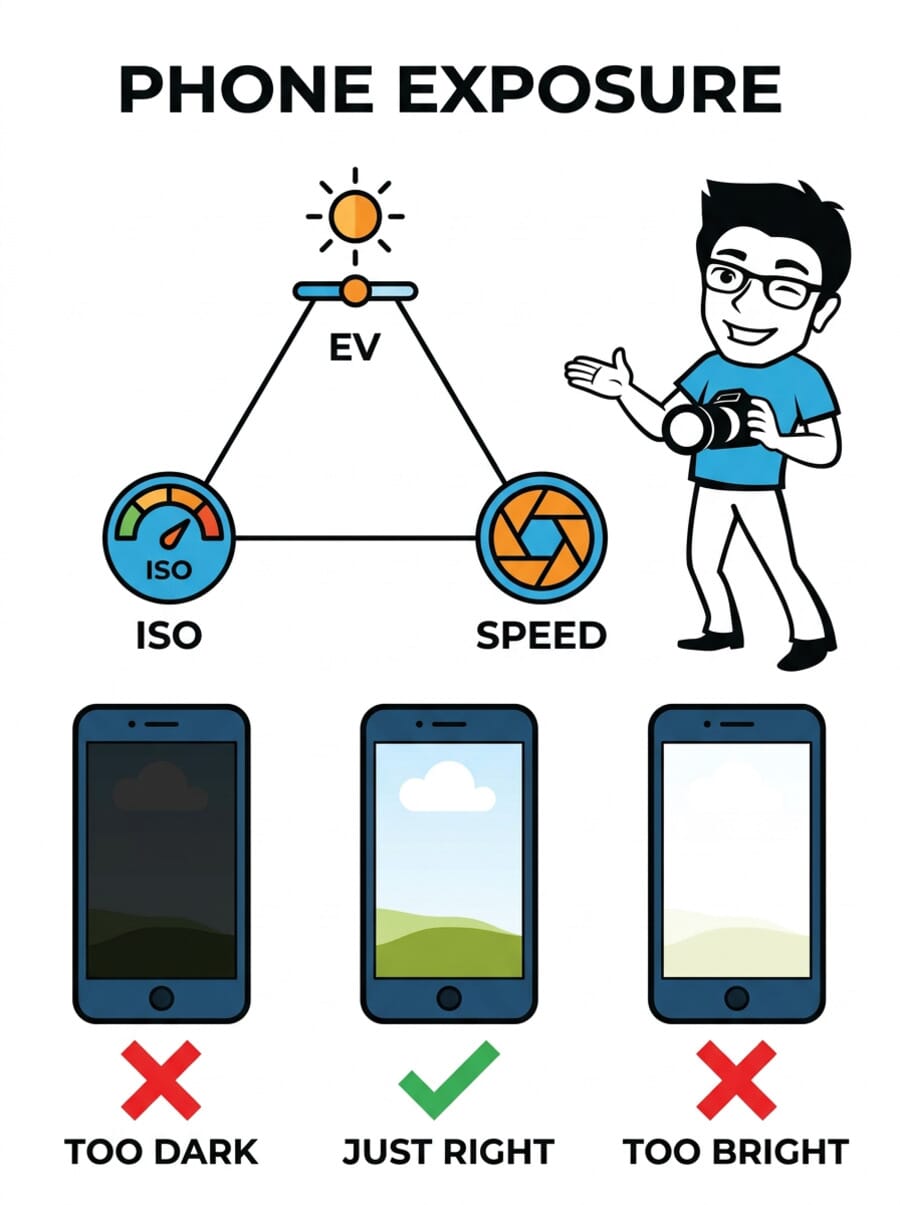
- The three key exposure controls on phones are the EV slider, ISO, and shutter speed (in Pro/Manual mode).
- HDR mode and Night mode use computational photography to handle tricky lighting that manual settings alone cannot fix.
- The most common mistake is letting your phone decide everything – learn when to override auto exposure for dramatically better results.
- Test your knowledge with our smartphone exposure quiz at the end.
What Is Exposure?
Exposure is the amount of light that reaches your camera sensor. It determines whether your photo looks bright, dark, or somewhere in between.
Get it right, and you capture a scene exactly as you see it – rich shadows, detailed highlights, natural colors. Get it wrong, and you end up with a washed-out mess or a murky, unusable image.
On a traditional camera, exposure is controlled by three settings: aperture, shutter speed, and ISO. On a smartphone, the concept is the same, but the tools are slightly different. Since your phone has a fixed aperture (the lens opening doesn’t change), you work primarily with EV compensation, ISO, and shutter speed.

The goal is simple: capture a photo where important details are visible in both the bright and dark areas. Photographers call this a well-exposed image. When a photo is too dark, it is underexposed. When it is too bright with blown-out whites, it is overexposed.
How Auto Exposure Works on Your Phone
Every time you open your phone’s camera app, it instantly analyzes the scene and picks what it considers the best exposure. This happens in milliseconds, using a process called metering.
Modern smartphones like the iPhone 17, Pixel 10, and Galaxy S25 use sophisticated AI-powered metering that factors in face detection, scene recognition, and even depth information. The phone knows when you are shooting a face, a landscape, or a document – and adjusts accordingly.
Most of the time, auto exposure works well. But it fails predictably in certain situations:
- Backlit subjects – A person standing in front of a bright window or sunset will appear as a dark silhouette.
- Snow and beaches – Bright, reflective scenes confuse the meter into underexposing, making white snow look gray.
- Stage and concert lighting – Spotlights surrounded by darkness trick the camera into overexposing.
- High-contrast scenes – A bright sky above a shadowy street is too much range for a single exposure to handle.
When auto fails, you need to take control. That is where the exposure tools below come in.
The Exposure Triangle for Smartphones
On a dedicated camera, photographers talk about the “exposure triangle” – aperture, shutter speed, and ISO working together. On a smartphone, the triangle looks different because your phone lens has a fixed aperture (typically f/1.7 to f/1.9). You cannot change it.
That leaves you with three controls that actually matter:
EV Compensation (The Brightness Slider)
EV compensation is the single most useful exposure tool on your phone, and the one most people never touch. EV stands for “Exposure Value,” and adjusting it tells your phone to make the image brighter or darker than what auto exposure chose.
On most phones, you access it by tapping the screen to set focus, then dragging the sun icon (iPhone) or the brightness slider (Android) up or down. Moving it up (+EV) brightens the image. Moving it down (-EV) darkens it.
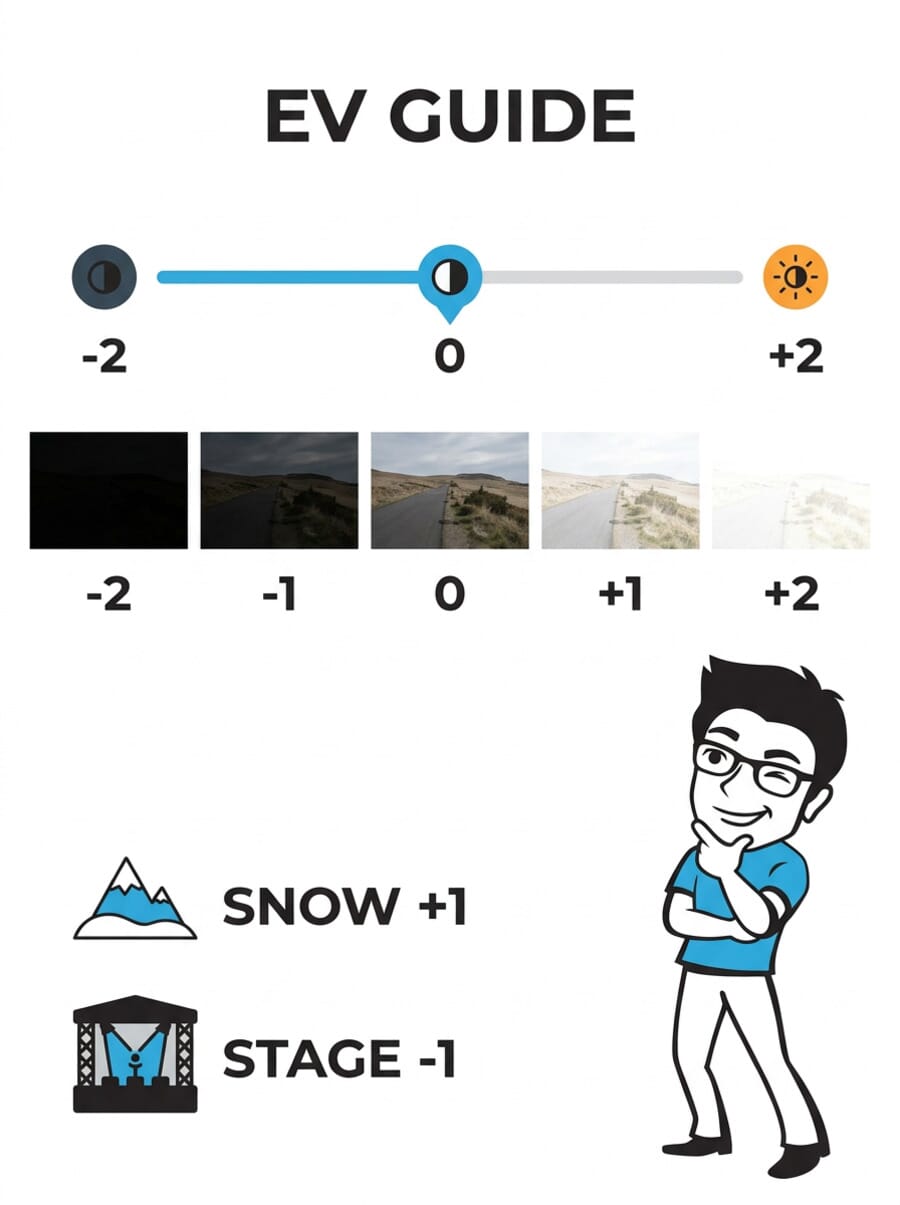
When to use positive EV (+1 to +2):
- Snow scenes (the phone thinks all that white is “too bright” and darkens it)
- Beach photography with bright sand
- Photos of white objects or documents
When to use negative EV (-1 to -2):
- Concert or stage photography (prevents blown-out spotlights)
- Sunset silhouettes (keeps the sky dramatic)
- Neon signs and light displays at night
ISO (Sensor Sensitivity)
ISO controls how sensitive your camera sensor is to light. A low ISO (like 50 or 100) produces clean, noise-free images but needs plenty of light. A high ISO (like 1600 or 3200) brightens the image in dark conditions but introduces visible grain (noise).
In auto mode, your phone manages ISO for you. In Pro/Manual mode, you can set it yourself. The general rule: keep ISO as low as possible for the cleanest results. Only raise it when you have no other choice.
Modern phones handle noise much better than they did a few years ago. The iPhone 17 and Pixel 10 use advanced computational processing to reduce noise even at ISO 1600+. The Xiaomi 17 Ultra’s LOFIC sensor even captures single-exposure HDR, reducing noise across the entire dynamic range. But there are still limits – an ISO 3200 phone photo will never match ISO 100 in clarity.
Shutter Speed (Motion Control)
Shutter speed determines how long the sensor is exposed to light. A fast shutter speed (like 1/1000s) freezes motion and produces sharp images. A slow shutter speed (like 1/4s or longer) lets in more light but blurs anything that moves.
In auto mode, your phone typically shoots between 1/30s and 1/1000s depending on conditions. In Pro/Manual mode, you can go much slower (several seconds) or much faster.

Slow shutter speed is what creates those dreamy light-trail photos and silky waterfall shots. On the iPhone, you can simulate this through Live Photo long exposure. On Android, Pro/Manual mode or a dedicated app like ProCam gives you direct shutter speed control.
Tip: For any shutter speed slower than 1/30s, you need a stable surface or a phone tripod. Even the steadiest hands cannot avoid camera shake at slow speeds. If you are serious about night photography, a compact tripod is the single best investment you can make.
Using Pro Mode (Manual Exposure)
Every major flagship phone now includes a Pro or Manual mode that gives you direct control over ISO, shutter speed, white balance, and focus. Here is how to find it:
- Samsung Galaxy S25: Open Camera > swipe to “Pro” mode
- Google Pixel 10: Open Camera > tap “Manual” in the mode carousel
- iPhone 17: No built-in Pro mode, but the Camera app lets you lock exposure by long-pressing. For full manual control, use a third-party app like Halide or ProCamera
Pro mode is not something you need for everyday snapshots. But for specific scenarios – low light, creative long exposures, high-contrast scenes – it gives you the precision that auto mode cannot provide.
When to use Pro mode:
- Night photography without Night mode’s heavy processing
- Light trail photography (set slow shutter, low ISO)
- Shooting in RAW format for better editing flexibility
- Precise control in studio or controlled lighting
If you are new to manual settings, check out our camera settings cheat sheet for a printable quick reference that covers all the basics.
Tap to Expose: The Most Underrated Phone Camera Trick
Before reaching for Pro mode, learn this fundamental technique: tap-to-expose.
When you tap anywhere on your phone’s viewfinder, it sets both focus and exposure for that spot. This is incredibly powerful because it lets you tell your phone exactly what part of the scene matters most.

Practical examples:
- Portrait against a bright window: Tap the person’s face. The phone will brighten the face and let the window blow out slightly – much better than a dark silhouette.
- Dramatic sunset sky: Tap the bright clouds. The phone will expose for the sky, creating rich colors and potentially silhouetting foreground elements.
- Product on a table: Tap the product. Exposure locks to the subject regardless of the background.
On iPhone, you can lock exposure by long-pressing on the screen until you see “AE/AF Lock.” This prevents the phone from re-metering when you recompose. On most Android phones, the lock behavior varies by manufacturer – Samsung locks exposure with a long press, while Pixel requires a tap then hold on the exposure slider.
HDR Mode: Taming High-Contrast Scenes
HDR (High Dynamic Range) is your phone’s answer to scenes where the brightness difference between the lightest and darkest areas is too extreme for a single exposure. Think: bright sky above a shadowed street, a window in a dim room, or a sunlit building next to a shaded alley.
Here is how it works: your phone rapidly captures multiple frames at different exposure levels – one for the highlights, one for the shadows, one for the midtones – and merges them into a single image with detail across the full tonal range.
On most modern phones, HDR is enabled by default (often labeled “Auto HDR” or “Smart HDR”). The iPhone 17 uses Smart HDR 5, which processes every frame with HDR whether you ask for it or not. The Pixel 10 uses HDR+ with a similar always-on approach. Samsung’s Galaxy S25 lets you toggle HDR on or off in the camera settings.
When HDR helps:
- Landscapes with bright sky and dark foreground
- Interior shots with windows
- Backlit portraits
When to turn HDR off:
- When you want dramatic shadows or silhouettes (HDR will try to “fix” them)
- Fast-moving subjects (the multi-frame capture can cause ghosting)
- Scenes with intentionally moody, low-key lighting
Night Mode: Computational Low-Light Photography
Night mode is arguably the biggest exposure breakthrough in smartphone photography. It lets you capture usable, detailed photos in conditions where traditional cameras would produce nothing but black frames or grainy messes.

Night mode works by taking a burst of exposures over 1-5 seconds (sometimes longer), then computationally aligning and stacking them. This achieves the light-gathering effect of a long exposure without the motion blur, because AI removes hand shake and subject movement between frames.
All three major platforms handle Night mode slightly differently:
- iPhone 17: Night mode activates automatically when the phone detects low light. You can adjust the exposure time (1-3s handheld, up to 30s on a tripod) by tapping the Night mode icon.
- Pixel 10: Night Sight activates automatically or can be selected manually. Astrophotography mode kicks in when placed on a stable surface, enabling 4+ minute exposures for star photos.
- Galaxy S25: Night mode is a separate shooting mode. It also supports long exposure captures of up to 10 seconds handheld.
Pro tip: Even with Night mode, a stable phone produces dramatically better results. Lean against a wall, rest on a railing, or prop against a surface. The steadier you hold, the more frames the algorithm can cleanly align, and the sharper your final image will be.
Creative Exposure Techniques
Once you understand the basics, exposure becomes a creative tool, not just a technical necessity. Here are three techniques that use exposure intentionally for artistic effect.
Silhouettes
A silhouette is what happens when you expose for a bright background and let the foreground subject go completely dark. Instead of fighting this, lean into it for dramatic, moody shots.

How to shoot silhouettes on your phone:
- Position your subject in front of a bright light source (sunset, window, bright wall)
- Tap the bright area behind them to set exposure for the background
- If the subject is not dark enough, drag the EV slider down (-1 to -2)
- Turn off HDR – it will try to lift the shadows and ruin the silhouette
Long Exposure Effects
Long exposure effects turn moving elements into smooth streaks while keeping stationary objects sharp. Light trails from cars, silky waterfalls, and ghostly crowd scenes all use this technique.
On iPhone, the easiest method is shooting a Live Photo, then swiping up on it in your gallery and selecting “Long Exposure.” On Android, use Pro mode to set a slow shutter speed (1-4 seconds) with a low ISO (50-100). A tripod or stable surface is essential.
Low-Key and Moody Shots
Not every photo needs to be bright and evenly lit. Low-key photography uses intentional underexposure for mood and drama – think dark backgrounds with selective highlights on a face or object.

To shoot low-key on your phone: find a subject with a single light source (window, lamp, spotlight), tap the brightest part of the subject to set exposure, then drag EV down by -1 to -1.5. The background will fall to near-black while your subject stays lit.
Common Exposure Mistakes (and How to Fix Them)
Even experienced phone photographers make these errors. Knowing what to watch for will save you from deleting half your shots.
Mistake 1: Trusting Auto Exposure in Tricky Light
Auto exposure averages the entire scene. In scenes with extreme contrast – a person in front of a window, a spotlight on a dark stage – this average is wrong. The fix: tap your subject to meter for what matters, then fine-tune with the EV slider.
Mistake 2: Shooting Into the Sun Without Adjusting
When the sun is in your frame, the phone will dramatically underexpose everything else. This can be great for silhouettes (see above), but if you want detail in both the sky and your subject, use HDR mode and tap the subject to prioritize it.

Mistake 3: Using Flash as a Fix for Bad Exposure
The built-in LED flash on phones is harsh, unflattering, and only reaches about 2-3 meters. Instead of using flash, try: moving closer to a light source, using Night mode, increasing ISO in Pro mode, or positioning your subject near a window. Almost anything beats that on-camera flash.
Mistake 4: Cranking ISO Too High
In low light, it is tempting to push ISO to maximum. But beyond ISO 1600-2000 on most phones, noise becomes destructive. Better alternatives: use Night mode (it combines multiple lower-ISO frames), stabilize the phone for a slower shutter speed, or simply move to better light.
Mistake 5: Not Checking Exposure Before Shooting
Your phone screen shows a live preview of the exposure. If the preview looks too dark or too bright, the photo will be too dark or too bright. Take a second to evaluate the screen, tap to adjust, and check the preview again before pressing the shutter. This single habit prevents most exposure problems.
Quick Settings for Common Scenarios
Here are practical starting points for common situations. These settings assume you are using your phone’s Pro/Manual mode. For a comprehensive reference covering all camera settings, see our camera settings cheat sheet.
Golden hour portrait: ISO 100, shutter speed 1/125s, EV 0 to +0.3. Let the warm light do the work.
Bright daylight landscape: ISO 50-100, shutter speed 1/500s+, EV 0. Standard settings work well in good light.
Indoor restaurant or cafe: ISO 400-800, shutter speed 1/60s, EV 0 to +0.5. Brace against the table for stability.
Night cityscape: ISO 200-400, shutter speed 1-2s (on tripod), EV 0. Night mode may actually produce a better result here.
Light trails from traffic: ISO 50-100, shutter speed 2-4s (on tripod), EV -0.5. The low ISO keeps light trails clean without overexposing the scene.
Snow or beach: Auto mode with EV +1 to +1.5. This compensates for the meter’s tendency to underexpose bright white scenes.
Frequently Asked Questions
What does the sun icon next to the focus square do?
That is the EV compensation slider. After you tap to focus, drag the sun icon up to brighten the image or down to darken it. It is available on both iPhone and most Android phones, and it is the quickest way to override auto exposure without entering Pro mode.
Is it better to overexpose or underexpose on a phone?
Slightly underexpose if you have to choose. Smartphone sensors lose detail quickly in blown-out highlights, but you can usually recover some shadow detail in editing. That said, extreme underexposure introduces noise, so aim for correct exposure whenever possible.
Do I need a third-party camera app?
For most people, the stock camera app is sufficient – especially on Pixel and Samsung, which have excellent Pro modes built in. iPhone users who want full manual control should consider Halide or ProCamera. Third-party apps also let you shoot in RAW format for maximum editing flexibility.
Should I always shoot in RAW on my phone?
Not always. RAW files are larger and require post-processing. Shoot in RAW when you know you will edit the photo and want maximum control over exposure, white balance, and shadows. For casual photos and social media sharing, JPEG is faster and more convenient.
Can smartphone Night mode replace a real camera for low-light photography?
For casual and social photography, absolutely. Night mode on the iPhone 17, Pixel 10, and Galaxy S25 produces results that would have been impossible on any camera five years ago. For professional work requiring large prints, minimal noise, or precise depth of field control, a dedicated camera with a large sensor still has the advantage. Our night photography guide covers both approaches in depth.
Featured image: Photo by Melissa Askew on Unsplash via SampleShots. Shot on Apple iPhone X.


