Exposure Triangle: Key Takeaways
- The exposure triangle consists of three key variables: aperture, shutter speed, and ISO
- ISO refers to a camera’s sensitivity to light; the higher the ISO, the brighter the photo
- Aperture refers to the size of the aperture hole in the lens; the larger the hole, the brighter the photo
- Shutter speed refers to the length of time the sensor is exposed to the outside world; the longer the shutter speed, the brighter the photo
- Together, ISO, aperture, and shutter speed determine the overall exposure of an image
The exposure triangle is a fundamental concept in photography. It applies to digital photography as much as it does to film photography. It involves three critical aspects that make up any image – Aperture, Shutter Speed, and ISO. Occasionally, it is also referred to as the ISO aperture shutter speed triangle.
Let’s look at each of the aspects that make up the core of all photography. As a matter of fact, regardless of the camera system, you are using all of these aspects.
If you are just branching out into SLR photography, you may be starting to pluck up the courage to play about with the non-auto settings and try out some of the camera’s manual capabilities. But before you do that, let us understand the Exposure Triangle.
The exposure triangle is like the holy trinity of photography. Nothing is beyond it. In other words, you cannot make any image without an understanding of what is also known as the ISO, aperture, shutter speed triangle. Let’s find out more…
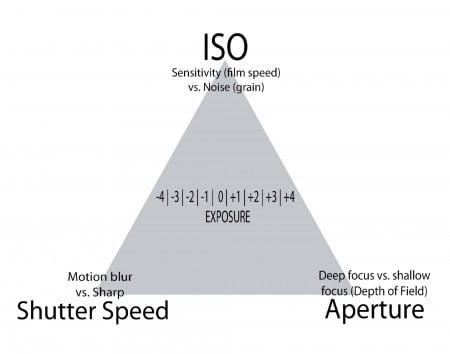
Shutter Speed + Aperture + ISO = Exposure Triangle
One of the cornerstones of basic photography is learning and understanding the Exposure Triangle.
The Exposure Triangle is the name given to the three main elements of the camera’s exposure: the ISO, the Aperture, and the Shutter Speed.
These elements all help to control the amount of light which is getting to the digital light sensor in the camera.
- The ISO is the name given to the basic measure of light sensitivity in your digital camera. Read more details about ISO.
- The Aperture is the size of the opening in the lens. This opening controls how much light is let through to the digital sensor in the camera. Read more about Aperture.
- The Shutter Speed is the length of time that the shutter of the camera remains open for when a picture is being taken. Read more details about Shutter Speed.
Aperture is Like the Size of a Window
Many teachers of basic photography like to use the window metaphor to describe the exposure triangle. In this metaphor, you must imagine a room with a window. On the outside of the window are plastic shutters and on the inside is a thin, semi-transparent curtain.
The aperture is the size of the window – a big window means lots of light can get into the room. A tiny window would mean that the room was dimly lit.
How Long are the “Window Shutters” Open? (Shutter Speed)
When the shutters are open, light can get into the room, but when the shutters are closed, the room is dark (Shutter speed > how long the shutter is open).
ISO is Like a Curtain
The amount of light that can get into the room also depends on the thickness of the semi-transparent curtain (ISO). A thick curtain will prevent much light from getting in and a thin curtain will allow nearly all of the light to get in.
Related Post: Getting out of Auto Mode
Once you understand the differences between these elements, you will be able to start using them to take control of your pictures.
- Long shutter speeds and large apertures are great for taking night shots, where there is not as much light. However, if you crank up the ISO as well, you may end up with grainy shots.
- Fast shutter speeds are great for capturing motion.
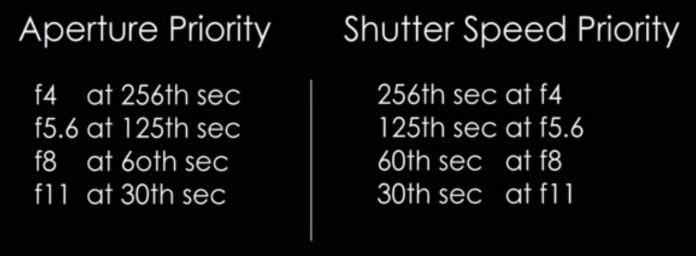
Subtly playing with each of these settings is the best way to get a feel for them. Don’t begin to alter other things on the camera until you know how to use these features properly. To give you a better understanding of the interplay of ISO, shutter speed, and aperture, have a look at this graphic:
How ISO, Aperture, and Shutter Speed Work
ISO (and ASA)
I briefly wrote about the ISO above. ISO and ASA are the same things.
- ISO stands for the International Organization for Standardization.
- ASA, on the other hand, stands for the American Standards Association.
They both stand for standardization and definitely mean something more than just light sensitivity. When used in photography, however, they are actually related to the light sensitivity of the imaging medium that captures light. The digital sensor or the film as the case may be.
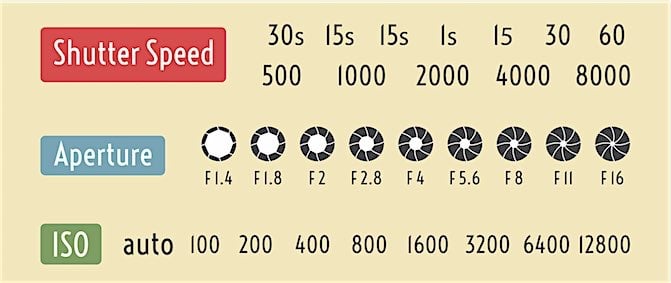
Light sensitivity denotes how sensitive the sensor (or the film in the case of film cameras) is to light. It also tells you the least amount of light that the sensor (or the film) can work with in order to shoot properly exposed images. ISO is always expressed as a number. Such as 100, 200, 400 and so on. Every following number on that scale doubles the sensitivity of the sensor.
Normal ISO Range: 100 – 1600
ISO 100 is the lowest ISO number possible on most cameras. It suggests the lowest level of light sensitivity. There is no upper limit. At least theoretically. Every new camera seems to be pushing the limit of the upper number ever so slightly. But then shooting at insanely high ISOs is never a good idea. We will learn why shortly.
As a general rule, with modern DSLR cameras, you can safely shoot at ISO 1600 and walk away with great images. That’s an exposure leeway of up to five stops in case you are shooting in low light.
Let’s Take an Example to Explain how ISO Works
Let’s say that at ISO 100 the exposure meter mode on your camera suggests that the camera is able to shoot at f/11 and shutter speed of 1/100 sec. If the ambient light drops and you prefer to keep the same shutter speed and aperture, then the only way you can achieve the same exposure is by increasing the ISO. In this case, depending on how much the ambient light changes you can increase the ISO number accordingly.
Let’s say that the ambient light drops by one stop (halves). You will then have to use ISO 200 to balance the exposure. ISO 200 is one stop higher than ISO 100 and has the same effect as increasing the exposure by one stop.
Note: ISO Doesn’t Alter the Exposure
There is a lot of misunderstanding around ISO. Many photographers say that ISO alters the exposure. No, it does not.
ISO deals with what happens after the exposure is made.
It is a technique of signal amplification. Higher the ISO number more is that signal amplification. But just as with all signal amplification, there will be an increase in static as well. In photography that is noise.
Noise is small specs of white and black present across an image. You can see them more clearly in the shadow areas. Using a higher ISO, thus, is not without its drawbacks.
The Auto ISO Mode is a feature on some cameras where the camera decides what should be the optimum ISO for the exposure. Your camera will not trigger Auto ISO when there is a lot of light. Your camera will shoot at the lowest ISO setting possible on your camera when the light is right. Let’s say ISO 100 or ISO 200 whatever is the lowest ISO setting. But as the light becomes dimmer and dimmer, Auto ISO will kick in. Your camera will boost the ISO number to keep the exposure correct.
Aperture and Aperture Blades
Now for an understanding of what’s Aperture. In very simple terms Aperture is a “hole in your lens”.
This is the hole (or “window”) that allows light to enter the camera and reach the digital sensor/film at the back of the camera. Aperture is expressed as a fraction. It is a ratio between the focal length of the lens in question and the diameter of the lens opening. Thus, the aperture is never an absolute number.
Aperture = f/ or F-Stop
Also, aperture varies based on the lens’ focal length and the format of the lens in question. Aperture is alternatively referred to as f-number or f-stop.
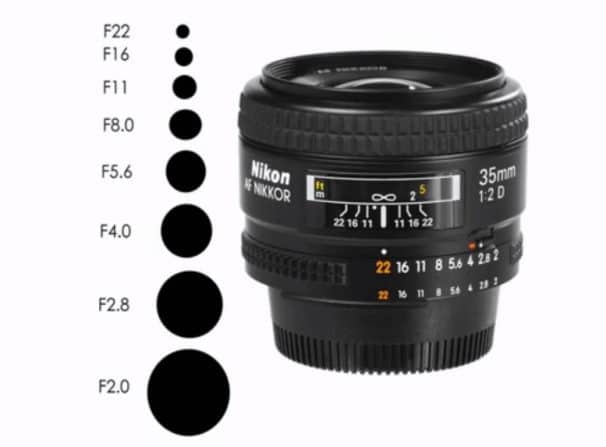
The depth of field is a concept that is directly related with aperture. Apart from controlling the amount of light that enters the camera, aperture also controls how much of a scene would be in focus.
- In simple words, the larger the aperture (opening of the hole), less is the extent of the image that will be in focus. In other words, large aperture suggests a shallow depth of field.
- On the other hand, the smaller the aperture, larger will be the extent of the frame that is in focus. In other words, a smaller aperture produces a larger depth of field.
Related Post: Large Aperture vs. Small Aperture (Image Samples)
Your ability to control the aperture manually or otherwise throws open the door for hundreds of creative applications with it. As you can imagine, one of the creative ways to shoot is by controlling the depth of field.
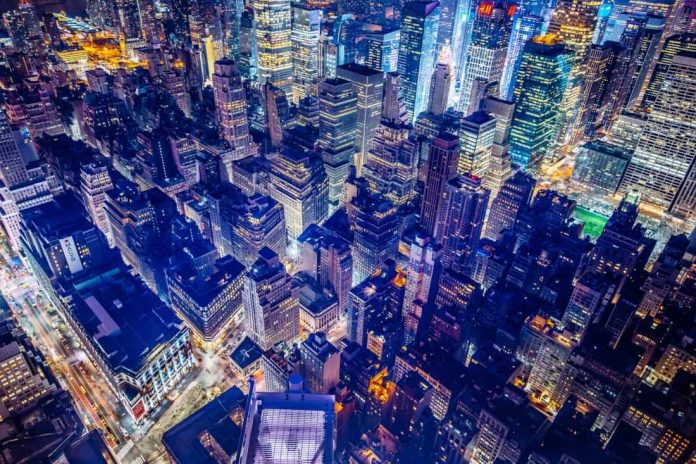
For example, when you are shooting landscapes, or cityscapes, or seascapes or architecture or group shots. You can stop down the lens to ensure it brings in large areas of the frame in focus.
On the other hand, when shooting something like a flower, or portrait or newborns or anything where you want to melt the background (and the foreground), you must shoot with a large aperture and in the process create a small depth of field.
Shutter Speed
Shutter speed is the second of the three elements that make up the exposure triangle. Shutter speed denotes the length of time for which the camera shutter remains open. Therefore, it suggests how long the camera is likely to receive light in a given situation.
Of course, this length of time is controllable. In Auto mode, as well as Aperture priority mode, shutter speed is controlled by the camera automatically, in reference to the aperture that was dialed in or the type of scene that is in front of the camera. In manual mode, the photographer has to dial in the shutter speed by hand.
Shutter speed is expressed in fractions of a second.
- 1/30, 1/60, 1/120, 1/250 and so on. From 1/60 to 1/120 shutter speed quickens up by 1/60 of a second. Precisely, the amount of light halves.
- If you move the other way, i.e. increase the shutter speed to 1/30, shutter speed actually slows down. The amount of light that enters the camera doubles.
We continuously refer to this as shutter speed though sometimes it can be a bit counter-intuitive. Shutter speed can be several seconds or even minutes long. You can drag the shutter for as long as you want to by using external tools. You will need a remote trigger and must have Bulb Mode on your camera to allow you to drag the shutter for long durations.
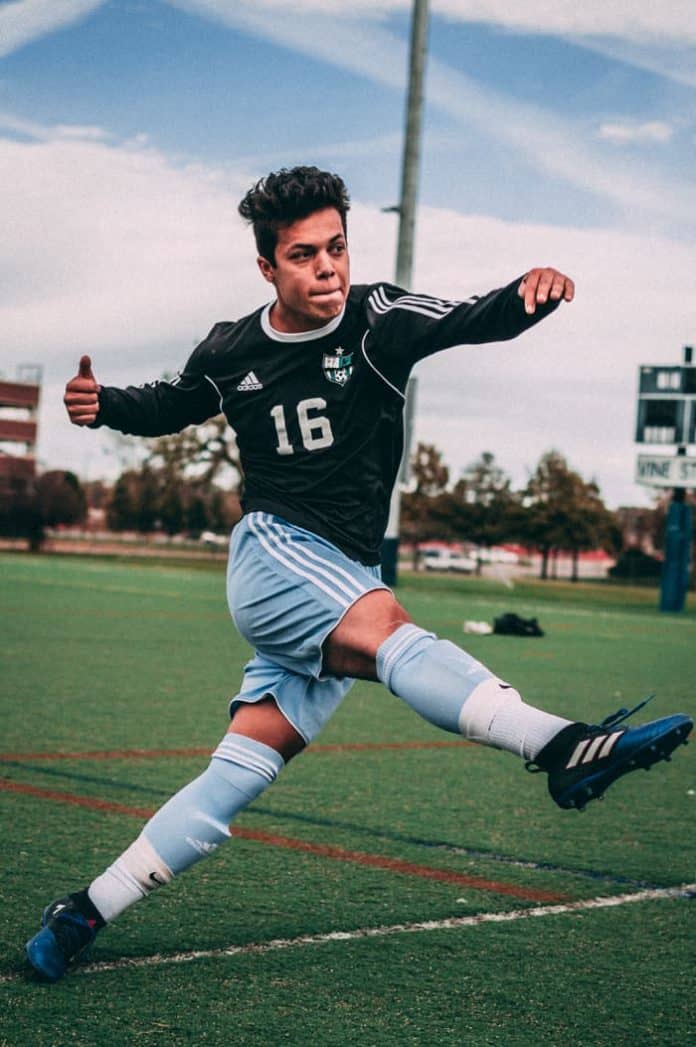
Creative Applications – Freezing a moment
One of the many uses of shutter speed is to freeze movement. Such as a bird in mid-flight, a striker about to drive the ball past the goalie, or a cyclist zooming past the spectators at the Tour de France. It can also be used when paired with a camera with a sufficiently fast shutter speed to capture elements such as a bursting balloon or a bullet hitting a wooden board or a glass pane shattering captured at the exact moment of impact.
Normally, the limits of mechanical shutter do not allow such high-speed action to be recorded properly. You need additional elements such as a laser trigger and external lights to be able to record something as fast. More on that some other time.
Shutter Speed and Motion Blur
Just as you use shutter speed to freeze motion, you can also use shutter speed to capture motion blur. You drag the shutter in order to make this possible. In other words by keeping the shutter curtain open for a longer duration.
Using a Remote Trigger
I referred to using a really long shutter speed above. It is all about dragging the shutter for minutes and even hours. Normally, the camera does not have a built-in preset to choose such a long shutter speed. You will have to switch to the Bulb Mode and then press and hold the shutter release button.
Now, that can be a really difficult thing to do e.g., when you are shooting star trails etc. The best option would be to use an external shutter release trigger.
Exposure and the Exposure Triangle
Incidentally, all of these three elements are related to exposure. Except for ISO. ISO does not influence the quantity of light that gets into the camera. What it is related to is what happens afterward. Despite this, it is known as ISO – aperture – shutter speed triangle.
The other two are complementary and share an inverse relationship with each other. Let’s elaborate this in further detail. But first a word on exposure itself.
Exposure
Exposure is nothing but the quantity of light that your camera captures using a particular combination of shutter speed and aperture.
It is a product of the aperture and the shutter speed that you have set on your camera or the camera has dialed in on its own.
Exposure denotes how bright or dark your images would be. When the image is too bright we say the image is over-exposed. On the other hand, when the image is too dark we say it is under-exposed.
At times, though, we need the exposure to be actually bright, quite deliberately. At other times we need the exposure to be darker. Again, this is purely by choice and it is completely at the discretion of the photographer. As a general rule, however, you want your pictures to be properly exposed. Neither too bright and neither too dark.
The Relationship Between Aperture and Shutter Speed
Earlier I mentioned that Aperture and Shutter Speed has an inverse relationship. There is a reason for that. The reason is the size of the aperture and the length of time for which the shutter remains open both determine how much light is captured.
That means theoretically you can alter either of the two to balance an exposure.
In practical situations, however, you are limited by the kind of scene you are trying to capture.
- If you are shooting landscapes you have to use a small aperture. That means you will need to drag the shutter speed in order to balance the exposure.
- On the other hand, if you are shooting portraits, you will likely use a wide enough aperture and therefore speed up the shutter to compensate.
At no time can you open up both the aperture and drag the shutter or do the exact opposite with both options. That said, if you open up the aperture you will have to speed up the shutter to compensate. Vice versa when you drag the shutter you will have to stop down the aperture to ensure that the camera is able to compensate for the lack of light.
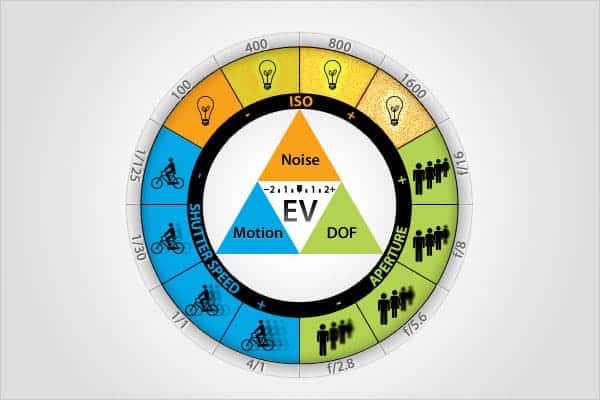
To Recap the Aperture Priority & Shutter Speed Priority Modes:
- If you are taking photos in the aperture priority mode the shutter speed will automatically adjust to let more/less light in.
- And if you are shooting in the shutter speed priority mode the aperture will adjust. Suppose you keep the ISO unchanged, the shutter speed/aperture combination will always remain the same.
Let’s Do Some Basic Exposure Triangle Workout!
Aperture Priority Mode
- Shoot some photographs with a low aperture value (=big aperture “window”, more light), e.g. at f/1.4 or f/2.8. This mode is ideal for portraits, indoors and night scenes.

- Shoot some photographs with a high aperture value (less light, smaller “window”), which is ideal for landscape photography and wide depth of field (more sharpness), e.g. f/22.
Shutter Speed Priority
- Set a fast shutter speed to freeze the moment (e.g. 1/1000 second).
- At night, you may have to select a longer shutter speed (e.g. a second or two) to capture enough light.
Related Post: Example Photos of Low and High Aperture
Change the ISO
- See how a high ISO affects your image, e.g. set the ISO to 6,400.
- Then, make a photo at low ISO e.g. 50 and see the difference.