Editor’s Key Takeaways: Unlock Dynamic Photos with the Golden Ratio

In the blog post, “Golden Ratio in Photography,” readers are introduced to the concept of the golden ratio and its application in composing visually appealing images. The article delves into several key aspects:
- What Is the Golden Ratio? – The golden ratio, approximately 1.618, is prevalent in nature and art, appearing in patterns like flower petal arrangements and animal body proportions. It can also be represented as a spiral seen in phenomena like nautilus shells.
- The Golden Ratio as a Compositional Tool – Photographers can use the golden ratio to structure their compositions. It adds a balance of harmony and dynamism to images.
- The Spiral and the Grid – These are specific formats of the golden ratio used in photography. The spiral involves increasing rectangular shapes that align with the golden ratio, while the grid applies these principles in a more straightforward layout.
- Golden Ratio vs. Rule of Thirds and Golden Ratio vs. Golden Triangle – Comparisons between the golden ratio and other common composition techniques like the rule of thirds and the golden triangle reveal the unique benefits of using the golden ratio, especially for adding depth and movement.
- When to Use the Golden Ratio – Recommendations on when to implement this technique to enhance photographic compositions.
The article provides photographers with valuable insights on utilizing the golden ratio to create balanced and dynamic photographs.
Introduction
If you’re trying to wrap your head around photographic composition, then you’ve probably come across plenty of popular tricks and techniques, such as the rule of thirds, the rule of odds, leading lines, and the golden triangle.
But while all of these compositional methods can certainly help you arrange image elements for beautiful effects, one technique that often gets overlooked is the golden ratio. It’s a great way to create harmonious compositions that also feature a dash of dynamism, so if your compositions have been looking a little bland, then I highly recommend you give it a try!
In this article, I offer an in-depth exploration of the golden ratio in photography. I discuss what the ratio is, how it compares to other composition techniques, and how you can use it to produce stunning photos!
Golden Ratio in Photography:
What Is the Golden Ratio?
The golden ratio is a number that appears all over the place in both art and nature. Technically speaking, it’s 1.618. You often get this number by taking the ratio of two quantities in nature (i.e., by dividing one quantity by the other).
For instance, flower petal positions around a flower head often correspond to the golden ratio. And if you look at animal bodies, joints and limbs will often exist in an approximate golden ratio to one another.
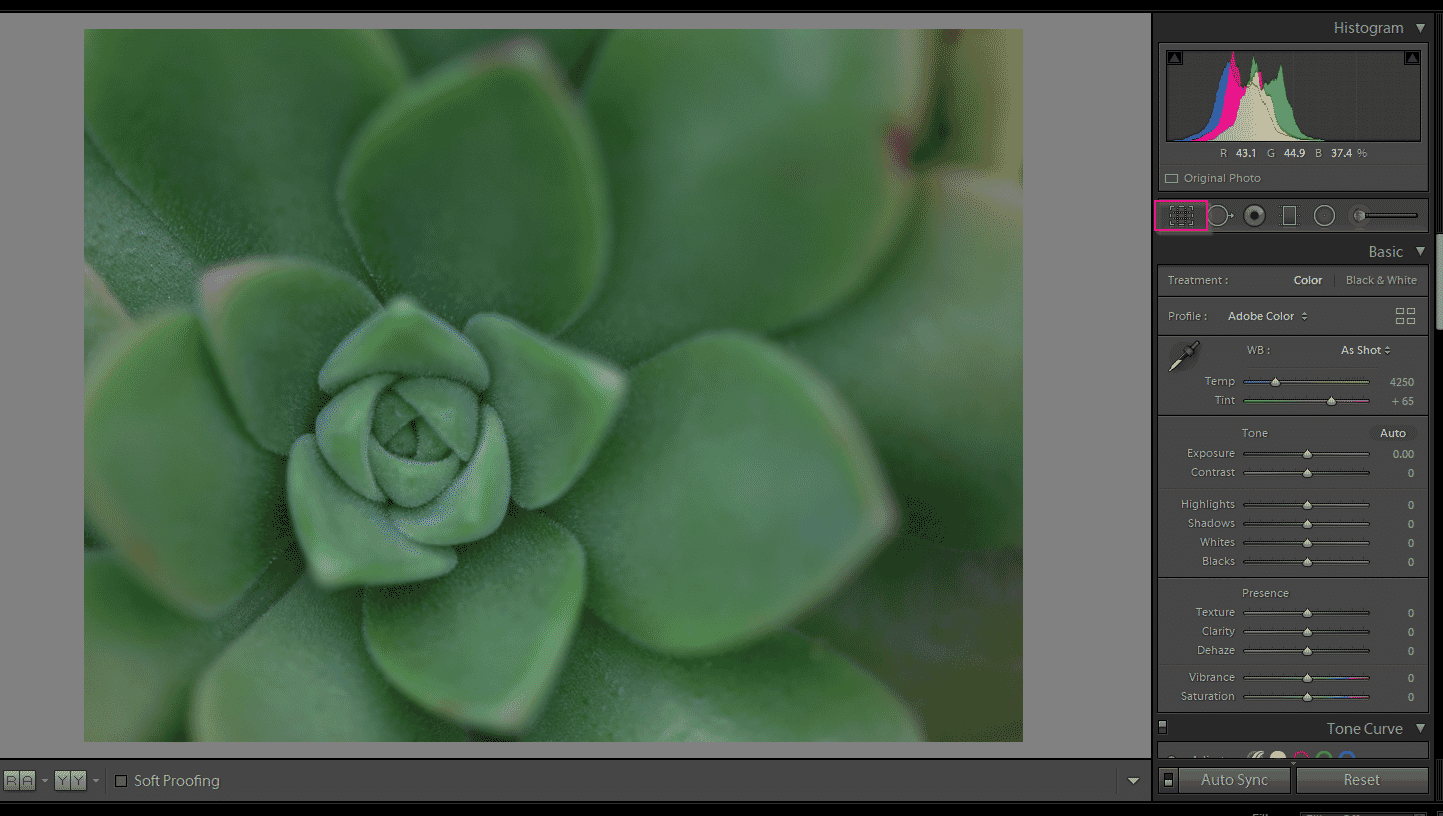
This ratio can also be expressed in a more complex way: As a spiral. The spiral starts with small rectangles in the center, and then increases in size until you get something that looks like this:
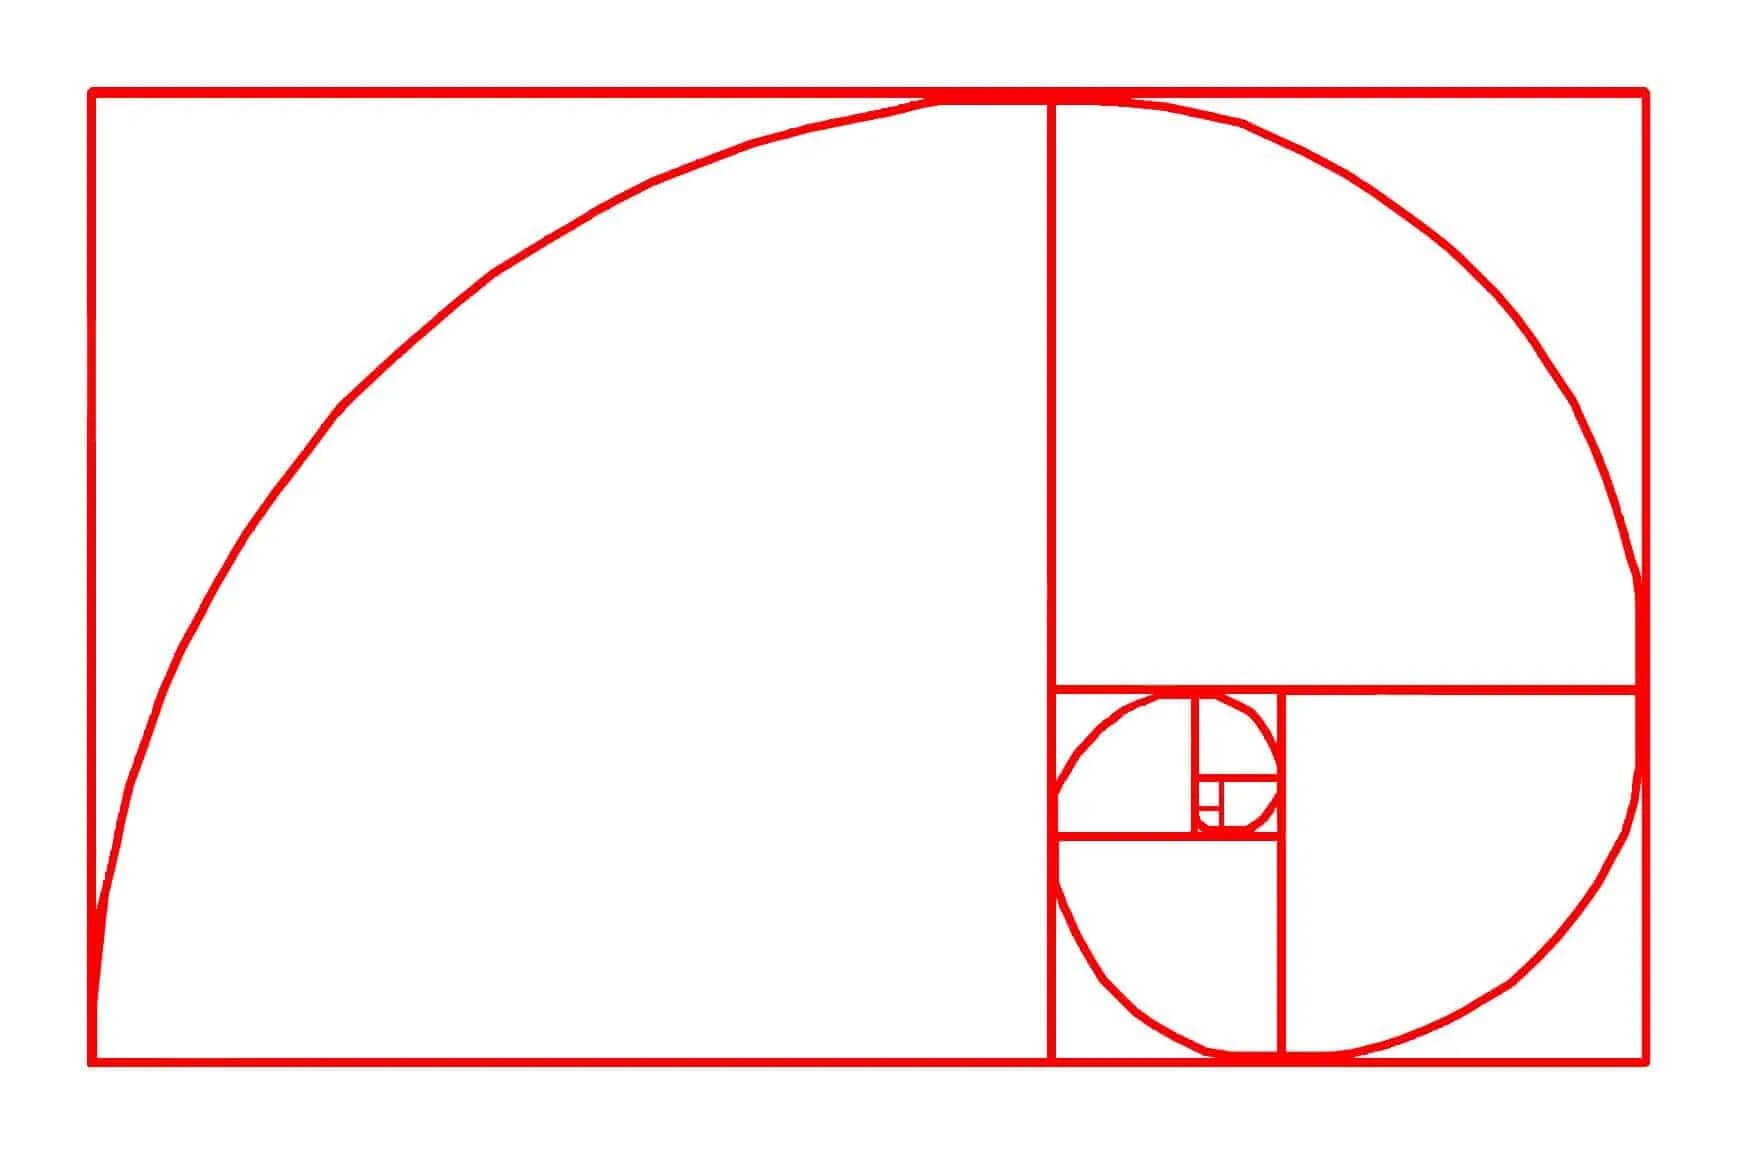
If you measure carefully, you’ll find that the rectangle sizes approximately fit the golden ratio in relation to one another.
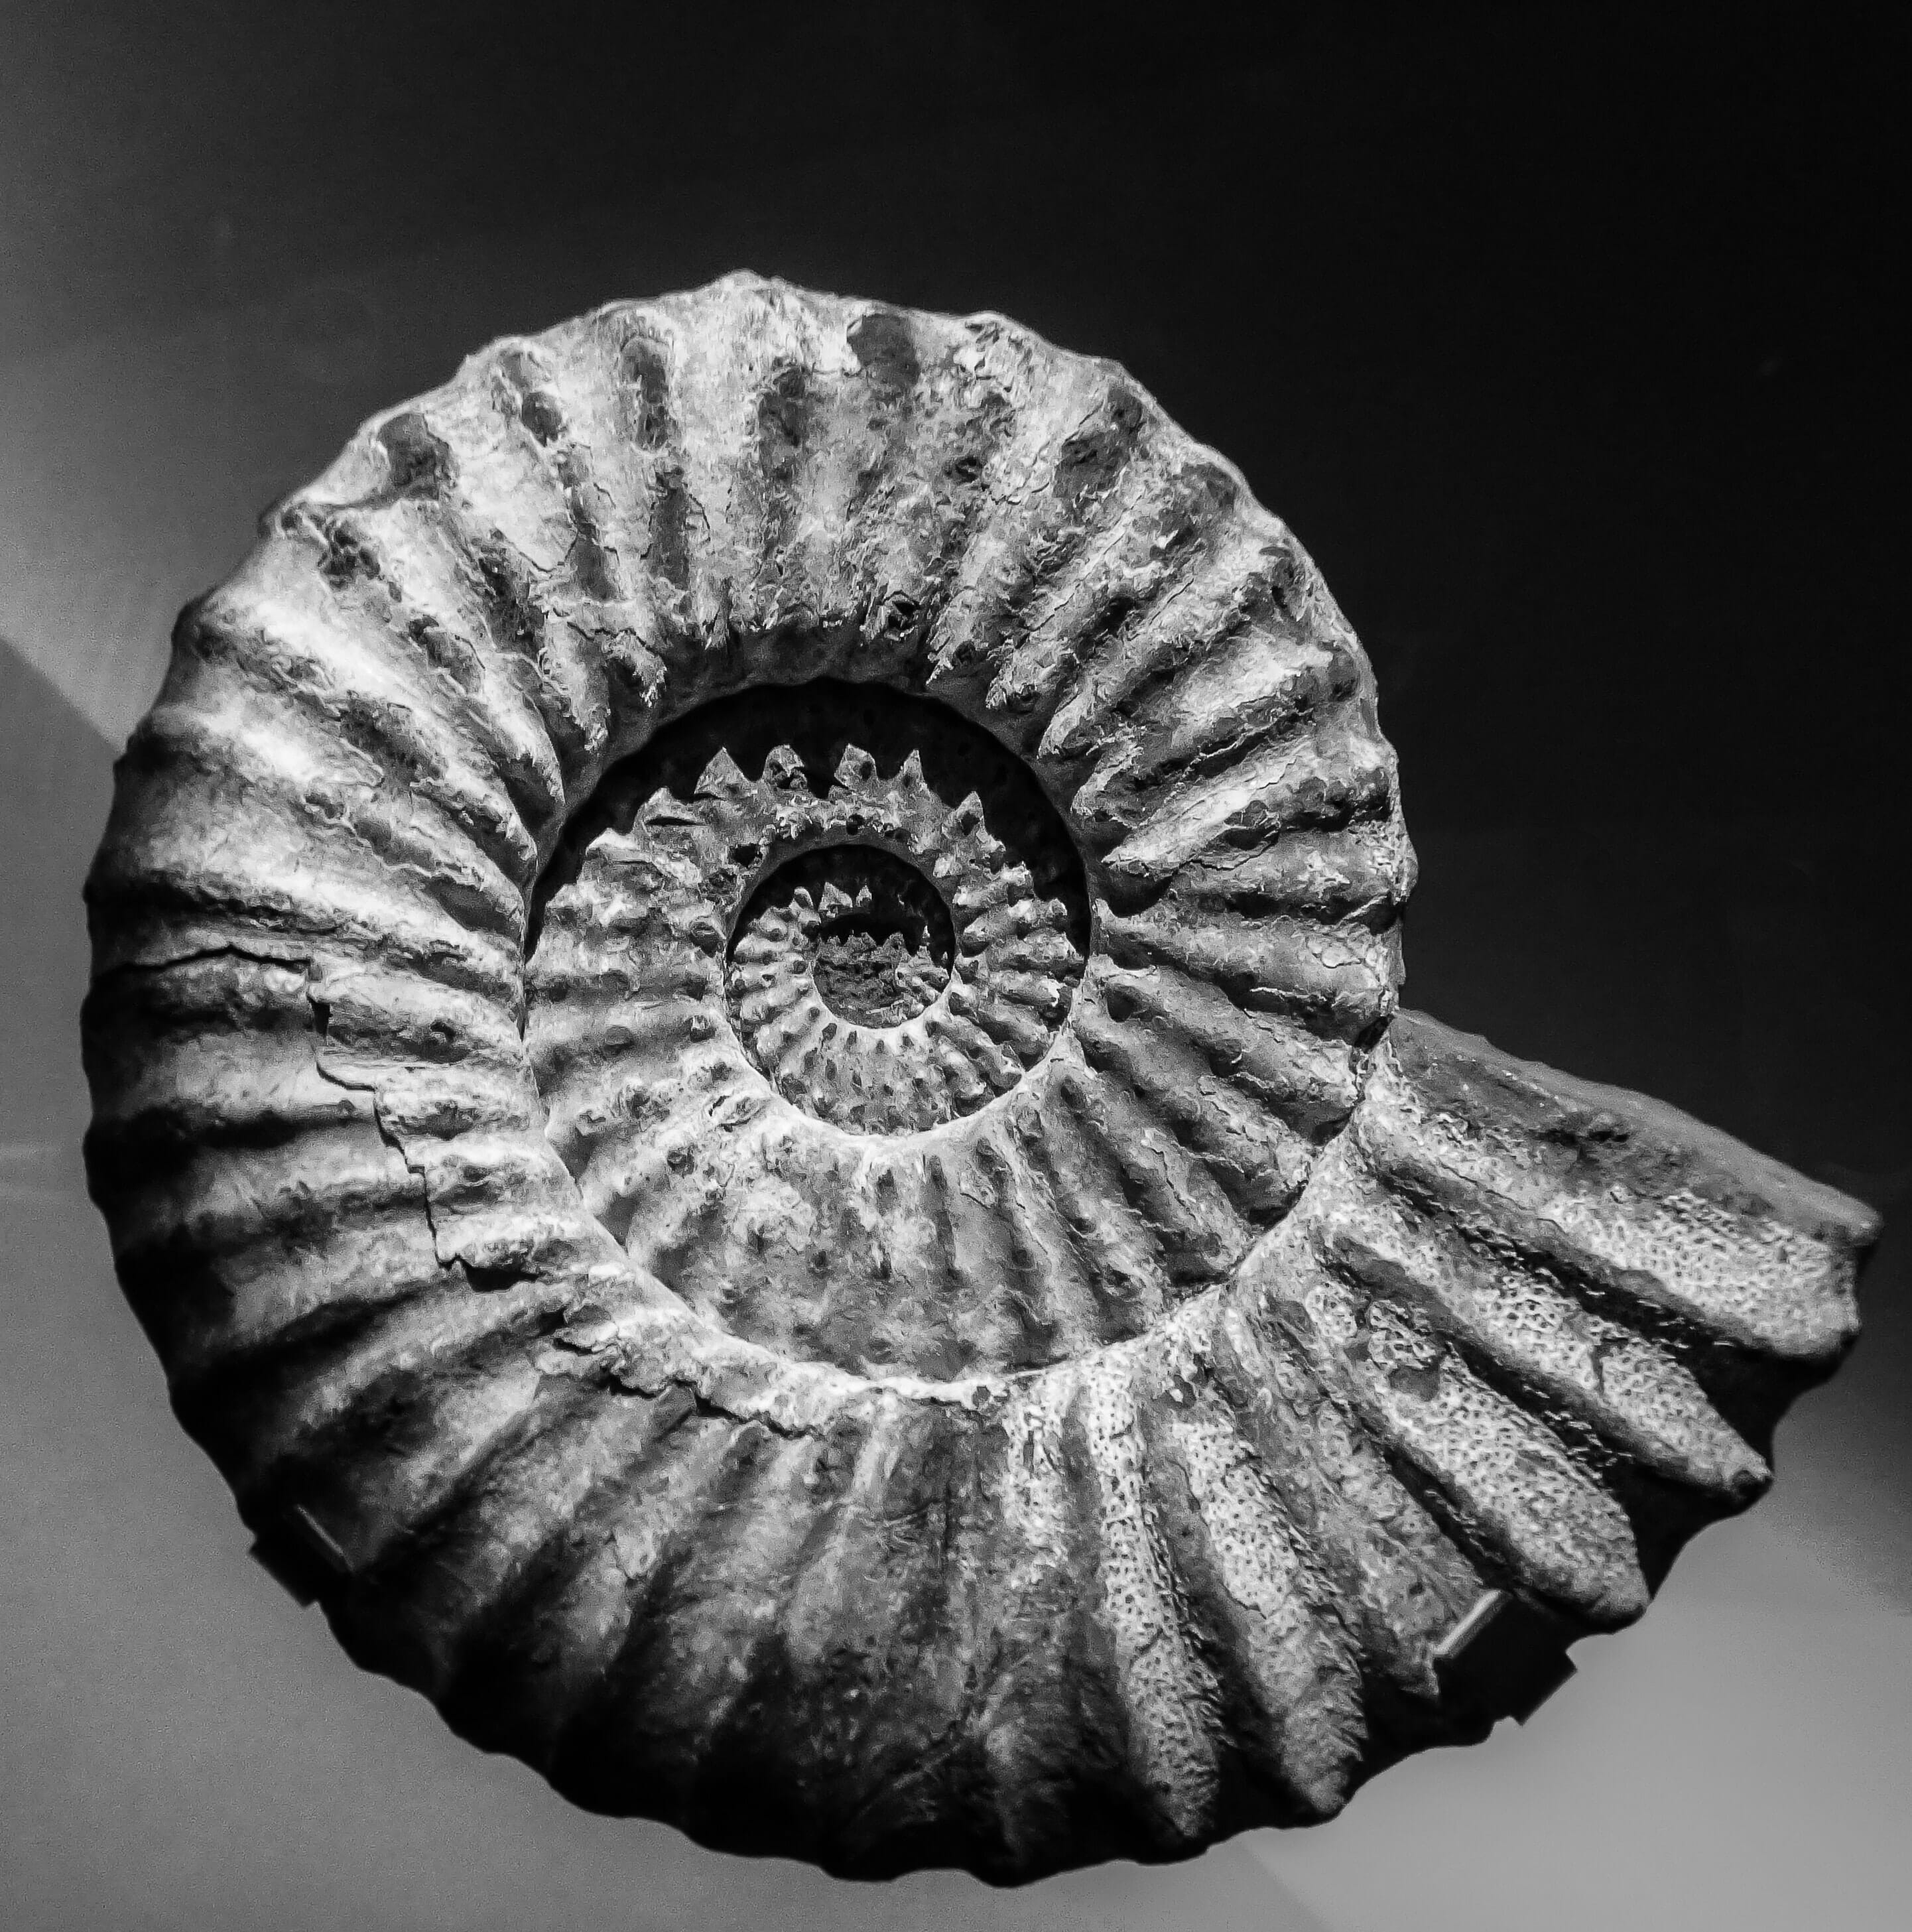
You can find these spirals in nature, too. Just look at the shell of a nautilus, which mirrors the spiral displayed above:
The Golden Ratio as a Compositional Tool
This ratio matters to photographers for one basic reason: It creates balanced, harmonious compositions. Now, there are two basic methods of using the golden ratio in photography:
- The spiral.
- And the grid.
The Spiral
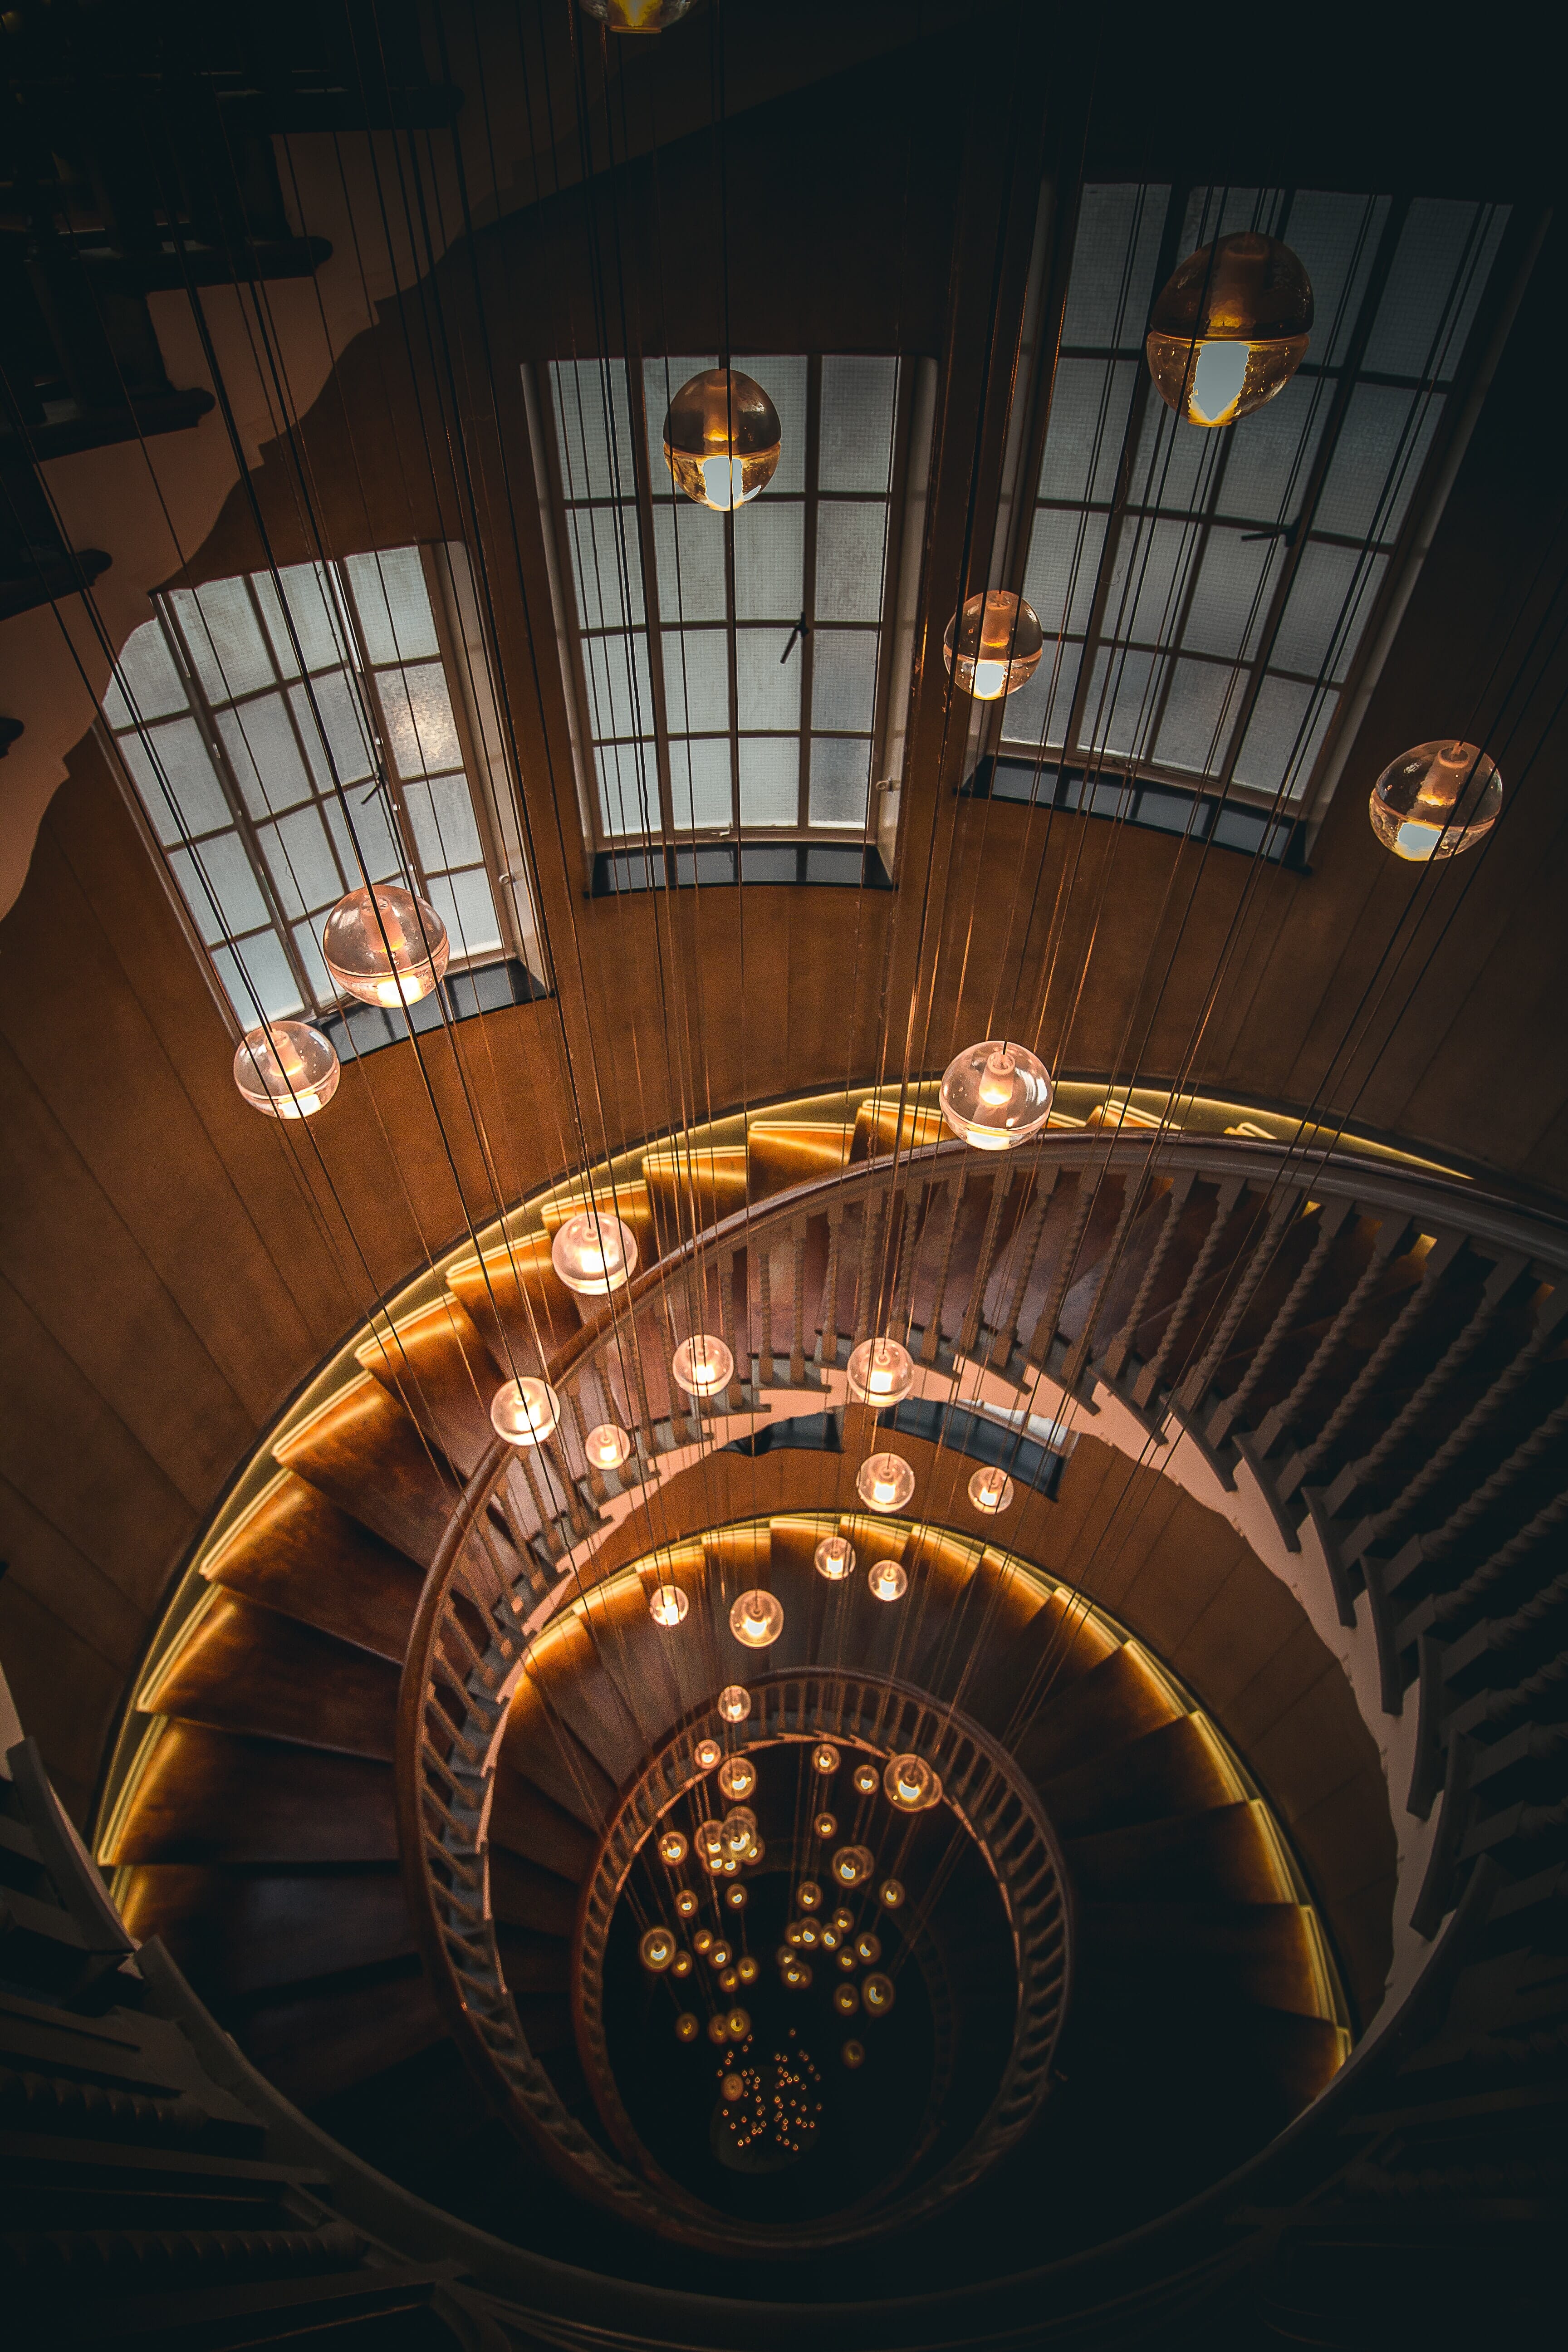
In the preceding section, I talked about how you can find golden ratio spirals in nature. (From now on, I’ll refer to these as golden spirals.)
These spirals are formed by rectangles that are 1.618 times the size of the preceding rectangle (roughly speaking). And if you take this spiral and imagine it while taking photos, you can end up with some very cool compositions.
First, you should try to superimpose a mental image of the golden spiral on the scene you’re photographing. Note that you can imagine the spiral in any orientation.
Then you should look around the scene and try to find a composition where the most interesting element sits at the center of the spiral. The rest of the elements should spiral outward so that they balance out the main point of interest while also drawing the eye from the edges to the spiral center.
Related Posts
That said, you don’t need a whole scene to conform perfectly to the spiral. It’s okay if you have some elements that are slightly out of line. Just try to keep the main elements aligned with the spiral, and you’ll be good to go.
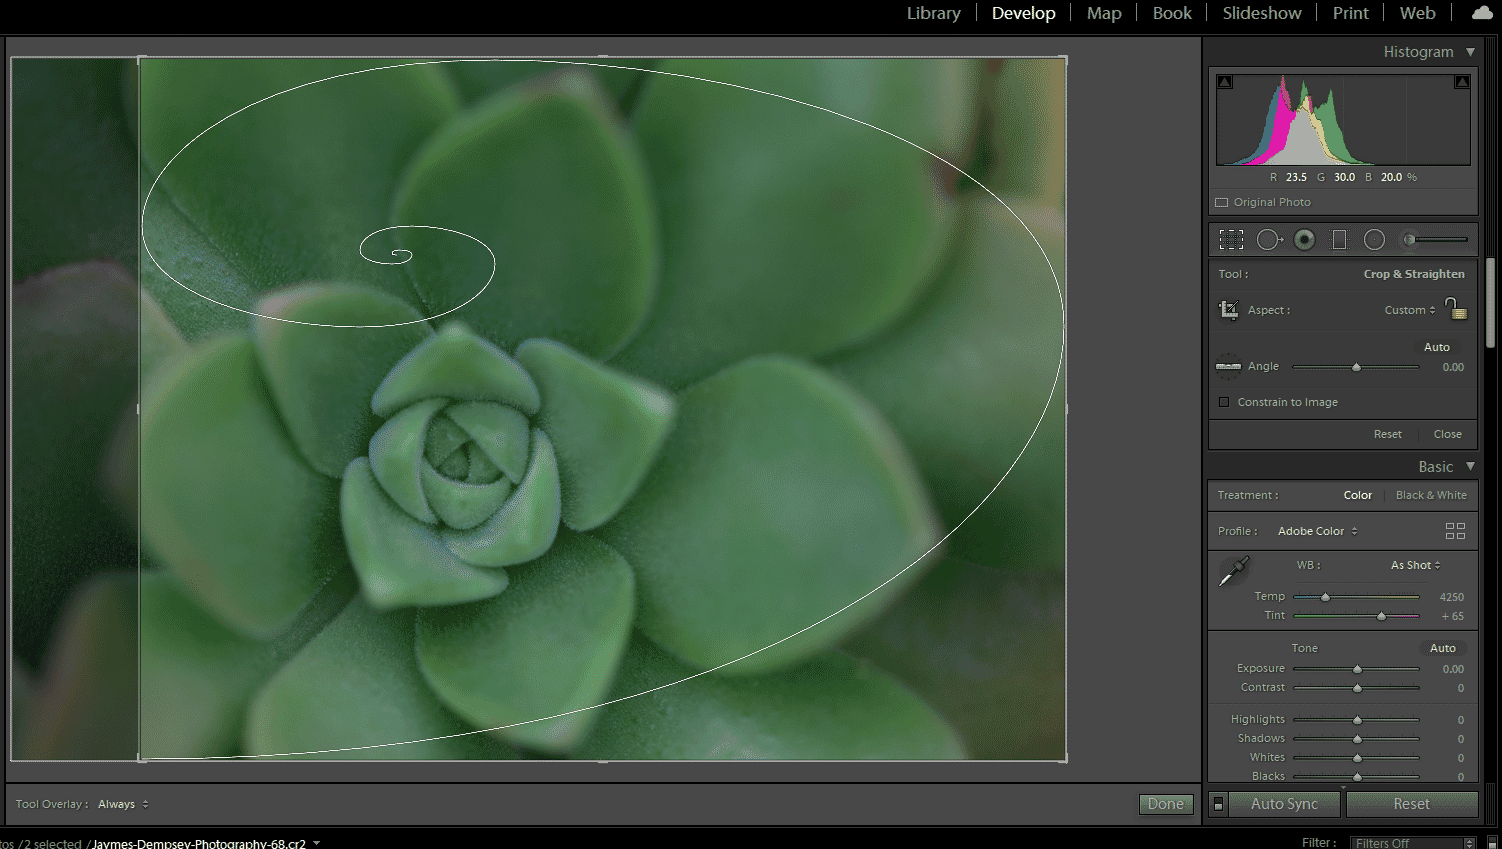
Also note that it’s often possible to crop your images to fit the golden spiral, even if you haven’t managed to create a spiraling composition while in the field. In fact, Lightroom offers a golden spiral overlay option so you can see how your compositions line up with the spiral and identify any areas you can improve.
All you have to do is tap on the Crop tool:
Then hit “O” to cycle through various overlay options. Eventually, you’ll come upon the golden spiral:
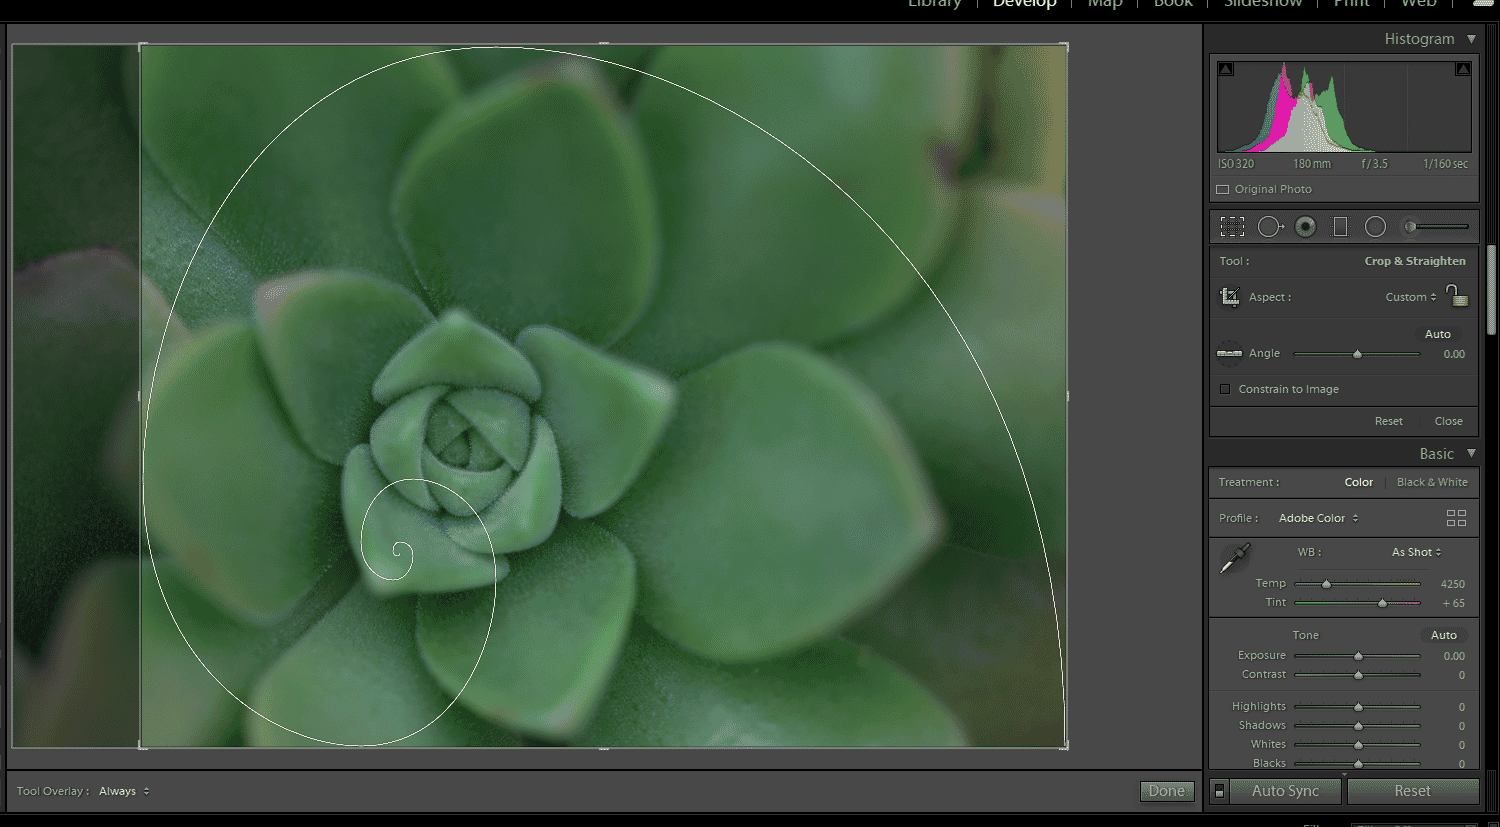
Even cooler, you can hit Shift+O, and Lightroom will change the orientation of the spiral. So you can have a spiral starting at the top left, the bottom right, and more!
The Grid
You may be familiar with the rule of thirds, which states that the best compositions have their main elements positioned a third of the way into the frame and comes with some handy gridlines.
Note that each gridline is exactly one-third of the way into the photo. The rule of thirds literally just divides the frame up into thirds, then recommends that you place elements at the points of division.
But the golden ratio grid (henceforth referred to as the golden grid) is slightly different. Instead of dividing a frame into perfect thirds, it divides the frame so it fits the golden ratio, like this:
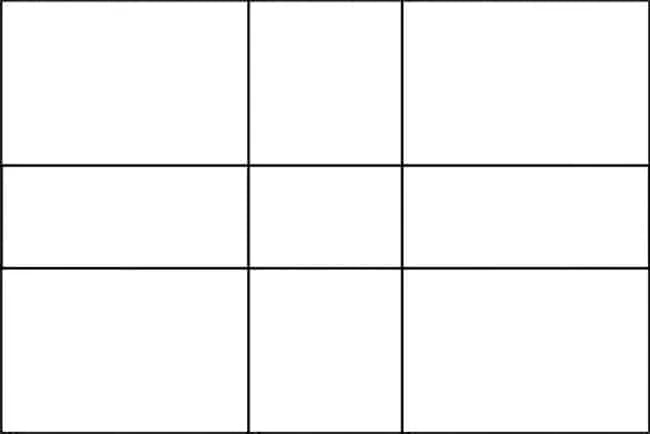
In fact, the divisions have a ratio of 1:0.618:1!
Note that, compared to the rule of thirds grid, the golden grid is compressed so that the intersections are closer to the center of the frame.
This will give your photos a different look. In fact, some photographers argue that the rule of thirds is just a way to simplify the golden ratio and that the golden grid actually looks a lot better than the rule of thirds.
So I recommend you test it out and see what you think! Try placing your main compositional elements along the golden grid. (To imagine the gridlines, just divide the scene into thirds and then compress the lines a bit.)
As with the golden spiral, you can sometimes crop to achieve the golden grid after the fact. Lightroom even includes this grid as one of its crop overlays, which is perfect for creating a careful golden ratio crop. And with Lightroom’s grids on hand, you can try both approaches and see which you prefer.
Also, one thing to note is that you can always start with the golden grid, then crop to a rule of thirds grid by taking off the edges of the frame. But it’s harder to start with the rule of thirds and crop to a golden grid. So just bear this in mind when you’re out shooting, especially if you want to test out different crops.
The Golden Ratio vs the Rule of Thirds
As I discussed above, the golden ratio can be used as the golden spiral or the golden grid. And while the golden spiral is obviously very different from the rule of thirds grid, the golden grid is quite similar, which leads to a key question: Which grid should you be using in your compositions?
Personally, I use the rule of thirds because it’s easier to envision. When I’m out in the field, I can instantly call up a rule of thirds grid in my mind, while the golden grid is more difficult to imagine. (Also, most cameras – including smartphone cameras – can display a rule of thirds overlay in the viewfinder or on the rear screen.)
Now, as I mentioned above, some photographers do argue that the golden grid is the more “correct” compositional guideline, while the rule of thirds is just a simplified version of that. But I don’t agree.
If you use the golden grid to compose your images, you’ll often end up with shots that look good. But they can sometimes be tight toward the middle because the intersection points are clustered around the center of the frame. Whereas the rule of thirds results in images that have a bit more breathing space.
In other words: There are times when the rule of thirds makes for a more pleasing composition than the golden grid, and there are times when the golden grid is better. Therefore, you definitely don’t want to discard the rule of thirds! Both have their place, and both are tools you can use to guide your compositions.
The Golden Ratio vs the Golden Triangle
The golden triangle is a lesser-known compositional guideline, but it’s still one that photographers (and other visual artists) need to be familiar with. It uses an overlay made of three lines (or four triangles):
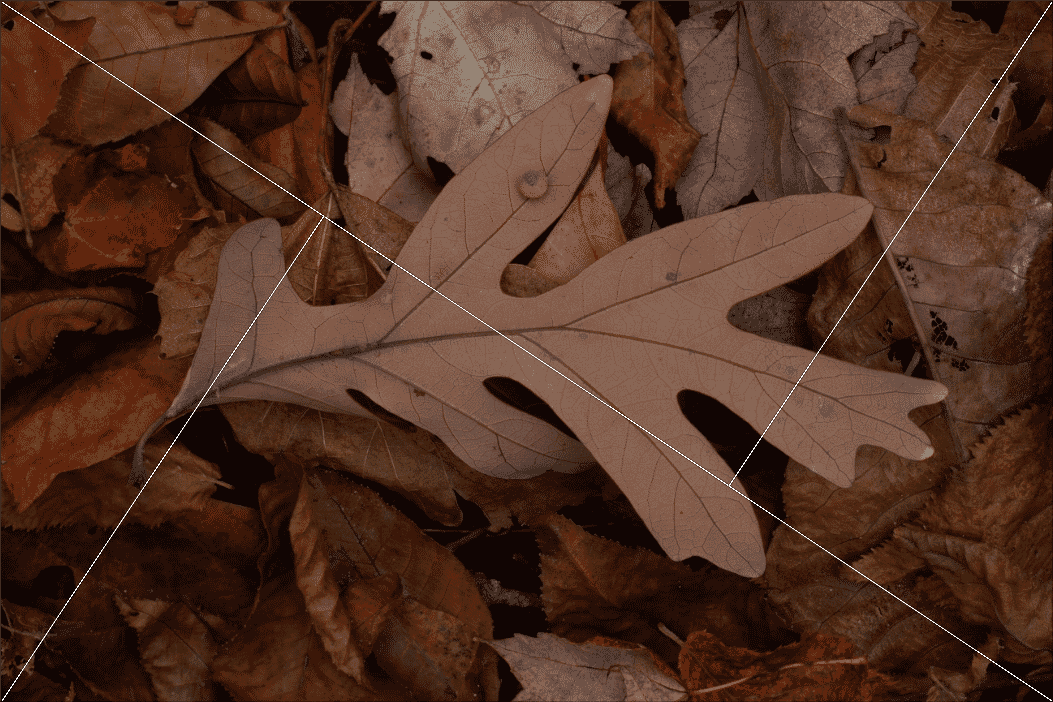
Now, the golden triangle works like the other overlays shared above: It guides you in the placement of key compositional elements. You can position lines along the triangle edges (i.e., the diagonals), and you can position your main subject at the intersection points on the grid or within the triangles themselves.
So should you use the golden triangle in your work? Or should you use the golden grid? It really all depends on the scene.
Sometimes, you’ll be confronted by triangular items, and the golden triangle will just make sense. Other times, you’ll want to stick with the golden grid because it nicely overlays your compositional elements.
And there will also be times when you can use both the golden triangle and the golden grid. For instance, the golden triangle grid can help you position a nice leading line or two, while the golden ratio can help you position your horizon.
When Should You Use This Technique?
You can use the golden ratio in pretty much any genre of photography, especially because it offers two useful compositional overlays (i.e., the grid and the spiral).
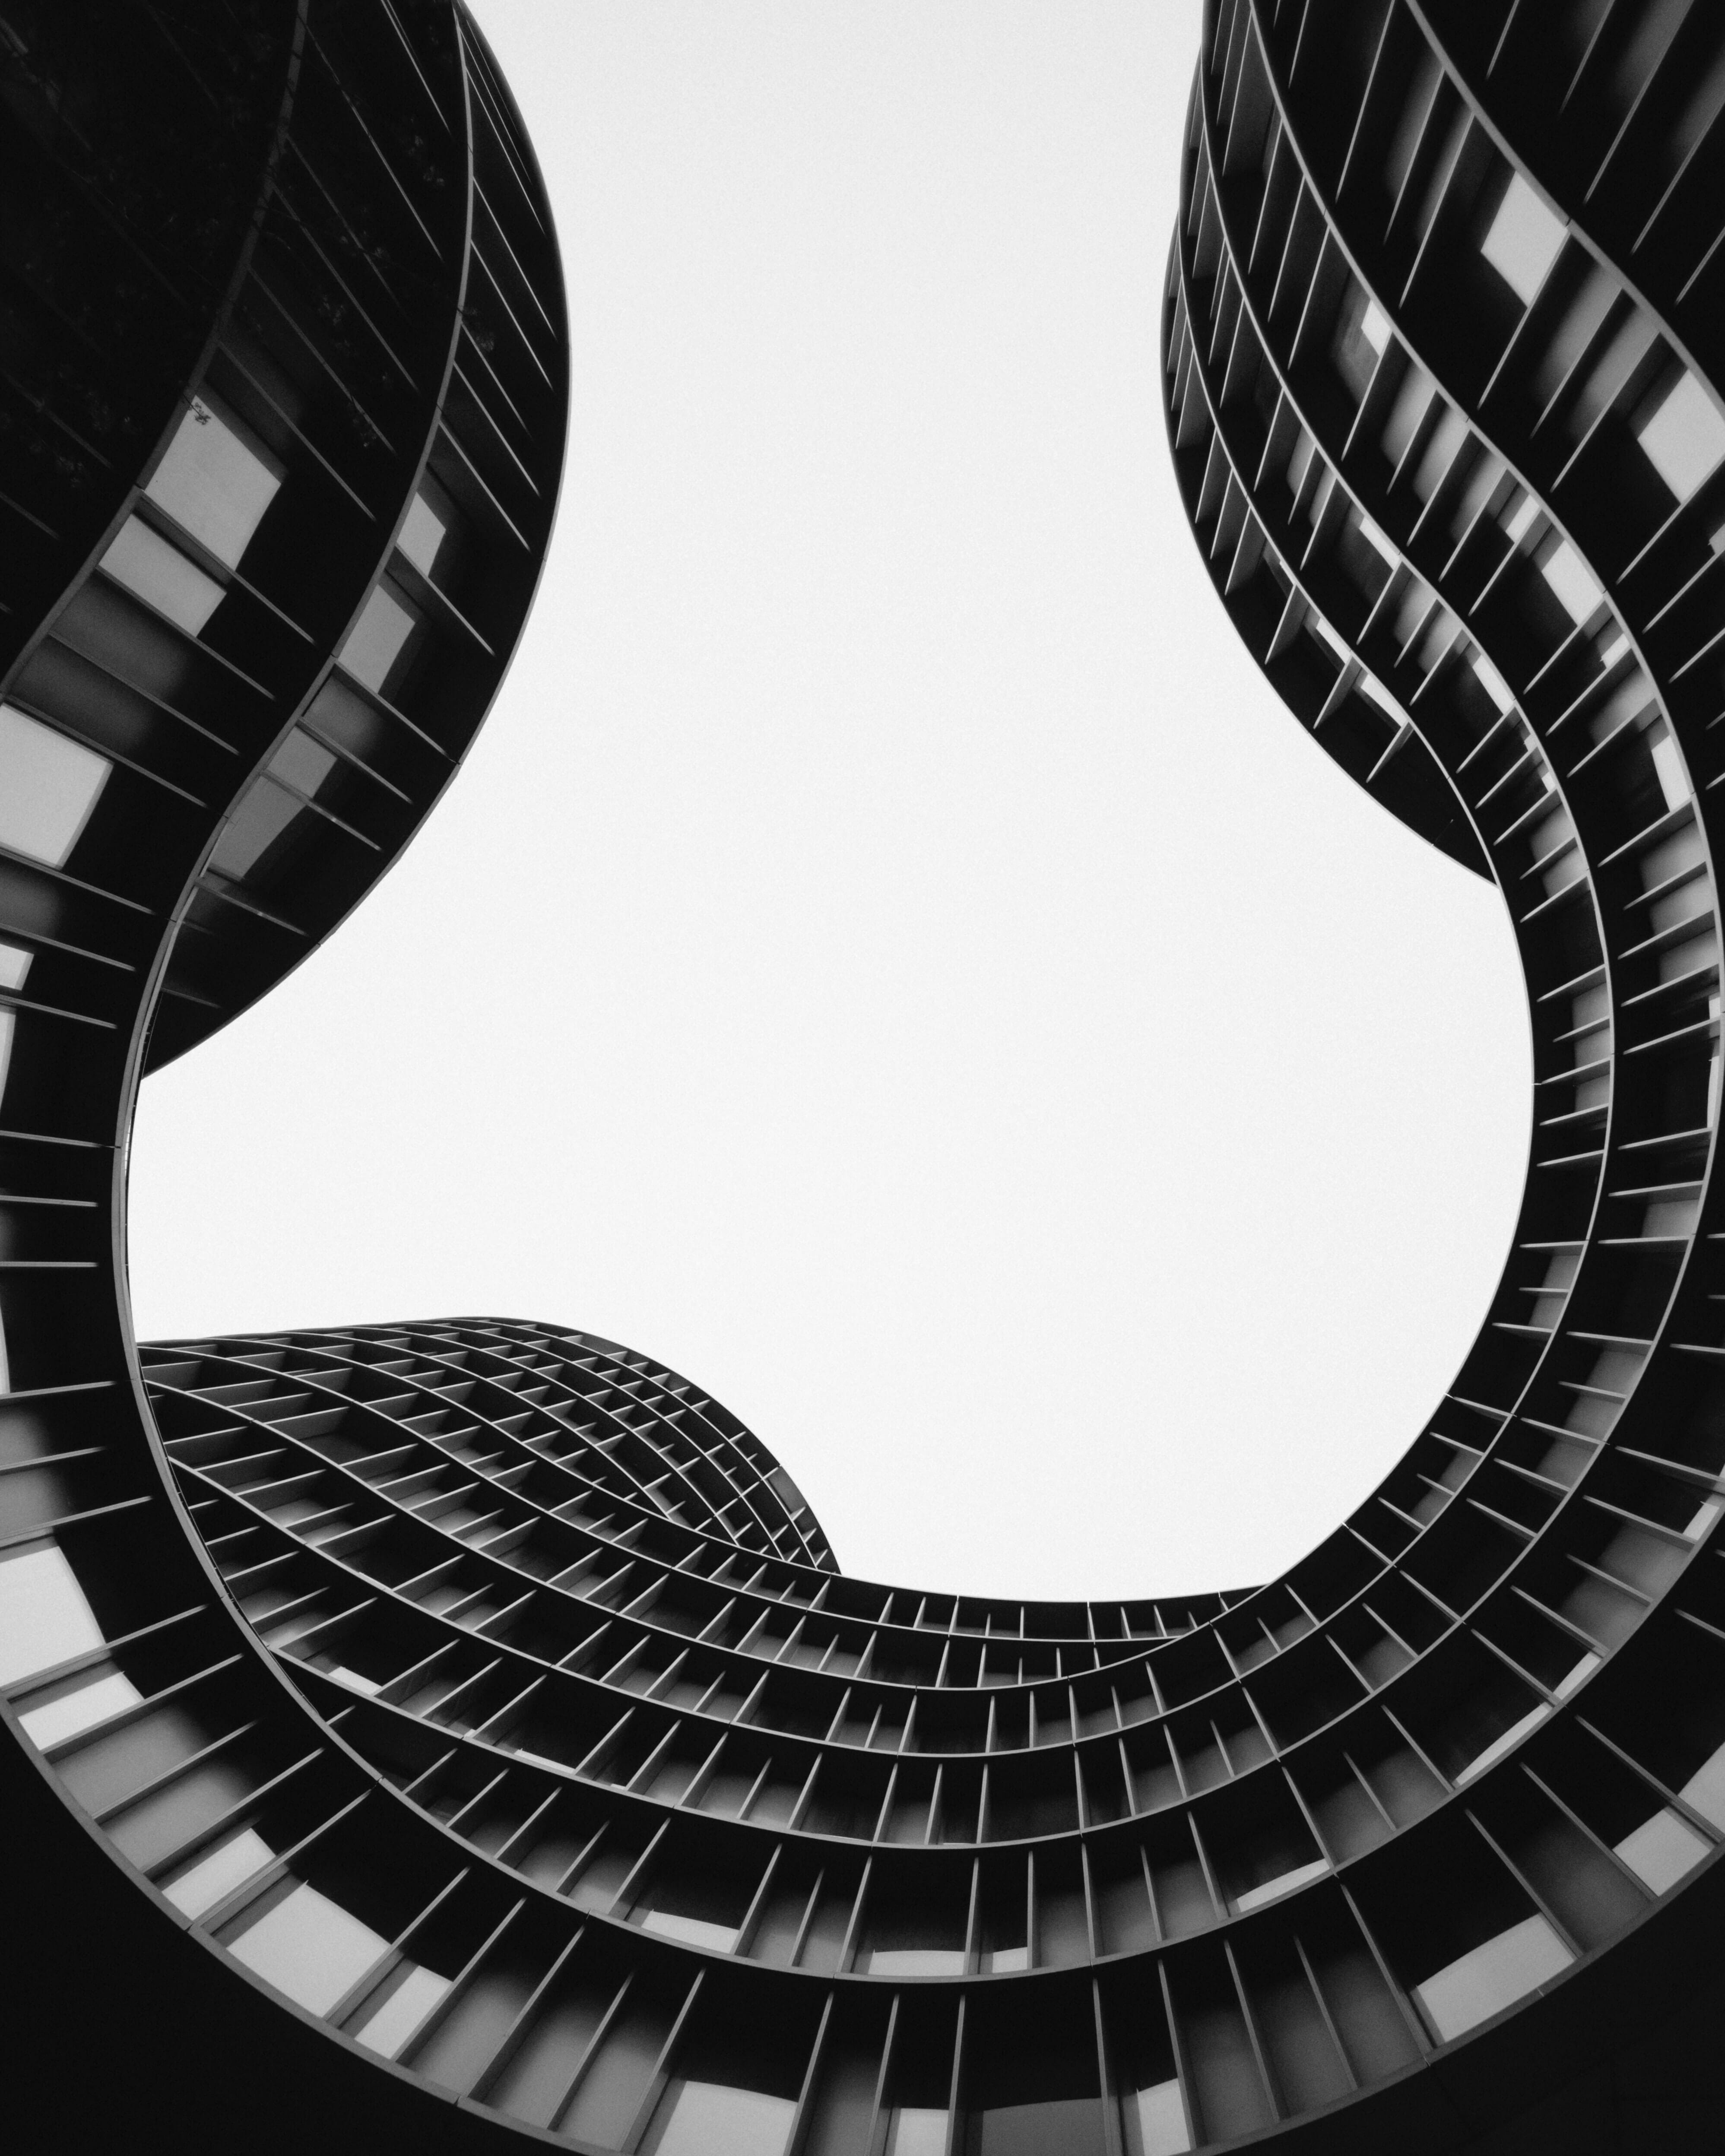
For instance, if you’re a landscape photographer, you can use the golden spiral to position your main subject with clouds spiraling outward. Alternatively, you can use the golden grid to position your horizon line as well as any vertical items (such as trees).
If you’re a portrait photographer, you can position the subject’s eyes along a golden gridline. Or you can position the subject at the center of the golden spiral, while other compositional elements (e.g., an archway) follow the spiral outward.
Related Posts
If you’re a street photographer, you’ll often be able to position your subject within the golden spiral while carefully positioning other curved elements throughout the rest of the frame. And you’ll also often have the opportunity to position buildings and horizon lines along the golden gridlines (for impactful results!).
Go Capture Harmonious Compositions!
The golden ratio is a great way to enhance your images – especially if you’re interested in really taking your compositions to the next level.
So I recommend you spend a bit of time looking at the golden grid and the golden spiral. Commit them to memory. And then, when you’re out shooting, make sure you use them!
The Golden Ratio FAQ
What is the golden ratio?
Technically speaking, the golden ratio is just the number 1.618. However, you can use the ratio to create compelling photographic compositions.
Is the golden ratio better than the rule of thirds?
That’s up for debate! Some photographers prefer the golden ratio over the rule of thirds. But I’m a fan of the rule of thirds because it’s a) easier to remember in the field and b) able to produce more spacious compositions.
What is the golden spiral?
The golden spiral is a way to visualize the golden ratio. It’s a spiral that has golden ratio dimensions.