
- Macro photography in 2026 needs a settings strategy by subject — not a single recipe. Tripod flowers, handheld insects, and product shots each demand different aperture/shutter/ISO combinations. Use the settings table in this guide as a starting point and adjust by stop.
- Focus stacking is the modern sharpness solution at 1:1 magnification. Razor-thin depth of field at macro distances makes a single-shot sharp result nearly impossible — stacking 5–20 frames in software is how working macro photographers now hit clean front-to-back sharpness.
- AI subject-detection autofocus is finally good enough for macro on flagship bodies (Sony a1 II, Canon R5 III, Nikon Z9). Insect-eye recognition and continuous tracking work where they didn’t two years ago, but manual focus still wins for static subjects on a tripod.
- Modern IBIS changes the shutter-speed math. With 7–8 stops of stabilization, handheld macro at 1/60s is now reasonable at 1:2 magnification — but the old reciprocal rule (1/focal-length minimum) still applies for live subjects that move on their own.
- Phones can do real macro work now with the right clip-on. Moment’s 75mm Macro Lens + a Pro app gives an iPhone genuinely usable close-up reach. Not a DSLR replacement, but a viable everyday-carry option.
Macro photography rewards exact technique. At 1:1 magnification, depth of field shrinks to millimeters, every breath shakes the frame, and the wrong autofocus mode turns a sharp insect eye into a soft blob. The settings recipe in this guide hits the modern macro workflow — subject-specific exposure tables, focus stacking as the sharpness default, and the new generation of AI autofocus that actually works for moving subjects.
This is a settings-first guide. Each section gives a defendable starting point with the why behind it, plus the specific adjustment to make when conditions change. Read top-to-bottom for a full mental model, or jump to the settings table for a fast cheat sheet.
Use Aperture Priority or Manual Mode
Macro is an aperture-driven discipline. Depth of field is the variable that defines every other choice — once aperture is set, shutter speed and ISO follow. Two camera modes give explicit aperture control without forcing exposure decisions for shots that don’t need them.
- Aperture Priority (A or Av) — the default for most macro work. The photographer chooses the aperture; the camera handles shutter speed. Useful when light is changing (early-morning insect work, dappled sun on flowers) and the priority is consistent depth of field across frames.
- Manual (M) — required when the lighting is mixed or controlled. Tabletop product macro under continuous LED panels, ring-flash insect work, and any setup with off-camera strobes all need manual to fix shutter speed at the sync ceiling (typically 1/200s to 1/250s).
Avoid Program mode and full Auto for macro. Both will collapse depth of field at the worst possible moment by pushing aperture wider to grab more light — exactly the wrong choice when the subject is 3cm away and DoF is already paper-thin.
Choose Aperture by Magnification, Not Subject Type
The textbook macro advice — “use a wide aperture for shallow depth of field” — only works at moderate magnification. As the lens approaches 1:1, depth of field shrinks fast and the open-aperture math stops working.
The practical rule at 1:1 macro: depth of field at f/2.8 is roughly 0.5mm. At f/8 it grows to about 1.5mm. At f/16 it reaches roughly 3mm — still razor-thin. Stopping down further hits diffraction softness on most sensors past f/11–f/13. Three working defaults:
- 1:4 to 1:2 magnification (general close-up) — f/4 to f/5.6. Enough background separation for portrait-style bokeh while keeping the subject’s plane sharp.
- 1:2 to 1:1 magnification (true macro) — f/8 to f/11. The sweet spot between depth of field and diffraction softness on full-frame and APS-C sensors.
- Greater than 1:1 (super-macro) — f/8 (no smaller) plus focus stacking. Single-shot sharp at 2:1+ magnification is essentially impossible. See the focus stacking section below.
Shutter Speed in the IBIS Era
The old reciprocal rule for macro — “1 / (focal length × magnification factor)” — was designed for unstabilized bodies. Modern in-body image stabilization changes the math.
- Stabilized body (IBIS, 5+ stops): 100mm macro at 1:2 magnification — 1/60s handheld is reasonable, 1/30s is achievable with good technique. Without IBIS, the old reciprocal rule called for 1/200s minimum at this focal length and magnification.
- Subject-motion override — IBIS only fights camera shake, not subject movement. An insect’s antennae, a flower in a breeze, a hand-held subject under controlled studio light: shoot 1/250s or faster regardless of how good the stabilization is.
- Wind multiplier — outdoor macro on a flower in any moving air needs 1/500s minimum. The subject moves more than the camera at typical macro distances.
For modern Sony Alpha 1 II (8.5 stops), Canon R5 Mark III (8 stops), and Nikon Z9 (6 stops) bodies, handheld macro at 1:2 is genuinely sharp with technique. The camera-shake-vs-subject-motion framework from general motion photography applies here directly — IBIS handles camera shake, fast shutter handles subject motion.
Use the Lowest Practical ISO
Macro work shows noise badly. The fine detail in petal veins, insect compound eyes, and product surfaces is exactly the texture that gets eaten by chroma noise. The base ISO on modern full-frame bodies (typically 100 or 64) is the working default.
Stay at ISO 100 whenever the aperture-shutter combination allows it. The pecking order when more light is needed:
- Add flash (ring flash or twin flash) — always the first move for insect or static-subject work indoors and within a few feet outdoors. Turns ISO 100 + f/11 + 1/200s into a routine exposure.
- Open the aperture by one stop (only acceptable if depth of field allows it).
- Drop shutter speed (only acceptable on a tripod with a still subject).
- Raise ISO. Modern flagships are usable to ISO 1600 with denoise; AI noise reduction (Topaz, DxO, Lightroom Denoise) extends that another 1–2 stops cleanly.
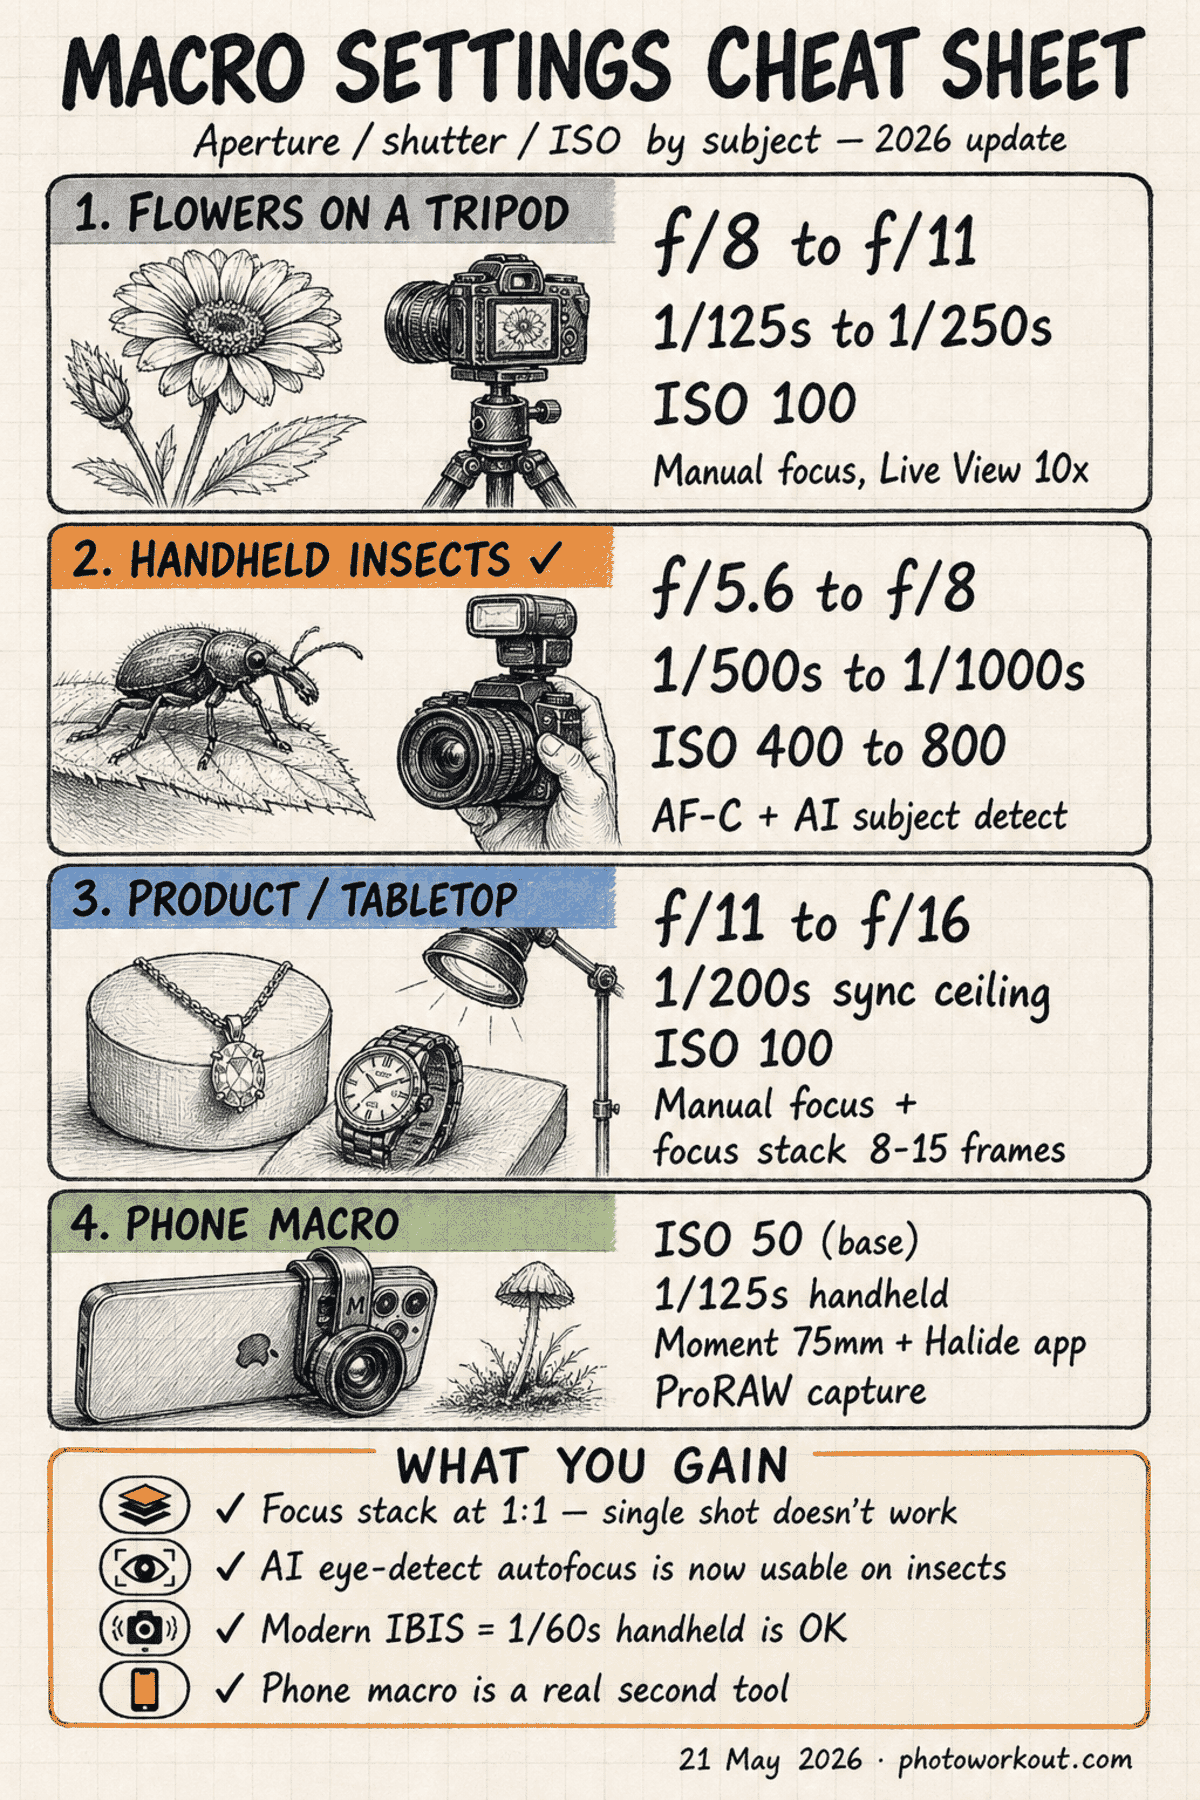
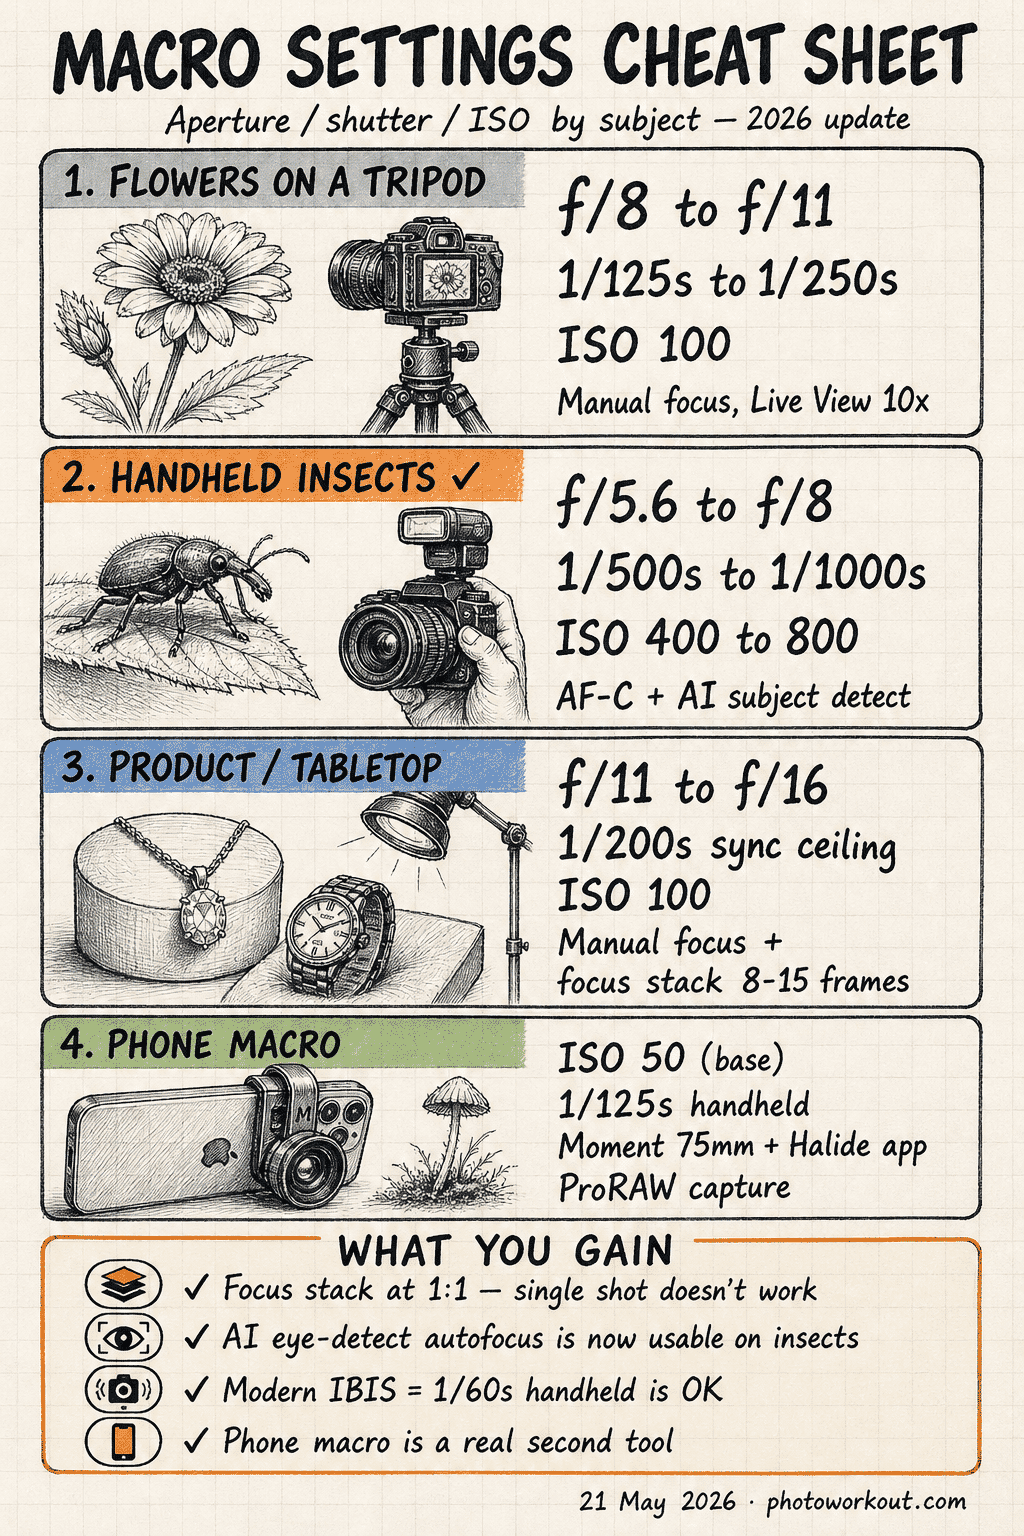
Settings By Subject: A Working Cheat Sheet
Three macro scenarios cover most actual shooting: tripod flowers, handheld insects, and product/tabletop work. Each has a defensible exposure baseline. Use these as the starting point, then adjust by stop based on what the histogram says.
Settings by subject
Each macro scenario demands different aperture, shutter, and focus choices. Start with these baselines and adjust by stop based on the histogram, subject motion, and ambient light.
| Scenario | Aperture | Shutter | ISO | Focus mode | Notes |
|---|---|---|---|---|---|
| Flowers on a tripod (controlled, static) | f/8–f/11 | 1/125s–1/250s | 100 | Manual + Live View 10× zoom | Tripod, mirror lock-up (or EFCS), focus rail if available. Stack 3–7 frames at greater than 1:2 magnification. |
| ✓ Recommended Handheld insects (field, moving) | f/5.6–f/8 | 1/500s–1/1000s | 400–800 | AF-C + AI subject detect (insect-eye) | Burst mode, twin flash for fill, faster shutter when antennae visible. AI subject AF is the unlock — see next section. |
| Product / tabletop (controlled, static) | f/11–f/16 | 1/200s (sync ceiling) | 100 | Manual focus + tethered live view | Studio strobes or continuous LED. Stack 8–15 frames for jewelry, watches, electronics. Diffuse light hard. |
| Mushrooms / forest floor (low light, static) | f/8 | 1/30s–1/60s (tripod) | 100–400 | Manual focus | Tripod and a kneeling pad. Reflector for fill, or a single off-camera speedlight at 1/8 power. |
| Water droplets / refraction (controlled, static) | f/11 | 1/200s (with flash) | 100 | Manual focus on droplet front edge | Off-camera flash through diffuser, focus rail for stacking. Background 30cm+ behind subject for clean bokeh. |
The aperture column shifts ± one stop with magnification: closer to 1:1, stop down; closer to 1:4, open up. The shutter column shifts with subject motion: still subject + tripod, drop to 1/30s; flying insect, push to 1/2000s with flash burst.
Focus Stacking: The Modern Sharpness Default
At 1:1 magnification on full-frame, depth of field at f/11 is roughly 2mm. A bee’s eye is 4mm deep. A flower’s reproductive parts span 8–15mm. Stopping down further hits diffraction softness. The math of single-shot macro at 1:1 does not work for most subjects — focus stacking is how working macro photographers now solve it.
How focus stacking works
The technique shoots a sequence of frames at the same aperture, shifting the focus plane slightly between each shot. Stacking software then merges only the in-focus regions from each frame into a single composite that’s sharp front-to-back. Two ways to shift focus:
- In-camera focus bracketing — most modern bodies (Sony, Canon, Nikon, Fujifilm, OM System) ship with built-in focus bracketing. The camera shifts focus across N frames automatically. Set step size (smaller = more frames, more overlap, easier to merge) and shoot count.
- Focus rail (manual) — a geared rail that shifts the camera body, not the lens. Standard for studio macro because it preserves the exact framing and magnification across frames. Velbon Super Mag Slider and Cognisys StackShot are the working-pro defaults.
Stacking software
Three options cover almost all macro stacking work:
- Helicon Focus — the macro specialist. Renders methods A (depth map), B (depth map with smoothing), and C (pyramid) handle different subject types. Best output quality for jewelry, scientific, and insect stacking. Around $200 perpetual.
- Adobe Photoshop Auto-Blend — Edit → Auto-Align Layers, then Edit → Auto-Blend Layers with “Stack Images” checked. Free if you already have Photoshop. Adequate for 3–8 frame stacks; struggles past that.
- Affinity Photo — built-in Focus Merge persona. One-click stacking for up to ~30 frames, costs about $70. Underrated alternative.
For deeper coverage of options, see PhotoWorkout’s best focus stacking software roundup.
Stacking gotchas
Three common failures:
- Subject motion between frames kills the stack. Insects and flowers in wind both rule out stacking unless conditions are dead-still. For moving subjects, accept a single-frame approach and shoot at f/11+ with flash.
- Step size too large creates focus gaps in the final composite. Stack software needs overlap between adjacent frames to know where to blend. When in doubt, halve the step size — overshooting is cheap (more storage), undershooting wastes the whole stack.
- Different aperture per frame breaks the blend. The merge algorithm assumes consistent depth of field across the sequence. Lock aperture in Manual mode before starting.
AI Autofocus Hits Macro: 2026 Update
Until recently, the standard macro workflow defaulted to manual focus because autofocus systems couldn’t reliably lock onto the right millimeter on a moving insect. That changed in 2025–2026 with the new generation of AI subject detection on flagship bodies.
- Sony Alpha 1 II — released late 2024. Insect-eye detection in AI Real-time Recognition mode works on visible-eye subjects (bees, dragonflies, mantis, beetles) at distances down to about 5cm. Lock acquisition takes around 80ms when the eye is in the frame; misses on hidden-eye angles. Pairs well with the Sony FE 90mm f/2.8 Macro G OSS.
- Canon EOS R5 Mark III — released mid-2025. Dual Pixel Intelligent AF detects animal-eye on smaller subjects than the R5 Mark II did. Stronger on butterflies and dragonflies than on small flies or bees. RF 100mm f/2.8L Macro IS USM is the matching lens — its 1.4× magnification (greater than 1:1) at minimum focus distance is unusual for a macro lens.
- Nikon Z9 (firmware 6.0 and later) — 2025 firmware added “small subject” detection that performs well on insect work, especially when the eye is angled toward the camera. Slightly less reliable than Sony for tiny subjects but more decisive autofocus motor on the Z 105mm f/2.8 VR S.
When AI AF works, and when it doesn’t
- Works: moving insects with visible eyes (dragonflies, bees in flight, butterflies on flowers), handheld field macro at 1:2 to 1:1, situations where waiting to fully manual-focus would miss the shot.
- Doesn’t work: subjects without recognizable eye landmarks (water droplets, abstract textures, jewelry components), greater-than-1:1 magnification where DoF is too thin for AF to land cleanly, anything where the focal plane needs to be on a specific feature (the front of a flower’s stamen, not the petal edge).
The practical workflow: AI AF for handheld field macro, manual focus for tripod work and focus-stacked sequences. The two methods aren’t competing — they cover different shooting scenarios. For the gear side of this decision, see PhotoWorkout’s best cameras for macro photography roundup.
When Manual Focus Still Wins
Even with the AI autofocus improvements above, manual focus remains the right choice for many macro situations. Three scenarios where AF — even the best AI AF — does not win:
- Tripod-based static subject work — flowers in a controlled studio, product photography, scientific specimen work. Manual focus via Live View at 10× zoom lands the focal plane to the half-millimeter. Autofocus, even with AI, samples and re-samples and creates micro-shifts that smear at greater than 1:1 magnification.
- Focus stacking sequences — the stack needs a precise focus shift per frame. Either in-camera focus bracketing (which uses manual focus internally to step) or a focus rail. AF mode would constantly re-acquire and break the consistent step size.
- Subjects without AI-recognizable features — water droplets, ice crystals, fabric textures, abstract metal work, electronics. There’s no “subject eye” for the AI to find, and contrast-detect AF on a flat plane hunts indefinitely.
The technique: switch the lens to manual focus (M on the focus mode switch), use Live View on the camera back or tethered to a laptop, zoom in to 10× or 20× in the live view, and rotate the focus ring or move a focus rail until the target detail is critically sharp. Then trigger via remote release or 2-second timer to eliminate shutter-button shake.
Phone Macro: Real Now, With the Right Clip-On
Smartphone macro went from a marketing claim to a viable everyday-carry option in the past two years. The unlock is two things: optical clip-on macro lenses that actually focus close enough, and the Pro camera apps that expose manual ISO + shutter on phones.
The hardware that works
- Moment 75mm Macro Lens (M-Series, $150) — the working-photographer pick. Pairs with Moment cases on iPhone 12 through 16 Pro. 25× magnification at minimum focus distance, 1:1 effective on iPhone’s main camera. Glass quality good enough that the resulting files survive light editing without falling apart.
- Sandmarc Macro Lens ($90) — cheaper alternative with similar reach. Edge softness is more noticeable than the Moment but center sharpness is competitive.
- Apsel / Beastgrip clip-on lenses ($25–$50) — universal clip mount that doesn’t require a phone case. Lower glass quality; useful as an entry experiment, not a working tool.
App + settings
The iPhone Camera app doesn’t expose enough manual control for real macro. Three apps fix that:
- Halide Mark II ($60/yr or $40 lifetime) — manual focus peaking, ProRAW capture, focus distance readout. The standard pro-iPhone-photography pick.
- Moment Pro Camera ($8/yr) — the matched app for Moment lenses. Auto-detects the lens and adjusts compensation.
- Adobe Lightroom Mobile Pro (free with Creative Cloud) — slightly less granular than Halide but bundles editing.
Settings for iPhone macro with a Moment 75mm: ISO 50 (the base on iPhone), shutter 1/125s minimum handheld, focus peaking on, ProRAW or DNG capture for editing latitude. Phone macro can’t replicate full-frame for jewelry or scientific work, but for casual flower-and-bug field macro on a hike, it covers the brief. For the lens-specific recommendations, PhotoWorkout’s iPhone macro lens roundup covers the current options in depth.

Frequently Asked Questions
What’s the difference between true 1:1 macro and close-up photography?
1:1 magnification means the subject is projected onto the sensor at life size — a 5mm insect produces a 5mm image on a full-frame sensor. Close-up photography is any tighter-than-normal framing without hitting that ratio; a 1:2 close-up (half life size) is the most common consumer-zoom “macro” mode. The settings differences are real: at 1:1 the depth-of-field math demands focus stacking, while at 1:2 a single shot at f/8 usually works.
Is a dedicated macro lens worth it over close-up filters or extension tubes?
For 1:1 work, yes. Close-up filters add a single optical element in front of the lens and introduce noticeable edge softness past 0.5× magnification. Extension tubes preserve sharpness but lose infinity focus and reduce light by roughly 1.5 stops. A dedicated 100mm f/2.8 macro maintains weather sealing, autofocus speed, and full sharpness across the magnification range. For 1:4 to 1:2 occasional use, extension tubes on a 50mm prime work fine.
How many frames does a typical focus stack need?
For a flower or insect at 1:1 magnification on a full-frame sensor at f/8, expect 5–12 frames to cover the subject front-to-back with comfortable overlap. Tabletop product macro at 1:1 with strict client requirements (jewelry, watches, electronics) often hits 20–40 frames. Greater-than-1:1 super-macro can run 50+ frames per composite. In-camera focus bracketing defaults to 50–100 frames as the safe upper limit; software handles them fine.
Does AI subject autofocus work for water droplets or non-living subjects?
No. AI subject detection on Sony, Canon, and Nikon flagships is trained on animals (eye detection), people, vehicles, and birds — not abstract subjects. Water droplets, jewelry, ice crystals, and other non-living macro subjects don’t trigger subject recognition and fall back to standard contrast-detect or hybrid AF. Use manual focus with Live View + 10× zoom for those scenarios.
Can phone macro replace a DSLR macro setup?
For casual outdoor field macro and content creation, increasingly yes — the iPhone 15 Pro and later with a Moment 75mm produces files that survive social-media sharing and modest editing. For commercial product macro, scientific specimen work, focus-stacked landscape elements, or anything requiring 1:1 with extreme detail, a dedicated camera + 100mm macro + flash setup still wins by a clear margin. The phone is a viable second tool, not a replacement.
Putting It All Together
Macro photography in 2026 isn’t a one-recipe craft. The settings table above gives a starting point per scenario, but the working photographer’s mental model is: identify the subject category, set aperture by magnification, set shutter by motion (camera and subject), and choose AI AF for moving subjects or manual focus for static ones. Focus stacking is the modern sharpness solution at 1:1, and a phone with the right clip-on covers the everyday-carry use case the dedicated rig misses.
The biggest single change since this guide first published in 2024: AI autofocus now genuinely handles handheld field macro on insects and small subjects, which was the dominant pain point for two decades. Pair that with the IBIS systems on current flagships and handheld macro at 1:2 is finally a casual proposition rather than an expert one. For more on settings across photography disciplines, PhotoWorkout’s camera settings cheat sheet covers the broader exposure-triangle reference.
Image sources: Macro flower (Ngan Nguyen / Unsplash), green fly compound eye (Charlotte Kirkland / Unsplash), insect on leaf (Tonmoy Iftekhar / Unsplash). All photos used under the Unsplash license.
Technical references and prior PhotoWorkout coverage cited in this guide:
Standards and Manufacturer References
- Sony — Alpha 1 II Real-time Recognition AF – Manufacturer documentation for the AI subject-detection autofocus referenced in the AI AF section.
- Canon — EOS R5 Mark III specifications – Canon's spec sheet for the camera body referenced in the AI AF + Dual Pixel Intelligent AF coverage.
- Nikon — Z9 firmware update history – Z9 firmware notes including the small-subject detection added in version 6.0.
Macro Photography Technique
- Helicon Soft — Helicon Focus methods explained – Documentation of the three rendering methods (A: depth map, B: smoothed, C: pyramid) referenced in the focus stacking section.
- Moment — 75mm Macro Lens specifications – Manufacturer spec for the phone clip-on referenced in the mobile macro section.
Image Sources
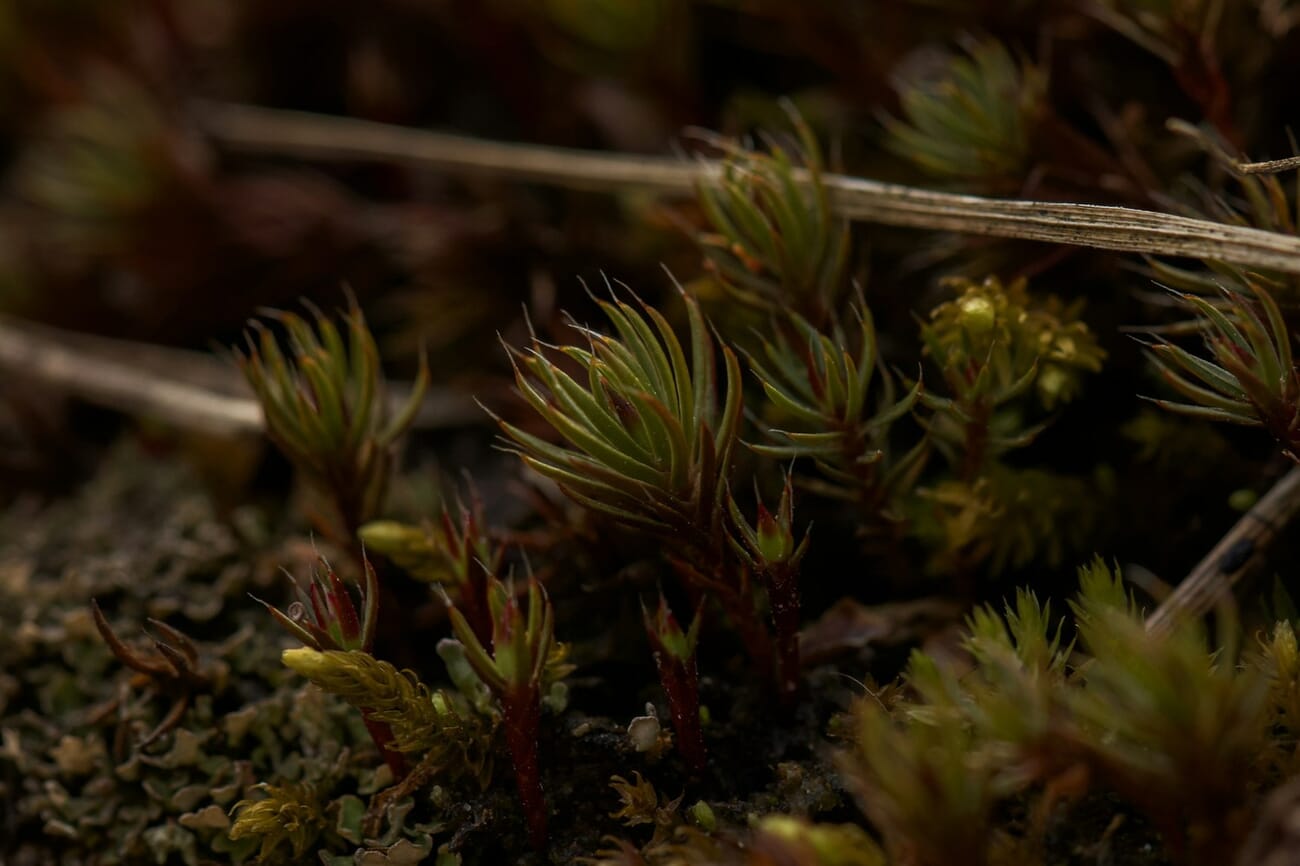
- Ngan Nguyen — moss macro (Unsplash) – Hero image of moss and small plants.
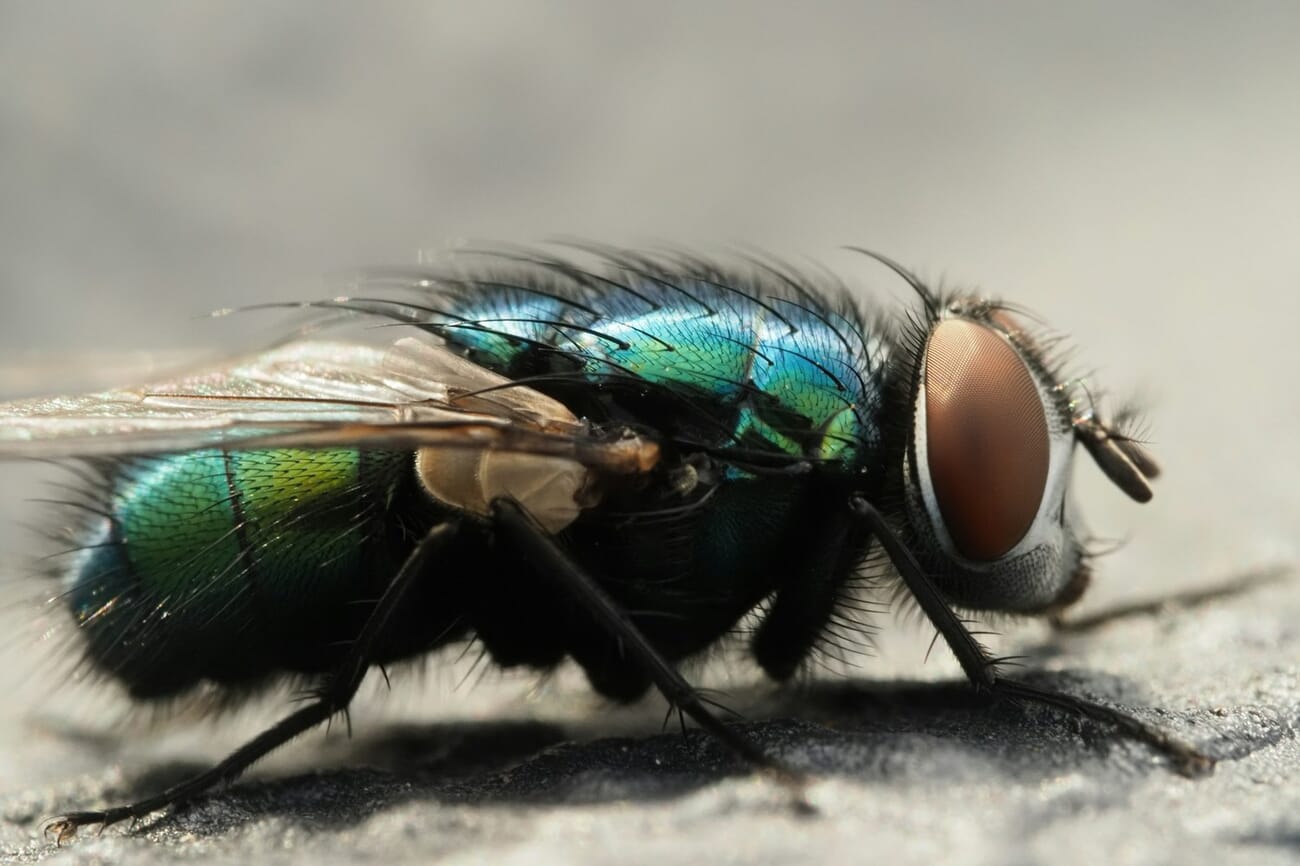
- Charlotte Kirkland — fly compound eye (Unsplash) – Focus stacking section illustration of the metallic green fly.
- Tonmoy Iftekhar — bug on leaf (Unsplash) – Mobile macro section image.


