Editor’s Key Takeaways: Top Tools for Real Estate Photography Success

Real estate agents recognize the importance of high-quality photography in expediting property sales. Superior photos are proven to significantly reduce a property’s time on the market, underscoring the need for optimal photography tools. Beyond just elite hardware, post-processing software is crucial for producing standout images. Here are three top options for real estate photographers:
- Photomatix Pro 6: A cost-effective option at $99, with an even more affordable Photomatix Essentials at $39. The software offers vital features like HDR merging and tone mapping, with further upgrades available.
These tools and their varying features ensure photographers can enhance their images effectively and stay competitive in the real estate market.
When you buy through links on our site, we may earn a commission at no cost to you. We evaluate products independently. Commissions do not affect our evaluations.
Introduction
When it comes to selling a house, cameras are a real estate agent’s single most useful tool. Statistics prove that people are heavily influenced by pictures (as opposed to written descriptions) when it comes to making housing decisions.
Studies have also shown that the quality of a house or apartment’s photographs have a significant influence on how long it remains on the market. In short – the better the picture, the quicker the sale.
With the increased emphasis on photography in the real estate market, it’s more important than ever for photographers to have the tools necessary to put them ahead of the competition and capable of producing the best end product possible. This extends far beyond having top of the line lenses or a steady tripod. Often overlooked, it’s equally important to have post processing software that can bring out the best parts of your photograph.
Related Post: Best Cameras for Real Estate Photography
Today, we’ll be going over three of the most popular options available for real estate photographers. Each has its own set of merits and drawbacks – read on to discover which option best suits your needs!
Option 1: Photomatix Pro 6
What we love:
- Bargain Buy: Photomatix Pro 6 is available to both Mac and PC users for a single $99 payment.
- Photomatix Essentials is even more affordable, costing just $39,
- or as a real estate photographer, you may want to opt for the Photomatix Essential RE version, available at $79 (7 March 2022 Update: Now part of Photomatix Pro).
Whichever option you choose, it’s easy to upgrade later by paying the differential price. To understand the different Photomatix program versions, check out this detailed comparison chart:
| Photomatix Pro | Photomatix Essentials | |
|---|---|---|
| Application Type | Standalone + Lightroom Plugin | Standalone |
| Merge to HDR | ✓ | ✓ |
| Maximum number of bracketed photos per set | Unlimited | 5 |
| HDR “Look” with a Single Photo | ✓ | ✓ |
| Native RAW support | ✓ | ✓ |
| Details Enhancer HDR style (Tone Mapping) | ✓ | ✓ |
| Contrast Optimizer HDR style (Tone Mapping) | ✓ | ✓ |
| Tone Balancer HDR style (Tone Mapping) | ✓ | ✓ |
| Tone Compressor HDR style (Tone Mapping) | ✓ | ✓ |
| Fusion/Natural HDR style (Exposure Fusion) | ✓ | ✓ |
| Fusion/Interior HDR style (Exposure Fusion) | ✓ | – |
| Exposure Fusion from a single RAW file | ✓ | – |
| Advanced HDR settings | ✓ | – |
| Individual color adjustments | ✓ | – |
| Brush Tool | ✓ | – |
| Blend with original and source exposures | ✓ | – |
| Finishing (Sharpening & Contrast) | ✓ | ✓ |
| Crop Tool | ✓ | ✓ |
| Straightening Tool | ✓ | – |
| Undo HDR adjustments | ✓ | ✓ |
| Saving & loading custom presets | ✓ | ✓ |
| Thumbnails of built-in presets | ✓ | ✓ |
| Thumbnails of custom presets | ✓ | – |
| Favorite presets | ✓ | – |
| Preset thumbnails display options (larger size & 2 columns) | ✓ | – |
| Histogram | ✓ | – |
| Noise reduction | ✓ | ✓ |
| Automatic alignment of hand-held photos | ✓ | ✓ |
| Automatic ghost removal | ✓ | ✓ |
| Selective ghost removal tool | ✓ | – |
| Chromatic Aberrations reduction | ✓ | – |
| Automatic lens correction of RAW files | ✓ | – |
| Batch Bracketed Photos | ✓ | – |
| Batch Single Photos | ✓ | – |
| Opens & saves in 32-bit HDR image formats | ✓ | – |
| Color managed workflow | ✓ | ✓ |
| Integration with Lightroom | ✓ | – |
Each license validates the use of the software across several computers. Furthermore, if you’re working with an older version of Photomatix, it’s possible to upgrade your existing software for just $29.
Fusion/Interior Method: Among the program’s editing controls are some features dedicated explicitly to the composition of stunning HDR real estate shots. For many real estate photographers, it can be a challenge to get an image that includes a full gamut of detail without risking an unrealistic end product that looks over-processed.
Creating HDR Real Estate Interior Photos
Learn how to use HDR photography to create a real estate interior photo that is well lit without blowing out the highlights from the window.
However, Photomatix has tools (presets) specifically designed to create bright HDR images. For instance, Photomatix makes it possible to blend rendered images seamlessly with source files using the two presets’Interior’ and ‘Interior 2’ especially created by the HDRSoft team for real estate (interior) photography.
The latest iteration of the program also boasts a Tone Balancer that keeps highlights and shadows in check to a higher degree than ever before. As a result, it’s not hard to retain a true-to-life image.
Streamlined editing: Photomatix has some automated options designed specifically to expedite your editing process. On the right sidebar of the Adjust & Preview module, users will find some presets with a significant stylistic range.
The program also allows users to batch process, or apply identical adjustments across a set of images – for HDR users, this quality is especially useful. Furthermore, slider tools for fine-tuning are clearly marked and easy to find.
Testing the Photomatix Pro 6 Updates
Merging 3 Images (Overexposed, Underexposed, Normal Image)
First, we dragged these 3 JPEG images (without any adjustments) into the Photomatix 6 application.

Here is what we got presented with (after clicking merge, without any adjustments):

So far, the process has been super easy and we haven’t done any editing to the image.
Now, let’s look at the new features of Photomatix Pro 6 which can improve this photo even further:
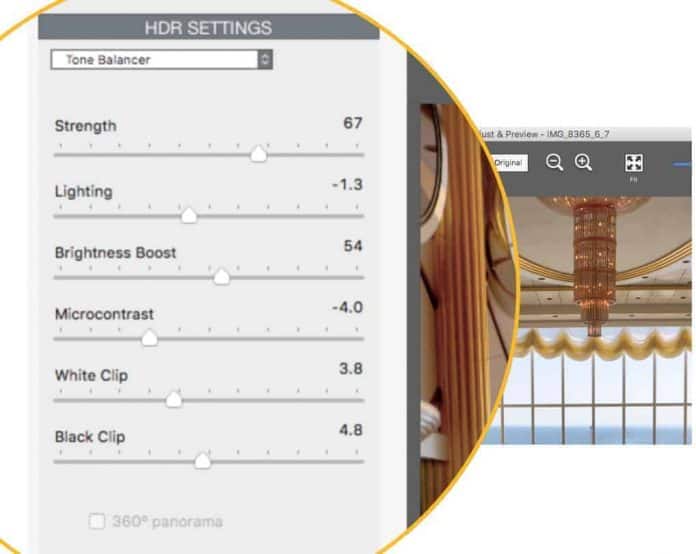
✔ More Style Choices for Realistic Results: the Tone Balancer is a new HDR rendering method which gives you more options for achieving a realistic look. It is well suited to real estate photographers.
The Tone Balancer lets you adjust: Strength, Lighting, Brightness, Micro Contrast, and the White and Black Clip.
✔ More Refined Control using Brush Tool: With the new interactive brush tool, you can make adjustments to just part of your image. Select the changes to color or brightness that you want, and paint over the area you want to affect.
✔ Individual Color Adjustments: Photomatix 6 Plus now has a new color adjustment tool which lets you change the saturation, temperature, and brightness of individual colors in your HDR image. This is a great tool! E.g. We enhanced the sky, the walls, and the roof in our example image.
✔ Blending: For a more realistic look, you can now blend the HDR rendered image with one of the original photos. You can now change the opacity to get a larger or smaller influence on the result.
✔ Straightening Tool: In our test image, we could easily align the horizon (the ocean wasn’t that straight of a line, which often happens also with buildings and real estate images in general). This new tool is part of the Finishing Touch palette. After clicking the finish button, you will find these additional settings, including the “Straighten Button”:

✔ More Intuitive Workflow: Photomatix now has a more intuitive workflow, which makes it even easier to load & choose images before you start the editing process.
Our Final Result (Test Image)

Photomatix: All You Need as a Real Estate Professional
Less is more (especially for Real Estate Photographers): Photomatix relative simplicity is what you want if you are looking for a real estate (HDR) photography software. The Photomatix RE version (now part of Photomatix Pro) focuses on the real estate niche and gives its users a clear and straightforward solution (this is especially useful for real estate agents who may not be pro photographers and don’t need unnecessary editing tools).
At times, the interface seems a bit dated in comparison to the more sleek, modern looks implemented by programs like Lightroom and Luminar Neo, but Photomatix will soon be releasing a “dark mode” which will appeal to users who find the current gray interface a little dull.
Special Discounts for PhotoWorkout readers:
Who should use this:
For real estate photographers looking for something straightforward, Photomatix is a fantastic option. Though it may not have all the bells and whistles, it proves to be an approachable choice for beginners that might feel overwhelmed by other photo editors.
All too often, photographers just starting out can be overwhelmed by complicated post-processing software. Photomatix, unlike some of its competition, keeps things simple and easy to understand.
Download Photomatix 6 Free Trial (Windows and Mac)
15% Off Photomatix Pro (Use Coupon Code: PHOTOWORKOUT)
When it comes to selling a house, cameras are a real estate agent’s most valuable tool. Statistics show that people are significantly influenced by pictures rather than written descriptions when making housing decisions.
Studies have also indicated that the quality of a home’s photographs significantly affects how long it remains on the market. In essence, better pictures lead to quicker sales.
With the growing emphasis on photography in the real estate market, it’s crucial for photographers to have the tools necessary to stay ahead of the competition and produce the best possible results. This involves more than just high-end lenses or a steady tripod. Post-processing software, which can enhance the best aspects of your photos, is equally important.
Related Post: Best Cameras for Real Estate Photography
Today, we’ll review three popular options available for real estate photographers. Each has its own advantages and disadvantages – read on to find out which one suits your needs best!
Option 2: Aurora HDR (Now part of Luminar Neo)
What we love:
State-of-the-Art Interface: One of Aurora HDR’s greatest strengths, now integrated into Luminar Neo, is its incredibly intuitive interface. The latest updates have improved the overall speed and responsiveness. Features such as a live preview window take much of the guesswork out of post-processing, making it easier than ever to perfect your photographs.
Competitive Pricing: Like Photomatix Pro, customers can get their hands on Luminar Neo via a one-time purchase, which now includes the powerful HDR merging capabilities of Aurora HDR.
Considering all the tools Luminar Neo offers, it’s excellent value for money. If you have any hesitations about whether the program is right for you, the official website offers a free trial to give potential buyers a feel for what they can expect.
Made to Serve: Luminar Neo, with Aurora HDR capabilities, was created with input from groundbreaking HDR photographer Trey Ratcliff. It’s designed by image makers for fellow image makers. The program offers a wide array of editing tools and provides 24/7 support for any troubleshooting needs. Luminar Neo is accessible to both Mac and Windows users.
What could improve:
Ever-changing: While continuous evolution is often a point of pride, keeping up with frequent updates can sometimes be challenging. Unlike subscription-based software that provides automatic updates, users must buy into the latest iterations of Luminar Neo to access new features. This means that you may eventually spend more to stay current with the latest tools.
Preset Pitfalls: Presets can be incredibly handy, especially when working with hundreds of photos. However, some users find that Luminar Neo’s presets, inherited from Aurora HDR, can sometimes produce an overly processed look. Careful manual adjustments are necessary to avoid unrealistic, heavily saturated results.
Who should use this:
Real estate photographers looking for the best HDR images possible should consider Luminar Neo. While the competition can create decent HDR composites, Luminar Neo’s advanced algorithms and user-friendly interface make it a top choice for creating stunning images.
Download Luminar Neo Free Trial (Windows and Mac)
Option 3: Adobe CC for Photographers
What we love:
Two for the Price of One: This benefit is fairly self-explanatory, but important to consider nonetheless. Within the Photography plan, Adobe CC includes two formidable forces in the form of Lightroom and Photoshop.
Individually, both programs can compete head-to-head with similar software on the market. Bundled together, however, it’s almost impossible not to consider adding these heavyweights to your editing arsenal.
Creative Freedom: By a long shot, Photoshop offers users the greatest creative liberties. Advanced layering and masking abilities alone are powerful enough to tempt real estate photographers looking to fine-tune property shots. But that only scrapes the surface of what Photoshop can do.
In reality, the software is capable of manipulating images in just about any conceivable way. Whether you’d like to apply a minor adjustment or make a major alteration, Photoshop can almost certainly accomplish the task.
Virtual Storage System: There’s no denying that Lightroom has some helpful editing and adjustment tools. But the program’s greatest asset is its ability to organize and catalog images. For all those working with large image collections, the ability to keyword, tag, and sort shots by metadata is undoubtedly beneficial.
Related Post: Best HDR Software
What could improve:
Long-Term Costs: On the surface, the $9.99 per month fee to keep Adobe running may not seem like much. However, Aurora and Photomatix (as well as some other competitors) only require one-time payments to run. There’s no doubt about which option will have the biggest financial impact on your wallet eventually.
Compositing Pains: The plethora of tools Adobe CC provides is certainly tempting for many real estate photographers. But, unlike Aurora and Photomatix, Adobe CC does not cater to HDR users (or other niche styles, for that matter).
Though it’s possible to attain a composite similar to what one might get through competing programs, Adobe doesn’t include automated tools to expedite the process. That being said, editing images and creating composites manually may become a time commitment, not all photographers can afford.
Who should use this:
Adobe CC is built with the versatile multi-tasker in mind. With the most advanced editing capabilities available, just about any adjustment imaginable is possible with the Creative Cloud in tow. Furthermore, individuals with extensive image libraries will benefit from creating organized catalogs through Lightroom.