
- Flash sync speed is the fastest shutter speed your camera can use while fully exposing the sensor to a flash burst — typically 1/160 to 1/250 second.
- High-Speed Sync (HSS) lets you shoot with flash at shutter speeds far beyond the normal sync limit by pulsing the flash rapidly instead of firing a single burst.
- HSS is essential for outdoor portraits with wide apertures in bright light, but it comes with a significant power trade-off you need to plan around.
- Alternatives like ND filters and HyperSync each have pros and cons — the right choice depends on your shooting situation.
You set up an outdoor portrait, dial in a wide aperture for creamy bokeh, meter the scene — and then your flash fires a frame with a harsh black band across the bottom. Sound familiar?
That black band is your camera telling you that you’ve exceeded its flash sync speed. Understanding this limit — and learning how to work around it with High-Speed Sync (HSS) — is one of the most practical flash skills you can develop.
This guide covers everything from how your shutter and flash interact, to when HSS makes sense, to the gear and settings you need to make it work.
How a Focal-Plane Shutter Works
Before diving into sync speed, you need to understand what happens inside your camera when you press the shutter button.
Most interchangeable-lens cameras — both DSLRs and mirrorless — use a focal-plane shutter. This consists of two curtains (sometimes called “blades”) that sit directly in front of the sensor:
- The first curtain opens to start the exposure, sliding away to reveal the sensor.
- The second curtain follows behind it to end the exposure, covering the sensor again.
At slower shutter speeds (say 1/60 second), there’s a moment when the first curtain has fully opened but the second curtain hasn’t started moving yet. During this brief window, the entire sensor is exposed to light simultaneously.
At faster shutter speeds (like 1/1000 second), the second curtain starts chasing the first curtain before it finishes opening. The result is a narrow slit that travels across the sensor. No single moment exposes the entire sensor at once — different parts of the frame are exposed at slightly different times.
This distinction is the foundation of everything related to flash sync. A flash fires an extremely brief burst of light (often 1/1000 second or shorter), and it needs the entire sensor uncovered to illuminate the whole frame evenly.
What Is Flash Sync Speed?
Your camera’s flash sync speed (also called “X-sync”) is the fastest shutter speed at which the first curtain has fully opened before the second curtain begins to close. It’s the maximum speed where the entire sensor is exposed at once — and therefore the fastest speed at which a single flash burst can light the whole frame.
For most cameras, sync speed falls between 1/160 and 1/250 second. Here are some common examples:
- 1/200s — Canon EOS R5, R6, most Canon DSLRs
- 1/250s — Nikon Z6 III, Z8, Sony A7 IV, most Nikon/Sony DSLRs
- 1/160s — Some older or entry-level bodies
- 1/400s — Sony A9 III with its global electronic shutter (a notable exception)
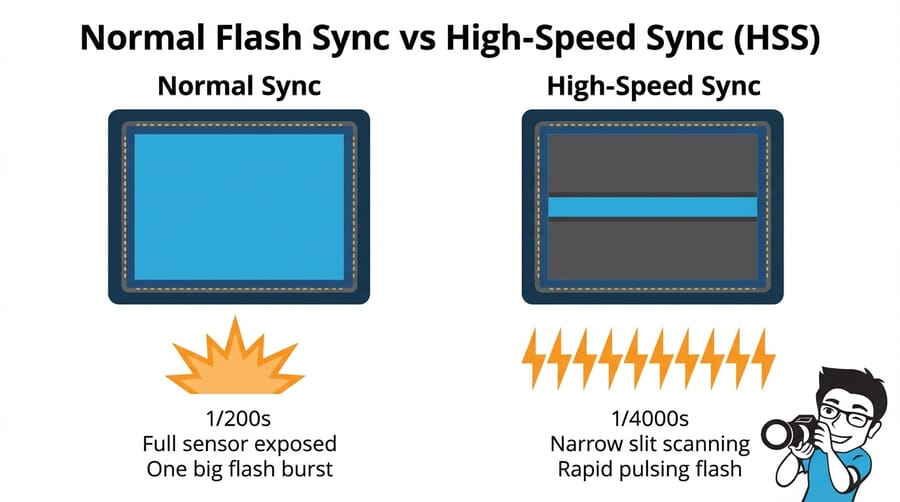
If you set your shutter speed faster than the sync speed and fire a standard flash, you’ll get that telltale black band — the shadow of the second curtain blocking part of the sensor when the flash fires.

How High-Speed Sync (HSS) Works
High-Speed Sync is a flash mode that lets you shoot at shutter speeds faster than your camera’s native sync speed — 1/500, 1/2000, even 1/8000 second — while still getting even flash illumination across the entire frame.
The trick is in how the flash fires. Instead of one powerful single burst, the flash emits a rapid series of lower-power pulses that essentially create a continuous wash of light for the entire duration of the exposure. As the narrow slit travels across the sensor, the pulsing flash illuminates each strip evenly.
Think of it this way:
- Normal sync = one bright camera flash, entire sensor open at once
- HSS = many rapid pulses, keeping up with the slit as it scans across the sensor
The result is an evenly lit frame at any shutter speed your camera supports. But this comes at a cost — more on that in the power loss section.
When to Use High-Speed Sync
HSS isn’t something you leave on all the time — it has trade-offs. But in certain situations, it’s the best (or only) tool for the job.
Outdoor Portraits at Wide Apertures
This is the most common HSS use case. You’re shooting portraits outside on a sunny day and want to use f/1.8 or f/2.8 for shallow depth of field. Even at ISO 100, a wide aperture in bright sun demands a fast shutter speed — often 1/1000s or faster.
Without HSS, you’d be stuck at your sync speed (say 1/200s), which means shooting at f/8 or f/11 to avoid overexposure. That kills the background blur you wanted in the first place. HSS lets you shoot at f/1.8 and 1/2000s while still adding flash to fill shadows or overpower the sun.

Overpowering the Sun for Dramatic Lighting
Want to darken the sky behind your subject while keeping them perfectly lit? You need to underexpose the ambient light (fast shutter speed) while adding flash to the subject. This technique — sometimes called “dragging the shutter” in reverse — requires shutter speeds well above sync speed, making HSS essential.
It’s a staple of portrait photography lighting and editorial work where you need dramatic, punchy results outdoors.
Freezing Action with Flash
In sports, dance, or any fast-moving situation in bright light, you may need both a fast shutter speed (to freeze ambient motion) and flash (to add catch lights or fill shadows). HSS bridges that gap, letting you shoot at 1/1000s+ with flash.

Balancing Flash with Bright Ambient Light
Even when you don’t need a super-wide aperture, you may find that the correct ambient exposure puts your shutter speed above sync. HSS gives you the flexibility to use flash as fill without worrying about the sync ceiling.
The HSS Power Trade-Off
HSS is not free. The rapid pulsing required to maintain even illumination across the slit dramatically reduces your flash’s effective output — typically by 2 to 3 stops compared to normal sync mode at the same power setting.
Why? In normal mode, all the flash energy goes into one brief, intense burst. In HSS mode, that same energy gets spread across dozens of smaller pulses over a longer period. The total light output hitting your subject is significantly less.
The practical consequences:
- Reduced working distance — Your flash may only be effective at 3-5 meters instead of 10+
- Slower recycle times — More energy used per shot means more wait between frames
- Battery drain — Expect fewer shots per charge
- Higher shutter speed = more power loss — The narrower the slit, the more pulses needed, the less light per pulse
This is why many professionals use the most powerful flash units they can when planning HSS work — a speedlight at full power in HSS might only have the effective output of a speedlight at 1/4 power in normal sync. For demanding outdoor work, battery-powered strobes like the Godox AD200 Pro or Godox AD600 Pro provide the extra headroom you need.
HSS vs. ND Filters
If the goal is simply to shoot at a wide aperture in bright light, an ND (Neutral Density) filter is a common alternative to HSS. An ND filter reduces the light entering your lens, letting you use a wider aperture and/or slower shutter speed — potentially keeping you within normal sync range.
Here’s how the two approaches compare:
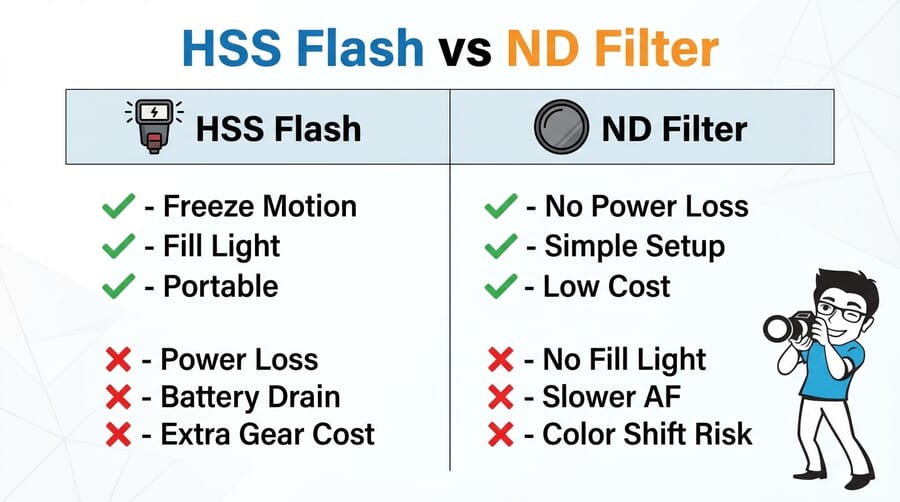
Choose HSS when:
- You need to freeze motion as well as control aperture
- You want fill flash or creative lighting on your subject
- You’re shooting in rapidly changing light and need flexibility
- You don’t want to fiddle with filters between shots
Choose ND filters when:
- You need maximum flash power (normal sync delivers full output)
- You’re shooting at a fixed location with stable light
- Budget is tight — good ND filters cost less than HSS-capable flash systems
- You want the simplest possible setup
Many working photographers carry both. A 3-stop ND filter on the lens combined with flash at normal sync speed can be more powerful than HSS alone — and you can always switch to HSS if conditions demand it.
HSS vs. HyperSync
HyperSync (a term popularized by PocketWizard and also used by Elinchrom with their “Hi-Sync” mode) takes a different approach than HSS. Instead of pulsing, it times the flash to fire slightly before the first curtain begins to open, exploiting the long tail of a powerful strobe’s flash duration.
Because studio strobes and high-powered battery packs have longer flash durations than speedlights, there’s enough light output during the tail end of the burst to cover the sensor as the slit passes. The key differences:
- HSS — Works with speedlights and portable strobes; pulses rapidly; significant power loss; universally compatible with HSS-capable flashes
- HyperSync — Works best with powerful studio/battery strobes; single burst (timed early); less power loss; requires specific radio triggers (PocketWizard ControlTL, Elinchrom Skyport) and compatible flash units
HyperSync typically preserves more flash power than HSS because it still fires a single burst rather than pulsing. However, you may see slight gradient banding at the edges of the frame, and it requires more careful calibration. For most photographers, HSS is the simpler and more accessible option.
Mirrorless Cameras and Sync Speed in 2026
The shift to mirrorless has changed the sync speed landscape in interesting ways. Most mirrorless cameras still use mechanical focal-plane shutters with the same 1/200–1/250s sync limitations as DSLRs.
However, there’s a notable exception: the Sony A9 III, released in early 2024, features a global electronic shutter that exposes the entire sensor simultaneously — no curtains, no slit. This gives it a flash sync speed of 1/80000 second (effectively unlimited), eliminating the need for HSS entirely when using compatible flash units.
Other developments to watch:
- Electronic first curtain shutter (EFCS) — Many mirrorless cameras offer this, but it doesn’t improve flash sync speed since the mechanical second curtain still determines the limit.
- Fully electronic shutters — Most current electronic shutters use a rolling scan (reading the sensor line by line), which causes the same slit-scanning issue as a mechanical shutter — just electronically. Flash sync with these is typically worse or unsupported.
- Global shutter sensors — Like the A9 III’s stacked CMOS, these read all pixels simultaneously. As this technology matures and reaches more camera bodies, HSS may become less necessary. But for now, the A9 III remains an outlier at a premium price point.
For the vast majority of photographers in 2026, HSS remains the primary solution for using flash above sync speed.
HSS Flash Gear Worth Considering
To use HSS, you need a flash unit and trigger system that both support it. Here’s what’s popular and proven in 2026:
Speedlights
The Godox V1 and Godox V860 III are the go-to budget HSS speedlights. Both work with Godox’s 2.4GHz wireless system and offer TTL + HSS across Canon, Nikon, Sony, Fuji, and other mounts. The V1’s round head produces slightly softer light. For those in the Canon or Nikon ecosystem, the Canon EL-1 and Nikon SB-5000 are excellent first-party options with seamless HSS integration.
Portable Battery Strobes
When speedlight power isn’t enough — and in HSS, it often isn’t — battery-powered strobe lights step in. The Godox AD200 Pro (200Ws) is compact and affordable, while the Godox AD600 Pro (600Ws) is a workhorse for outdoor HSS portrait work. On the premium end, the Profoto B10X and Profoto B1X deliver excellent HSS performance with Profoto’s AirTTL system.
Radio Triggers
HSS requires communication between camera and flash that basic manual triggers can’t provide. Use system-matched triggers: Godox X2T or XPro II for Godox flashes, Profoto Connect Pro for Profoto, or PocketWizard FlexTT6 for cross-brand compatibility with HyperSync support.
Camera Settings for HSS Shooting
Here’s a practical workflow for setting up an HSS flash shot:
- Step 1: Enable HSS on your flash — Look for the HSS icon (lightning bolt with “H” or stacked arrows). On Godox units, press the Sync button until HSS appears. On Profoto, enable HSS in AirTTL settings.
- Step 2: Set your camera to Manual mode — You want full control over both exposure settings and flash output.
- Step 3: Set aperture for your desired depth of field — This is usually the starting point (f/1.4–f/2.8 for shallow DOF portraits).
- Step 4: Set ISO to 100 — Keep it low to maximize dynamic range and minimize noise.
- Step 5: Adjust shutter speed to control ambient exposure — This is the key creative control. Faster shutter = darker background. Start around 1/500–1/1000s and adjust.
- Step 6: Set flash power to light your subject — Start at 1/2 or full power (you’ll need it in HSS) and adjust based on test shots. TTL mode can help you get in the ballpark quickly.
- Step 7: Take a test shot and refine — Check the histogram. Adjust shutter speed for background brightness and flash power for subject brightness independently.
A helpful tip: take a photo without the flash first to gauge ambient exposure. Then add flash and adjust power until the subject is properly lit. This two-step approach makes it much easier to balance ambient and flash light — a fundamental concept in off-camera flash photography.
Common HSS Mistakes and Troubleshooting
Even experienced photographers run into issues with HSS. Here are the most common problems and their fixes:
Black Band Across the Frame
If you see a dark band at the top or bottom of your image, HSS isn’t enabled (or isn’t communicating properly). Check that HSS is activated on both the flash and the trigger. Also verify that your trigger supports HSS — basic manual triggers won’t pass the HSS signal.
Subject Is Underexposed
This usually means you’ve hit the HSS power ceiling. Your options:
- Move the flash closer to the subject
- Use a more powerful flash unit
- Open your aperture slightly (if depth of field allows)
- Raise ISO (adds noise but increases flash effectiveness)
- Slow down the shutter speed slightly (less HSS power loss)
- Add an ND filter and drop below sync speed to use normal flash mode
Inconsistent Exposure Between Frames
If flash exposure varies shot to shot, check your recycle time. Firing before the flash has fully recycled means reduced output. Slow down your shooting pace or use an external battery pack. Also ensure you’re shooting in manual flash mode — TTL can vary between frames as it re-meters each shot.
Flash Won’t Fire at All Above Sync Speed
Some cameras automatically limit shutter speed to sync speed when a flash is detected. Check your camera’s flash settings menu for an option like “Flash sync speed” or “Flash shutter speed” — it may be locked to a specific speed. You may also need to update firmware on your flash or trigger to enable HSS compatibility with newer camera bodies.
Practical Tips for Better HSS Results
- Use the lowest shutter speed you can get away with. Every stop faster costs you flash power. If 1/500s gives you the look you want, don’t shoot at 1/2000s just because you can.
- Get the flash as close as possible. Light follows the inverse square law — halving the distance quadruples the effective light. In HSS where power is limited, distance matters even more.
- Use a modifier wisely. A bare flash in HSS is already power-limited. Adding a large softbox eats more light. Consider smaller modifiers or shoot-through umbrellas that lose less power.
- Carry spare batteries. HSS is power-hungry. Budget 2-3x the batteries you’d normally pack.
- Practice the two-shot method. Nail your ambient exposure first (no flash), then layer in flash power. It’s the fastest way to dial in portrait settings when mixing flash and daylight.
Frequently Asked Questions
What is a camera’s flash sync speed?
Flash sync speed is the fastest shutter speed at which the camera’s shutter is fully open, allowing a single flash burst to illuminate the entire sensor evenly. For most cameras, this is between 1/160 and 1/250 second. Exceeding this speed without HSS causes a black band in the image.
Does High-Speed Sync reduce flash power?
Yes, significantly. HSS typically costs 2-3 stops of flash output compared to normal sync mode. The flash spreads its energy across many rapid pulses instead of one concentrated burst, reducing the total light reaching your subject.
Should I use HSS or an ND filter for outdoor flash portraits?
It depends on the situation. HSS gives you fill flash and motion-freezing ability with quick adjustability, while ND filters preserve full flash power and are simpler to use. Many photographers carry both — use the ND filter when you need maximum flash output at a fixed location, and switch to HSS when conditions change quickly.
Do all flash units support High-Speed Sync?
No. HSS requires specific hardware capability in the flash unit, and you need a compatible radio trigger or on-camera hot shoe connection. Most modern TTL-capable speedlights and portable strobes from brands like Godox, Profoto, Canon, Nikon, and Sony support HSS, but basic manual-only flashes typically do not.
Will global shutter cameras make HSS obsolete?
Potentially, in the long run. Cameras with global electronic shutters (like the Sony A9 III) can sync flash at virtually any shutter speed without HSS. However, as of 2026, global shutter sensors are only available in a handful of premium camera bodies. For most photographers, HSS remains the practical solution.
Featured image: Photo by Anton Acosta on Unsplash.
