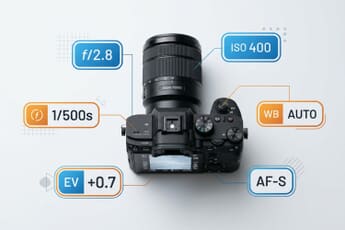
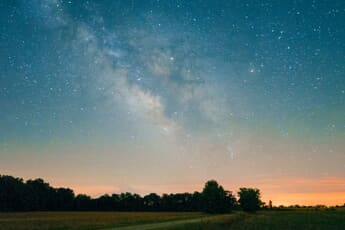
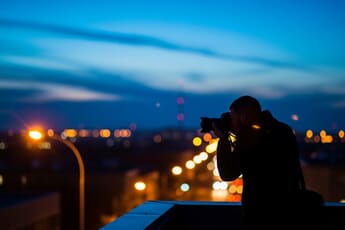
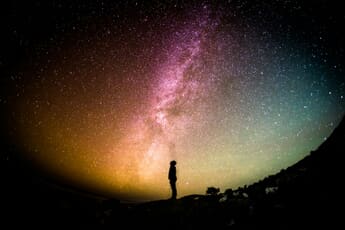
Blue Hour Photography: A Comprehensive Guide (With 7 Tips)

What is blue hour in photography? And what makes it so special?

In this article, I’m going to share everything you need to know about blue hour, including why it actually matters, and how you can use it for gorgeous images. I do a lot of blue hour shooting, myself, so I make sure to give you my favorite tips and tricks for getting great blue hour results. 

Let’s dive right in.

What Is Blue Hour in Photography?

Blue hour refers to the hour or so before sunrise and the hour or so after sunrise – when the sun is below the horizon and the sky is a beautiful blue color.

Note that blue hour is sandwiched between nighttime, when there’s very little light and you often need lengthy shutter speeds to get a decent shot, and the golden hours, when the sun is low in the sky and you can work with its beautiful golden light.

Why Is Blue Hour So Great for Photography?

Blue hour offers two key benefits.

First, blue hour light is soft. You can shoot without harsh shadows or blown-out highlights; during the blue hour, your subjects will be illuminated with jaw-droppingly beautiful light. 

(Think I’m exaggerating? I’m really not. Blue hour is a favorite of photographers – particularly landscape photographers – for this very reason.)

Second, blue hour light brings a magical, ethereal quality to photos, thanks to its sleepy blue tint. During blue hour, pretty much everything turns blue, and this can look one-hundred percent incredible. Blue hour even provides a dreamy glow, which can take a simple landscape composition and turn it into a work of art. 

See what I mean?

Now, blue hour isn’t the only great time for photography. I mentioned the golden hours, and they’re also a photographer’s favorite. 

But blue hour genuinely is a gorgeous time to get out your camera. If you’ve never tried shooting during blue hour before, I highly recommend it. 

The Best Subjects for Blue Hour Photography

Now that you understand the ins and outs of blue hour, you’re probably wondering:

What subjects should I actually shoot

I already mentioned that landscape photographers love blue hour, and it’s true: if you like to shoot landscapes, then blue hour is a great time to set up. You’ll get a beautiful blue glow, you’ll get soft light, and you can even incorporate moving elements for stunning long exposures (more on that later!).

But landscapes aren’t the only subjects you should consider during the blue hour. You can do portraits for a soft, ethereal effect:

And you can capture blue-toned cityscapes, as well. 

You can even do wildlife photography during blue hour, though I’d recommend you combine it with flash for the best results. 

By the way, there are no hard-and-fast rules for blue hour subjects. If you want to photograph a subject I didn’t mention here, do it. Have fun. Experiment! You might end up with a beautiful result.

Tips and Tricks for Blue Hour Photography

Blue hour photography isn’t especially hard, but it does require some special know-how. These tips and tricks will help you take stunning blue hour photos, fast.

1. Use a Long Shutter Speed (Plus a Tripod to Prevent Blur)

Blue hour only begins once the sun is below the horizon. 

Which means that light is very, very limited. 

Now, when shooting in low light, you have three options:

Boost your ISO.

Widen your aperture.

And lengthen your shutter speed. 

Related Posts

In general, you want to keep your ISO as low as possible. And your aperture should be determined by artistic considerations (i.e., depth of field). 

That leaves your shutter speed. 

To get a proper exposure, you’ll want to drop your shutter speed, often below 1 second (and sometimes to 10 seconds, 20 seconds, or more). 

And unless you also use a tripod, you’re going to end up with one ultra-blurry shot. 

I’d recommend using a remote shutter release, too; this will let you trigger your camera without pressing the shutter button (because actually hitting the button can create camera shake!). Another option is the two-second or ten-second self-timer, but I personally don’t like waiting for a handful of seconds – after all, two seconds can be the difference between a bad shot and a great shot!

So remember: 

Lengthen your shutter speed for a good exposure. And make sure you use a tripod – plus a remote shutter release – to minimize blur.

2. For Blue Hour Portraits, Use a Wide Aperture for Increased Sharpness (And Beautiful Bokeh)

As I explained in the previous tip, blue hour doesn’t offer much light. And for still subjects, such as landscapes, the clear response is to lower your shutter speed until you get a good exposure. 

But what if you’re photographing a moving subject, such as a person? How are you to get a sharp image?

Instead of lengthening your shutter speed (and risking blur), why not widen your aperture?

Widening your aperture will brighten up your exposure, and it’ll let you keep your shutter speed fast while capturing plenty of detail. It’ll have another effect, too: it’ll decrease your depth of field, so you get beautiful bokeh in the background.

At the right blue hour location, this can create an incredible effect. Simply angle your portrait subject so you have lights in the background, such as car lights or streetlights. 

Then dial in an aperture between f/1.2 and f/2.8.

Make sure there’s sufficient distance between the subject and the background lights…

And get a shot just like this one, with dreamy, creamy bokeh:

3. Focus Manually for the Sharpest Results

These days, autofocusing technology is superb – but when the light gets low, your camera’s AF will tend to hunt (and it’ll sometimes fail completely).

In other words:

During blue hour, you can’t trust your camera’s autofocus. Sure, some cameras have better low-light thresholds than others. But even the best cameras struggle a little in low light, which is why I recommend you consider turning off your autofocus and focus manually instead. 

Intimidated? Don’t be. Manual focusing might sound difficult, but it’s actually pretty simple. Just turn the focus ring on your lens until your main subject looks sharp, then fire off a shot!

(If you want to be precise, you can always zoom in using your camera’s Live View and focus on your magnified main subject.)

If you’re dead set on using autofocus, there are some tricks you can try; for instance, you can shine a flashlight onto your subject and try to focus where the beam hits. 

But it’s a good idea to familiarize yourself with manual focusing, just in case.

After you’ve taken a manual focus shot or two, I do recommend you check the shot on your camera’s LCD. Use the magnification option to check on the details, because manual focusing isn’t perfect.

And if you missed focus slightly, don’t get too frustrated; it’s bound to happen on occasion. Just take a deep breath, reshoot the scene, and check again. You’ll get your shot, even if it takes a couple of tries.

4. Be Ready With a Few Compositions

Blue hour doesn’t last very long, which means that you should make the most of it. 

And every second you’re scrambling around looking for compositions is a second you’re not shooting. 

That’s why, especially if you’re heading to a new or special location, you should scout the scenery in advance. 

Head out a few hours before the blue hour begins and hunt around for possible compositions. If you’ll be shooting landscapes or cityscapes, look for powerful leading lines and eye-catching backgrounds. If you’ll be shooting portraits, look for clean, non-distracting backgrounds, as well as street lights for eye-popping bokeh effects. 

You can even bring your camera and take a few images. Try to work out the optimal settings for your blue hour photoshoot. If you’re after sharp landscapes, select an aperture and calculate the hyperfocal distance. And think about whether you’ll need to focus stack for a truly sharp image.

5. Photograph Moving Subjects for Powerful Long Exposures

As I’ve repeated throughout this article, the blue hour offers limited light. 

So, why not embrace the low light and capture some beautiful long exposures? 

Specifically, find a scene with a moving element, such as grasses blowing in the wind or water moving across rocks. 

Then dial in a low ISO, pick a narrow aperture (so everything remains sharp), and use a lengthy shutter speed. 

As long as you work with a tripod and a remote shutter release, the scene will be rendered in perfect detail, except for the moving element; it’ll give you a jaw-dropping blur effect, like this:

And don’t be afraid to push your exposure to ridiculous lengths. You can get cool effects with an exposure of 1 second or so, but why not try 20-second exposures? Minute-long exposures? If you’re up for it, you can even try a five- or ten-minute exposure for wonderfully ethereal results. 

(Note that, to capture an exposure over a few seconds, you will need a neutral density filter to prevent the shot from overexposing.)

6. Experiment With Intentional Camera Movement for Artistic Results

Intentional camera movement (ICM) is one of my favorite blue hour techniques. It’s a great way to capture original, creative images, like this one here:

Plus, it’s just a lot of fun. 

Here’s how it works:

First, choose a narrow aperture and a low ISO. 

Then pick a slow shutter speed. The particular value will depend on the lighting, but at the beginning of the blue hour you might be able to work at 1/10s or so. By the end, you’ll be at 1s or longer (and you can adjust this by changing the aperture and ISO to compensate).

Next, find an interesting subject. Lots of colors are good (which is why a classic intentional camera movement subject is fall foliage!). Zoom in to fill the frame, if possible.

Finally, start panning your camera from left to right or right to left and fire the shutter as you do. Keep panning, even as your finger comes off the shutter button (and feel free to take multiple images in a single pan!). 

While ICM photography is pretty hit-and-miss, when it works, it really works. Don’t be afraid to take dozens or hundreds of images in pursuit of that one perfect shot.

(And experiment with different shutter speeds. A shorter shutter speed will give you less blur and more detail, whereas a longer shutter speed can turn your whole shot into an abstract wall of color.)

7. Combine the Sky With Interesting Foreground Elements to Improve Depth

Blue hour tends to offer breathtaking skies. 

But while it can be tempting to compose solely with the sky in mind, I’d highly recommend taking your photo one step further. Instead of just focusing on the sky, look for compelling foreground elements that you can incorporate into the composition.

For instance, you might find leading lines, such as rocks jutting out from the foreground or a river leading off into the distance.

You might also find standalone foreground elements, such as a colorful rock or an interesting flower. 

By positioning these foreground elements at the very bottom of your image, you can draw the viewer in – and only then show them the beauty of the sky. It’s a more sophisticated, and often more powerful, method of composing. It’ll add plenty of depth to the scene, so the viewer feels like they can walk into the photo and keep going. 

Note that you’re not limited to just an interesting foreground element plus a background/sky. You can always add interesting elements to the middle ground, and you can even find additional interesting elements to add to the background. 

That way, you can create a complex and beautiful blue hour shot.

Blue Hour Photography: The Next Step

Well, there you have it:

Everything you need to know about blue hour for stunning photos. 

So go on a blue hour photoshoot. See what you think. While blue hour isn’t for everyone, it can certainly help you capture some stunning shots!

How long does blue hour last? 

That depends on where you live, the weather, and the season. You can expect the blue hour to last anywhere between 15 minutes to 1.5 hours. 

What time is best for photography? 

There’s no one best time for photography, but blue hour certainly is a good time to shoot. The golden hours (just before sunset and just after sunrise) are also worth considering.

Which is better, blue hour or golden hour?

Blue hour and golden hour are both great, but in different ways. Golden hour delivers light that’s golden and soft, and it’s great for sculpting your subject with light and shadow. Blue hour offers even softer light, plus a beautiful blue color. 

What are the best blue hour camera settings?

I’d recommend using a low ISO as well as a narrow aperture (for landscapes) and a longer shutter speed (assuming you own a tripod). If you want to shoot handheld, you’ll need to use a wide-aperture lens (set to f/2.8 or wider).

About the Author
jaymes dempsey author

Jaymes Dempsey is a professional macro and nature photographer from Ann Arbor, Michigan; his work is published across the web, from Digital Photography School to PetaPixel. You can connect with Jaymes on Instagram, Facebook, and LinkedIn.

Leave a Comment

Your email address will not be published. Required fields are marked *

3 thoughts on “Blue Hour Photography: A Comprehensive Guide (With 7 Tips)”

  1. In the opening comment “What is…” it should read “the hour or so after sunset”, not after sunrise.
    Small typo there.

    1. jaymes dempsey author
      Jaymes Dempsey

      Glad it helped, Derek! The blue hour is a lot of fun to shoot – if you get any images you’re pleased with, I’d love to see them!