For the past few weeks, we’ve been testing Skylum’s latest AI-powered program, Luminar Neo. And in this Luminar Neo review, we offer an in-depth evaluation of its features. We discuss:
- All the latest Luminar editing tools
- Whether Luminar Neo offers effective image organization
- How Luminar Neo compares to Luminar AI
- How Luminar Neo compares to Adobe, ON1, and Phase One software
By the time you’re finished, you’ll know whether Luminar Neo is a capable post-processing program – or whether you’d be better off with a different editor.
Let’s dive right in.
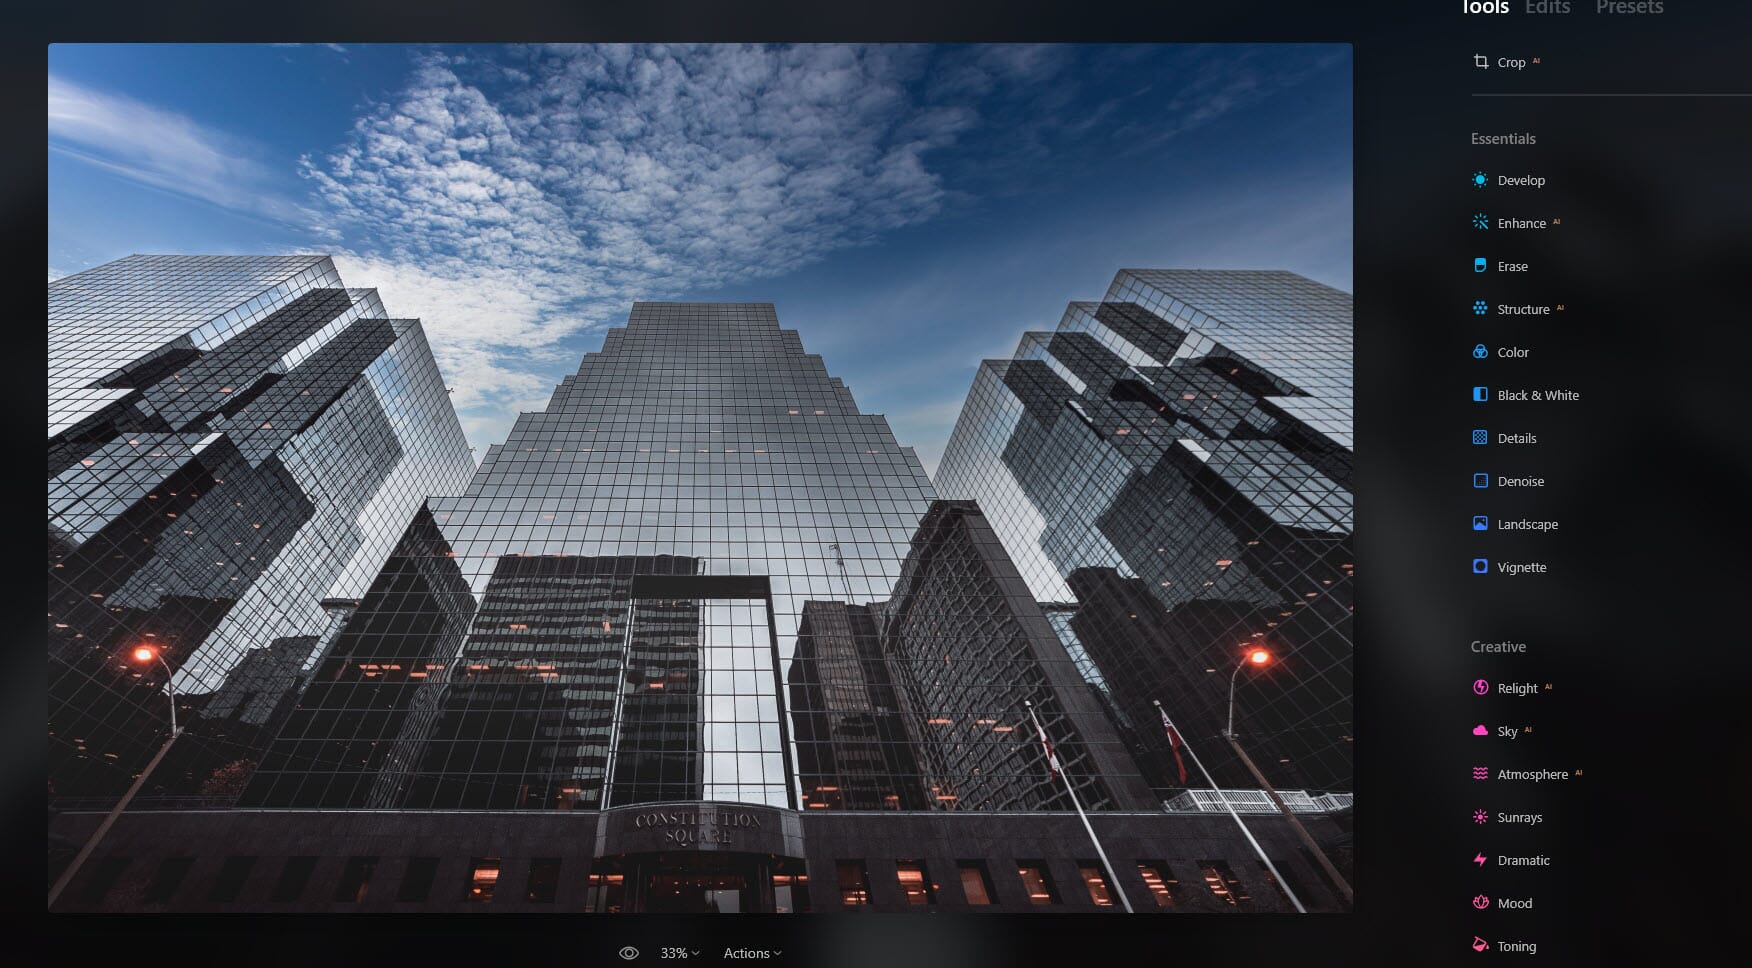
Luminar NEO Review:
When you buy through links on our site, we may earn a commission at no cost to you. We evaluate products independently. Commissions do not affect our evaluations.
Luminar Neo: Overview

Although its performance could do with a serious upgrade, Luminar Neo offers powerful AI features for an affordable price.
Luminar Neo is Skylum’s latest addition to the Luminar lineup. Like its predecessors, Neo combines artificial intelligence and a minimalist layout to create powerful, easy-to-use editing software.
Luminar Neo is aimed at beginner and intermediate photo editors; hence, the program features plenty of one-click options, including:
- Sky AI, which lets you instantly replace an original sky with various dramatic options
- Crop AI, which suggests crops to improve your photo compositions
- Portrait Bokeh AI, which lets you create beautiful background blur behind your portrait subjects
- One-click presets, which Luminar’s AI-powered interface suggests based on the content of each image
But while Luminar Neo targets inexperienced users via automatic edits, it also packs a comprehensive set of editing options, similar to programs like Adobe Lightroom Classic and ON1 Photo RAW. You get exposure adjustments, color adjustments, and a black and white converter, along with more advanced tools such as a tone curve and masking. You also get a digital asset management module, which you can use to select “keeper” photos and categorize files by topic, date, and more.
Related Post: ON1 Photo RAW 2022 Review
Luminar Neo is also relatively inexpensive compared to its competitors. You can grab a single-computer version for a one-time payment of $79, which includes plenty of presets and texture overlays, plus access to updates released over the next few years.

That said, Luminar Neo does come with significant drawbacks. As you might expect from such a powerful AI photo editor, the program suffers from significant performance issues. Additionally, its local editing features pale in comparison to Lightroom’s new masking panel, and its DAM functionality is frustratingly limited (to say the least).
And Luminar Neo, while currently available for purchase, isn’t complete. If you buy Neo, you’ll get access to many features – but you’ll need to wait for certain tools, such as Mask AI and Portrait Background Removal AI. These features will come as an eventual free update, but Skylum has not unveiled a timeline – so if you’re hoping to put Luminar Neo through its paces right away, then you’re out of luck.
At the end of the day, Luminar Neo is a decent editing program, and it’ll certainly suit the needs of some beginners. But we can’t wholeheartedly recommend Neo as a Lightroom alternative for intermediate and advanced editors; despite the program’s power, its performance remains disappointingly slow, and it’s missing too many features to be a serious all-in-one RAW editor.
Ease of Use and Layout
Luminar Neo boasts a minimalist layout that manages to simplify photo editing and organization even more than Luminar AI – quite an achievement, given the beautifully streamlined interface offered by the latter.
Luminar Neo offers two – just two! – modules, Catalog and Edit:

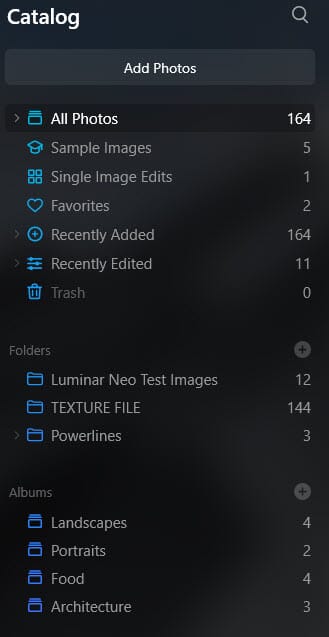
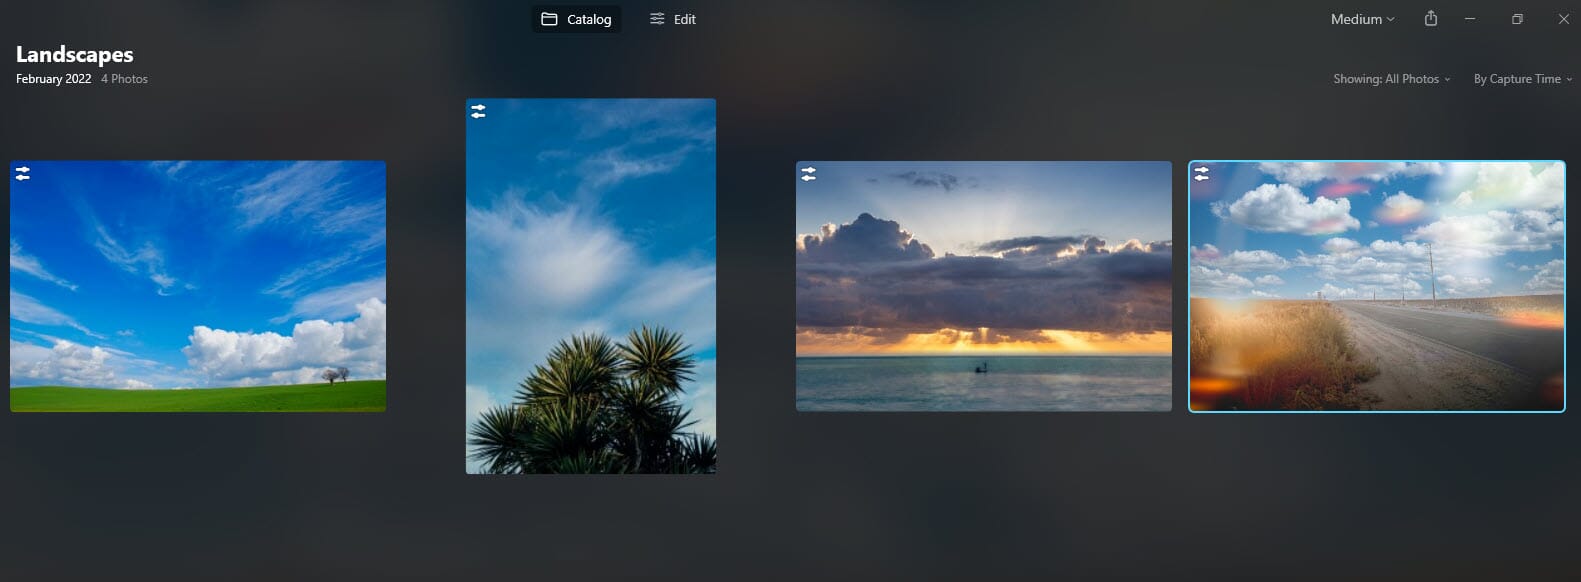
In the Catalog module, you can import image folders and organize files into Albums. You can also view any edited images and recently added files as well as your entire catalog of files:
You can view files up close via the loupe view, useful for quickly evaluating shots after a photography outing:
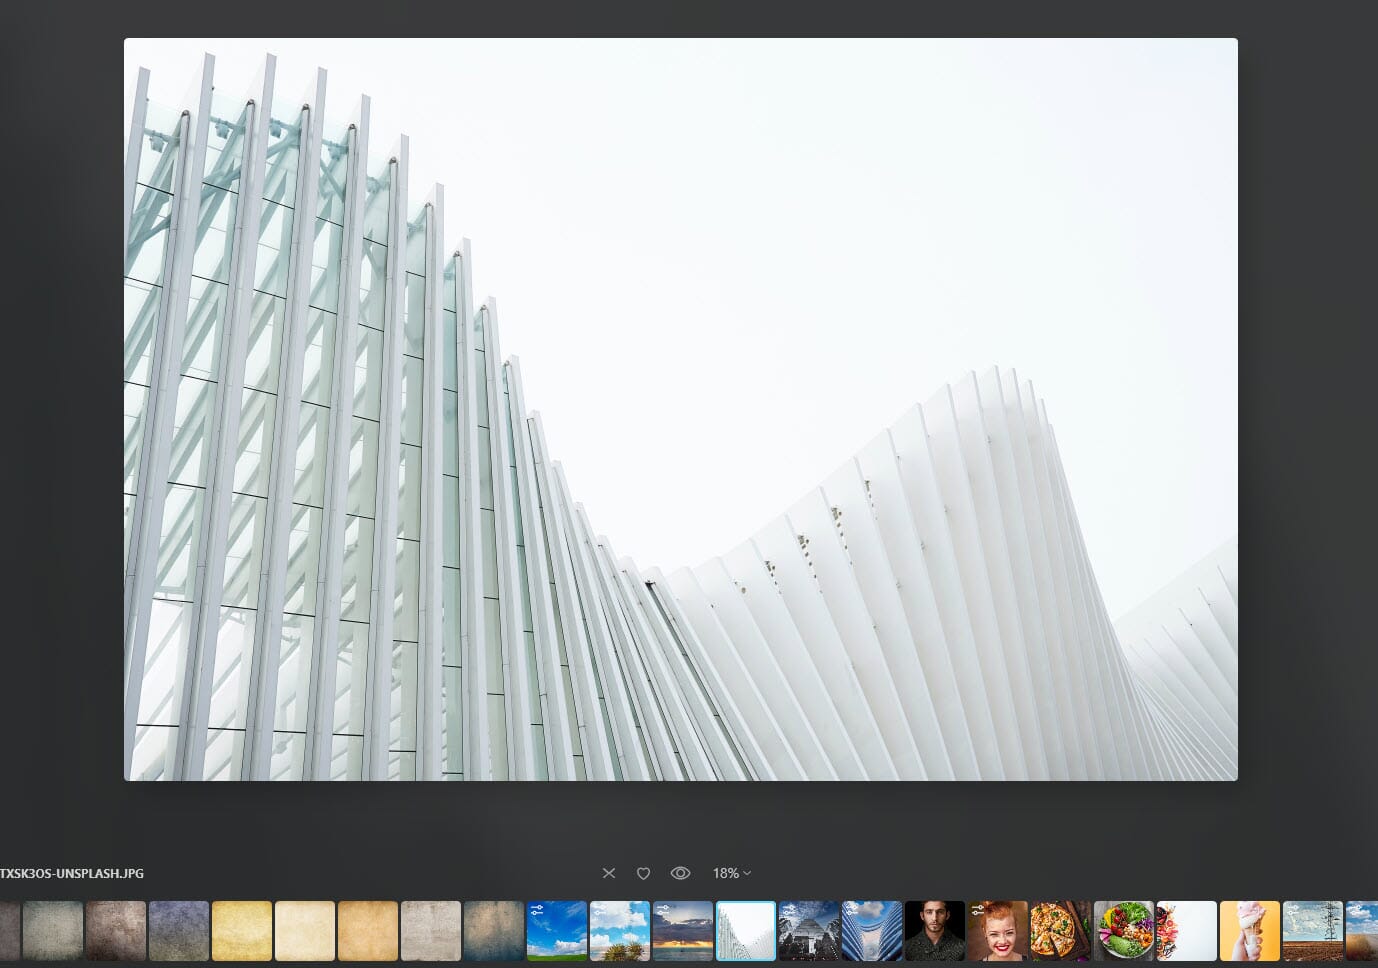
The entire Catalog module is easy to use and takes about five seconds to master. There are zero complex import options, and viewing photos is highly intuitive. We do wish it were easier to add images to Albums (right now, there’s only click-and-drag functionality, which is annoying when you’re trying to organize thousands of images), but that’s a minor issue.
Click on the Edit option, and you’ll go straight into the Edit module:
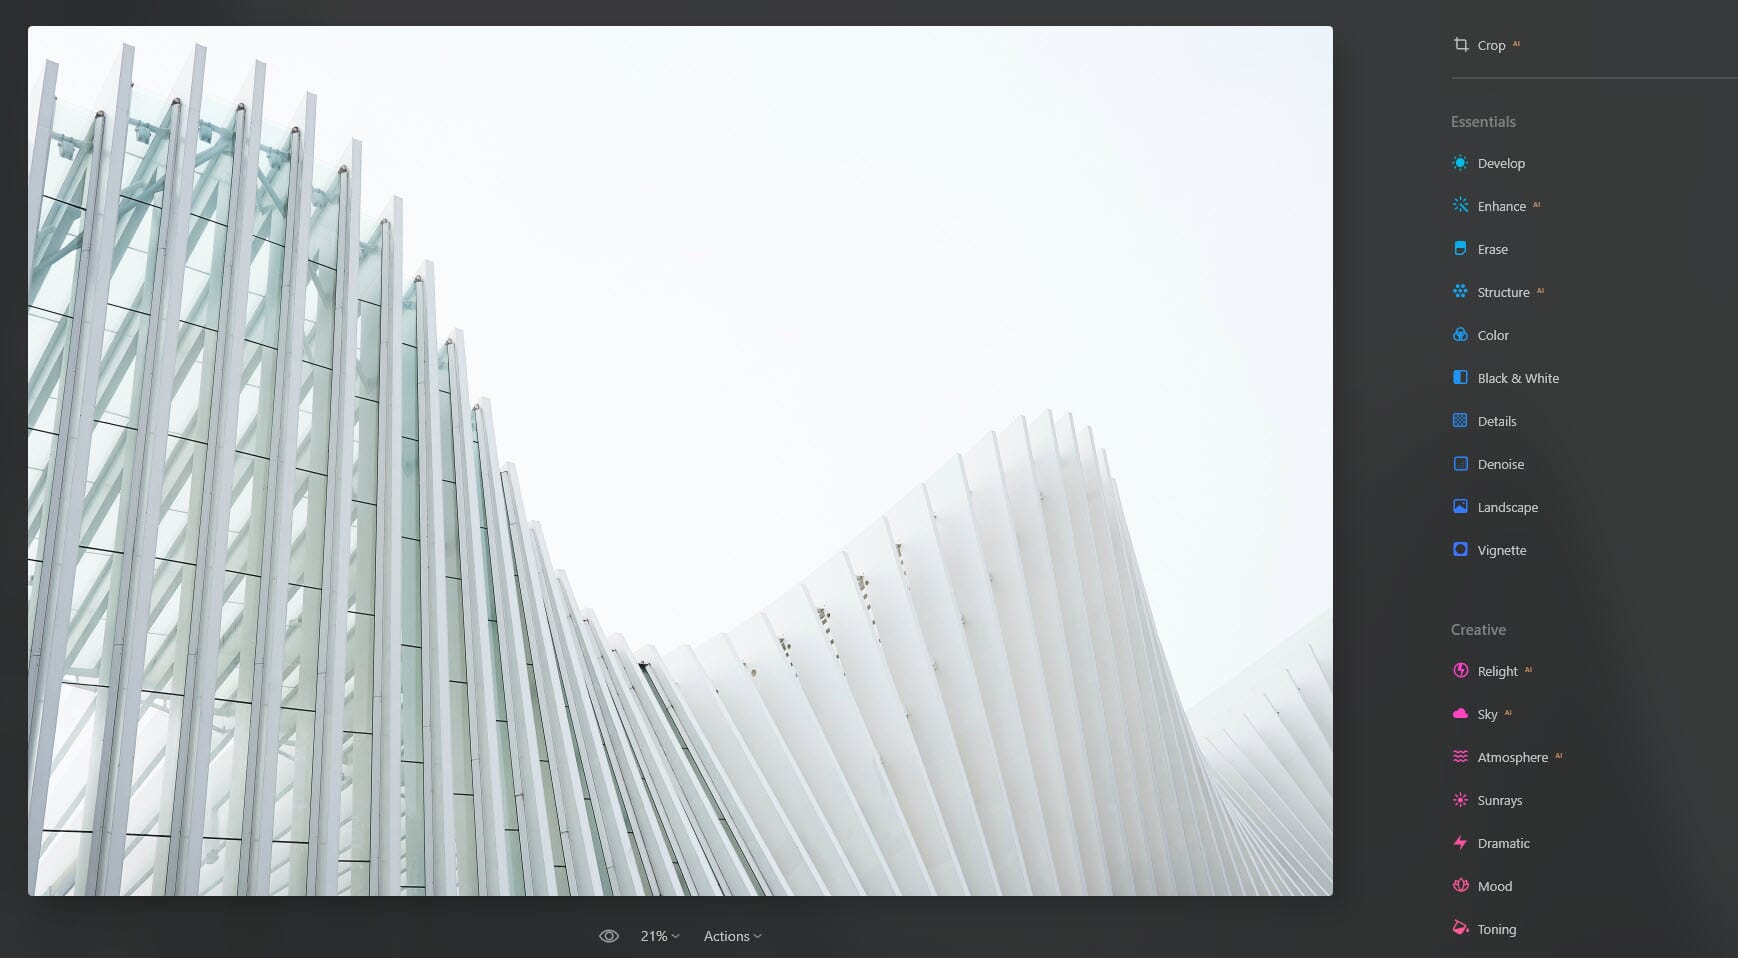
Earlier versions of Luminar AI categorized the editing tools into four separate panels, but Skylum has discarded these and set everything out, list-style, for the user to access:
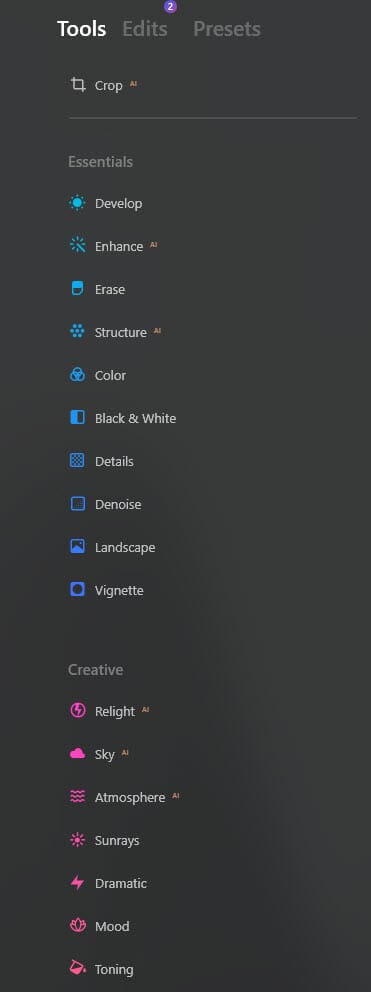
You can click on a tool to see its various options and start making adjustments:
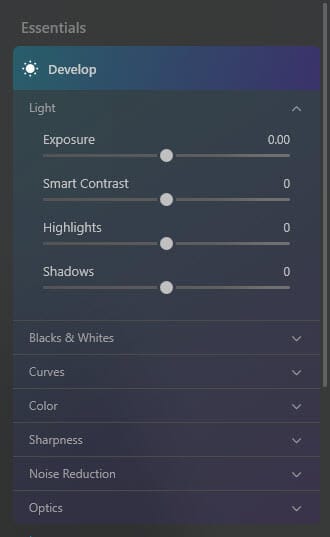
Again, everything is simple and easy to access, though we did prefer the categorized “panel” version used by original iterations of Luminar AI and Luminar 4. Given the huge number of Skylum tools, scrolling through a huge list becomes inconvenient after a few minutes of editing.
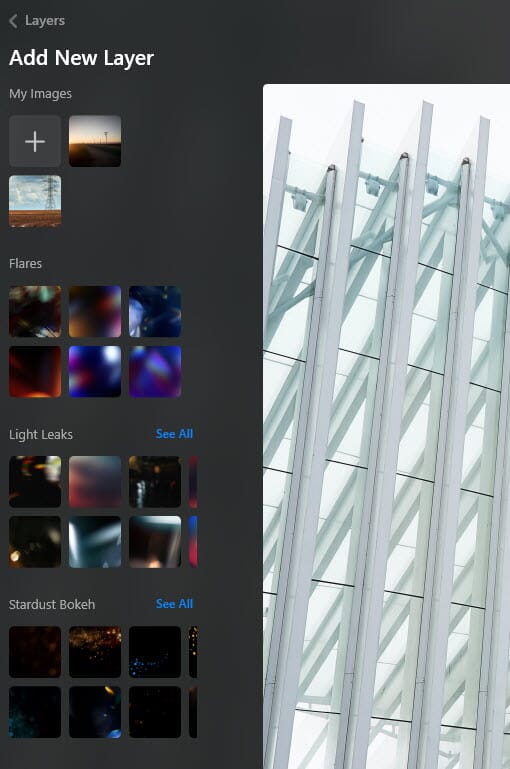
On the left-hand side, you can access Layers, which allow you to add overlays (such as light leaks and bokeh) to your images:
And on the right-hand side, you can access Presets, which offer one-click photo editing:

Luminar Neo has added an Edits pane, which lets you view your editing history for each photo. You can use this to step back in time and re-style different edits, which is very cool, especially if you’re the type of person who likes to come back to your photos after a few days (or months) away from the computer.
Much less cool, however, is how the Edits pane is implemented. As soon as you close an editing tool, your adjustments get sent to the Edits pane, which means that, if you open your editing tool back up again, the edits are gone (they remain applied to your image but are only viewable in the Edits pane). This makes it very frustrating to hop from tool to tool, because as soon as you close one, you cannot adjust it again without heading into the Edits panel and finding the relevant tool.
Finally, you get the standard Luminar Export panel, which appears identical to its Luminar AI counterpart:
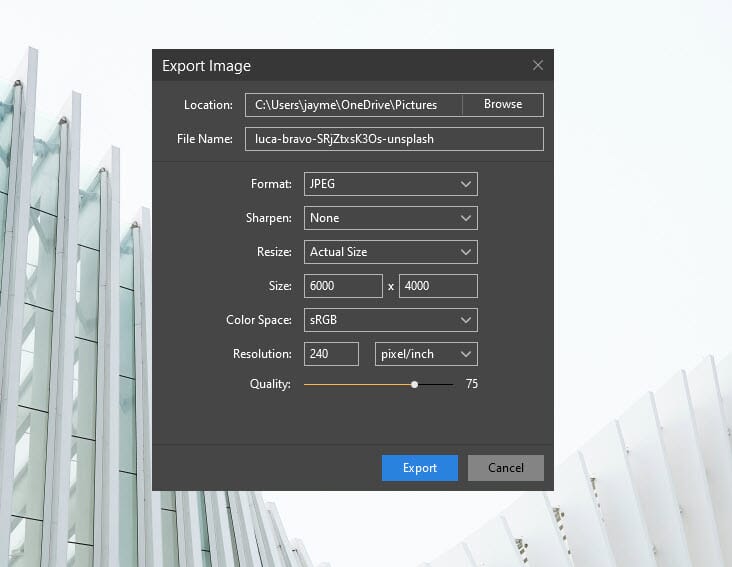
Like Luminar Neo’s other features, it’s simple to use – perhaps too simple. There’s no option to batch rename files, which is a big deal to us and plenty of other editors; if you want to export 10 landscape photos as “landscape-portfolio-1,” “landscape-portfolio-2,” “landscape-portfolio-3,” etc., you have to export each image individually.
Overall, though, the Luminar Neo interface is beautifully designed and requires zero editing experience to understand. Beginners, in particular, will appreciate the program’s simplicity, and it certainly feels more accessible than editors like ACDSee and Capture One, which are overflowing with tools and panels.
Image Management
We’ve been saying it for years: Luminar’s image organization features – that is, the digital asset management options – are abysmal.
And Luminar Neo’s DAM workflow is equally disappointing, on par with Luminar AI and (marginally) worse than Luminar 4.
As discussed above, you manage your files in the Catalog module. You can import photo folders via the Add Photos button in the upper left-hand corner:
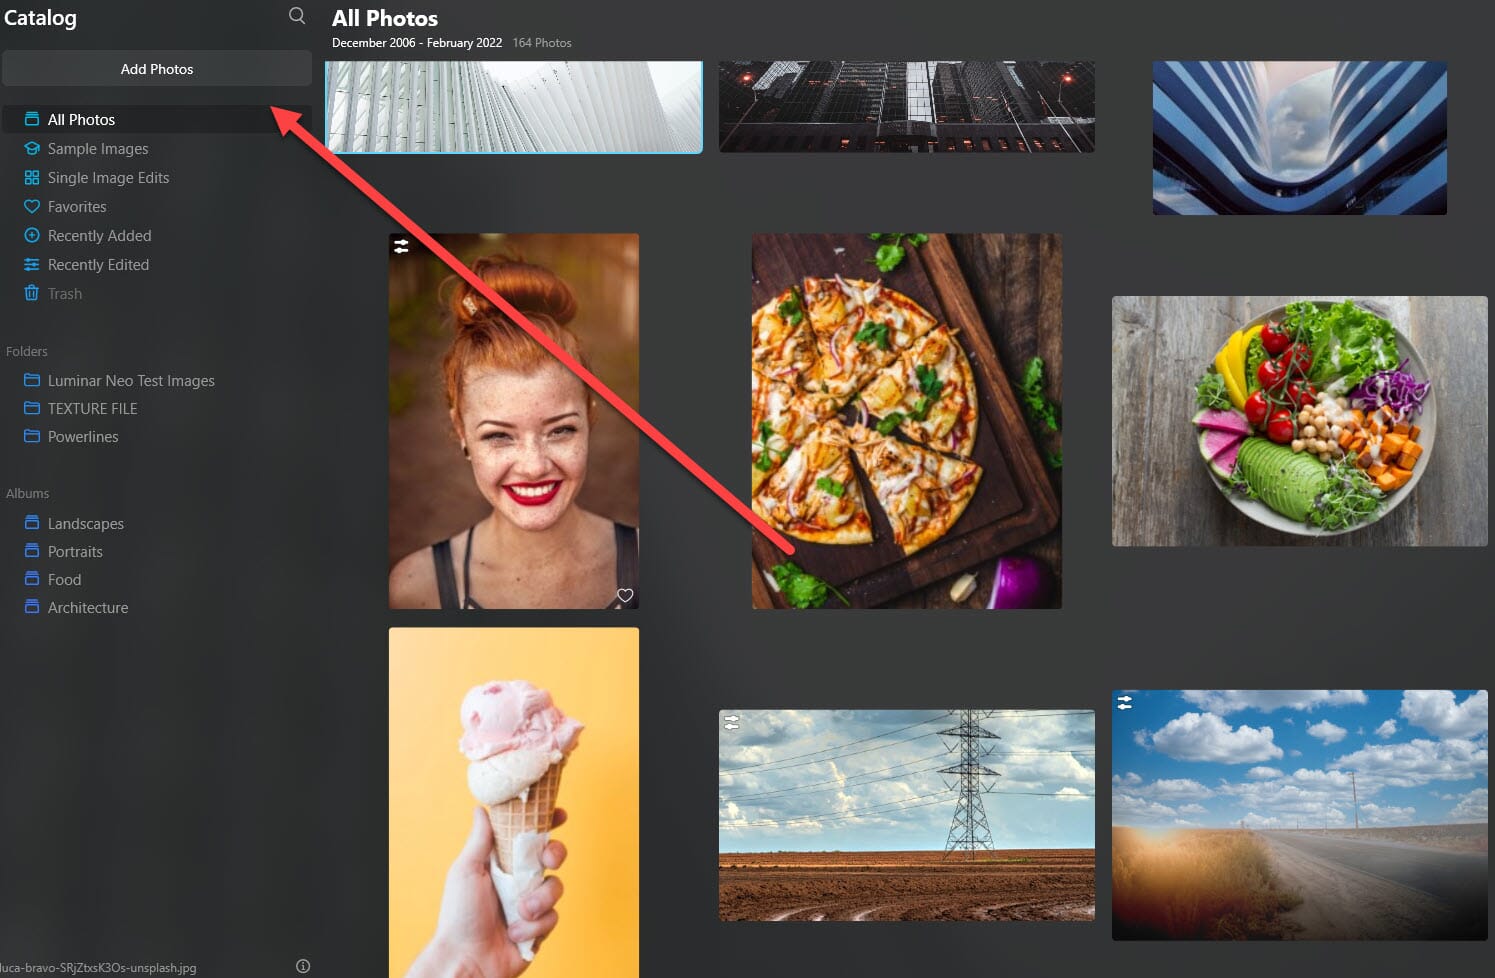
There’s no option to import individual photos on the main screen, which you may find frustrating depending on how you like to work, though you can hit Ctrl/Cmd+O to import single files. Folders, once imported, will appear in the Folders section, which corresponds to your desktop photo hierarchy.
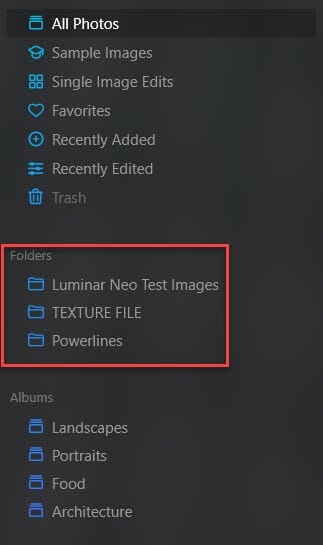
And you can view your imported photos by selecting the relevant file. To see a full-screen image, you’ll need to double-click, which brings you into the loupe view.
Many photographers like to take imported files and reorganize by genre, photoshoot date, quality (i.e., “keepers” versus “maybes” versus “deletes”), and so on. Luminar Neo technically lets you do this by creating Albums, but in truth the functionality is insufficient for most serious users; you can’t create nested Albums, and there’s no way to automatically add photos to Albums by flagging or favoriting. If you wish to move a photo to an Album, you must select it and drag it over to the relevant area.
Luminar Neo doesn’t offer much in the way of image selection, either. There’s absolutely zero keyword functionality (which we seem to remember Skylum promising to develop way back when, but that never seems to have happened), nor is there an option to star or color code your files. For many editors, star functionality is a key part of a good photo organization workflow, so this omission is more than a little annoying. You do have the option to Favorite and Reject files, which is nice, but – at least in our minds – just not enough.
At the end of the day, if you’re looking for serious image organization options, Luminar Neo isn’t it. Lightroom, Capture One, ON1 Photo RAW – these programs are miles beyond Luminar Neo and are a better buy for users hoping to organize thousands of files. Note that you can use Luminar Neo as a Lightroom plugin, so you don’t have to rely on the program’s DAM if you don’t want to, but many photographers prefer to pay for one editor, not two.
Beginners, on the other hand, may be satisfied by Luminar Neo’s basic DAM functionality. No, you won’t be able to manage files from dozens of portrait photoshoots, but as a beginner, does it really matter?
Editing Features
Powerful photo editing is Luminar Neo’s main strength, and here Skylum manages to (mostly) deliver. Below, we evaluate Neo’s editing options, including its core editing functionality and AI-powered tools.
The Basics
Luminar Neo packs all the core editing tools you’d expect from a standard post-processing program, from exposure adjustments and white balancing to sharpness and noise reduction.
You can find these tools in Neo’s Essentials section, and they primarily consist of simple-to-use sliders:
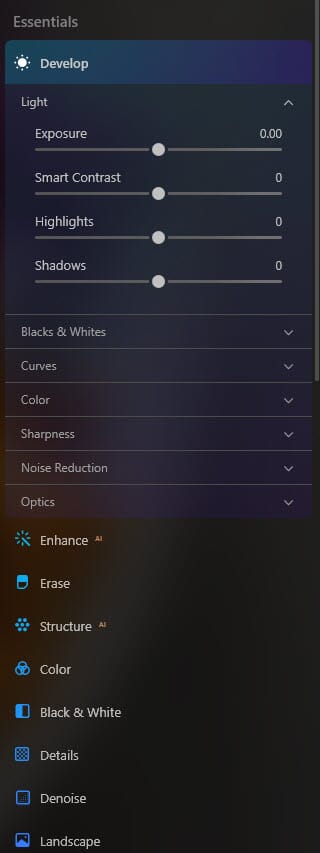
These are all identical to the tools in Luminar AI, and you’ll have no problem boosting exposure, adjusting the white balance, removing noise, and so on. Skylum has thrown in a few AI tools, including Enhance AI and Structure AI, which generally make your photos look better, even if they don’t do a perfect job.
And there’s even Skylum’s Crop AI (Composition AI, for those Luminar AI users), which suggests crops based on an AI-understanding of image aesthetics. We’ve always been pretty disappointed with the results, but maybe you’ll have better luck.

The only glaring omission here is a clone tool, which was present in Luminar AI but was apparently dropped from Luminar Neo. (Skylum does promise the tool in the first update, but that may be several months away.)
Fortunately, there is an Erase tool, and this allows you to remove blemishes and even objects from your photos – but when Erasing fails, you’re stuck.
The Erase tool does offer functionality beyond a standard healing brush, however. You can remove both power lines and dust spots with a single click, though we tested the power-line removal feature pretty extensively and weren’t especially pleased by the results. Here’s a photo with a handful of annoying power lines:
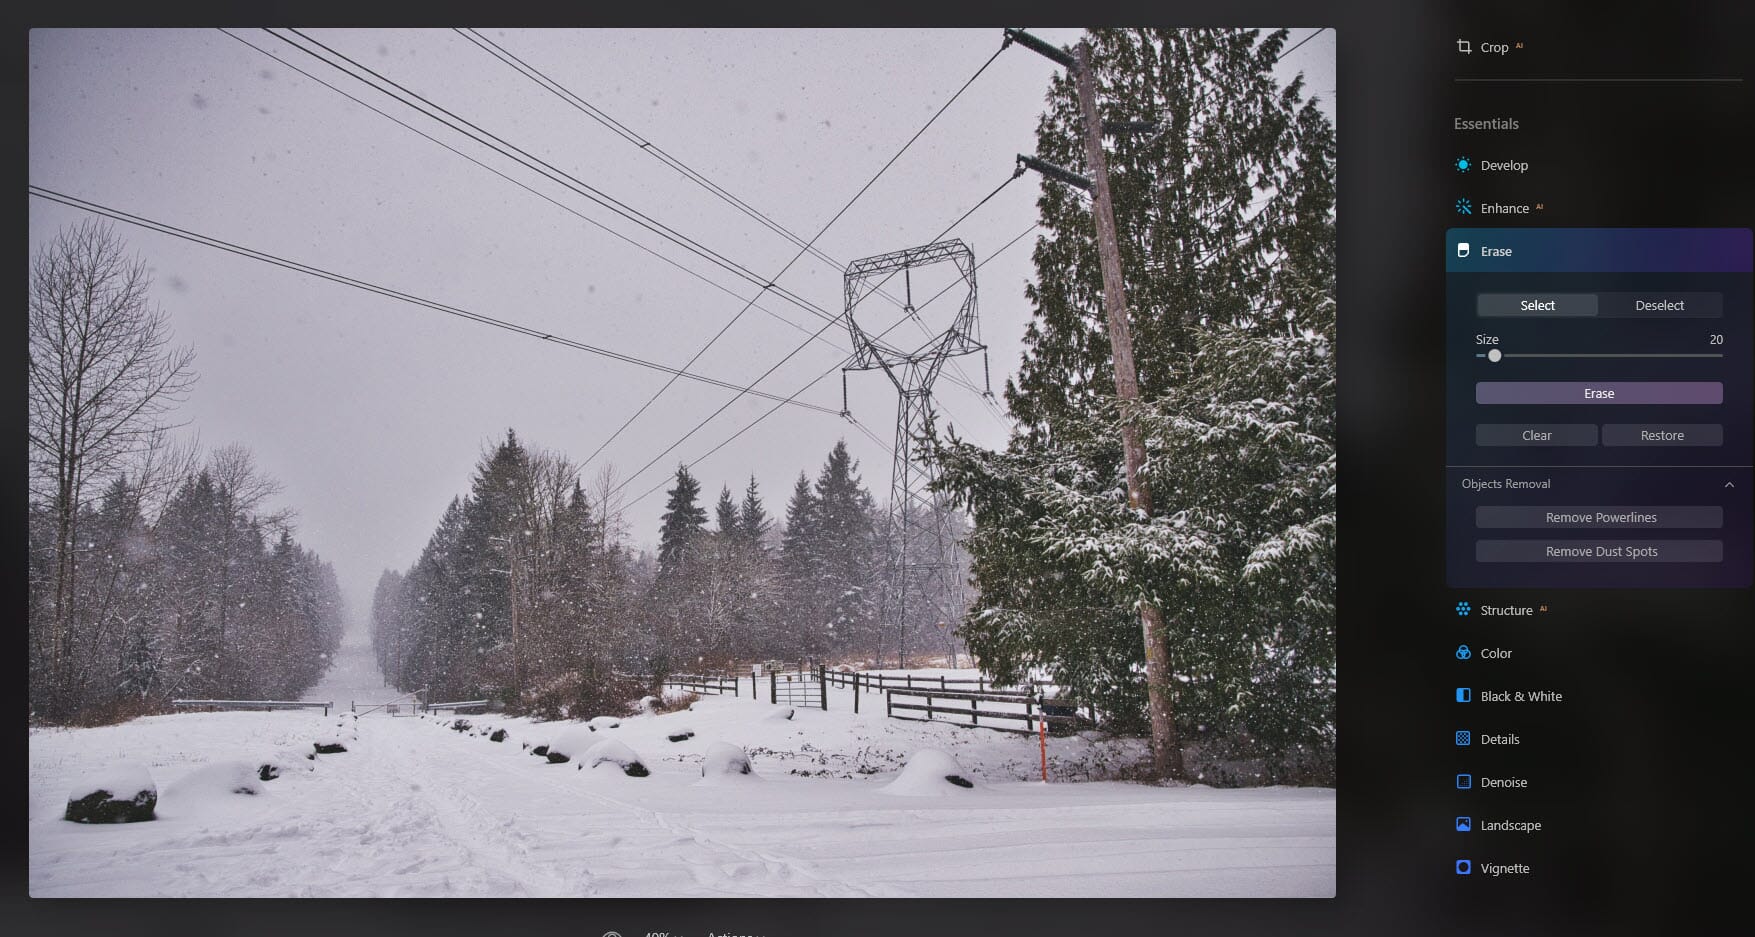
And here’s the photo after power line removal:
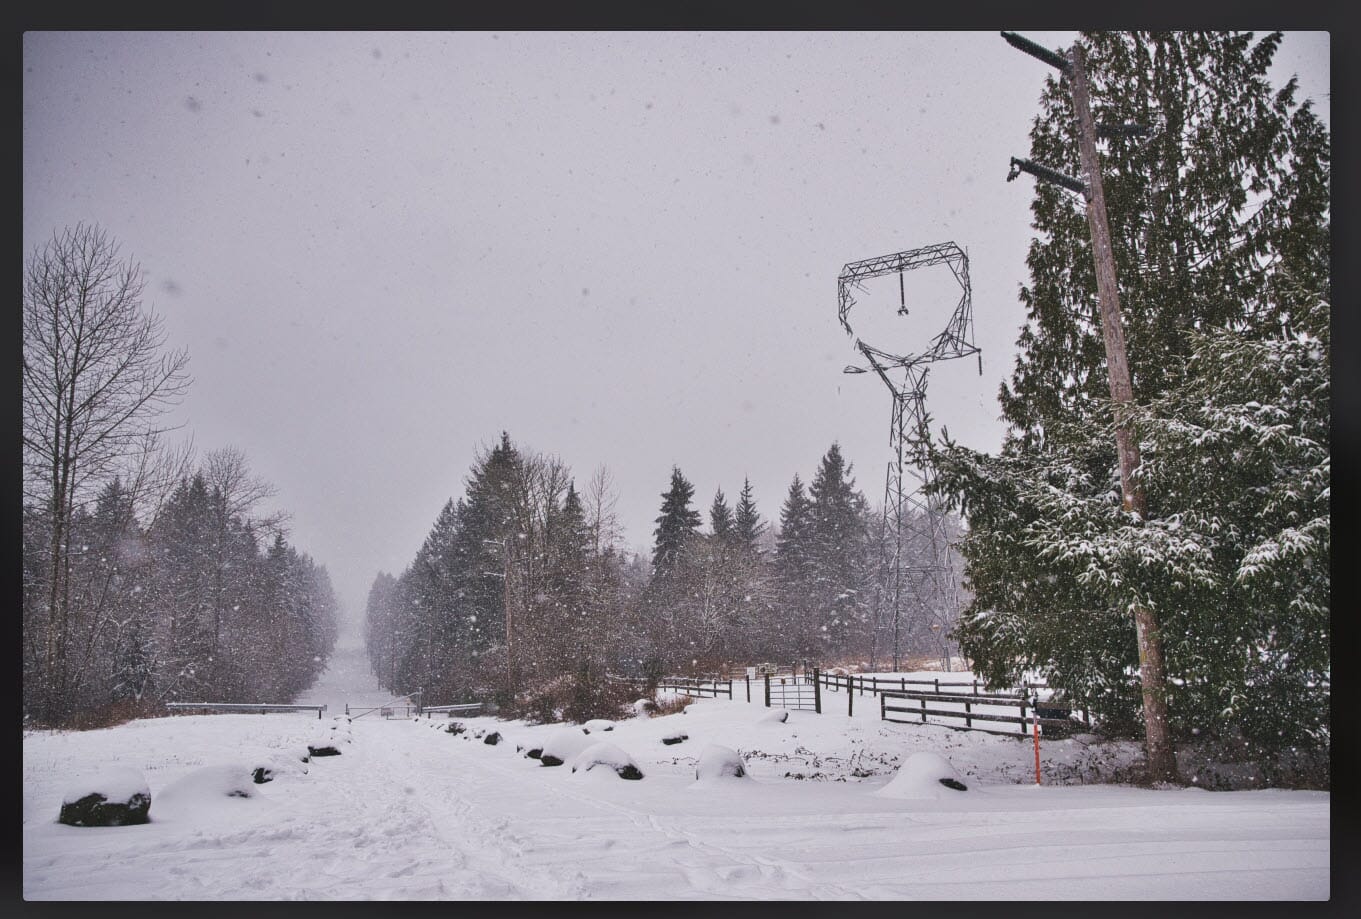
Not so great, eh?
Creative Effects
Like its predecessors, Luminar Neo includes plenty of effects for the artistic post-processor. The results are hit and miss depending on your photo, but you can:
- Enhance fall foliage
- Add sunrays
- Add a soft-focus or Orton-style glow
- Add LUTs (which are like presets but more limited)
- Create a cinematic split-tone look
- Much more!
These effects are all very cool to play around with, and while they might encourage some overediting, they’re certainly great fun (and they’re even useful for advanced editors when applied judiciously).
Note that Neo also offers several creative AI effects, such as sky swapping, which we discuss in the AI sections below.
Presets
Luminar Neo includes plenty of one-click presets, and you can access these in the Presets pane.

In fact, Neo even analyzes your photo and suggests preset collections, which is perfect for beginners who struggle to start each new edit.
Presets are a great way to make your photos look great with minimal editing experience, and here, Luminar Neo won’t let you down; the program packs lots of great effects for portraits, landscapes, macro shots, and more.
Presets are also useful for experienced editors looking to speed up their workflows. Add a preset, do a bit of fine-tuning via Neo’s editing tools, and – voila! – you have a finished product. We do wish that Luminar allowed for preset batch processing, but adding the same preset to each file doesn’t take too much time.
At present, you can’t create presets of your own, but we think this feature will appear in a few days when Luminar Neo is released as a full-fledged editor. Nor can you see the adjustments each preset makes to your photo – hopefully, this will be added during the full release, too.
Sky, Atmosphere, and Relight AI Adjustments
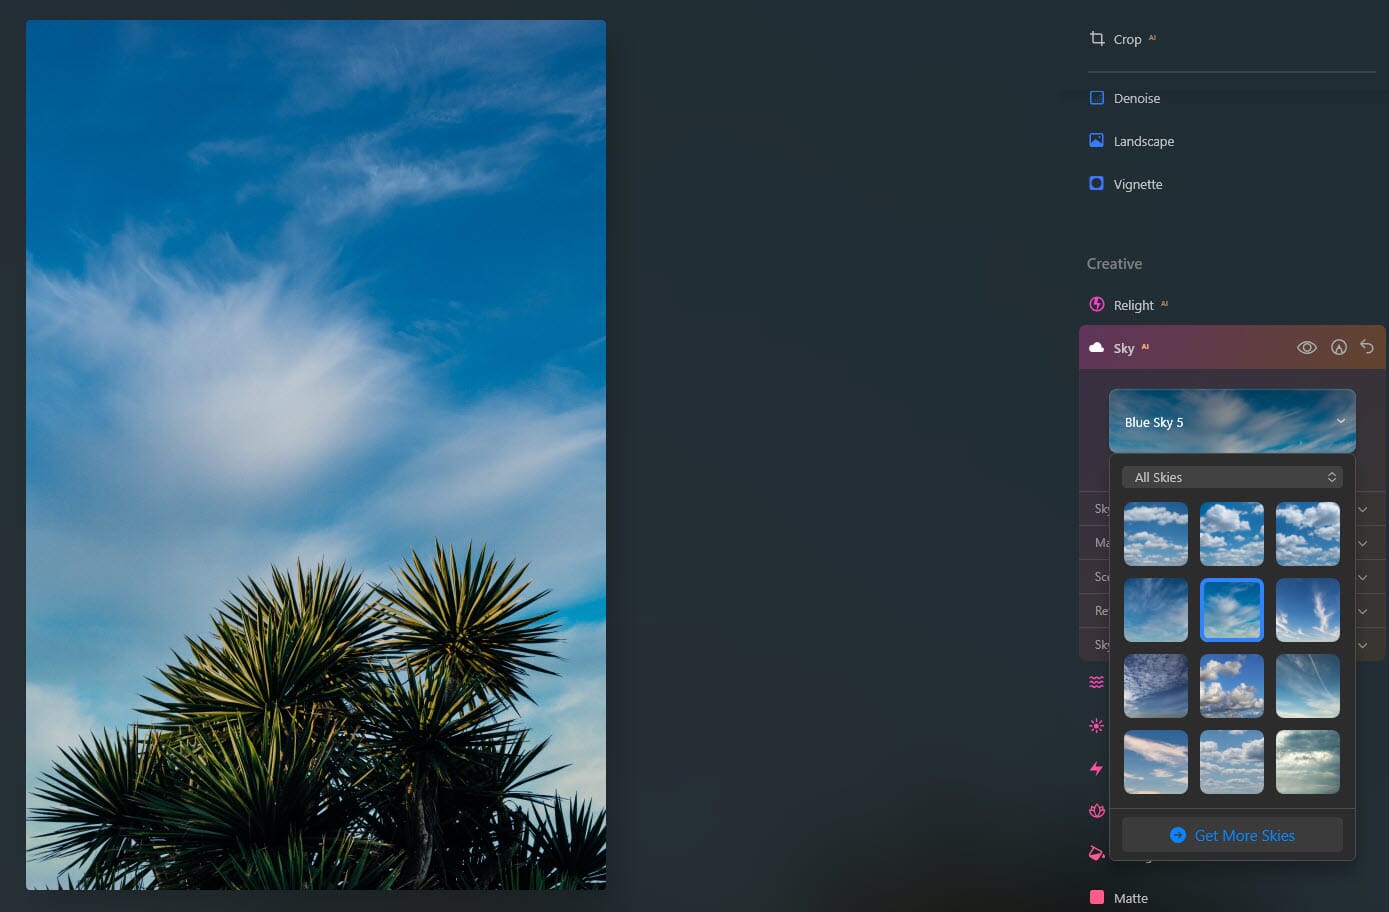
Skylum’s AI tools are back and better than ever in Luminar Neo, including the popular Sky AI, which allows you to swap out skies with the click of a button.
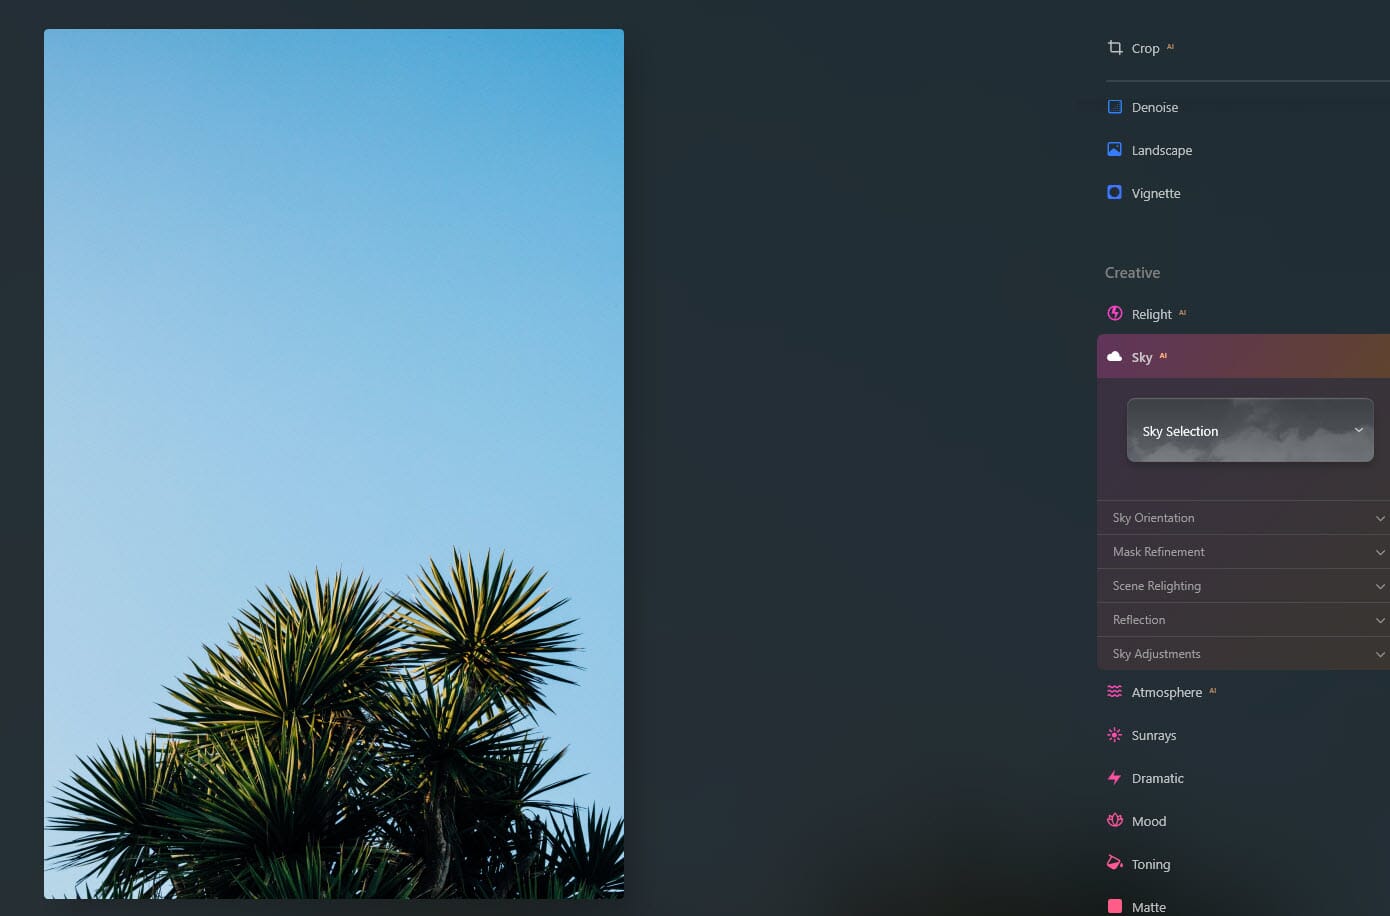
In the past, Luminar struggled to cope with challenging scenes, but Skylum seems to have worked out most of the kinks. We replaced plenty of skies in our tests, and the results generally looked outstanding (within reason, of course; you can’t expect to get a realistic-looking night scene from a midday shot).
Check out this original image:
With a brand-new sky:
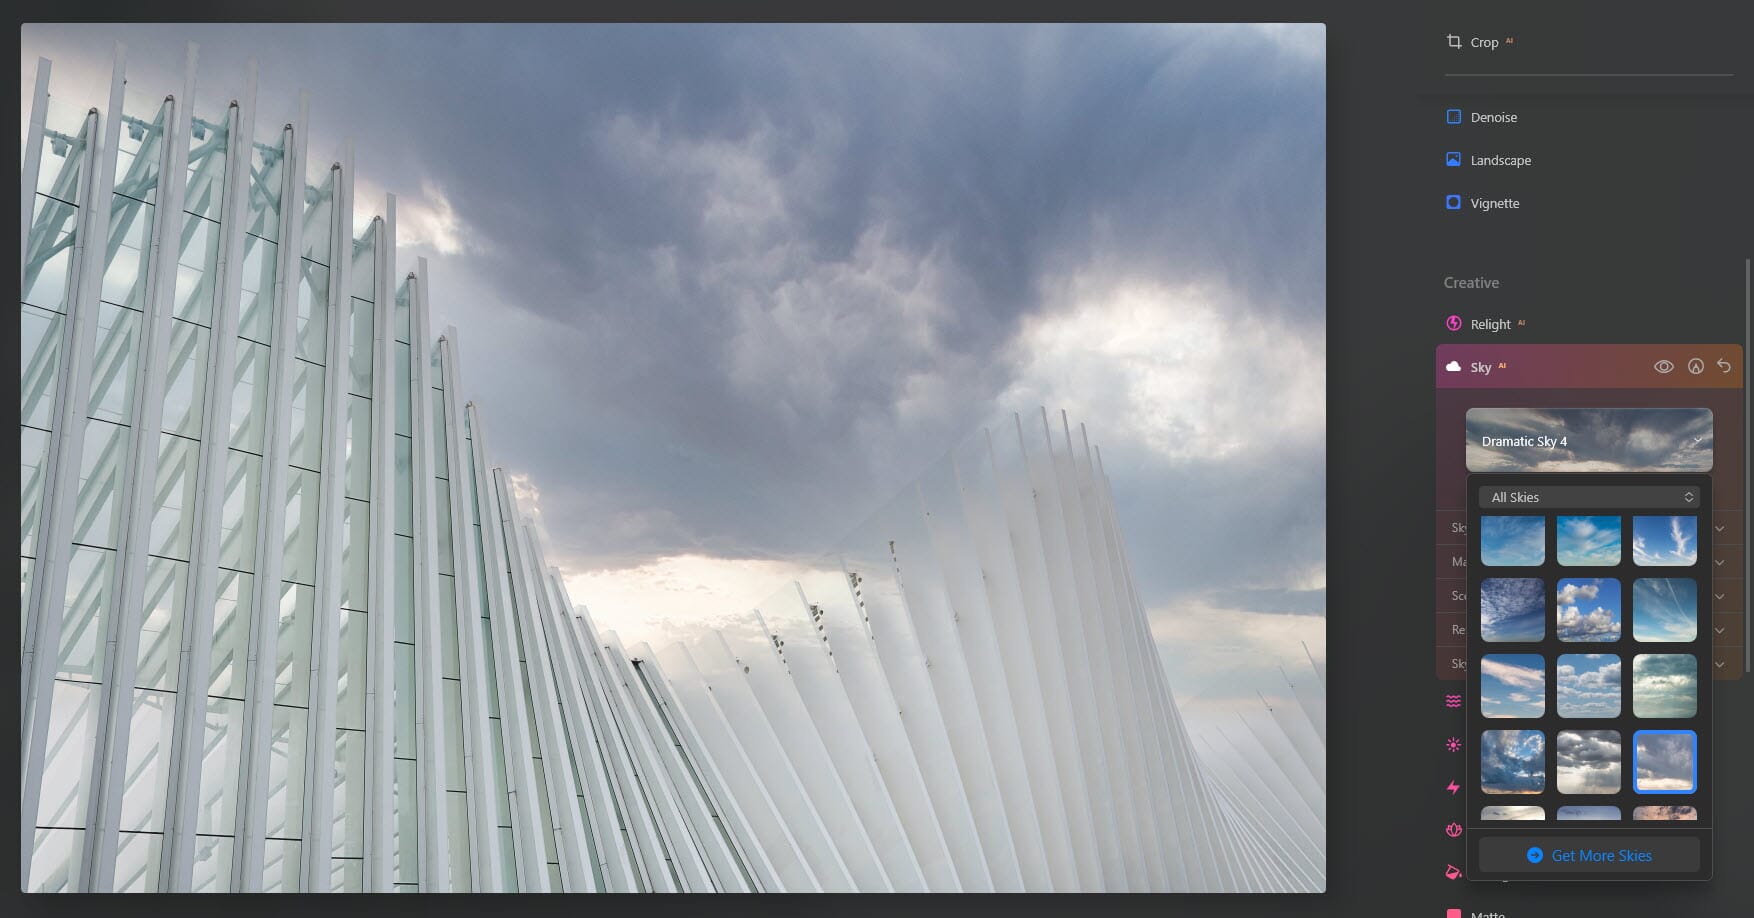
The tool even adds realistic reflections, though it did struggle when we gave it a high-key architecture shot to play with:
There’s also Atmosphere AI, first added in Luminar AI and still highly capable. You can use it to add mist, haze, and fog to your photos, and the effect is pretty realistic.
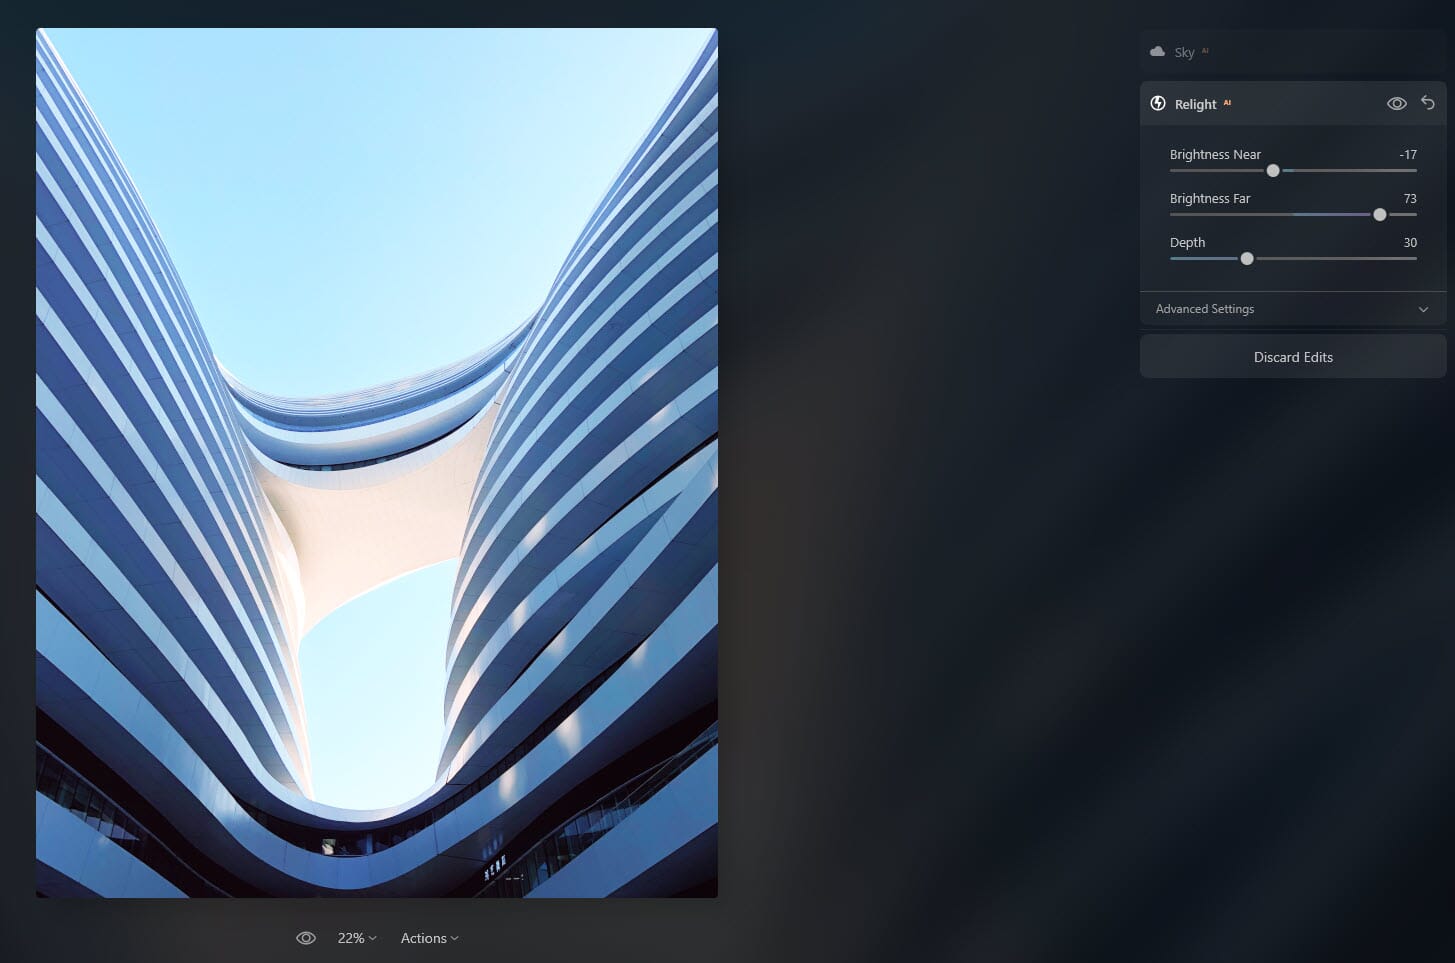
Luminar Neo also features a brand-new tool, Relight AI. It lets you selectively adjust the exposure of foreground and background areas, which is an easy way to quickly balance portrait lighting or add drama to landscapes. The effect looks decent, though the foreground-background masking isn’t always perfect, so you’ll want to carefully inspect your photos before exporting.
Portrait Editing
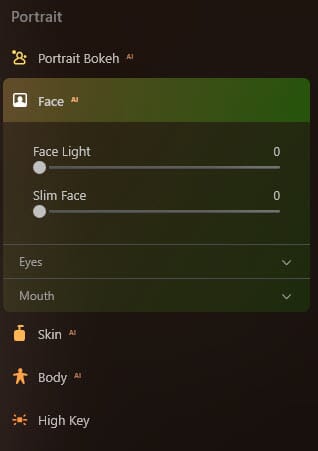
Skylum always includes a few good portrait-editing features in their Luminar releases, and Neo includes all the usual tools; there’s Face AI (perfect for selectively adjusting eyes and mouths), Skin AI (perfect for removing skin blemishes and enhancing skin texture), and Body AI (perfect for quickly adjusting body shape).
Neo also includes a new tool, Portrait Bokeh AI. It’s designed to add realistic bokeh to your portrait backgrounds, and it’s a great way to enhance already-existing blur or to add blur to photos taken with wide-angle lenses or narrow apertures.
And while it’s not yet present in Neo, Skylum promises Portrait Background Removal AI as part of its “first free update,” which will let you add new backgrounds to your portraits (like Sky AI but for people shots, presumably).
Bottom line: If you like to shoot portraits and you’re tired of spending hours retouching in Photoshop, Luminar Neo is worth a look (though bear in mind that, with the exception of Portrait Bokeh AI and Portrait Background Removal AI, Luminar AI includes all the same tools).

Local Adjustments and Layers
Luminar Neo offers an array of high-quality adjustment tools – but what about targeted adjustments? Can you apply edits via gradient masks, radial masks, and brushes?
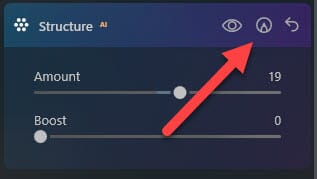
Unfortunately, Neo’s local adjustment performance is very mixed. On the one hand, you can turn nearly any edit – from exposure and color basics all the way to Sky AI – into a paintable adjustment. Simply make your changes, then click the Add Mask icon at the top of the tool, which will open your masking options.
You can then paint in your adjustment with a customizable brush.
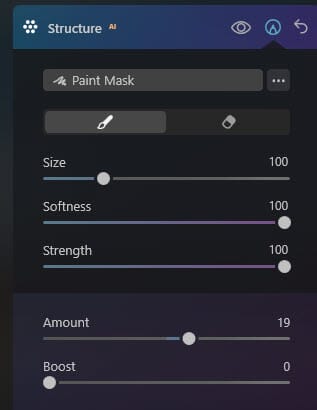
But Skylum’s implementation comes with two major drawbacks.
First, Skylum has left out the option to use a gradient or radial mask instead of a brush. According to Skylum’s website, this will be updated over the next few months, but the current version of Luminar does not include these local adjustment tools, so you can’t selectively apply adjustments to the sky, to the foreground, to the center of the image, and so on.
Second, you can only create masks as long as you don’t close the tool panel. As soon as the tool panel closes, the adjustments get sent to the Edits pane. The Edits pane itself offers no masking features, and if you open the relevant tool panel once more, the edits will have disappeared.
Is this an early glitch? Hopefully. But there’s a possibility that it’s here to stay, so it’s worth keeping in mind.
Luminar Neo also includes Layers. But these aren’t your standard adjustment layers à la Photoshop. Instead, they allow you to add creative effects, such as bokeh and light leaks:
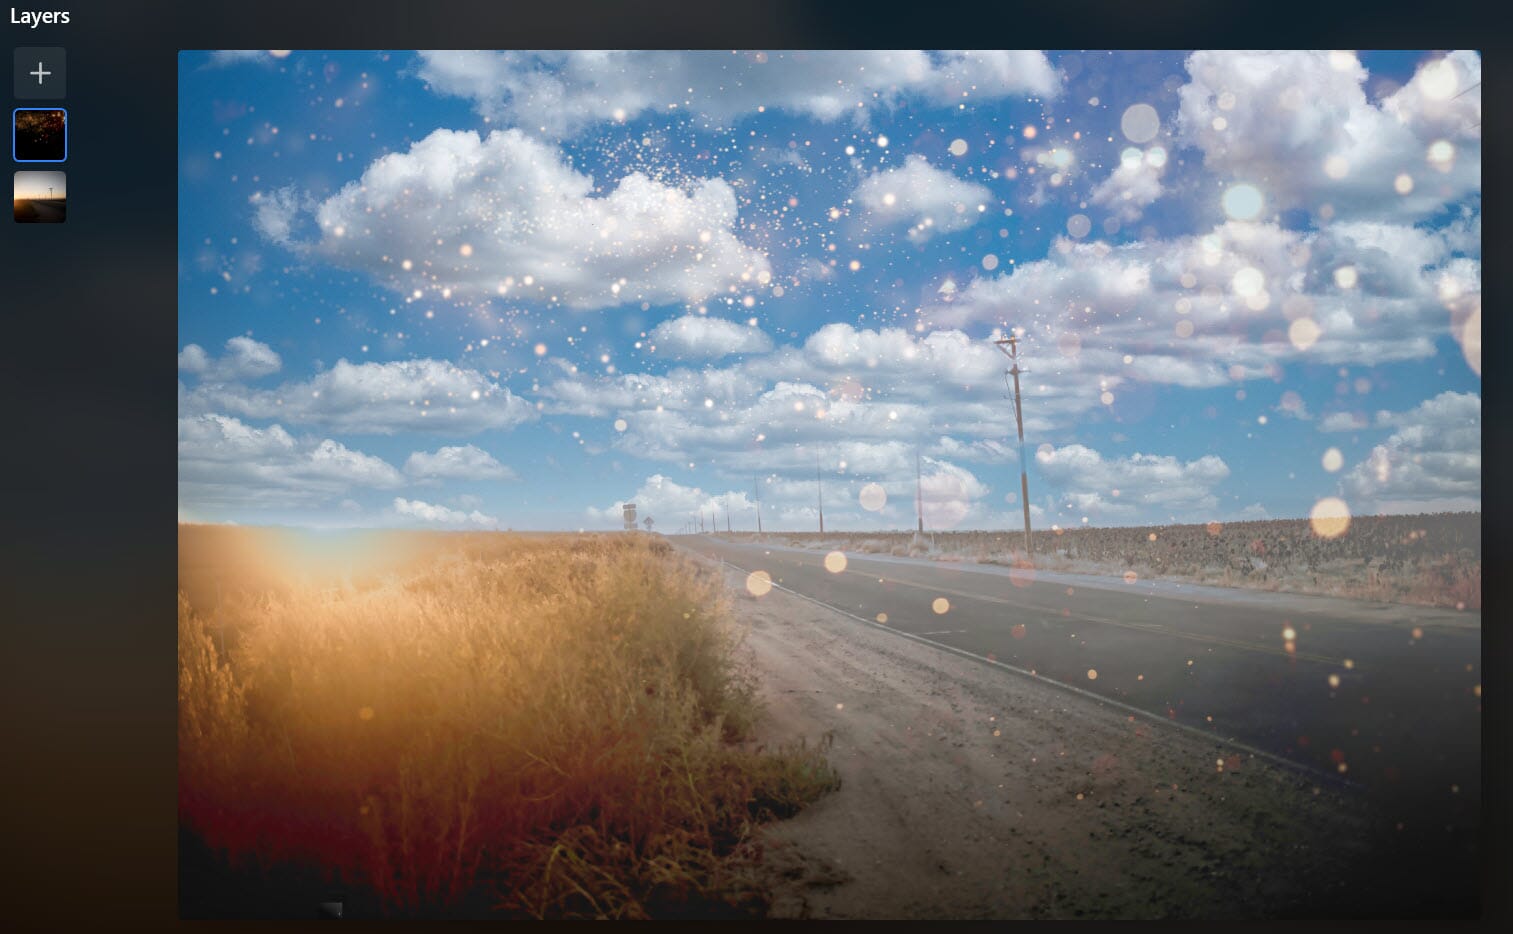
You can also use them to overlay textures and images, and you do have the option to resize, blend, adjust, and even mask these files.
It’s a nice touch, especially for photographers hoping to apply textures, bokeh, and other finishing touches to their files, even if it doesn’t rival the power of Photoshop.
To-Be-Released Tools
At the time of writing, Skylum has promised two sets of updates.
The “main release” update will occur “in February” and will supposedly add Presets and Layers to the program.
However, while the Luminar Neo webpage claims that this hasn’t yet happened – it’s still only offering the “Early Access” product – our version of Luminar Neo does include both Presets and Layers, so it seems this first set of features has been added ahead of schedule.
The second update will appear “later on” and will add both Mask AI (for easy masking of objects) and Portrait Background Removal AI (so you can quickly swap out portrait backgrounds), as well as radial and gradient masks, a clone tool, and more.
If Mask AI is well implemented, it could be groundbreaking, though it sounds like we won’t see it for several months (at least).
And for portrait shooters, the Portrait Background Removal AI will be a fun addition, though its effectiveness remains to be seen.
Performance
We activated Luminar on a relatively high-spec Windows PC (with 24 GB of RAM, a Core i7 processor, and an SSD drive)…
…and the performance was terrible. Every time we moved a slider, the adjustment lagged behind. When we tested the Remove Powerline option, we waited for over thirty seconds and got nothing. Luminar Neo crashed at least three times, and it was impossible to paint on adjustments with any precision; no matter what we did, the brush lagged far behind the cursor.
Yes, we’re testing the Early Access version, and you should expect to see improvements over time. But Luminar Neo was nearly unusable, especially for editors who frequently apply local adjustments or AI tools – not a great starting point, and frustrating for users who want to get started right away.
This is a major sticking point, and it’s the primary reason we cannot recommend Luminar Neo to the average user until Skylum performs some major updates. If you have a high-powered editing computer, you may be fine – but many a photographer will undoubtedly grow frustrated while editing. Programs such as Lightroom Classic and Capture One are certainly resource intensive, but they’re light years ahead of Luminar Neo’s performance.
Skylum lists the minimum and recommended system requirements for Luminar Neo (note that our test computer was far beyond the recommended requirements):
For Windows Devices
- At least Intel Core i5 or AMD Ryzen 5
- At least 8 GB of RAM (recommended: 16 GB or more)
- At least 10 GB of storage space (ideally on an SSD)
- At least Windows 10 version 1909
For Mac Devices
- At least Intel Core i5 (M1 chip is compatible)
- At least 8 GB of RAM (recommended: 16 GB or more)
- At least macOS 10.14.6
- At least 10 GB of storage space (ideally on an SSD)
Luminar Neo vs Luminar AI
Luminar Neo and Luminar AI are fundamentally similar programs. The layouts are related, the DAM features are identical, and even the editing tools are mostly indistinguishable.

However, there are a few notable differences between the programs. Luminar Neo does offer several new tools and features, including:
- Relight AI
- Power-line and dust-spot removal
- Layers
- Editing history
- Mask AI (not yet added)
- Portrait Background Removal AI (not yet added)
Most of the features present in Luminar AI but absent from Luminar Neo will eventually be added to the newer program, such as:
- Dodge & Burn
- Cloning
- Radial and gradient masks
- User presets
Luminar Neo does cost more than Luminar AI ($79 for one computer or $99 for two computers, versus $47 for two computers), but the difference isn’t huge. And Luminar Neo offers the benefit of future updates, whereas Luminar AI will likely be placed on the back-burner.
So which program should you get? Unless you’re on a serious budget, we encourage you to go for Luminar Neo. It offers additional power, and with the promise of future updates, it’s a much more compelling option.
Should You Buy Luminar Neo?
Luminar Neo Review: A Powerful Editor with Plenty of Problems

Name: Luminar Neo
Description: Luminar Neo is an AI-powered editing program aimed at beginners. You get DAM capabilities, class-leading AI tools, plus lots of creative edits for the artistic photographer.
Offer price: 79
Currency: USD
Operating System: Mac and Windows
Application Category: Photo Editor
Author: Jaymes Dempsey
-
Ease of Use
-
Editing Features
-
Photo Organization
-
Performance
-
Price
Summary
Luminar Neo is a powerful photo editor offering plenty of class-leading AI features, a digital asset management module, and more. Replace skies, add realistic fog, apply one-click presets, and take your photos to the next level with beautiful light leaks and bokeh effects.
Pros
- Easy to use
- Beautiful design
- Impressive AI tools
- Inexpensive
Cons
- Limited DAM features
- Laggy performance
Luminar Neo is an easy-to-use, sleek editing program that may satisfy beginner and even intermediate editors, especially those who wish to streamline their workflow with AI-powered tools.
Luminar’s Sky AI is genuinely great and further cements Luminar’s place as one of the best sky replacement programs on the market; Relight AI is very cool, especially for portraits and landscape shots; and Mask AI will (hopefully) be a great addition to the software.
On the other hand, Luminar Neo is not for photographers hoping for an all-in-one editing program. Neo’s digital asset management capabilities are limited; here, Lightroom, Capture One, and ON1 Photo RAW are far better options.
And Luminar Neo’s performance leaves much to be desired, so unless you’re using a high-spec computer, you should really look elsewhere.
Hopefully, Skylum will improve Neo’s performance in future updates. But for now, the program is an uninspiring addition to the Luminar lineup.
