


- Light position matters most: moving one light from front, to 45 degrees, to the side shifts a portrait from safe and flat to sculpted and dramatic.
- Soft, large sources (windows, softboxes) flatter skin; small, hard sources add punchy contrast. Modifiers are how you control the look.
- Learn the four classic patterns, Rembrandt, butterfly, loop, and split, so you shape a face on purpose instead of by accident.
- You do not need a studio: one light, or a bright window plus a reflector, covers the vast majority of portraits.
- Affordable LED and COB lights now make continuous lighting easy, and RGB gels open up high-key, low-key, and cinematic looks.
Introduction
Portrait lighting separates amateur snapshots from professional-quality images. While cameras and lenses matter, lighting determines whether a portrait flatters or fails the subject. The good news: mastering portrait lighting doesn’t require expensive equipment or years of training.
This guide covers everything from free natural light techniques to professional studio setups. Whether shooting with a smartphone near a window or building a dedicated portrait studio, these principles apply universally.
Understanding Light Direction
Before exploring equipment, understanding how light direction affects portraits is essential. The same light source creates completely different results depending on its position relative to the subject.
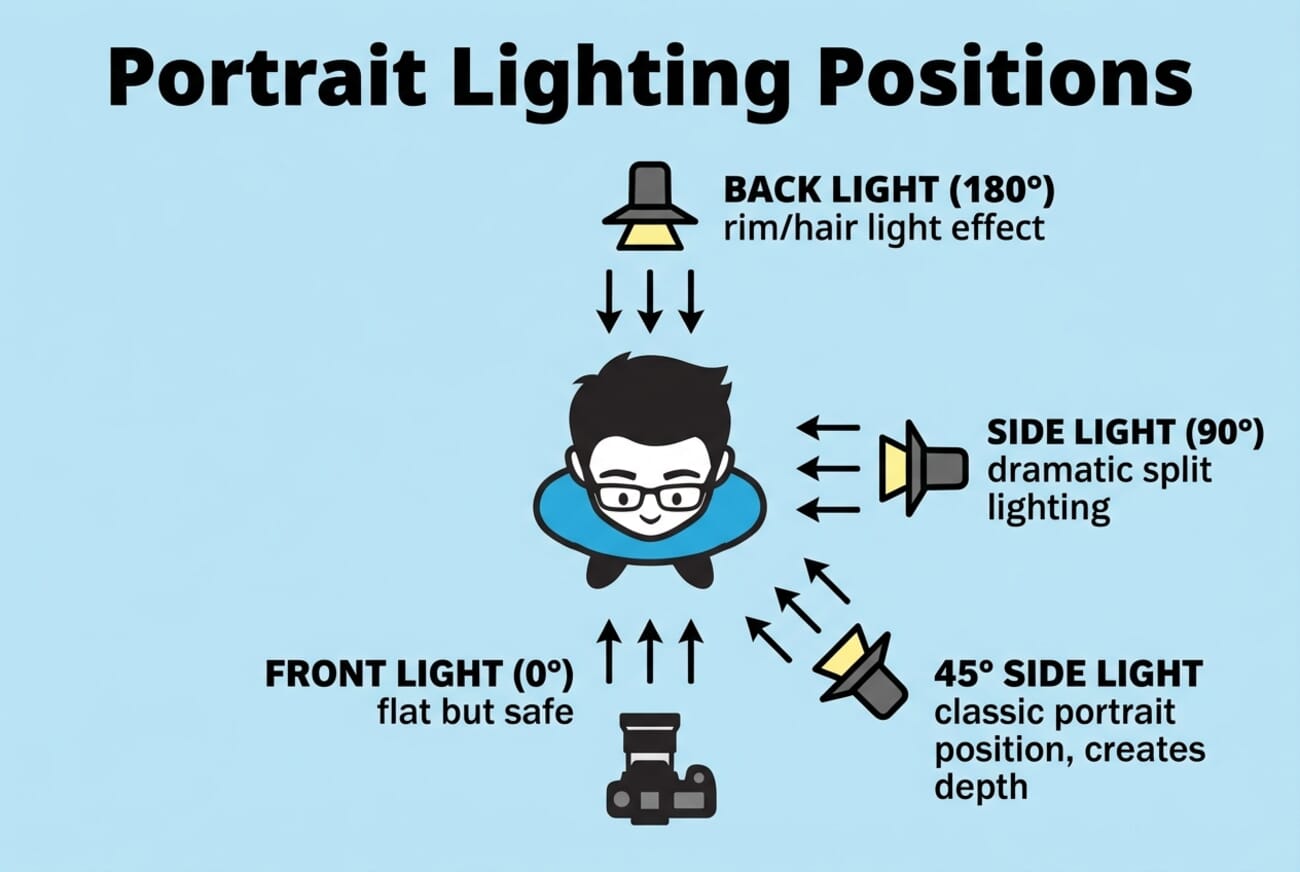
Front Light
Light positioned directly in front of the subject produces flat, even illumination. This minimizes shadows and skin texture, flattering for most subjects but lacking dimension. Front lighting is the safest choice when learning.
45-Degree Light (Classic Portrait Position)
Positioning the light 45 degrees to one side and slightly above the subject creates the most versatile portrait lighting. This angle produces gentle shadows that add depth and dimension while remaining flattering. Most professional portraits use some variation of this position.
Side Light (90 Degrees)
Light from directly beside the subject creates dramatic split lighting, half the face illuminated, half in shadow. This works well for moody, artistic portraits but can be unflattering without careful positioning.
Related: Split Lighting in Photography
Back Light
Light behind the subject creates rim lighting, a glowing outline that separates the subject from the background. Backlight alone produces silhouettes; combined with front fill, it adds dimension and a professional look.
Related: Rim Light Photography
Natural Light Portrait Techniques
Natural light produces beautiful portraits without any equipment investment. Learning to see and shape available light is fundamental to portrait photography.
Window Light
A large window provides soft, directional light that rivals expensive studio setups. Position the subject facing the window or at a 45-degree angle for classic portrait lighting. The larger the window, the softer the light.
Tips for window light portraits:
- Avoid direct sunlight streaming through, wait for clouds or use sheer curtains
- Position subject 2-4 feet from the window for softer light
- Use a white foam board opposite the window to fill shadows
- North-facing windows (in the northern hemisphere) provide consistent light all day
Overcast Days
Cloud cover acts as a giant softbox, diffusing sunlight into soft, even illumination. Overcast days eliminate harsh shadows and squinting subjects, ideal conditions for outdoor portraits. The light remains consistent regardless of shooting direction.
Golden Hour
The hour after sunrise and before sunset produces warm, directional light that flatters skin tones. Position subjects with the sun behind them for glowing backlight, or at an angle for warm side lighting. Golden hour light changes quickly, work efficiently.
Related: Best Time to Take Pictures Outside
Open Shade
Positioning subjects in shade while keeping a bright background creates beautiful, even illumination. Look for areas shaded by buildings or trees with open sky providing soft fill. Avoid dappled shade from leaves, it creates unflattering patterns.
LED Continuous Lighting
LED panels have revolutionized portrait lighting. Unlike traditional hot lights, LEDs run cool, offer adjustable color temperature, and provide instant visual feedback, what you see is what you capture.
Advantages of LED Lighting
- Instant feedback: See exactly how light falls on the subject before shooting
- Cool operation: Comfortable for subjects during long sessions
- Adjustable color temperature: Match ambient light or create specific moods (2700K-6500K)
- Video-ready: Same lights work for both stills and video
- Battery options: Many LED panels run on batteries for location work
Recommended LED Setup for Beginners
Start with a single bi-color LED panel (capable of warm to cool adjustment) around 12-18 inches. Add a softbox or diffusion panel to soften the output. This simple setup handles most portrait situations and costs under $200.
Related: Best LED Lights for Photography
Ring Lights for Portraits
Ring lights have become ubiquitous in content creation, beauty photography, and video calls. The circular design creates signature ring-shaped catchlights in the eyes and provides even, shadowless illumination.
When to Use Ring Lights
- Beauty and makeup photography: Even illumination shows details without harsh shadows
- YouTube and video content: Flattering, consistent light for talking-head videos
- Video calls and streaming: Professional appearance with minimal setup
- Self-portraits: Easy to use when photographing yourself
Ring Light Limitations
Ring lights produce flat, low-contrast illumination. While flattering, this lacks the dimension of directional lighting. For more dramatic portraits, combine ring light fill with a directional key light, or use traditional lighting setups instead.
Flash and Strobe Lighting
Flash remains the most powerful and versatile portrait lighting option. Modern speedlights and studio strobes offer precise control, overwhelming ambient light when needed, and freezing motion.
Speedlights (Hot Shoe Flash)
Portable flash units that mount on camera hot shoes or fire wirelessly. Speedlights offer portability and affordability, making them ideal for location portraits. Budget brands like Godox provide professional features at accessible prices.
Related: Guide to External Flash
Studio Strobes
More powerful than speedlights, studio strobes provide consistent output and faster recycle times. They require AC power or large battery packs but offer modeling lights for positioning and greater light modification options.
Related: Best Strobe Lights
The 45-45 Flash Setup
Position a flash 45 degrees to the side and 45 degrees above the subject’s face. This classic position creates flattering shadows under the nose and chin while illuminating the eyes. Add a reflector or second flash opposite as fill to control shadow depth.
Light Modifiers
Raw light sources, whether sun, LED, or flash, often produce harsh results. Modifiers soften, shape, and control light for flattering portraits.
Softboxes
Enclosed modifiers with internal baffles and a diffusion front panel. Softboxes produce soft, controllable light with defined edges. Rectangular softboxes mimic window light; octagonal versions create pleasing round catchlights.
Umbrellas
The most affordable modifier option. Shoot-through umbrellas create soft, widespread light. Reflective umbrellas bounce light back toward the subject with more control. Umbrellas set up quickly but offer less precision than softboxes.
Reflectors
Essential for natural light portraits. A simple white or silver reflector bounces light into shadows, reducing contrast. Gold reflectors add warmth; black panels subtract light for more dramatic shadows.
Diffusion Panels
Translucent panels placed between light source and subject. Diffusers soften harsh sunlight or undiffused flash into flattering portrait light. A simple white bedsheet can serve as an effective diffuser.
Classic Portrait Lighting Patterns
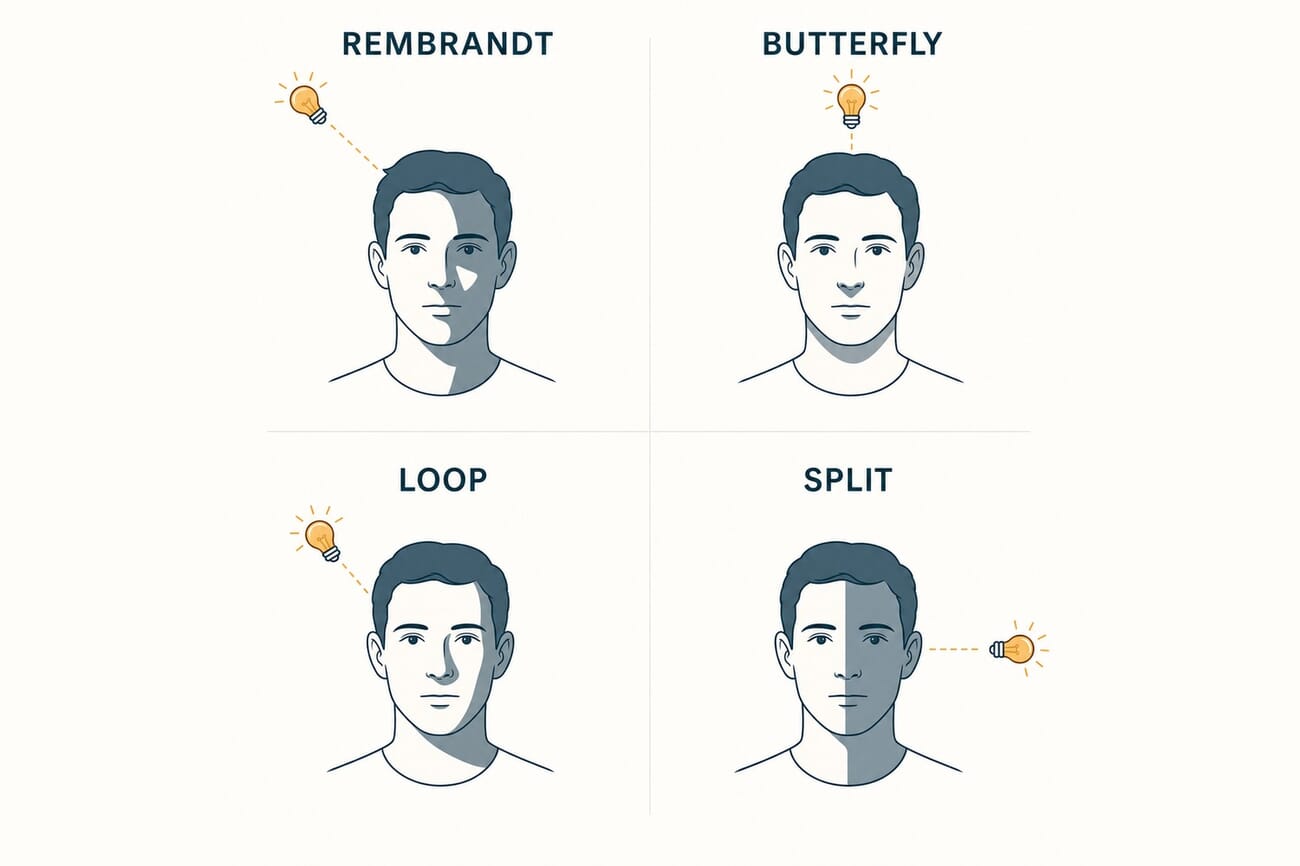
These patterns are just names for repeatable light positions. Once you can see them, you can dial any of them in with a single light. For deeper walk-throughs, see our guides to portrait lighting patterns, loop lighting, and split lighting.
Photographers have developed named lighting patterns that consistently produce flattering results. These patterns describe the shadow placement on the face.
Loop Lighting
The most common portrait pattern. Light positioned slightly above and to one side creates a small shadow loop extending from the nose. Flattering for most faces, loop lighting adds dimension without drama.
Related: Loop Lighting Guide
Rembrandt Lighting
Named after the Dutch painter, this pattern creates a triangle of light on the shadowed cheek. More dramatic than loop lighting, Rembrandt lighting works well for masculine portraits and artistic work.
Butterfly Lighting
Light positioned directly above and in front creates a butterfly-shaped shadow under the nose. This glamorous pattern emphasizes cheekbones and is popular in beauty photography.
Related: Butterfly Lighting Guide
Split Lighting
Split lighting places the key light at 90 degrees to the side, lighting one half of the face and leaving the other in shadow. It is the boldest of the classic patterns, ideal for moody, high-contrast character portraits and low-key looks. Add a reflector on the shadow side if you want to lift the darkness slightly. See our full split lighting guide for setups.
Broad and Short Lighting
Broad and short describe which side of a turned face you light. Broad lighting illuminates the side of the face turned toward the camera and visually widens it. Short lighting lights the side turned away, which slims the face and adds depth. Short lighting is the more flattering, more common choice for most people.
Modern Portrait Lighting Looks for 2026
High-key: flood the subject with soft, even light and a bright or white background for a clean, upbeat result that suits beauty, fashion, and modern headshots. Feather a large softbox across the face and add a second light on the background so it reads pure white.
Low-key and dark: do the opposite. Use one small, controlled light, flag it to keep spill off the background, and let deep shadows carry the mood. Split and Rembrandt patterns are made for this.
Cinematic and colored gels: the look that took over social feeds is two-tone gel lighting, a warm key on one side and a cool rim on the other (the classic orange-and-teal, or the neon blue-and-red rim from music-video portraits). Affordable RGB LED lights make it easy: keep a neutral key on the face and add one gelled rim light behind the subject.
Practical Tips for Better Portrait Lighting
1. Start with One Light
Multi-light setups come later. Mastering a single light source teaches fundamental principles that apply to any setup. One light plus a reflector handles most portrait situations.
2. Watch the Catchlights
Catchlights, the reflection of light sources in the eyes, indicate light position and quality. Round catchlights suggest soft, large sources; harsh points indicate small, hard lights. Position lights to create pleasing catchlights in the upper portion of the eye.
3. Control the Background
Separate subject lighting from background lighting. Moving the subject away from the background and controlling spill light creates professional-looking separation and depth.
4. Use Light Ratios
The ratio between key light and fill light determines contrast. High ratios (4:1 or greater) create dramatic portraits; low ratios (2:1) produce softer, more commercial results. Adjust fill light distance or power to control ratios.
5. Consider the Subject
Different faces suit different lighting. Broad faces benefit from short lighting (key light on the far side); narrow faces work with broad lighting. Skin texture considerations may favor softer sources. Adapt the approach to flatter each individual subject.
Portrait Lighting FAQ
What is the best portrait lighting for beginners?
One light plus a reflector, or a large window with a reflector. Start with loop or Rembrandt lighting at about 45 degrees. It is forgiving, flattering, and teaches you far more than a full multi-light kit.
Can you get professional portraits with just one light?
Yes. Most classic patterns use a single key light, with a reflector or white wall on the shadow side to fill. Master one light before adding a second.
Softbox or umbrella for portraits?
Softboxes give more control and a defined edge, which is why studios prefer them. Umbrellas are cheaper and spread light widely, easier to start with but harder to control spill. For portraits, a softbox is the more precise choice.
Natural light or artificial light for portraits?
Both work. Window light is free and beautiful but shifts through the day; LED or strobe is consistent and repeatable. Many portrait shooters learn on window light, then add a continuous LED for control.
Conclusion
Portrait lighting mastery comes through practice and experimentation. Start with natural light from a window, progress to a single LED or flash with modifier, then explore multi-light setups as skills develop.
The principles remain constant regardless of equipment: light direction creates mood, soft light flatters most subjects, and catchlights bring portraits to life. Whether using sunlight or studio strobes, these fundamentals guide every portrait lighting decision.
Begin with the simplest setup that achieves the desired look. As understanding deepens, adding lights and modifiers expands creative possibilities, but a single well-placed light source remains the foundation of beautiful portrait photography.
Image Sources
- Lighting position and pattern diagrams: original PhotoWorkout illustrations – Editorial infographics created for this guide.