Editor’s Key Takeaways: Master the Art of Soft Proofing in Lightroom and Photoshop

In this article, the process of soft proofing for photo printing using Adobe Lightroom and Photoshop is discussed.
- Soft proofing is a process that allows you to simulate the look of a print on your monitor, enabling you to prepare your image for printing and ensuring that the print matches what you see on the screen.
- The need for soft proofing arises from the fact that different printer and paper combinations can render the same image differently, causing variances in print appearance, which can be frustrating if you’re striving for a cohesive look.
- Through soft proofing, you can use profiles or evaluations of different printer-paper combinations to see how your final print will look without physically printing it. This process also allows you to make necessary adjustments prior to actual printing.
- Unlike hard proofing, which involves printing an image to see how it looks, soft proofing is a more cost-efficient and less time-consuming way to verify print accuracy.
The blog post also shares step-by-step guides for soft proofing in both Lightroom and Photoshop. Though soft proofing is not considered perfect, it is an invaluable tool for photographers aiming for precise print output.
Introduction
If you’re aiming to print your photos, then soft proofing is a hugely useful tool–one that’s offered by both Lightroom and Photoshop.
But how do you actually soft proof your photos? What’s the overall process? And what, precisely, will soft proofing get you?
That’s what this article is all about.
So if you’re ready for a comprehensive guide to soft proofing–both in Lightroom and Photoshop–then keep reading.
Soft Proofing in LR & PS:
What Is Soft Proofing?
Soft proofing refers to a process by which you can simulate the look of a print on your monitor.
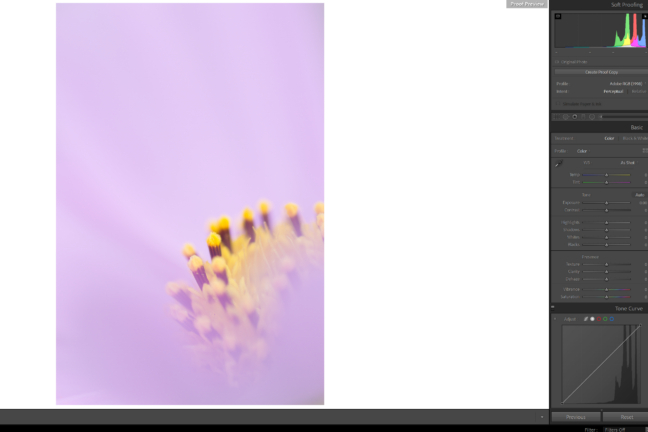
You see, every printer and paper combination will render the same image slightly differently.
Which means that if you print a standard seascape photo, one printer-paper combination will exaggerate the yellows, another printer-paper combination will desaturate the whole shot, another printer-paper combination will boost the darkest tones, and so on.
Obviously, this is a problem, and for two main reasons:
First, it means that your prints won’t match what you see on the monitor (and, generally speaking, what you see on your monitor before hitting the Print button, is what you want).
Second, it means that your prints will vary in terms of their look. This can be hugely frustrating if you’re using different print-paper combinations and you want them all fit the same style.
That’s where soft proofing comes in handy.
Soft proofing uses profiles–that is, evaluations of different printer and paper combinations–to simulate the look of your final print.
In other words:
You can see how a print will look…
…without actually going through the effort of printing.
And you can then tweak the image prior to sending it off to the printer so that it looks exactly as you want it to.
When Should You Soft Proof Your Images?
Soft proofing is useful for anyone looking to print images.
After all, if you’re spending money on a print, you don’t want it to look desaturated or faded or too blue, etc.
This includes printing that you do yourself, as well as printing that you do at a lab. If you’re not sure what printer-paper combination will be used, make sure to ask before sending your file off for printing (good labs should have profiles mapped out for all their materials).
Note that soft proofing isn’t very useful if you’re looking to simply display your images on the web. As long as you convert the color space to sRGB before uploading your photo, the uploaded photo will look just as you expect it to.
Soft Proofing Alternatives: Hard Proofing
If you’re thinking about printing your photos, you may have come across another term:
Hard proofing.
But what is hard proofing? And how is it different from soft proofing?
Hard proofing involves printing out physical copies of your image.

If you’re planning on printing your photos in bulk, it often makes sense to just get a couple of test prints done.
Because while soft proofing is useful, it’s not perfect. And you don’t want to spend a chunk of change on prints, only to find that they don’t look how you imagined.
That said, I do recommend you soft proof before hard proofing. It’ll make the hard proofing process easier (and will prevent you from having to create multiple hard proofs).
One more thing to note:
You’ll sometimes run into situations where you don’t have access to a printer-paper profile.
In such cases, you cannot do a soft proof–but a hard proof will still work, and it’s often worth doing (especially if you’ll be printing a lot of photos).
Soft Proofing in Lightroom: A Step-By-Step Guide
Soft proofing in Lightroom is pretty easy and intuitive.
Here’s how it works:
Step 1: Open Your Photo in the Lightroom Develop Module
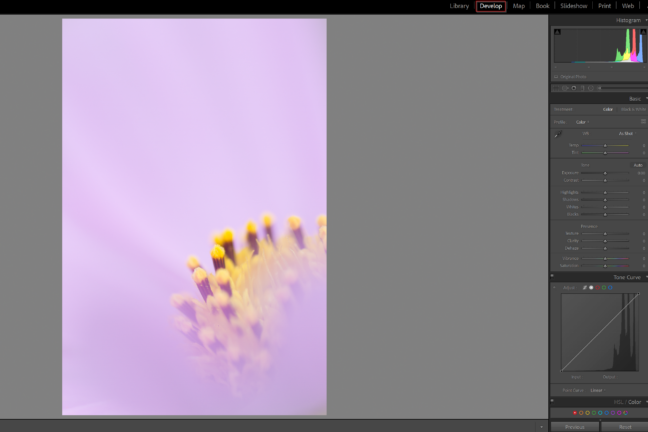
Before soft proofing, you’ll want to make sure you’ve edited your photo to taste.
The soft proofing process is about getting the displayed image to match the printed image–and if you tweak your image after soft proofing, you’ll need to go through the soft proofing process once again.
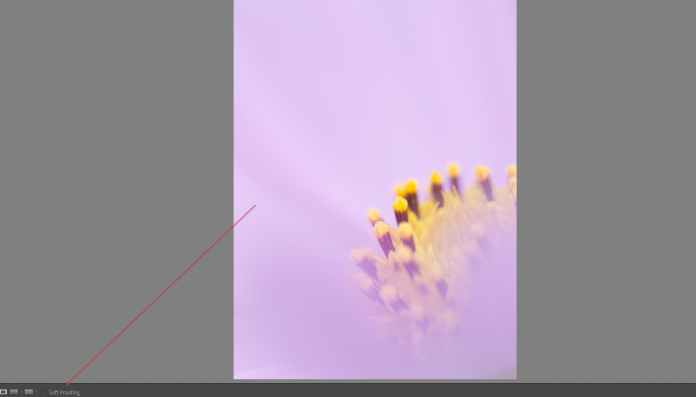
Step 2: Tap the Soft Proofing Checkbox at the Bottom Left and Create a Proof Copy
You should see the checkbox here:
But if it’s not present, you’ll need to hit the dropdown menu on the right and select Soft Proofing:
Then, under the histogram, select Create Proof Copy:
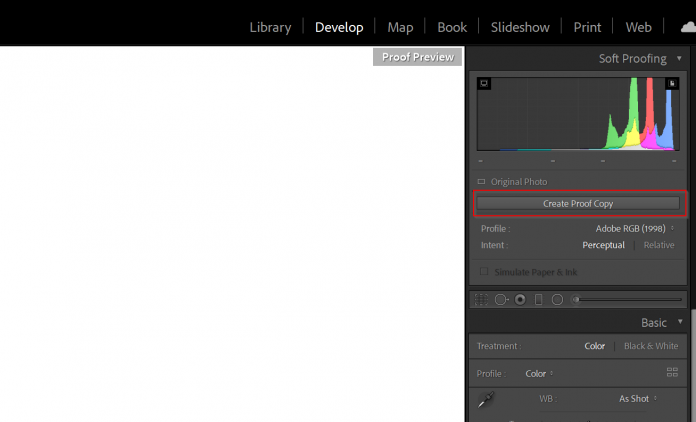
This will make a virtual copy of your image (which allows you to keep your originally edited image on hand as a reference photo).
Step 3: Select Your Proof Settings
You’ll find the proof settings just under the histogram in the top right:
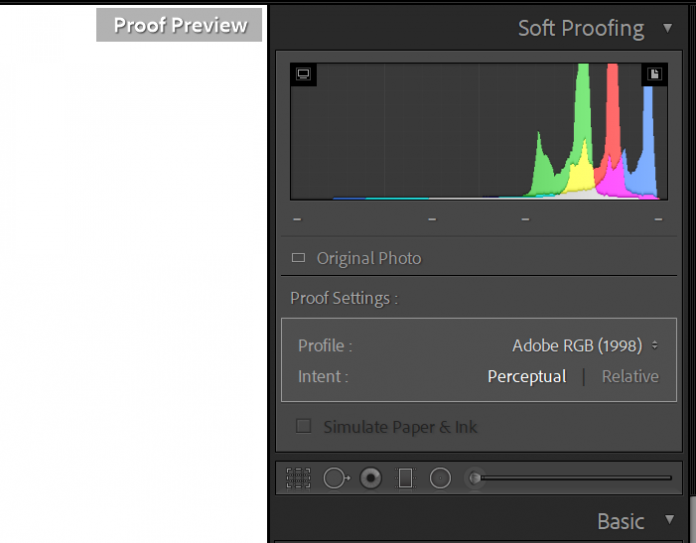
This is where you’ll need to select your printer profile, as well as your intent.
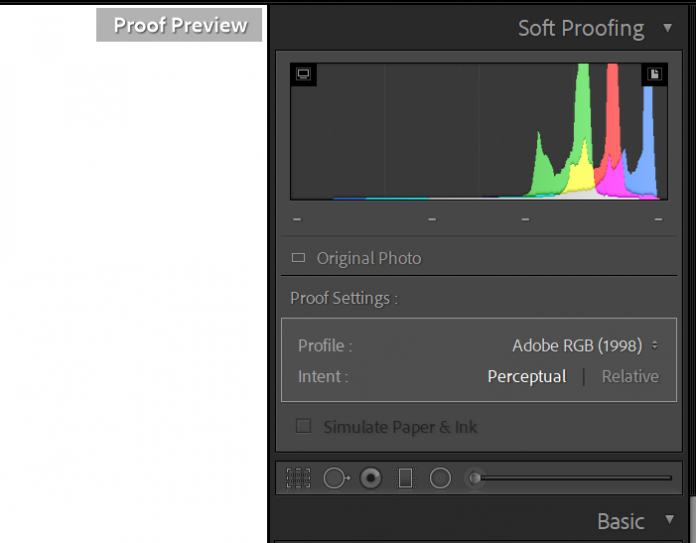
The printer profile should match your printer–and, if you’re able, check the Simulate Paper & Ink box.
As for the intent:
Generally, Perceptual is the better option. This will ensure that any colors not printable will be brought back into gamut in a realistic way.
Step 4: Adjust Your Proof Until It Looks Right
At this point, you should have a sense of how your final print will look.
Head over to the adjustment panels and make any necessary tweaks:
And remember:
You’re seeing the print version of your image, not the original version. So if you uncheck the Soft Proofing box, your image will instantly look weird, but that’s okay–it’s supposed to look weird, since you’re compensating for discrepancies between your monitor and the printer.
A helpful trick here, by the way, is to use the Before/After view, which you can access beneath the image:
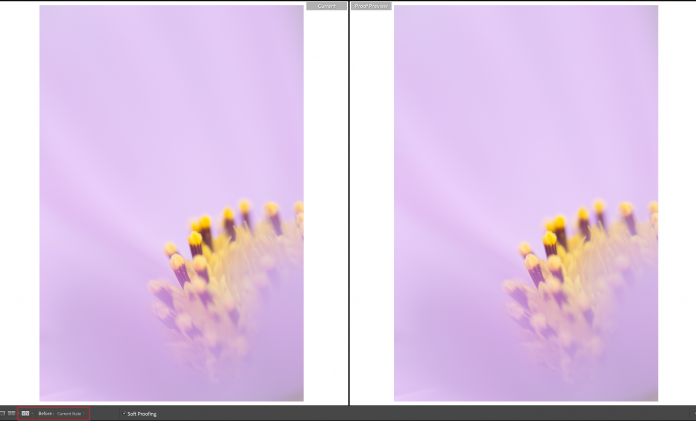
And selecting Current State for the Before version:
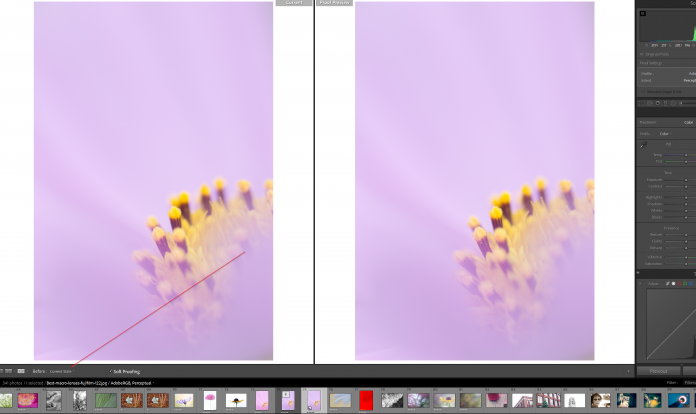
Now, the image on the left will be your monitor version of the image, while the image on the right will be the printed (i.e., soft proofed) version of the image. And any adjustments you make will be applied to the proof preview only.
That way, you can adjust your proof to fit the original monitor version–ensuring that your print will look as you wanted.
Step 5: Uncheck the Soft Proofing Box and Print Your Image
Once you’ve edited your proof preview, you’re essentially done.
You can uncheck the Soft Proofing box, then proceed with the normal printing process.
Easy, right?
Soft Proofing in Photoshop: A Step-By-Step Guide
Soft proofing in Photoshop isn’t quite as intuitive as soft proofing in Lightroom.
However, it can still be done.
Here’s how it works:
Step 1: Open Your Image, Then Select View>Proof Setup>Custom
This is how the proof process begins:
By opening your (already edited) image.
And tapping View>Proof Setup:
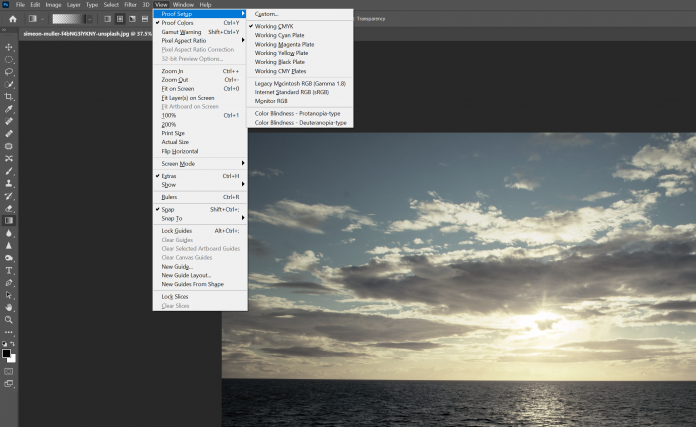
If you see the profile you’re after, you can select it in the dropdown.
Or you can proceed to the Custom window:
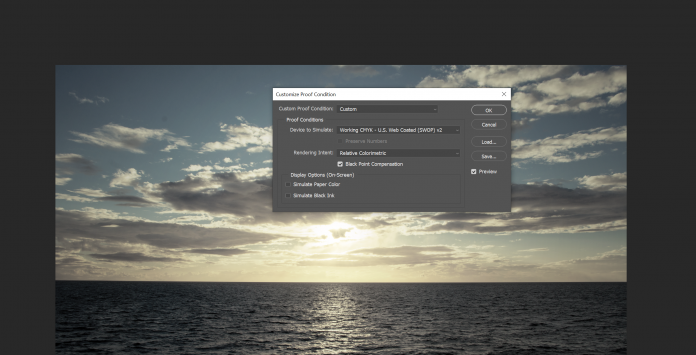
Step 2: Select Your Device to Simulate in the Customize Proof Condition Window
Simply find the right profile in the dropdown menu:
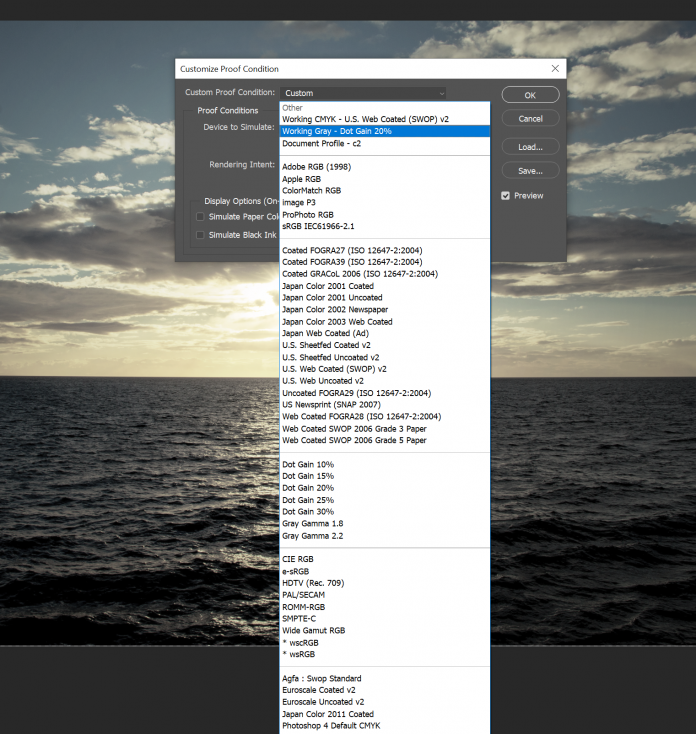
If your profile isn’t present, you may need to load it into Photoshop, which you can do via the Load option on the right.
Then choose your Rendering Intent (I’d recommend Perceptual, but it’s up to you):
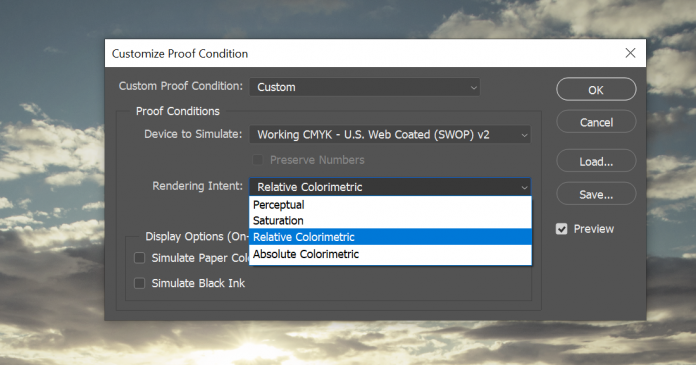
And check both the Simulate Paper Color and Simulate Black Ink boxes for an accurate preview.
Hit OK.
And then adjust your proof until you like the results!
At that point, you can proceed with the normal printing process.
Is Soft Proofing Perfect?
As I suggested above:
While soft proofing is very useful, it’s not perfect.
For one, profiles do vary slightly from printer to printer. So unless you’re using a custom profile, you may see some slight discrepancies.
Also, if your monitor isn’t calibrated, you’re going to end up with issues. So make sure that you’ve done any necessary calibration before soft proofing.
Here’s the bottom line:
While soft proofing is an excellent method of previewing a print…
…don’t rely on it too heavily.
Soft proofing plus hard proofing will give you the best result of all. So if you need absolute accuracy, use both those methods, together.
Soft Proofing in Lightroom and Photoshop: The Next Steps
Now that you’ve finished this article, you should be able to soft proof your images with ease.
And your prints will look so much better!
So go ahead and make some prints. You can soft proof in Lightroom, Photoshop, or another program entirely.
And good luck!
Do I need to soft proof before printing my images?
I highly recommend you soft proof before printing! Soft proofing ensures you get the closest representation of your original file when you actually go to print (or, at the very least, it ensures that you’re not surprised by your final result!). Now, you don’t have to soft proof–it’s not a requirement–but your images will often turn out looking very different from what you saw on your monitor. This is true regardless of whether you print from home or from a high-quality lab. So soft proofing is a great idea!
What is soft proofing in Lightroom?
Soft proofing is the process of simulating your final print on your computer screen before sending it off to the printer. This allows you to see how your print will look without wasting money on paper and ink. Once you see what your print will look like, you can then adjust it until it’s exactly where you want it to be!
What software do I need to soft proof?
To soft proof, you can use either Lightroom or Photoshop, both of which offer powerful soft proofing options. Lightroom is more intuitive, but Photoshop is quite powerful; either should work for basic soft proofing needs.
What is a soft proof in printing?
A soft proof refers to a simulation (on screen) of your final print. It lets you see how your print will look before you actually print it–and based on the soft proof, you can choose to make changes that’ll improve the final print.
What is a hard proof in printing?
A hard proof refers to a physical test print. If you’re going to print many copies of the same image, you might want a hard proof–because while soft proofing is a decent way of simulating a final print, the best way to know how a final print will look is to actually print it! Note that you won’t need to hard proof if you’re only planning on printing a single copy (or two) of your image. But if you’re planning on printing hundreds of copies, a hard proof is a good way to make sure everything’s looking good before you use all that printing paper!
Do I need to calibrate my monitor before soft proofing?
Yes. If you don’t calibrate your monitor before soft proofing, you’re going to end up with a print that looks nothing like the image file on your monitor–no matter how careful you are when soft proofing. An uncalibrated monitor won’t match up with the printer (even if you use the printer profile!), so you’ll get an unexpected result, one that’s generally not going to satisfy you. Make sure you calibrate your monitor before printing!
