
- Output sharpening is the final sharpening step applied when exporting – it compensates for softness introduced by resizing (web) or printing.
- Lightroom Classic makes output sharpening easy – just check the Sharpen For box in the Export dialog and pick Screen, Matte, or Glossy.
- Photoshop gives more control via Unsharp Mask and the High Pass filter – ideal for fine-tuning.
- Print output needs more aggressive sharpening than web because ink on paper absorbs sharpness.
- The biggest mistake? Oversharpening – it creates ugly halos and a crunchy, artificial look.
- Test your knowledge with our Output Sharpening Quiz at the end of this guide.
What Is Output Sharpening?
Every digital photo loses some sharpness on its way to the viewer. Whether you’re resizing for Instagram or sending a file to a printer, the final output will look softer than what you see on your editing screen.
Output sharpening is the fix. It’s a targeted sharpening pass applied at the very end of your editing workflow, specifically designed to compensate for the softness introduced by your chosen output method.
Think of it this way: your editing software shows you a full-resolution preview. But the moment you export – whether you’re downscaling to 2048px for a website or converting to CMYK for a print lab – some of that crisp detail disappears. Output sharpening adds it back.
Capture Sharpening vs Output Sharpening
Sharpening isn’t a one-step process. Professional photographers typically apply three distinct levels of sharpening during their editing workflow:
- Capture sharpening – Applied first to compensate for inherent softness in RAW files caused by the sensor’s anti-aliasing filter and demosaicing process
- Creative/local sharpening – Selective sharpening on specific areas like eyes in a portrait or fine feather detail in wildlife shots
- Output sharpening – The final pass, tailored to the specific output medium (screen, matte print, glossy print)
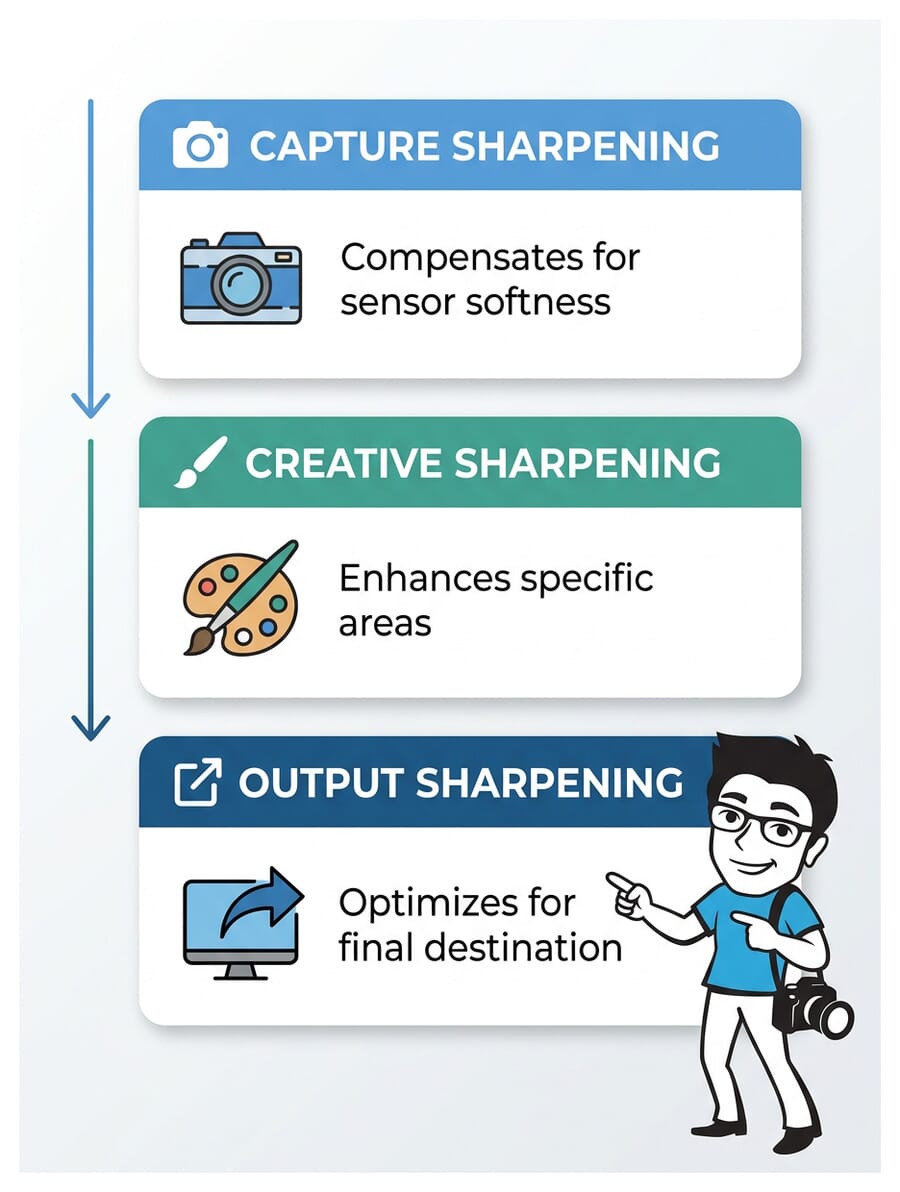
The key distinction: capture sharpening fixes what the camera lost, while output sharpening fixes what the export process will lose. They serve completely different purposes, and you need both.

Why Output Sharpening Matters
Skip output sharpening and your images will look noticeably softer than what you saw on screen. Here’s why:
- Web display – Resizing a 6000px image down to 2048px means the software must interpolate pixels, which inherently softens edges and fine detail
- Print output – The physical process of putting ink on paper diffuses detail even further, especially on textured or matte papers
- Social media compression – Platforms like Instagram and Facebook apply their own compression on top of resizing, compounding the softness
Output sharpening is the safety net that ensures your final image matches your creative intent. It’s not optional – it’s essential.
Web vs Print: Different Outputs Need Different Settings
This is the most important concept to understand: web and print sharpening are fundamentally different.
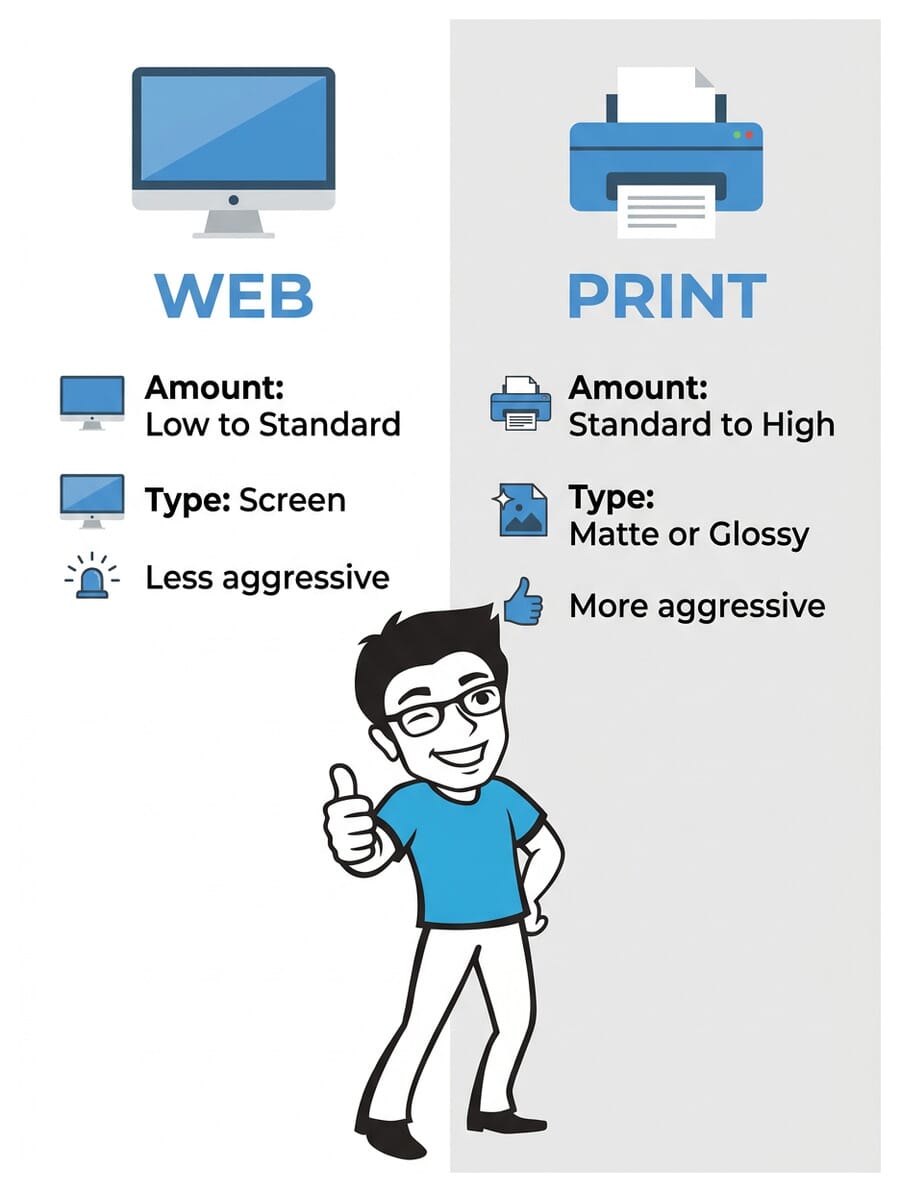
For web/screen display:
- Lower sharpening amounts (the viewer sees pixels directly)
- Smaller radius values to avoid visible halos on screen
- The image should look correctly sharp at 100% zoom
For print:
- Higher sharpening amounts (ink spread on paper softens everything)
- The image should actually look slightly oversharpened on screen – the print process will absorb the excess
- Matte paper needs more sharpening than glossy because of its textured surface
Understanding this distinction is the foundation for everything else in this guide. If you take one thing away, let it be this: always match your sharpening to your output.
Output Sharpening in Lightroom Classic: For the Web
Lightroom Classic makes web output sharpening almost effortless. The settings are built right into the Export dialog.
Step-by-step:
- Select your image and go to File > Export (or use the keyboard shortcut Ctrl/Cmd + Shift + E)
- Set your file settings (JPEG, sRGB color space, quality 80-90 for web)
- Under Image Sizing, resize to your target dimensions (e.g., 2048px long edge for social media)
- Scroll down to the Output Sharpening section
- Check Sharpen For and select Screen
- Set Amount to Standard (use Low for intentionally soft images like dreamy portraits)
- Click Export
Which amount should you choose?
- Low – Soft, dreamy images (portraits with shallow depth of field, abstract work)
- Standard – Most images (landscapes, street, architecture, general photography)
- High – Heavy detail images (macro, texture studies, architectural detail)
For a deeper dive into editing photos in Lightroom, check out our complete guide.
Output Sharpening in Lightroom Classic: For Print
Lightroom gives you two ways to sharpen for print: through the Export dialog or through the Print module. Both work well – the Print module just gives you a bit more control.
Method 1: Export Dialog
Follow the same steps as web sharpening above, but change the Sharpen For dropdown to either Matte Paper or Glossy Paper:
- Matte Paper – For textured papers (fine art, watercolor, canvas). Applies more aggressive sharpening to cut through the surface texture.
- Glossy Paper – For smooth papers (lustre, metallic, traditional glossy). Lighter sharpening since the smooth surface preserves more detail.
Start with Standard amount and do a test print. Adjust to Low or High based on the result.
Method 2: Print Module
For more control – especially when printing directly from Lightroom:
- Switch to the Print module
- Set up your layout and paper size
- In the right panel, find the Print Job section
- Check Print Sharpening
- Select your Media Type (Matte or Glossy) and Sharpening amount (Low, Standard, or High)
The Print module method is ideal when you’re printing at home and want to dial in the sharpening by doing quick test prints. For lab printing, the Export dialog method works just as well.
For a complete walkthrough of the print workflow, see our guide to printing in Lightroom.
Output Sharpening in Photoshop
Photoshop gives you much finer control over sharpening than Lightroom. The trade-off is more complexity. Two methods dominate: Unsharp Mask and High Pass filter.
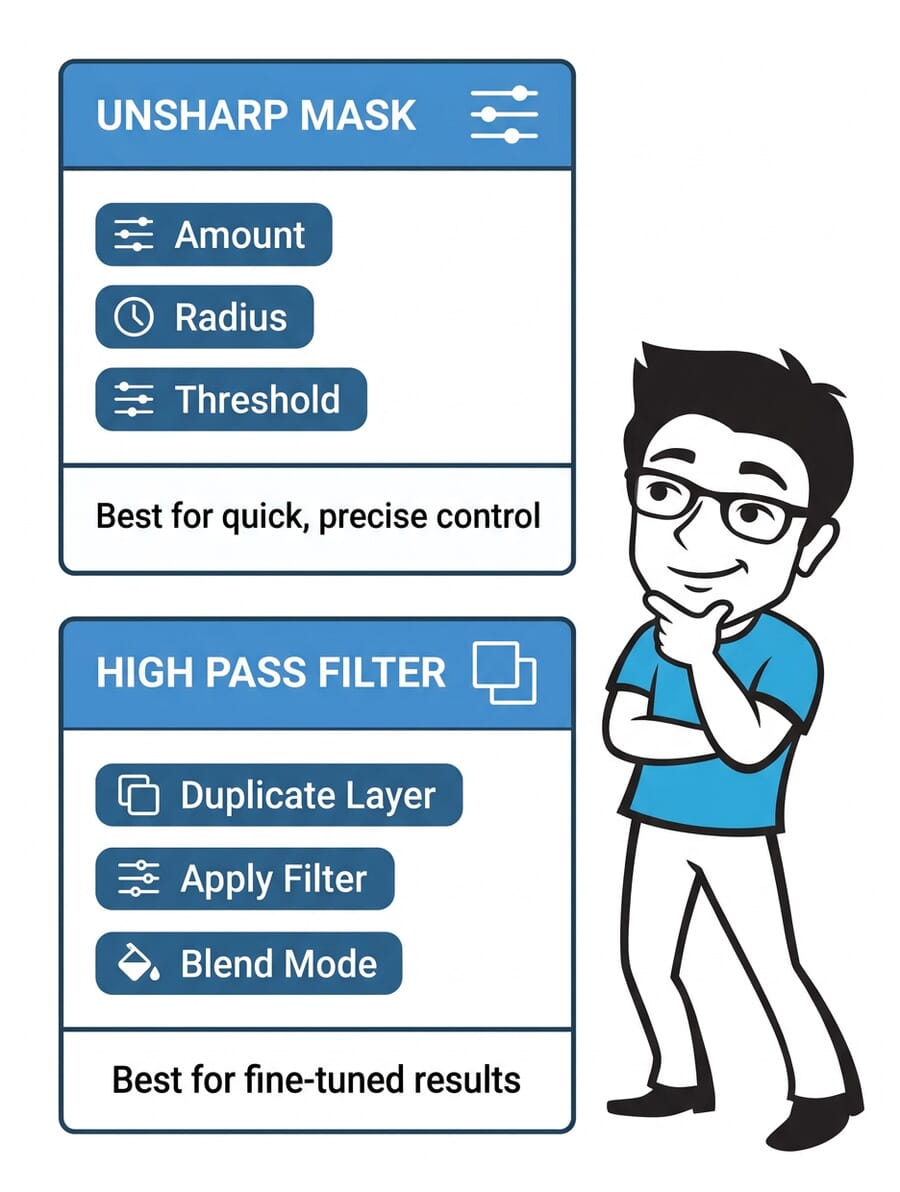
Method 1: Unsharp Mask
Despite its confusing name (a holdover from darkroom terminology), Unsharp Mask is the most straightforward Photoshop sharpening tool.
- Flatten or stamp visible layers (Ctrl/Cmd + Shift + Alt + E) to create a merged sharpening layer
- Go to Filter > Sharpen > Unsharp Mask
- Adjust three sliders:
- Amount – How much sharpening to apply (start at 50-80% for web, 100-150% for print)
- Radius – How many pixels around each edge to affect (0.5-1.0 for web, 1.0-2.0 for print)
- Threshold – How different pixels must be before they’re sharpened (2-5 to protect smooth areas like skin)
Quick reference settings:
- Web (general) – Amount: 60%, Radius: 0.8, Threshold: 3
- Web (high detail) – Amount: 80%, Radius: 0.5, Threshold: 2
- Print (glossy) – Amount: 120%, Radius: 1.2, Threshold: 3
- Print (matte) – Amount: 150%, Radius: 1.5, Threshold: 3
Always zoom to 100% when adjusting these settings – you can’t accurately judge sharpening at any other zoom level.
Method 2: High Pass Filter
The High Pass method gives you more flexibility because you control the sharpening intensity through layer blending, not just filter settings.
- Duplicate your layer (Ctrl/Cmd + J)
- Go to Filter > Other > High Pass
- Adjust the Radius until you can just see the edges of your subject (typically 1-3 pixels for web, 3-5 for print)
- Click OK
- Set the layer blend mode to Overlay (moderate sharpening) or Soft Light (subtle sharpening)
- Reduce layer opacity if the effect is too strong
Pro tip: The High Pass method is non-destructive. You can toggle the sharpening layer on and off to compare, and adjust the opacity anytime. This makes it ideal for learning – you can experiment without committing.
Want to learn more about Photoshop techniques? Our Photoshop editing guide covers the fundamentals.
Common Sharpening Mistakes (and How to Avoid Them)
Even experienced photographers make these errors. Here are the four most common sharpening mistakes:
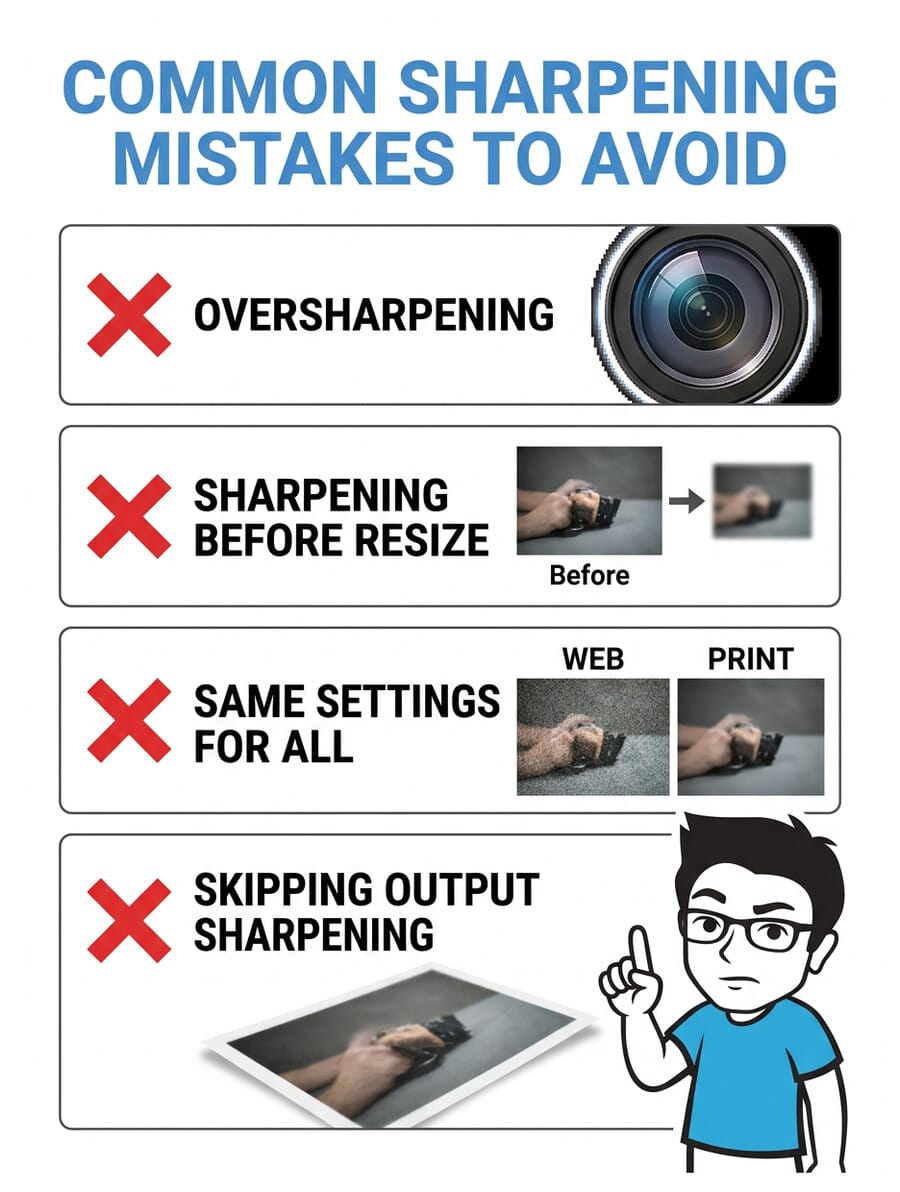
1. Oversharpening
The most common mistake by far. Oversharpening creates visible halos (bright outlines along edges), amplifies noise, and gives images an unnatural, “crunchy” appearance. If you can see the sharpening, you’ve gone too far.
How to check: Zoom to 100% and look for bright lines along high-contrast edges. Toggle your sharpening on and off to compare. When in doubt, dial it back.
2. Sharpening Before Resizing
Output sharpening should always be the very last step. If you sharpen and then resize, the resize operation undoes much of your sharpening work. Lightroom handles this automatically (sharpening is applied during export after resizing), but in Photoshop you need to resize first, then sharpen.
3. Using the Same Settings for Everything
A landscape full of fine foliage detail needs different sharpening than a portrait with smooth skin tones. Similarly, web output and print output require completely different approaches. Always adjust your settings based on the image content and the intended output.
4. Skipping Output Sharpening Entirely
Some photographers assume capture sharpening is enough. It’s not. Capture sharpening compensates for sensor softness – output sharpening compensates for export softness. They’re different problems requiring different solutions.
If you find sharpening is amplifying noise in your images, consider running noise reduction software before applying output sharpening.
Output Sharpening Best Practices
Follow these guidelines for consistently good results:
- Always view at 100% zoom when evaluating sharpening – any other zoom level is misleading
- Sharpen on a separate layer in Photoshop so you can adjust or undo without starting over
- Do test prints before committing to large format output – screen preview never perfectly matches paper
- Use Lightroom’s built-in sharpening if you want simplicity – it handles the technical details automatically
- Consider your paper type – matte and textured papers need noticeably more sharpening than glossy
- Keep a sharpening preset in Lightroom for your most common output (e.g., “Web – Standard” or “Fine Art Matte – High”)
- Don’t sharpen JPEGs that will be compressed again – each compression cycle degrades quality
New to photo editing in general? Our photo editing for beginners guide covers all the basics before you dive into sharpening.
Test Your Output Sharpening Knowledge
Think you’ve got the basics down? Take this quick quiz to test your understanding of output sharpening concepts.
Do you always need to apply output sharpening?
Yes, for any image being exported for display or print. Output sharpening compensates for the softness introduced by resizing (for web) or the printing process. The only exception is if you’re keeping the image at its original resolution and viewing it directly on screen in your editing software.
When in the editing workflow should you apply output sharpening?
Output sharpening should always be the very last step in your workflow, applied during or after export. In Lightroom, it’s built into the Export dialog and Print module so the timing is handled automatically. In Photoshop, resize your image first, then apply sharpening as the final edit.
Should I use Lightroom or Photoshop for output sharpening?
For most photographers, Lightroom Classic is the easier and faster choice – its built-in output sharpening presets (Screen, Matte Paper, Glossy Paper) work well for the vast majority of images. Use Photoshop when you need precise control over sharpening parameters (Amount, Radius, Threshold) or when you want to selectively sharpen only certain areas of the image.
Why do prints need more sharpening than web images?
Printing involves putting ink on paper, which inherently softens the image. Textured papers (matte, fine art) absorb even more sharpness. Web images only lose sharpness from the resize step, which is a smaller loss. That’s why print sharpening values are typically 50-100% higher than web settings.
How can I tell if I’ve oversharpened an image?
Look for three telltale signs at 100% zoom: bright halos along high-contrast edges, amplified noise in smooth areas (like sky or skin), and a “crunchy” or artificial texture. Toggle your sharpening layer on and off to compare. If the sharpening is obvious, reduce the amount.
Featured image: Photo by Jakub Zerdzicki on Unsplash.
