Editor’s Key Takeaways: Topaz Photo AI: All-in-One Image Enhancement
Here is a concise summary of the blog post “Topaz Photo AI Review” formatted with WordPress blocks:
- Topaz Labs is renowned for producing image-enhancement software that excels in noise reduction, sharpening, and upscaling.
- The company’s latest release, Topaz Photo AI, consolidates these three major features into a single package.
Topaz Photo AI: Overview
- Topaz Photo AI: a standalone program supporting multiple file formats including RAW.
- Available as plugins for Photoshop and Lightroom.
- Key features: AI-enhanced sharpening, AI-enhanced noise reduction, resolution enhancements.
- Combines features of Denoise AI, Sharpen AI, and Gigapixel AI.
- No file-management tools; consider additional software for photo organization.
An In-Depth Look at Topaz Photo AI
- The software uses advanced technology and machine learning to detect issues and apply corrections effectively.
Performance
- Topaz Photo AI offers effective image-enhancement tools powered by machine learning algorithms.
Topaz Photo AI Alternatives
The blog post suggests considering other programs for file management, such as Lightroom.
Topaz Photo AI Is a Good Investment for Professionals
- Especially beneficial for users needing advanced noise reduction, sharpening, and upscaling.
In summary, Topaz Photo AI is a powerful tool for photographers seeking advanced image enhancement through AI technology, despite lacking file-management capabilities.
When you buy through links on our site, we may earn a commission at no cost to you. We evaluate products independently. Commissions do not affect our evaluations.
Introduction
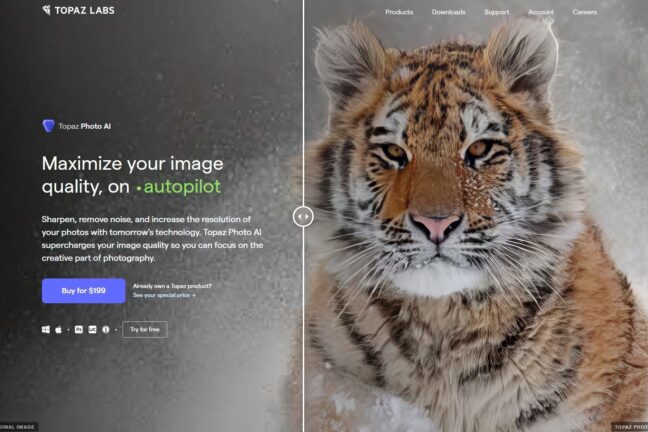
Topaz Labs is known for producing fantastic image-enhancement software, particularly when it comes to noise reduction, sharpening, and upscaling. Topaz Photo AI, the company’s latest release, essentially gives you these three major features in one neat package.
Topaz Photo AI uses advanced technology and machine learning to analyze your photos, detect issues such as noise, and apply effective corrections. In this Topaz Photo AI review, I test the software to see how it performs, and I discuss who should (and shouldn’t) buy it.
Topaz Photo AI Review:

Topaz Photo AI: Overview
 PhotoWorkout’s Rating: 4.4/5
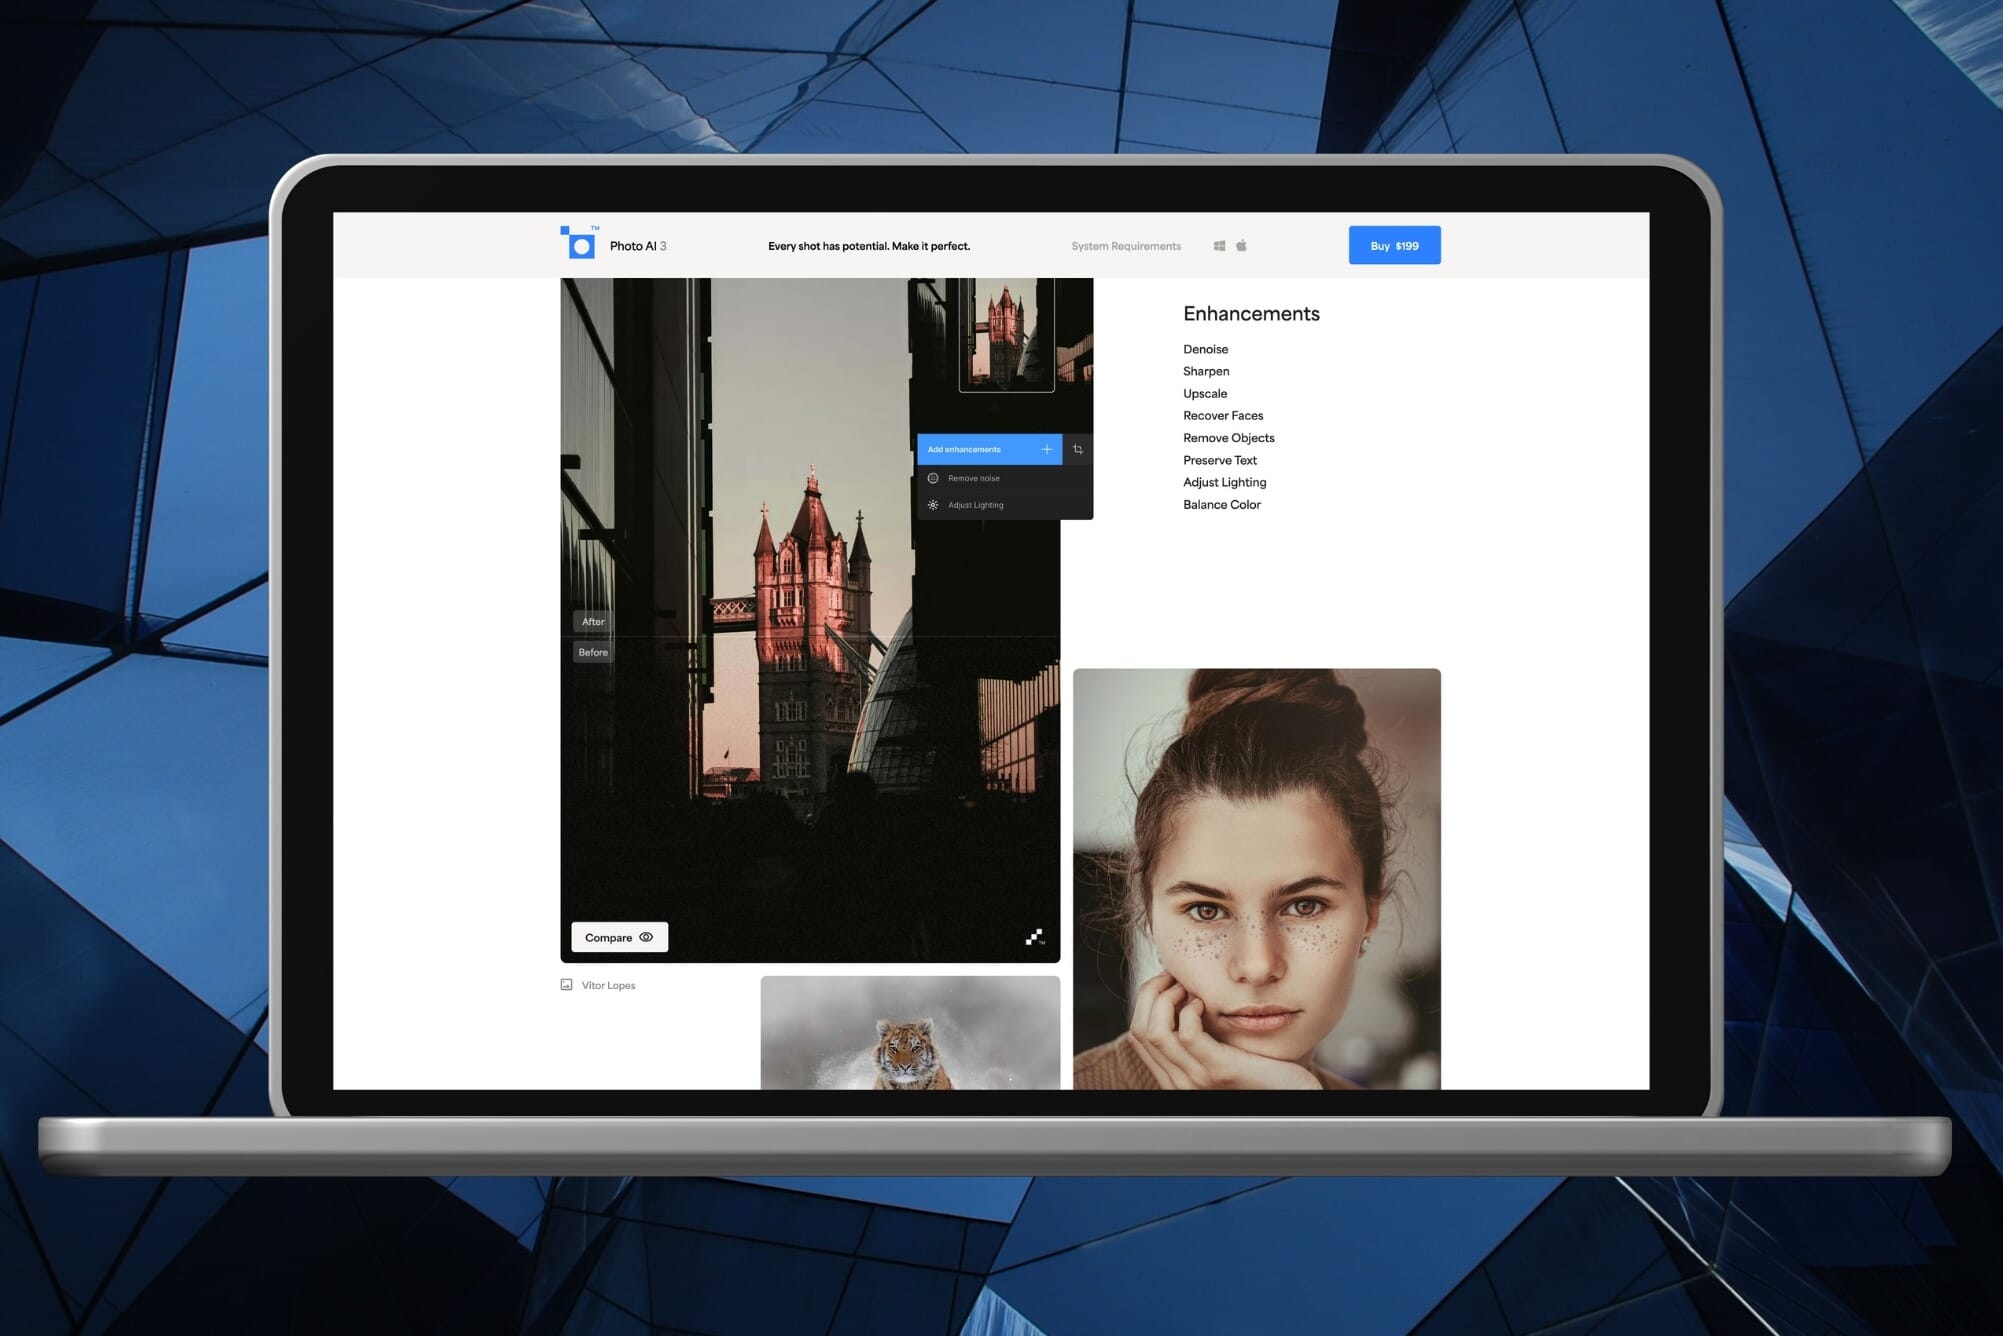
This AI-based software is ideal for professionals who require the ultimate in terms of quality. The sharpening and noise reduction tools are fantastic, and the program is incredibly easy to use. The only drawback is the somewhat slow performance.
$199 One-time payment- Minimalistic interface and tools
- Superb, AI-enhanced results
- Automatic subject detection
- Rendering and preview generation is slow
Topaz Photo AI is a standalone program that allows you to apply noise reduction, sharpening, and upscaling to your image files. It supports multiple file formats – including RAW – and is available for Windows and Mac computers. It’s also available as a Photoshop and Lightroom plugin.
With Topaz Photo AI, you can add:
- AI-enhanced sharpening
- AI-enhanced noise reduction
- Resolution enhancements
As the name suggests, Topaz Photo AI relies on artificial intelligence technology to analyze photos and make changes. You’re still given full control, however, and you can make further tweaks as required. Longstanding Topaz fans may realize that the program actually combines the features of Denoise AI, Sharpen AI, and Gigapixel AI into one handy and powerful package.
It is important to note that Topaz Photo AI does not have any file-management tools. If you want to organize your photos, consider other options, such as a dedicated photo-organization program or an all-in-one program like Lightroom.
Related Posts

An In-Depth Look at Topaz Photo AI
I spent time testing the software to bring you a comprehensive Topaz Photo AI review. In particular, I explored the system requirements, ease of use, overall performance, functionality of the individual tools, and the program’s price.
Performance
Performance is always important to consider when looking at AI-equipped editing software. This is because it generally requires more power to run AI tech. We tested Topaz Photo AI on a Windows 10 computer with the following specs:
- Intel Core i5-12400F 12th Gen processor
- 32 GB of DDR4 RAM
- NVIDIA GeForce GTX 1050 GPU
- 1 TB NVMe PCIe SSD
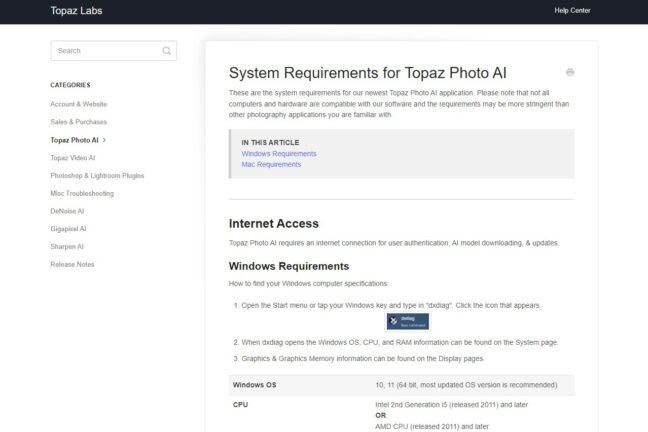
System Requirements
Topaz Photo AI is available for Windows and Mac computers, but there is no Linux support. The minimum system requirements for this photo-enhancement software are listed below:
Windows
- Processor: Intel 2nd Gen i5 or later
- Memory: 12 GB (16 GB recommended)
- Graphics card: DirectX 12 compatible
- Display: 1280×720
- Operating system: Windows 10 or later
Mac
- Processor: Intel 2nd Gen i5 or later | Apple M1
- Memory: 16 GB with Intel processor | 8 GB with Apple M1
- Graphics card: DirectX 12 compatible
- Display: 1280×720
- Operating system: 10.15 Catalina or later
The minimum specs are quite low, so pretty much all decent photo-editing computers should be capable of running the software. Today, 16 GB of RAM is all but standard, and the most recent computers feature the 13th generation of Intel i5 and i7 processors. For Macs, the Apple M1 chip is in all new models; in fact, the M2 is already in use.
Performance
When testing Topaz Photo AI, I had low performance expectations. As discussed above, the software relies heavily on AI technology, so I didn’t expect the same smooth operation found in standard editing software. Each time the user applies a function – such as sharpening – the photo is analyzed using complex AI algorithms. It isn’t a quick process no matter the program.
With this in mind, the performance of Topaz Photo AI is mediocre. I would say that it’s the best you can expect due to the heavy AI reliance. Fortunately, the standard menu navigation and file browsing features perform perfectly. It’s only when the AI kicks into action that the program starts to slow down.
For example, when an image is loaded, a time-consuming initial scan is performed. Adding an enhancement comes next, and it isn’t instant, either. Whenever AI is used, you can expect to wait after applying each process.
More frustrating is that the photo preview has to be rendered each time you change the magnification or pan around the photo. This means that simply moving the preview to look at a different section of the file can take time.
Therefore, the performance could be improved. But as stated, I’m not sure you can expect anything better when dealing with such AI-intensive processes.
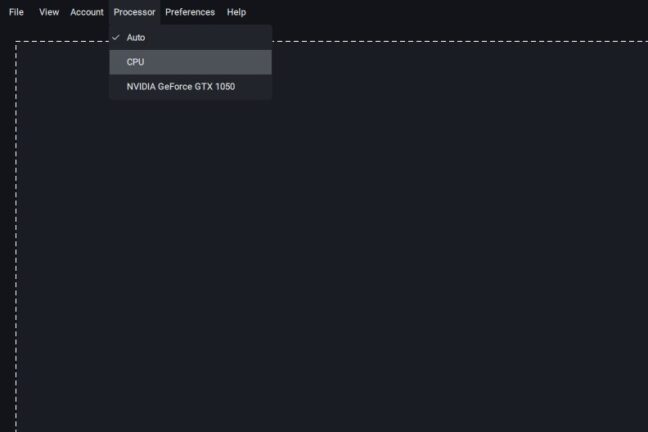
You can change how your computer processes the AI operations. In the main menu, click “Processor;” you’ll then have the option to select “Auto,” “CPU,” or “GPU.” If you have a particularly powerful CPU or GPU, you can potentially improve the performance of the software manually.
User Experience
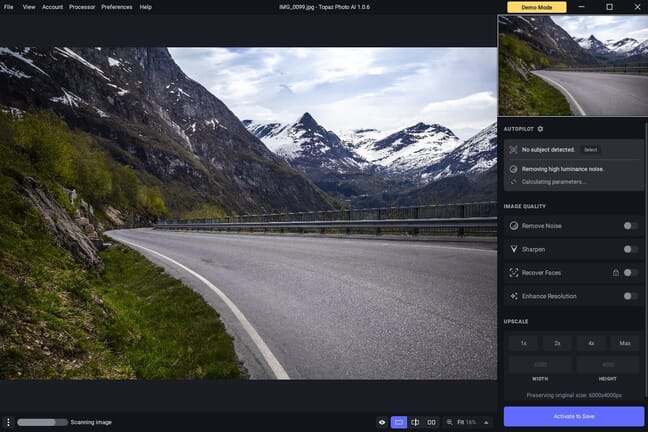
Performance issues aside, Topaz Photo AI is very easy to use. Upon opening the software, you’ll encounter the simple main navigation options and a button to immediately upload photos. You can also find a link to a quick-start guide if you need help.
From there, you simply have to load a file. This opens the image in the main editing screen, and Photo AI immediately scans the photo to check for areas of improvement. I like how the editing layout is split into three clear sections. On the left, you can see your original image, and on the right, you can see an updated preview with enhancements applied. Finally, on the far right, you’ll find the editing toolbar.
Topaz Photo AI’s layout is uncluttered, simple, and easy to understand. And the small number of tools and buttons means that you shouldn’t have any issues learning the ropes. I literally spent five minutes playing with the options and felt I had uncovered all of the program’s secrets.

There are a couple of important things to note. First, you can enable lens corrections in the Preferences menu. If you are importing unedited RAW files, this is a good idea. Second, consider checking the “Configure Autopilot” option (which is also in the Preferences menu). That way, you can choose how the program analyzes images when they are first loaded. You can change features like subject detection, face detection, and auto-upscaling. This is useful if you’re dealing with specific images and want to try and improve the software’s performance.
Overall, it’s a highly usable program that relies on a minimalistic but very effective set of tools.
Sharpening
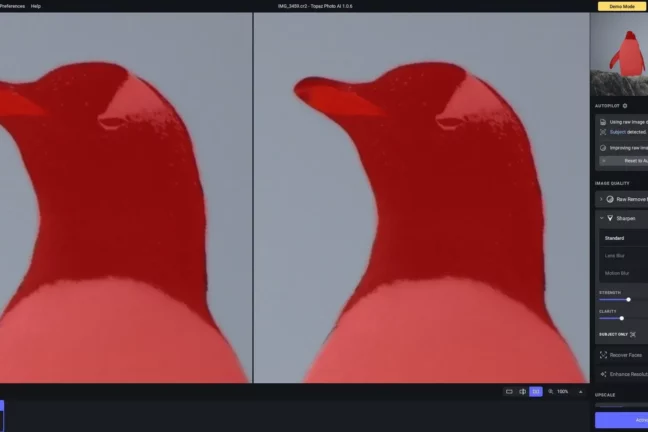
When you load an image, it’s scanned for subjects. If a subject is found, a mask is created, and the Sharpen tool is used. I like this automated process as it prevents you from needing to do manual work.
In most instances, the subject selection is accurate. For example, look at how the program automatically masked the two penguins in the image below. (You can also refine the selection manually if you don’t like what you see.)
I was highly impressed by the sharpening capabilities. They’re a great way to counteract motion blur and misfocusing (though it’s always best to get it right in the field if you can).
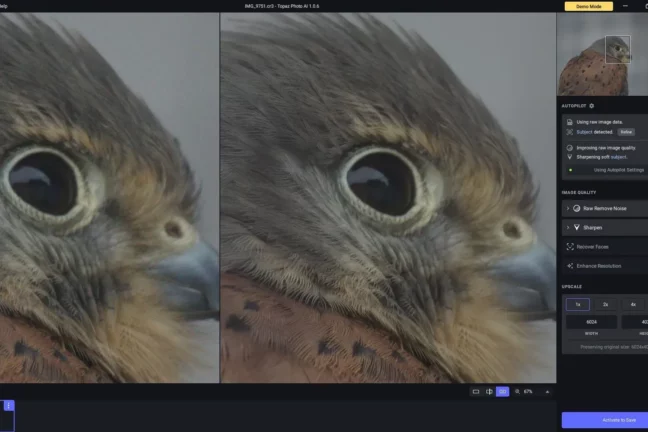
Check out the photo below. Notice how the eye in the original isn’t totally sharp? Well, Topaz Photo AI automatically detected the bird and greatly improved the sharpness of its face.
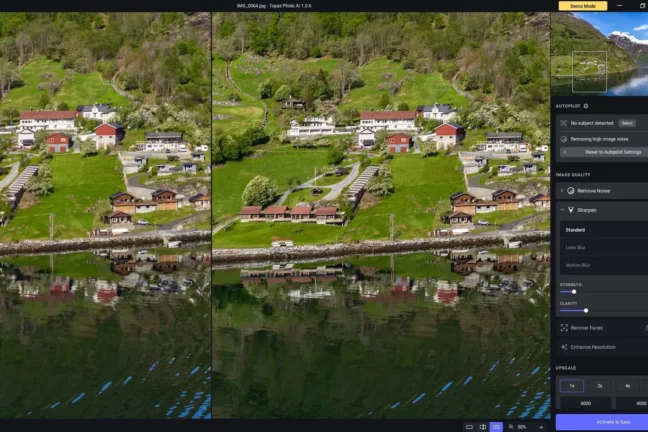
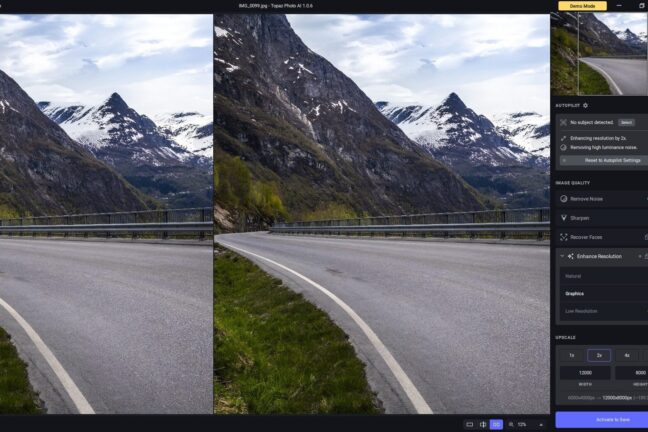
The Sharpen tool can be used for general landscape work, too. This next image is of a fjord in Norway, and to my eye, it’s a little soft. But after applying Photo AI’s sharpening, the quality of the photo is vastly improved.
The automatic AI analysis generally works well. However, you do have the option to alter several parameters, including the type of sharpening, the sharpening strength, and the clarity. This gives you greater control and flexibility when dealing with different types of images.
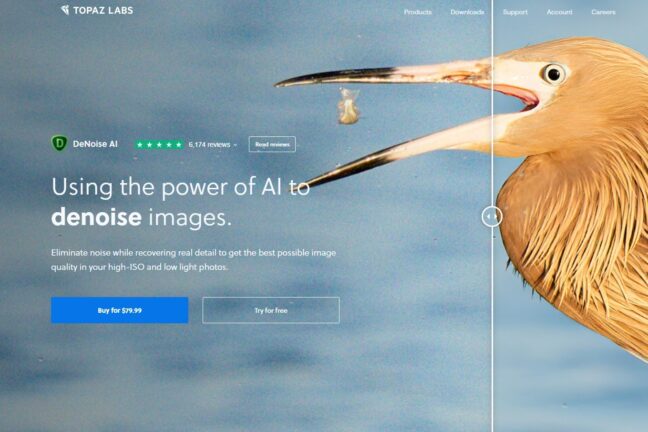
Noise Reduction
I tested a variety of RAW photos from my own collection that had a decent amount of background noise, and the results were fantastic – particularly in compositions with clear main subjects.
I also like the incredible simplicity of the noise reduction tool. Upon loading an image, the AI software analyses the photo and determines the necessary approach. If it detects noise, the Remove Noise feature is automatically applied. Generally, the AI gets it right, and you don’t need to tinker any further. However, if you do want to make changes, there is a “Strength” and a “Detail” slider that you can adjust to fine-tune the noise reduction.
Let’s look at an example. The next photos feature a red kite that I photographed at a bird sanctuary. Unedited, both the subject and the background have a noticeable amount of noise.
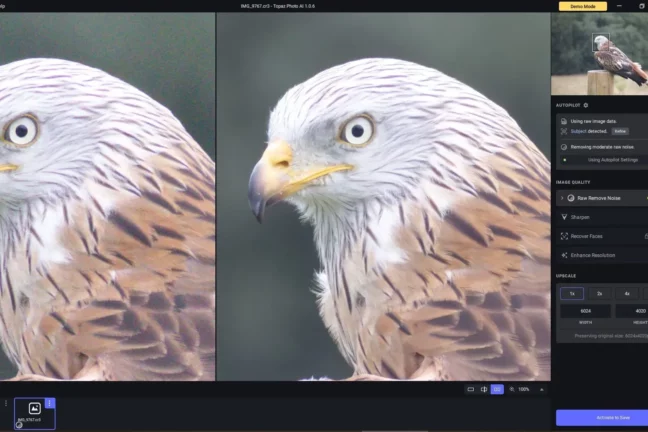
I loaded the file into Topaz Photo AI and let the program work its magic. As you can see in the right-hand image, the red kite’s darker feathers are much improved and have practically no noise. Photo AI made a huge difference without sacrificing sharpness.
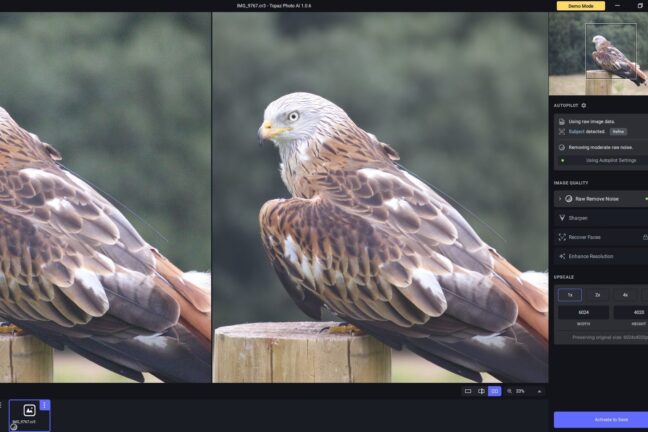
I’ve zoomed out below so you can see how the Remove Noise tool transformed the background. It now looks very smooth; the overall effect is fantastic, and you can see a clear improvement in the base quality of the file.
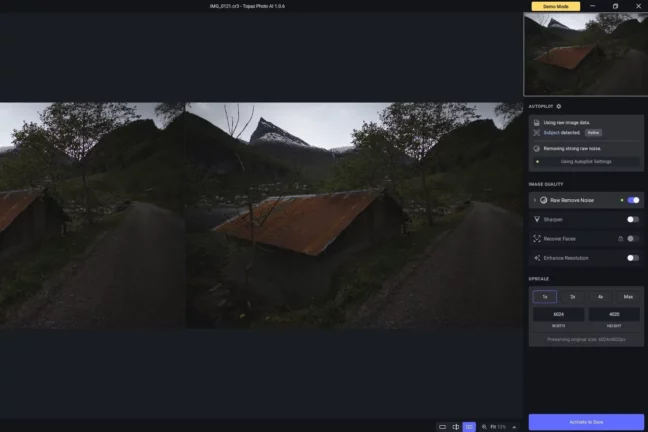
This next example features a low-light image of a tunnel. I shot it handheld and therefore had to use a higher ISO, so you can see lots of noise.
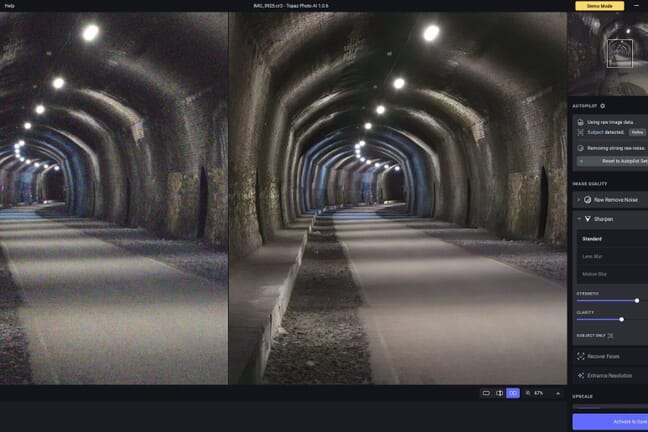
Once I imported the file, Topaz Photo AI detected that it had excessive noise and automatically applied the Raw Remove Noise function. I was really impressed with the result, and as you can see, the overall image quality is greatly improved.
Image Scaling
Photo AI’s image-scaling tool is useful if you have low-res files but plan to use them in more demanding scenarios (e.g., you want to create large prints). You can choose from three different types of enhancement: Natural, Graphics, and Low Resolution.
You can also select from a handful of upscale factors, including 1x, 4x, and Max. I like that Photo AI shows the original and upscaled pixel resolutions as well as the new file sizes. The end results are great, and the software manages to maintain the original image quality even as it adds pixels.
The only downside is that the upscaling process takes a long time, though that’s hardly unexpected given the complexity of the task.
Pricing
Topaz Photo AI is a standalone software program and is available for a one-off purchase price. There is no subscription model (unlike other photo-enhancement products such as Adobe Lightroom).
Currently, there are three ways to get the program. New customers pay a set fee of $199, existing Topaz customers are offered a special discount price, and potential customers can download a free trial.
Initially, $199.00 might seem incredibly expensive. However, you’re essentially getting the functionality of three programs in one: DeNoise AI, Gigapixel AI, and Sharpen AI. If you buy each of these programs separately, you’ll pay $259.97. Therefore, by purchasing Photo AI, you’re actually saving money.
Honestly, if you’re a professional or you plan to regularly use photo-enhancement software, the one-off price is worth it. But it’s important to remember that Topaz Photo AI offers no basic editing tools, so you’ll still need to pay for additional post-processing software if you want to edit your images more comprehensively.
Given that, I feel the software is too expensive for general and hobbyist use. For general editing (in a non-professional capacity), you could save money simply by using the sharpening and noise reduction tools offered by a program such as Lightroom.
Topaz Photo AI Alternatives
Topaz Labs is known for its image improvement software, and its programs are generally considered some of the best options for sharpening and noise reduction. Therefore, many – but not all! – of the best alternatives are Topaz’s own products:
- Topaz DeNoise AI
- Topaz Gigapixel AI
- Topaz Sharpen AI
Update: these stand-alone software applications are now part of Photo AI.
If you only ever plan to sharpen your images, you could pick another great sharpening program, such as the standalone Topaz Sharpen AI or InPixio Photo Focus. Both of these options are much cheaper than Topaz Photo AI and excel at improving image sharpness.
Similarly, if you want to remove noise, Topaz DeNoise AI is arguably the best dedicated noise-reduction program on the market. Nik Dfine from the Nik Collection is a solid choice, too.
Finally, if you only want to upscale your images, I highly recommend Topaz Gigapixel AI; it’s highly effective photo-enlarger software, and it’s reasonably affordable.
Note that most generic editing programs do have basic sharpening and noise-reduction tools. Therefore, software such as Adobe Lightroom Classic, ON1 Photo RAW, and Capture One Pro are all worth considering. But compared to a dedicated program like Topaz Photo AI, their capabilities are limited.
Topaz Photo AI Is a Good Investment for Professionals
I hope you found this Topaz Photo AI review useful. The program’s AI-centric tools are incredibly powerful and yield fantastic results. I was impressed by the noise reduction and sharpening capabilities; they’re much better than what is offered by standard editing software like Lightroom and ON1 Photo RAW.
But who should purchase the software? If you aren’t intending to showcase or sell your work, the $199 price tag may not be worth it. Instead, the basic noise reduction and sharpening tools included in standard editing software should be an adequate – and far cheaper – alternative.
However, for professionals who need perfection, Topaz Photo AI is definitely a great investment. It’s one of the best options for noise reduction and sharpening on the market, and it can help take your work to the next level.